

Broken intermediate snap ring 4L80E
 06-14-2014, 12:40 PM
#1
TECH Fanatic
Thread Starter
iTrader: (3)

Join Date: Feb 2009
Location: Highland, MI
Posts: 1,366
Likes: 0
Received 0 Likes
on
0 Posts

I bought a low mileage/ used 4L80E. I also bought a transgo HD2 kit. Upon pulling the pan I discovered it already had some of the transgo stuff installed but not all. I also found a piece of snap ring in my pan so I decided to dig into my trans. Good thing the transgo kit comes with a heavy duty unit. After pulling the old ring out and inspecting the damage, I was happy to find only the ring itself and the steel were damaged. Should I buy a new steel or smooth this one out? Where can I buy just the one steel?
 06-14-2014, 04:49 PM
#5
FormerVendor

That is the intermediate pressure plate, not a steel. Make sure you buy one that is the same thickness. I would buy a new direct drum as well, you can order a 4L80E direct drum for $30-$40 online.
1FastBrick is correct in asking further questions. If the ring is broken and the drum has taken a hit, the likelihood of metal contamination is definitely there. I would recommend doing a complete tear down, buying a case of brake cleaner and doing some thorough inspection. While you're in the transmission and have it apart like this, I'd like to make a recommendation to better dual feed your 3rd gear clutches rather than doing it TransGo's way. TransGo's allows you to do it without having to go into the transmission, but doing the modification internally is the ideal scenario.
Take the sealing ring at the second from the top of the center support and leave it off. Disassemble the direct drum and inside of the drum itself, NOT the piston, take that sealing right out. It's right in the middle of the drum. Now look at the case valve body and look where the center support bolt resides. There are two open passages on both sides of it. Take a 3/8" cup plug and plug the hole to the right of the center support bolt. Voila, you have true dual fed your clutches.
My other recommendation while the drum is apart and disassembled while you're doing this would be to take a 0.030" drill bit and drill a bleed hole on the edge of the drum.
Furthermore, I would recommend replacing all of the clutches and steels. Use genuine Borg Warner Hi Energy clutches. Nothing fancy for the steels. Remember the thicker steels that look just like the directs are for the forwards. Rebuild kits come with 5 clutches and steels for the direct drum. Buy an extra clutch and steel (make sure you choose the right steel thickness!) and put it in the direct drum to have a 6 clutch pack in the drum.
Purchase a brad new OEM Borg Warner 34 element sprag as well. Always good preventative maintenance and should be a part of every rebuild in my opinion.
I would also replace the low/reverse and intermediate bands. Since the trans is apart at this point, look at the output assembly before taking it apart. Notice the 3 tang thrust washer on the back of the case, the big silver one? Throw that out. The 4 tab thrust washer on the output shaft? Don't throw that out, but instead put it between the low gearset and reaction carrier. Better than the stock plastic piece. Buy a TH350 pump bearing and a shim kit (very cheap) and put it in the back of the case. This will require pushing the bushing in a bit into the case, but not very much. Just enough to get a small lip. Presto, you've now rollerized the rear of the trans and reduced some parasitic power loss.
Might behoove you to look into purchasing a Sonnax boost valve/spring assembly for the pump as well. It's ~$30 and a quick install.
Do this after cleaning all of the internal components and you've got yourself a decent budget built 4L80E that will definitely hold more power than stock.
 06-15-2014, 02:54 AM
#7
In this thread, it better explains the Internal Dual Feed mod with Pictures as NorthTexasConverter described above. ---> http://www.performancetrucks.net/for...t-drum-506779/
Trending Topics
06-15-2014, 06:13 PM
#8

If the intermediate pressure plate is still in excellent shape where the clutch makes contact, (no leopard spots) then it should be perfectly reusable as the damaged area affects nothing at all. The wear on the pressure plate is the direct drum hitting it from the broken snap ring. The direct drum looks fine, as the damage is slight and will not interfere with anything. The TransGo HD intermediate snap ring will stop this from happening. Yes, you can leave off the 2nd ring on the center support as suggested when using the TransGo "dual feed" separator plate, or doing the other "dual feed" modification, but leave in the middle seal in the direct drum as taking this out slows down the release of the piston as you are forcing all of the fluid to exit one hole instead of two as used when leaving in the middle seal. There are no disadvantages when leaving in the center seal. The Borg Warner Hi-Energy clutches are the only ones to use in direct and intermediate, along with the other suggested updates. Since this is a "low mileage" unit, inspect everything closely and only replace what is needed. If you have the "Heavy Duty" direct springs from the TransGo HD2 kit, make sure you install them. If you are staying under 7,000 rpm and are using these HD direct springs then you really do not need the .030" bleed hole on the edge of the direct drum, but if you plan on going over that rpm, then go ahead with the modification. If you replace the sealing rings on the center support and or the front pump, use the plastic (Peek material) step cut rings as they are easy to install, work and wear extremely well.
06-16-2014, 01:48 PM
#10
TECH Fanatic
Thread Starter
iTrader: (3)
Join Date: Feb 2009
Location: Highland, MI
Posts: 1,366
Likes: 0
Received 0 Likes
on
0 Posts
Wow guys this is some great info, thanks to everyone who replied.
Since I posted I've been doing some reading, I realize the intermediate pressure plate does not ride on the direct drum. For now I will inspect and clean everything. The wear on the drum is very minor so I'm not concerned with it. Also, looking at all the wear surfaces I can see there is virtually 0 wear on anything. I will replace the pressure plate though. I looked at the lugs and didnt see any damage, however I am going to go in there with a mirror and flashlight and inspect the **** out of it tonight, I just pray the case is good. Those mods don't sound very difficult however I would need more detailed instructions to feel comfortable messing with it. I'll look over the link provided. This is my first trans dissection and to be honest it's not as bad as I thought it would be. My only question is: is it ok to do the internal mods when I've already installed the full transgo HD-2? I'm only pushing 525hp and shifting at 6600. I would like it to hold a 200 shot though, incase I decide to get stupid.
Since I posted I've been doing some reading, I realize the intermediate pressure plate does not ride on the direct drum. For now I will inspect and clean everything. The wear on the drum is very minor so I'm not concerned with it. Also, looking at all the wear surfaces I can see there is virtually 0 wear on anything. I will replace the pressure plate though. I looked at the lugs and didnt see any damage, however I am going to go in there with a mirror and flashlight and inspect the **** out of it tonight, I just pray the case is good. Those mods don't sound very difficult however I would need more detailed instructions to feel comfortable messing with it. I'll look over the link provided. This is my first trans dissection and to be honest it's not as bad as I thought it would be. My only question is: is it ok to do the internal mods when I've already installed the full transgo HD-2? I'm only pushing 525hp and shifting at 6600. I would like it to hold a 200 shot though, incase I decide to get stupid.
06-16-2014, 07:51 PM
#11
FormerVendor
If the intermediate pressure plate is still in excellent shape where the clutch makes contact, (no leopard spots) then it should be perfectly reusable as the damaged area affects nothing at all. The wear on the pressure plate is the direct drum hitting it from the broken snap ring. The direct drum looks fine, as the damage is slight and will not interfere with anything. The TransGo HD intermediate snap ring will stop this from happening. Yes, you can leave off the 2nd ring on the center support as suggested when using the TransGo "dual feed" separator plate, or doing the other "dual feed" modification, but leave in the middle seal in the direct drum as taking this out slows down the release of the piston as you are forcing all of the fluid to exit one hole instead of two as used when leaving in the middle seal. There are no disadvantages when leaving in the center seal. The Borg Warner Hi-Energy clutches are the only ones to use in direct and intermediate, along with the other suggested updates. Since this is a "low mileage" unit, inspect everything closely and only replace what is needed. If you have the "Heavy Duty" direct springs from the TransGo HD2 kit, make sure you install them. If you are staying under 7,000 rpm and are using these HD direct springs then you really do not need the .030" bleed hole on the edge of the direct drum, but if you plan on going over that rpm, then go ahead with the modification. If you replace the sealing rings on the center support and or the front pump, use the plastic (Peek material) step cut rings as they are easy to install, work and wear extremely well.
I also agree about using the plastic scarf cut rings as well.
JDMC5, the direct drum actually doesn't look too bad now that I can actually see it full screen. Hell I can even see the the fibers on the int. sprag's outer race that must have been left behind from some kind of cloth towel
However, take the direct drum center seal out. This does not slow any piston movement. I have never known another builder nor have I ever read any transbrake instructions from any other company in my time with transmissions that recommend leaving that seal in.
Dana, I mean no offense but I disagree. There is no way you are only forcing fluid through one hole rather than both by leaving the seal off.
Allow me to demonstrate with some photos so that everyone else can get an idea of what I'm saying here. I'll try to keep it user-friendly, so if I use simple descriptions and terms in some places, don't think I'm trying to be condescending

This is the drum with the seal in question

This image here simulates where the sealing rings ride in the drum without the actual piston being in there. The other two seals that are added in this picture are normally installed on the piston, but the piston wouldn't let anyone see what's underneath.
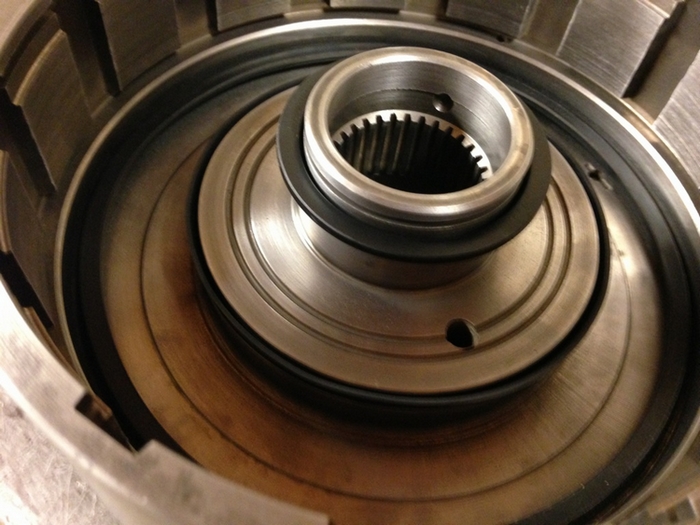
These are the two holes in question

For anyone curious, the piston is "stepped", there's a top portion and a bottom portion. To get a visual, here's what I mean.
Top view of the piston

Bottom view

The lip seals are obviously not installed on the piston in this picture, but you get the idea. Notice the top part of the piston that then steps down into the larger apply area?
The larger area (of the piston) has the smaller feed hole in the drum. Leaving the seal on would make the piston release only as fast as the slower of the two areas, whereas leaving out the seal would average the two areas and allow it to release faster. The smaller hole essentially becomes a bottleneck (and has more volume of fluid to release at that).
Does that not make sense for anyone? Any clarification needed?
I'd also like to add that the Borg Warner Hi Energy clutches should be used in not only the direct and intermediates, but the forwards as well.
The bleed hole should be used in every build in my opinion. Centrifugal apply can happen in low gear as well and the bleed hole will prevent that. The return springs do help, and a combo of the two would not be bad for sure, but there is a lot more room for error for a newbie builder (no offense to JDMC5!) to mess up disassembling the spring cage, replacing the springs and putting it back together with no problems rather than taking 15 seconds to drill a hole. I like to think of it as working smarter not harder. If he can do both however, by all means go for it (this is especially good for transbrake units). Drill the bleed hole even if your RPMs will be below 7,000 however.
Wow guys this is some great info, thanks to everyone who replied.
Since I posted I've been doing some reading, I realize the intermediate pressure plate does not ride on the direct drum. For now I will inspect and clean everything. The wear on the drum is very minor so I'm not concerned with it. Also, looking at all the wear surfaces I can see there is virtually 0 wear on anything. I will replace the pressure plate though. I looked at the lugs and didnt see any damage, however I am going to go in there with a mirror and flashlight and inspect the **** out of it tonight, I just pray the case is good. Those mods don't sound very difficult however I would need more detailed instructions to feel comfortable messing with it. I'll look over the link provided. This is my first trans dissection and to be honest it's not as bad as I thought it would be. My only question is: is it ok to do the internal mods when I've already installed the full transgo HD-2? I'm only pushing 525hp and shifting at 6600. I would like it to hold a 200 shot though, incase I decide to get stupid.
Since I posted I've been doing some reading, I realize the intermediate pressure plate does not ride on the direct drum. For now I will inspect and clean everything. The wear on the drum is very minor so I'm not concerned with it. Also, looking at all the wear surfaces I can see there is virtually 0 wear on anything. I will replace the pressure plate though. I looked at the lugs and didnt see any damage, however I am going to go in there with a mirror and flashlight and inspect the **** out of it tonight, I just pray the case is good. Those mods don't sound very difficult however I would need more detailed instructions to feel comfortable messing with it. I'll look over the link provided. This is my first trans dissection and to be honest it's not as bad as I thought it would be. My only question is: is it ok to do the internal mods when I've already installed the full transgo HD-2? I'm only pushing 525hp and shifting at 6600. I would like it to hold a 200 shot though, incase I decide to get stupid.
Sheesh, simple instructions and you still want more!

Fine you win
A filthy rust coated direct drum pulled out of a core

Same drum but cleaned up

Drill the bleed hole on the edge of the drum like so. It definitely does not hurt to go over the hole with some fine grit sandpaper and/or Scotch Brite to make sure it's deburred.

You can see the hole
Keep the seal out of the direct drum. I'm sure you get the idea for this one by now lol.
Take the sealing ring SECOND FROM THE TOP off of the center support. You can just take the seal off and leave it as is, and that will work well. I machine them down on the lathe to maximize flow but it's not essential.

This is a TH400 case, not a 4L80E but this part is the same. Use a 3/8" cup plug and drive it into this passage to block it off
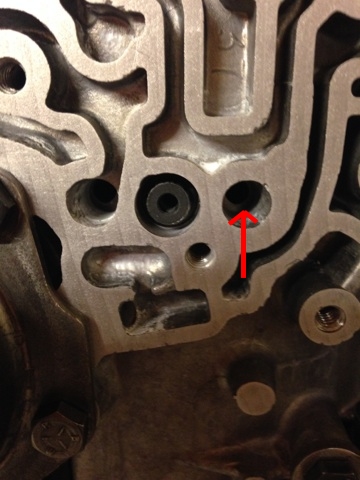
Tada! Dual fed.
Holy **** that took forever to type hahaha!
06-16-2014, 09:29 PM
#12
TECH Fanatic
Thread Starter
iTrader: (3)
Join Date: Feb 2009
Location: Highland, MI
Posts: 1,366
Likes: 0
Received 0 Likes
on
0 Posts
Ill reply in a more detailed response tomorrow. I will looking at drilling the direct drum and removing the seal. I'm going to have my trans guy install the springs that come with the kit too as long as it's not a pricy ordeal, otherwise I'll just do the drill and seal mods. No offense taken, gotta start somewhere. I can tune and build engines so this just rounds my skills a little more. I appreciate all the help btw. I'm still gonna replace the pressure plate, I can see stress marks around the "teeth?" and I can feel the grooves are too deep for my liking.
I just need to mock up the trans to cut the floor and yoke and I'm almost done with my swap.....it's about time.
I just need to mock up the trans to cut the floor and yoke and I'm almost done with my swap.....it's about time.
06-16-2014, 09:53 PM
#13
FormerVendor
Ill reply in a more detailed response tomorrow. I will looking at drilling the direct drum and removing the seal. I'm going to have my trans guy install the springs that come with the kit too as long as it's not a pricy ordeal, otherwise I'll just do the drill and seal mods. No offense taken, gotta start somewhere. I can tune and build engines so this just rounds my skills a little more. I appreciate all the help btw. I'm still gonna replace the pressure plate, I can see stress marks around the "teeth?" and I can feel the grooves are too deep for my liking.
I just need to mock up the trans to cut the floor and yoke and I'm almost done with my swap.....it's about time.
I just need to mock up the trans to cut the floor and yoke and I'm almost done with my swap.....it's about time.
If you have a trans guy installing the springs, by all means go for it. Like I said, if you can do the springs and the bleed hole, then rock on with it! I doubt that would be a very pricey ordeal, at least for just the springs. Ask him to use Borg Warner Hi Energies and to make that drum a 6 clutch pack. It's worth it. I wouldn't even do a 5 clutch pack drum without the mods I mentioned on a "stock" rebuild.
And I agree man, thank you for not taking that as an attack on your transmission building skills. We all start or started somewhere and make mistakes a long the way that you'll be damned if you ever make again
Are the grooves on the bottom of the pressure plate, the side where the top-most intermediate clutch would be in contact with?
Any pictures of the stress marks you mentioned?
06-17-2014, 06:21 AM
#14
when you do the 6 clutch conversion, do you mill down or get a thinner pressure plate so its not to thick?
thanks for the tips, built a couple with the HD-2 kit
besides the boost valve I would add the Sonnax 34200-14k pressure valve, located behind the boost valve-but ya have to stop somewhere adding parts, lol
thanks for the tips, built a couple with the HD-2 kit
besides the boost valve I would add the Sonnax 34200-14k pressure valve, located behind the boost valve-but ya have to stop somewhere adding parts, lol
06-17-2014, 06:31 AM
#15
glad the OP started this, a wealth of info
I have a question prob most home builders like myself need to ask-how do you really tell if bushings need to be replaced
I usually just replace all of them, some are a PITA to remove (and install)
if its not an ops. bad one, visual to the eye, kind of hard, as they all have a small amount of wiggle
some are prob mand. to replace, while others prob don't see a lot of ware
06-17-2014, 08:36 AM
#16
TECH Fanatic
Thread Starter
iTrader: (3)
Join Date: Feb 2009
Location: Highland, MI
Posts: 1,366
Likes: 0
Received 0 Likes
on
0 Posts
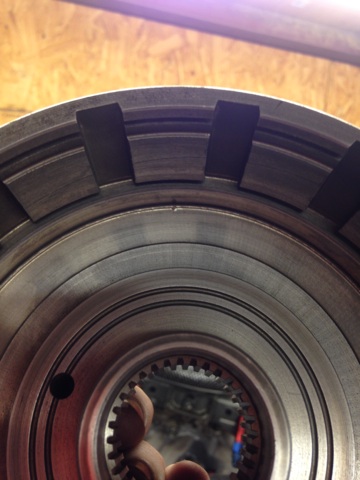
Here are the close up pics of what I'm talking about. The grooves are on the snap ring side and will not cause any issue since nothing really comes in contact with it, however the dark spots on the teeth where the snap ring makes contact with pressure plate tell me I should replace it.
I'll take a pic of the clutch side tonight, but it looks to have minimal wear.
I'll take a pic of the clutch side tonight, but it looks to have minimal wear.
Last edited by JDMC5; 06-17-2014 at 11:49 AM.
06-17-2014, 11:07 AM
#18
TECH Fanatic
Thread Starter
iTrader: (3)
Join Date: Feb 2009
Location: Highland, MI
Posts: 1,366
Likes: 0
Received 0 Likes
on
0 Posts
Ok, finally read over your recommendations in full and.....unfortunately I have a few questions. (Please don't dream of stabbing me). To summarize the pressure mods I can do without going through rebuilding it.
1. Take out center support sealing ring, second from top
2. Take out direct drum sealing ring, middle of drum
3. Drill .030" hole in edge corner of direct drum
4. Plug hole in valve body
Does this look right? I have a couple questions, where would one acquire a 3/8" cup plug? Roughly what size diameter is the direct drum sealing ring, so I'll know it when I see it. Lastly, is there an easy way to get the spring cage off the piston without a special tool?
06-17-2014, 12:09 PM
#19
FormerVendor
Ok, finally read over your recommendations in full and.....unfortunately I have a few questions. (Please don't dream of stabbing me). To summarize the pressure mods I can do without going through rebuilding it.
1. Take out center support sealing ring, second from top
2. Take out direct drum sealing ring, middle of drum
3. Drill .030" hole in edge corner of direct drum
4. Plug hole in valve body
Does this look right? I have a couple questions, where would one acquire a 3/8" cup plug? Roughly what size diameter is the direct drum sealing ring, so I'll know it when I see it. Lastly, is there an easy way to get the spring cage off the piston without a special tool?
1. Take out center support sealing ring, second from top
2. Take out direct drum sealing ring, middle of drum
3. Drill .030" hole in edge corner of direct drum
4. Plug hole in valve body
Does this look right? I have a couple questions, where would one acquire a 3/8" cup plug? Roughly what size diameter is the direct drum sealing ring, so I'll know it when I see it. Lastly, is there an easy way to get the spring cage off the piston without a special tool?
Correct on all 4 points. Cup plug can be found at many hardware stores, just give them a call and make sure they have one in stock before you take the time to go up there.
Don't know the diameter of the sealing ring since I never mess with the seal, but you can't miss it, it's the only seal in the drum itself. NOT the seals on the piston, those are essential, but the one in the drum itself is not.
There are some methods that make spring cage disassembly fairly painless, but if I've ever needed to install stronger return springs I've used a TH400 aluminum piston that has spring seats cast into it from the factory and machine the piston down accordingly to fit 6 clutches if needed.
06-17-2014, 01:37 PM
#20
TECH Fanatic
Thread Starter
iTrader: (3)
Join Date: Feb 2009
Location: Highland, MI
Posts: 1,366
Likes: 0
Received 0 Likes
on
0 Posts
Ok cool, my trans guy is getting me the converter bushing, large pump seal, pump to case gasket, pressure plate and installing the converter/ pump bushing for 40 bucks. Not bad
Should I install the plug dry or use some kind of sealant?
Should I install the plug dry or use some kind of sealant?