When you click on links to various merchants on this site and make a purchase, this can result in this site earning a commission. Affiliate programs and affiliations include, but are not limited to, the eBay Partner Network.
"band-release orifice just needs to be sized accordingly"
If you have the checkball hole plugged...then yes. For upshifts you need to size the orifice correctly.
otherwise, that orifice is just controlling exhaust oil flowrate
If the check ball is left active, the orifice is nearly useless because the ball is un-seated on a 2-3 upshift and the release side of the servo gets full flow
If the check ball is blocked and inactive...then the orifice has to control the apply and exhaust.
Worst case scenario, you have the checkball blocked, the orifice is too small, and you are using an aftermarket large ratio servo.
Not enough oil via the orifice caused delayed band release relative to the 3/4. This won't cause a "bind" persay...it will just have the effect of shifting 1-2-4-3-4
That "middle" 4 will be what happens when the 3/4's are applied and the band isn't released yet. Band on and 3/4 on is 4th gear!
Most customers will not even notice this and they'll just be plenty happy it's not flaring so you'll never hear a complaint. Maybe this is part of the reason it gets blocked
Right.
I'm saying it should be fine
I just don't see the benefit?
I see it being a possible downside should someone read this thread, see the mod, and do it without properly matching orifice sizing to their parts combo
Right.
I'm saying it should be fine
I just don't see the benefit?
I see it being a possible downside should someone read this thread, see the mod, and do it without properly matching orifice sizing to their parts combo
We have somewhat discussed this (eliminating the check-ball and its hole... only using the orifice) in the past.
I will still say now, what I said back then...
I do NOT generally recommend this modification to the masses...
It is common to have to drop the valve-body an additional time or two; in order to get the Band-Release orifice sized correctly.
The ONLY reason that I brought this up in this thread... Is because the OP has his transmission set-up this way from Pro-Built Automatics... and had questions about it.
I personally like this modification and it works well for my units...
They are tested on the Transmission Run-Stand first and then on the Chassis-Dynomometer, after the Power-Train is installed in a vehicle.
After the 2-4 Band/ Servo End-Play has been established...
You can start installing all of the Servo seals.
Dana (Pro-Built Automatics) should have given you Viton-Rubber D-Rings to use...
They might be together with a large Red O-Ring and Blue O-Ring.
Be very careful not to install the D-Rings with any twists in them... they must be installed completely in-line/ untwisted.
Also, go order/ grab two of these seals (the Red ones) in the photo below:
These are a solid PTFE (Teflon) sealing ring... and are an upgrade!
These two Red seals replace the two white seals in the photo.
They install on the Servo-Pin:
Use part #54189BT at most Transmission Parts Houses (original number= GM #8632588).
These will definitely be much cheaper from a Transmission Parts House than GM.
Make sure that you do not pay more than 1 or 2 dollars per seal.
They sometimes come in a different color... no need to worry.
Last edited by vorteciroc; Feb 17, 2021 at 10:04 PM.
Right.
I'm saying it should be fine
I just don't see the benefit?
I see it being a possible downside should someone read this thread, see the mod, and do it without properly matching orifice sizing to their parts combo
Originally Posted by vorteciroc
We have somewhat discussed this (eliminating the check-ball and its hole... only using the orifice) in the past.
I will still say now, what I said back then...
I do NOT generally recommend this modification to the masses...
It is common to have to drop the valve-body an additional time or two; in order to get the Band-Release orifice sized correctly.
The ONLY reason that I brought this up in this thread... Is because the OP has his transmission set-up this way from Pro-Built Automatics... and had questions about it.
I personally like this modification and it works well for my units...
They are tested on the Transmission Run-Stand first and then on the Chassis-Dynomometer, after the Power-Train is installed in a vehicle.
EXACTLY. I first wanted to really understand the mod. And at this point I think I do by potentially eliminating another path.
But I also wanted to make sure like you guys mentioned that if someone sees this they dont go plugging their separator plate thinking they are doing something good rather they are making a mistake. PBA set up my separator plate according to my build and application and I had yet to see this done before so I wanted to discuss it on here to understand it more. I hope Dana can chime in when he has time as well
After the 2-4 Band/ Servo End-Play has been established...
You can start installing all of the Servo seals.
Dana (Pro-Built Automatics) should have given you Viton-Rubber D-Rings to use...
They might be together with a large Red O-Ring and Blue O-Ring.
Be very careful not to install the D-Rings with any twists in them... they must be installed completely in-line/ untwisted.
Also, go order/ grab two of these seals (the Red ones) in the photo below:
These are a solid PTFE (Teflon) sealing ring... and are an upgrade!
These two Red seals replace the two white seals in the photo.
They install on the Servo-Pin:
Use part #54189BT at most Transmission Parts Houses (original number= GM #8632588).
These will definitely be much cheaper from a Transmission Parts House than GM.
Make sure that you do not pay more than 1 or 2 dollars per seal.
They sometimes come in a different color... no need to worry.
Yes I did take a picture of all the seals and such installed on the servo assembly but I dont plan to initially install with them on it to check band clearance. It was for picture only. Yes, the Sonnax pin did come with the white seals. I will look to see if I can find the red ones. Will they have to be sized?
Also, while talking about servo pin and band clearance. I do have tool J-33037 and I know I will have to grind the pin down some. In the instructions from Sonnax it says one can use this tool and make sure the white line is within the window like normal procedure. I assume this will get me within the .075-.125" clearance? I thought you guys mentioned and I think even PBA mentioned .060"?? If thats the case and im using the tool to get a tighter clearance I can make sure the white line just starts to appear in the window rather than in the middle no? This would tell me the clearance would be set tighter right?
The bearing with no lip centers fine in the sonnax tube.
It doesn't rely on the carrier to center
Run the supplied bearing with the shim. It works with everything.
If you can't get the output shaft snap ring on..
A. make sure the stackup is correct with the sunshell and bearing.
B. Try harder...sometimes they're a real bugger to get installed. There is a GM/Kent Moore tool to support the output towards the pump while you install snap ring. A properly placed ratchet strap with light tension works just as well for the DIY guy
Originally Posted by vorteciroc
The Sonnax supplied bearing centers fine on the reaction-shaft.
The bearing fitment to the carrier is however poor... The original GM bearing with the Lip is a better fit.
Unless you are saying, that the supplied bearing ONLY fits with the 0.030" shim?
I was referring to the fitment without the 0.030" shim.
Well, im not ashamed to admit I found my clearance issue with the reaction tube and output shaft snap ring. I will say when I first started this thread I told myself to pay attention to the details and dont get in a situation where you have an issue and you have guys trying to help diagnose the issue when at the end of the day you did something really stupid and wasted everyones time. Well I did that......
I had the bearing installed upside down. For the life of me, I had it like this
When it obviously needed to be like this
I can give all the excuses in the world, but its irrelevant. It shouldnt of happened. I apologize. The bright side is the output shaft goes in much better, has slight end play, and the carrier spins much better. That said I did go over the other bearings to double check they were installed correct and they are
I want to share this slight issue I had to not create shade on someone, rather to show how great it was handled.
Earlier in the thread I had decided I wasnt going to run a billet input shaft with the 4L79 drum. Mason with K & M Transmissions (4L79) installed a nice stock input shaft into the drum and shipped it to me. After I got it, I had decided to go ahead and run a billet input shaft. So I pressed out the factory shaft and ran into this:
As you can see the walls of the drum are galled and when this happens there is a very likely chance there will be a big leak between the shaft and drum. I went ahead and put a liberal amount of green sleeve retainer on the drum and shaft and pressed in the billet shaft. I let it setup a day or so then heated up the drum and air checked it. It didnt go too well.......
I emailed Mason with my situation and less than an hour he emailed me back requesting me to ship the drum back to him and he will get it taken care of. I shipped the drum back to him, he pressed out my shaft and pressed it into a new drum and had it shipped back out that same day! He even included a few more various steels to help with 3/4 clutch pack setup. I ran the drum under hot water for about 10 minutes then air checked it and it seals tight with no leaks! I emailed him back thanking him and again for which he responded not to long after that again.
I just wanted to take the time to mention his top notch customer service and support. I have seen others post about his great service and I wanted to post that I experienced it first hand. I cant wait to run his setup in this build.
With the reaction tube/output shaft debacle behind me and a good sealing input drum, we can move forward
For the record, the green o-ring is in!
I didnt take pictures of the lower half of the drum assembly as its routine assembly. Just follow the manual. But, the TransGo 7CS high RPM springs are installed and I did install the Blue-Tite 3-4 and forward molded pistons. As you can see the Sonnax billet overrun piston is installed also as im running the steel drum collar. I also wanted to showcase the killer billet top ring from 4L79. Such a nice piece to be covered up inside a trans!
The accumulator valvetrain is essentially useless in a 60e
it controls the reactive oil to the 1-2 and 3-4 accum
3-4 accum on virtually any build could (and should) get blocked---so it's a moot point as far as shift feel is concerned.
If you block it properly, you omit the spring and piston and use accum oil for added rear lube oil via the small orifice in the accum bore pointed at the rear planet.
1-2 accumulator doesn't get blocked but there are enough spring options and orifice sizing combos that you can get desired shift feel with any letter'd accumulator. I can make an AX shift more firm than a DX
Ideally, you'd just block the accum valve outboard, force max oil delivery to the lube orifice, Then match the accumulator spring setup and orifice for the 1-2 and get desired shift feel
LOL
just having some fun back and forth with you bud
In the 60e/700r4 the accumulator valve doesn't have much useful function.
If you block the 4th accum...it's totally useless for that
The accum valve has no effect on the 2-3 shift
and the affect it has on the 1-2 shift can very easily be overcome or altered to get a desired feel
If you are doing a stock build, or a build for grandma's buick. Then the accumulator valve will get attention.
But if you're building a higher performance unit...there isn't much need to overthink the valve.
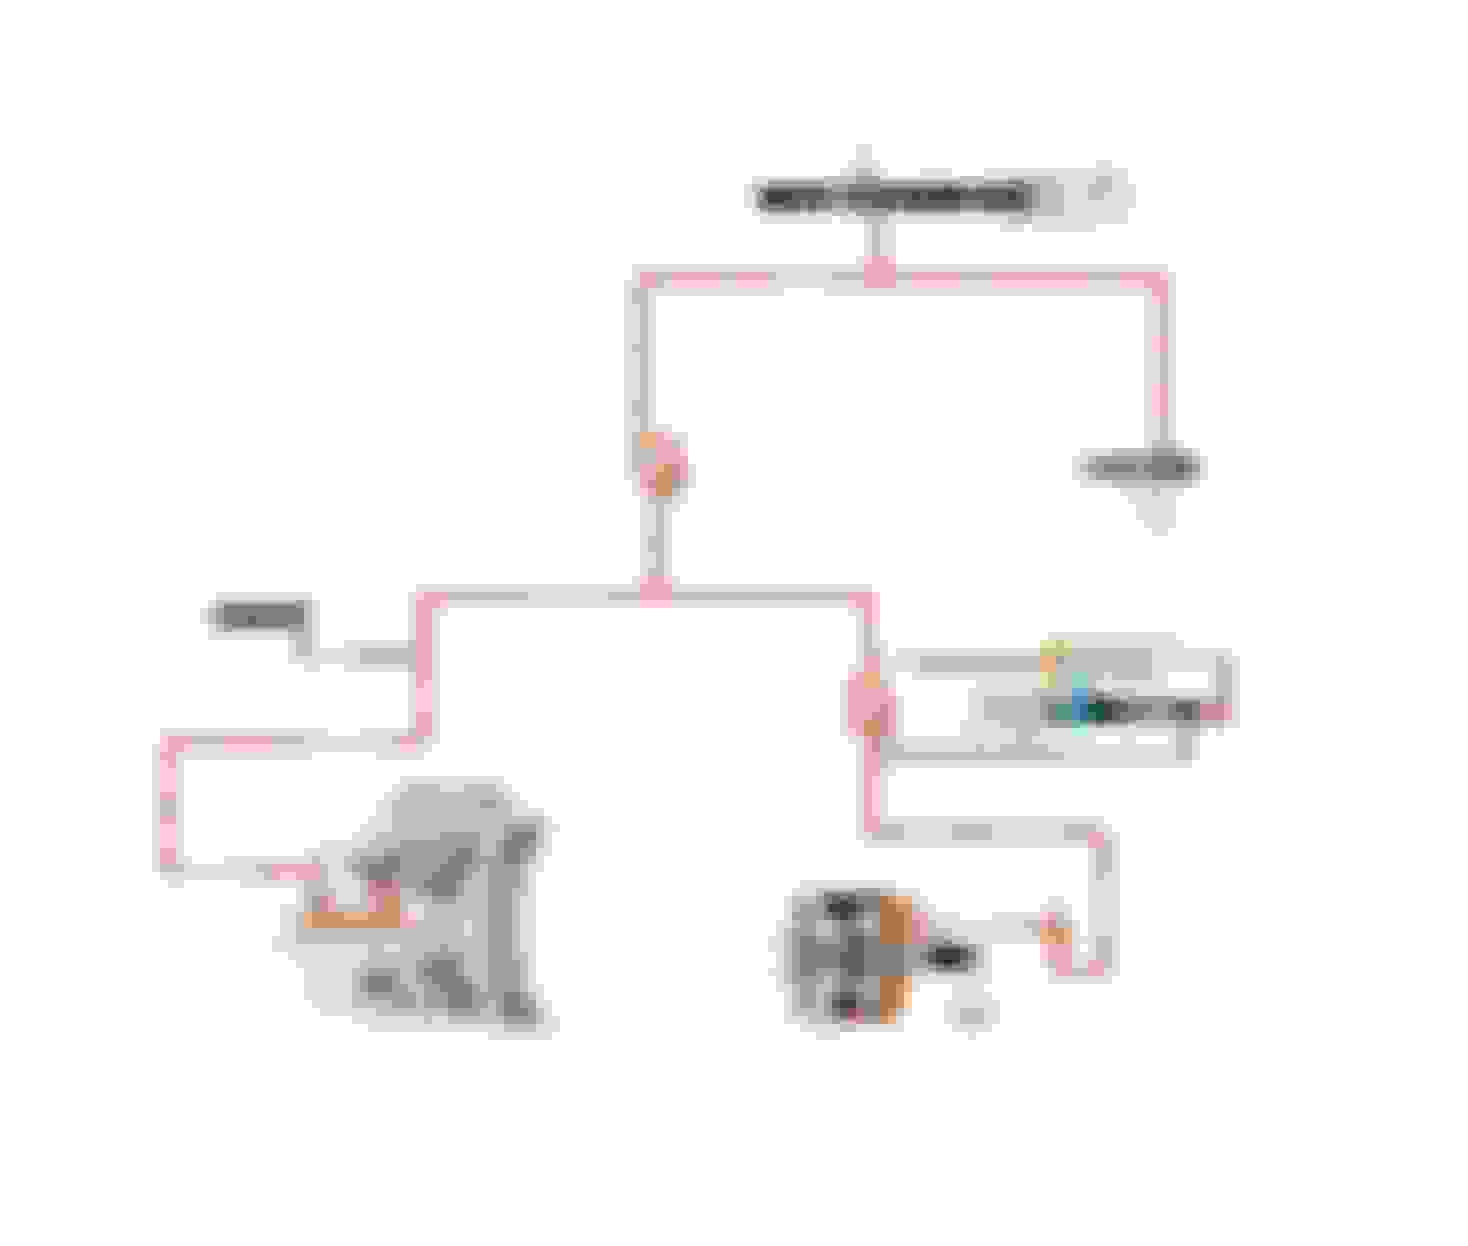
I was not happy with the diagrams that I posted earlier in this thread.
So here is an updated diagram of the same circuits... the sections in PURPLE are essentially the paths that are blocked-off when both the 3-2 downshift and 3-2 control valves are blocked in.
In 2009, near the end of the production run for the 4L60E transmission family...
The 3-2 Control-Valve/ circuit was removed from these transmissions.
Note: This circuit dates back to the 1981 model year, and was problematic for most all of its life.
This circuit never functioned as intended until 1996 after being redesigned a few times and switching to an On/ Off solenoid.
Even with this circuit mostly operating as intended from 1996 to 2008, it did not provide the benefit that engineers had wanted.
Here is a Hydraulic diagram of the 2009+ model year units that do not have a 3-2 Control circuit.
Note: these diagrams were only produced in a "Printed" manual for less than One year, and are only available now digitally.
Excluding the 3-2 Downshift-Valve... we can see here how the 3rd accumulator oil and 3-4 clutch oil circuits now resemble our modified circuits with the 3-2 Control-Valve blocked.
WOW! Just Wow to Vorteciroc for his super detailed contributions and diagrams, many thanks for MaroonMonster for his contributions and congrats/thanks to 2BFAST for starting this thread and turning it into the ultimate 4L60E build thread. And WOW to 2BFAST for the excellent pictures which document every step. I will carefully monitor this thread until 2BFAST is done to make sure nothing extraneous get posted here, no hijacks, etc. Then when done, it will become a sticky, probably a closed sticky.
This thread covers all of the latest performance upgrades from Sonnax and Superior, great explanations of the possible and suggested mods to the 3rd feed circuits, new versus older reaction drums, the cool new 4L79 drum and so much more.
I haven't been very active here for several years and now feel that I should correct and/or update some of my older posts; well at least the ones that are simply incorrect based on the latest knowledge from Vorteciroc and experience from MaroonMonster.
I also feel like I should remove my perfectly fine 4L65E and rebuild it with some of the new parts and circuit changes.
Good luck with your final assembly 2BFAST. We know you will be successful.
I also feel like I should remove my perfectly fine 4L65E and rebuild it with some of the new parts and circuit changes.
I know what you mean. I'm also tempted to tear into my perfectly fine 4L60E to try out some of the things that were discussed in this thread. I may pick up core and build one but I don't have anything to put it in. LOL
WOW! Just Wow to Vorteciroc for his super detailed contributions and diagrams, many thanks for MaroonMonster for his contributions and congrats/thanks to 2BFAST for starting this thread and turning it into the ultimate 4L60E build thread. And WOW to 2BFAST for the excellent pictures which document every step. I will carefully monitor this thread until 2BFAST is done to make sure nothing extraneous get posted here, no hijacks, etc. Then when done, it will become a sticky, probably a closed sticky.
This thread covers all of the latest performance upgrades from Sonnax and Superior, great explanations of the possible and suggested mods to the 3rd feed circuits, new versus older reaction drums, the cool new 4L79 drum and so much more.
I haven't been very active here for several years and now feel that I should correct and/or update some of my older posts; well at least the ones that are simply incorrect based on the latest knowledge from Vorteciroc and experience from MaroonMonster.
I also feel like I should remove my perfectly fine 4L65E and rebuild it with some of the new parts and circuit changes.
Good luck with your final assembly 2BFAST. We know you will be successful.
Thanks for the kind words. This was I was hoping for. Not only a sound trans, but to take all the amazing information scattered through a few threads and combine them into one. These guys have helped tremendously and this is what a forum is about is to share proudly and learn.