
Gen 1 CTS-V Engine Removal/Pull R&R LS6
 03-20-2013, 09:58 AM
#1

Having to pull and go through my 05 V's LS6 because a lifter decided to fall apart. That being said holy smokes what a nest of wiring and unfun things thus far. I'll be coming out the top with the engine but looking for any tips/tricks. I'm shocked how packed in it all is, things as simple as a lower radiator hose seem all but impossible without removing the entire engine. The engine wiring harness goes all the way go the ABS sensors??? Has anyone actually removed their engine, and if so did you pull the harness towards the front of of the car, or fold it over the windshield?
I'm about 3.5 slow hours into it and have the under tray, radiator, alternator, power steering, serp belt, hoses, battery and intake off. Almost all connectors removed, down to the wheels I believe. Was shocked by the huge computer in the driver side of the bumper. It'll be amazing if I get this huge harness back on the car with no broken wires or connectors. Any tips would be appreciated!
I'm about 3.5 slow hours into it and have the under tray, radiator, alternator, power steering, serp belt, hoses, battery and intake off. Almost all connectors removed, down to the wheels I believe. Was shocked by the huge computer in the driver side of the bumper. It'll be amazing if I get this huge harness back on the car with no broken wires or connectors. Any tips would be appreciated!
 03-20-2013, 01:19 PM
#2
TECH Resident
iTrader: (1)

Join Date: Sep 2010
Location: Winnipeg, mb
Posts: 789
Likes: 0
Received 0 Likes
on
0 Posts
I have mine out of car right now. Pulled the tranny and motor right out the top. Remove hood, and rad with fans (seems you already have that done)
The more accessories you can get off the front the more room you will have.
You can leave the ac compressor in the engine bay, just unbolt it from the block. Removing the balancer will give you more room by the abs unit.
Disconnecting all the harness wires to the engine and the transmission, there are 4 connections to the transmission from what I remember. Undoing a couple conections on the side of the engine bay is necessary, then you can move the wiring harness from the back up to the front and to the fuse box side, enough to sneek the engine through no problem.
 03-20-2013, 02:00 PM
#4
I did my Camaro out the bottom. I put the back wheels on ramps then used the hoist to pull the car off the motor. I've never done the v that way, (I'll be buying a lift for that) but its easier than you think.
 03-20-2013, 06:05 PM
#7
I have mine out of car right now. Pulled the tranny and motor right out the top. Remove hood, and rad with fans (seems you already have that done)
The more accessories you can get off the front the more room you will have.
You can leave the ac compressor in the engine bay, just unbolt it from the block. Removing the balancer will give you more room by the abs unit.
Disconnecting all the harness wires to the engine and the transmission, there are 4 connections to the transmission from what I remember. Undoing a couple conections on the side of the engine bay is necessary, then you can move the wiring harness from the back up to the front and to the fuse box side, enough to sneek the engine through no problem.
The more accessories you can get off the front the more room you will have.
You can leave the ac compressor in the engine bay, just unbolt it from the block. Removing the balancer will give you more room by the abs unit.
Disconnecting all the harness wires to the engine and the transmission, there are 4 connections to the transmission from what I remember. Undoing a couple conections on the side of the engine bay is necessary, then you can move the wiring harness from the back up to the front and to the fuse box side, enough to sneek the engine through no problem.
So you didn't remove the "computer" in the driver side bumper or the wheel sensors etc? I'm really trying to avoid the wheel sensor part if possible. Already did the computer deal but that could be put back in quick. Such a damn nightmare of wiring on this car. Wiring doesn't worry me one bit but holy smokes this thing is loaded with it. Hood is already off the car, that took 2mn and I don't have to think about it anymore.
Easier to remove engine from bell housing, or bell housing from transmission for removal? I have no reason to pull the transmission at all so one of the two will be what I attempt tonight.
Trending Topics
03-20-2013, 07:35 PM
#10
TECH Resident
iTrader: (1)
Join Date: Sep 2010
Location: Winnipeg, mb
Posts: 789
Likes: 0
Received 0 Likes
on
0 Posts
So you didn't remove the "computer" in the driver side bumper or the wheel sensors etc? I'm really trying to avoid the wheel sensor part if possible. Already did the computer deal but that could be put back in quick. Such a damn nightmare of wiring on this car. Wiring doesn't worry me one bit but holy smokes this thing is loaded with it. Hood is already off the car, that took 2mn and I don't have to think about it anymore.
.
.
True hood probably doesn't need to be removed, just one less thing in the way, like op said, takes 2 min.
03-20-2013, 08:37 PM
#11
TECH Addict
iTrader: (19)
Join Date: Aug 2007
Location: Where the Navy tells me to go
Posts: 2,408
Received 107 Likes
on
89 Posts

Here's how I did mine. I didn't mess with the transmission at all, I unbolted the engine from the bellhousing.
As described in that thread, I partially disassembled the engine (pulled the intake and heads) prior to pulling it, so I was able to lift the engine up through the wiring harness. When it came time to reinstall, the heads were already installed, making the engine too wide to fit back through the loop of the harness. So, I flopped the wiring harness forward, which meant that I had to unplug a few sensors on either side of the tranny and pull the tranny wiring forward.
As described in that thread, I partially disassembled the engine (pulled the intake and heads) prior to pulling it, so I was able to lift the engine up through the wiring harness. When it came time to reinstall, the heads were already installed, making the engine too wide to fit back through the loop of the harness. So, I flopped the wiring harness forward, which meant that I had to unplug a few sensors on either side of the tranny and pull the tranny wiring forward.
03-21-2013, 12:36 AM
#12
TECH Addict
iTrader: (14)
Join Date: Feb 2007
Location: Owasso, OK
Posts: 2,342
Likes: 0
Received 0 Likes
on
0 Posts
Like was said, pull the 4 connectors of the trans, undo the 4 O2 sensor plugs and the remaining engine plugs. Pull the negative battery cable off the passengers side of the motor and a set of grounds on the back of each head and just pull it all forward and over the front of the car. Don't mess with pulling the PCM or speed sensors. Completely unnecessary.
I also pulled my trans on engine removal just because it seemed easier to stab the transmission with the engine in the car rather than the engine with the trans in the car.
I was able to do everything by myself with no help pulling the trans first and reinstalling last.
I also pulled my trans on engine removal just because it seemed easier to stab the transmission with the engine in the car rather than the engine with the trans in the car.
I was able to do everything by myself with no help pulling the trans first and reinstalling last.
03-21-2013, 12:32 PM
#13
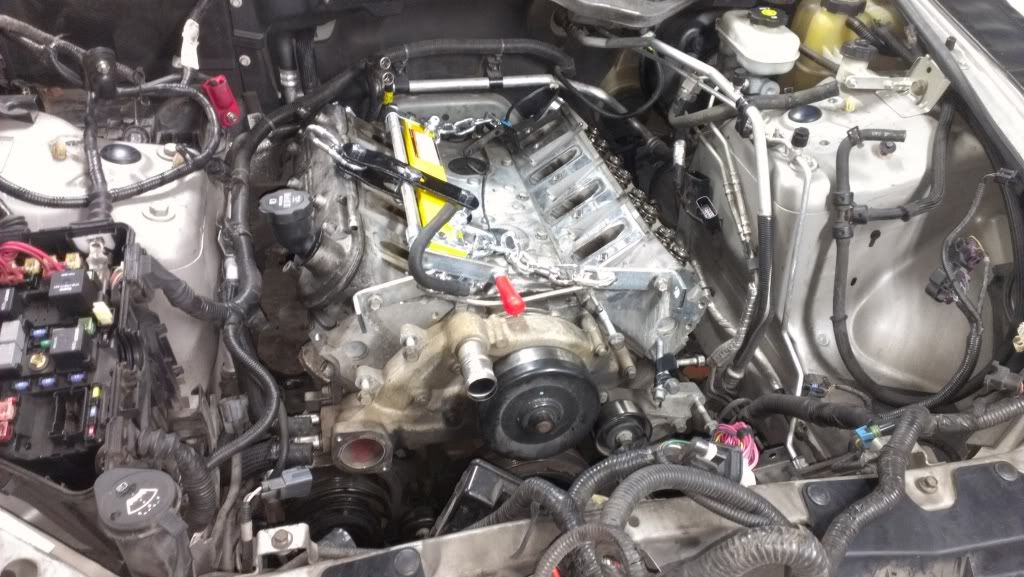
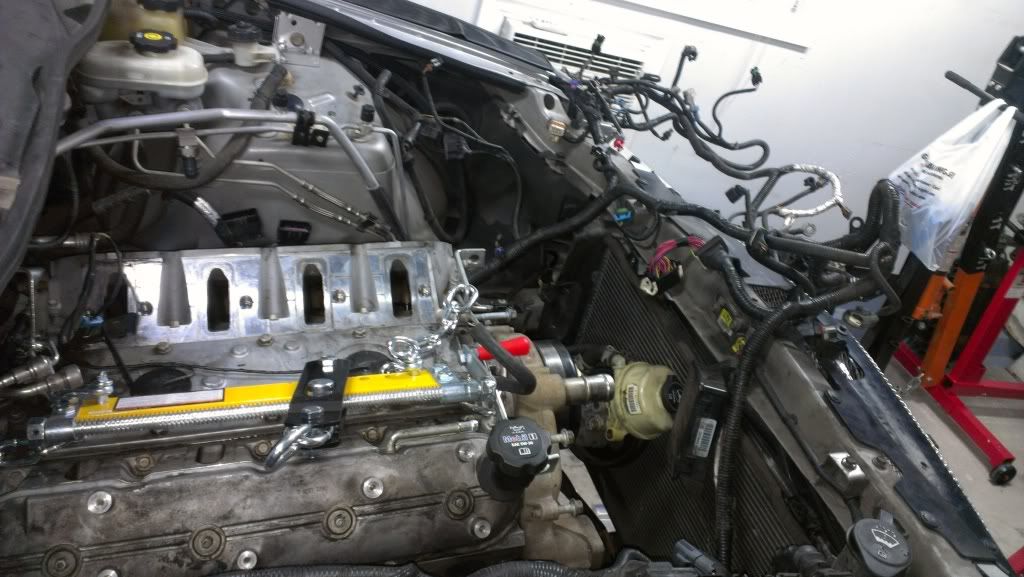
Went ahead and kept working last night and got all of the connectors off, quite fun routing the harness back to the engine bay, very tight up against the trans. Removed the intake manifold, which really did free up a lot of room. Got all of the grounds off the back of the heads, removed both exhaust manifolds which wasn't all that hard with an air ratchet and REALLY freed up some room. Then pulled all but one of the bottom engine-bell housing bolts. Unhooked A/C compressor and folded the harness over the front of the car. Hooked up a load leveler to it and called it a night. Tonight I'll pull the one bolt holding them together and the motor mount bolts and out she comes. Interested to see how shitty it will be to pull the motor forward (off the input shaft of the transmission) without going directly into the ABS unit. Might not be that bad, but I assume going back in won't be very fun.
Hoping to not have any bad bearings as after the lifter died it said I lost oil pressure. Either way headers showed up today, cam package in the mail (cam, LS7 lifters, dual springs, COMP trunnion kit, chromolly pushrods, LS2 trays), GMPP oil pump, LS7 clutch/flywheel/slave cylinder, head gaskets, rod bolts, front/rear main seals and some other misc stuff. Shouldn't be half bad if all goes well. Did see a bit of oil around the intake ports, hoping that's not blowby, hoping its old valve seals which are being replaced.
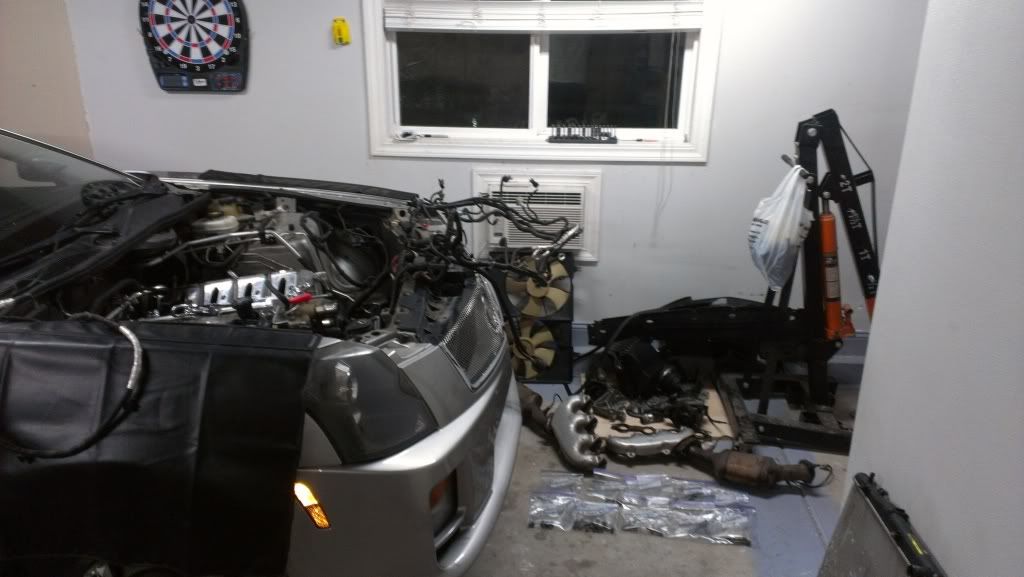
Thus far I'm 6 hours of work into it (working alone at a realistic pace, and never having worked on any LS car, built many cars over the years but was always import stuff). She is ready to be pulled, can't imagine it being more than an hour to get it physically out of the car tonight and on a stand. Here's how she sits now:
Hoping to not have any bad bearings as after the lifter died it said I lost oil pressure. Either way headers showed up today, cam package in the mail (cam, LS7 lifters, dual springs, COMP trunnion kit, chromolly pushrods, LS2 trays), GMPP oil pump, LS7 clutch/flywheel/slave cylinder, head gaskets, rod bolts, front/rear main seals and some other misc stuff. Shouldn't be half bad if all goes well. Did see a bit of oil around the intake ports, hoping that's not blowby, hoping its old valve seals which are being replaced.
Thus far I'm 6 hours of work into it (working alone at a realistic pace, and never having worked on any LS car, built many cars over the years but was always import stuff). She is ready to be pulled, can't imagine it being more than an hour to get it physically out of the car tonight and on a stand. Here's how she sits now:
 03-21-2013, 01:18 PM
#16
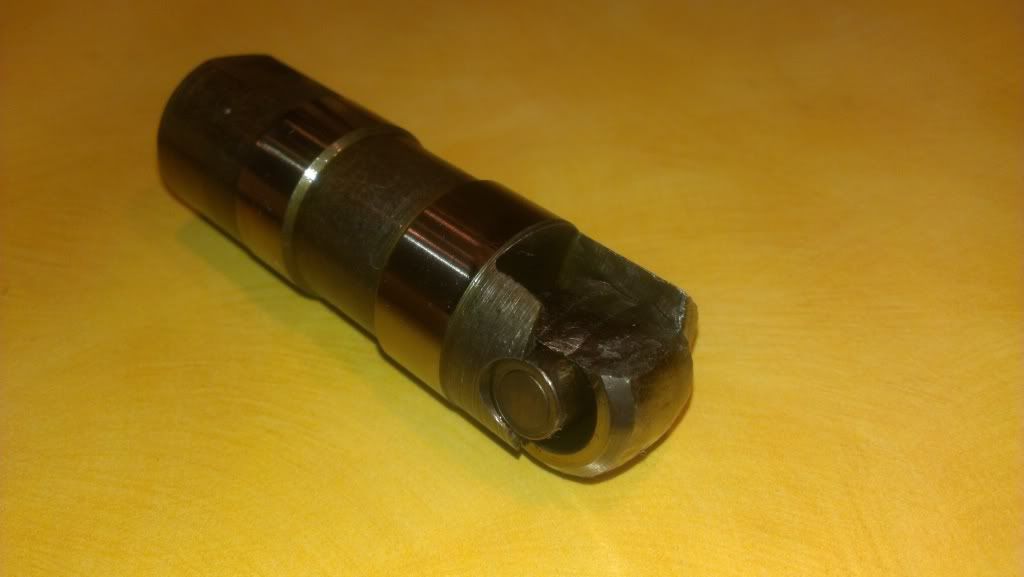
A week or two ago started noticing a very light ticking, then one night it got a bit louder. Next morning drove it very lightly home and when almost home it got very loud, then quiet, then loud. Figured it was a rocker, opened it up and all were fine. Drained oil and found needle bearings attached to the plug and a chunk of something cast. Only other thing in the motor to have needle bearings is a lifter. So my determination is that a lifter took a **** on me. There was some metal shavings in the oil, nothing over the top but it was certainly there. As of this moment my best guess is a lifter failed, and chewed up the cam. Hoping it wasn't a full loss of oil pressure causing the motor to chew up bearings too. Either way I'll find out tonight.
So the reason for pulling is that either way I have to rip it most of the way apart just to check a lifter. And I have no desire to rip it apart and start it up and ruin the rest of the motor if there is more damage. And it's a great excuse to do all the upgrades at once.
So the reason for pulling is that either way I have to rip it most of the way apart just to check a lifter. And I have no desire to rip it apart and start it up and ruin the rest of the motor if there is more damage. And it's a great excuse to do all the upgrades at once.
03-21-2013, 01:34 PM
#17
Launching!
iTrader: (10)

Join Date: Feb 2009
Location: Topeka, KS
Posts: 212
Likes: 0
Received 0 Likes
on
0 Posts
So the reason for pulling is that either way I have to rip it most of the way apart just to check a lifter. And I have no desire to rip it apart and start it up and ruin the rest of the motor if there is more damage. And it's a great excuse to do all the upgrades at once.
Post of pictures of what you find.
03-21-2013, 01:45 PM
#18
Should have some up tonight, hoping for the best, however I think realistically it will go to the machine shop one way or another. Either to have the lifter area "sleeved" or more extensive for the bearings/polish the crank or something that effect. If it needs that work I'll be fighting the urge to do a forged stroker kit..
03-22-2013, 02:31 AM
#19
Well folks here's the update. Lets start with the actual removal. Things learned and certainly things that MUST be done.
First I can say, that without a doubt you will not get the engine out without at least removing the driveshaft, and dropping the tail of the transmission. Otherwise you will absolutely not be able to get the motor out. This is because once the engine is unbolted from the trans it needs move forward enough to have the input shaft come out of the clutch. That being said the oil pan immediately hits the front cross member/steering assembly. Even when you start pulling the engine upwards the bell housing on the transmission hits the firewall FAR before you get enough angle to clear the whole steering assembly. Don't try it, you won't get far. I completely removed the engine mounts for more maneuverability, as the studs coming out the bottom of the mounts into the front cross member were long enough that it created a major pain. All in all it was a giant nightmare until I removed the driveshaft and dropped the tail of the transmission about 6", then it came out quick and easy.
On to the good stuff. Pulled the heads, all looked great. Got to the culprit of all of this, and let me first say ALL other lifters looked perfect. This one clearly just had a failure. So, all I can say is I hope this doesn't happen to you guys. $8 part is costing me thousands and tons of down time:
All of its needle bearings were in the pan and so were the missing chunks. The lobe of the cam it rides on seems to be beat up a bit, haven't pulled it yet though.
Now that I 100% expected, but what I prayed was that its metal and or the loss of oil pressure didn't cause bearing damage. So I flipped the engine over and started pulling mains. Most looked relatively good, 2 show some wear far above what I'd consider OK. Now that being said I can't conclusively say that this damage is abnormal for a main bearing with 90k miles, but I'd be willing to bet its not completely normal. You can just feel the wear with a finger nail. May have been slowly wearing over time, or may have worn quickly due to the metal in the engine, but most of the mains looked OK so it leads me to believe either just a small piece got into each main or its damage over time:
Crank:
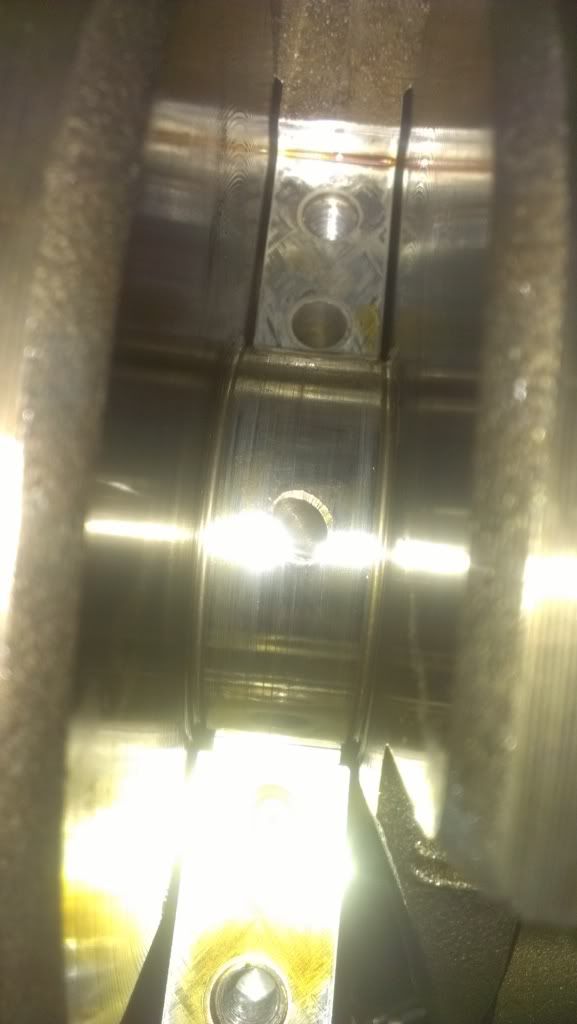
Bearing:
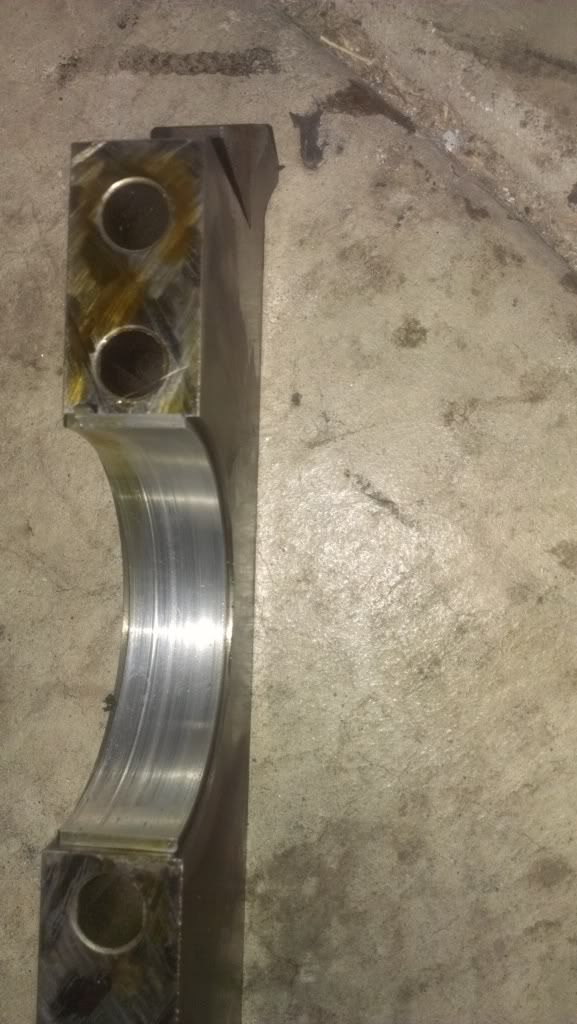
Both next to eachother:
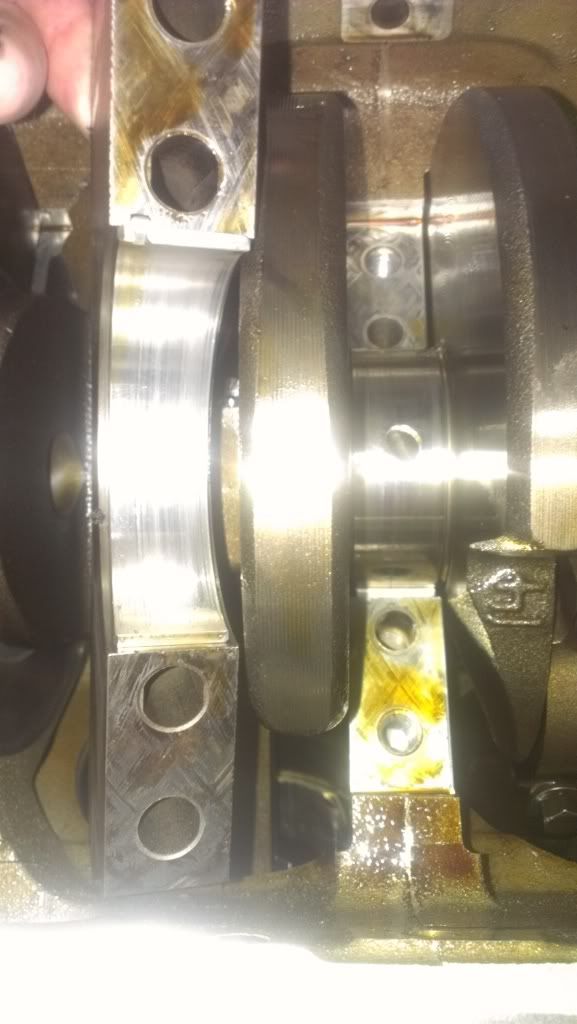
So for now, I assume I'll be taking the block down to the machine shop to have the crank polished. I've only cracked open two rods but they looked fine. Either way I'll replace all bearings.
My pickle now is, do I replace just the bearings and call it a day, or do new rings, or do forged pistons, and new rings, or forged pistons and forged rods?
Car is my daily driver, and doesn't really NEED either of those by any means. But I never intended to rip this thing apart to begin with, and I'd hate to go this far and wish I had replaced my rings at a minimum. Seems like a full rebuild at this point. Major bummer.
First I can say, that without a doubt you will not get the engine out without at least removing the driveshaft, and dropping the tail of the transmission. Otherwise you will absolutely not be able to get the motor out. This is because once the engine is unbolted from the trans it needs move forward enough to have the input shaft come out of the clutch. That being said the oil pan immediately hits the front cross member/steering assembly. Even when you start pulling the engine upwards the bell housing on the transmission hits the firewall FAR before you get enough angle to clear the whole steering assembly. Don't try it, you won't get far. I completely removed the engine mounts for more maneuverability, as the studs coming out the bottom of the mounts into the front cross member were long enough that it created a major pain. All in all it was a giant nightmare until I removed the driveshaft and dropped the tail of the transmission about 6", then it came out quick and easy.
On to the good stuff. Pulled the heads, all looked great. Got to the culprit of all of this, and let me first say ALL other lifters looked perfect. This one clearly just had a failure. So, all I can say is I hope this doesn't happen to you guys. $8 part is costing me thousands and tons of down time:
All of its needle bearings were in the pan and so were the missing chunks. The lobe of the cam it rides on seems to be beat up a bit, haven't pulled it yet though.
Now that I 100% expected, but what I prayed was that its metal and or the loss of oil pressure didn't cause bearing damage. So I flipped the engine over and started pulling mains. Most looked relatively good, 2 show some wear far above what I'd consider OK. Now that being said I can't conclusively say that this damage is abnormal for a main bearing with 90k miles, but I'd be willing to bet its not completely normal. You can just feel the wear with a finger nail. May have been slowly wearing over time, or may have worn quickly due to the metal in the engine, but most of the mains looked OK so it leads me to believe either just a small piece got into each main or its damage over time:
Crank:
Bearing:
Both next to eachother:
So for now, I assume I'll be taking the block down to the machine shop to have the crank polished. I've only cracked open two rods but they looked fine. Either way I'll replace all bearings.
My pickle now is, do I replace just the bearings and call it a day, or do new rings, or do forged pistons, and new rings, or forged pistons and forged rods?
Car is my daily driver, and doesn't really NEED either of those by any means. But I never intended to rip this thing apart to begin with, and I'd hate to go this far and wish I had replaced my rings at a minimum. Seems like a full rebuild at this point. Major bummer.
03-22-2013, 08:24 AM
#20
Launching!
iTrader: (10)
Join Date: Feb 2009
Location: Topeka, KS
Posts: 212
Likes: 0
Received 0 Likes
on
0 Posts
That is a bummer. I can honestly say that I've never seen a lifter failure like that before. It's a good thing you tore it down though.
As far as what to do, it all depends on what your goals are. If you want it to remain a fun reliable daily driver, I'd just freshen it up with new bearings and I'd probably do rings since you're in it that far anyway. Since you have to replace the cam, might as well get a nice mild cam for it too. That'd get you a good 20+rwhp, an entirely fresh motor and stay on the relatively cheap side. Then once you have it back together, any bolt-ons you do will get further benefit from the cam already in there.
If you're wanting to do it big even if it weren't in the immediate future, now is the time to do it.