
Lowering CTS-V with cut stock springs - results and review

 03-11-2016, 08:10 PM
#22
TECH Fanatic
Gentlemen: If the spring rate is a function of (directly proportional to) the number of active coils, how is it that you can reduce the number of coils and produce a spring with an unchanged spring rate? Note in the formula, below, "na" is the number of active coils. I believe the OP removed a portion of them. That most definitely changes the spring rate "k".
Formula to Calculate Rate:
k = Gd^4 � (8D^3 na)
G = E � 2 ( 1 + V)
D = D outer - d
Formula symbols:
d = Wire Diameter
D outer = Outer Diameter
D = Mean Diameter
E = Young's Modulus of Material
G = Shear Modulus of Material
L free = Free Length
k = Spring Rate (Spring Constant)
na = Active Coils
v = Poison's Ratio of Material
Source: http://www.thespringstore.com/spring...alculator.html
Last edited by rand49er; 03-12-2016 at 05:02 AM.
03-12-2016, 09:08 PM
#24
TECH Enthusiast
They are Linear springs from the factory.
Randy,
You need to actually follow the math that you posted.
When you reduce the number of coils look at the equation.
k = Gd^4 � (8D^3 na)
The "na" number is reduced.... meaning the lower the numerical value of "na", the higher the value of k becomes. Pretty straight forward math.
Gentlemen: If the spring rate is a function of (directly proportional to) the number of active coils, how is it that you can reduce the number of coils and produce a spring with an unchanged spring rate? Note in the formula, below, "na" is the number of active coils. I believe the OP removed a portion of them. That most definitely changes the spring rate "k".
Formula to Calculate Rate:
k = Gd^4 � (8D^3 na)
G = E � 2 ( 1 + V)
D = D outer - d
Formula symbols:
d = Wire Diameter
D outer = Outer Diameter
D = Mean Diameter
E = Young's Modulus of Material
G = Shear Modulus of Material
L free = Free Length
k = Spring Rate (Spring Constant)
na = Active Coils
v = Poison's Ratio of Material
Source: http://www.thespringstore.com/spring...alculator.html
Formula to Calculate Rate:
k = Gd^4 � (8D^3 na)
G = E � 2 ( 1 + V)
D = D outer - d
Formula symbols:
d = Wire Diameter
D outer = Outer Diameter
D = Mean Diameter
E = Young's Modulus of Material
G = Shear Modulus of Material
L free = Free Length
k = Spring Rate (Spring Constant)
na = Active Coils
v = Poison's Ratio of Material
Source: http://www.thespringstore.com/spring...alculator.html
Randy,
You need to actually follow the math that you posted.
When you reduce the number of coils look at the equation.
k = Gd^4 � (8D^3 na)
The "na" number is reduced.... meaning the lower the numerical value of "na", the higher the value of k becomes. Pretty straight forward math.
 03-15-2016, 08:59 PM
#26

my kit keeps the shock from hydraulic assist for over 2.5 of 'lowering' capability
lots of people lower to different heights, i went with what would 'get them out of the way' without a compromise in sight for the 99%
if you drop the shock back toward the stock spot, to the point that it begins playing an active role in suspension, you are on your way toward defeating the purpose of the relocation, and will see raising and lowering during use (like we don't want).
the hr springs are just really soft and people get aggressive with the trimming because well hey its 2016 everybody in a rush i send out spring shim kits on the regular because people get a little too happy with the cutoff wheel. it actually ends up just helping the 'too soft' hr and all is right with the world
lots of people lower to different heights, i went with what would 'get them out of the way' without a compromise in sight for the 99%
if you drop the shock back toward the stock spot, to the point that it begins playing an active role in suspension, you are on your way toward defeating the purpose of the relocation, and will see raising and lowering during use (like we don't want).
the hr springs are just really soft and people get aggressive with the trimming because well hey its 2016 everybody in a rush
i send out spring shim kits on the regular because people get a little too happy with the cutoff wheel. it actually ends up just helping the 'too soft' hr and all is right with the world
04-09-2016, 12:49 PM
#31
Did you reuse the rear shock boots? MM instructions say to leave them out, but I'm not crazy about that for a winter driven set-up. I'm assuming they need to be removed for more aggressive drops and my (yours) mild drop should be fine with them in place.
EDIT: Nevermind, that didn't work, the metal cap on the top of the dust boot prevents the shock rod from installing far enough into the cabin. Solution, pry the metal cap off the top of the dust boot. The shock rod now extends freely through the end of the bump stop and dust boot and can be properly attached inside the car. I used JB Weld to glue to dust boot to the lower MM spacer mounting plate which will prevent the boot from sliding down.
EDIT: Nevermind, that didn't work, the metal cap on the top of the dust boot prevents the shock rod from installing far enough into the cabin. Solution, pry the metal cap off the top of the dust boot. The shock rod now extends freely through the end of the bump stop and dust boot and can be properly attached inside the car. I used JB Weld to glue to dust boot to the lower MM spacer mounting plate which will prevent the boot from sliding down.
Last edited by Fweasel; 04-09-2016 at 03:04 PM.
04-09-2016, 04:11 PM
#34
Bought a pair of these from amazon and put the slightly trimmed bump stops inside of them. Trimmed the boots to fit without any binding. Once suspension is loaded it seals up against the top. No way I'm daily driving my car in MN all year without protection from road spray onto shock shaft and seal as well as into cabin.
 04-09-2016, 04:55 PM
#35
Nice!!
Bought a pair of these from amazon and put the slightly trimmed bump stops inside of them. Trimmed the boots to fit without any binding. Once suspension is loaded it seals up against the top. No way I'm daily driving my car in MN all year without protection from road spray onto shock shaft and seal as well as into cabin.

04-15-2016, 01:34 PM
#36
Launching!
iTrader: (6)
Join Date: Aug 2008
Location: Spangdahlem AB,Germany
Posts: 220
Likes: 0
Received 0 Likes
on
0 Posts

I also want to do this, thanks for the awesome review!! I had 2 questions...
1- Do you have to have a spring compressor for the fronts? Does it just make it easier or?
2-Can I use a sawzall to cut the springs? or do I have to use a cutoff wheel?
Thanks!
1- Do you have to have a spring compressor for the fronts? Does it just make it easier or?
2-Can I use a sawzall to cut the springs? or do I have to use a cutoff wheel?
Thanks!
04-15-2016, 08:19 PM
#37
Yes you can, but you'll need to secure the spring before you cut because the blade will likely shake it quite a bit. The cutoff wheel is definitely easier to handle.
04-18-2016, 12:02 PM
#39
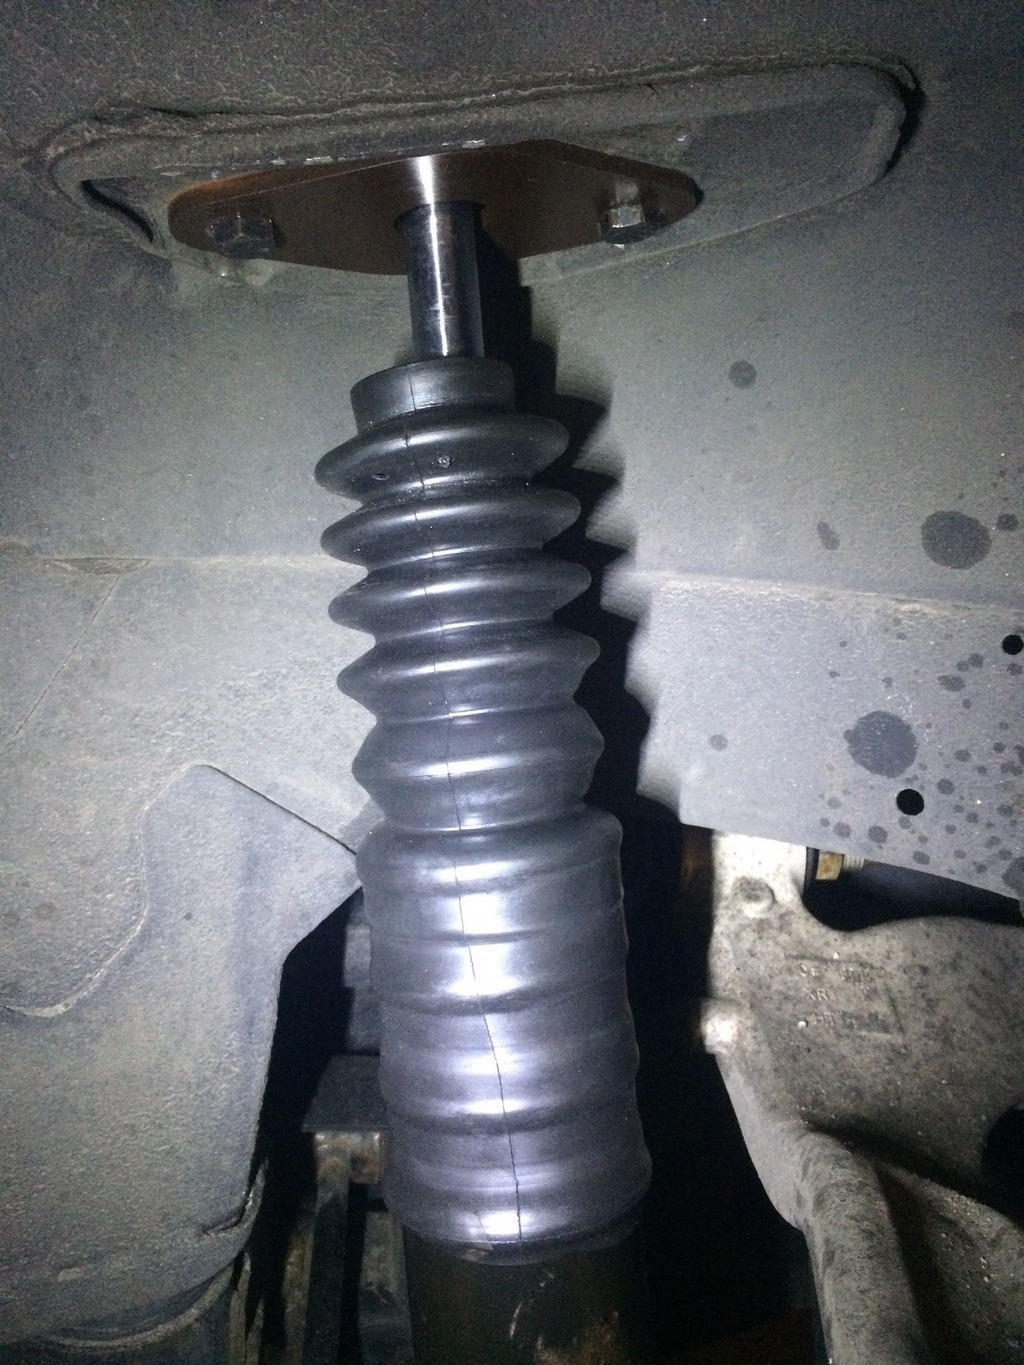
I set my MM spacers up in a way that allowed me to keep the shock covers/boots on.
I relocated one of the spacer sleeves below the top plate to reduce the spacing to be closer to an inch (and I put a rubber spacer beneath the spring to reduce tire tucking and fender rub from my flushed 275's).
Doing this brought the shoulder on the piston rod right up to the top of fender and the boot is resting on that and snugged to the top of the fender with the top nut holding the two together. No rattles. It took a couple extra washers to get everything right.
04-30-2016, 08:33 AM
#40
TECH Regular
I was contemplating cutting stockers, but then some H&Rs popped up locally for $100.
Im supposed to pick them up today.....now I'm not sure.
Im supposed to pick them up today.....now I'm not sure.