
1973 Nova LS BUDGET swap
 10-30-2011, 09:10 PM
#1

Hey guys, I am Taylor from Wisconsin! I just posted my intro a few days ago, check it out for little background on me and my Nova:
https://ls1tech.com/forums/introduct...wi-newbie.html
First off I should say that is is all your fault! I had plans on dropping a nice simply 1-for-1 Gen I SBC into my Nova! But a budget LS swap sounds like just the unique challenge I need! So I guess thank you's are in order! So, THANKS!
Some might consider this a pre-emptive post seeing as I do not yet have my LS motor, well to bad. I have started work on my LS swap I should also start my build thread. Otherwords I never will!
This weekend I drove my car for what will be the last time for the long cold Wisconsin winter! But next time it drives, it will be powered by 21 century technology! Well, and a carb...
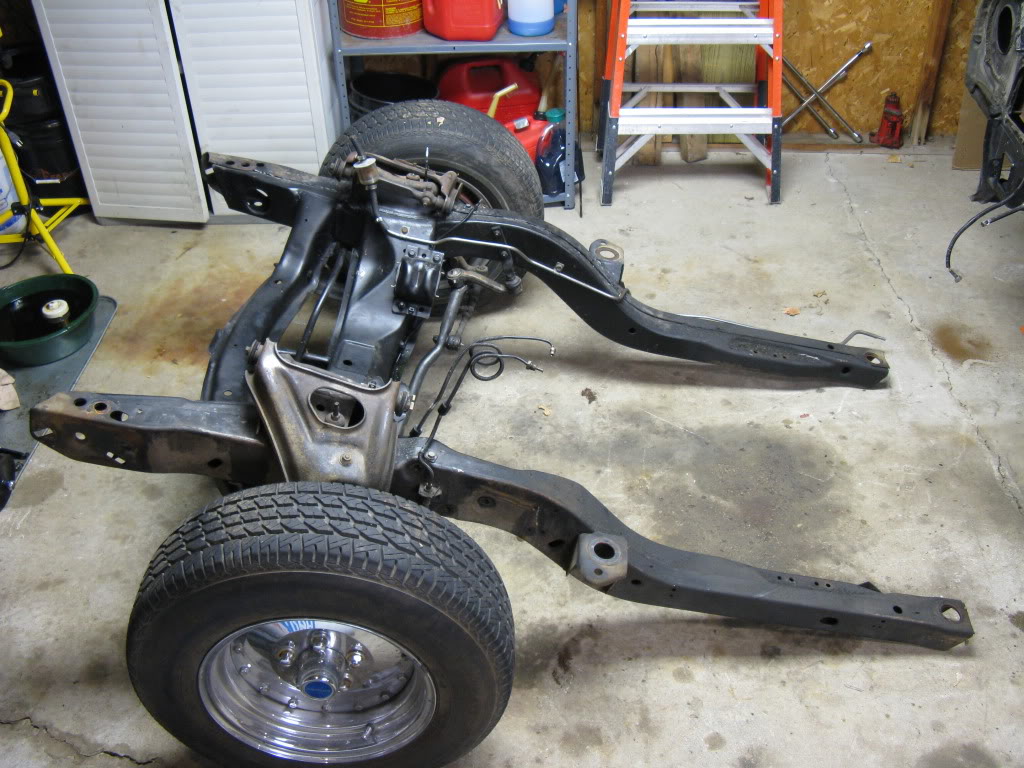
I had been going back and forth about removing the fenders, inner fenders and core support to perform the swap and finally this weekend I just gave in and did it! Aligning them later may give me some grief but it also gave me the piece of mind of finding that my quarters, firewall, core, jambs and inner fenders are very solid. I only found surface rust is a few small places. This is surprising considering the Nova spent many winters in the wet Washington coastal environment. Before re-assembly I will be removing any rust and coating all un-seen surfaces.
My efforts this weekend also included disconnecting the engine and transmission from the chassis in prep to be pulled out sometime early this week once my buddy can lend me a hand drinking a few beers!
And that pretty much brings me to tonight. I have thrown a few pics in for your enjoyment! Plans for the next week include pulling the engine and selling all Gen I parts I will not need on Craiglist to contribute to the LS swap fund.
While the Nova is engine-less I plan to:
-Design/build/install custom subrame connectors
-Manual steering conversion
-Solid front subframe mounts
-AL radiator swap
Please feel free to post all comments and idea. Thank you and I am glad to be here!
BTW, I have created a photobucket account. Check it out for more pictures. But I was also wondering, how do I incorporate fullsize pics directly into my posts like most folks? Thank you for help on this one.
https://ls1tech.com/forums/introduct...wi-newbie.html
First off I should say that is is all your fault! I had plans on dropping a nice simply 1-for-1 Gen I SBC into my Nova! But a budget LS swap sounds like just the unique challenge I need! So I guess thank you's are in order! So, THANKS!
Some might consider this a pre-emptive post seeing as I do not yet have my LS motor, well to bad. I have started work on my LS swap I should also start my build thread. Otherwords I never will!
This weekend I drove my car for what will be the last time for the long cold Wisconsin winter! But next time it drives, it will be powered by 21 century technology! Well, and a carb...
I had been going back and forth about removing the fenders, inner fenders and core support to perform the swap and finally this weekend I just gave in and did it! Aligning them later may give me some grief but it also gave me the piece of mind of finding that my quarters, firewall, core, jambs and inner fenders are very solid. I only found surface rust is a few small places. This is surprising considering the Nova spent many winters in the wet Washington coastal environment. Before re-assembly I will be removing any rust and coating all un-seen surfaces.
My efforts this weekend also included disconnecting the engine and transmission from the chassis in prep to be pulled out sometime early this week once my buddy can lend me a hand drinking a few beers!
And that pretty much brings me to tonight. I have thrown a few pics in for your enjoyment! Plans for the next week include pulling the engine and selling all Gen I parts I will not need on Craiglist to contribute to the LS swap fund.
While the Nova is engine-less I plan to:
-Design/build/install custom subrame connectors
-Manual steering conversion
-Solid front subframe mounts
-AL radiator swap
Please feel free to post all comments and idea. Thank you and I am glad to be here!
BTW, I have created a photobucket account. Check it out for more pictures. But I was also wondering, how do I incorporate fullsize pics directly into my posts like most folks? Thank you for help on this one.
 10-30-2011, 11:27 PM
#3
Welcome!
One thing to note about the subframe connectors is that the final install (whether it be final weld-in or hole drilling for bolt-on, but really don't bother with bolted) should be done with the car sitting on all 4 wheels with the vehicle's weight being as close as possible to what it will be under normal driving circumstances.
One thing to note about the subframe connectors is that the final install (whether it be final weld-in or hole drilling for bolt-on, but really don't bother with bolted) should be done with the car sitting on all 4 wheels with the vehicle's weight being as close as possible to what it will be under normal driving circumstances.
10-31-2011, 06:22 AM
#4
Hey Frojoe, thanks for the welcome and advice on the subframe connectors. I have actually heard both trains (sp?) of thought. That the car should be loaded at the wheels AND also that it should be lifted in the middle with either end almost hanging. I think the best solution would rely on some sort of a factory measurement I can reference like ground to chassis or subframe point-to-point. I am pretty sure I am getting massive unibody deflection as:
A) There is a dimple in the radius of the roof right at the B-pillar.
B) The rear window seal is nearly completely let go and will have to be replaced for the 3rd time in 11 years.
C) The crack in my windshield is growing faster then Rosie O'donnell's belt line on 1/2 price burger day.
A) There is a dimple in the radius of the roof right at the B-pillar.
B) The rear window seal is nearly completely let go and will have to be replaced for the 3rd time in 11 years.
C) The crack in my windshield is growing faster then Rosie O'donnell's belt line on 1/2 price burger day.
11-23-2011, 10:58 AM
#6

When ur car is over at Allens for whatever reason have him weld them in. I had Allen weld on my bolt in connectors.
11-23-2011, 11:17 AM
#7
Welcome.... if you’re on a budget.. read the $1500 Swap Thread, along with the other great X-body swap threads in the top FAQ.. Mine is in my sig.. also, while the engine/trans is out, it is better to spend a little extra now if you can afford, instead of doing it as a mod later. both $$ and time in labor..
Sound like your trying to blame us for the swap. but I'm think you and your buddy were sitting in the garage drink too many cheap beer’s and someone said.. we can do a LS swap.. and it just took off from there !! LOL, that is kind of what why my Chevelle swap started..
Anyway.. sound like you got your plans going in the right direction.
From Photobucket. if you mouse over the image in your pages... it well drop down/up some of the links to embed into the page.. just do the copy IMG and then paste on your page/thread. It’s that simple !
Good Luck, I'll be following..
BC
Trending Topics
11-23-2011, 12:58 PM
#8
Welded at the rear and to the floorpan, but bolted to the subframe. I think being able to remove the subframe is still important. With a good bolted joint at this location, it should be every bit as effective as welded. There is plenty of room on the subframe to add a good bolted joint to the front of the subframe connector.
11-23-2011, 01:15 PM
#9
Clint that is a phenomenal idea... btw, mine didn't require cutting the floor pan. I believe they were comp engineering.
Richard I've got a buddy that can weld them in (rear only) for a few beers. He builds cages and rock sliders for trucks (or at least his).
Richard I've got a buddy that can weld them in (rear only) for a few beers. He builds cages and rock sliders for trucks (or at least his).
11-23-2011, 01:23 PM
#10
 .
. I love the Custom Plate. I didnt even think of that one, all i thought of was either LQ9NOVA or LSXNOVA.
12-07-2011, 09:54 PM
#11
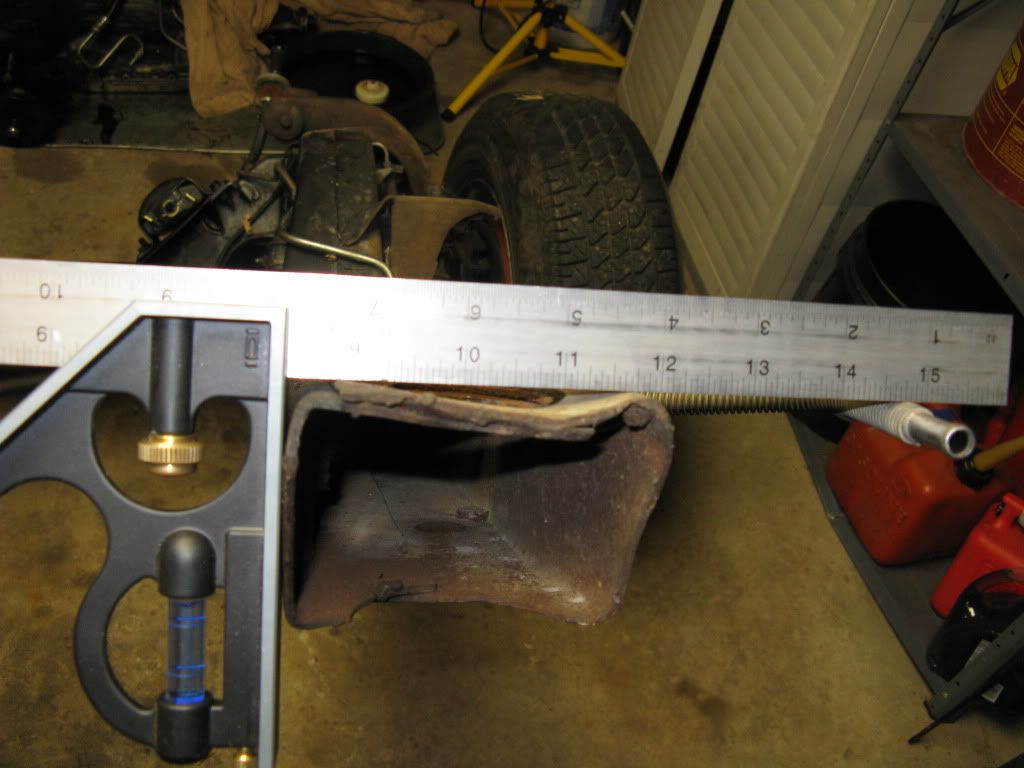
Hey guys. OK not much car related progress to report. The past several weeks I have been going back and forth about EFI. Long story short I will be sticking to the original carb build plan for the sake of focusing my energy on the rest of the car. That being said, this carb motor will probably be a stepping stone for a few years while I get the rest of the car to the point I want it at. Then I will do a complete powertrain swap to an EFI and 4L60E. But that is in the future. In the here and now I have pulled the subframe of and I have begun tear down in preparation of painting.Just about everything came of without issue. But the end of the right frame rail is deformed strangely. Hoping maybe one of you Nova/Camaro guys can shed a little light on what might do something like this


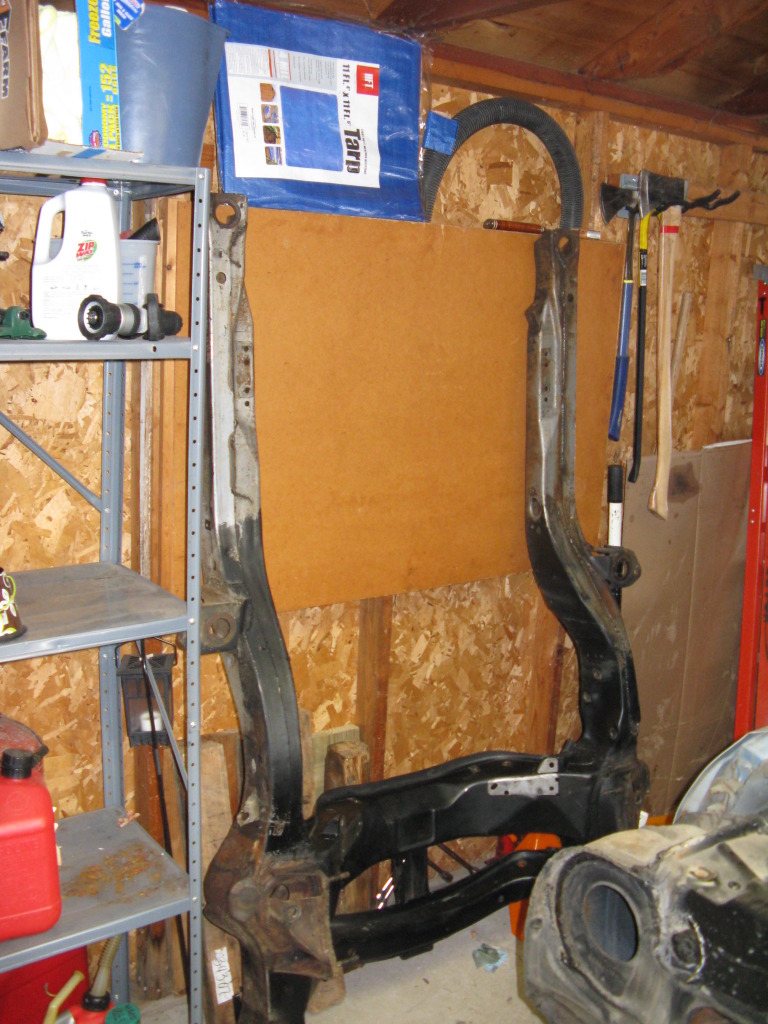
Any thoughts?? To support the body and allow me to roll it around with the subframe I came up with this:
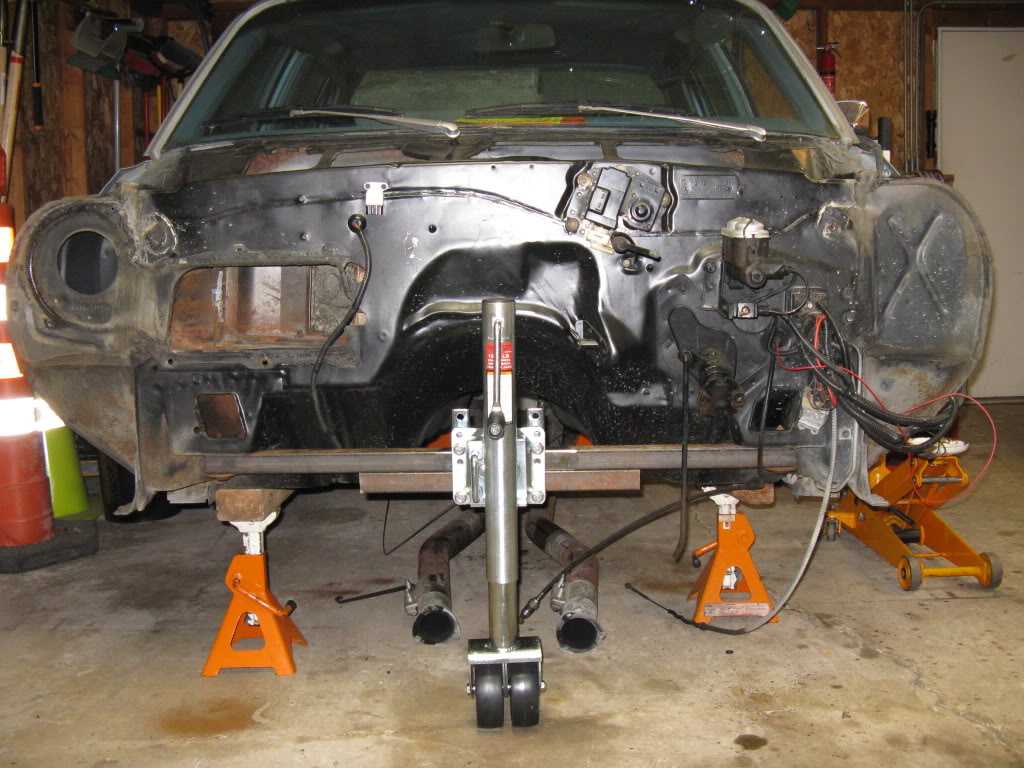
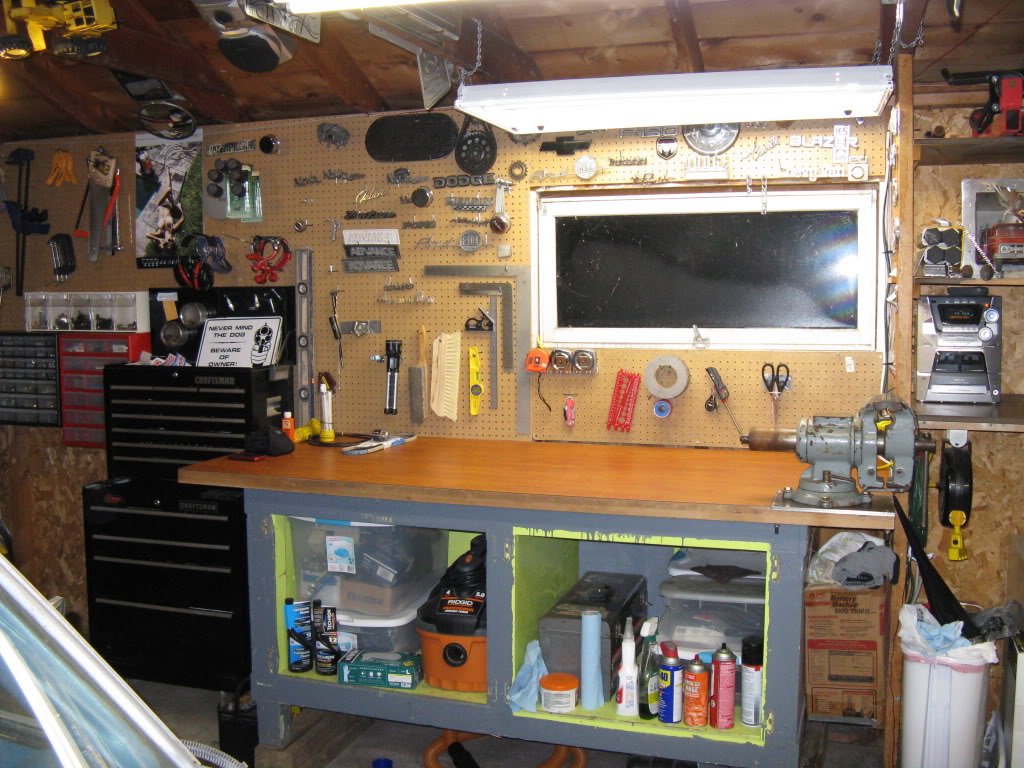
I wish I could take all the credit, but I actually copied the design from a thread I on Steve's Nova Site. Pretty cheap and nifty! I wouldn't take it down the street, but it will keep it mobile. I have also been outfitting my shop with a few of the tools I will need to perform this swap:
I used the router to sink in my 3/8" hammer plate on the corner of my table. I then tapped the plate so I could mount my vise when needed.
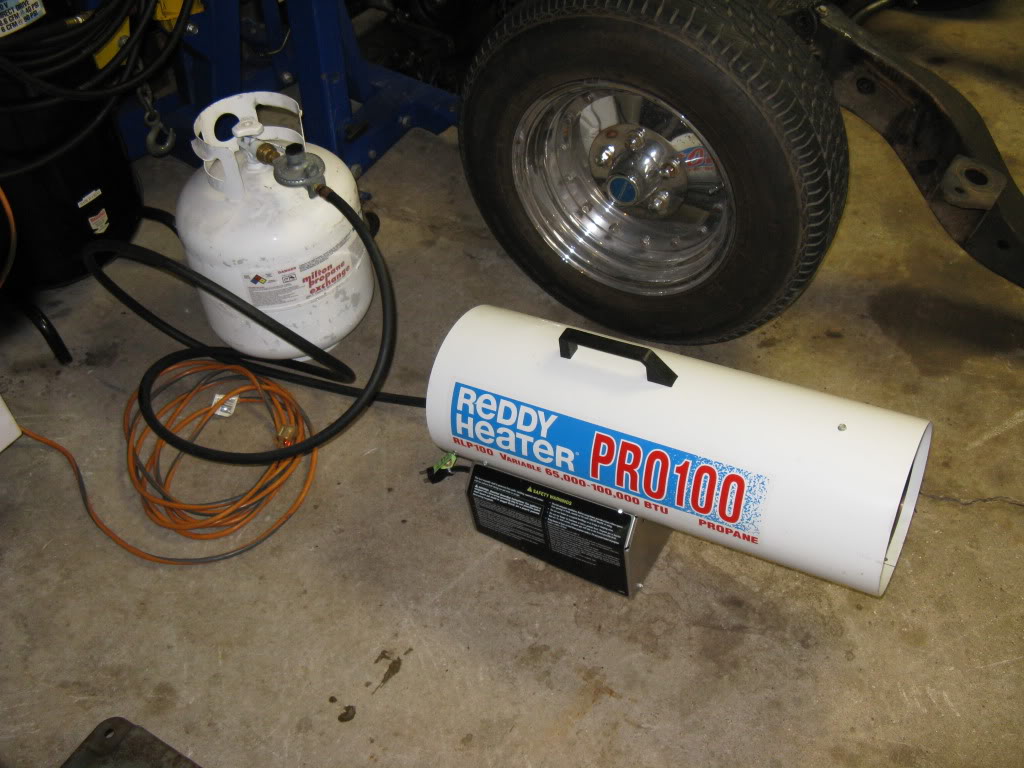
This is 100,000 BTU of summer right here! I run it just long enough to keep the temp in the 40's its not tropical, but its enough to work without gloves and Sorels!
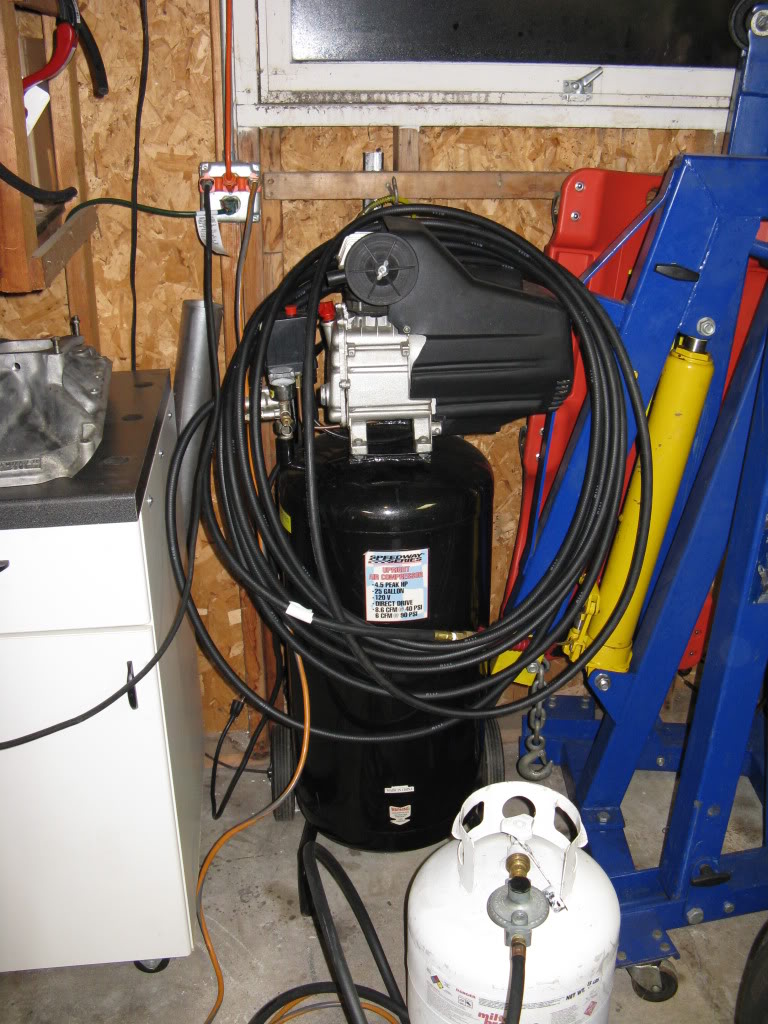
I have NO IDEA how I got along without an air compressor! I have already got my money worth out of this Craigslist score!
Here is my pride and joy a 73' Rockwell 1/2 HP drill press. I spent all day Saturday polishing the column, removing rust from the table, greasing the ways, and oiling bearings. Now she spins almost good as new. Already made chips making the body dolly. Only issue is the lowest speed is still pretty fast for drilling steel. But I wil come up with a fix for that!
Any thoughts?? To support the body and allow me to roll it around with the subframe I came up with this:
I wish I could take all the credit, but I actually copied the design from a thread I on Steve's Nova Site. Pretty cheap and nifty! I wouldn't take it down the street, but it will keep it mobile. I have also been outfitting my shop with a few of the tools I will need to perform this swap:
I used the router to sink in my 3/8" hammer plate on the corner of my table. I then tapped the plate so I could mount my vise when needed.
This is 100,000 BTU of summer right here! I run it just long enough to keep the temp in the 40's its not tropical, but its enough to work without gloves and Sorels!
I have NO IDEA how I got along without an air compressor! I have already got my money worth out of this Craigslist score!
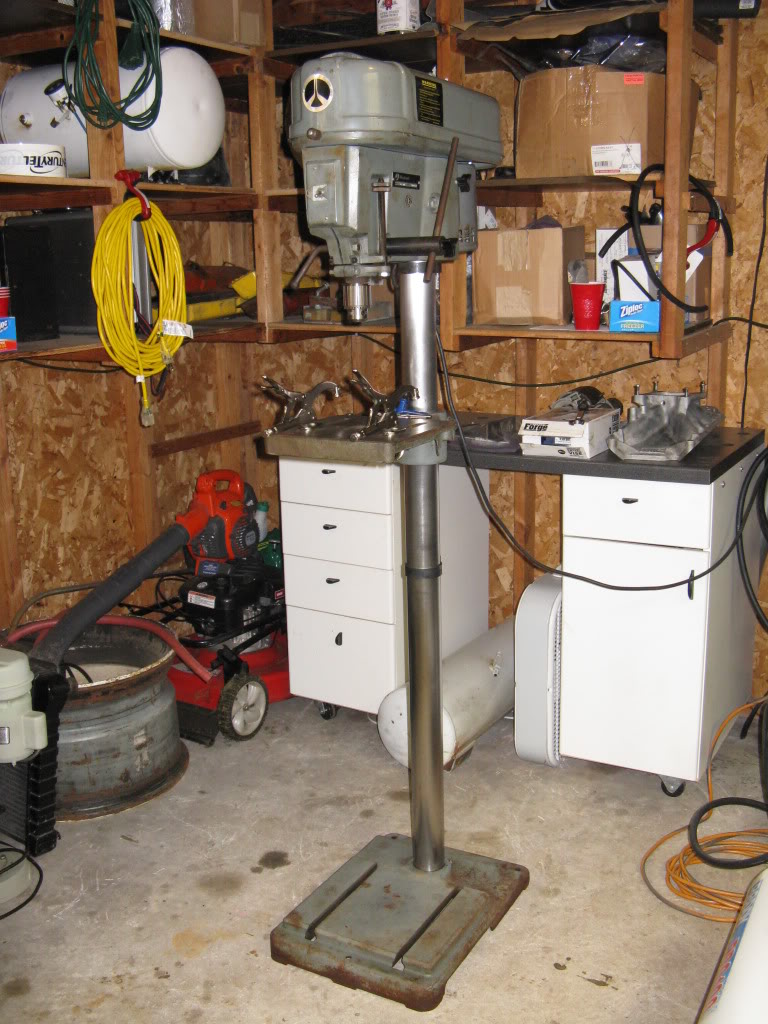
Here is my pride and joy a 73' Rockwell 1/2 HP drill press. I spent all day Saturday polishing the column, removing rust from the table, greasing the ways, and oiling bearings. Now she spins almost good as new. Already made chips making the body dolly. Only issue is the lowest speed is still pretty fast for drilling steel. But I wil come up with a fix for that!
Last edited by cruisin'73; 12-07-2011 at 10:03 PM.
12-07-2011, 10:19 PM
#13
FroJoe I have read your build start to finish and I have say that I am impressed! Great build! Even more so knowing you fab'd all those parts without a drill press or an air compressor?! I see you are just across the border from my hometown I am from Everett WA. And I graduated at the vehicle design program at Western in Bellingham a few years ago. Shoot, if I was still over I would give you my old bench top dill press, but shipping from wisconsin would be a little expensive, sorry man.
Also I totally dig your subframe connectors. I was thinking about tying in above the floor to the torque box but without cutting up the floor I wasn't sure it would work. Now I know it would be worth the extra work. Now if I only had a welder...all good things in time!
Also I totally dig your subframe connectors. I was thinking about tying in above the floor to the torque box but without cutting up the floor I wasn't sure it would work. Now I know it would be worth the extra work. Now if I only had a welder...all good things in time!
02-06-2012, 01:04 PM
#14
Hey guys. Sorry for the lack of updates. But no worries, I have been making progress on the chassis prep. Heres a little update:
Subframe is out and stripped of all lines, bushings and mounts. The suspension has been broken down all the way. Man were thouse control arm bushings and ball joints a *JOY* to remove!! Front wheel ends are torn apart including the drum brakes which I am taking this chance to freshen up. New parts are on the way including Moog control arm bushings, ball joints, anti-roll bar bushings and links. Shoes and rebuild kits for the drums are on the way as well. Yesterday I was able to use a buddies pressure washer to blast all the parts and remove 39 years of road grime! The subframe came out really nice. And oh, if you are curious I through it on the scale, 100lb on the nose!
With the subframe clean and before paint I was going to have my buddy throw some stitch welding on the frame rails for some additional reinforcment, but low and behold it appears someone already beat me to the punch!
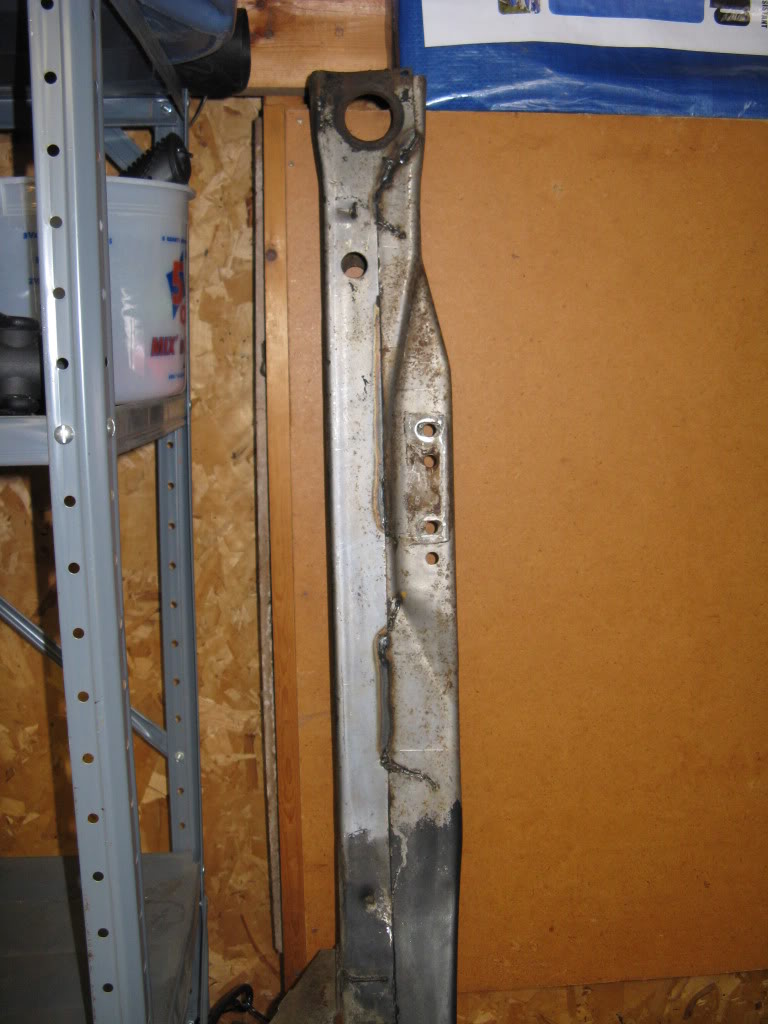
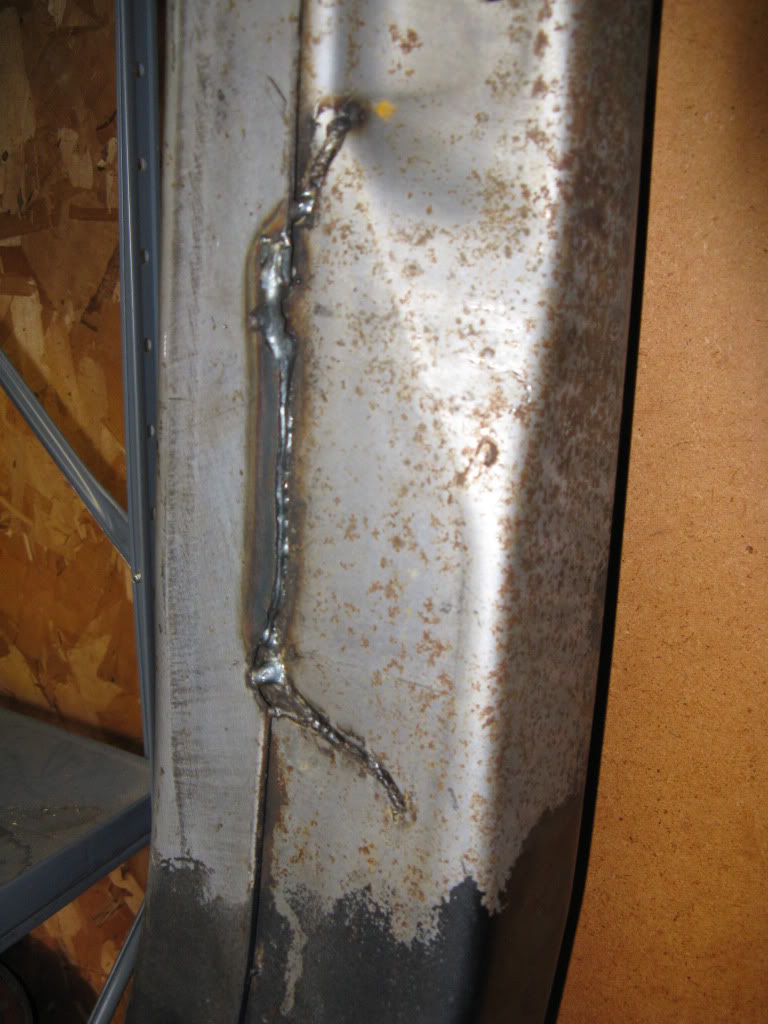
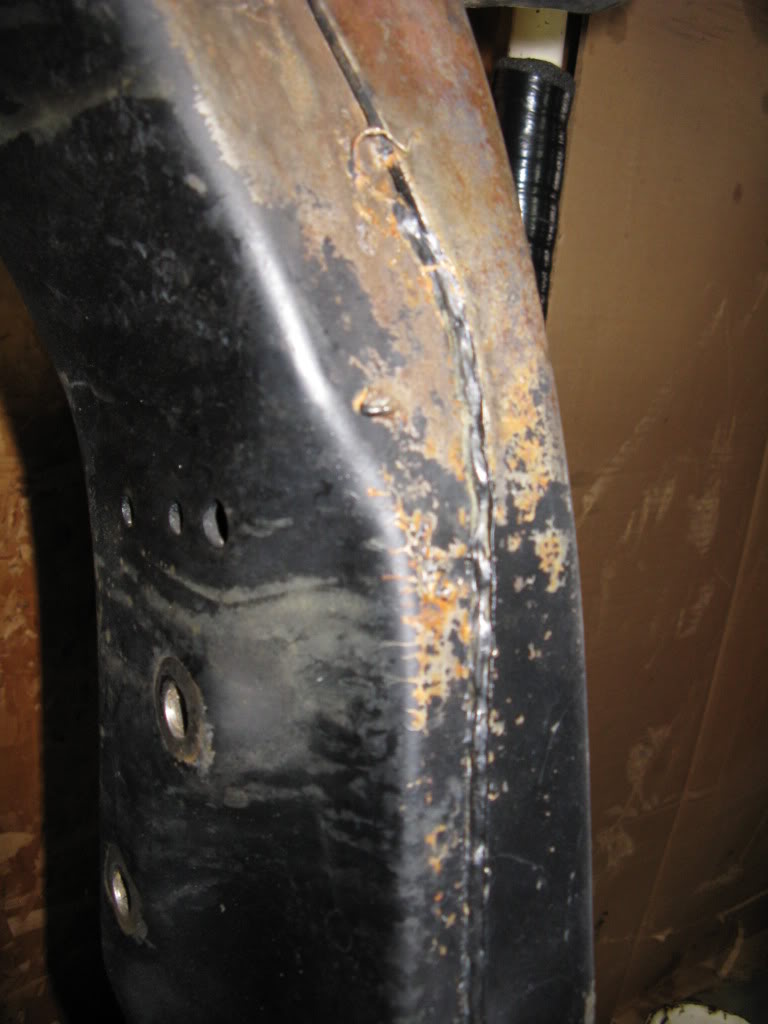
From the quality of the welds, it looks like someone performed the welding with the engine out, but the subframe still under the body. For the most part the welding actually looks pretty solid. So, that is one less task for me!
During the entire process of rebuilding the front chassis, suspension and brakes I have been fighting off a case of the upgrade flu. Thoughts of aftermarket subframes, tubular A-arms and disc brakes have been filling my thoughts day and night. Its tough to justify spending money to rebuild poor geometry suspension and stone age brakes. But I keep in mind that the point of this stage of the Nova project is to get her up and going with a budget LS, and then go through each system and upgrade as time and budget permits!
So, with that in mind the next step for me is to have several parts including the subframe abrasive blasted in prep for paint. Then install all the new bushing, bumpers and ball joints. Rebuild the drums and wait for fund-age for purchase of my junkyard engine! Crossing my fingers for a nice tax return.
This little taste of progress is tantilizing and I feel like I am in line to make my mid-May deadline, but I will have to keep my nose to the grindstone!
Oh, BTW during all of this Nova progress I found time to put a ring on my Girlfriend's finger! Finally realized I got myself a keeper. BUT DON'T WORRY: I was sure to give her the disclaimer that I will always spend way to much time and WAAAAYYY to much money on cars. She rolled her eyes and still said yes. Thats how I know she is a keeper!
Subframe is out and stripped of all lines, bushings and mounts. The suspension has been broken down all the way. Man were thouse control arm bushings and ball joints a *JOY* to remove!!
Front wheel ends are torn apart including the drum brakes which I am taking this chance to freshen up. New parts are on the way including Moog control arm bushings, ball joints, anti-roll bar bushings and links. Shoes and rebuild kits for the drums are on the way as well. Yesterday I was able to use a buddies pressure washer to blast all the parts and remove 39 years of road grime! The subframe came out really nice. And oh, if you are curious I through it on the scale, 100lb on the nose! With the subframe clean and before paint I was going to have my buddy throw some stitch welding on the frame rails for some additional reinforcment, but low and behold it appears someone already beat me to the punch!
From the quality of the welds, it looks like someone performed the welding with the engine out, but the subframe still under the body. For the most part the welding actually looks pretty solid. So, that is one less task for me!
During the entire process of rebuilding the front chassis, suspension and brakes I have been fighting off a case of the upgrade flu. Thoughts of aftermarket subframes, tubular A-arms and disc brakes have been filling my thoughts day and night. Its tough to justify spending money to rebuild poor geometry suspension and stone age brakes. But I keep in mind that the point of this stage of the Nova project is to get her up and going with a budget LS, and then go through each system and upgrade as time and budget permits!
So, with that in mind the next step for me is to have several parts including the subframe abrasive blasted in prep for paint. Then install all the new bushing, bumpers and ball joints. Rebuild the drums and wait for fund-age for purchase of my junkyard engine! Crossing my fingers for a nice tax return.
This little taste of progress is tantilizing and I feel like I am in line to make my mid-May deadline, but I will have to keep my nose to the grindstone!
Oh, BTW during all of this Nova progress I found time to put a ring on my Girlfriend's finger! Finally realized I got myself a keeper. BUT DON'T WORRY: I was sure to give her the disclaimer that I will always spend way to much time and WAAAAYYY to much money on cars. She rolled her eyes and still said yes. Thats how I know she is a keeper!
 , She is a keeper, My wife calls my Nova the B*tch!! She hates the car lol. LUCKY!
02-07-2012, 12:31 PM
, She is a keeper, My wife calls my Nova the B*tch!! She hates the car lol. LUCKY!
02-07-2012, 12:31 PM
#16
I know this won't be much help but I would honestly do the front disk brake conversion before the motor swap. You don't need to go Wilwoods or anything, just pop on some new spindles from that era of car. I did that conversion on my 69 Camaro and it made a huge difference. I took the whole spindle assembly off a junkyard Nova no less. Of course that was back in the early 70's when junkyards were full of stuff like that, but I would think you could still source used stuff relatively inexpensively. Look at a swap guide for compatible models, but by the mid 70's it seems like everything went to front disks.
Don't add too much go without adding some whoa.
Don't add too much go without adding some whoa.
02-07-2012, 01:51 PM
#17
Truth be told I am working to make a deal for discs, calipers, backing plate, master cylinder and proportioning valve right now. If I can make it work out then I will return the drum parts I have purchased thus far and go with the disc conversion. If not, I will continue with the drums for now and the disc upgrade will be pushed to the top of the project list.
An idea I have been tinkering with is a complete rear axle swap to a 4th gen camaro axle. That would net me a stronger axle, disc brakes, 3.08 or better ratio and maybe a posi. thoughts?
An idea I have been tinkering with is a complete rear axle swap to a 4th gen camaro axle. That would net me a stronger axle, disc brakes, 3.08 or better ratio and maybe a posi. thoughts?
02-07-2012, 02:20 PM
#18
Using a 4th Gen Rear is doable.. but it is about 4" wider than your Nova one. You try using some wheels with about 5"-6" offset or have the Axle / Tube shorten. Sinch you would have to cut the mount and weld new one, you may as well have the tubes shorten and get new HD axle, but that might put you pass the budget build.
You should be able to fine many of the with 3.42's.. .which would be a good alround street ratio.
You should be able to fine many of the with 3.42's.. .which would be a good alround street ratio.
02-07-2012, 02:31 PM
#19
Thanks for the info BCzee! Overall width was my biggest concern. If I would have to get the axle narrowed it might just make more sense to select a different axle of the correct width. But not a worry right now, an axle swap would be a few years in the future probably.
02-07-2012, 02:42 PM
#20
Were your bushings badly deteriorated? That might explain a failure like this. Any damage on the body side?
Given the already re-welded frame, I wonder if it was "repaired" after a collision. Those welds don't look too pretty, but neither do the factory welds. Just to be safe, I'd do some cross measurements from the locating pin holes at the firewall bushings to the UCA and LCA mounting points. Make sure the frame is reasonably straight.
Given the already re-welded frame, I wonder if it was "repaired" after a collision. Those welds don't look too pretty, but neither do the factory welds. Just to be safe, I'd do some cross measurements from the locating pin holes at the firewall bushings to the UCA and LCA mounting points. Make sure the frame is reasonably straight.