
My 1965 Buick Skylark L92/6L80 Swap
 03-14-2015, 09:08 PM
#541
Launching!
iTrader: (4)

Join Date: Jan 2007
Location: Medford, OR
Posts: 221
Likes: 0
Received 0 Likes
on
0 Posts

Cool, seems like an easy fix... I found this on the Dirty Dingo website under the LS swap info section

Is this all you need to do to get it to charge?? Seems too easy. Does this (with the resistor) basically make it output ~14.7ish volts all the time rather than the 13.8 the other one was putting out in "safe mode"?
Is this all you need to do to get it to charge?? Seems too easy. Does this (with the resistor) basically make it output ~14.7ish volts all the time rather than the 13.8 the other one was putting out in "safe mode"?
 03-14-2015, 10:33 PM
#542

The one wire may work but I am not taking any chances. Here is what I am going to do using your A,B,C,D.
Regarding the voltage the 13.8VDC was the best it would put out but mostly somewhat below that. I believe this was a fail safe mode to get the car home type of thing and would throw a code to let you know something was not quite right.
The new one will be in the higher 14's(supposedly) but will drop as the battery is charged up. I will report back on how this all works out.
D is the S or sense wire. I am taking this wire to a terminal strip where I want the voltage to be highest and least amount of fluxuation. My ECM gets its voltage(ignition) at this point for example.
C is the I/F and I will take it to a switched voltage/ignition source.
B is the L or lamp circuit. This is the one I will put the 470 ohm resistor in series and take that to an ignition voltage source.
A. Not used and as you can see I have already put heat shrink over the end of the wire as shown in the last photo.
Yes, in my opinion it is that easy. Someone not handy with tools or electrical then maybe not. Remember guys disconnect the battery while doing any of this type of work.
As a side note, today I took my homemade J-pipes(Helmholtz resonators) over to the welding shop to be welded up. More on that later.
Edit: I also want to mention that I purchased a 1/4" drive E5 socket to remove the screws with.
Last edited by 1989GTA; 03-14-2015 at 10:57 PM. Reason: Add information
03-14-2015, 10:49 PM
#543
Here is a link to what a guy on the Trifive forum did to convert his DR44 alternator to the non ECM controlled 4 pin style. I don't think he knew of the type of regulator that is a direct fit/bolt in. He did more work than is necessary. It is interesting and he goes into more detail for those that are interested. Here is the link.
http://www.trifive.com/forums/showthread.php?t=116343
http://www.trifive.com/forums/showthread.php?t=116343
03-16-2015, 01:51 PM
#544
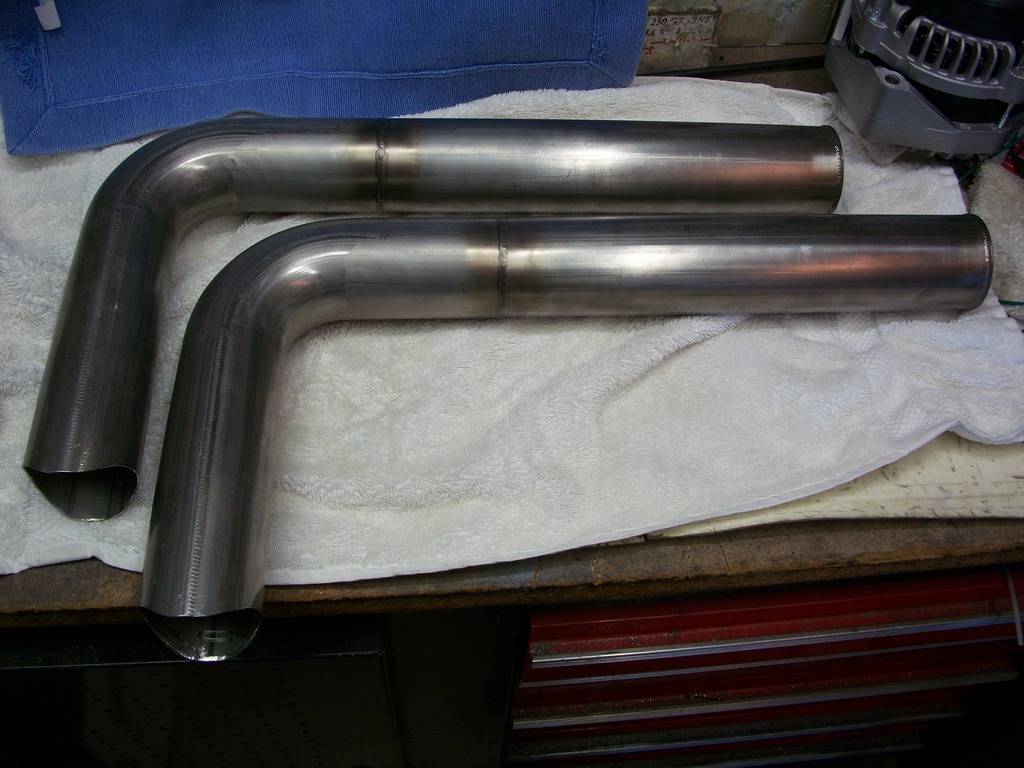
I have the Helmholtz J-pipes back from the welder and ready to be installed on the car. These are 2 1/2" stainless steel to match the material of the pipes that are on the car. The exhaust pipes on the car are 3" in diameter. Now to find an exhaust shop that has a TIG welder and will do SS. These should tune in around 1950 or so rpm. Here is a picture.
 03-16-2015, 04:10 PM
#545
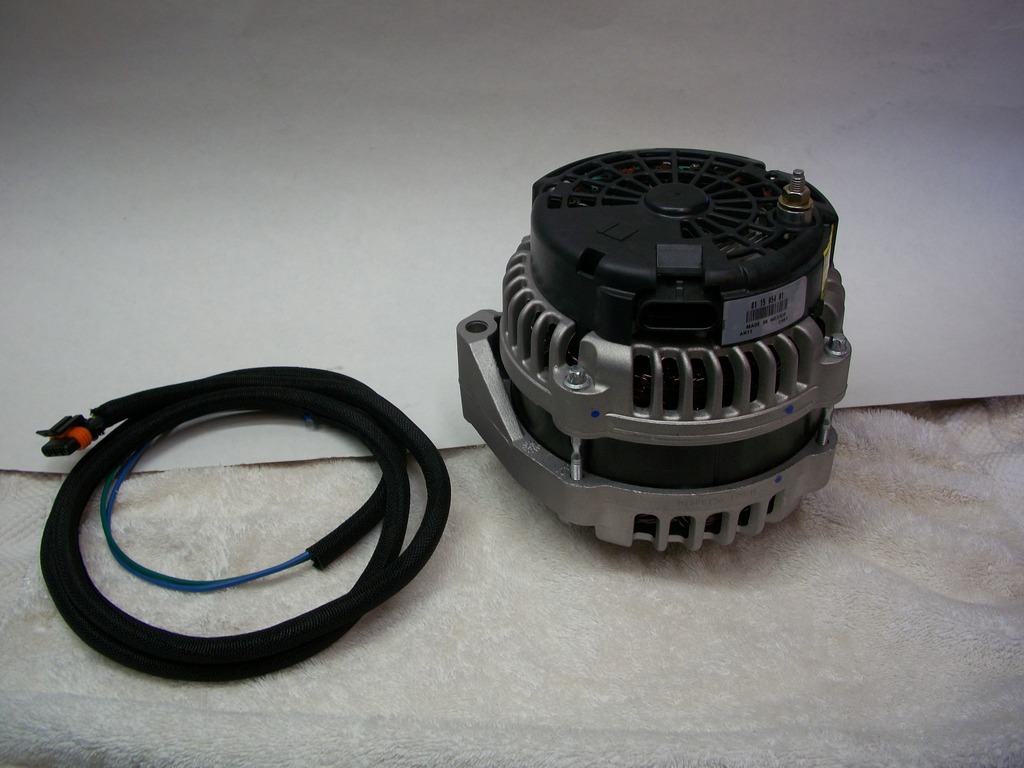
Here is a final picture of the DR44 alternator fully assembled with the 4 pin regulator. I have also made up the harness and I am using 3 wires. The 3rd yellow wire is just barely in the harness and out of sight. Here is the picture and ready to go on the car.
 03-18-2015, 02:53 PM
#546
I have good news to report. The 4 pin voltage regulator change works for the DR44 alternator. The battery was pretty well charged as I kept it that way from my previous problems. When I first fired it up the voltage was 14.4 at my switched terminal strip. After awhile it settle down to around 14.2. On my long test drive it settled down some more to around 14 to 14.1 volts. This a full 1/2 volt higher than the 2 pin regulator without the ECM controls. I also tried it with the A/C, lights and fans running.
I feel real good about this. Now, what to do next? On the list is the Helmholtz pipes for the exhaust and changing out the accessory brackets to the Holley style. Down the road I am thinking of changing out the intake manifold to the Vararam X-style if the dyno results are there.
I feel real good about this.
Now, what to do next? On the list is the Helmholtz pipes for the exhaust and changing out the accessory brackets to the Holley style. Down the road I am thinking of changing out the intake manifold to the Vararam X-style if the dyno results are there.
03-18-2015, 03:00 PM
#547
I have the Helmholtz J-pipes back from the welder and ready to be installed on the car. These are 2 1/2" stainless steel to match the material of the pipes that are on the car. The exhaust pipes on the car are 3" in diameter. Now to find an exhaust shop that has a TIG welder and will do SS. These should tune in around 1950 or so rpm. Here is a picture.

 03-18-2015, 03:12 PM
#548
Alright, the Helmholtz pipes are next. I will try and get it done next week. Actually the car is "relatively" quiet but I want to hear just the wind and the tires when I am cruising down the highway.
The resonators I put on did a good job of knocking down the noise and hopefully the J-pipes will finish it off at my cruising rpms.
The resonators I put on did a good job of knocking down the noise and hopefully the J-pipes will finish it off at my cruising rpms.
 03-18-2015, 05:56 PM
#551
I do have new door seals to put on. The drivers side is not in the best of shape but the passenger side is not bad. I am also going to get the door panels replaced and Dynamat installed in the doors. That is a couple of months off.
Waiting to hear back from my exhaust guy to see when he can fit me in.
Waiting to hear back from my exhaust guy to see when he can fit me in.
03-20-2015, 03:17 PM
#552
I have the dyno tune set up for April 28 at Cunningham Motorsports. He has a Mustang dyno and I am hoping for 490-500RWHP and Torque. I have the exhaust scheduled for next week maybe Thursday. I will report on both events when they happen.
03-24-2015, 05:46 PM
#554
Thanks Ryne.
Ok, I got the Helmholtz pipes welded on today. I would say I need to add a couple of inches to reach my target goal. I can hear the effect above 2000 rpms while cruising down the highway. I would like it to come in a few hundred or so rpm below that. In my case maybe 28" would have been better instead of 26"? Maybe I will make up another set that is longer and install it elsewhere in the car?
Ok, I got the Helmholtz pipes welded on today. I would say I need to add a couple of inches to reach my target goal. I can hear the effect above 2000 rpms while cruising down the highway. I would like it to come in a few hundred or so rpm below that. In my case maybe 28" would have been better instead of 26"? Maybe I will make up another set that is longer and install it elsewhere in the car?
03-31-2015, 01:12 PM
#555
A little update. Now that I have put some miles on the car with the Helmholtz pipes, with the length that I have the effect is coming in around 1950 rpm. At 1750 the drone is still there. So going down the highway at 70mph it works.
Now a little day-dreaming. The low lash solid rollers from Cam-Motion seem to be working out really well. See Speedtriggers post with his 1965 Buick Skylark as one example. There have be a lot of good reports coming in from people who have changed over to them. So I think I will save up my pennies and do the conversion.
Also I have stated before I am highly interested in the new Vararam intake manifold when it hits the market. There are some versions of the MSD Atomic Air Force intake manifold hitting the market now and I will be watching the reports on those as well. If they turn out as advertised I could go that route.
I have purchased the Holley accessory conversion brackets for both sides so I will do that installation when I do the camshaft change.
Those are my plans for down the road later this year.
04-02-2015, 05:20 PM
#557
04-29-2015, 04:17 PM
#558
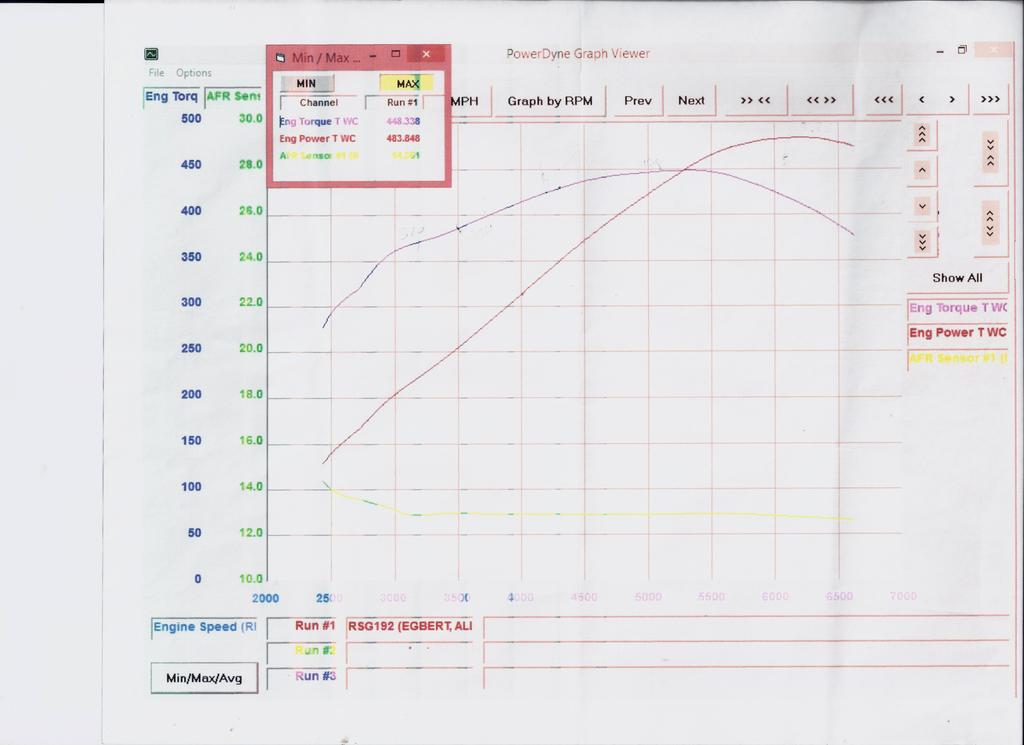
Yesterday I got the car dyno tuned with the new 427 motor. This is on a Mustang dyno. The car was run in 3rd gear because he does not like the high speeds everything is turning at in 4th gear. He has had too many drive shaft failures etc. I can't blame him. On a Mustang dyno I don't know what the differences are between 3rd and 4th gear. With a 6L80 3rd gear is 1.53:1 and 4th is 1.15:1. I also have a Yank SS3200 stall that was unlocked.
Anyways the result was 483.85rwhp and 448rwtq. The dyno tune from last years was 469rwhp and 421rwtq. Here is the chart.
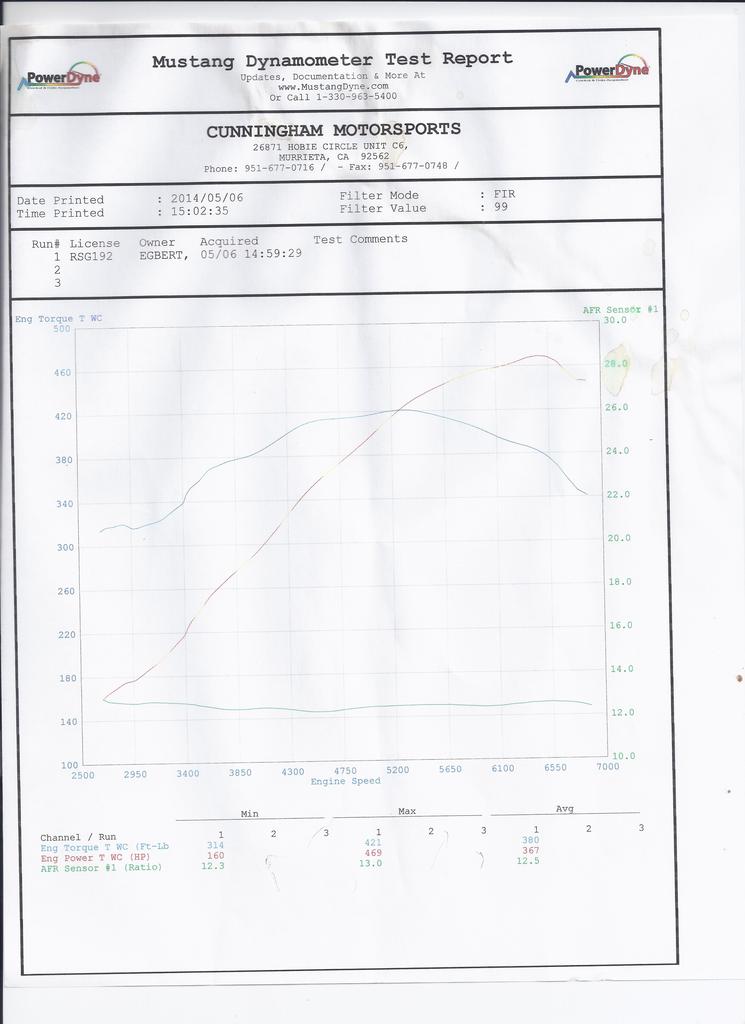
Here is last years dyno chart with the 376" and VVT.
Anyways the result was 483.85rwhp and 448rwtq. The dyno tune from last years was 469rwhp and 421rwtq. Here is the chart.

Here is last years dyno chart with the 376" and VVT.

Last edited by 1989GTA; 04-29-2015 at 04:25 PM.
04-29-2015, 04:55 PM
#559
TECH Resident

As a reference point, I had my stock L92 / 6L80 tuned by Cunningham too about a month ago. It dyno'd at 342 rwhp and 348 rwtq . He said that was a bit higher than stock, but I didn't ask much about it.
You've got a lot more cowbell. My truck is probably lighter, not that we are bench racing.
I'm guessing he dyno'd mine in third gear, too for the same reason, but I didn't know that.
Doug
You've got a lot more cowbell. My truck is probably lighter, not that we are bench racing.
I'm guessing he dyno'd mine in third gear, too for the same reason, but I didn't know that.
Doug
04-29-2015, 08:24 PM
#560
As a reference point, I had my stock L92 / 6L80 tuned by Cunningham too about a month ago. It dyno'd at 342 rwhp and 348 rwtq . He said that was a bit higher than stock, but I didn't ask much about it.
You've got a lot more cowbell. My truck is probably lighter, not that we are bench racing.
I'm guessing he dyno'd mine in third gear, too for the same reason, but I didn't know that.
Doug
You've got a lot more cowbell. My truck is probably lighter, not that we are bench racing.
I'm guessing he dyno'd mine in third gear, too for the same reason, but I didn't know that.
Doug