
An s13 Ls2 grip-n-slide build.
 09-05-2013, 12:35 PM
#1
Staging Lane
Thread Starter
iTrader: (1)
Join Date: May 2013
Location: Oklahoma
Posts: 60
Likes: 0
Received 0 Likes
on
0 Posts
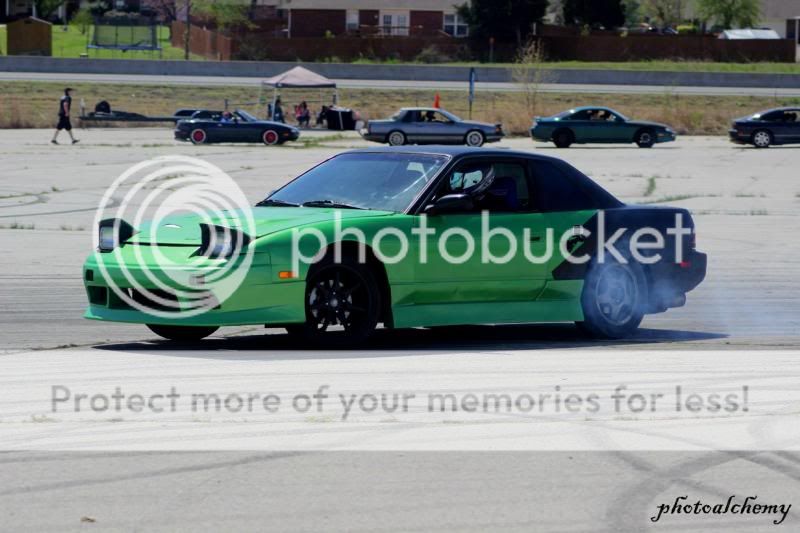
So... I don't know what it is about build threads that I like so much but I wanted to chronicle my adventure in putting this thing together and getting it out on the track. I get some flak from both sides of the fence on this kind of build... the import guys don't like the motor, the domestic guys don't like the body... but this is my car. Hopefully I can at least find some kinda common ground here. The car is being set up as an autocross car with some street cruising on nice days and a little sideways drifting action when there's an event held nearby.
Anyway... so here we go!
A brief history (to get everything up to speed with the current LS status).
About a year and a half ago I decided to stop tracking my daily and pick up another vehicle for my shenanigans, so I always had a dependable car to take to work once the weekends were over. I went through a few shells in my search but eventually I picked this s13 coupe as a semi-forgotten barn find with no motor or carpet.

Gutted the thing, put in some stuff.

Dropped in an SR20det, threw some parts at it and got it running really well about 7 months ago.
Bought some cheap rims and tires I got a good deal on, upgraded the suspension stuff to a full compliment of SPL arms and most of their bushings, got a VLSD, painted it (going for a "Frankenstein" theme), and raced it out at one of our local tracks for autocross/high-speed touring, plus hit up some drift events.
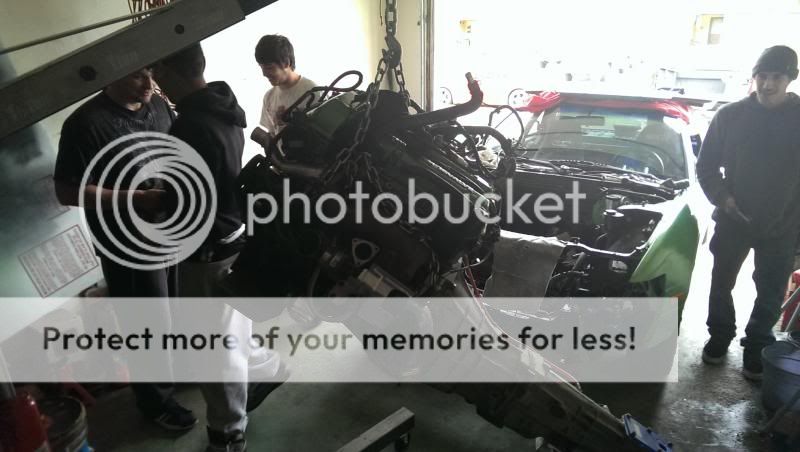
Started buying a bunch of new turbo+standalone+injectors and all that stuff looking to go for 320-350hp and try and keep it reliable enough to beat on without much maintenance... and that's when I really started seeing all the $$ adding up to get that kind of power sitting in boxes all over my garage. All it took was a little prodding and then a guy I met who swung by to buy an oil pan from me off Craigslist offering to buy my whole swap out-right for an s13 he's building... and I took the plunge. On 5/5/13 I raced it again out at the track, won our clubs "Fastest Lap" trophy against a boosted miata, 350z, and several other cars... and then on 5/6/13... I pulled the motor out and sold it.
Anyway... so here we go!
A brief history (to get everything up to speed with the current LS status).
About a year and a half ago I decided to stop tracking my daily and pick up another vehicle for my shenanigans, so I always had a dependable car to take to work once the weekends were over. I went through a few shells in my search but eventually I picked this s13 coupe as a semi-forgotten barn find with no motor or carpet.
Gutted the thing, put in some stuff.
Dropped in an SR20det, threw some parts at it and got it running really well about 7 months ago.
Bought some cheap rims and tires I got a good deal on, upgraded the suspension stuff to a full compliment of SPL arms and most of their bushings, got a VLSD, painted it (going for a "Frankenstein" theme), and raced it out at one of our local tracks for autocross/high-speed touring, plus hit up some drift events.
Started buying a bunch of new turbo+standalone+injectors and all that stuff looking to go for 320-350hp and try and keep it reliable enough to beat on without much maintenance... and that's when I really started seeing all the $$ adding up to get that kind of power sitting in boxes all over my garage. All it took was a little prodding and then a guy I met who swung by to buy an oil pan from me off Craigslist offering to buy my whole swap out-right for an s13 he's building... and I took the plunge. On 5/5/13 I raced it again out at the track, won our clubs "Fastest Lap" trophy against a boosted miata, 350z, and several other cars... and then on 5/6/13... I pulled the motor out and sold it.
 09-05-2013, 12:37 PM
#2
Staging Lane
Thread Starter
iTrader: (1)
Join Date: May 2013
Location: Oklahoma
Posts: 60
Likes: 0
Received 0 Likes
on
0 Posts
So I've made some progress so far in moving this thing along. Kinda bummed it won't be ready by the drift day on the 1st... but maybe I'll catch the next one.
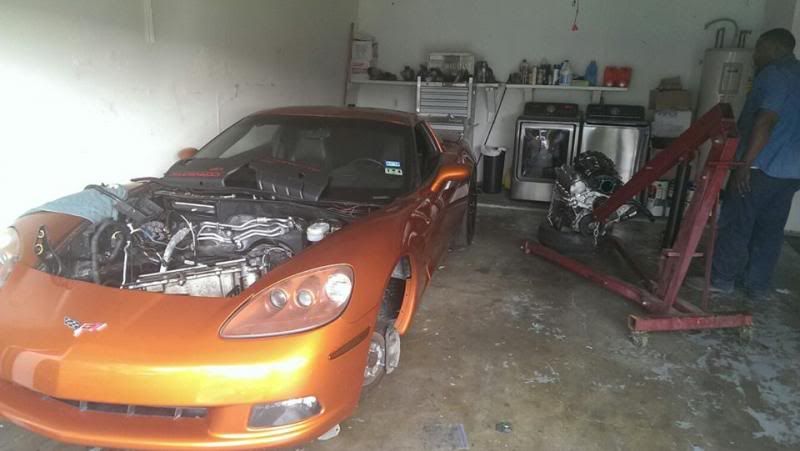
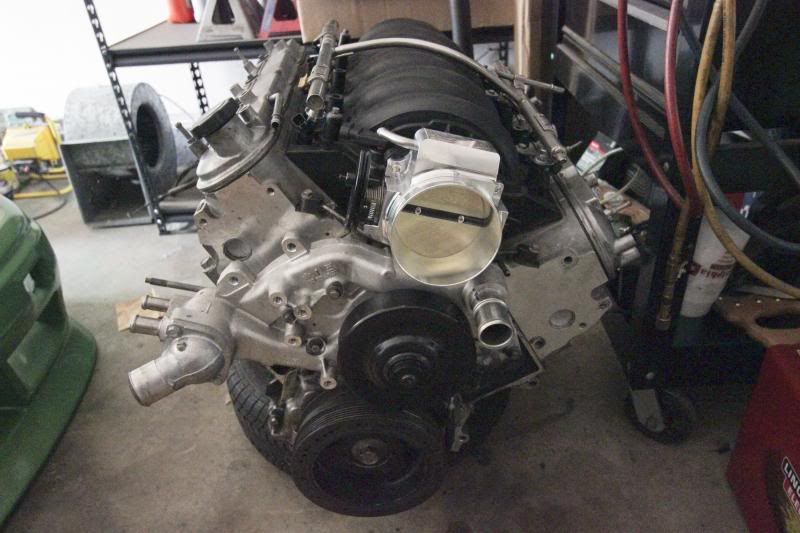
Found me an LS2 from an '05 Corvette down in Dallas with pretty low mileage (41K). The guy was selling the motor to fund a larger turbo engine for his Vette... which was fine by me!
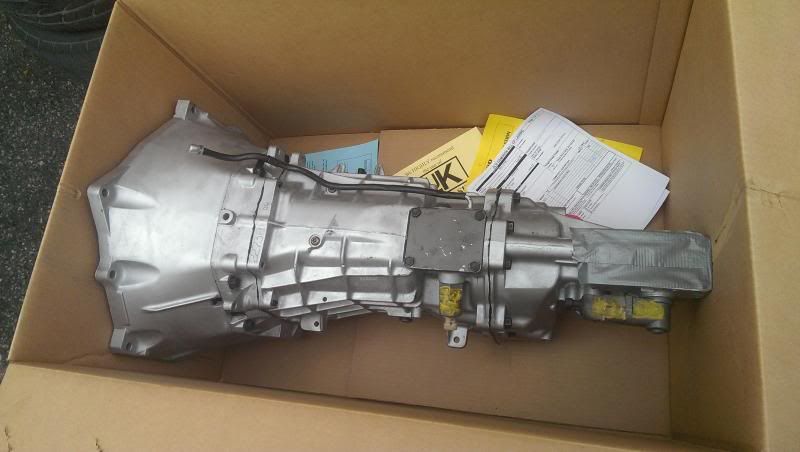
The bad news is... that means it was stripped of most everything you'd get with a "drop out". No accessories (besides water pump), no transmission (since they use the torque-tube rear-mounted tranny setup), and no DBW (drive by wire) throttle/pedal, no wiring harness, no computer. So... after a bunch of research, I started replacing those parts. Started out trying to find me a t-56 used out of an f-body from 98-02... but that wasn't doing me much good... so I just ordered a freshly rebuilt one. Got it next day delivery (to my surprise). Not bad pricing and good service from Smart Parts Auto. No complaints at all. Even got a bellhousing from them on the relatively cheap. Came with a 2 year warranty.
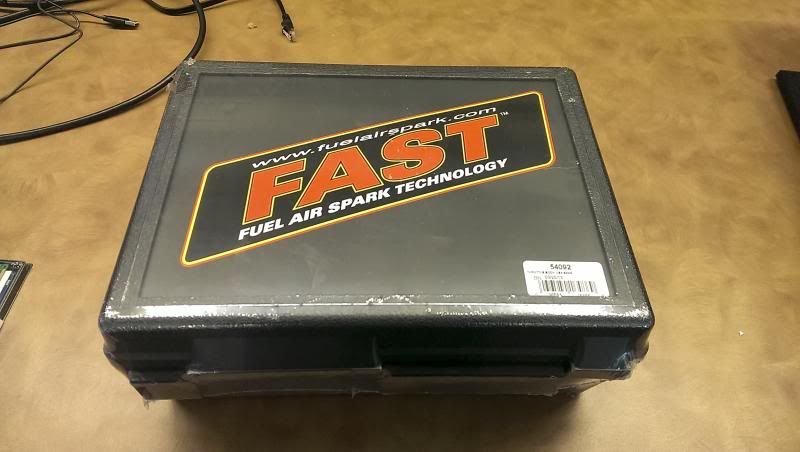
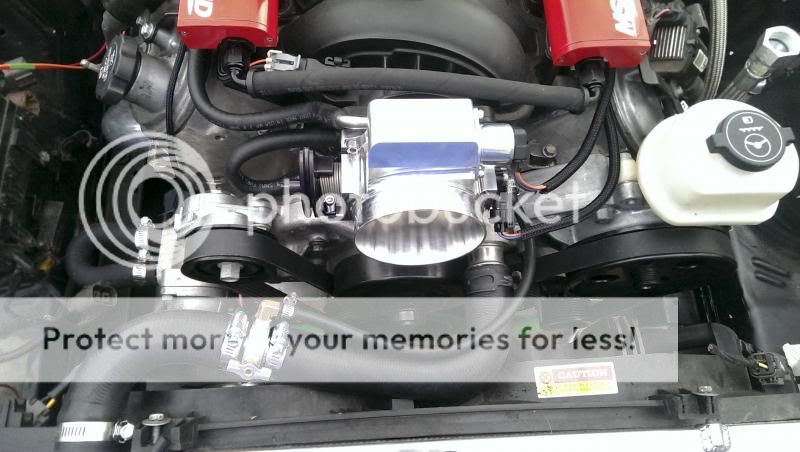
Since I lacked a throttle body, didn't want to run a drive by wire setup with the EFI I was going with (it's not available yet), I picked up a FAST 92mm. The thing came in it's own plastic case... which was pretty awesome for no reason.
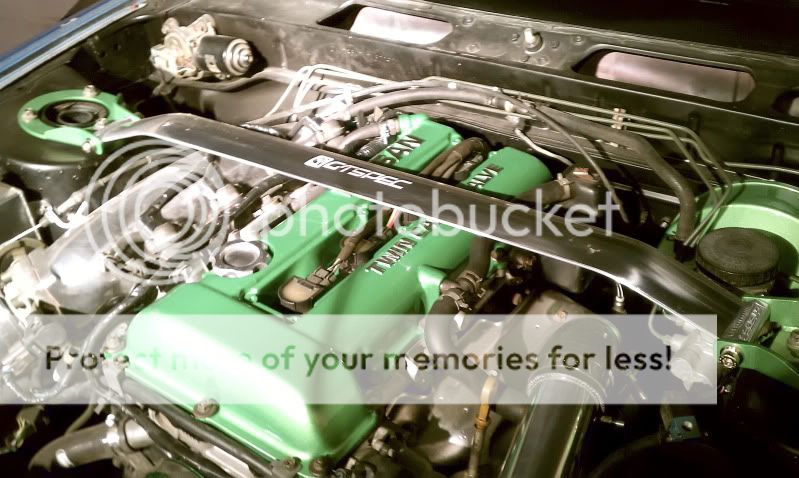
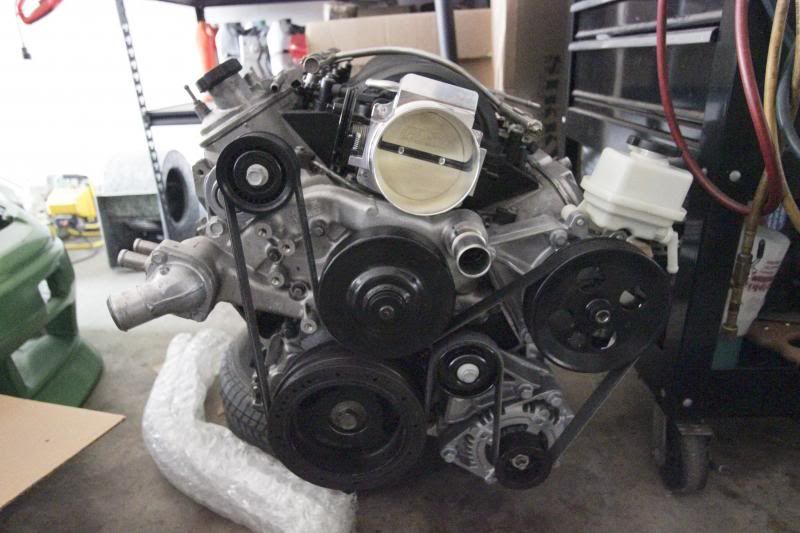
Next up... what accessories to run... truck, f-body, corvette, CTS-V, GTO? I found out that the crank pulley is the main source for the decision on this. The Corvette and Cadillac CTS-V setups are very close to the block, the F-body and GTO setups are about 3/4" further out, and truck accessories are like... 1.5" further out. Since I already had the Corvette pulley, didn't want the Vette's "wide" alternator setup, but still wanted to keep as much room in my engine bay for puller-style fans as I could, I decided on the CTS-V arrangement. Ordered my parts from Pace Performance and got GMPP #19299070, which includes all the bolts, brackets, and accessories (other than AC) for a CTS-V setup on a crate motor.

Put those bad-boys on...
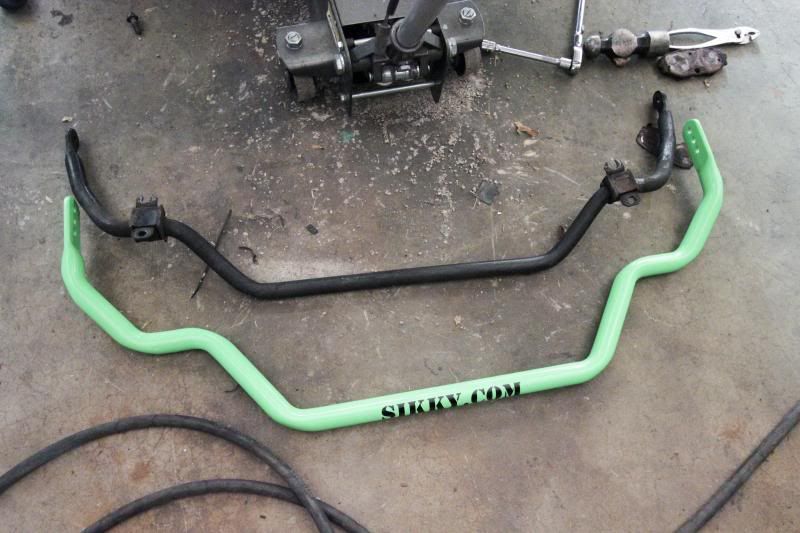
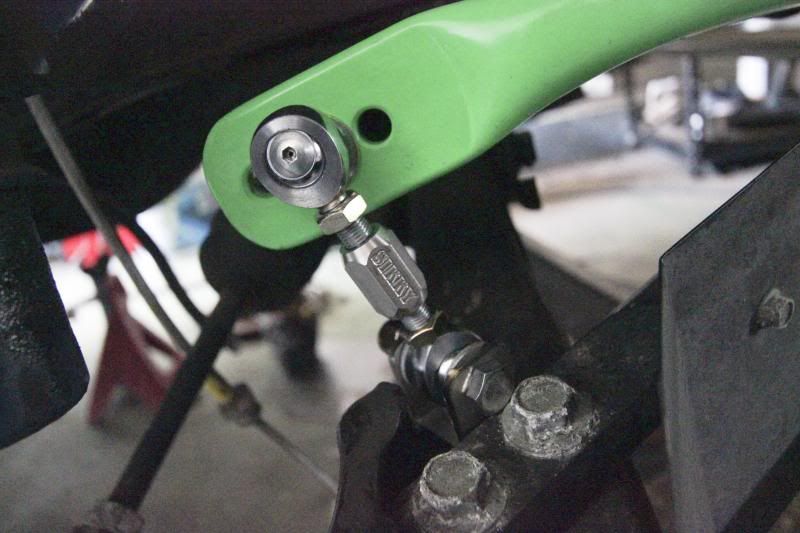
Also... a little suspension upgrade out front won't hurt any thing! Removed my old OEM sway bar and bolted up the Sikky unit. The Sikky sway bar is a lot thicker and adjustable, and yet weighs in at only 9 lbs... which was about a pound and a half less than the stock sway bar. I haven't set up the adjustable end-links yet, because Sikky recommends you do that once the car is at normal ride height. Since I don't know what that'll be without having an engine in there, they're just left relatively loose at the moment. This ended up being upside down... but more on that later.
Found me an LS2 from an '05 Corvette down in Dallas with pretty low mileage (41K). The guy was selling the motor to fund a larger turbo engine for his Vette... which was fine by me!
The bad news is... that means it was stripped of most everything you'd get with a "drop out". No accessories (besides water pump), no transmission (since they use the torque-tube rear-mounted tranny setup), and no DBW (drive by wire) throttle/pedal, no wiring harness, no computer. So... after a bunch of research, I started replacing those parts. Started out trying to find me a t-56 used out of an f-body from 98-02... but that wasn't doing me much good... so I just ordered a freshly rebuilt one. Got it next day delivery (to my surprise). Not bad pricing and good service from Smart Parts Auto. No complaints at all. Even got a bellhousing from them on the relatively cheap. Came with a 2 year warranty.
Since I lacked a throttle body, didn't want to run a drive by wire setup with the EFI I was going with (it's not available yet), I picked up a FAST 92mm. The thing came in it's own plastic case... which was pretty awesome for no reason.
Next up... what accessories to run... truck, f-body, corvette, CTS-V, GTO? I found out that the crank pulley is the main source for the decision on this. The Corvette and Cadillac CTS-V setups are very close to the block, the F-body and GTO setups are about 3/4" further out, and truck accessories are like... 1.5" further out. Since I already had the Corvette pulley, didn't want the Vette's "wide" alternator setup, but still wanted to keep as much room in my engine bay for puller-style fans as I could, I decided on the CTS-V arrangement. Ordered my parts from Pace Performance and got GMPP #19299070, which includes all the bolts, brackets, and accessories (other than AC) for a CTS-V setup on a crate motor.
Put those bad-boys on...
Also... a little suspension upgrade out front won't hurt any thing! Removed my old OEM sway bar and bolted up the Sikky unit. The Sikky sway bar is a lot thicker and adjustable, and yet weighs in at only 9 lbs... which was about a pound and a half less than the stock sway bar. I haven't set up the adjustable end-links yet, because Sikky recommends you do that once the car is at normal ride height. Since I don't know what that'll be without having an engine in there, they're just left relatively loose at the moment. This ended up being upside down... but more on that later.
09-05-2013, 12:38 PM
#3
Staging Lane
Thread Starter
iTrader: (1)
Join Date: May 2013
Location: Oklahoma
Posts: 60
Likes: 0
Received 0 Likes
on
0 Posts
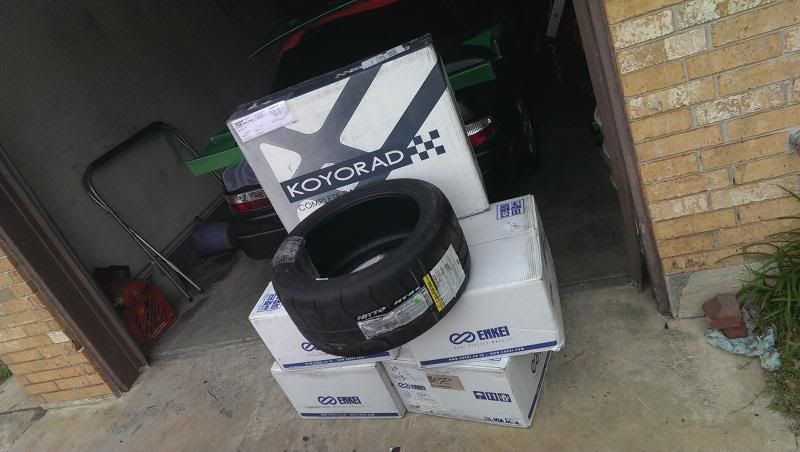
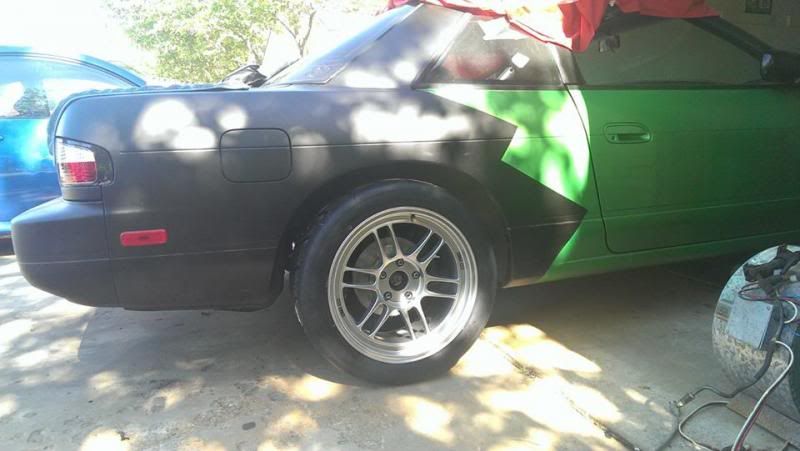
Time to ditch the 4 lug for more rim offset options!
I sold off my Motegi rims and Nitto NeoGen tires and picked up a set of 17x9+22 Enkei RPF1's and some Nitto Nt01's in a 255/40r17. These have substantially more tread than my last set, more aggressive fitment for sure, much softer rubber, and probably even lighter.
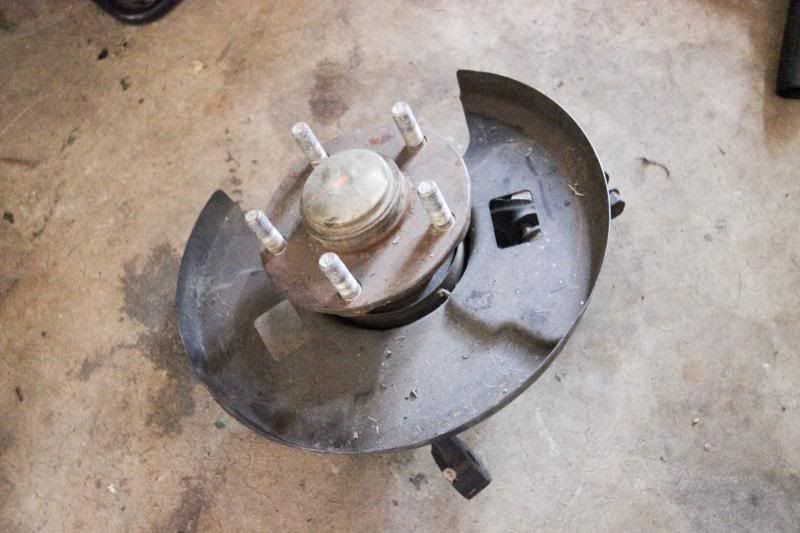
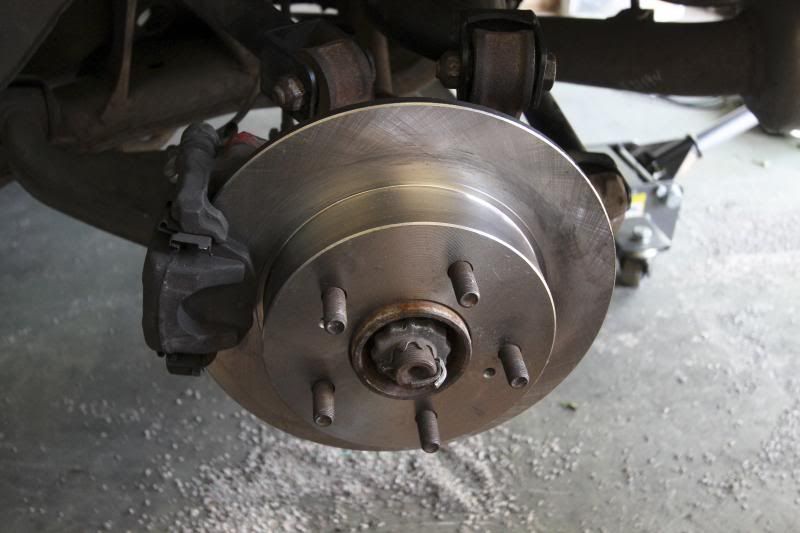
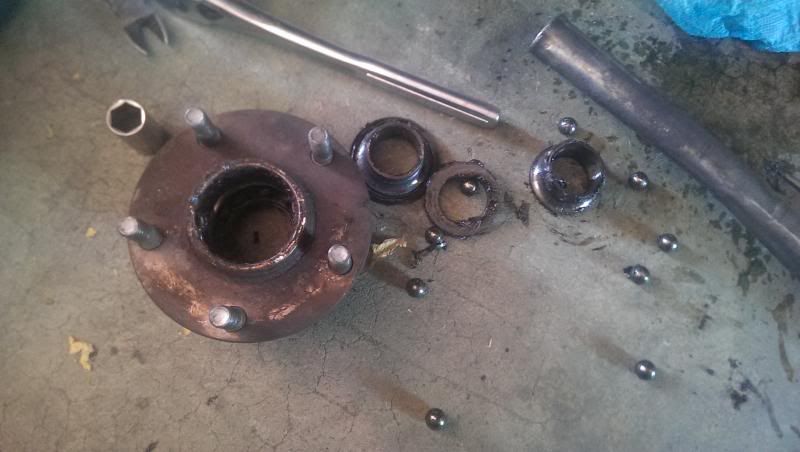
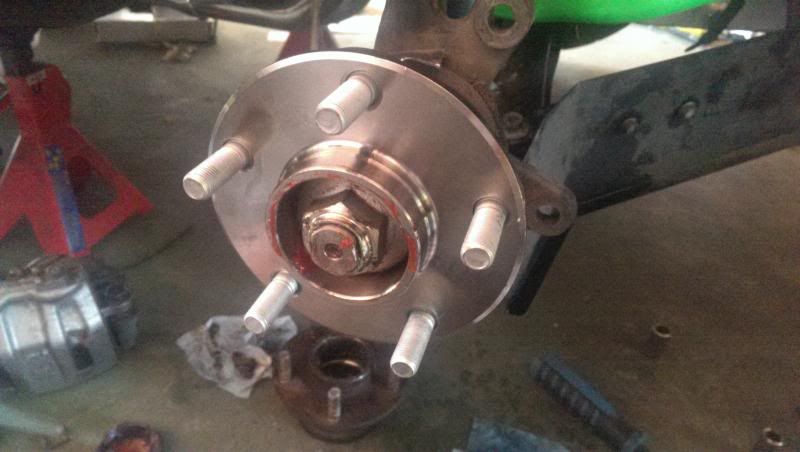
For a long time I've had a full set of s14 5-lug hubs so I decided it was time to put them to use. It seems like the right front has a bad bearing, and even though all the parts stores have (so they say) the s14 bearings to "press in"... I also discovered that the part they have listed is the same as for the s13 fronts... which means they don't actually work. The s13 spindle diameter is 30mm, and the s14's are 32mm... so they aren't compatible. So... I had to order the whole hub. We'll get to that when it comes in though. So I took my front knuckles and chopped the splash shields off again.
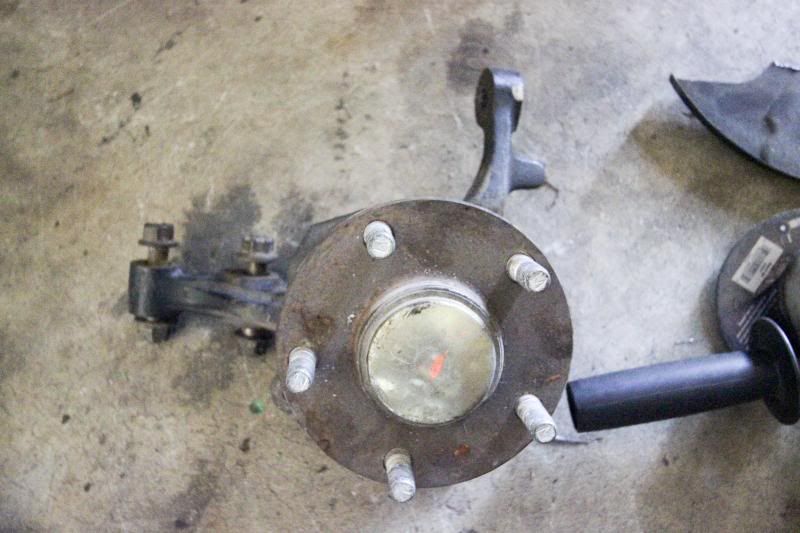
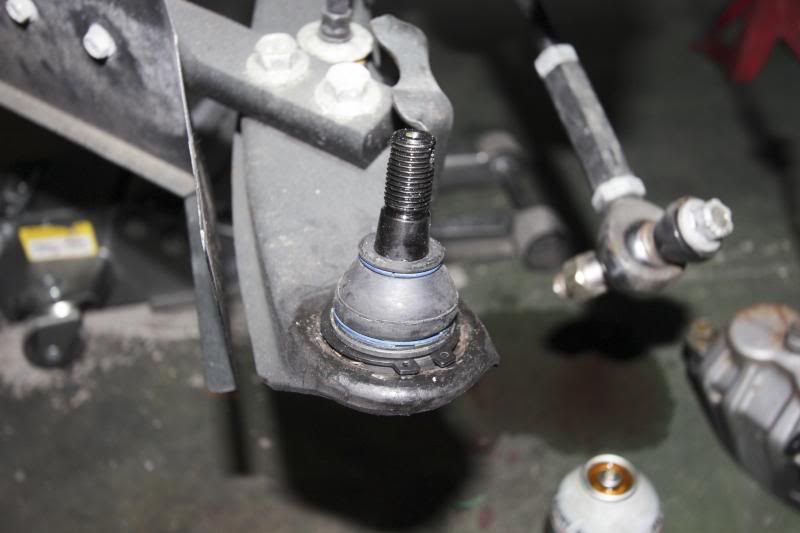
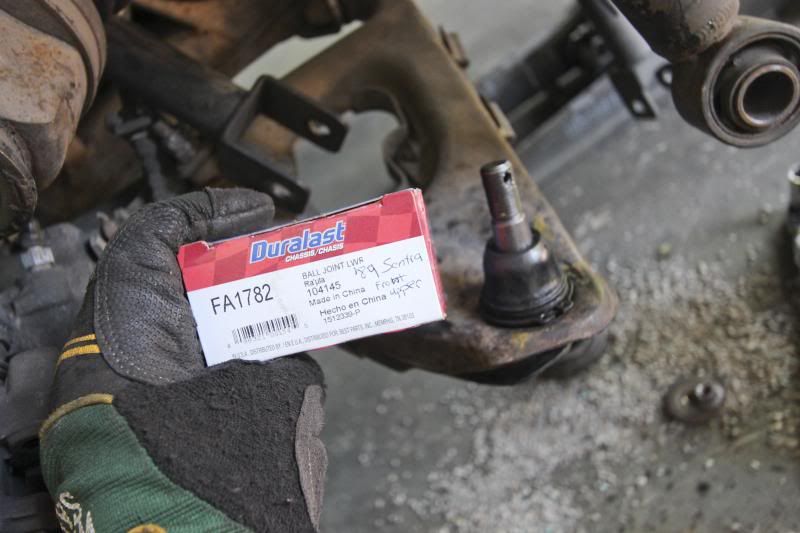
Ditched the worn out s13 lower ball joints for s14 ball joints (since the knuckles need the larger-diameter s14 set).
I didn't want to drill out my shocks (or coilovers later on)... so I installed the bolt sleeve adapters.
Luckily my q45 rotors were drilled for either option so, until I get my z32 stuff in, everything bolted back up!
On to the backs!
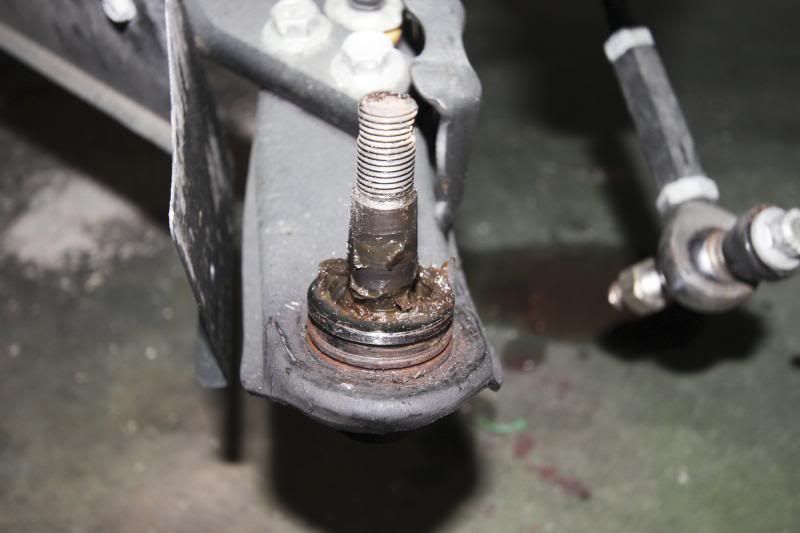
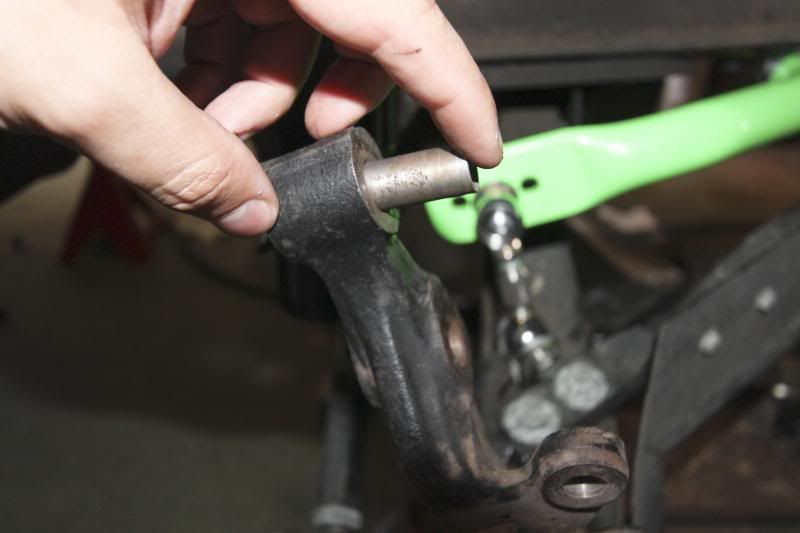
The lower ball joint on the rears doesn't technically have a part number and isn't sold in your part stores. However, a good hunt on some of the bigger forums reveals that there's another part that will work perfectly from a 1989 Nissan Sentra. So I picked some up. The store gave me 2 different ones (same part number though), but the one Duralast I got ended up having a longer "thread" than the other, which made the crown-nut screw down past where the cotter-pin would have been useful... but everything still seems to have fit up well. The other side (again, same part number, just not Duralast) fit perfectly with a slightly shorter threaded section. Tossed on some stock s14 rear rotors.
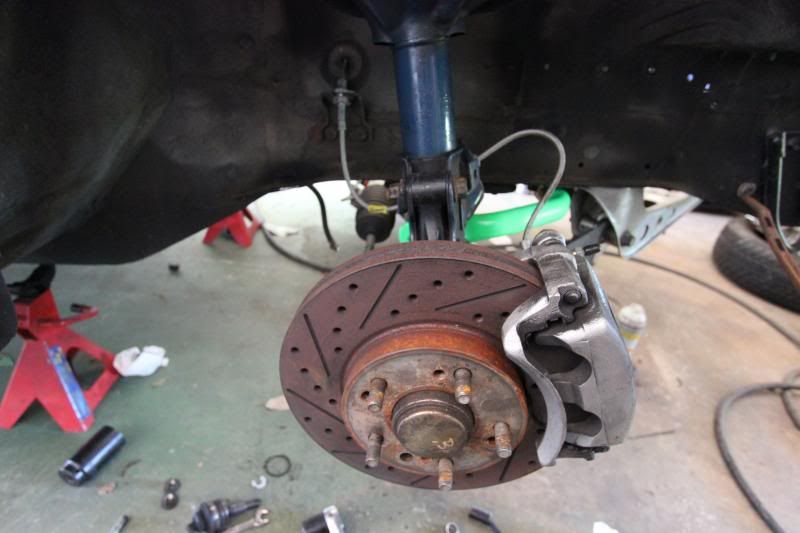
Put the rims on and rolled part of it outside. RPF1's are a little played out in my book... but nothing beats the weight, strength, and quality at this price point. An excellent bang for your buck. It definitely pokes out, probably by nearly an inch. So I need to decide if I want to install my over-fenders, leave it alone, or just try a roll and pull...
I sold off my Motegi rims and Nitto NeoGen tires and picked up a set of 17x9+22 Enkei RPF1's and some Nitto Nt01's in a 255/40r17. These have substantially more tread than my last set, more aggressive fitment for sure, much softer rubber, and probably even lighter.
For a long time I've had a full set of s14 5-lug hubs so I decided it was time to put them to use. It seems like the right front has a bad bearing, and even though all the parts stores have (so they say) the s14 bearings to "press in"... I also discovered that the part they have listed is the same as for the s13 fronts... which means they don't actually work. The s13 spindle diameter is 30mm, and the s14's are 32mm... so they aren't compatible. So... I had to order the whole hub. We'll get to that when it comes in though. So I took my front knuckles and chopped the splash shields off again.
Ditched the worn out s13 lower ball joints for s14 ball joints (since the knuckles need the larger-diameter s14 set).
I didn't want to drill out my shocks (or coilovers later on)... so I installed the bolt sleeve adapters.
Luckily my q45 rotors were drilled for either option so, until I get my z32 stuff in, everything bolted back up!
On to the backs!
The lower ball joint on the rears doesn't technically have a part number and isn't sold in your part stores. However, a good hunt on some of the bigger forums reveals that there's another part that will work perfectly from a 1989 Nissan Sentra. So I picked some up. The store gave me 2 different ones (same part number though), but the one Duralast I got ended up having a longer "thread" than the other, which made the crown-nut screw down past where the cotter-pin would have been useful... but everything still seems to have fit up well. The other side (again, same part number, just not Duralast) fit perfectly with a slightly shorter threaded section. Tossed on some stock s14 rear rotors.
Put the rims on and rolled part of it outside. RPF1's are a little played out in my book... but nothing beats the weight, strength, and quality at this price point. An excellent bang for your buck. It definitely pokes out, probably by nearly an inch. So I need to decide if I want to install my over-fenders, leave it alone, or just try a roll and pull...
09-05-2013, 12:41 PM
#4
Staging Lane
Thread Starter
iTrader: (1)
Join Date: May 2013
Location: Oklahoma
Posts: 60
Likes: 0
Received 0 Likes
on
0 Posts
I ran into an issue when I was getting ready to bolt my engine to my transmission. I'd ordered a T-56 for an 02 Pontiac Trans Am, and asked them to include a bellhousing, which they did. Everything looked okay on first inspection until I go to put my new F-body slave cylinder in...

Well crap. Now... I know I don't actually NEED that to fit, since I'm running the Sikky clutch slave kit, but if that isn't right, it makes me question the rest of the transmission. So... since this is my first LS I've ever messed with... and first t-56... I jump on here, silviav8, and Google like crazy. I don't like to ask questions unless I'm in a real time crunch or just can't find the answer I need. So... I start looking stuff up. I use this number, and the Borg-Warner designations first...
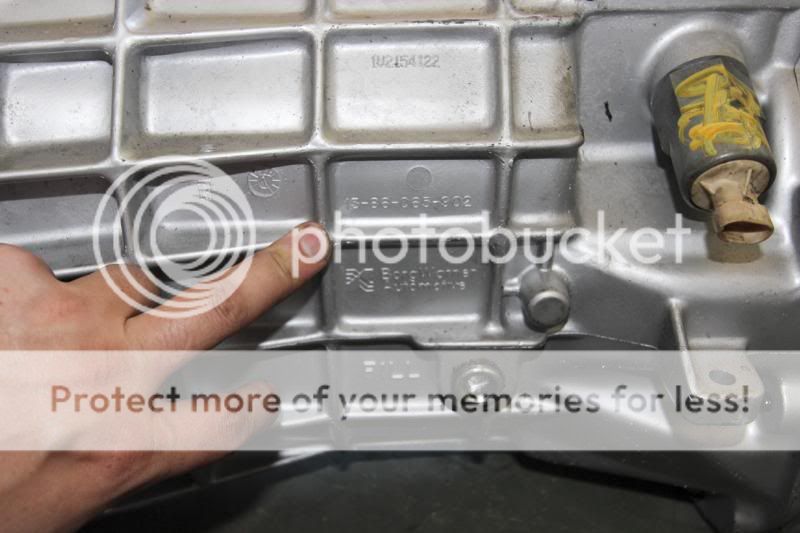
For a minute I was worried I'd been shipped a LT1 T-56... but the lack of cutout for the clutch fork eased my mind there. As it turns out... I've got at least the front plate and main case from a Pontiac GTO, with the rear cover for an f-body. I call up the transmission shop I bought it from and talk to one of their technicians, send them pictures and all that. He confirms it is a GTO transmission with the rear shifter housing from an F-body, and that if I have to modify/cut the transmission (even though I don't actually have to for my use) I won't void my warranty. I then point out my bellhousing bolts up fine, but the holes don't line up.
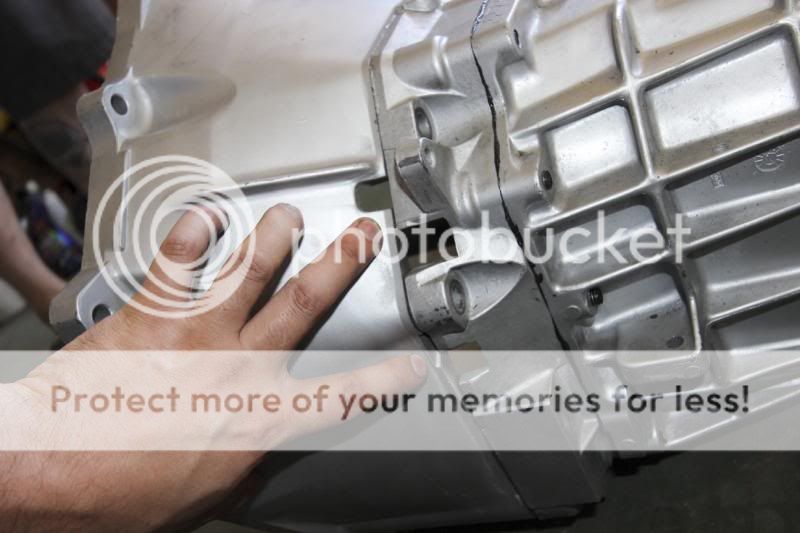
The guy tells me that's the only one, period, that they had in stock. So... more googling later, I discover this is the CTS-V bellhousing. Now I just need to find out if I'll have trouble running an f-body starter with this setup I've heard that if I had the GTO bellhousing I had to run an LS2 starter... but with this, I'm just not sure.
As it turns out... the CTS-V bellhousing was going to cause me some issues later...
Well crap. Now... I know I don't actually NEED that to fit, since I'm running the Sikky clutch slave kit, but if that isn't right, it makes me question the rest of the transmission. So... since this is my first LS I've ever messed with... and first t-56... I jump on here, silviav8, and Google like crazy. I don't like to ask questions unless I'm in a real time crunch or just can't find the answer I need. So... I start looking stuff up. I use this number, and the Borg-Warner designations first...
For a minute I was worried I'd been shipped a LT1 T-56... but the lack of cutout for the clutch fork eased my mind there. As it turns out... I've got at least the front plate and main case from a Pontiac GTO, with the rear cover for an f-body. I call up the transmission shop I bought it from and talk to one of their technicians, send them pictures and all that. He confirms it is a GTO transmission with the rear shifter housing from an F-body, and that if I have to modify/cut the transmission (even though I don't actually have to for my use) I won't void my warranty. I then point out my bellhousing bolts up fine, but the holes don't line up.
The guy tells me that's the only one, period, that they had in stock. So... more googling later, I discover this is the CTS-V bellhousing. Now I just need to find out if I'll have trouble running an f-body starter with this setup I've heard that if I had the GTO bellhousing I had to run an LS2 starter... but with this, I'm just not sure.
As it turns out... the CTS-V bellhousing was going to cause me some issues later...
09-05-2013, 12:42 PM
#5
Staging Lane
Thread Starter
iTrader: (1)
Join Date: May 2013
Location: Oklahoma
Posts: 60
Likes: 0
Received 0 Likes
on
0 Posts
Stayed home from work to get a clear day of working on the car without interruption and made lots of progress. As it turns out... there are no issues running an f-body starter with this set up (bellhousing clearance wise anyway), so I got to work.
Removed the donor f-body oil pan...

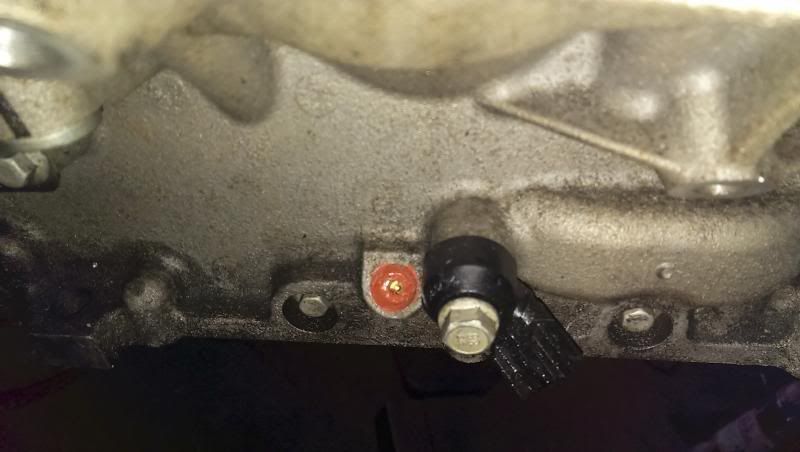
Tapped the old dip-stick hole with 1/8" NPT thread and plugged it with Sikky's provided plug. It seemed a little loose to me, even with thread sealant, so I added some Nissan RTV for extra insurance.
Took the stock oil splash shield and marked it, cut it, and swapped it back on, as per Sikky's instructions. Make sure to pay attention to the area stamped "Rear" and make your cuts there.
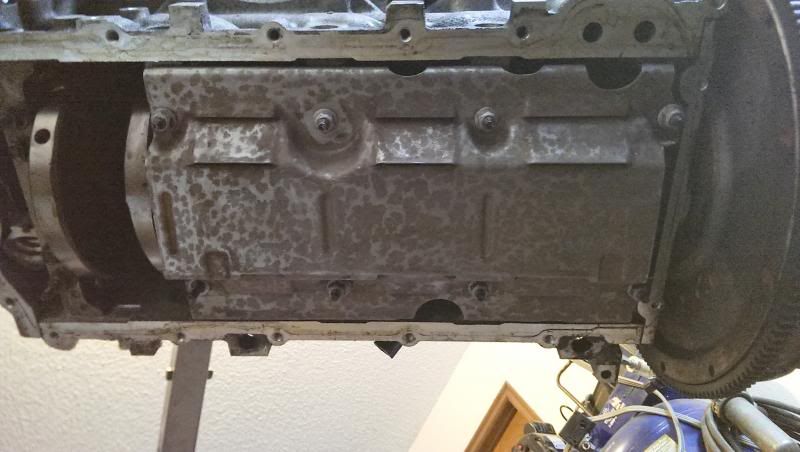
Next, I go to install my new front sump oil pick-up and notice that even though all my shipping boxes seemed to be in good shape, my oil pick-up wasn't! Luckily, a friend who runs our local drifting circuit had a spare for his eventual LS swap waiting, so I traded him out for his good one.
Installed the pan and torqued to specs.
Removed the donor f-body oil pan...
Tapped the old dip-stick hole with 1/8" NPT thread and plugged it with Sikky's provided plug. It seemed a little loose to me, even with thread sealant, so I added some Nissan RTV for extra insurance.
Took the stock oil splash shield and marked it, cut it, and swapped it back on, as per Sikky's instructions. Make sure to pay attention to the area stamped "Rear" and make your cuts there.
Next, I go to install my new front sump oil pick-up and notice that even though all my shipping boxes seemed to be in good shape, my oil pick-up wasn't! Luckily, a friend who runs our local drifting circuit had a spare for his eventual LS swap waiting, so I traded him out for his good one.
Installed the pan and torqued to specs.
09-05-2013, 12:43 PM
#6
Staging Lane
Thread Starter
iTrader: (1)
Join Date: May 2013
Location: Oklahoma
Posts: 60
Likes: 0
Received 0 Likes
on
0 Posts
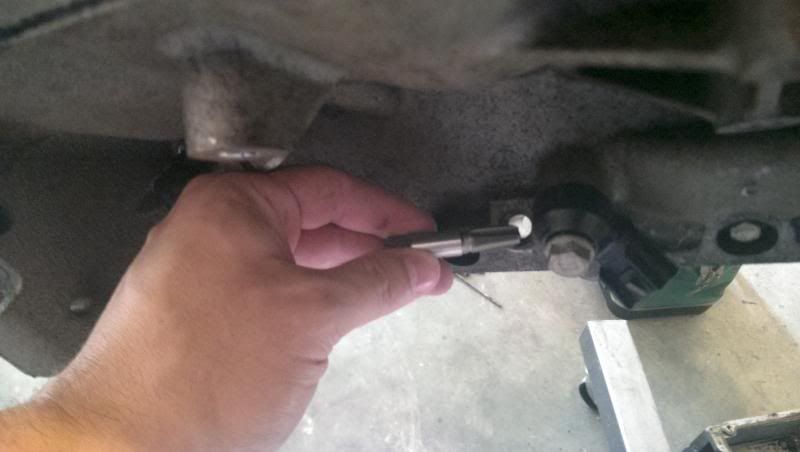
Time for the slave cylinder!
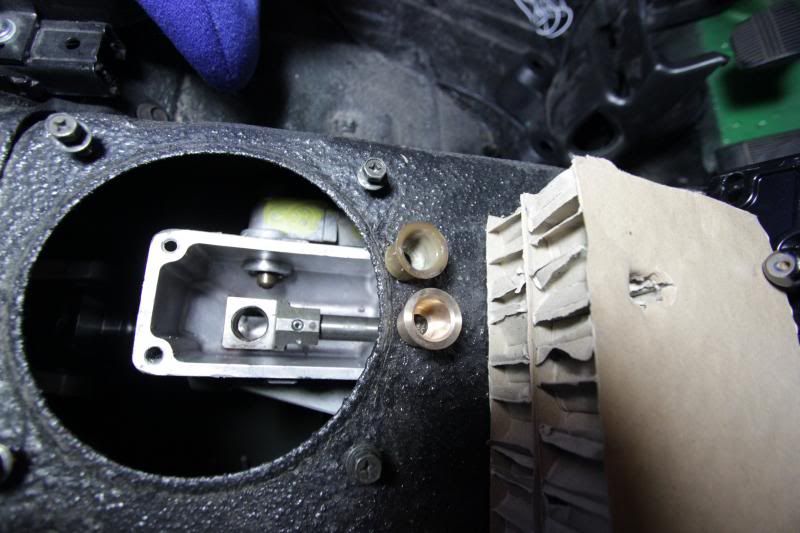
I was really confused at first on how you installed the stock slave and the Sikky clutch master kit together... but I eventually learned you had to drive out this little pin and remove this quick-connect fitting, then install the one that came with the Sikky kit. Took a little filing and tapping with a hammer, but it ended up working.
Installed it on the transmission along with the bleeder line. Ran into an issue with a stripped hole for the slave cylinder bolts. They're 6mmx1.00 pitch, but there wasn't even enough metal after tapping it to get a good grip. Luckily a 7mmx1.00 tap was available, so I cut new, larger threads and picked up a slightly larger bolt (that still fit the stock slave bolt hole) and it worked great.
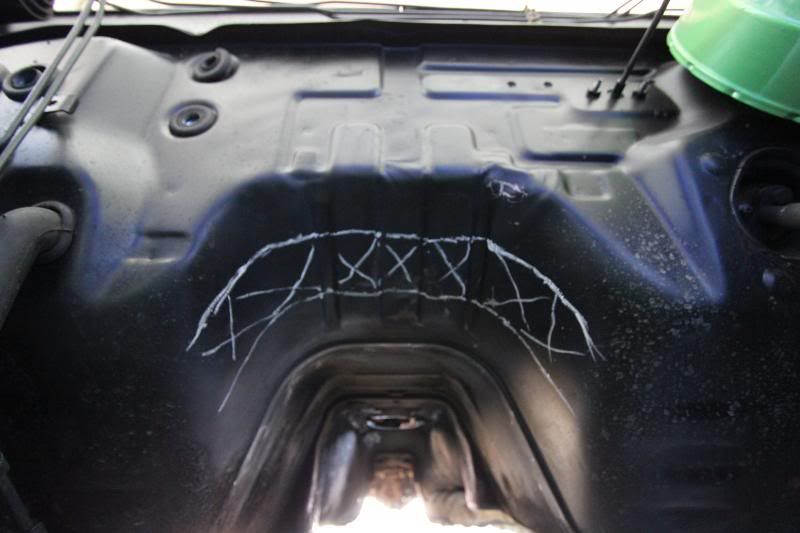
Pounded the crap out of the transmission tunnel after marking it. It wore out my shoulder and arm, but my efforts paid off.
Put it together and slid it into the engine bay. I had to remove the coupler from the steering column to the rack and wiggle the drivers side header in while the engine was suspended... but it fit well enough... then I hooked my steering knuckle/coupler back up through the headers.
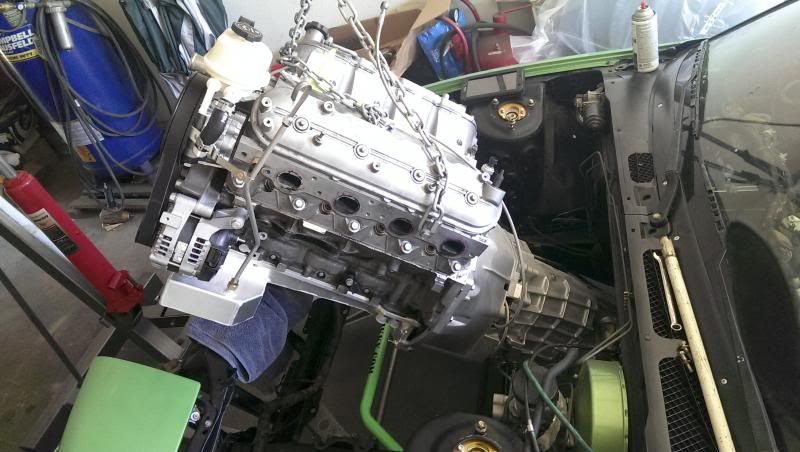
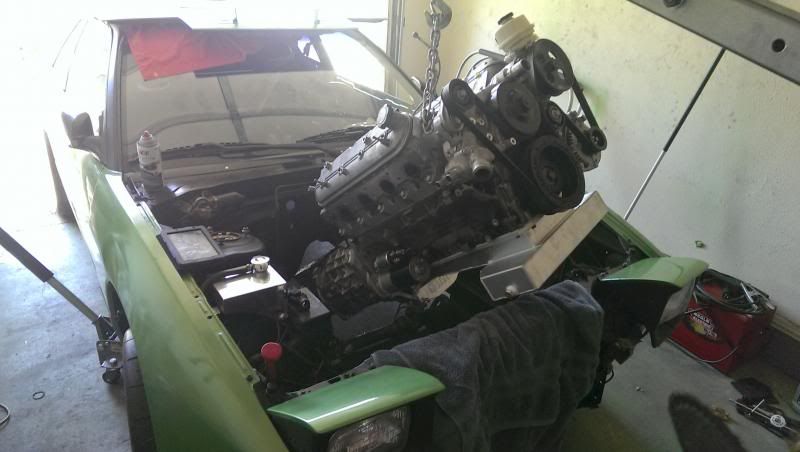
Had to remove the Sikky sway bar for it to fit, bring the passenger side header up through the bottom after removing the starter, and I installed the engine mounts (not in the normal Sikky instructions) onto the engine once it was already in and still suspended by the hoist... bit it's now officially sitting in the engine bay! First try.
I was really confused at first on how you installed the stock slave and the Sikky clutch master kit together... but I eventually learned you had to drive out this little pin and remove this quick-connect fitting, then install the one that came with the Sikky kit. Took a little filing and tapping with a hammer, but it ended up working.
Installed it on the transmission along with the bleeder line. Ran into an issue with a stripped hole for the slave cylinder bolts. They're 6mmx1.00 pitch, but there wasn't even enough metal after tapping it to get a good grip. Luckily a 7mmx1.00 tap was available, so I cut new, larger threads and picked up a slightly larger bolt (that still fit the stock slave bolt hole) and it worked great.
Pounded the crap out of the transmission tunnel after marking it. It wore out my shoulder and arm, but my efforts paid off.
Put it together and slid it into the engine bay. I had to remove the coupler from the steering column to the rack and wiggle the drivers side header in while the engine was suspended... but it fit well enough... then I hooked my steering knuckle/coupler back up through the headers.
Had to remove the Sikky sway bar for it to fit, bring the passenger side header up through the bottom after removing the starter, and I installed the engine mounts (not in the normal Sikky instructions) onto the engine once it was already in and still suspended by the hoist... bit it's now officially sitting in the engine bay! First try.
09-05-2013, 12:46 PM
#7
Staging Lane
Thread Starter
iTrader: (1)
Join Date: May 2013
Location: Oklahoma
Posts: 60
Likes: 0
Received 0 Likes
on
0 Posts
It got hot and I got tired of working on the car... which means I got lazy. I'd hit several little hurdles and snags during this build so far... and it'd killed my motivation. Everything from my FAST 92 intake not working with my fuel injection setup to the Sikky sway bar that I installed being upside down (even though the Sikky sticker would make you think it was the right way) and having to be re-installed... which requires dropping the Nismo power brace and re-installing it, to clutch issues, to waiting for parts and more. But anyway... here we go.
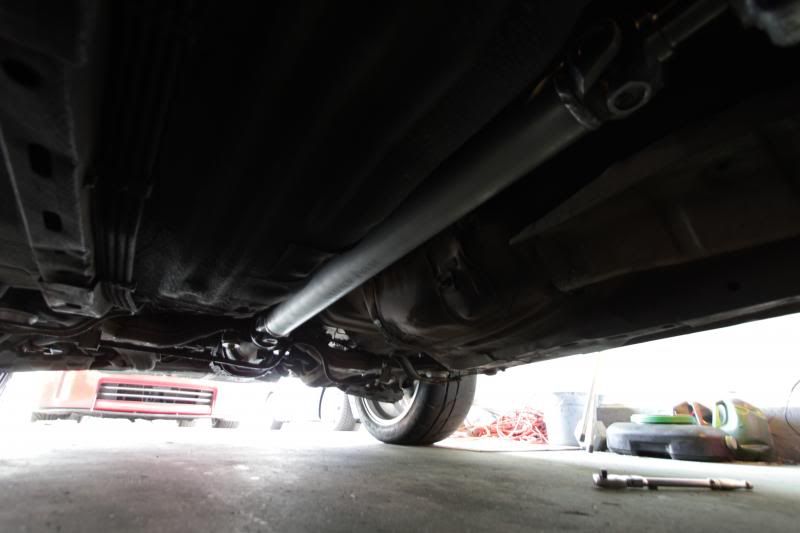
Got the aluminum Sikky driveshaft installed, that wasn't too tough.
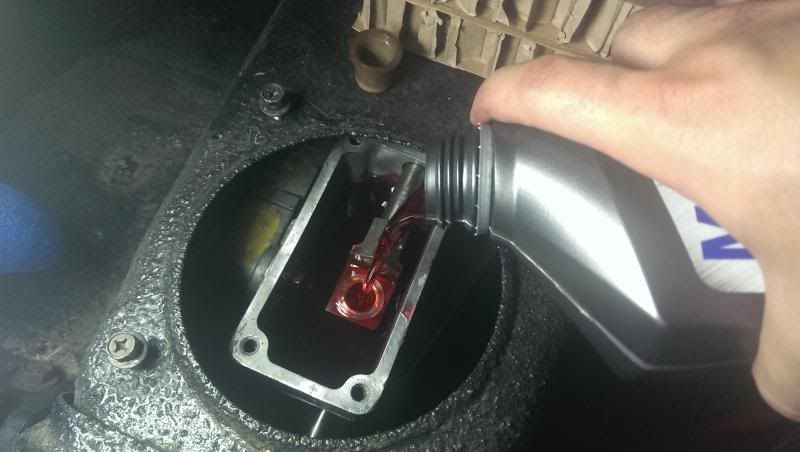
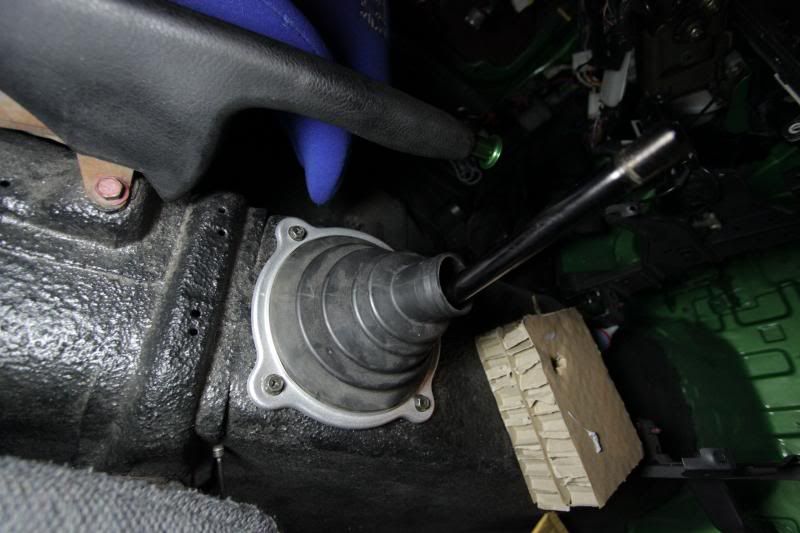
Checked my alignment of my shifter housing and it looked good, so I replaced the plastic shifter bushing with a brass one, filled it with the recommended fluid, then installed the shifter.
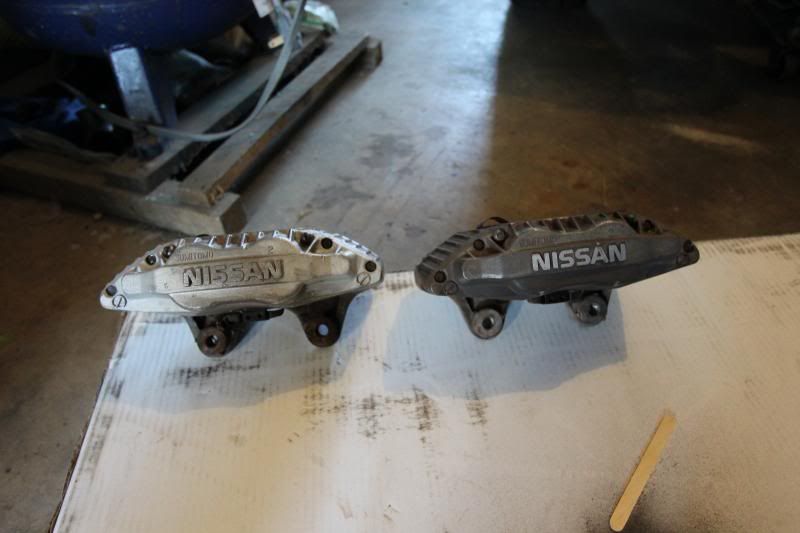
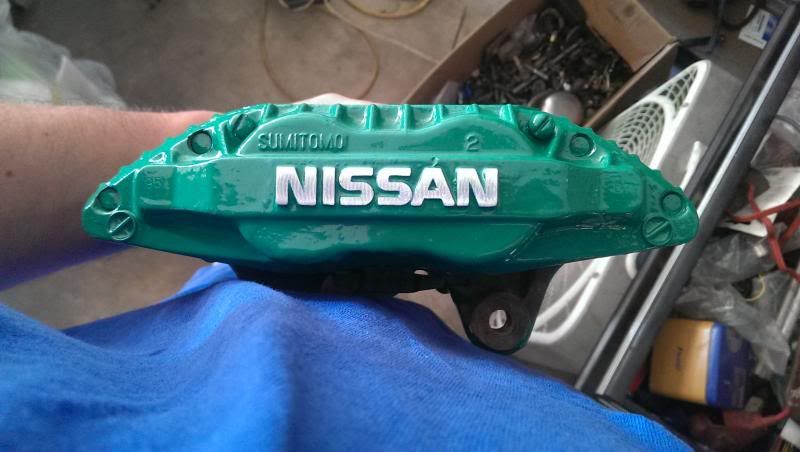
I picked up a set of z32 26mm aluminum front brakes a while back and decided it was time to get them ready to go on. It's no secret that I didn't like the 7/8ths stock non-abs master cylinder and q45 front brake pedal feel. They stopped just fine, just way too much pedal movement for my liking. But anyway, grabbed the stock calipers (one looks like it was rebuilt/replaced at some point)..
And then I grabbed some super-high temp brake caliper paint and coated them pretty well. The stuff I got was made by G2, and it brushed on well enough. Dried pretty fast and came out decent. The color of green isn't very close to my actual paint, but I figure it'll get the job done and won't be as obvious once on the car.
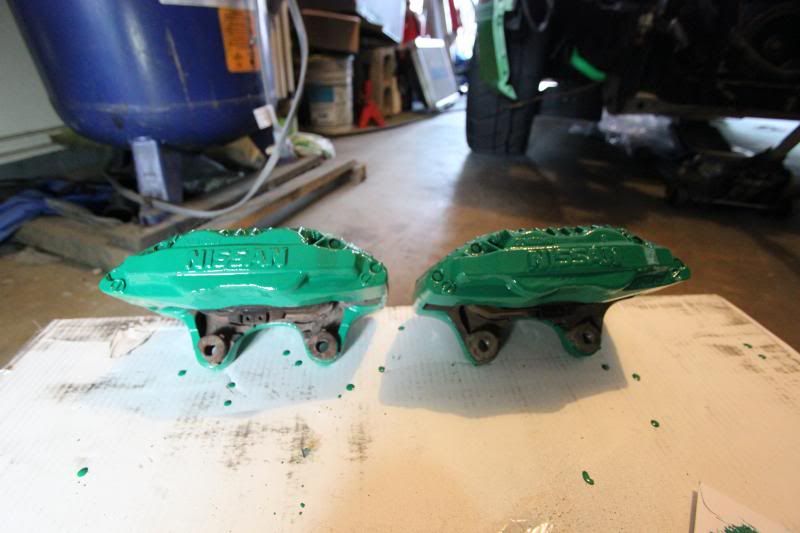
Once I let it dry for a couple days, I took some sand paper to the letters. This is "mostly" done... I sanded it a bit more after this photo.
Then I disconnected my q45 setup...
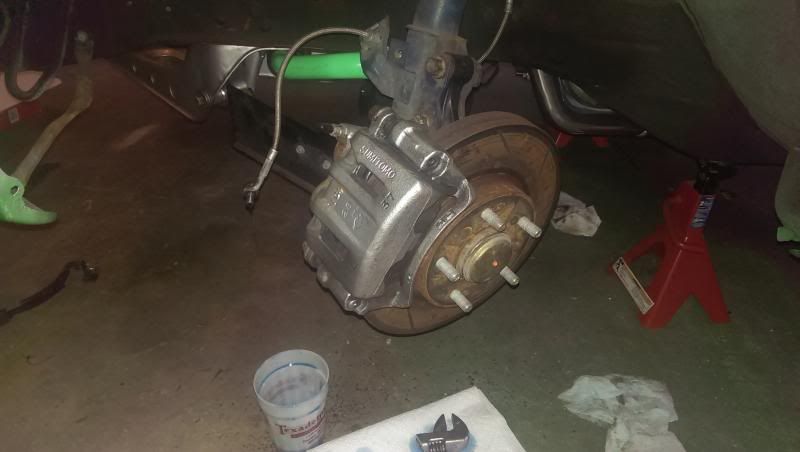
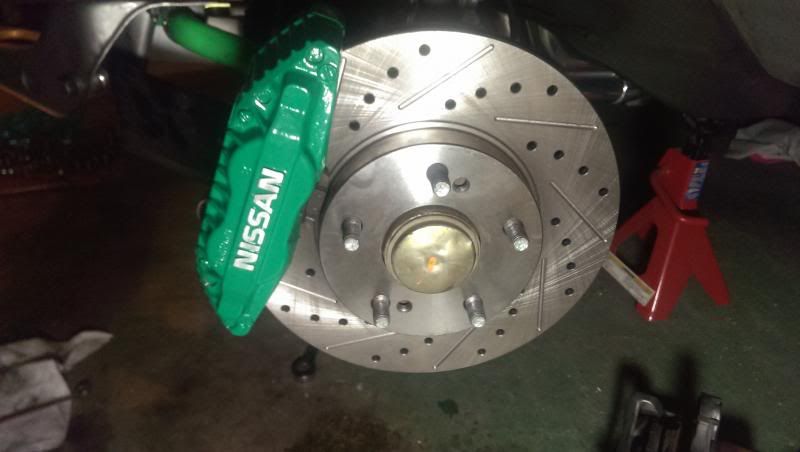
And slapped on my new rotors, ss lines, and calipers.
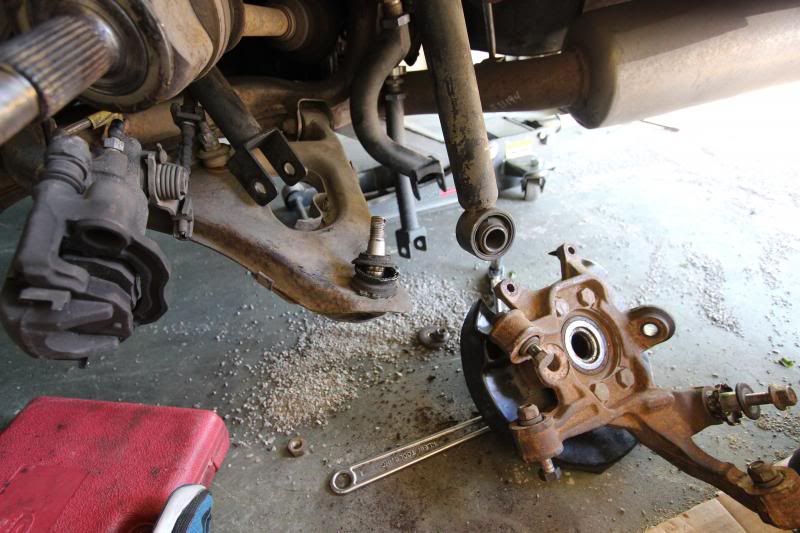
My right front hub was jacked up, so I replaced it.
Got the aluminum Sikky driveshaft installed, that wasn't too tough.
Checked my alignment of my shifter housing and it looked good, so I replaced the plastic shifter bushing with a brass one, filled it with the recommended fluid, then installed the shifter.
I picked up a set of z32 26mm aluminum front brakes a while back and decided it was time to get them ready to go on. It's no secret that I didn't like the 7/8ths stock non-abs master cylinder and q45 front brake pedal feel. They stopped just fine, just way too much pedal movement for my liking. But anyway, grabbed the stock calipers (one looks like it was rebuilt/replaced at some point)..
And then I grabbed some super-high temp brake caliper paint and coated them pretty well. The stuff I got was made by G2, and it brushed on well enough. Dried pretty fast and came out decent. The color of green isn't very close to my actual paint, but I figure it'll get the job done and won't be as obvious once on the car.
Once I let it dry for a couple days, I took some sand paper to the letters. This is "mostly" done... I sanded it a bit more after this photo.
Then I disconnected my q45 setup...
And slapped on my new rotors, ss lines, and calipers.
My right front hub was jacked up, so I replaced it.
Last edited by Lrn2Go; 03-12-2014 at 04:33 PM.
Trending Topics
09-05-2013, 12:47 PM
#8
Staging Lane
Thread Starter
iTrader: (1)
Join Date: May 2013
Location: Oklahoma
Posts: 60
Likes: 0
Received 0 Likes
on
0 Posts
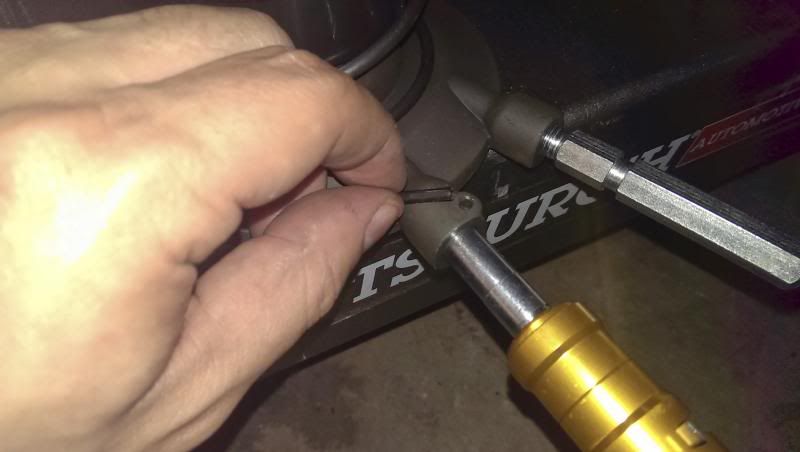
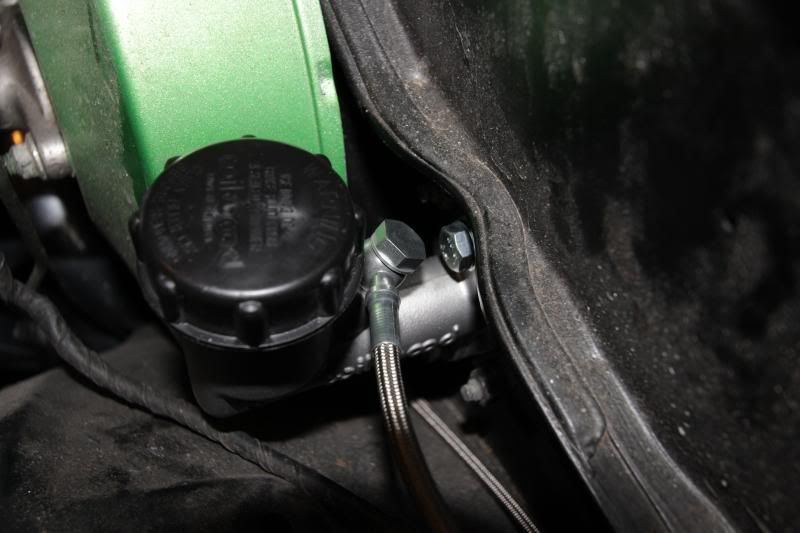
Got my slave cylinder hooked up in my car. Swapped the stock one for the larger-bore Wilwood setup. You have to swap the plunger shafts between the two. It's pretty easy... utilizing a set of locking c-ring clips. I hear the reason for this is because the supplied Wilwood one isn't long enough.
And installed in the car with the line hooked up.
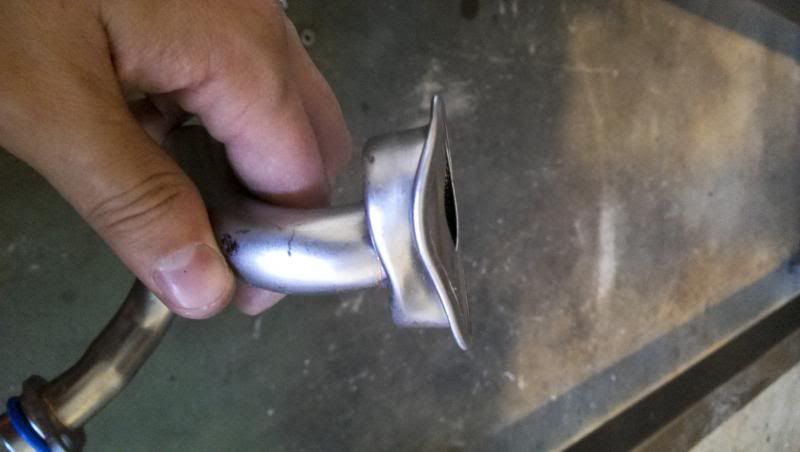
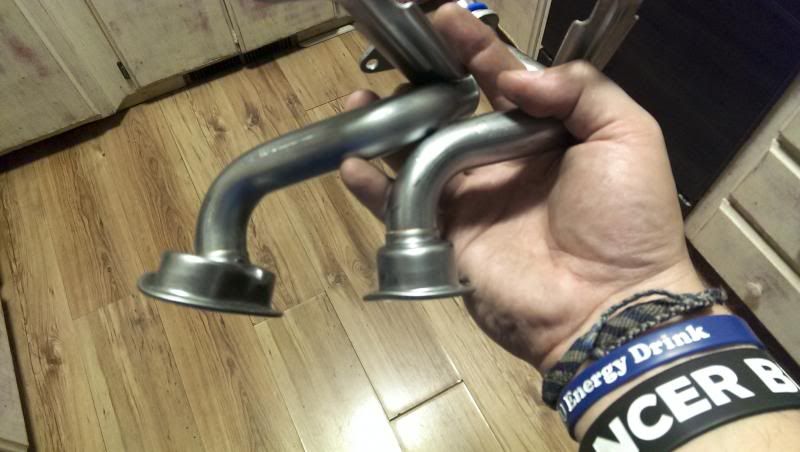
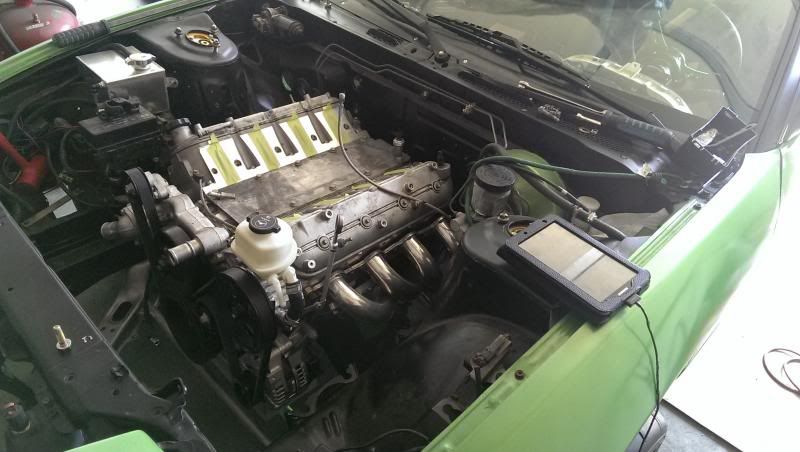
I also bolted up the headers. Fully adjusted and with as much space as I can give it, my steering shaft's knuckle (more specifically, the bolt that goes through it) actually touches one of the pipes ever so slightly. So I'm going to have to figure out what I can/want to do about that.
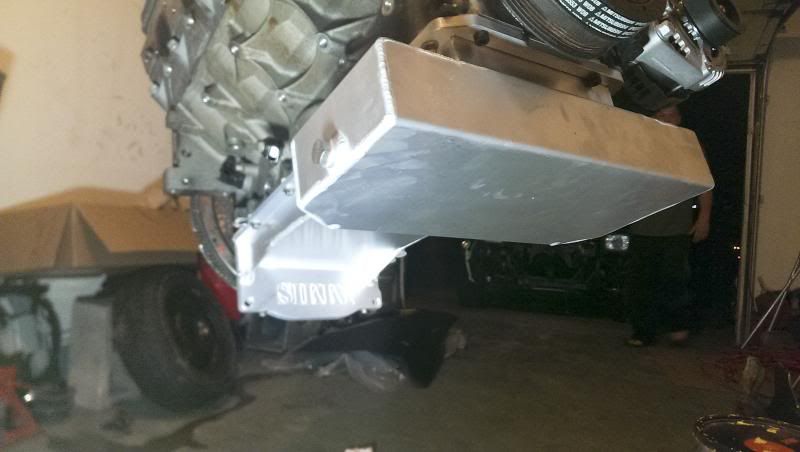
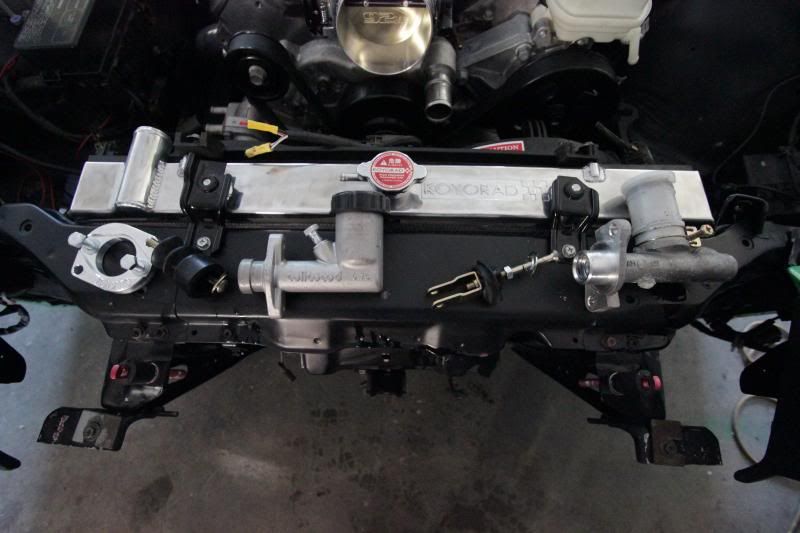
I also installed my radiator and fan setup. I probably could have stayed with the SR radiator, but the KA one will work fine I think. As you can see, sticking with the corvette/cts-v setup has given me pretty good clearance, even with the fatter radiator and fans.

And installed in the car with the line hooked up.
I also bolted up the headers. Fully adjusted and with as much space as I can give it, my steering shaft's knuckle (more specifically, the bolt that goes through it) actually touches one of the pipes ever so slightly. So I'm going to have to figure out what I can/want to do about that.
I also installed my radiator and fan setup. I probably could have stayed with the SR radiator, but the KA one will work fine I think. As you can see, sticking with the corvette/cts-v setup has given me pretty good clearance, even with the fatter radiator and fans.
09-05-2013, 12:50 PM
#9
Staging Lane
Thread Starter
iTrader: (1)
Join Date: May 2013
Location: Oklahoma
Posts: 60
Likes: 0
Received 0 Likes
on
0 Posts
Even though the next series of track and drift days wass closing in fast, I'd been fighting to get both time and motivation to keep after it. The good news is, I'd got a few more updates to post about, so here goes.
So... in my never ending quest to try and do things different (which sure seems to complicate things for me), instead of going the "normal" route and purchasing a modified stand-alone harness and using an LS ecu... I decided to give MSD's brand new Atomic EFI Ls setup a go instead. It's not a "thrifty" option... but since it has the ability to "self-tune" for any modifications I make, I'm hoping it saves me the tuning money down the line. I've gotten a little flak for choosing this too... but since I haven't seen many people run this system, even here on LS1tech, I figure I can at least work as a reference and can answer some questions if anybody has any.
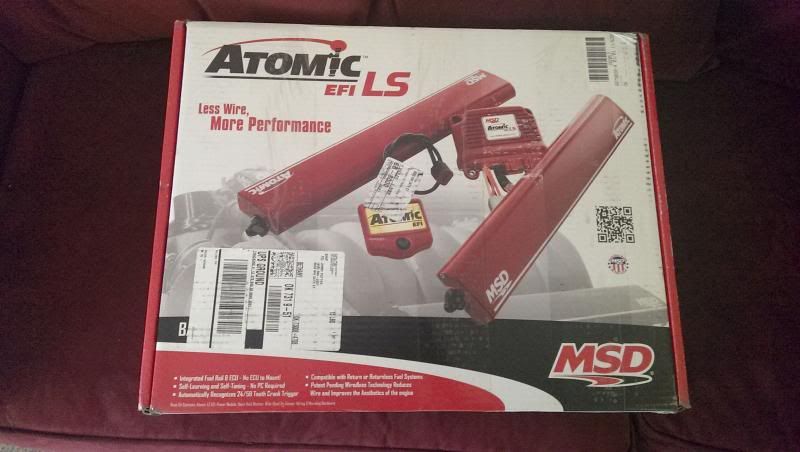
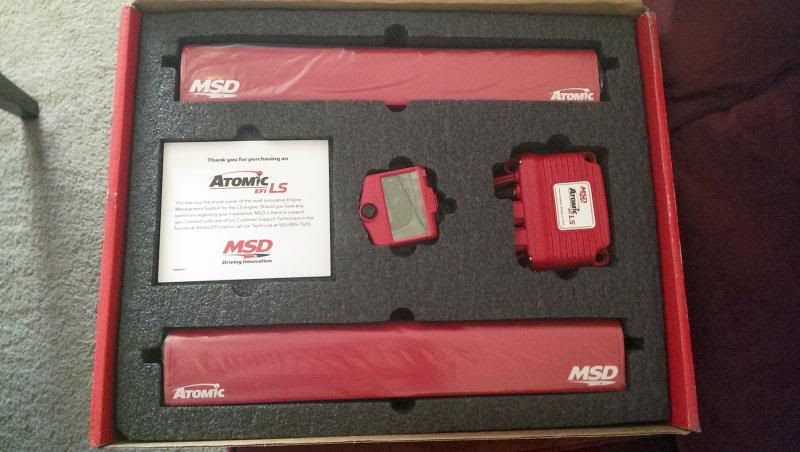
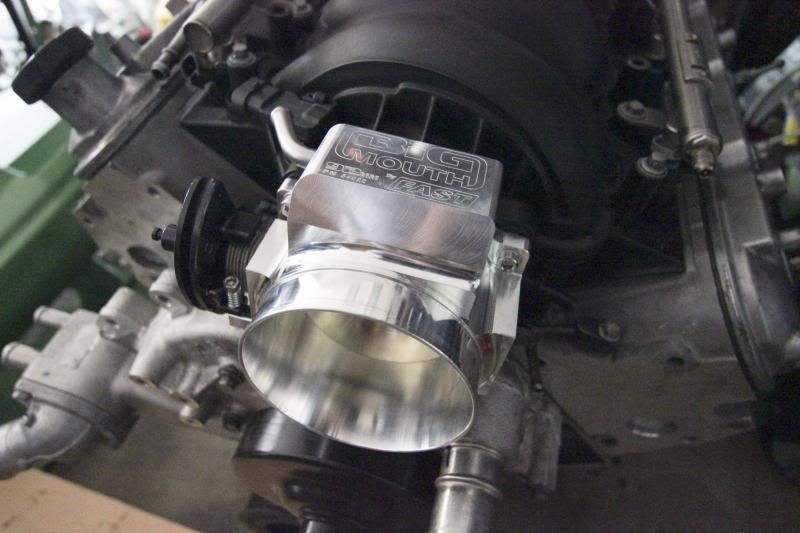
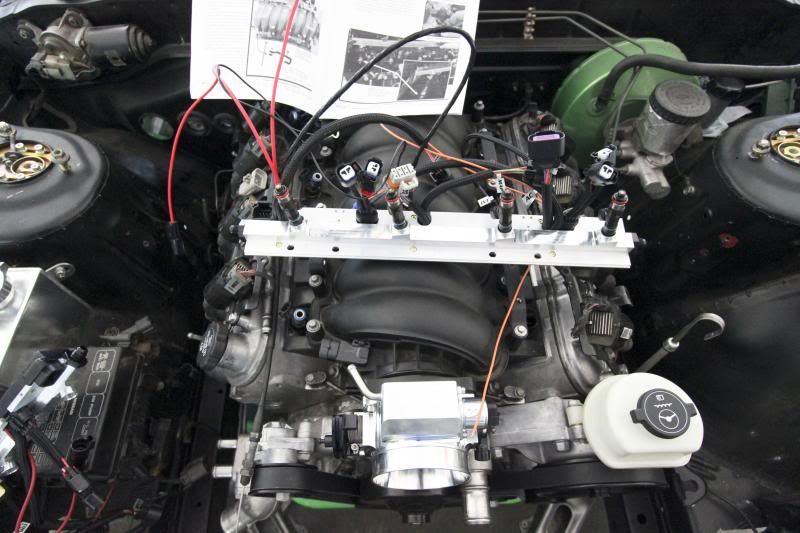
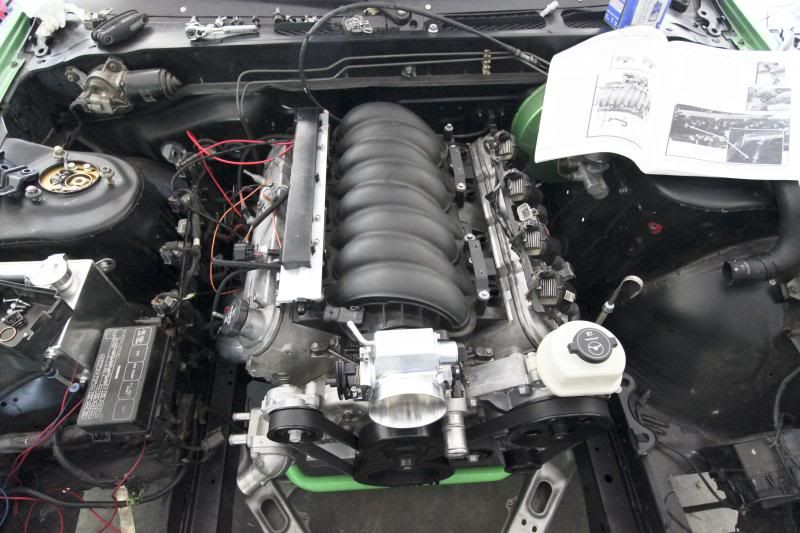
I was just about ready to install these after installing a brand new FAST 92mm intake, but since the FAST 92mm was designed originally for LS1 applications, my MSD setup (which I purchased the "LS2" version, obviously) wouldn't work. The brackets didn't line up and it would place the EFI setup too tall for the Ls2 injectors (which are almost an inch sorter than the LS1 style) even if it did. So, my options were to spend $300-400 on getting what I needed to make it work, or simply send back the FAST intake and swap it out for the 102mm (which I did, but I'll install it later). For now, the stock instake is back on.
This thing is so new that I've already been in contact with MSD on a few issues I had (like the CAM sensor wires and location, the length of the IAT sensor wire, the fact that the kit didn't include a -6AN cap for the return side of the rail if you were running the Vette filter or a return-less system, and a few other things). Some of which they've since "corrected", and they've been very helpful. On their forum, there's a support tech "MSDTech1955" who's been relatively un-helpful and actually blatantly wrong on several things I've asked... but I got a hold of one of their engineers who writes code, does some of the testing both on and off the cars of LS motors, has 8 years of experience with them, and has participated in autocross, auto x, and high speed touring before. This guy's been very helpful. He answered a few questions like "Will the system use the knock sensors, since it doesn't now?" (Yes, there will be an add-on for purchase later), "What can I use to give a speed signal to the unit?" (The worthless tech basically said "nothing"... but this guy corrected him and let me know you can use the stock VSS sensor on a t56), "Can you utilize more than one wideband?" (soon, another add-on module), and so on.
Aaaaaaanyway. Next up was my fuel lines. I thought about re-using my stock hard-lines, but I had a roll of -6AN stainless steel line and a few AN fittings sitting around, so I decided to just do a full swap. Started by pulling my old fuel lines (return, feed, and "vent").
Then I bought some fire-sleeve reflective material (I hear the LS motors can get vapor-lock via fuel or something like that from under-hood temps and lines too close to the swap headers), so I slid that on...
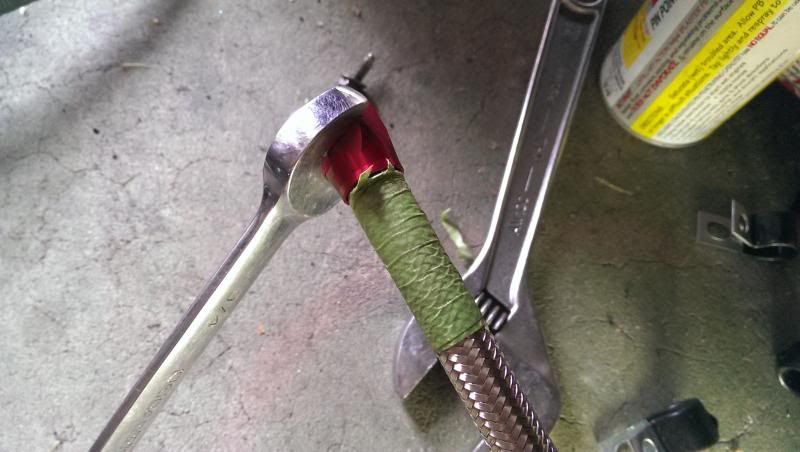
Then I attached my SS line to my AN fitting and routed the line down under the car. Attaching this -6AN fitting to this line was WAY harder than I remembered it being doing my -10AN line on my oil cooler for my Z. I messed it up and had to re-do it around 5 times... and it's still not as awesome as I'd like, but it'll hold good, so that's what's important.
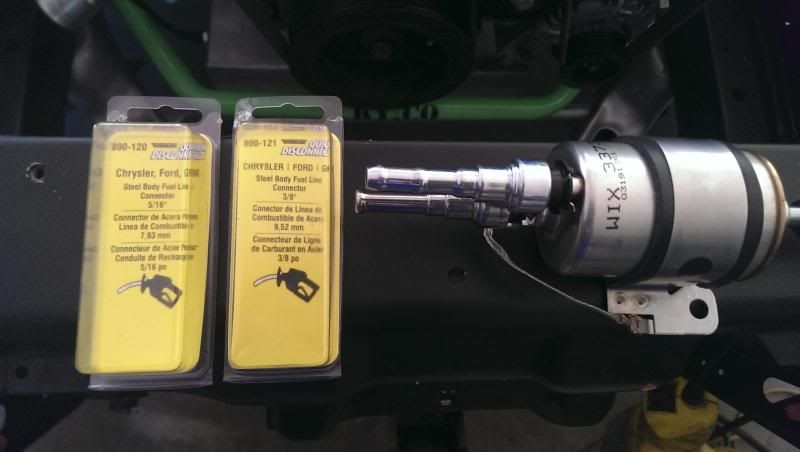
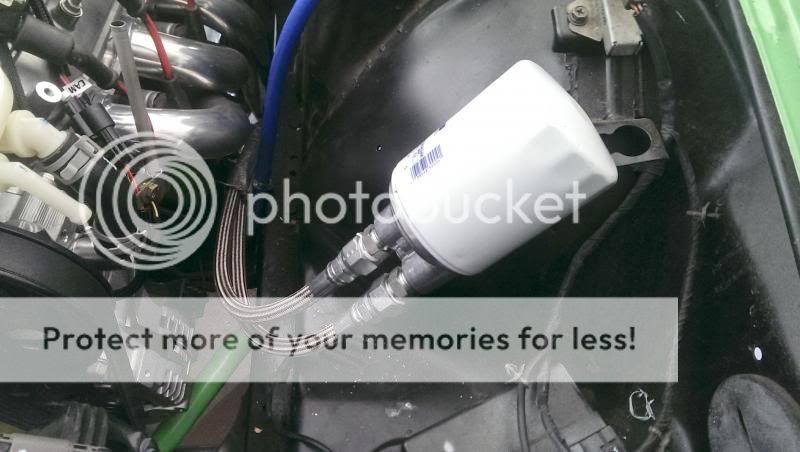
I still need to finish attaching the line under the car and figure out where to put my new fuel filter... but for now, here's a photo of the WIX filter and all the fittings you need to buy to make it usable in a 240sx.
So... in my never ending quest to try and do things different (which sure seems to complicate things for me), instead of going the "normal" route and purchasing a modified stand-alone harness and using an LS ecu... I decided to give MSD's brand new Atomic EFI Ls setup a go instead. It's not a "thrifty" option... but since it has the ability to "self-tune" for any modifications I make, I'm hoping it saves me the tuning money down the line. I've gotten a little flak for choosing this too... but since I haven't seen many people run this system, even here on LS1tech, I figure I can at least work as a reference and can answer some questions if anybody has any.
I was just about ready to install these after installing a brand new FAST 92mm intake, but since the FAST 92mm was designed originally for LS1 applications, my MSD setup (which I purchased the "LS2" version, obviously) wouldn't work. The brackets didn't line up and it would place the EFI setup too tall for the Ls2 injectors (which are almost an inch sorter than the LS1 style) even if it did. So, my options were to spend $300-400 on getting what I needed to make it work, or simply send back the FAST intake and swap it out for the 102mm (which I did, but I'll install it later). For now, the stock instake is back on.
This thing is so new that I've already been in contact with MSD on a few issues I had (like the CAM sensor wires and location, the length of the IAT sensor wire, the fact that the kit didn't include a -6AN cap for the return side of the rail if you were running the Vette filter or a return-less system, and a few other things). Some of which they've since "corrected", and they've been very helpful. On their forum, there's a support tech "MSDTech1955" who's been relatively un-helpful and actually blatantly wrong on several things I've asked... but I got a hold of one of their engineers who writes code, does some of the testing both on and off the cars of LS motors, has 8 years of experience with them, and has participated in autocross, auto x, and high speed touring before. This guy's been very helpful. He answered a few questions like "Will the system use the knock sensors, since it doesn't now?" (Yes, there will be an add-on for purchase later), "What can I use to give a speed signal to the unit?" (The worthless tech basically said "nothing"... but this guy corrected him and let me know you can use the stock VSS sensor on a t56), "Can you utilize more than one wideband?" (soon, another add-on module), and so on.
Aaaaaaanyway. Next up was my fuel lines. I thought about re-using my stock hard-lines, but I had a roll of -6AN stainless steel line and a few AN fittings sitting around, so I decided to just do a full swap. Started by pulling my old fuel lines (return, feed, and "vent").
Then I bought some fire-sleeve reflective material (I hear the LS motors can get vapor-lock via fuel or something like that from under-hood temps and lines too close to the swap headers), so I slid that on...
Then I attached my SS line to my AN fitting and routed the line down under the car. Attaching this -6AN fitting to this line was WAY harder than I remembered it being doing my -10AN line on my oil cooler for my Z. I messed it up and had to re-do it around 5 times... and it's still not as awesome as I'd like, but it'll hold good, so that's what's important.
I still need to finish attaching the line under the car and figure out where to put my new fuel filter... but for now, here's a photo of the WIX filter and all the fittings you need to buy to make it usable in a 240sx.
09-05-2013, 12:52 PM
#10
Staging Lane
Thread Starter
iTrader: (1)
Join Date: May 2013
Location: Oklahoma
Posts: 60
Likes: 0
Received 0 Likes
on
0 Posts
As is usual... every time I make a prediction, it all goes to crap. I was making good headway but then a friend had sort of an emergency and needed his intake gasket replaced on his truck so he could keep making it to work, so I knuckled down and got his car taken care of instead of mine... and then work, blah blah blah. I'm lazy sometimes.
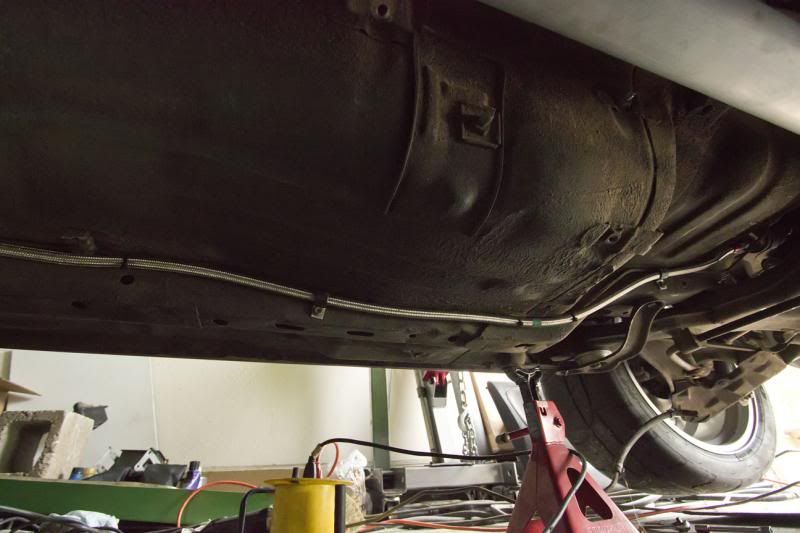
Anyway... FINALLY (this was stupid how long it took and I have no excuse) finished running my fuel line and filter. I learned a few things from all my efforts on the front of the line, so this time I wrapped the braid much tighter with tape and peeled it off only gradually as I worked the AN fitting on there.
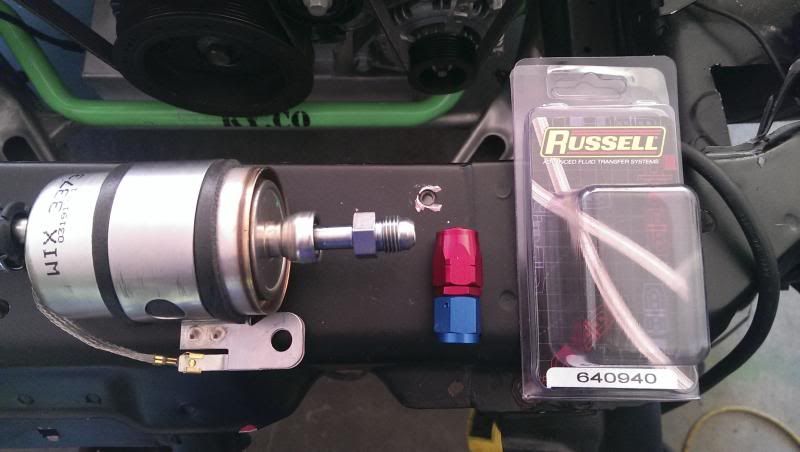
After removing the stock lines, there were several bolt holes from the stock clips that were now un-used. One of them in the back, above the sub-frame, passenger side, right above the axles is where I decided would be the perfect spot to mount my filter. I was a little worried the brake line would be in the way, but it ended up working out awesome I think.

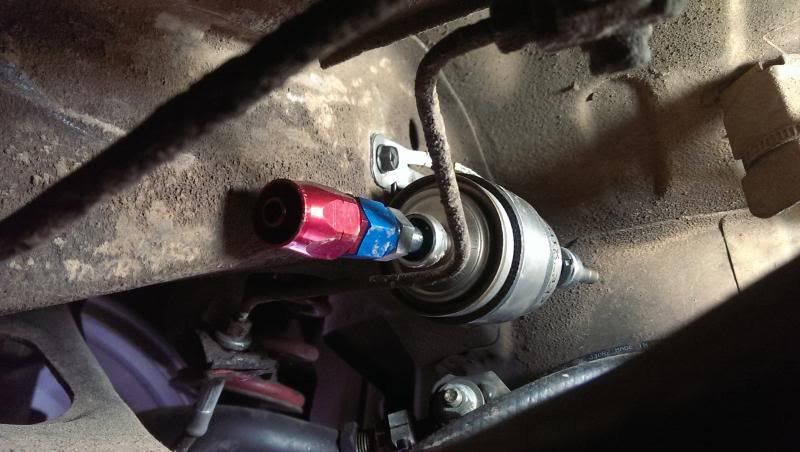
After that, it was just a matter of getting the new fuel line attached. I used several of these things that I picked up from home depot, which I bolted in the stock location of the aforementioned brackets.
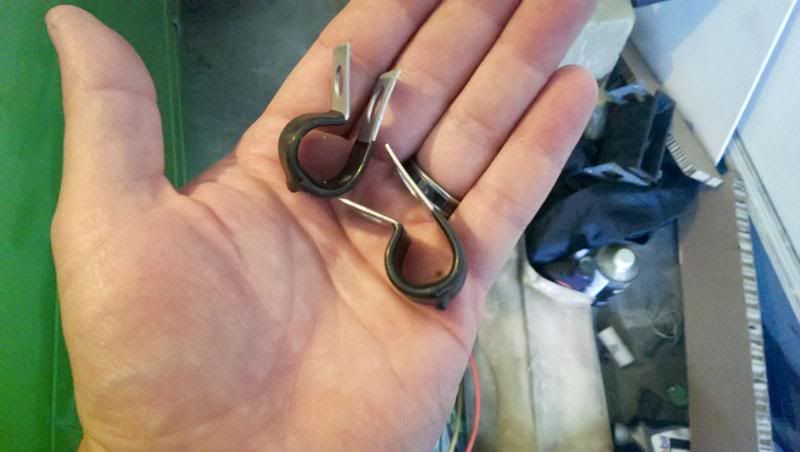
There was only one place that was a little further than I'd have liked between brackets, but I used a few plastic zip-ties for extra security. The clamps hold it really well though, and there shouldn't be any movement in the line so I don't think it'll saw it's way through or anything. I'm happy with the setup.
Next up... time to sort out the wiring! I had just enough time (before I lost all my light and the mosquitoes descended on me) to map out the main MSD plugs wiring and label my wires for the ones that will be remaining inside, and those that need to go outside the car.
Anyway... FINALLY (this was stupid how long it took and I have no excuse) finished running my fuel line and filter. I learned a few things from all my efforts on the front of the line, so this time I wrapped the braid much tighter with tape and peeled it off only gradually as I worked the AN fitting on there.
After removing the stock lines, there were several bolt holes from the stock clips that were now un-used. One of them in the back, above the sub-frame, passenger side, right above the axles is where I decided would be the perfect spot to mount my filter. I was a little worried the brake line would be in the way, but it ended up working out awesome I think.
After that, it was just a matter of getting the new fuel line attached. I used several of these things that I picked up from home depot, which I bolted in the stock location of the aforementioned brackets.
There was only one place that was a little further than I'd have liked between brackets, but I used a few plastic zip-ties for extra security. The clamps hold it really well though, and there shouldn't be any movement in the line so I don't think it'll saw it's way through or anything. I'm happy with the setup.
Next up... time to sort out the wiring! I had just enough time (before I lost all my light and the mosquitoes descended on me) to map out the main MSD plugs wiring and label my wires for the ones that will be remaining inside, and those that need to go outside the car.
09-05-2013, 12:53 PM
#11
Staging Lane
Thread Starter
iTrader: (1)
Join Date: May 2013
Location: Oklahoma
Posts: 60
Likes: 0
Received 0 Likes
on
0 Posts
So I continued a little more with the wiring...
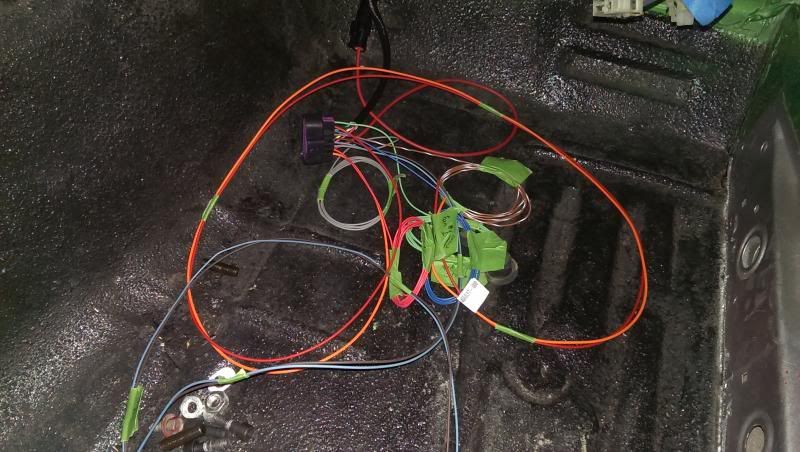
Mounted my power control unit for the MSD set up.
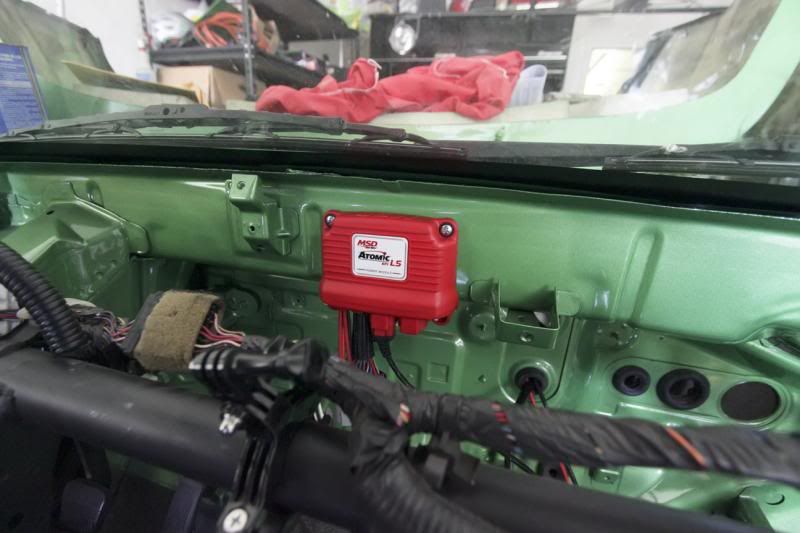
Ran my wires, including my power wire for the fuel pump (MSD's power unit delivers the main power to whatever fuel pump you're running, so none of my stock stuff would work). I haven't tested it yet, but this (I believe) is the wire you need to tap into. It's black with a yellow stripe.

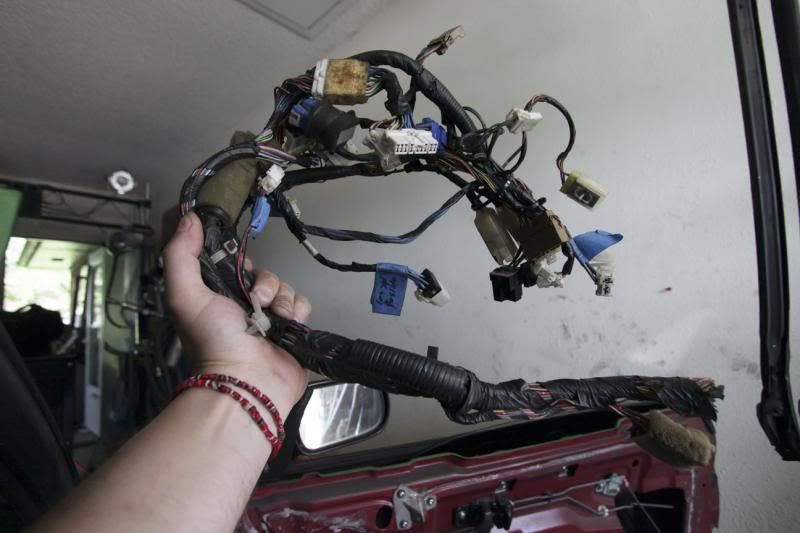
Since I don't run a dash, all these stock wires were getting in my way, so I chopped them off. After this thing is wired up, I pretty much only need my light and starter wiring still in the car... so most everything else is useless.
And here's an update shot of what everything is looking like thus far.

Mounted my power control unit for the MSD set up.
Ran my wires, including my power wire for the fuel pump (MSD's power unit delivers the main power to whatever fuel pump you're running, so none of my stock stuff would work). I haven't tested it yet, but this (I believe) is the wire you need to tap into. It's black with a yellow stripe.
Since I don't run a dash, all these stock wires were getting in my way, so I chopped them off. After this thing is wired up, I pretty much only need my light and starter wiring still in the car... so most everything else is useless.
And here's an update shot of what everything is looking like thus far.
09-05-2013, 12:53 PM
#12
Staging Lane
Thread Starter
iTrader: (1)
Join Date: May 2013
Location: Oklahoma
Posts: 60
Likes: 0
Received 0 Likes
on
0 Posts
So a few more updates are in order.
After debating what I was going to do with my Sikky oil relocator and ordering some tools to get in at the pan's fittings with the limited space I had to work with once it was in the car, I eventually found a place to mount everything.
One of those fittings still leaked pretty badly at the filter side, so I took it apart and fixed it with some teflon tape. For people that are wondering, the routing for the Sikky labeled lines is "Out to In". AKA, "Out" side of the pan (labeled as such) to the "in" side of the relocator, "out" of the relocator to "in" on the pan. The flow of oil into and out of a filter (in case you didn't know) is in through the outer portion, and exits out the center.
Next, I got lots of my wiring done. Ran my starter wiring, hooked up my grounds, ground my coils, and hooked up the EFI LS power and grounds (though somewhat temporary for now). I also finished hooking up my steam vent setup which turned out nice. I had to cut one of the brackets that held the Altima fan's OEM plug to give me some clearance for the hose, but that wasnt' a big deal.
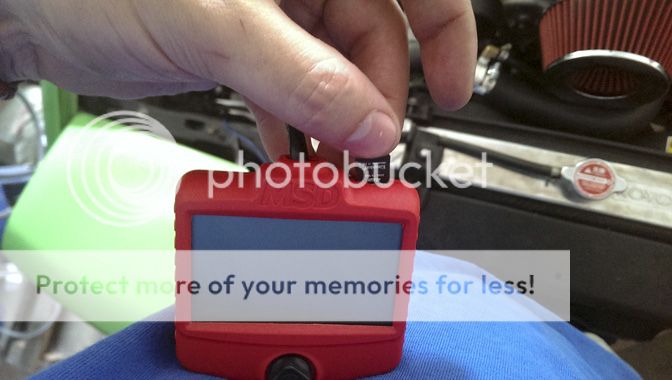
After that, I loaded up the latest firmware into the hand-held unit for the MSD EFI LS system and turned the key on to start updating everything.
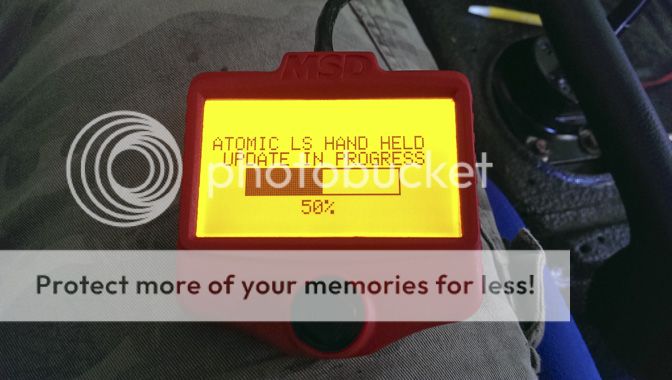
After that... I wish I had a successful start-up video to show you all... but the engine won't fire. It cranks nice and solid, it's getting fuel (I can hear the pump cycle/run, and it even showed me where I had a fuel leak that I had to fix) and even shows around 56 psi through the little handheld there, but it just won't get spark and I'm not sure why. I took a spark plug out, grounded the body (to the chassis and battery) and cranked the car over and it just wouldn't spark. I tried 2 plugs on the drivers side and 1 on the passenger, all with the same result. I tried grounding my coil packs in all different kinds of ways, no difference. All the diagnostics features of the EFI setup are showing up as good... sooo... at this point, I'm not sure what the deal is so I've put in an email to MSD and I'll probably call them a little later today if I've not heard back. I've got a track day coming up Sunday, so that's my current goal!
EDIT: Got a quick email back first thing this morning from an engineer over at MSD and he gave me some insight. Though it doesn't tell you, apparently the MSD hand-held thing should stay on during engine cranking. Apparently, the fuse location I decided to tap into has it's power cut during cranking, so unbeknownst to me, when the engine cranked, my MSD system was shut off. Sooo... I went home for lunch and ran the "key on" wire through a switch and then straight to power (the MSD guy said it didn't need a fuse), hooked up my old and tired battery, and gave it a go! Below is what happened...
Still no start, but I think that's because my battery just hit the limit of what it had power left to do. Tonight I'll hook up a spare when I've got a little more time and try it again. I suspect I'll be taking it in for some exhaust work soon!
After debating what I was going to do with my Sikky oil relocator and ordering some tools to get in at the pan's fittings with the limited space I had to work with once it was in the car, I eventually found a place to mount everything.
One of those fittings still leaked pretty badly at the filter side, so I took it apart and fixed it with some teflon tape. For people that are wondering, the routing for the Sikky labeled lines is "Out to In". AKA, "Out" side of the pan (labeled as such) to the "in" side of the relocator, "out" of the relocator to "in" on the pan. The flow of oil into and out of a filter (in case you didn't know) is in through the outer portion, and exits out the center.
Next, I got lots of my wiring done. Ran my starter wiring, hooked up my grounds, ground my coils, and hooked up the EFI LS power and grounds (though somewhat temporary for now). I also finished hooking up my steam vent setup which turned out nice. I had to cut one of the brackets that held the Altima fan's OEM plug to give me some clearance for the hose, but that wasnt' a big deal.
After that, I loaded up the latest firmware into the hand-held unit for the MSD EFI LS system and turned the key on to start updating everything.
After that... I wish I had a successful start-up video to show you all... but the engine won't fire. It cranks nice and solid, it's getting fuel (I can hear the pump cycle/run, and it even showed me where I had a fuel leak that I had to fix) and even shows around 56 psi through the little handheld there, but it just won't get spark and I'm not sure why. I took a spark plug out, grounded the body (to the chassis and battery) and cranked the car over and it just wouldn't spark. I tried 2 plugs on the drivers side and 1 on the passenger, all with the same result. I tried grounding my coil packs in all different kinds of ways, no difference. All the diagnostics features of the EFI setup are showing up as good... sooo... at this point, I'm not sure what the deal is so I've put in an email to MSD and I'll probably call them a little later today if I've not heard back. I've got a track day coming up Sunday, so that's my current goal!
EDIT: Got a quick email back first thing this morning from an engineer over at MSD and he gave me some insight. Though it doesn't tell you, apparently the MSD hand-held thing should stay on during engine cranking. Apparently, the fuse location I decided to tap into has it's power cut during cranking, so unbeknownst to me, when the engine cranked, my MSD system was shut off. Sooo... I went home for lunch and ran the "key on" wire through a switch and then straight to power (the MSD guy said it didn't need a fuse), hooked up my old and tired battery, and gave it a go! Below is what happened...
Still no start, but I think that's because my battery just hit the limit of what it had power left to do. Tonight I'll hook up a spare when I've got a little more time and try it again. I suspect I'll be taking it in for some exhaust work soon!
09-05-2013, 12:54 PM
#13
Staging Lane
Thread Starter
iTrader: (1)
Join Date: May 2013
Location: Oklahoma
Posts: 60
Likes: 0
Received 0 Likes
on
0 Posts
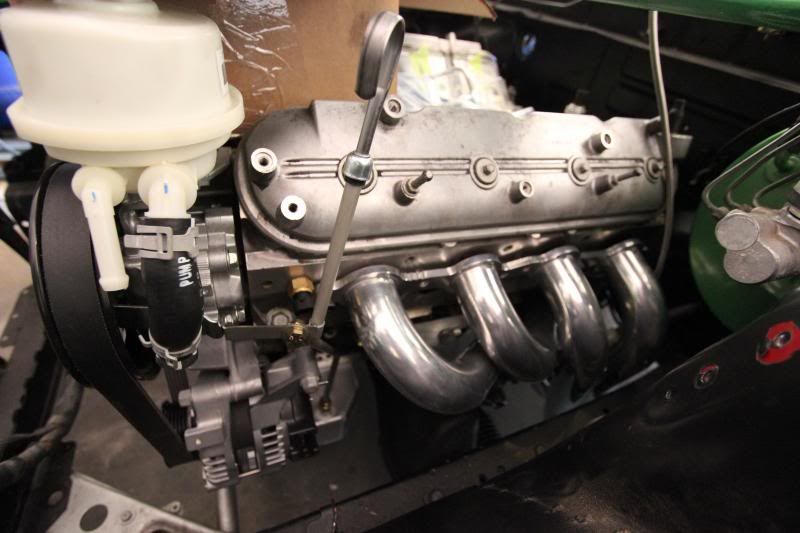
Okay... so... I missed the track-day deadline I'd been shooting for. It happens... so maybe I'll catch the next one. Since we had a nice long Labor-day weekend, I made some good progress on the car. First up, I finished swapping out my 15/16" z32 brake master cylinder. I've upgraded the brakes in front to z32's and I hated the long pedal travel of the stock non-abs s13 brake master with the q45 setup, so I'm hoping this helps firm the pedal up a bit without being too tough.
Unhooked my old 7/8" master...
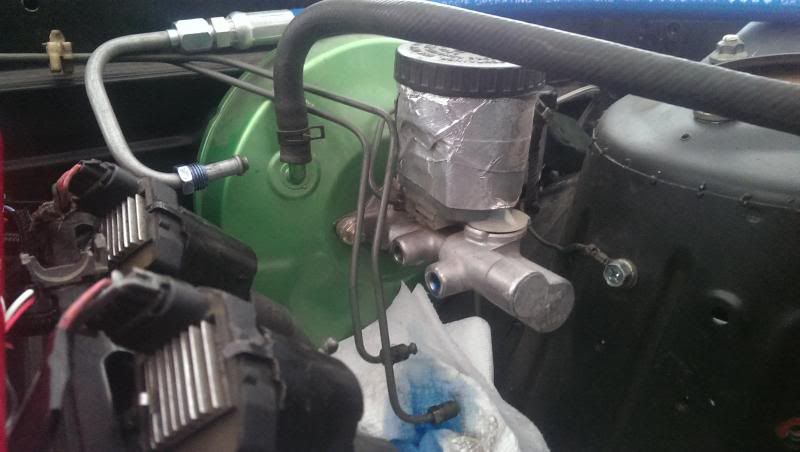
Removed the reservoir and got out the Dremel to cut out one of the fittings. They're not shaped how I was expecting, and sort of half-pressed in there... but it came out without too much trouble.
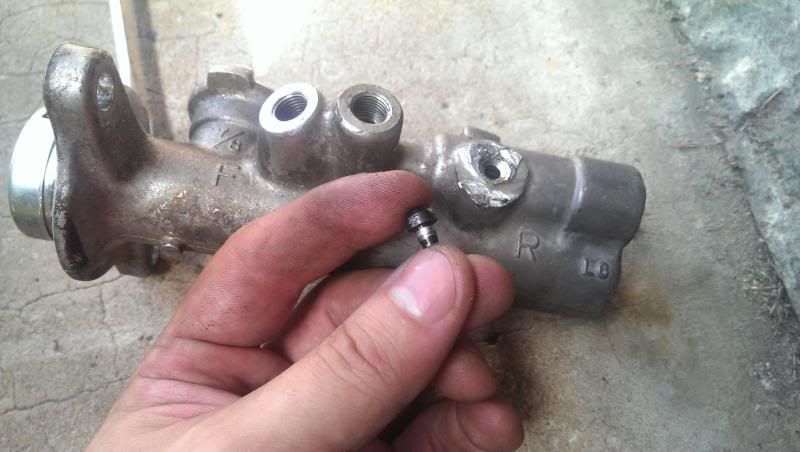
Removed the plug in the z32 master and dropped my fitting in there (and tapped it lightly into place)...
Then re-installed my reservoir and put it back in the car, tossed in some new racing blue brake fluid, bled the brakes, and it feels good to go. Looking forward to seeing how it feels once the car's moving.
So that made me feel better to make some progress... and so with a little push from the wife (it was hot and I was getting lazy)... I tackled the next big issue.
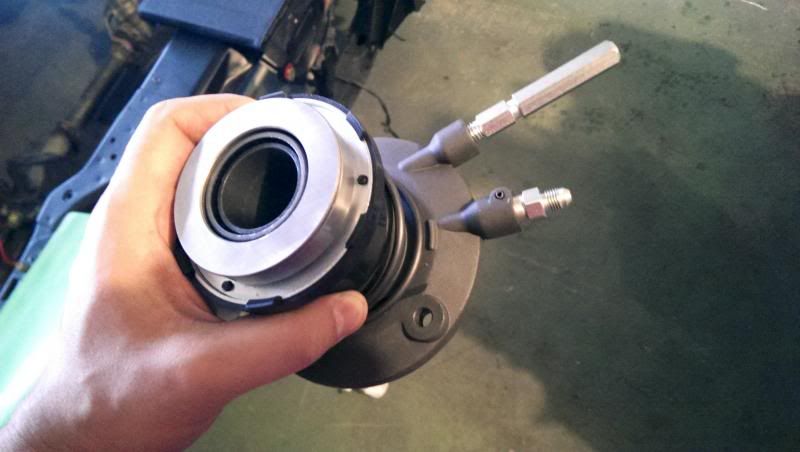
I kept fighting with my engine not starting. Fought and fought and fought with it. Eventually I figure out that when I try and crank the engine with the car in gear and the clutch pedal pressed, the rear tires still try to move. So I've clearly got an issue with my clutch and/or slave. I'm certain it's bled correctly, so I decided it was time to pull the thing apart and see if I needed some kind of shim.
I tried to save a little money by catching my brand new transmission fluid while I drained it... but then I dropped the plug. My efforts weren't off to a good start.

Eventually though... I did get it down. Since I needed the bellhousing still on the motor to take my measurements, no sense in removing that! This was actually not too difficult to do.
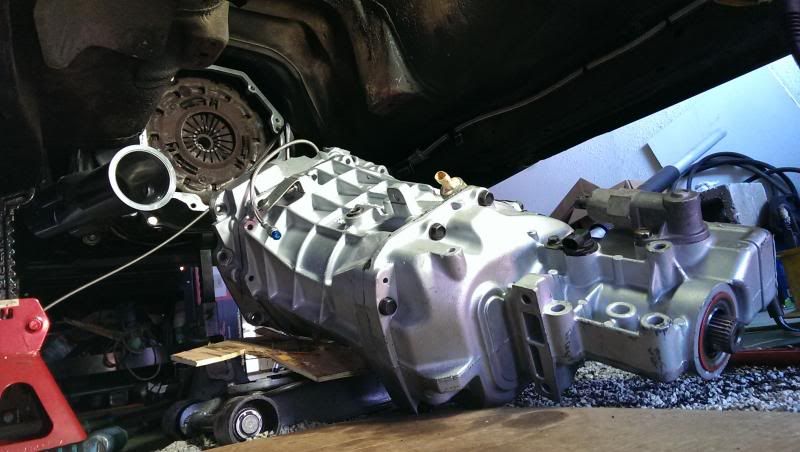
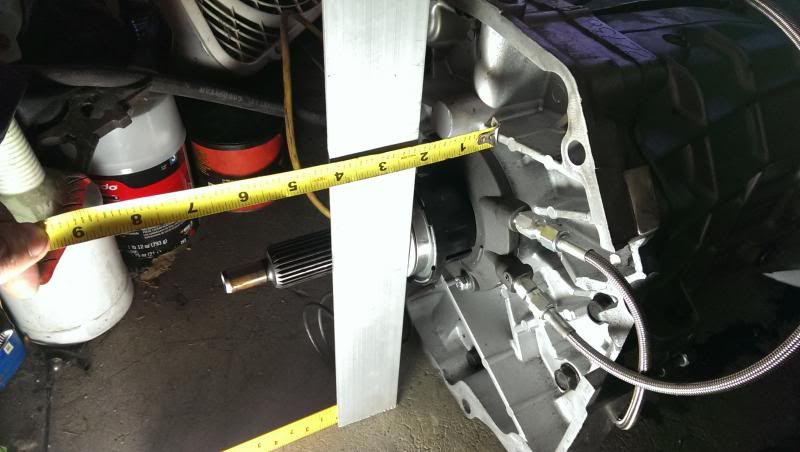
Time to grab my measurements! I used the procedure listed on LS1Tech.
Measurement A: (2 7/16")
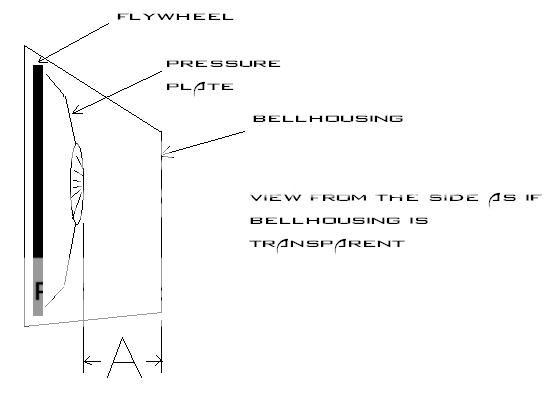
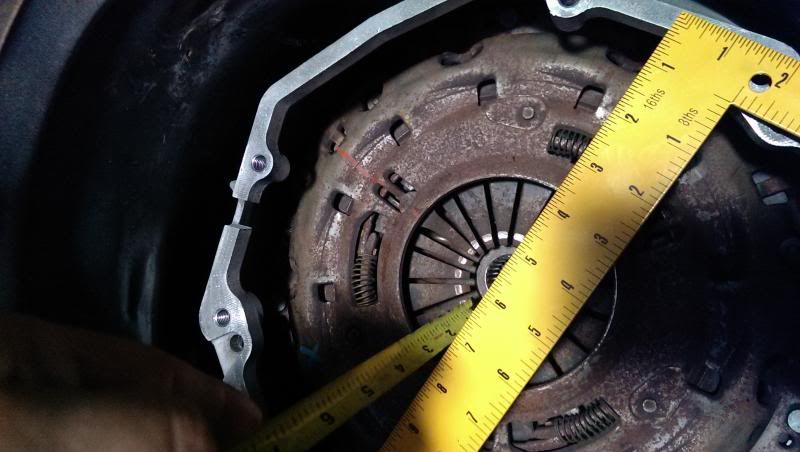
Measurement B: (2")

FYI... just in case people are wondering like I was on how to remove the spring to compress the slave cylinder... just pull on it. The little plastic retainers pop off with a little effort and the front metal/plastic section comes off. Remove the spring then re-install. Crack the bleeder open when you compress the piston so it goes all the way in.
Anyway... so, for those of you who know about this whole shim thing, you already know I've got a big issue. For those of you that don't... The math should be A > B by 0.062" to 0.125" (1/16"-1/8"). I double and triple checked myself, but my measurements come out to A > B by 0.4375", which is at least 0.3125" too much, and much larger then most shims, even the most common "3 pack" some places sell... all together! So something is way off.
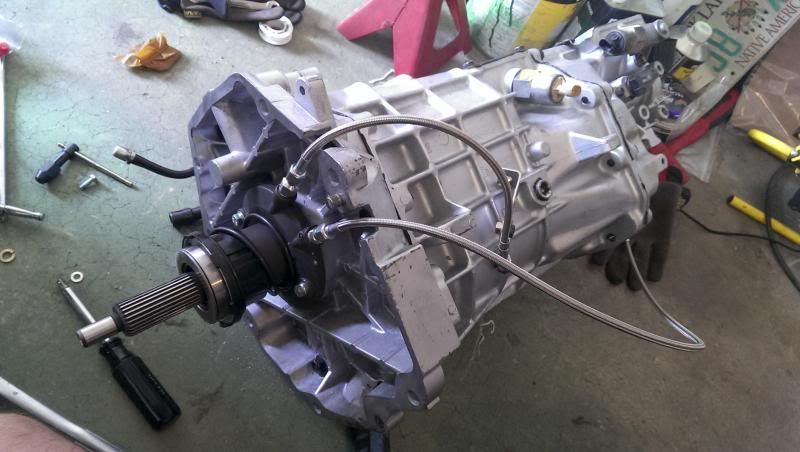
After some nice help from some of the people on this forum... I think I've nailed down my issues.
1. The CTS-V bellhousing (from everything I've read... though I still need to measure it myself) is 7mm (0.2755") longer than the f-body one. I've confirmed that the f-body/gto bellhousing is indeed 140mm (5.5") long.
2. The "larger" pilot bearing that the Corvette ls2 had in it won't work right with my t-56 combo. Had I gotten it to run, I'd most certainly have destroyed my engine's crank bearings due to too much pressure. So, I'll be switching to the "small" style version in the GTO's and F-body cars.
3. I'll need a good 'ole fashioned shim.
On the plus side... without the transmission on the engine, it fires right up!
Unhooked my old 7/8" master...
Removed the reservoir and got out the Dremel to cut out one of the fittings. They're not shaped how I was expecting, and sort of half-pressed in there... but it came out without too much trouble.
Removed the plug in the z32 master and dropped my fitting in there (and tapped it lightly into place)...
Then re-installed my reservoir and put it back in the car, tossed in some new racing blue brake fluid, bled the brakes, and it feels good to go. Looking forward to seeing how it feels once the car's moving.
So that made me feel better to make some progress... and so with a little push from the wife (it was hot and I was getting lazy)... I tackled the next big issue.
I kept fighting with my engine not starting. Fought and fought and fought with it. Eventually I figure out that when I try and crank the engine with the car in gear and the clutch pedal pressed, the rear tires still try to move. So I've clearly got an issue with my clutch and/or slave. I'm certain it's bled correctly, so I decided it was time to pull the thing apart and see if I needed some kind of shim.
I tried to save a little money by catching my brand new transmission fluid while I drained it... but then I dropped the plug. My efforts weren't off to a good start.
Eventually though... I did get it down. Since I needed the bellhousing still on the motor to take my measurements, no sense in removing that! This was actually not too difficult to do.
Time to grab my measurements! I used the procedure listed on LS1Tech.
Measurement A: (2 7/16")
Measurement B: (2")
FYI... just in case people are wondering like I was on how to remove the spring to compress the slave cylinder... just pull on it. The little plastic retainers pop off with a little effort and the front metal/plastic section comes off. Remove the spring then re-install. Crack the bleeder open when you compress the piston so it goes all the way in.
Anyway... so, for those of you who know about this whole shim thing, you already know I've got a big issue. For those of you that don't... The math should be A > B by 0.062" to 0.125" (1/16"-1/8"). I double and triple checked myself, but my measurements come out to A > B by 0.4375", which is at least 0.3125" too much, and much larger then most shims, even the most common "3 pack" some places sell... all together! So something is way off.
After some nice help from some of the people on this forum... I think I've nailed down my issues.
1. The CTS-V bellhousing (from everything I've read... though I still need to measure it myself) is 7mm (0.2755") longer than the f-body one. I've confirmed that the f-body/gto bellhousing is indeed 140mm (5.5") long.
2. The "larger" pilot bearing that the Corvette ls2 had in it won't work right with my t-56 combo. Had I gotten it to run, I'd most certainly have destroyed my engine's crank bearings due to too much pressure. So, I'll be switching to the "small" style version in the GTO's and F-body cars.
3. I'll need a good 'ole fashioned shim.
On the plus side... without the transmission on the engine, it fires right up!
09-06-2013, 05:13 PM
#16
On The Tree
iTrader: (7)
Join Date: May 2013
Location: Laurel, MD
Posts: 163
Likes: 0
Received 0 Likes
on
0 Posts
Haha I was the one that forwarded the thread on SilviaV8forums to Justin so he could know people were having trouble and warranty them 
It's def nice. Hit up my instagram (@BoostinIX) and there's some shots from JE/Sikky. I was just there today and going back tomorrow lol. Working on my own LS swap Should be starting the build thread on here (transferring it from 240sxforums) this weekend.
It's def nice. Hit up my instagram (@BoostinIX) and there's some shots from JE/Sikky. I was just there today and going back tomorrow lol. Working on my own LS swap
Should be starting the build thread on here (transferring it from 240sxforums) this weekend.
09-07-2013, 11:35 PM
#17
Staging Lane
Thread Starter
iTrader: (1)
Join Date: May 2013
Location: Oklahoma
Posts: 60
Likes: 0
Received 0 Likes
on
0 Posts
Haha I was the one that forwarded the thread on SilviaV8forums to Justin so he could know people were having trouble and warranty them
It's def nice. Hit up my instagram (@BoostinIX) and there's some shots from JE/Sikky. I was just there today and going back tomorrow lol. Working on my own LS swap Should be starting the build thread on here (transferring it from 240sxforums) this weekend.
It's def nice. Hit up my instagram (@BoostinIX) and there's some shots from JE/Sikky. I was just there today and going back tomorrow lol. Working on my own LS swap
Should be starting the build thread on here (transferring it from 240sxforums) this weekend.Followed ya. I'm gonna round-trip overnight the trans bushing to be swapped out. Might as well while the transmission's out. I need it back before next weekend though. I'm shooting to have this thing together to run in an autocross track day. Thanks for pointing him over there in that direction!

 09-09-2013, 09:04 AM
#20
Staging Lane
Thread Starter
iTrader: (1)
Join Date: May 2013
Location: Oklahoma
Posts: 60
Likes: 0
Received 0 Likes
on
0 Posts
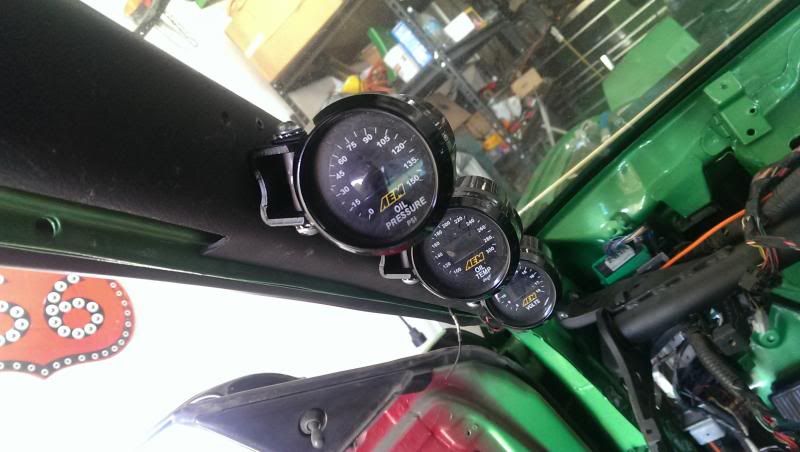
Had I gone LS1, I'd have picked up a wiring harness from Wiring Specialties (had great success with them on a CA and SR20 before) and used all my factory gauges... but since I went with the MSD EFI LS system, I ditched my factory setup and going with all aftermarket gauges (with no plans for a speedo at this time).
I'm sure I'll have this all in another update to my build thread here in a few days... but I did get my A-pillar gauges installed. Next up are some Autometer Elite Fuel, Water Temp, and Tachometer gauges. 2 in a steering column pod and one in it's own pod on the dash brace (since I don't run a dash in the car).
I'm sure I'll have this all in another update to my build thread here in a few days... but I did get my A-pillar gauges installed. Next up are some Autometer Elite Fuel, Water Temp, and Tachometer gauges. 2 in a steering column pod and one in it's own pod on the dash brace (since I don't run a dash in the car).