When you click on links to various merchants on this site and make a purchase, this can result in this site earning a commission. Affiliate programs and affiliations include, but are not limited to, the eBay Partner Network.
Found a leak at the extension housing split line, pulled it to re-silicone. While reinstalling, one must align the 5/6/reverse shift rail with the housing bore, which I didn't do. Long story short, I'm an idiot and bent the reverse shift fork. I went all the way down with it to ensure no more damage, and ordered the 5/6 fork as well just to be on the safe side. Luckily it was during the holidays so NO shops were open... parts should arrive today, planning to have the trans back up and installed Sunday (luckily the only good football game is early Saturday).
Trans is back together, all the hydraulics are stitched up, and I have made a new tunnel. I have a question for the group - I had to cut my floorpan brace all the way back to fit the shifter (due to the .500" spacer and general placement of my engine). I've made a shallow C-shaped piece of 1/8" thick steel to weld to the back side as bracing - is this sufficient?
For reference, I've attached pics of what Chicago TDP did. I basically cut all the way back and plan to weld the C plate to the back side. I've already filled the brace cross-section on either side as shown in the first picture.
Are you placing it on the top of the tunnel ? It would most likely work ok.
But would only suggest that the plate extend all the way down the side of the tunnel for some over kill and some Subframe Connectors to tie it in all together.
I'm welding it to the back side. My shifter extended to the very back of the brace.
I edited the photos to show what I've done. The first is my plan thus far. The area in red was removed. Area in green is the C-shaped piece of 1/8" steel I made to weld to the back side. I suppose I could do like Chicago TDP, though move the top plate back as in the second photo.
That's interesting actually. I didn't realize the bucket seat cars had the additional bracing - I was actually wondering last night while under the car why they didn't connect the aft brace - seems it would've made things more uniform and easier for manufacture. The front brace would need to be cut into two pieces, sadly, to accommodate the shifter, as it appears to sit atop the current brace.
Ok I got it! If you do not want to go to the extreme with a cage I have the next best thing. I assume you are using sub-frame connectors. Take a look at this piece from DSE.
Not saying you should buy a $750 tranny x-member but more on the lines of making a drive shaft loop/chassis stiffener. Cut the floor pan from left to right and recess the driveshaft loop/stiffener and then weld it to the sub connectors, floor pans, and tunnel. This would tie everything together and look badass all at the same time.
Haha, a cage could definitely work. Sadly (or rather, fortunately), I sold the house, and COE is the 29th. So I'm scrambling to get this thing done in the next week and a half. I just welded in a 1/8" piece to the floor pan and brace (a la Chicago TDP), in addition to the C brace I mentioned earlier. I'm fairly these will make the structure much stronger, as it appears the OE brace is maybe 12 gauge.
I've heard the praises from the remote bleeder, maybe it's time to pull the trigger while the trans is going in. Does it stay attached to the trans, or do you have to install it whenever you bleed the system? And what length did you get?
Does it stay attached to the trans, or do you have to install it whenever you bleed the system? And what length did you get?
It will replace the factory bleeder and remain in position from here on out. I bought the 48" bleeder so that I can access it from the drivers seat. When mine is not in use, I route it back over my bell housing, along the firewall and into the rear section of the inner fender well. Out of sight. When it is needed I simply cut a zip tie and go back over the bell housing, under the drivers side and it is within arms reach from the drivers seat. Its a one man operation if the need arises to bleed the slave. The beauty is, you never have to jack the car up or need assistance.
Doubtful; however, I don't think it would be terribly difficult to reroute the intake to the driver's side. I also have my AC receiver/dryer attached to the front of the inner fender, though I'm pretty sure VA designed it that way with the battery in the stock location, so I guess it wouldn't interfere...
Also, here's what I ended up with for the floor pan. It's just riveted in right now. I hope to install the trans to check fitment, tack the new hump in, remove trans, finish the weld and paint tonight. That's a 1/8" plate I bent and welded to the OE brace and floor pan. It turned out pretty well, especially for FCAW.
Welp, I got her up and running. Sadly, the movers packed away my welder, so I have to borrow my buddy's to finish the floor pan. But I got the clutch bled - Tony, phenomenal idea with the remote bleeder. It worked like a charm with my vacuum pump. I also picked up a SpeedTech crossmember to save time, which barely clears my exhaust.
I also wanted to note that I modified my reverse lockout solenoid per this thread due to space restrictions. A quick rundown:
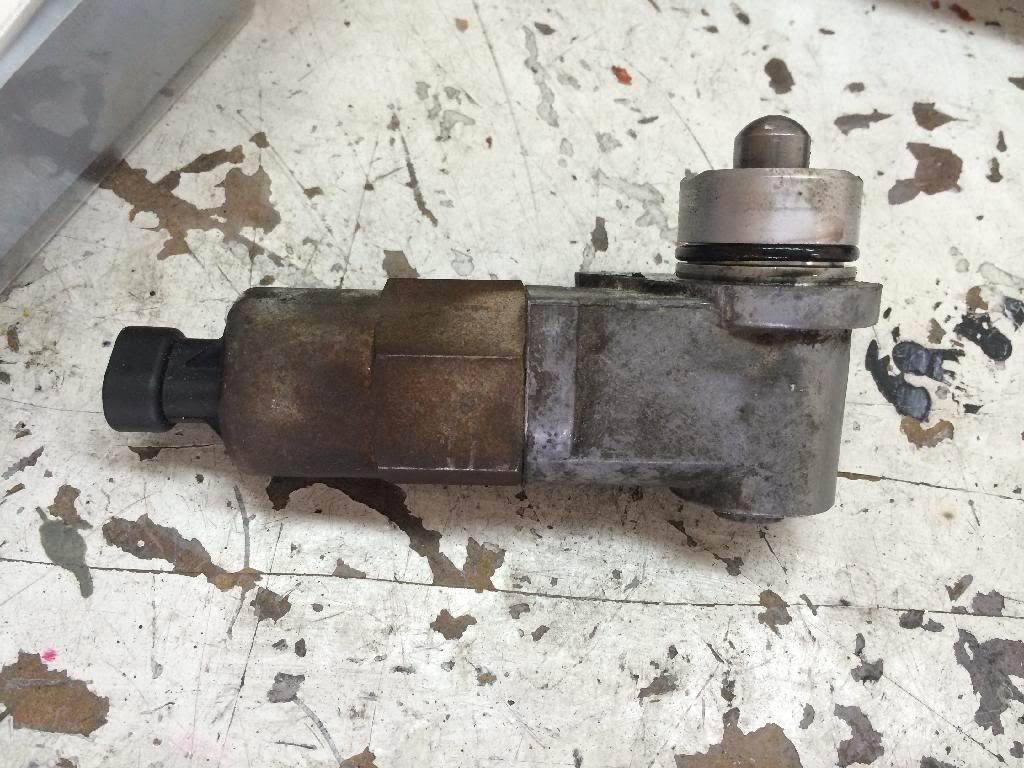
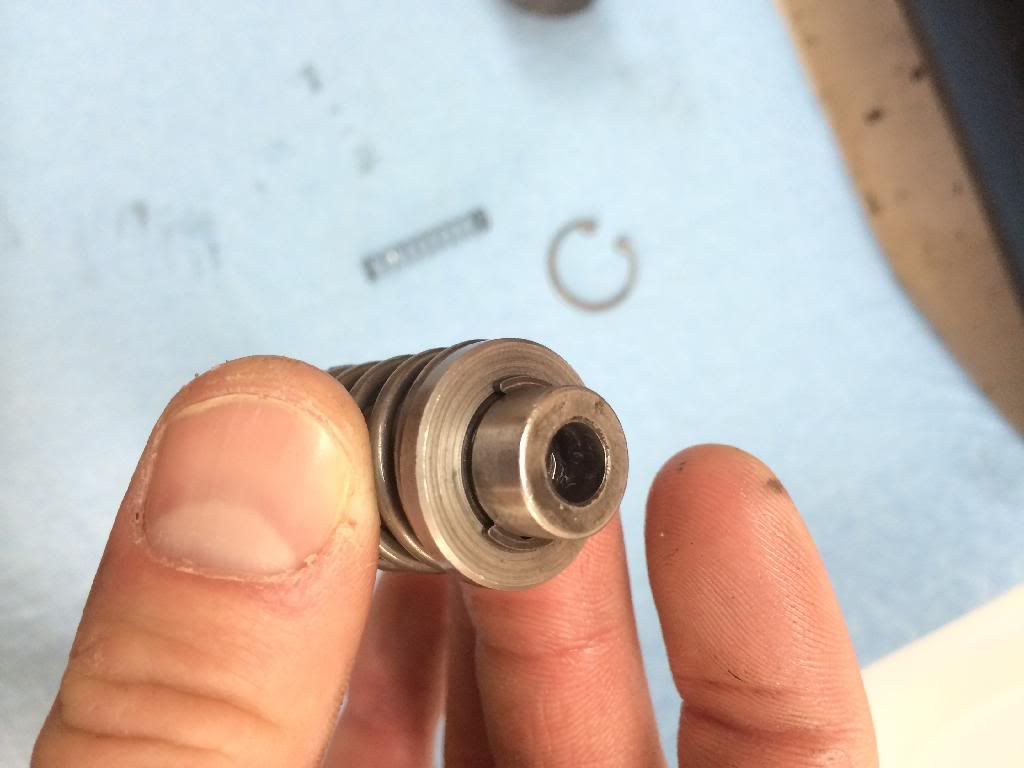
Here's the reverse lockout assembly. That entire left half is the solenoid... Unscrew it and discard.
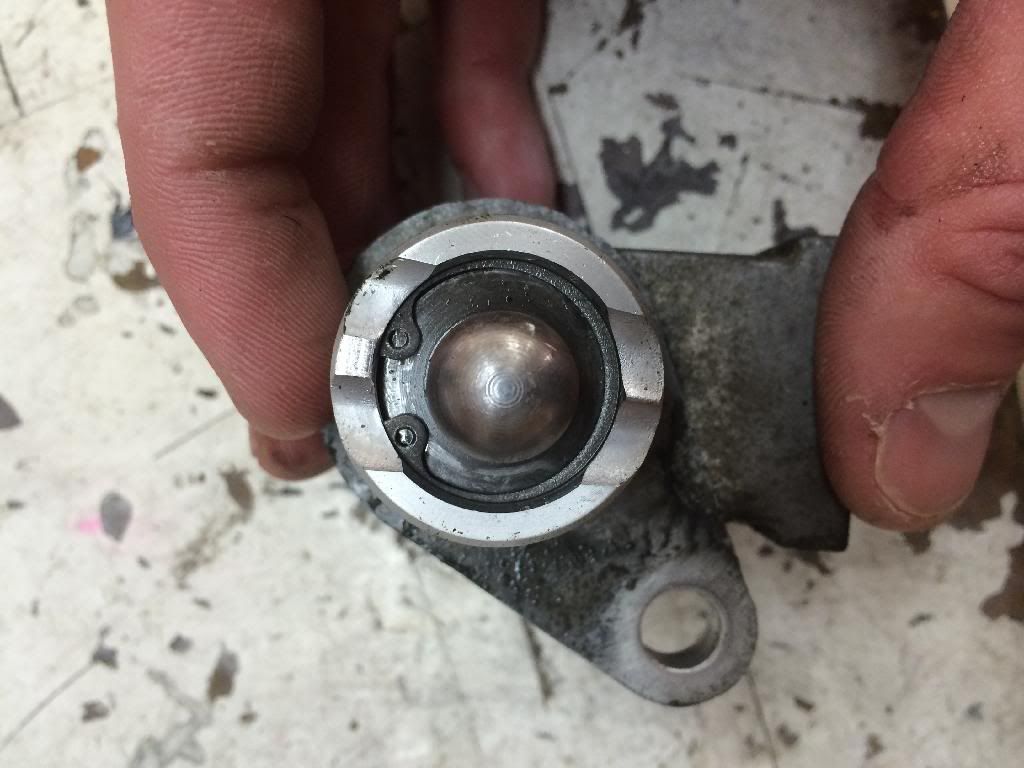
Next, the plunger is held in the housing by a snap ring. Remove it to pull the guts out.
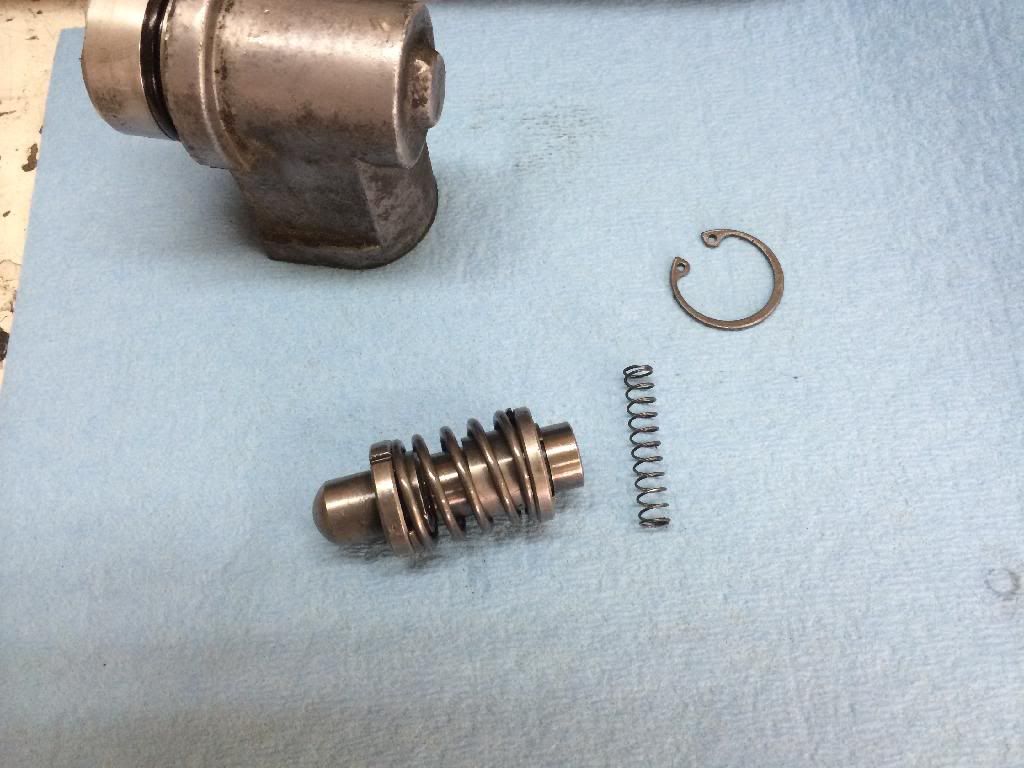
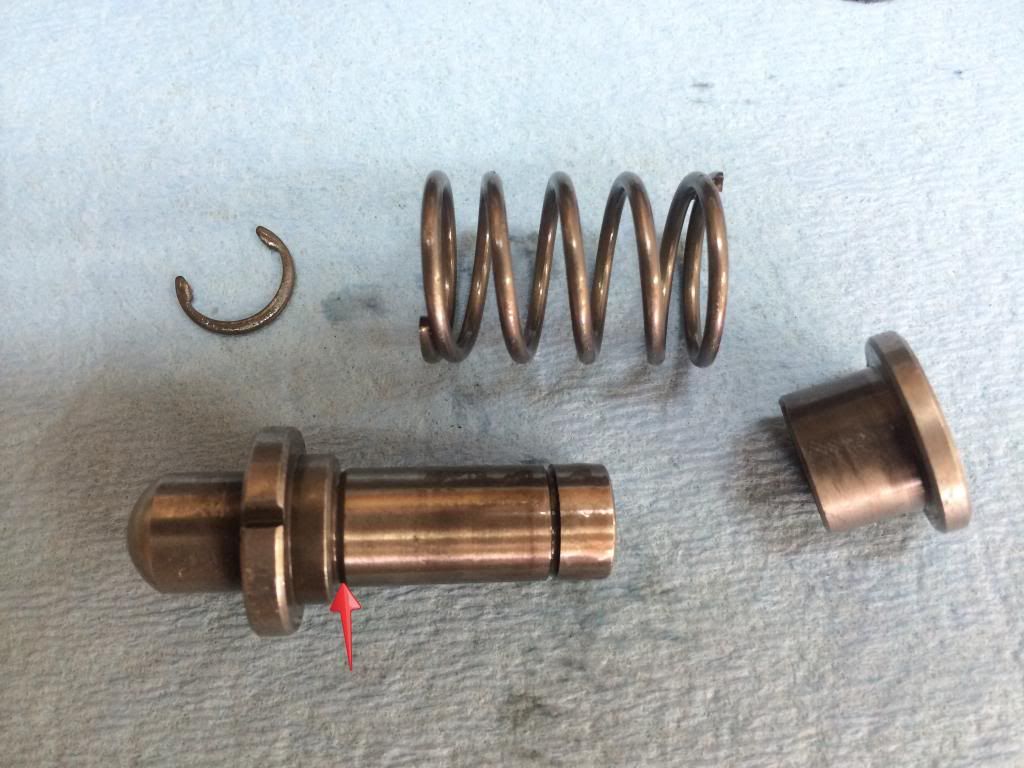
Guts. The small spring can be discarded.
Now, to disassemble the plunger assembly, you must slightly compress the spring in a vise and remove the snap ring.
Here's the plunger assembly apart. You will need to cut the plunger (lower left) at the arrow. The sping and the plunger to the left of the arrow will be used, everything else can be discarded. Note that I purchased a weaker spring than stock; you must cut the OE spring to suit your liking if reusing.
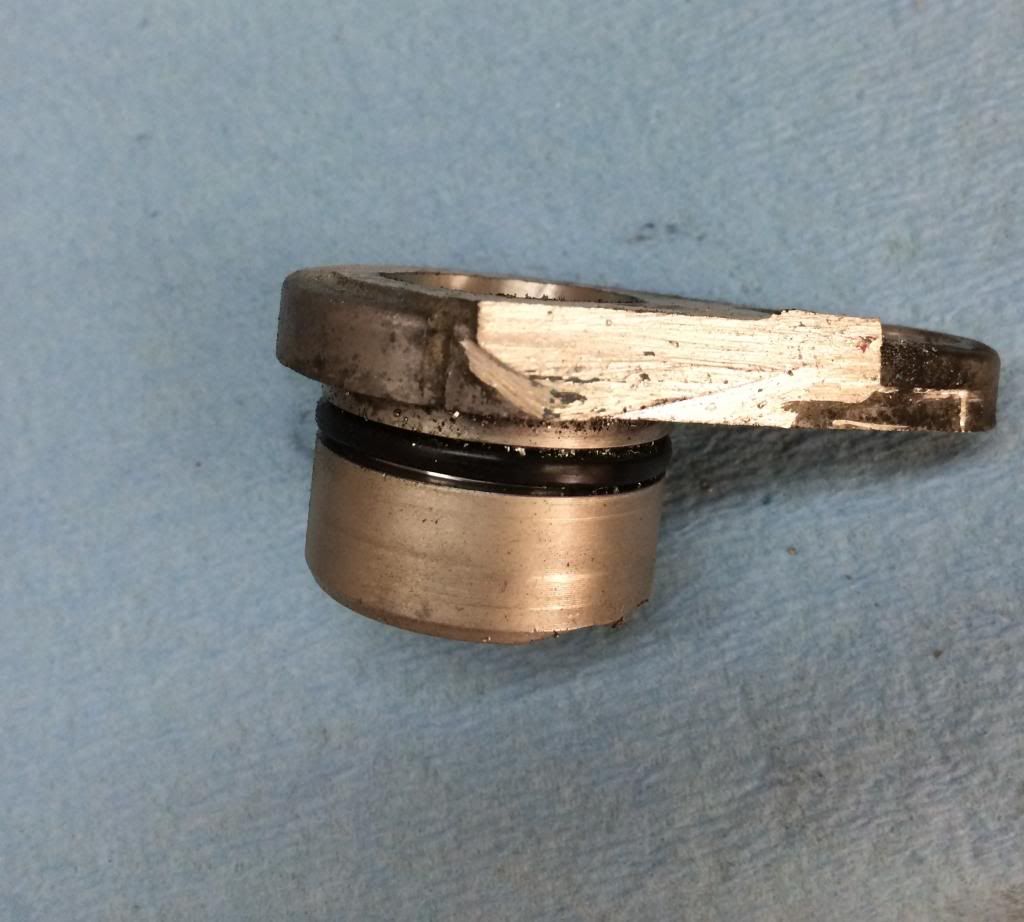
Next, cut the housing flush. You will need to weld on a cap to the back side. I can't weld aluminum, so I made a steel piece to fit over as a temporary solution until I can have another one welded up.
To reassemble, simply slide the larger spring in the housing, followed by the modified plunger, compress and reinstall the snap ring.
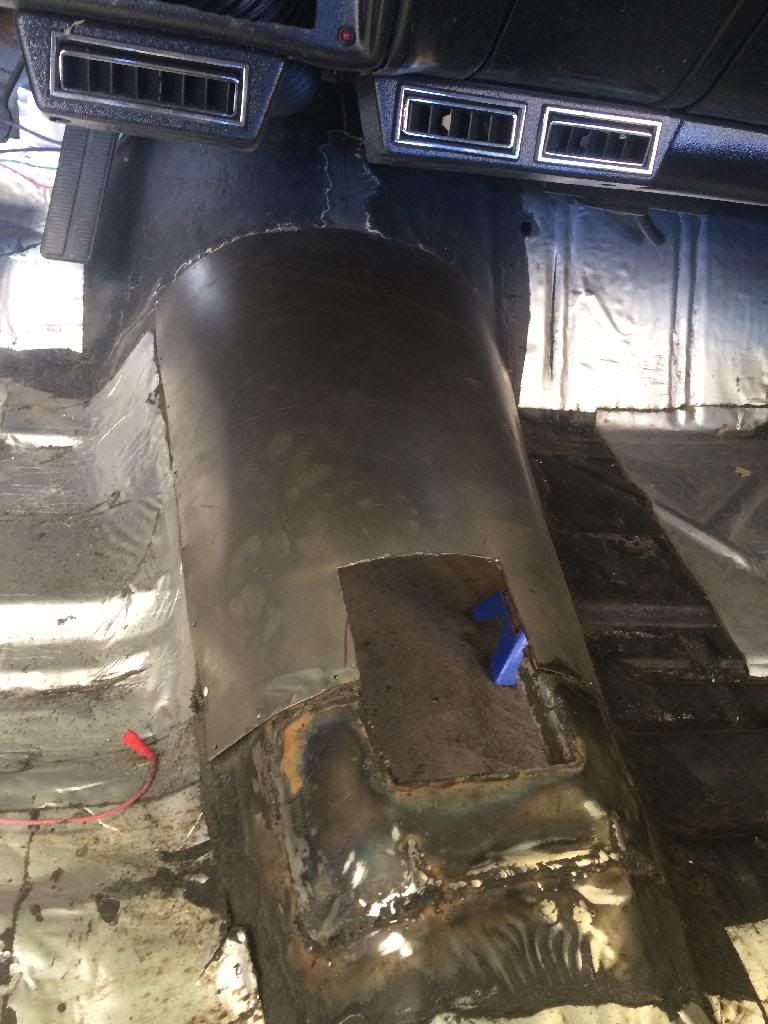
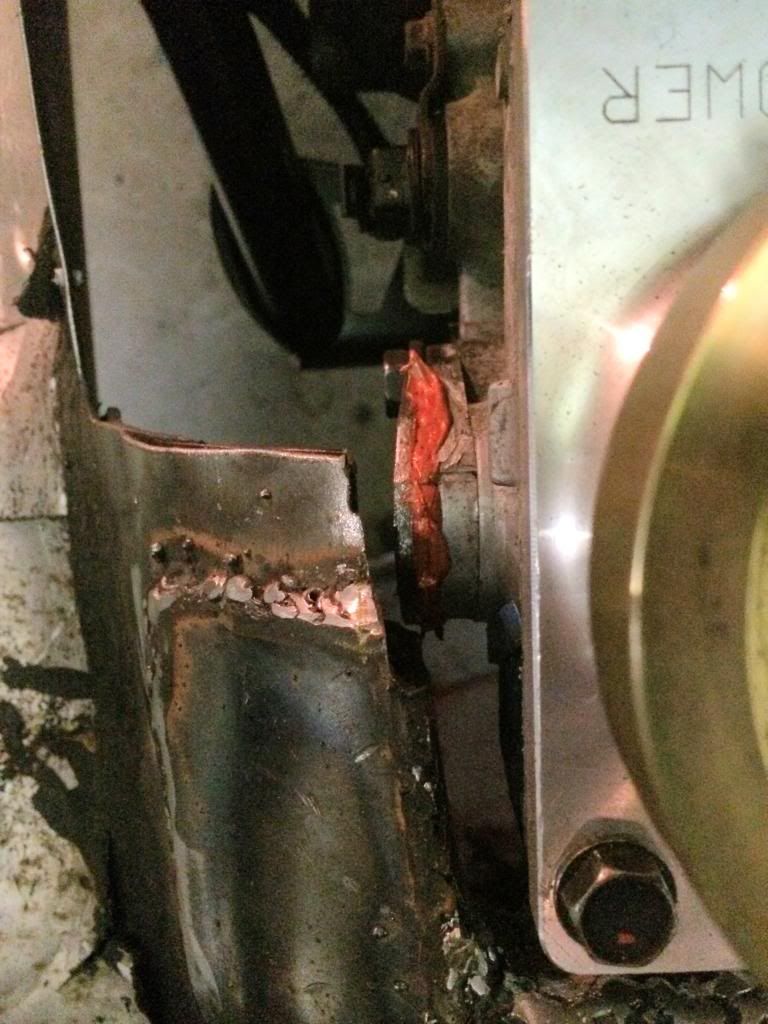
Voila, installed. Note my steel backing plate, which uses the reverse lockout mount bolt as well as silicon to hold it in place. Sadly, I still had to cut back a part of my floor brace to fit. I doubt that would be necessary for most cars, since my trans was pushed back an additional 1/2" due to the early LQ4 crank.
And finally a video of the trans in action. She rows through the gears beautifully. And, uhh, this clutch is... uhh... stiff.
Great job on the tranny swap! And to think you are days away from moving while doing the swap, that's crazy! I think you will absolutely love the 6 speed, I know I do.
Every single one of you planning to install an automatic trans in your car.
I just did a test drive in 5 o'clock traffic. Despite the ridiculously heavy/grabby clutch, damn if it wasn't the best thing I've ever done to the car. I don't like the way the Pro 5.0 shifter handle is canted toward the driver, so I ordered a Pro 5.0 Mustang handle and Cobra leather-wrapped **** to replace it. As I understand, the size/thread pitch differs between the Mustang and Camaro shifters. I actually like the Cobra **** much better than anything I found for GM products.
Last edited by hookemdevils22; Jan 29, 2014 at 10:57 AM.
So I've finally had some time and a garage to work on the car a bit, and fully installed the center console. I also bolted down the e-brake lever, though haven't run the cables yet. Plan is to fab up a couple brackets a la bczee, and cut the cables accordingly.
I also put the rear up on jack stands a few weeks ago, and ran her up to freeway speed. It started vibrating pretty bad no matter the axle location (full droop or weight-on). I still need to check driveline angles (since it's a giant PITA with a car this low), but I'm still fairly certain that I need to rebuild the axle, and see if I can check axle balance just in case I twisted one like I did my previous driveshaft. The plan is to do so in the coming months, once things settle down.
Finally, I took her out to the Good Guys event in November, and had a chance to autocross her a bit (sadly, no photos though). I'm hooked. Though it had the negative effect of resulting in a strong desire for a front brake upgrade; stay tuned for that.
6 Common C5 Corvette Failures and What's Involved In Repairing Them
Slideshow: From wobbling harmonic balancers to failed EBCMs, these are the issues that define long-term C5 ownership and what repairs typically involve.
Retro Modern Bandit Pontiac Trans AM Comes With Burt Reynolds' Autograph
Slideshow: A modern Camaro transformed into a retro icon, this limited-run "Bandit" build blends nostalgia with brute force in a way few revivals manage.
Top 10 Greatest Cadillac V Series Performance Models Ever, Ranked
Slideshow: Cadillac didn't just crash the high-performance luxury vehicle party, it showed up loud, supercharged, and occasionally a little unhinged...
Coachbuilt N2A Anteros Is an LS2-Powered C6 Corvette In Italian Clothes
Slideshow: A one-off sports car that looks like a vintage Italian exotic-but hides a C6 Corvette underneath-just sold for the price of a new mid-engine Corvette.


 [/IMG]
  [/IMG]