When you click on links to various merchants on this site and make a purchase, this can result in this site earning a commission. Affiliate programs and affiliations include, but are not limited to, the eBay Partner Network.
I can only guess VA chose that positioning so they could share line designs or mounting for some other application. I'm sure a lot of the buying public would not even notice the difference. As long as it's functional, it's probably okay. Bugged the heck out of me so I repositioned it back on center. Given your system is already charged and working, no big deal to keep it as is.
If you don't find the answer on the headlight bucket springs in the meantime, I will see if I can somehow take photos of mine later tonight.
Is your steering disconnected or toed out for some reason? Or is that just the photo and some normal akerman going on?
It's the angle of the photo. at least, I assume my toe is in ~1/16"-1/8" - I did an alignment after some suspension changes, but my steering box mounting bolts were loose. So I took it back after getting it bolted back in, and they set my camber to 0� because I didn't specify that I wanted them to keep it at 1/4-1/2� that it was at. I've been too lazy to take it back.
You can get a decent look at the spring by removing the bezel, but it's not a HUGE deal if you don't care to.
So with the new radiator keeping things under 210� my constant use of AC exacerbated an issue I've had since I finished the swap - voltage drop under electrical load. I'd see ~13.5v at first fire, but accessories and (especially) fan would drop that to just over 13v when it got to operating temp. Add in the vintage air, and volts would drop to below 13. I checked wires and connections to no avail. I was about to throw in the towel, and completely redo my alternator wiring, but then I stumbled across a recent alternator thread that had some good ideas. Specifically, there were some good posts by Pop N Wood and especially Project GatTagO.
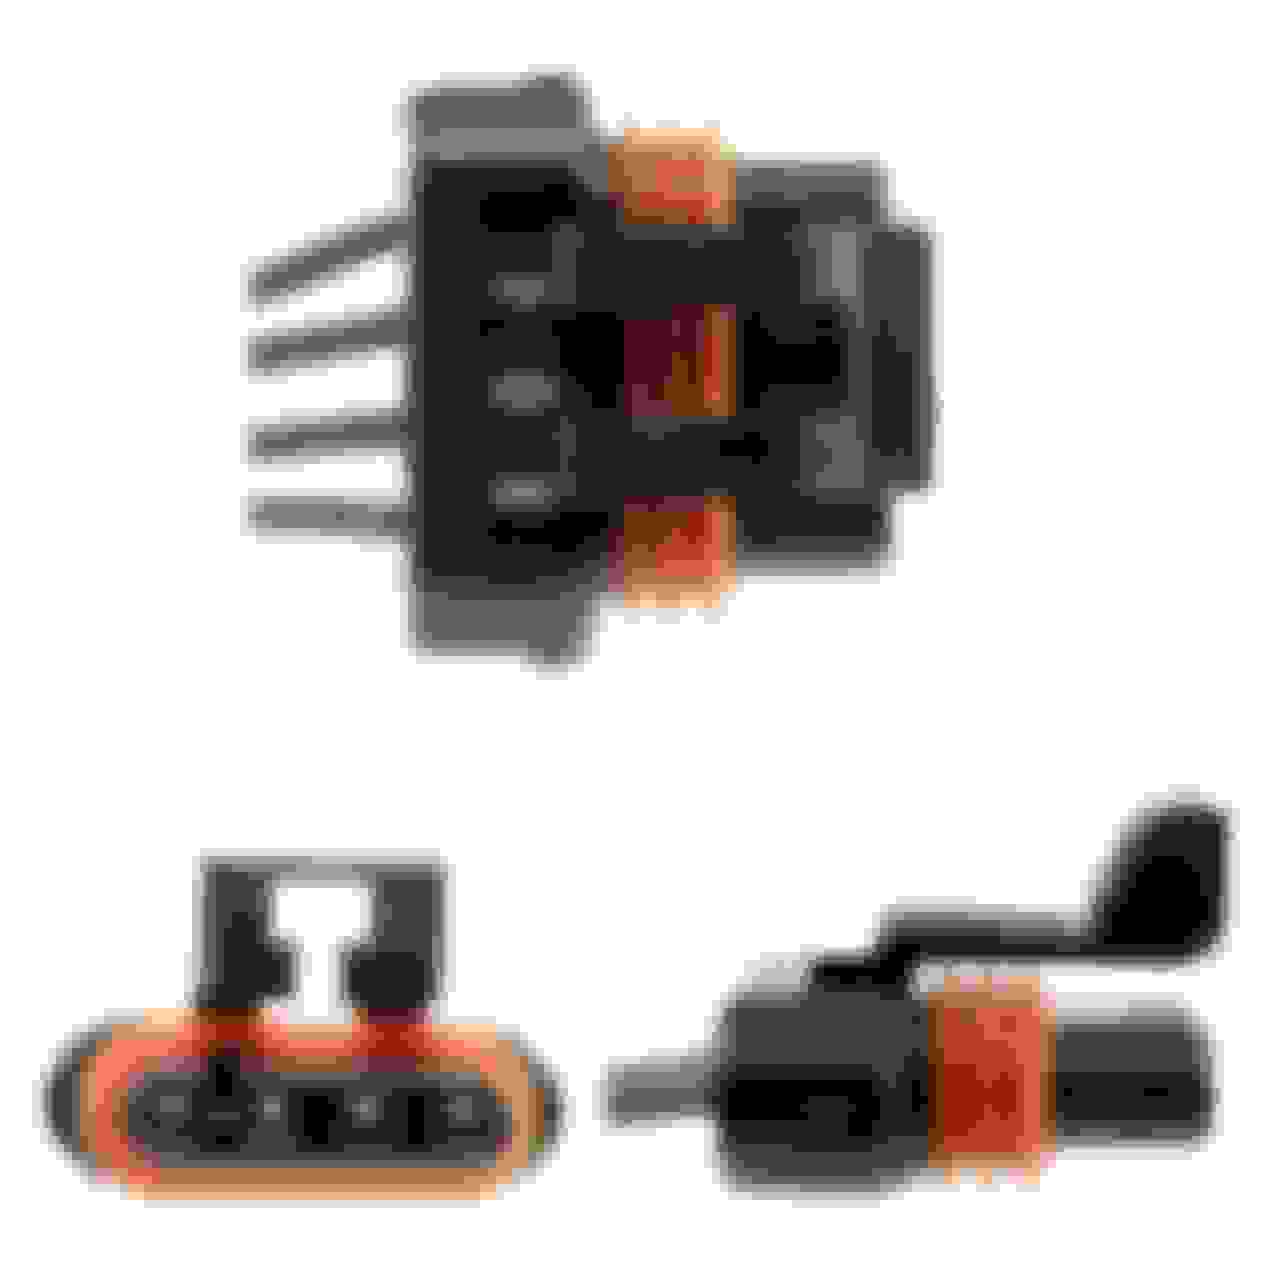
My 105-amp LQ4 alternator has one wire, to the L terminal only: this is the alternator turn-on signal from the PCM (red connector pin 15 for the 99-02 truck). The S terminal, which is used to sense voltage to be controlled via the main distribution point, wasn't used at all. Based on GatTagO's advice, I wired the S terminal using a Metripack 150 connector like that shown below. I had to do some quick dremel work to make it work due to the fact that the alternator plug is keyed, but it was otherwise plug and play. And wow, I'm finally seeing 13.5+v regardless of load, all for about $12 and an hour of my time.
From the alternator bible linked above:
Crucial connections:
...I consider it crucial for good performance that you also wire up the remote voltage sensing terminal. To do this, connect the S terminal to the vehicle electrical system's main power distribution point (bus bar, main switch, fuse panel, etc.). If the S remote voltage sensing terminal is not connected, the voltage regulator will revert to internal sensing of the alternator output terminal voltage - with all the limitations that brings. You will see some alternators wired with a short jumper wire from the S terminal directly to the battery connection at the back of the alternators, but this is neither the proper method for remote voltage sensing nor necessary for internal sensing - do it properly or leave it out.
Last edited by hookemdevils22; May 30, 2018 at 02:24 PM.
Congrats that's awesome! Good reminder to go to the basics when you have an issue like this. Have you had a chance to drive it much in hot weather? Really interested to hear how it does with the ac blowing. Any events planned for the car?
I've been driving it regularly: to work once or twice a week, to drop off the boys at school, and to their practice. I'm probably driving it more than my "daily", since I bike to work regularly. And the only thing really keeping me from driving it more is highway vibration and an awful rear suspension setup for the street. So I have another project to look forward to.
It topped 210� yesterday coming off the freeway, in 102� weather with the AC on high, but came back down to ~205� after a couple minutes on surface streets. I watched the temp gauge like a hawk at the light, but it wasn't ever concerning. I wired up a manual switch for my high-speed fan trigger last summer when I thought the PCM/trinary switch weren't triggering it; I flipped it on with no voltage drop, which suggests the fan was already on high. I'll be eliminating it in the coming days. I plan to continue driving until failure, which isn't out of the realm of possibility as we still have another 15� to climb. So I'll hopefully be able to declare victory in August.
Glad to hear she's driven on the regular. The kids are always going to remember heading to school in daddy's loud/fast car!
Your avatar is dated now with the old master/booster combo, yellow radiator hold-down panel, and cross-over coolant hose. The engine bay is looking super clean these days.
Father�s Day came early this year. I recently dropped the rear ever so slightly, and if you follow me on IG you saw that I found my rear springs are different lengths. That was the last straw. Now, I likely won�t get to this until next month, since we had our third baby yesterday, although I do have two weeks off for paternity leave... You�ll also note the door panel - I bought all new door panels and headliner, so I have a few summer projects lined up.
The plan is to take the axle completely out of the car and have it looked over by a shop for straightness and general condition, plus finish welds.
First a warm congratulations on your third! Hope mom, the new baby and siblings are all doing well. That could start pushing the limits of the back seat but three of the right car seats and boosters should still work That's the limit though unless you are gonna put a front bench in her lol
Second you suck! I'm jealous as hell of that box of goodness I hope the install goes well and both fitment and performance are as good as I've heard.
Thanks guys. I'm definitely done with kids. The Nova back seat is just as big or bigger than our other cars (2005 Civic and Element), and we've found boosters that work with the car seat in those.
One thing the boys have constantly complained about is the fact that my rear windows don't roll down all the way. I have a late-71, and it seems that somewhere along the line they changed them over to only roll down 3/4 of the way (along with the front bumper lenses going amber and tails going with a square reverse light from rectangular). I had a set of regulators from when I thought my front was bad, and decided to check them with the interior out. Lo and behold, they were different! The early-style arm (right) is lower on the gear - note the arm in relation to the gear teeth. The cool thing is that you only need drill out a rivet and move the arm to another hole to do this mod yourself. I now have a new headliner, door panels, and rear windows that roll all the way down.
With that done, I'll shortly be moving on to the good stuff...
Last edited by hookemdevils22; Jun 19, 2018 at 01:18 PM.
Did you do the headliner yourself? Mine's falling apart and I need to replace it soon too.
That's an interesting discovery on the regulator. On my 70 I have one side working and it goes all the way down but it can get bound up at the bottom sometimes. I wonder if they changed that so it wouldn't lock up at the bottom.
I did. It took nearly the full day, and I installed the bows in the wrong place and failed to notice until after I glued it Dow, so I will need to redo it in the not so distant future. I don’t want to redo it anytime soon, though.
It’s possible they redesigned it to eliminate ate binding. I put white lithium grease in the forward channel and they roll effortlessly - my passenger side was stuck before.
That's a bummer about the bow position/gluing! My headliner is falling down. It was somewhat manageable for a while until my son gave it a tug asking" why is there a hole here?" which was followed by an awful "riiiiiiip" sound. Damn kids! I am debating whether to do it myself or get someone with experience to do it. It's just one more thing on my long list!
Hope things are going well with #3. If you don't have a minivan yet, you don't know what you're missing out on!
That's a slick tip on the rear windows.. I would love for mine to roll all the way down, I always just figured that it was mechanically limited for all years to not go all the way down. Certainly looks silly with just the forward-top corner of the rear glass sticking up from the trim and not be fully flush.
Can either of you guys point me to an install/tips/tricks thing for headliners on our cars? Or anything to look out for in general? Maybe I'll just wait for Clint to do his and create an in-depth write up on his build thread... the headliner and sail panels are the last things I have to install in my interior.
FYI, I have done a few 60's pontiacs which are similar. They have gotten better every time I do it but there is always a place that is a little off or some glue that can be seen cause it gets everywhere. When it came to finishing my upholstery, I did not want the hassle. What happens is usually you get glue on the edges, then it gets all over your hands. Or, you get a little more stretch on one side or the other and it looks off. Or, worst, you trim a little too short and have a hard time tucking and gluing the last edge.
So, just my .02 cents, I paid an upholstery shop $200 and it looks amazing. He did a great job, steamed out the wrinkles and it was all done while I was out on my boat catching fish! No awkward time with my arms falling sleep over my head trying to clips and windlace to hold up the headliner. Not ever fun paying someone to do the job but it was done once and done right.
I totally agree.. there are some things (very few apparently) that I'm totally willing to pay someone else for their time and hassle of doing. I imagine seats have to be out for it to be easier to access?
I drove the car there with 1 seat, not sure if they took it out. The back seat was out because I had them recover that with a matching cover to flow with front ProCar buckets I installed
Also, they will match the visors and sail panels to the head liner, another detail that is important
It wasn�t *that* bad with the seats in, though I�m still cleaning that damn 3M aerosol adhesive that got past my attempts to mask the interior.
I called a shop to do another car, and they quoted $1,500(!) to do it. Granted, it was a wagon, but that drove me to attempt this myself - worst case, I�m out $55 and a few hours of my time.
I had some similar crazy-high quotes when I called around, but nobody would give me a firm number until they saw the car. They all were assuming they would have to take windows out which I am pretty sure is not required. There is a local shop I'm thinking about taking mine to for a quote and I like the idea of removing the seats to give them more access and make sure nothing comes back with adhesive on it. I have not yet had the pleasure of driving my car while seated on a milk crate and I figure that is one of those rights of passage we all must experience once!
Nice to see the rear coming out. Are you planning to use the same axle assembly and just remove the old brackets? Any changes beyond just putting the torque arm system in there? Feel free to text if there's anything I can help with. If I were closer I'd help you wrench & fab.
Last edited by -TheBandit-; Jun 27, 2018 at 02:47 PM.
After more than a month, I'm finally nearly finished with the new rear suspension. I elected to let a shop take care of the axle -- they cleaned and welded new brackets to the tubes, and replaced bad pinion bearings.
Once I got everything back (including powder coat for the Speedtech parts), it was time to go back up with it. Years of pinion seal leaks left some serious grime on the pumpkin, so the boys and I cleaned and repainted it before assembly.
Installation was surprisingly easy. I had to cut off a bracket on the forward and to the driver's side of the fuel tank and remove the rubber pinion snubber , but otherwise everything went together well. Sadly, the panhard bar was machined incorrectly, so Speedtech are sending a new one (hopefully) next week - you can see that the axle isn't centered laterally at the moment.
I included a check list below since I know you all love them so much. Once back down, I'll need to have the alignment checked to ensure the wheels are square. I will also need to whip up an H pipe for the exhaust, as my X pipe hits the torque arm.
6 Common C5 Corvette Failures and What's Involved In Repairing Them
Slideshow: From wobbling harmonic balancers to failed EBCMs, these are the issues that define long-term C5 ownership and what repairs typically involve.
Retro Modern Bandit Pontiac Trans AM Comes With Burt Reynolds' Autograph
Slideshow: A modern Camaro transformed into a retro icon, this limited-run "Bandit" build blends nostalgia with brute force in a way few revivals manage.
Top 10 Greatest Cadillac V Series Performance Models Ever, Ranked
Slideshow: Cadillac didn't just crash the high-performance luxury vehicle party, it showed up loud, supercharged, and occasionally a little unhinged...
Coachbuilt N2A Anteros Is an LS2-Powered C6 Corvette In Italian Clothes
Slideshow: A one-off sports car that looks like a vintage Italian exotic-but hides a C6 Corvette underneath-just sold for the price of a new mid-engine Corvette.