

'70 Nova LY6/TH400 6.0VVT

Thread Starter


Joined: Apr 2010
Posts: 2,816
Likes: 86
From: Instagram @chevyhotrodder
From the conversation it seemed to have been running great prior to the failure. He had put a lot of passes on the motor already including a few dyno pulls that killed the tranny. I asked him if he was sure the reluctor was the culprit and nothing had come apart that could have knocked it (for example no 8 rod/piston coming apart). He was pretty sure the reluctor went first based on his data log and the fact that the last few rod/piston assemblies were still fine. I actually don't know the extent of the resulting damage - he described it as though most of the bottom end was still okay. I don't know the guy or how to get ahold of him or I'd ask for more details. He said when he called Manley they said they hadn't had one fail yet that they knew about, but who knows.


I wouldn't see why you would need a catch can on the clean side as it pulls air from the front side of the throttle blade. Unless you are referring to piggy backing them both on the dirty side as a fail safe. Check out FroJoe's he made. He would make a great neighbor!!! Maybe you can sweet talk him into making you one. The baffling in the valve covers are supposed to be "improved" on the later models but after seeing how dirty my intake runners were on the 6.0 after I freshened it up, I wouldn't trust them. I bought my LS6 "revised version" for $88 and it came with a new gasket. Not bad in my opinion. I have not pulled the throttle body yet to see how it is performing but as soon as I do I will report the good or bad.
Thread Starter
Joined: Apr 2010
Posts: 2,816
Likes: 86
From: Instagram @chevyhotrodder
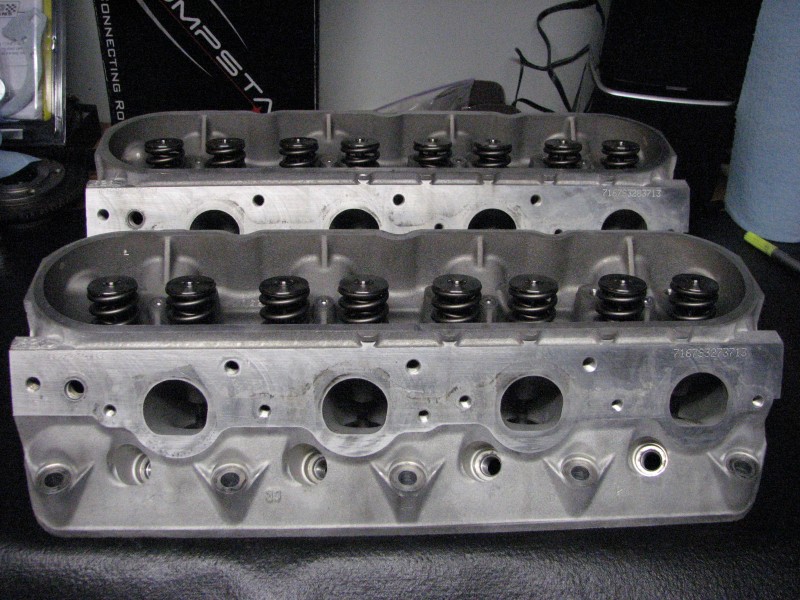
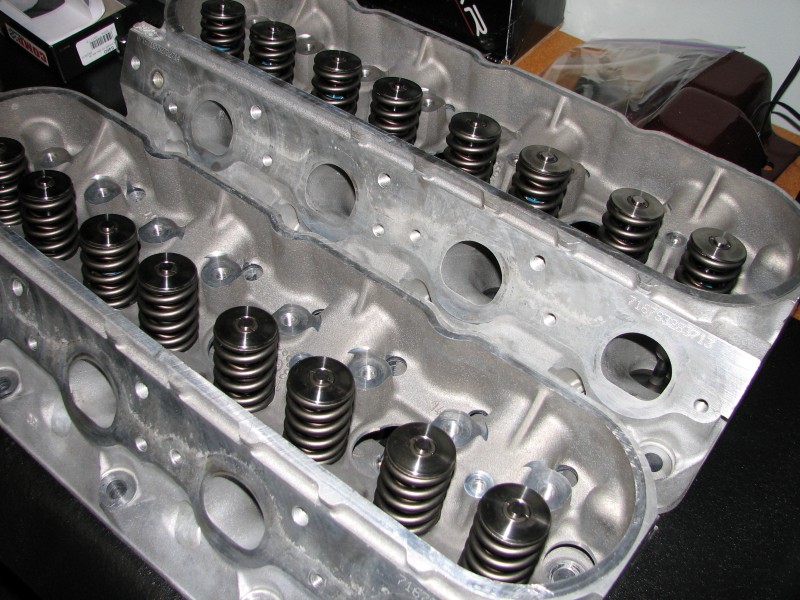
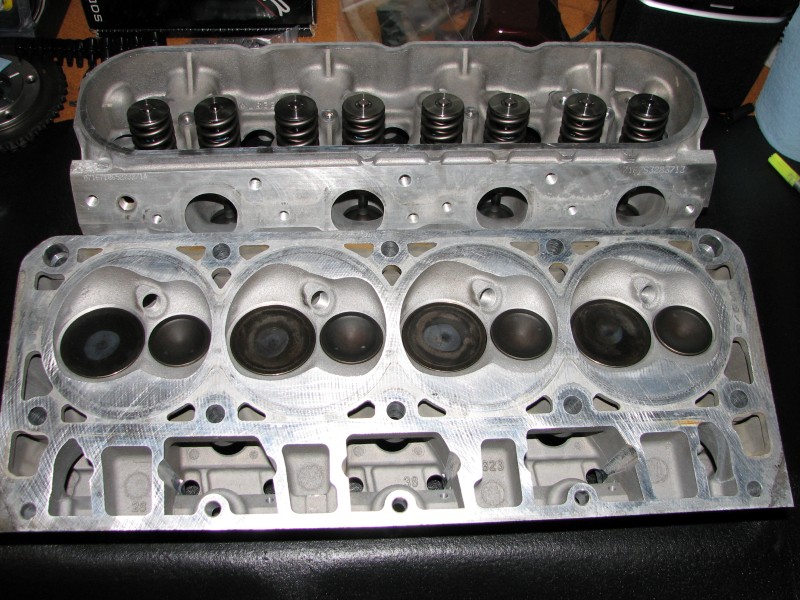
Here are some photos of the cleaned up & assembled heads:
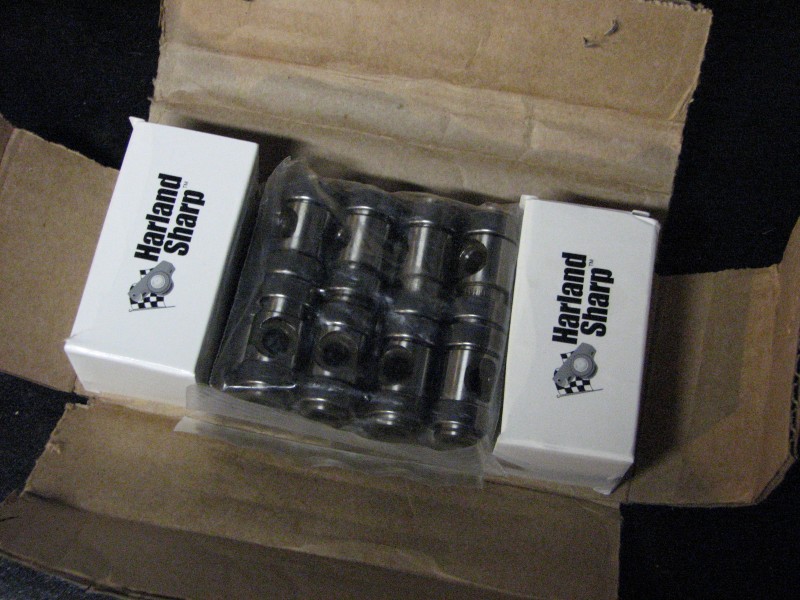
I wish I had brought the camera when I picked them up. I could have snapped a photo of the lapped valve surfaces. Anyway, right now I am waiting on parts to arrive (phaser & tensioner from Scoggin Dickey) so I can button up the bottom end. Meanwhile I received my Hardland Sharp trunnions
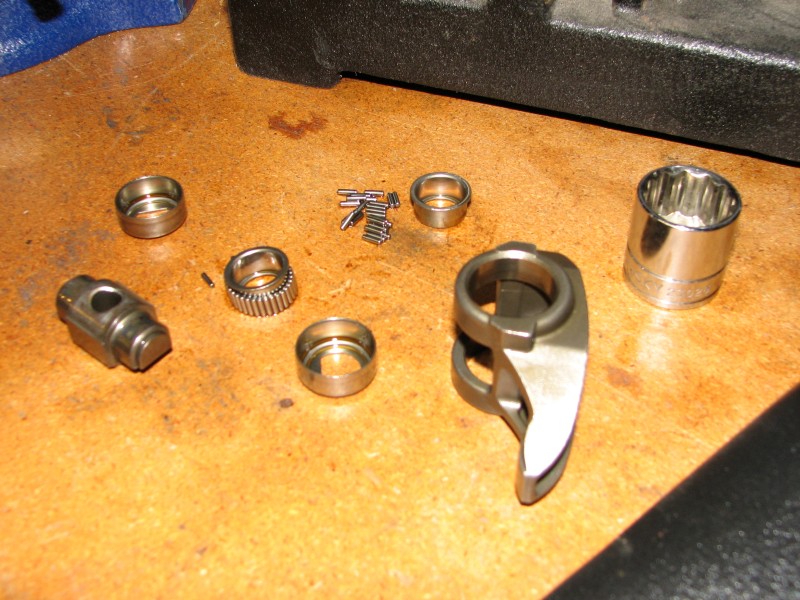
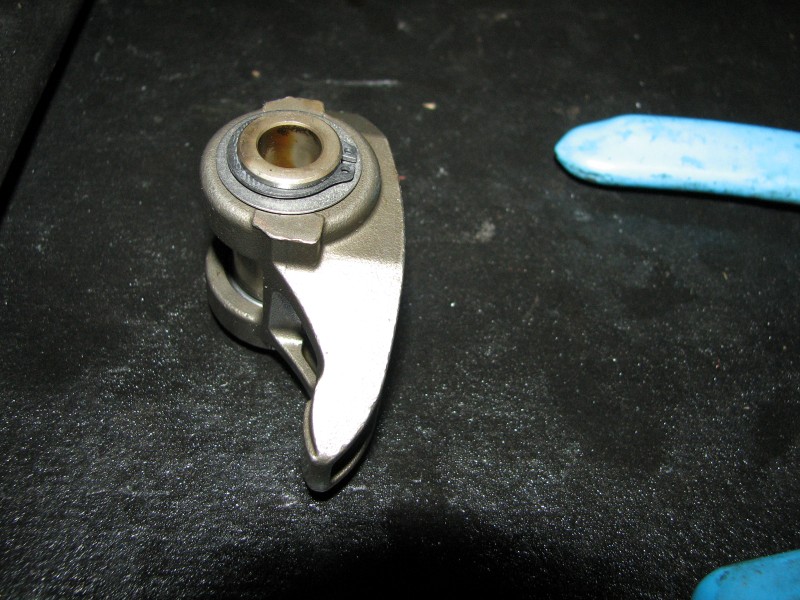
Here is the factory trunion blown apart.
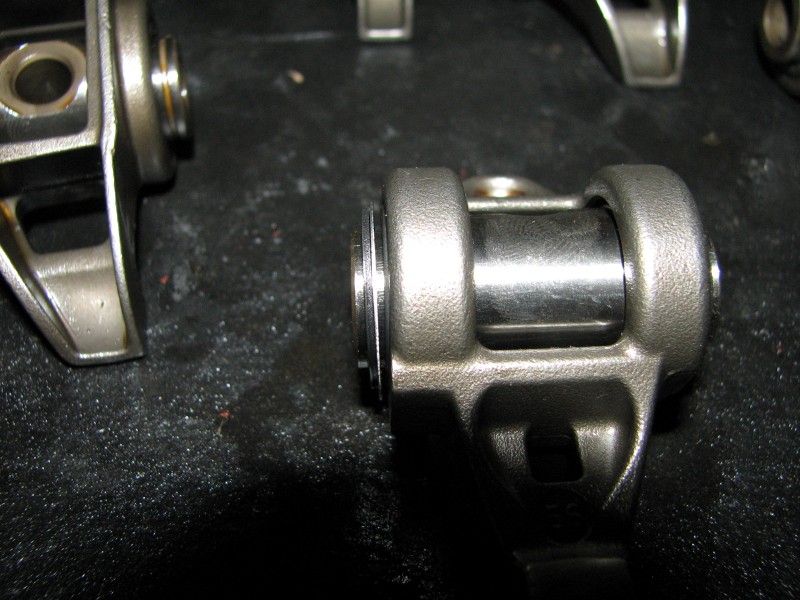
And here is a trunion with the HS trunion installed.
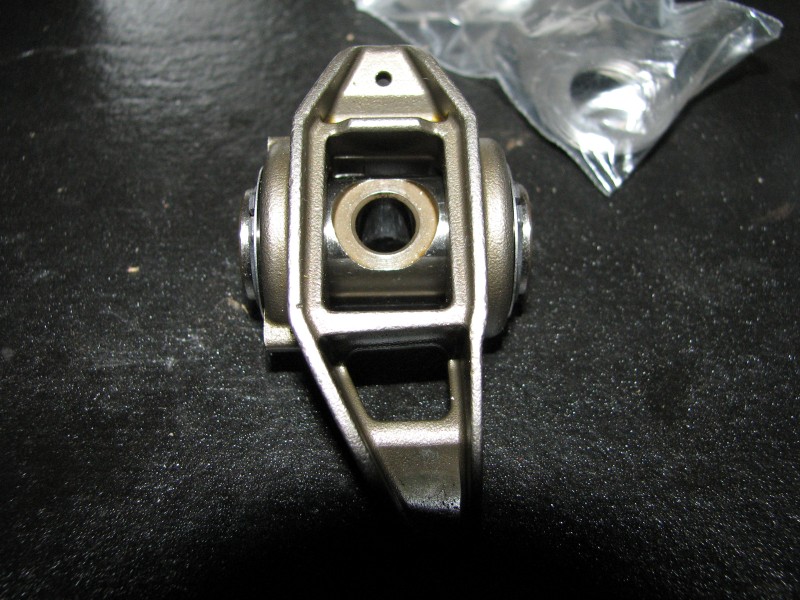
Notice how the end of the trunion is drilled for oil flow to the bearing and there are washers on either side.
The only difficulty with these is hitting an appropriate press depth for the bearings. HS does not supply installation washers, so I had to use a socket to press the second bearing in. There's nothing to control the press depth, so you can end up with side-to-side play or over press them to binding. I am not sure how much side-to-side to leave. The washers & c-clips aren't constraining. I need to put a call in to HS for their recommendation. Radially the bearings feel great. There's no slop and they move free & smooth like they should.
Thread Starter
Joined: Apr 2010
Posts: 2,816
Likes: 86
From: Instagram @chevyhotrodder
For me the main factors in going with HS instead of Comp Cams were:
- Very personal customer service with a great level of technical communication. Comp has good customer service too, but I like supporting a mom & pop shop.
- Assurance that all parts are US manufactured. To be clear, I do not know where Comp manufacturers their parts. I have heard of c-clip failures on Comp installs, but I don't know if that is a non-US sourcing issue. I did confirm HS uses US sourced materials (metal, bearings, washers, c-clips) and manufacturers their trunions in house.
- Splash oil feeds. I like this feature, but looking at other roller rockers on the market, this kind of thing isn't common so it may not be much of an advantage.
- Purchasing from the originator. To my knowledge, HS pioneered the upgraded trunion retrofit for LSx rocker arms and Comp followed with their own version. When someone innovates, especially a small company, I like to support the innovator.
I am neutral on the thrust washers. I think they will prevent wear between the c-cips and bearing shell or rocker body, but I'm not sure how important this is and it may impede some splash oiling from getting to the bearings.
The disadvantages I see with the HS product compared to the Comp product
- Cost; slightly more expensive than Comp's setup, but I found it was significantly cheaper when I called than what the HS website advertised.
- Sourcing; as far as I can tell you have to buy direct from HS whereas Comp is carried by many suppliers
- No installation washers provided; not a big deal, but the install washers would be nice.
- No instructions provided; not a big deal to me, especially given the great technical customer service available
Thread Starter
Joined: Apr 2010
Posts: 2,816
Likes: 86
From: Instagram @chevyhotrodder
I'm starting to get really antsy and as a result am about to rant. My phaser finally made it to Scoggin Dickey today and is shipping 2nd day air, so hopefully I'll see it this weekend. The waiting has been killing me. The bottom end is just waiting on the timing set before I can close it up. I put in the barbel restrictor and front oil plug, replaced the rear cover seal, mounted the rear cover with a fresh gasket, drilled the windage tray to mount on the ARP studs, drilled the oil pump pickup mounting tab for the same reason. As soon as these parts come in it shouldn't take long to button it up. In the meantime I've pressed out all the old rocker trunions and installed half of the new ones - should be done with those tonight. If things work out I could stab it back in this weekend. Now wouldn't that be somethin'! One more thing to be thankful for next weekend, if it works out.
C'mon weekend....
C'mon weekend....


I am doing a build but on a 2010 5.3. Had it bored 0.020 and going from a 53x to 24x. Bought the tool to install the new reluctor wheel and then start the build.
Good luck!
It is Friday!!!
Weekend time!!!

Good luck!
It is Friday!!!
Weekend time!!!
Thread Starter
Joined: Apr 2010
Posts: 2,816
Likes: 86
From: Instagram @chevyhotrodder
I'm anxiously awaiting parts, but they won't show until tomorrow so here are some photos of prior progress.
The new barbel restrictor is in place after a light coating of engine oil.
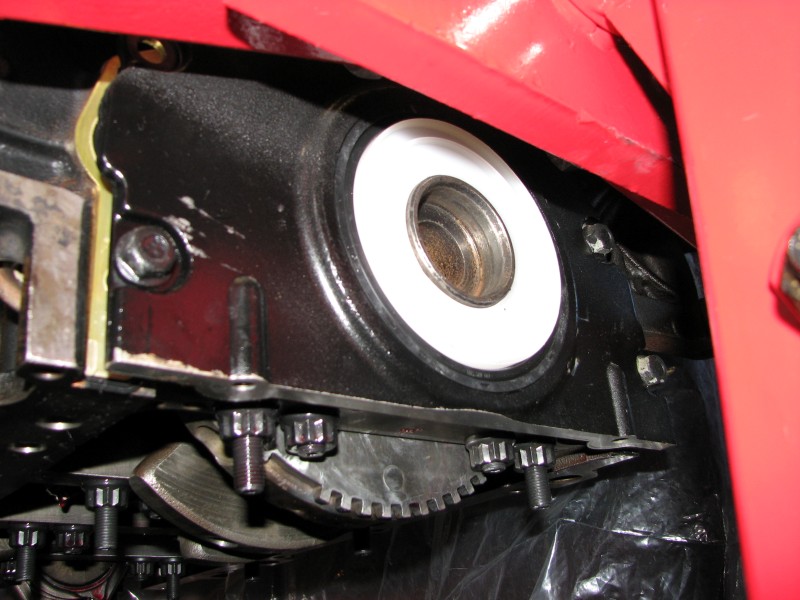
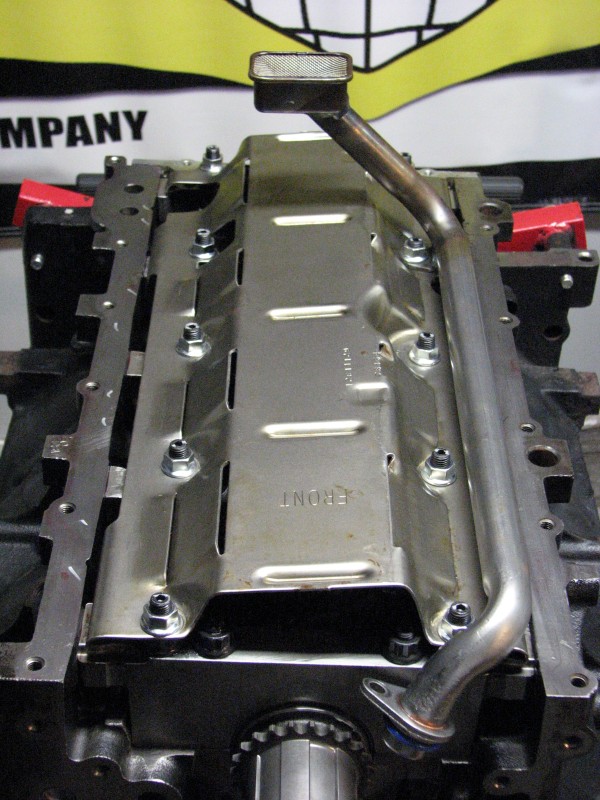
The rear main seal comes with a white plastic retainer that's used to align the seal and slide it onto the crank when installing the rear cover. Afterward you just toss it. It doesn't take much to eyeball the rear cover for alignment at the oil pan rail. Once it was aligned I torqued most of the bolts to spec. Unfortunately I can't get a torque wrench (much less any socket wrench) between the back of the engine and the stand, so I'll have to tighten the remaining bolts when the engine is on the cherry picker.
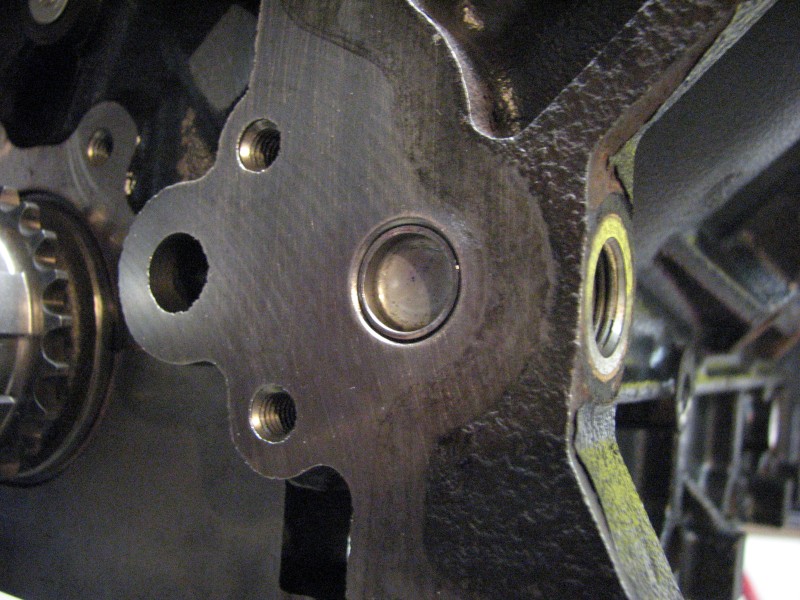
I installed the front metal oil plug with a light coating of medium strength Loctite. It gets tapped in place until it is subflush about 0.010in.
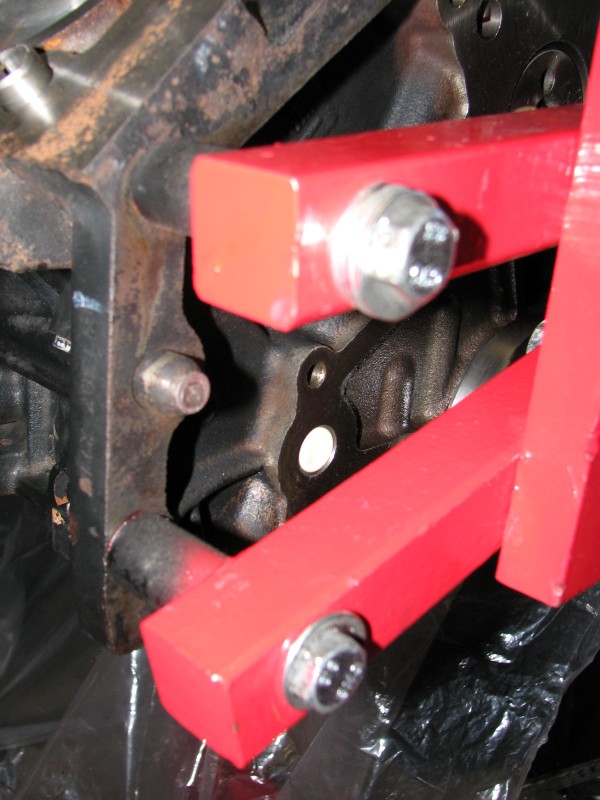
In order to install the windage tray I had to drill a couple of the holes out for the larger diameter ARP studs. I also found when I put it in place that part of the sheetmetal hits the inside stud on the #3 main cap. You can see it contacting if you look near the back of this photo.
I decided to just go ahead and tighten things in place, letting the sheetmetal "self clearance". You can see here the dimple made by the stud.

I also had to drill the mounting tab on the AutoKraft oil pump pickup because it was sized for the factory fasteners. One problem I am going to have with this particular mounting nut is that it's under the pickup tube. There's no way to get a socket in there or put a wrench in from the side, so I'll have to use an angled open-end wrench to tighten it down. Another note on the pickup - it was provided with the "blue" oil pump o-ring. GM also has "red" and "green" o-rings. Most of the truck motors like this use the red o-ring, but that is only for the factory truck pickup tube which has a bead rolled into it to serve as an o-ring groove. The AutoKraft pickup tube does not have this, so the blue o-ring is appropriate. Be careful if you are replacing your o-ring to get the one matched to you pickup tube.
The new barbel restrictor is in place after a light coating of engine oil.
The rear main seal comes with a white plastic retainer that's used to align the seal and slide it onto the crank when installing the rear cover. Afterward you just toss it. It doesn't take much to eyeball the rear cover for alignment at the oil pan rail. Once it was aligned I torqued most of the bolts to spec. Unfortunately I can't get a torque wrench (much less any socket wrench) between the back of the engine and the stand, so I'll have to tighten the remaining bolts when the engine is on the cherry picker.
I installed the front metal oil plug with a light coating of medium strength Loctite. It gets tapped in place until it is subflush about 0.010in.
In order to install the windage tray I had to drill a couple of the holes out for the larger diameter ARP studs. I also found when I put it in place that part of the sheetmetal hits the inside stud on the #3 main cap. You can see it contacting if you look near the back of this photo.
I decided to just go ahead and tighten things in place, letting the sheetmetal "self clearance". You can see here the dimple made by the stud.
I also had to drill the mounting tab on the AutoKraft oil pump pickup because it was sized for the factory fasteners. One problem I am going to have with this particular mounting nut is that it's under the pickup tube. There's no way to get a socket in there or put a wrench in from the side, so I'll have to use an angled open-end wrench to tighten it down. Another note on the pickup - it was provided with the "blue" oil pump o-ring. GM also has "red" and "green" o-rings. Most of the truck motors like this use the red o-ring, but that is only for the factory truck pickup tube which has a bead rolled into it to serve as an o-ring groove. The AutoKraft pickup tube does not have this, so the blue o-ring is appropriate. Be careful if you are replacing your o-ring to get the one matched to you pickup tube.
Thread Starter
Joined: Apr 2010
Posts: 2,816
Likes: 86
From: Instagram @chevyhotrodder
How to install the Harland Sharp LSx trunnion upgrade
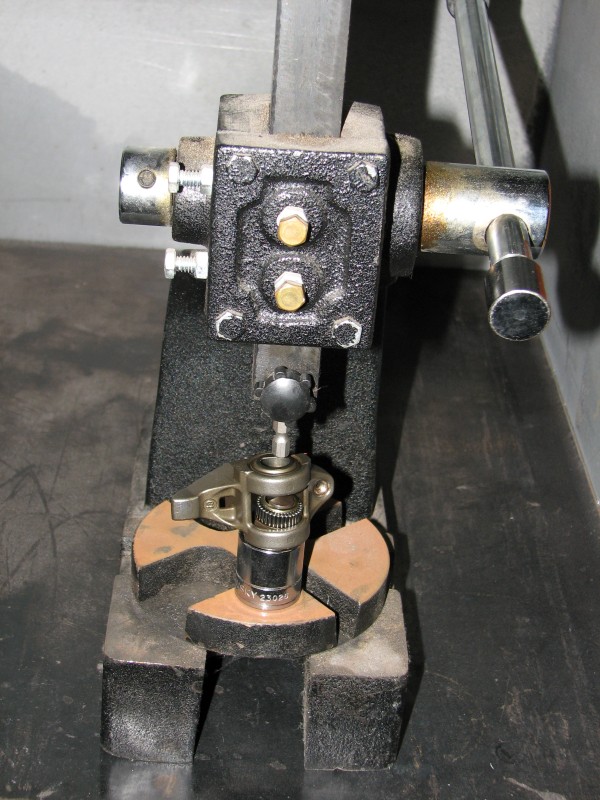
I thought I'd post a step-by-step on upgrading the factory rockers now that I've been through it. First off, I am a big proponent of having tools. For this job a small arbor press is your friend. It gives you feedback so you can tell when you've hit bottom and if anything is going in crooked. I think the second best tool for this might be a drill press used as an arbor press. There are other ways of doing this depending on what tools you have, for example a bench vice or a hammer or some combination.
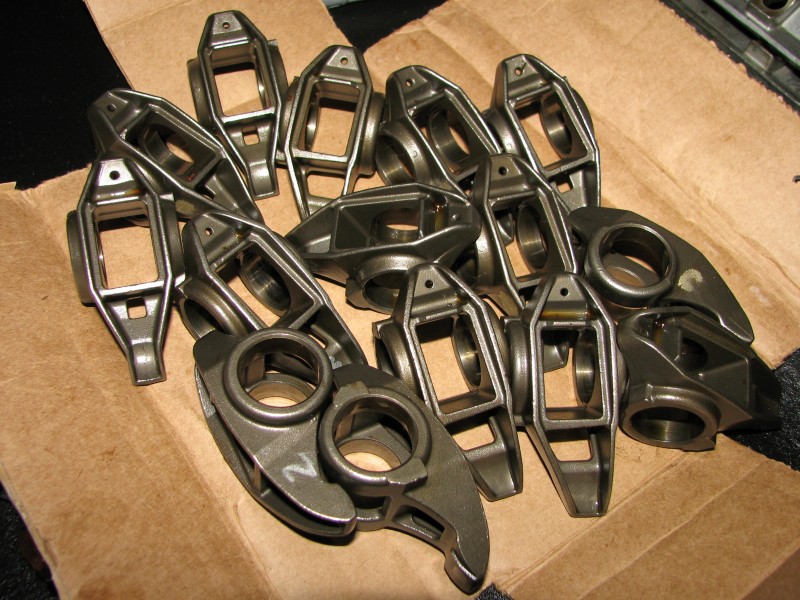
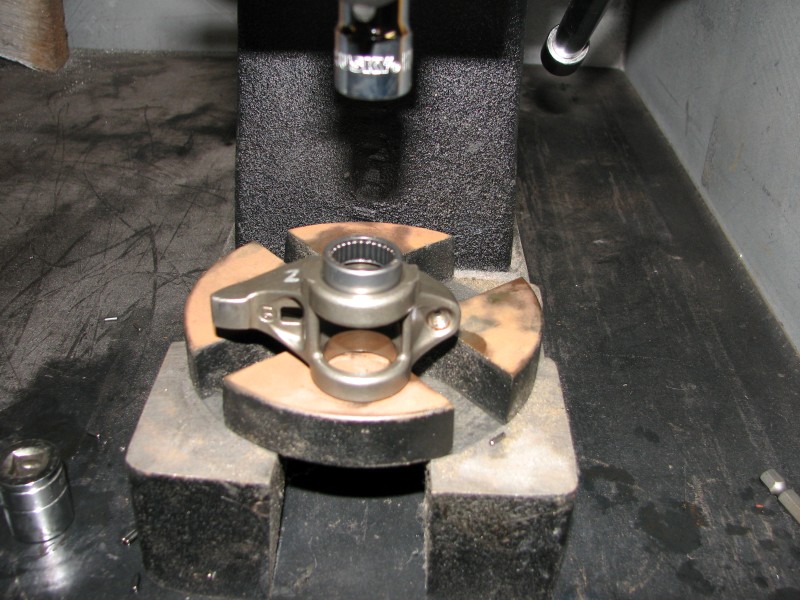
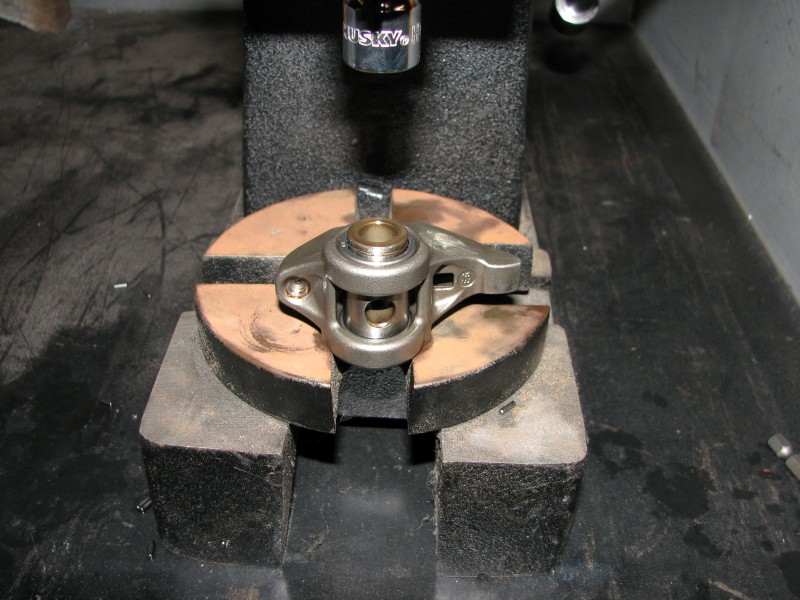
The first step is removing the old trunion. I did this with a socket under the rocker to support it, but you could also span the slot in the lower arbor plate. You can get creative with the end effector on the press. I kept some carefully selected sockets and bits nearby to switch out. For efficiency sake, I recommend removing all the trunions first then installing all the new trunions rather than completing one rocker at a time. I marked the rockers with a silver sharpie ahead of time so they would go back to their respective valves.
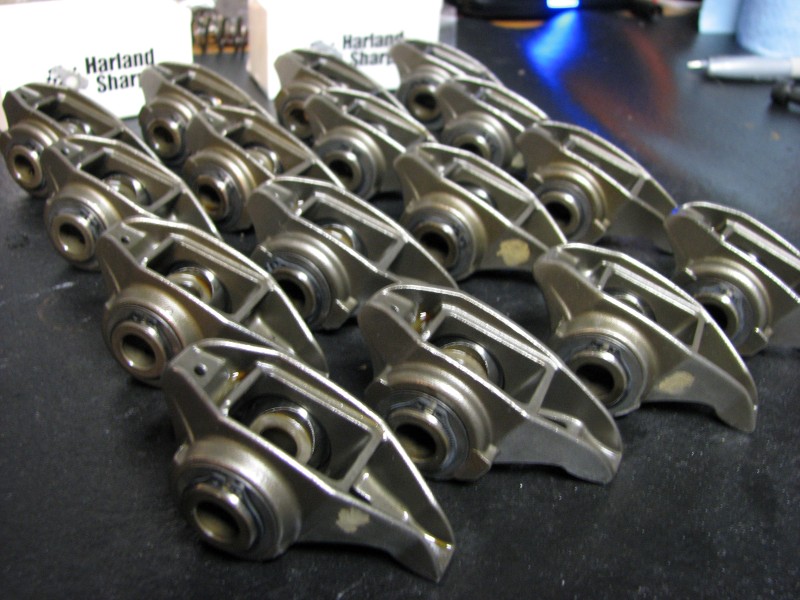
Do this 16 times and you'll have a pile like this:
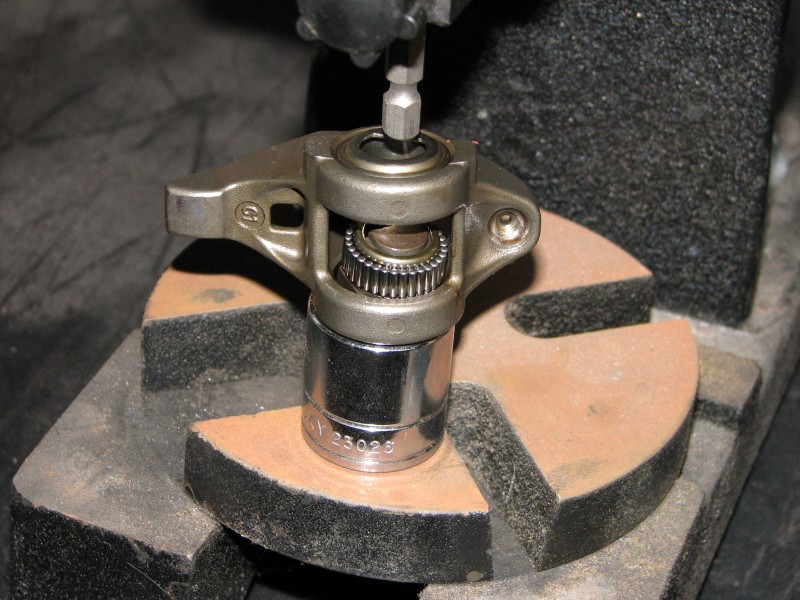
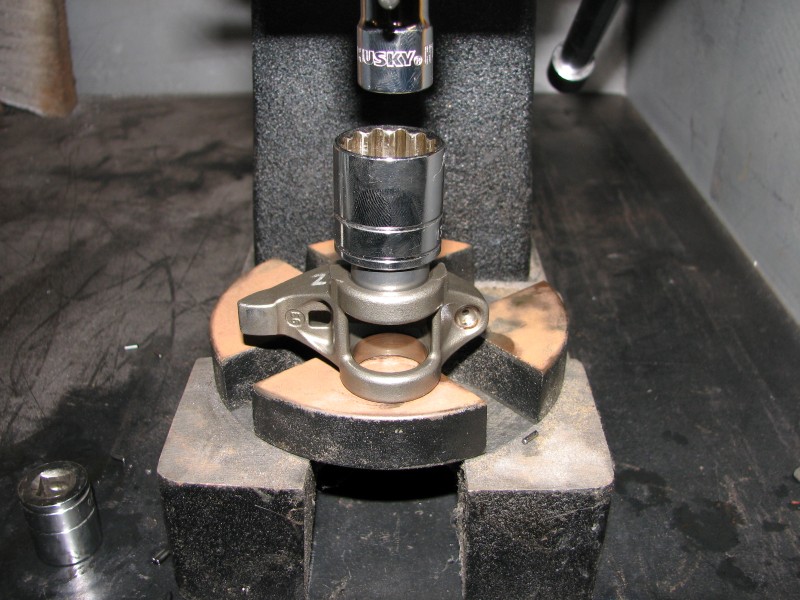
Now the fun part, putting in the new stuff. The rockers have flats machined on one side. Start with the flats up - I'll explain why shortly. Position one of the bearings, text up over the rocker bore.
Next place the flat side of a socket (or other suitable flat object) on top of the bearing, keeping the bearing straight before pressing. Then press the bearing in place until the top surface is flush with the top of the rocker. If you use an object slighly larger in diameter than the rocker bore it will stop the press in an appropriate position.
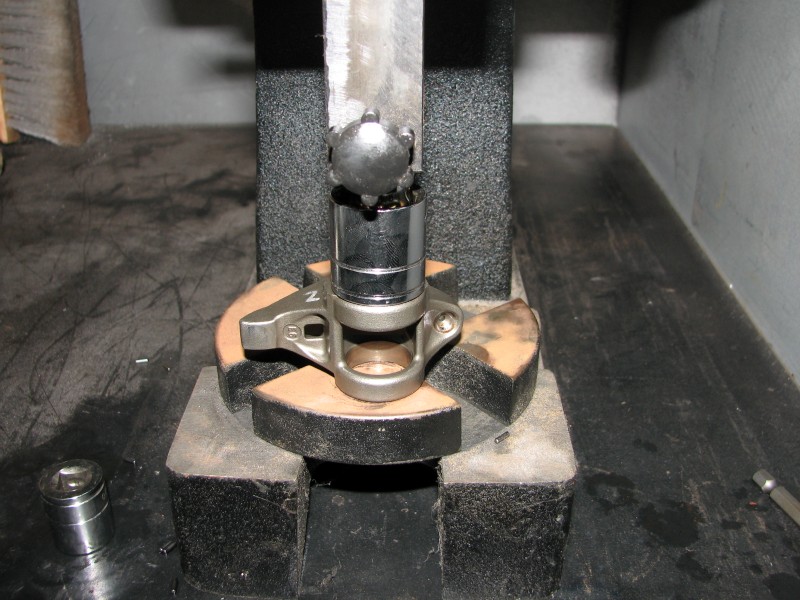
Now flip the rocker over and slide the trunion in. The bearing can go with it but will rest on the top of its bore. Now that the rocker is flipped over, the flats I talked about earlier can sit on either side of the lower arbor plate slot, providing a flat stable surface to press against and leaving room for the trunnion.
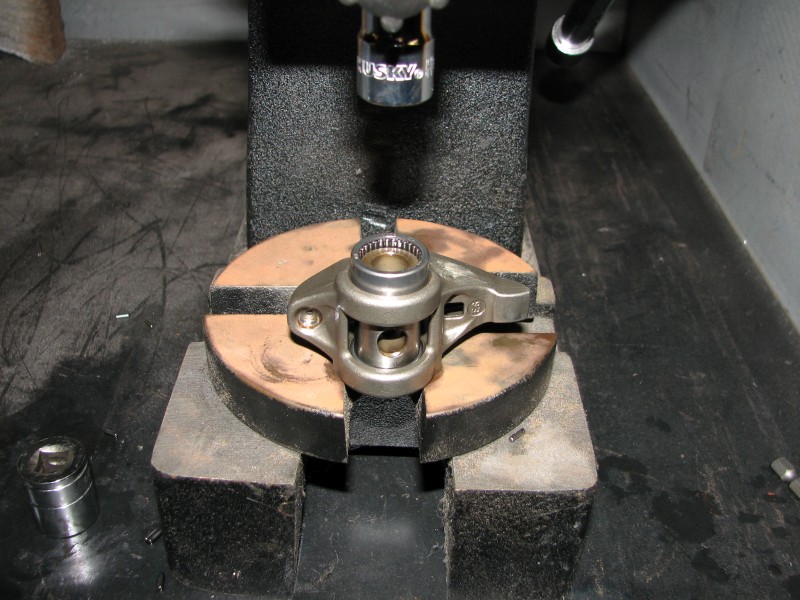
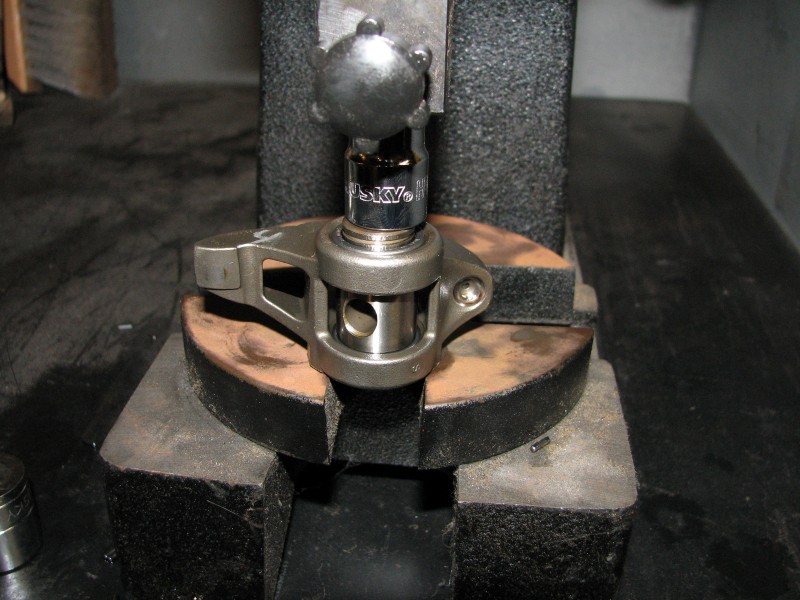
The next step is optional. I used the same socket used before to press the bearing until the top surface hit the trunion. This gets the bearing started.
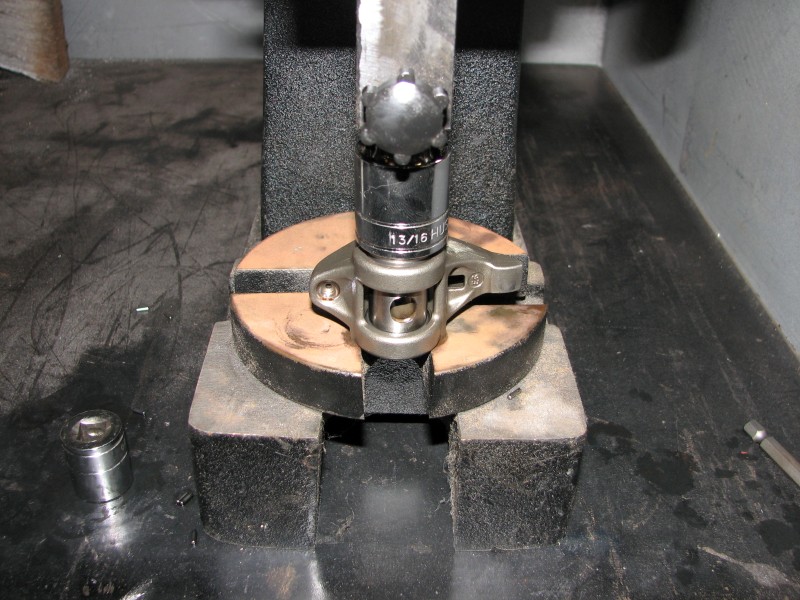
Now you can use the open end of an appropriately sized socket to press the bearing down. In this case you can press until the bearing stops against the trunion itself. Don't overdo it - you just need to feel it make contact, not clamp it down.
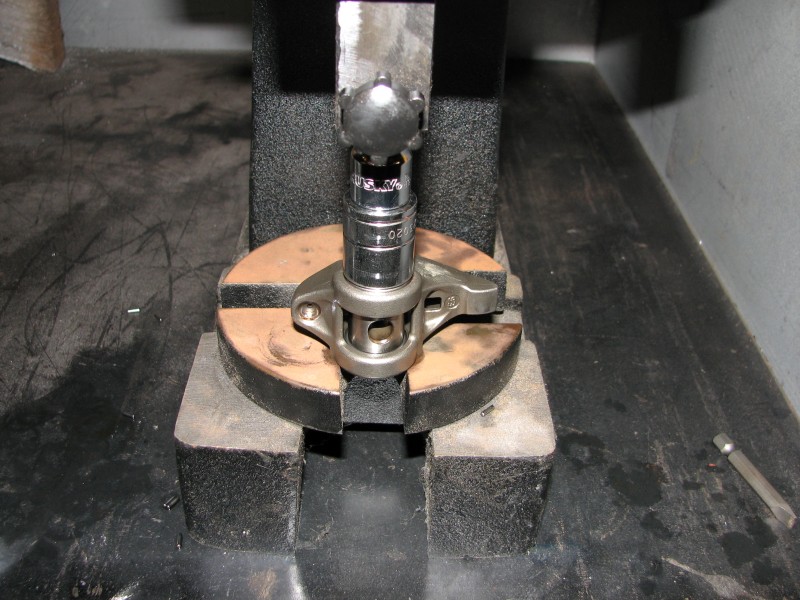
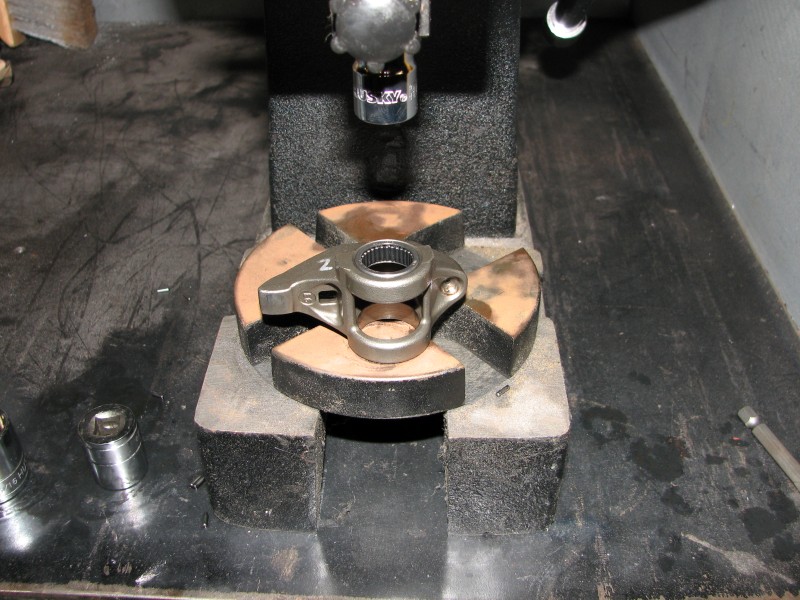
Now place the rocker in your hand and feel the side-to-side play of the trunion. It should have just a small amount of play, maybe a few thousandths, and you should be able to make it "click" back and forth. Also try rotating the trunion. It should move smoothly. If you can't rotate the rocker freely, chances are you pressed the bearings too hard. This causes them to clamp against the trunion and bind everything. When this happens, you can press against the trunion a small distance as shown below to move the bearings back apart. You may have to press them back in again depending on how skilled you are with the press. In the end you want to end up with the amount of play described above and a free rotating trunion.
Do that 16 times.
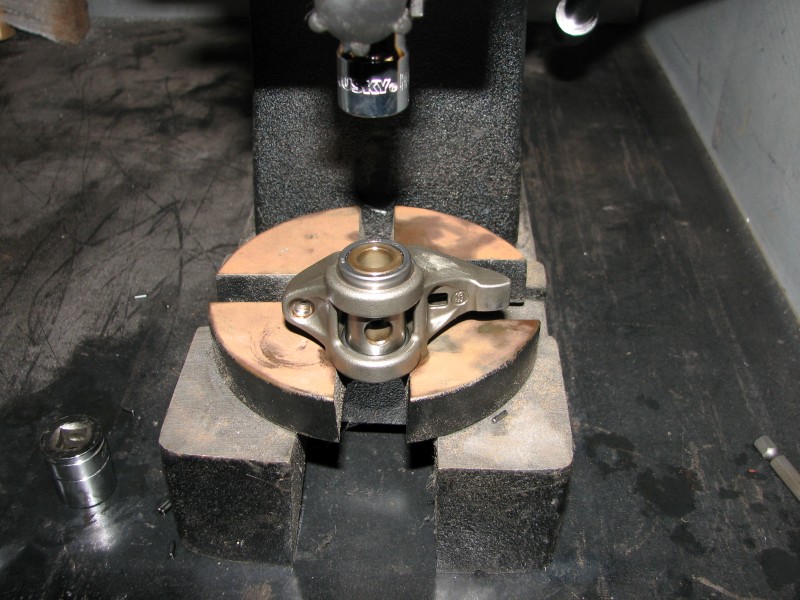
Now you're ready to install the washers and c-clips. You'll need snap ring pliers for this job - I wouldn't do it any other way.
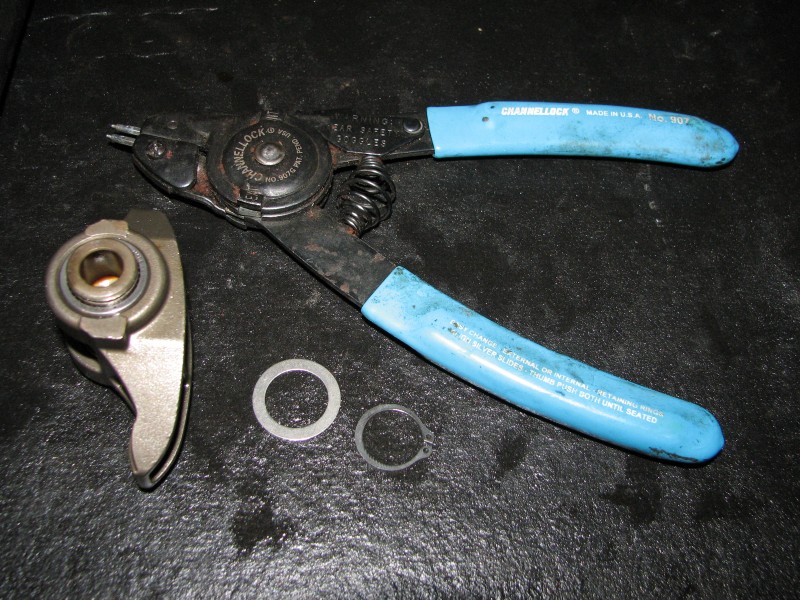
I recommend placing the rocker on its side to keep gravity on your side. Place a washer over the bearing as shown. Be sure it's fully seated.
Next install the c-clip. When doing this, you should hold the c-clip flatly against the end of the trunion before spreading it apart. Keep a finger on the side opposite the snap ring pliers to help press it into place. You should get a nice "snap" when it gets into place.
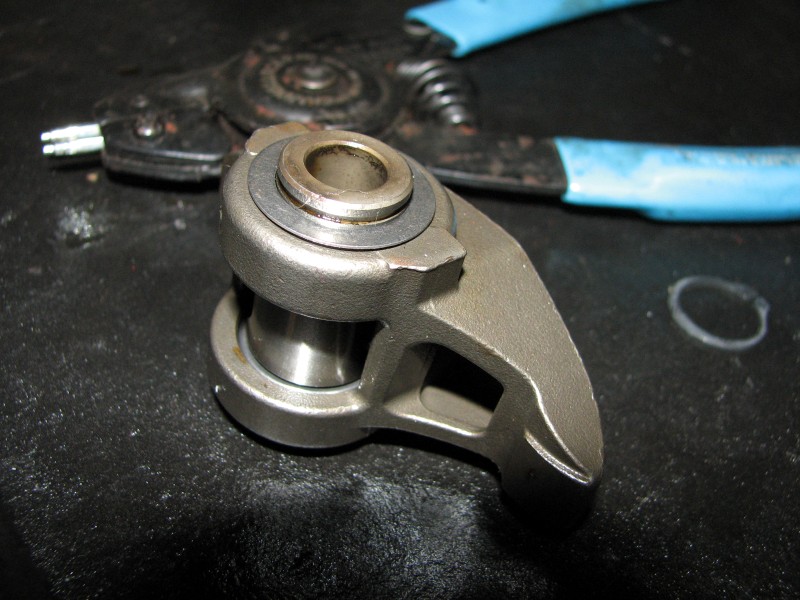
This may seem pretty straight forward, but there is one pitfall you need to be aware of. The washers are very thin and can easily get sandwiched in the c-clip slot. The image below shows what I'm talking about. Check each and every rocker you put together to make sure you leave none like this. If you do you could have the c-clip come off later - not good!
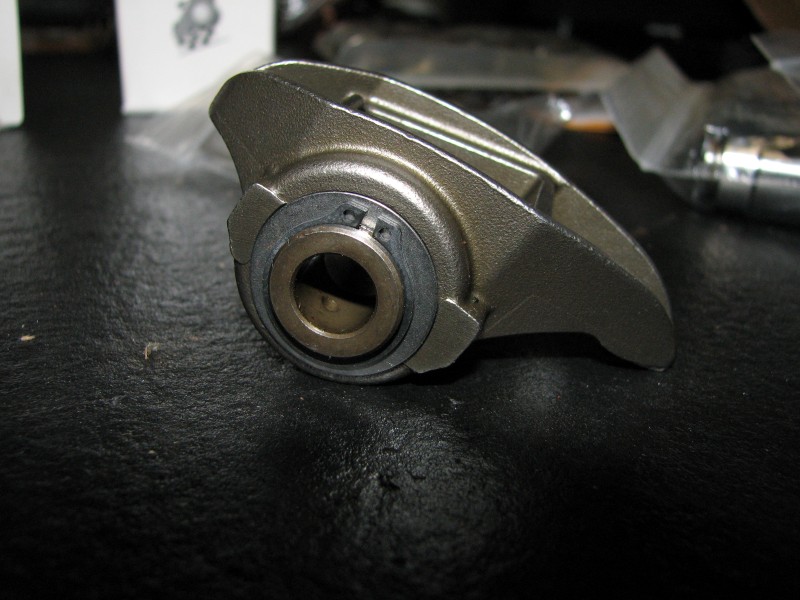
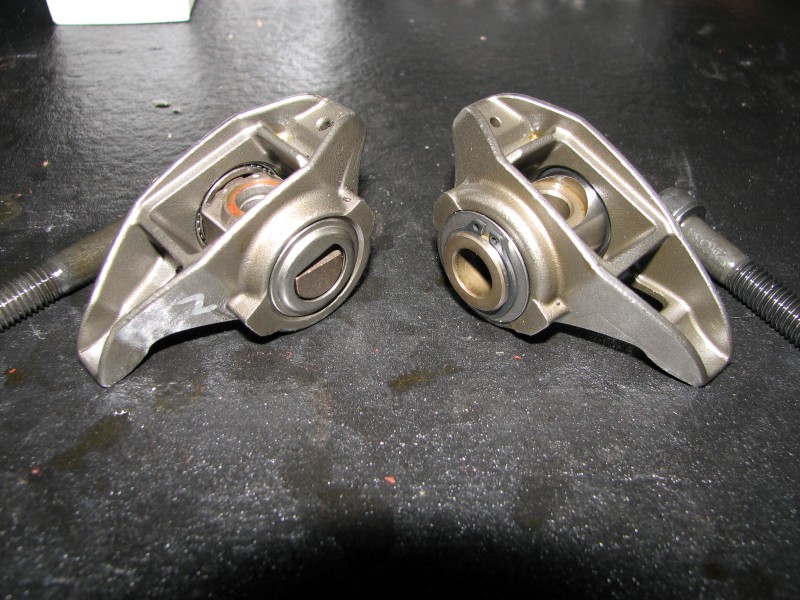
Here is the factory trunion (left) compared to the Hardland Sharp trunion (right). The bearings are much tighter than the factory set. Also notice the ends of the HS trunions are drilled to allow splash oil flow down into the bearings. The caged bearings and c-clips will prevent things from ever coming apart, unlike the lightly pressed factory bearings which have been known to come apart.
Do this 16 times and you will have a nice set of upgraded rockers! Be sure to use the provided socket cap screws to attach them and NOT the factory screws.
The total time for this was 1 hour 45 min (yes I timed it) to complete all 16 rockers.
I thought I'd post a step-by-step on upgrading the factory rockers now that I've been through it. First off, I am a big proponent of having tools. For this job a small arbor press is your friend. It gives you feedback so you can tell when you've hit bottom and if anything is going in crooked. I think the second best tool for this might be a drill press used as an arbor press. There are other ways of doing this depending on what tools you have, for example a bench vice or a hammer or some combination.
The first step is removing the old trunion. I did this with a socket under the rocker to support it, but you could also span the slot in the lower arbor plate. You can get creative with the end effector on the press. I kept some carefully selected sockets and bits nearby to switch out. For efficiency sake, I recommend removing all the trunions first then installing all the new trunions rather than completing one rocker at a time. I marked the rockers with a silver sharpie ahead of time so they would go back to their respective valves.
Do this 16 times and you'll have a pile like this:
Now the fun part, putting in the new stuff. The rockers have flats machined on one side. Start with the flats up - I'll explain why shortly. Position one of the bearings, text up over the rocker bore.
Next place the flat side of a socket (or other suitable flat object) on top of the bearing, keeping the bearing straight before pressing. Then press the bearing in place until the top surface is flush with the top of the rocker. If you use an object slighly larger in diameter than the rocker bore it will stop the press in an appropriate position.
Now flip the rocker over and slide the trunion in. The bearing can go with it but will rest on the top of its bore. Now that the rocker is flipped over, the flats I talked about earlier can sit on either side of the lower arbor plate slot, providing a flat stable surface to press against and leaving room for the trunnion.
The next step is optional. I used the same socket used before to press the bearing until the top surface hit the trunion. This gets the bearing started.
Now you can use the open end of an appropriately sized socket to press the bearing down. In this case you can press until the bearing stops against the trunion itself. Don't overdo it - you just need to feel it make contact, not clamp it down.
Now place the rocker in your hand and feel the side-to-side play of the trunion. It should have just a small amount of play, maybe a few thousandths, and you should be able to make it "click" back and forth. Also try rotating the trunion. It should move smoothly. If you can't rotate the rocker freely, chances are you pressed the bearings too hard. This causes them to clamp against the trunion and bind everything. When this happens, you can press against the trunion a small distance as shown below to move the bearings back apart. You may have to press them back in again depending on how skilled you are with the press. In the end you want to end up with the amount of play described above and a free rotating trunion.
Do that 16 times.
Now you're ready to install the washers and c-clips. You'll need snap ring pliers for this job - I wouldn't do it any other way.
I recommend placing the rocker on its side to keep gravity on your side. Place a washer over the bearing as shown. Be sure it's fully seated.
Next install the c-clip. When doing this, you should hold the c-clip flatly against the end of the trunion before spreading it apart. Keep a finger on the side opposite the snap ring pliers to help press it into place. You should get a nice "snap" when it gets into place.
This may seem pretty straight forward, but there is one pitfall you need to be aware of. The washers are very thin and can easily get sandwiched in the c-clip slot. The image below shows what I'm talking about. Check each and every rocker you put together to make sure you leave none like this. If you do you could have the c-clip come off later - not good!
Here is the factory trunion (left) compared to the Hardland Sharp trunion (right). The bearings are much tighter than the factory set. Also notice the ends of the HS trunions are drilled to allow splash oil flow down into the bearings. The caged bearings and c-clips will prevent things from ever coming apart, unlike the lightly pressed factory bearings which have been known to come apart.
Do this 16 times and you will have a nice set of upgraded rockers! Be sure to use the provided socket cap screws to attach them and NOT the factory screws.
The total time for this was 1 hour 45 min (yes I timed it) to complete all 16 rockers.
Last edited by -TheBandit-; Nov 17, 2012 at 12:13 AM.
 No phaser. No tensioner. No dropping the engine in.
 Looks like your temps are still in the 60-70s, so it could be worse
and having to put our swaps away for the next 4months..

I see you're starting to put on engine covers. Make sure you
Align/space them all before final torque. Someof the magazine
Articles have great tips on cover/pan alignment and oil pump
Alignment.
Thread Starter
Joined: Apr 2010
Posts: 2,816
Likes: 86
From: Instagram @chevyhotrodder
Yes it's a very minor setback considering how long this project has gone on. I am really lucky to live where I live. We have great weather. It only gets chilly in my garage, not frosty.
On the rear cover, I allowed it to float on the crank seal then rotated it with my fingers until it matched up with the oil pan rails. After torquing it down using a cross pattern, I put a straight edge across the oil pan rails and cover. I couldn't see light under the straight edge on either surface, so they must be very close to even. I just hope the crank seal isn't offset from the weight of the cover. It seems like many people have installed them this way without issue.
I had forgotten about the oil pump alignment. Thanks for the reminder. I'll see what I can dig up on that. Any tips?
Thread Starter
Joined: Apr 2010
Posts: 2,816
Likes: 86
From: Instagram @chevyhotrodder
Found this article which has some good tips on aligning the oil pump & f/r covers: http://www.carcraft.com/techarticles...d/viewall.html
That seems reasonable enough. I'll give it a try and also check with feeler gauges.
The oil pump is driven off the crankshaft and installed after the crank and cam are in place. A new pump must be aligned to ensure proper clearance. Tighten the four oil-pump-to-block bolts to a snug fit against the block. Then slowly turn the crank over several turns. This will align the gears and allow you to torque all four bolts.
We wanted to check if this trick really worked, so after spinning the engine, we removed the cover and measured the clearance around the gears with a pair of 0.002-inch feeler gauges, which is the spec. The shortcut worked perfectly
We wanted to check if this trick really worked, so after spinning the engine, we removed the cover and measured the clearance around the gears with a pair of 0.002-inch feeler gauges, which is the spec. The shortcut worked perfectly