

'70 Nova LY6/TH400 6.0VVT

Thread Starter


Joined: Apr 2010
Posts: 2,816
Likes: 86
From: Instagram @chevyhotrodder
Scott - I've seen a number of images of a C6.R racing engine photos which have the coils located as you showed:

BUT I've also seen a lot of C6.R engine photos with them mounted up front like this:

I have yet to find a photo of a C6.R engine bay that doesn't have them mounted up front.
They may have changed for reliability reasons or maybe the engine was configured in a different chassis or exhaust configuration. I think all the C6.R headers run straight outward from the exhaust ports for quite a distance before they turn down, which would subject the coils to less heat than I would see with my headers immediately turning down & rearward. I've become skeptical of the under header location for my car. I really like how it looks and it's perfectly accessible to work on, but I am worried about heat and I don't think I have room to do anything like that on the driver's side anyway.
BUT I've also seen a lot of C6.R engine photos with them mounted up front like this:
I have yet to find a photo of a C6.R engine bay that doesn't have them mounted up front.
They may have changed for reliability reasons or maybe the engine was configured in a different chassis or exhaust configuration. I think all the C6.R headers run straight outward from the exhaust ports for quite a distance before they turn down, which would subject the coils to less heat than I would see with my headers immediately turning down & rearward. I've become skeptical of the under header location for my car. I really like how it looks and it's perfectly accessible to work on, but I am worried about heat and I don't think I have room to do anything like that on the driver's side anyway.
Last edited by -TheBandit-; Dec 1, 2012 at 11:48 PM.

I love the BBC look of the Holley covers, but if they won't clear the box they aren't an option. Before they came out, I was actually thinking of cutting up a pair of BBC valve covers to make coil covers. I don't have either one in use at the moment because my LSx swap is still in the planning stage while I mess with my LT1 cars and my old big blocks.

This idea is going to be so far out of the box you might even giggle a little. What about a pair of coil packs from say a 1996-1998 Ford F150. They seem a little easier to hide as it is four in one. You might even have room under the header.

Teching In
Joined: Jan 2011
Posts: 19
Likes: 0
From: Fort Worth, Texas
Wow,what a great build thread! I can't believe what I just read going back all the way to Sept of 2010. Clint, your perseverance is to be admired as well as your fabricating skills. Your attitude about life also is to be admired. Congrats on being a 6 year cancer survivor. I too am one. 10 years in January from FNHL. It's not curable but it's treatable so I too am thankful for every day.
Just wanted to say thanks for some really great tips that helped me with my build. Best of continued health to you.
Just wanted to say thanks for some really great tips that helped me with my build. Best of continued health to you.
Thread Starter
Joined: Apr 2010
Posts: 2,816
Likes: 86
From: Instagram @chevyhotrodder
I love the BBC look of the Holley covers, but if they won't clear the box they aren't an option. Before they came out, I was actually thinking of cutting up a pair of BBC valve covers to make coil covers. I don't have either one in use at the moment because my LSx swap is still in the planning stage while I mess with my LT1 cars and my old big blocks.

I think they look awesome in top view, but what I don't like that they look like a "hat" placed on top with a big open gap/skirt all the way around. Here's a photo showing what I'm talking about:

Here is a link to the article on that engine. It is one of the best retro looking LSxs I've seen:
http://www.precisionenginetech.com/p...tro-ls-part-5/

https://ls1tech.com/forums/conversio...egasquirt.html
I think those are waste spark otherwise I don't know why he would run the wires crossing over like that. They do look slightly more compact than bunching up the LS coils, but having to criss-cross wires sucks.
I like that lower alt mount driven off the AC belt location in the pic with the ford coils.
I love the way this LS looks with the holley covers:
I love the way this LS looks with the holley covers:
Last edited by 1961ba427; Dec 3, 2012 at 12:34 PM.

TECH Enthusiast
Joined: Dec 2007
Posts: 566
Likes: 1
Why don't you like the coils on the valve covers?
I don't think it looks bad at all?
If heat is a concern under the headers, what about fabbing up a small flat heat shield and putting some gold reflective matt over the shield?
Doug
I don't think it looks bad at all?
If heat is a concern under the headers, what about fabbing up a small flat heat shield and putting some gold reflective matt over the shield?
Doug
TECH Enthusiast
Joined: Dec 2007
Posts: 566
Likes: 1
Thread Starter
Joined: Apr 2010
Posts: 2,816
Likes: 86
From: Instagram @chevyhotrodder
Doug - It's a personal preference thing really. There is no technical reason to move the coils, except maybe the last coil on the passenger side which is pretty close to the AC box. I just prefer the look of naked valve covers without wiring going over and around them. I have seen plenty of swaps with coils on the valve covers that look fantastic - it's just not my preference.
I did consider heat shielding. This is what I was thinking:
That type of shield would allow airflow underneath/through the coils, but still protect from radiant header heat. I just don't know if it would be enough. I talked to some well respected racecar/truck builders and while this is not a racecar, I got strong feedback that the coils will probably not live long in this location. I also have the problem of the driver's side where I don't have room to do this kind of mounting.
I'm pretty sure there will be at least as many people that don't like them on the firewall as there are people that don't like them on the valve covers. At this point I am pretty much decided on mounting them on the firewall.

Modified GTO FRC's.

Something to consider when looking at race applications is that many of the small parts are disposed of after each race. For maximum long-term reliability the coils need to stay away from heat.
Something to consider when looking at race applications is that many of the small parts are disposed of after each race. For maximum long-term reliability the coils need to stay away from heat.
Thread Starter
Joined: Apr 2010
Posts: 2,816
Likes: 86
From: Instagram @chevyhotrodder
Carl, I'm honored you would post in my thread. It's hard to see the covers past the TVS but when I squint really hard I can see them and they look great, especially in the orange & black.

ok cool, if you pm me the part number of yours, between my friends and I, we have owned too many LS Based motors! lol... they normally build them up, stroker kits etc. and many of them do not use the factory coils, i can look in my friends shop and see if i can find one or two... i thought they were the same too...

I didn't realize Katech made a coil relocation kit till last night, thanks. I like the mounting location as it allows for the valve covers to be removed easily. Bandit doesn't want the plug wires running over valve covers though. He could buy a longer set and route them two to the front and around and two to the rear and around.
Thread Starter
Joined: Apr 2010
Posts: 2,816
Likes: 86
From: Instagram @chevyhotrodder
If you like the Katech relocation, take a look at the Proform valve covers and relocation brackets. They are very similar and significantly less expensive. LINK
Thread Starter
Joined: Apr 2010
Posts: 2,816
Likes: 86
From: Instagram @chevyhotrodder
December is turning out to be a busy month between holiday activities and work. I've been out to the garage a lot, but not working on the car - just pulling down Christmas decorations. So I have little progress to show for the last couple weeks.
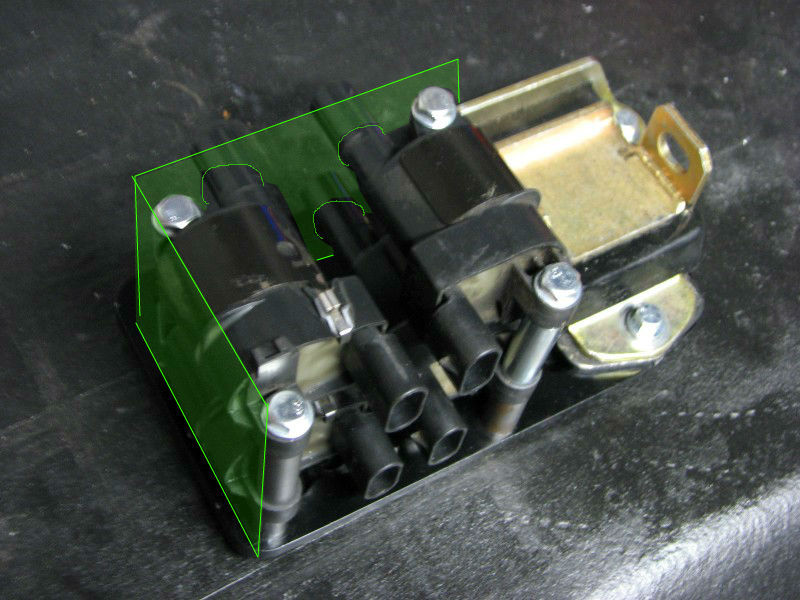
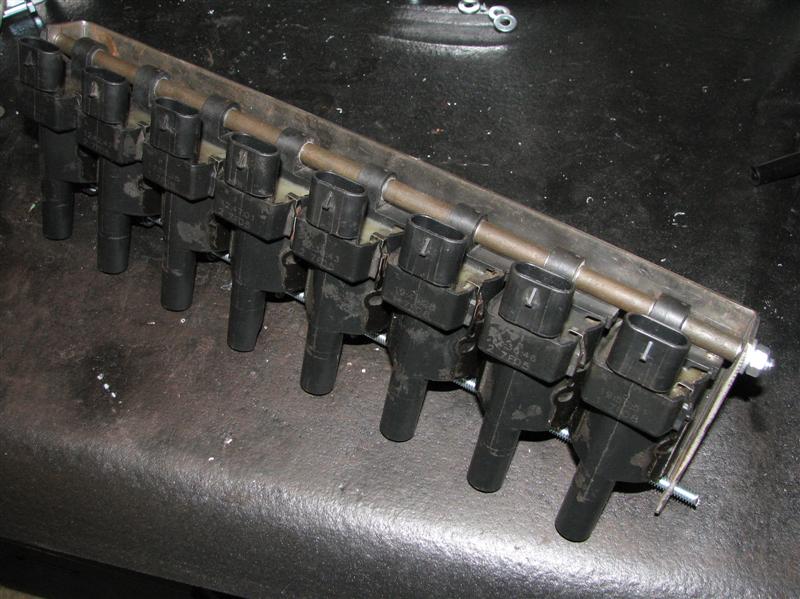
I did cut some new ignition coil spacers from some 3/8" steel tube I had laying around from a hydraulic project. In the process I reduced spacing from 1-1/2" to 1-1/4", saving 1-3/4" overall length from the coil stack. The coils are now pretty close together, but still have around 1/16" gap at their closest points. I found a piece of 3-1/2" 12 gauge (~.105in thick) steel in my remnant pile, drilled a few holes in it, and bent it in my press brake to make a crude mounting bracket.
This is where I plan to put the bracket on the firewall.
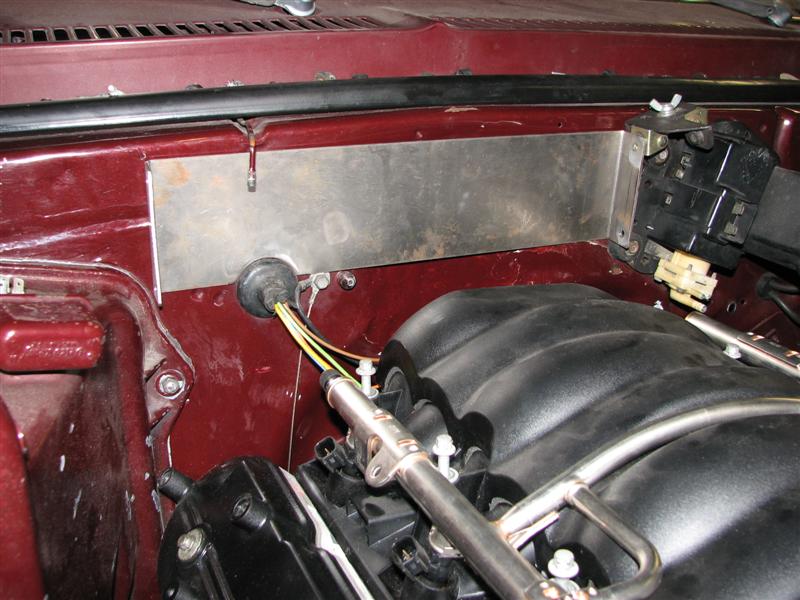
You can see above that I cut a half-moon shape out of part of the bracket to give space for my A/C & fan wiring harness to pass through. This was done with a hole saw in the mill. I don't think I need the full continuous width of this bracket. I could probably cut the middle section out and just mount the feet on either end, but the firewall in this area is dented pretty bad and it helps conceal it. I think I will keep it as a one piece bracket.
I plan to mount the bracket with some rivet nuts, but I haven't picked up the tool yet or the hardware. Things have just been too busy. Here's what it looks like held up by wire.

The problem with this design is the coils and spacers completely block access to the plate. So for fastening I have either mount the bracket first, then attach the stack of coils, or I need to add tabs to the top or sides that are accessible. I think I am going to go the first route because it will look cleaner, but this will make R&R of the coils more cumbersome. Some ideas I have for assembly:
- Slide the threaded rods (or bolts) to one side an inch or so, then thread the coils and spacers one by one onto the bracket
- Assemble the coil stack onto the threaded rod, angle the stack to insert it into one side, then slide the threaded rods back to get it into them other side.
- Notch out the four mounting holes out to the edges at roughly 45* so the pre-assembled stack can be dropped into place. The rods/bolts would not be fully captured, but R&R would be easier
- As an alternative, notch the bottom holes at 45* and the tops at 90* so the bottom is installed first, then the top of the stack tilted back.
I like the last option. What do you think?
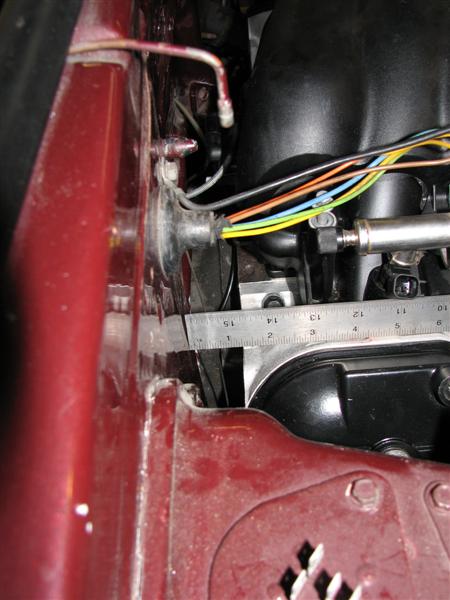
Someone asked over PM how much firewall clearance I have with the Dougs SK-100 adapters in the 1/2" setback position. Not considering the A/C suitcase, the closest is at the back of the passenger cylinder head and there is about 1-1/4" clearance. See photo below:
I did cut some new ignition coil spacers from some 3/8" steel tube I had laying around from a hydraulic project. In the process I reduced spacing from 1-1/2" to 1-1/4", saving 1-3/4" overall length from the coil stack. The coils are now pretty close together, but still have around 1/16" gap at their closest points. I found a piece of 3-1/2" 12 gauge (~.105in thick) steel in my remnant pile, drilled a few holes in it, and bent it in my press brake to make a crude mounting bracket.
This is where I plan to put the bracket on the firewall.
You can see above that I cut a half-moon shape out of part of the bracket to give space for my A/C & fan wiring harness to pass through. This was done with a hole saw in the mill. I don't think I need the full continuous width of this bracket. I could probably cut the middle section out and just mount the feet on either end, but the firewall in this area is dented pretty bad and it helps conceal it. I think I will keep it as a one piece bracket.
I plan to mount the bracket with some rivet nuts, but I haven't picked up the tool yet or the hardware. Things have just been too busy. Here's what it looks like held up by wire.
The problem with this design is the coils and spacers completely block access to the plate. So for fastening I have either mount the bracket first, then attach the stack of coils, or I need to add tabs to the top or sides that are accessible. I think I am going to go the first route because it will look cleaner, but this will make R&R of the coils more cumbersome. Some ideas I have for assembly:
- Slide the threaded rods (or bolts) to one side an inch or so, then thread the coils and spacers one by one onto the bracket
- Assemble the coil stack onto the threaded rod, angle the stack to insert it into one side, then slide the threaded rods back to get it into them other side.
- Notch out the four mounting holes out to the edges at roughly 45* so the pre-assembled stack can be dropped into place. The rods/bolts would not be fully captured, but R&R would be easier
- As an alternative, notch the bottom holes at 45* and the tops at 90* so the bottom is installed first, then the top of the stack tilted back.
I like the last option. What do you think?
Someone asked over PM how much firewall clearance I have with the Dougs SK-100 adapters in the 1/2" setback position. Not considering the A/C suitcase, the closest is at the back of the passenger cylinder head and there is about 1-1/4" clearance. See photo below:
Last edited by -TheBandit-; Dec 11, 2012 at 10:53 AM.
Option 4, no question. It will allow easy access to R&R the coils if necessary. The all thread doesn't need to be captured completely. Granted, I'm not the one trying to over-engineer everything on my hot rod. 
PS - I like the fact that you're making them install as an assembly, rather than trying to install them one-by-one into the bracket.
PS - I like the fact that you're making them install as an assembly, rather than trying to install them one-by-one into the bracket.