
'70 Nova LY6/TH400 6.0VVT
 08-13-2013, 02:21 PM
#881
the both look good. .I wanted to mount my coil up there too. But after mounting my engine as far back as I could.. it just was not possible to do that with the engine so close to the firewall, wiper motor and harness going through the firewall..
So. .I came up with my mounts high on the cover to get it away from the heat as much as possible.. You guys did great jobs.. !
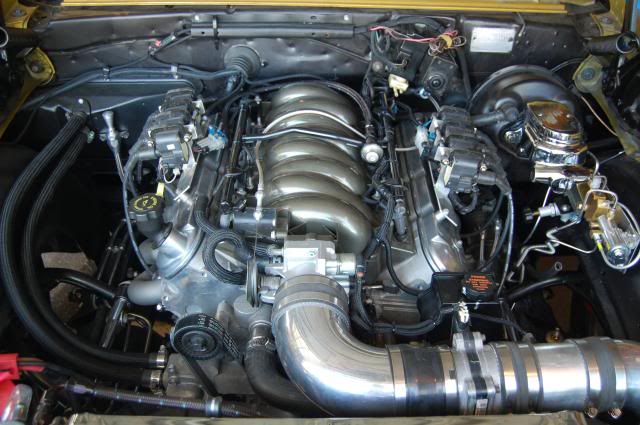
I also just got around to working the Brake Master, P-valve and Line Lock.. just one more line, might go with AN -4 and Stainless Braided hose as the line is pertty tight to be bending a hard line around.
Clint...Keep up the good work on the wiring..!
BC
BC
So. .I came up with my mounts high on the cover to get it away from the heat as much as possible.. You guys did great jobs.. !
I also just got around to working the Brake Master, P-valve and Line Lock.. just one more line, might go with AN -4 and Stainless Braided hose as the line is pertty tight to be bending a hard line around.
Clint...Keep up the good work on the wiring..!
BC
BC
Last edited by bczee; 08-13-2013 at 02:28 PM.
 08-14-2013, 08:16 AM
#882
Teching In
iTrader: (1)
Join Date: Sep 2012
Location: CA
Posts: 28
Likes: 0
Received 0 Likes
on
0 Posts

Clint, seriously man, turn off the engineer switch in the brain once in a while  Buddy of mine has the same problem over thinking things and coming up with elaborate ways of doing something that should be really really simple. Everything looks to be coming along great though! Little bits of info here and there will definitely help me with my swap.
Buddy of mine has the same problem over thinking things and coming up with elaborate ways of doing something that should be really really simple. Everything looks to be coming along great though! Little bits of info here and there will definitely help me with my swap.
08-14-2013, 10:53 AM
#884
the both look good. .I wanted to mount my coil up there too. But after mounting my engine as far back as I could.. it just was not possible to do that with the engine so close to the firewall, wiper motor and harness going through the firewall..
So. .I came up with my mounts high on the cover to get it away from the heat as much as possible..
So. .I came up with my mounts high on the cover to get it away from the heat as much as possible..
Thank you!
 08-18-2013, 10:15 PM
#889
3 of the tips ignite right away no problem at all, but the hot knife and the cone shaped soldering tips won't start. As far as I can tell the ports are wide open and I can see a little spark when I click the starter. I tried a second butane lighter near the ports but that only seems to light a small blue temporary flame that goes out immediately when the lighter is removed. The other tips light on the first click. I'll call Portasol to see what's up.
08-19-2013, 08:47 AM
#891
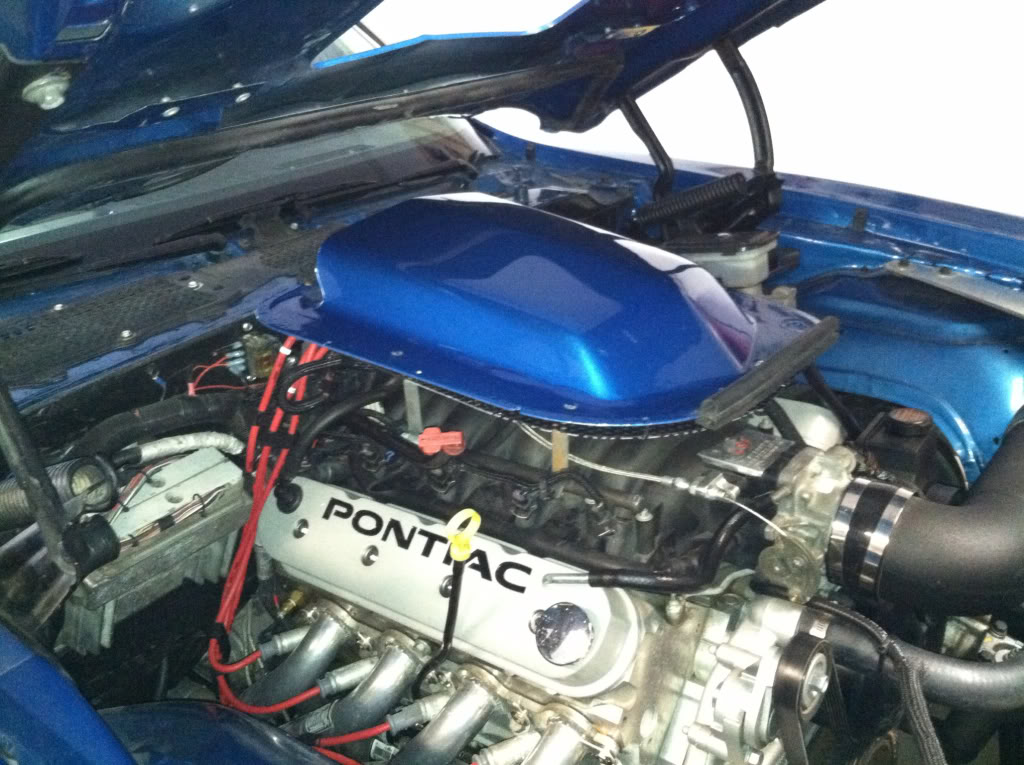
Here's another one I came across on a '78 TA that looks simlar. Build thread here. I assume he used loom to recover the existing harness.
 [/QUOTE]
That's my TA...yeah...i used fabric loom to cover existing harness. I relocated the coilpacks mainly because I switched to the PONTIAC valve covers. I used an eBay vendor for the coilpack relocate and made custom length wires. It's hard to see the coils now that I have my shaker mounted to the intake. It's not functional...just for show.

This is a real good build..I'm reading through it now!
[/QUOTE]That's my TA...yeah...i used fabric loom to cover existing harness. I relocated the coilpacks mainly because I switched to the PONTIAC valve covers. I used an eBay vendor for the coilpack relocate and made custom length wires. It's hard to see the coils now that I have my shaker mounted to the intake. It's not functional...just for show.
This is a real good build..I'm reading through it now!
08-19-2013, 11:47 AM
#892
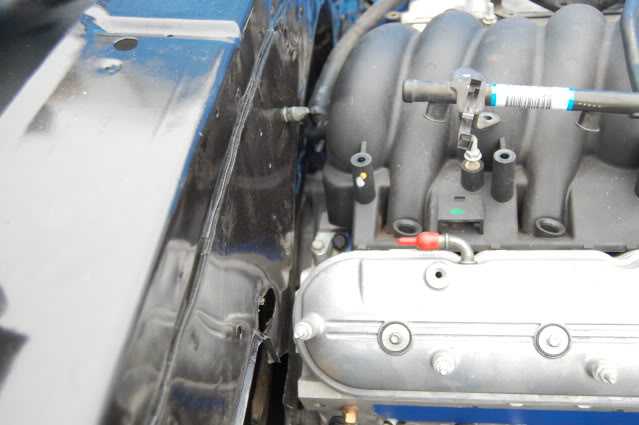
I finished up the even/passenger bank coil wiring and wrapped her up. This time I used a smaller heat shrink on the ends, but it still flares out a bit so I don't plan to redo the other ones; I'll just live with it.

After wrapping all 8 coil harnesses together, I proceeded to add loom. I found this method worked really well for teeing out of the braided. First I opened the split loom and wrapped it on the edge of the workbench, then I used my butane soldering iron to melt notches out of it everywhere I had an exit branch. The melting process ties all the loose ends together so you don't have fraying.

You may notice the even bank pigtails on the left are longer than the odd bank pigtails on the right. I did this to dodge the A/C harness pass-through on the firewall. I should have had all the pigtails the same length but realized this after I had done the first four.

Here it is on the firewall. I need to add wire clamps to even things up.


With everything loomed on the rear harness, I was ready to pin the coils, injectors and oil pressure sensor back into the ECM connector. A few notes on this; for one of the fuel injectors, I had to use a new length of wire and chose 18 gauge as a good general purpose. The insulation is a very tight fit on the ECM connector body. I wouldn't recommend using this big of wire unless you need to; 20 is plenty big and fits a lot better. Also you may notice I have a set of wires that is shorter than the other going into the ECM, so the routing on one set loops around while the other routes directly to the connector. This happened because my originally intention was to cut all the fuel injector wires shorter and repin them, but found one of the factory injector wires was shorter than all my coil wires. So I cut all the factory injector wires to the same length and left all the coil wires alone. The result is mismatched lengths, but I can wrap these up with a bend and they should work fine. I thought this was a better option than cutting all the coil wires and repining them too - no reason to mess with the factory crimped terminals if I don't need to.

Looking at my ECM I/O list, the only things left on connector 2 (X2) are the O2 sensors. On the other connector I still have a number of connections to make: brake switch, fans, ign+, batt+, pedal (APP), tach, fuel pump, MIL, VSS, and OBD/CAN/LAN. And of course I have the fuses to wire up.
After wrapping all 8 coil harnesses together, I proceeded to add loom. I found this method worked really well for teeing out of the braided. First I opened the split loom and wrapped it on the edge of the workbench, then I used my butane soldering iron to melt notches out of it everywhere I had an exit branch. The melting process ties all the loose ends together so you don't have fraying.
You may notice the even bank pigtails on the left are longer than the odd bank pigtails on the right. I did this to dodge the A/C harness pass-through on the firewall. I should have had all the pigtails the same length but realized this after I had done the first four.
Here it is on the firewall. I need to add wire clamps to even things up.
With everything loomed on the rear harness, I was ready to pin the coils, injectors and oil pressure sensor back into the ECM connector. A few notes on this; for one of the fuel injectors, I had to use a new length of wire and chose 18 gauge as a good general purpose. The insulation is a very tight fit on the ECM connector body. I wouldn't recommend using this big of wire unless you need to; 20 is plenty big and fits a lot better. Also you may notice I have a set of wires that is shorter than the other going into the ECM, so the routing on one set loops around while the other routes directly to the connector. This happened because my originally intention was to cut all the fuel injector wires shorter and repin them, but found one of the factory injector wires was shorter than all my coil wires. So I cut all the factory injector wires to the same length and left all the coil wires alone. The result is mismatched lengths, but I can wrap these up with a bend and they should work fine. I thought this was a better option than cutting all the coil wires and repining them too - no reason to mess with the factory crimped terminals if I don't need to.
Looking at my ECM I/O list, the only things left on connector 2 (X2) are the O2 sensors. On the other connector I still have a number of connections to make: brake switch, fans, ign+, batt+, pedal (APP), tach, fuel pump, MIL, VSS, and OBD/CAN/LAN. And of course I have the fuses to wire up.
08-23-2013, 06:22 PM
#895

Clint,
I really like what you done on the loom. Very clever and clean looking!!!
I really like what you done on the loom. Very clever and clean looking!!!
 10-28-2013, 11:04 AM
#898
Well, I can't ding him... my project has been sitting for the last three month without anything being done... $$$ has been going to vacations ... might get the Exhaust done this month... maybe...LOL
I am sure he has been busy with the like, family or vacation also...
BC
I am sure he has been busy with the like, family or vacation also...
BC
10-28-2013, 11:33 AM
#899
I'm guilty as well. I haven't had a real update since before the wedding, honeymoon, job search and moving across country. We all get busy with the little thing called "life" that always seems to get in the way of garage time!
Mostly its just fun to poke the bear!
Mostly its just fun to poke the bear!