
'70 Nova LY6/TH400 6.0VVT
 12-30-2013, 11:12 PM
#921

Great advise MisterD and much appreciated. Things were already moving way too fast for me with the now 3 year old. There are so many moments I wish I could bottle up and live in over and over. It all just happens too fast.
Hope Christmas treated everyone well this year. Mrs. TheBandit got me a set of Proform valve covers. They look great, but they're too tall. They interfere with the AC box and I didn't bother trying the driver's side because I didn't think it would clear the brake booster (looked very close). I sent them back and will likely pick up some of the GMPP competition covers instead, but I am a bit worried about PCV with those covers as they are not baffled like these. I think a baffled breather will be adequate.

Hope Christmas treated everyone well this year. Mrs. TheBandit got me a set of Proform valve covers. They look great, but they're too tall. They interfere with the AC box and I didn't bother trying the driver's side because I didn't think it would clear the brake booster (looked very close). I sent them back and will likely pick up some of the GMPP competition covers instead, but I am a bit worried about PCV with those covers as they are not baffled like these. I think a baffled breather will be adequate.
Last edited by -TheBandit-; 12-31-2013 at 12:01 AM.

 ..
.. 12-31-2013, 12:59 AM
#923
Funny you mention that. I actually am not a big fan of black crinkle, but the Proform covers look more like a textured flat black. I looked around and I think it's "flat black wrinkle" powdercoat. Maybe there are different grades of crinkle? Yours looks a lot more crinkly - almost like the Rustoleum Hammered finish.
12-31-2013, 01:24 PM
#924
I am a bit worried about PCV with those covers as they are not baffled like these. I think a baffled breather will be adequate.
12-31-2013, 05:10 PM
#925
There are PCV breathers and breather grommets available that include some baffling, so I'm hopeful that would be enough. I did come across this thread with images showing how someone added the PCV tube in the GMPP valve cover, but with no explanation of how or if they added baffling inside. http://www.camaro5.com/forums/showthread.php?t=66753
Here is a photo:
 12-31-2013, 05:24 PM
#926

It appears the owner of those valve covers is going to use a push-in style breather and cap off the tube. I cannot see a reason why they would have used a rubber grommet otherwise.
I am curious to find out what you come up with as I am using the old LQ4 covers with modified baffles to clear the rockers. One of those things done out of necessity and not something I am proud of. I want to retain the coils-near-plugs but I do like the Katech relocator!
I am curious to find out what you come up with as I am using the old LQ4 covers with modified baffles to clear the rockers. One of those things done out of necessity and not something I am proud of. I want to retain the coils-near-plugs but I do like the Katech relocator!
01-01-2014, 10:40 AM
#927
They are probably putting a push in oil fill cap where that grommet is. The PCV tube is coming off from the side between the cylinder 2 & 4 rockers, just like a stock cover. I can only assume they drilled the cover to add that tube since the GMPP covers don't come with it. The part I am curious about is if they also added baffling inside somehow.
01-06-2014, 02:47 PM
#928
Here are some GMPP valve covers with baffles built in. They come in a variety of finishes. Maybe you will find these to your liking.
http://www.classicmuscle.com/p-32097...et-chrome.aspx
[IMG] [/IMG]
[IMG] [/IMG]
http://www.classicmuscle.com/p-32097...et-chrome.aspx
[IMG]
 [/IMG]
[IMG]
 [/IMG]
01-06-2014, 02:57 PM
[/IMG]
01-06-2014, 02:57 PM
#929
I do like those, but I think they'll be too tall.
Here are those GMPP valve covers, 19156433, in a view to show height
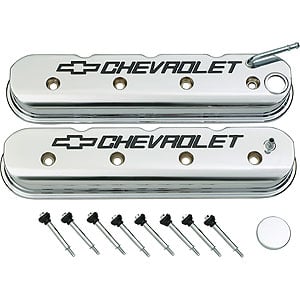
Here are the GMPP "competition" valve covers, 25534398 & 25534399 to give an idea of their height. I think they are closer to stock height.

I went ahead an ordered the 25534398 & 25534399. I have some ideas for PCV fresh air and also spoke to some local shops about having them powdercoated in wrinkle black.
Here are those GMPP valve covers, 19156433, in a view to show height
Here are the GMPP "competition" valve covers, 25534398 & 25534399 to give an idea of their height. I think they are closer to stock height.
I went ahead an ordered the 25534398 & 25534399. I have some ideas for PCV fresh air and also spoke to some local shops about having them powdercoated in wrinkle black.
Last edited by -TheBandit-; 01-07-2014 at 12:29 PM.
01-06-2014, 04:28 PM
#930
You may have answered this already or there is a reason why this won't work. Why not grind off the coil bracket nubs and smooth them out for paint, blasting etc.? Since they are the factory covers they should be baffled to suit the engine. Or are you just in favor of a new look? I am in search of new valve covers now thanks to you! Lol I am leaning on the Holley's since they do away with the coil brackets but retain the stock coil locations and are baffled. The baffles in my stock LQ4 covers look like I cut them out with a chain saw.
01-06-2014, 04:33 PM
#931
Smoothing the factory covers is definitely an option - I just really like the raised "CHEVROLET" w/ logo.
If you still want coils-on-covers, the Holley covers are great and there are also the LS9 covers which have that from the factory: https://ls1tech.com/forums/generatio...ve-covers.html Both Holley and factory LS9 include baffling.
I also like the Proform w/ coils moved up above the covers or the Katech ($$$). So many options.
01-06-2014, 04:48 PM
#932
I have to agree, the raised letters are sweet and will only add to the character of this engine!
I did not know that about the LS9/LSA covers. A little pricey though. Pace has them for $150/ side. The Holley's are $158 for the pair with a fill cap. Thanks for the link and info.
I did not know that about the LS9/LSA covers. A little pricey though. Pace has them for $150/ side. The Holley's are $158 for the pair with a fill cap. Thanks for the link and info.
01-07-2014, 12:34 PM
#933
There's something else I noticed about the covers above. Stock covers and the GMPP "competition" 25534398 / 9 covers below have a drip "skirt" that runs along the lower edge of the valve cover, inside of the seal. You can see it on the left side of the photo below, but it doesn't exist on a lot of aftermarket covers or the GMPP chrome covers 19156433 above. I assume this feature is to keep oil from dripping and pooling on the seal, which should help prevent leaks.

I found a local powder coating shop that will do the pair in wrinkle black for $80. The other option is VHT wrinkle paint, but I think I will go with powder for durability and consistent finish.
I found a local powder coating shop that will do the pair in wrinkle black for $80. The other option is VHT wrinkle paint, but I think I will go with powder for durability and consistent finish.
01-07-2014, 01:30 PM
#934
I love your build. Get ready as I will be asking tons of questions.
I was looking at the Holley valve covers, they seem pretty nice for the price as a pair.
But you relocated the coil pack so it is null point.
I was looking at the Holley valve covers, they seem pretty nice for the price as a pair.
But you relocated the coil pack so it is null point.
01-10-2014, 11:18 PM
#935
Good news - they fit!


They are certainly taller than the stock covers, but not nearly as tall as the ProForm covers. There is about 1/2" clearance between the a/c box and the valve cover. Having these on there will motivate me to get back into the project. Unfortunately it's still tough with our toddler and baby girl.
They are certainly taller than the stock covers, but not nearly as tall as the ProForm covers. There is about 1/2" clearance between the a/c box and the valve cover. Having these on there will motivate me to get back into the project. Unfortunately it's still tough with our toddler and baby girl.
 01-18-2014, 05:59 PM
#939
After I was sure the valve covers would fit, I took them to the local powdercoater, Applied Powdercoat in Oxnard. This place does a lot of work for Haas Automation (CNC machines) and I've used them in the past to coat my own automation equipment (the type of engineering I did before I got into medical devices). They do great work. I selected Cardinal BK59 textured black for the finish. It is a little shinier and more black than what the Proform covers came with and it makes a great match for the plastic intake cover. I thought about doing VHT wrinkle black paint at home, which would have been much less expensive, but I was worried I wouldn't get a consistent finish. I'm glad I went this route.


I did a lot of research before deciding how to finish the lettering. This is a common task for the Honda tuner people, so if you search "painting raised letter valve covers" you can find some videos and info, but hardly anything that actually shows the process of finishing the letters. From what I've read there are three common techniques: mask, vasoline (or variant), and sand. The masking method is tedious and can actually leave a bad edge. With vasoline, you coat the faces of the letters prior to painting, then wipe the paint off afterwards. Both of those methods seemed iffy to me, so I went with the sanding method. I used painters tape to protect from accidentally sanding the wrong part and loaded 220 grit into a 5" random orbital sander. It took about 5 minutes per cover to remove the powdercoat and leave a swirly-brushed finish. I would definitely recommend this method; as long as you are careful with the sander and let it do the work, it does a very nice job. The edges of the letters look very crisp.
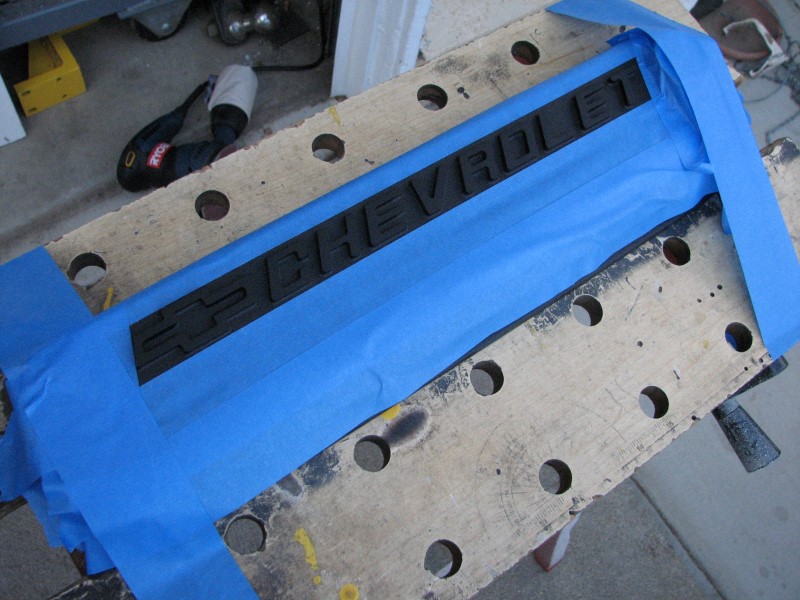


Before
After

I'm extremely happy with the results. Now I better get back to making the car go.
I did a lot of research before deciding how to finish the lettering. This is a common task for the Honda tuner people, so if you search "painting raised letter valve covers" you can find some videos and info, but hardly anything that actually shows the process of finishing the letters. From what I've read there are three common techniques: mask, vasoline (or variant), and sand. The masking method is tedious and can actually leave a bad edge. With vasoline, you coat the faces of the letters prior to painting, then wipe the paint off afterwards. Both of those methods seemed iffy to me, so I went with the sanding method. I used painters tape to protect from accidentally sanding the wrong part and loaded 220 grit into a 5" random orbital sander. It took about 5 minutes per cover to remove the powdercoat and leave a swirly-brushed finish. I would definitely recommend this method; as long as you are careful with the sander and let it do the work, it does a very nice job. The edges of the letters look very crisp.
Before
After
I'm extremely happy with the results. Now I better get back to making the car go.
Last edited by -TheBandit-; 01-19-2014 at 02:35 PM.