
'70 Nova LY6/TH400 6.0VVT


 01-19-2014, 07:41 AM
#943
Launching!

Join Date: Jun 2011
Location: Canada
Posts: 253
Likes: 0
Received 0 Likes
on
0 Posts
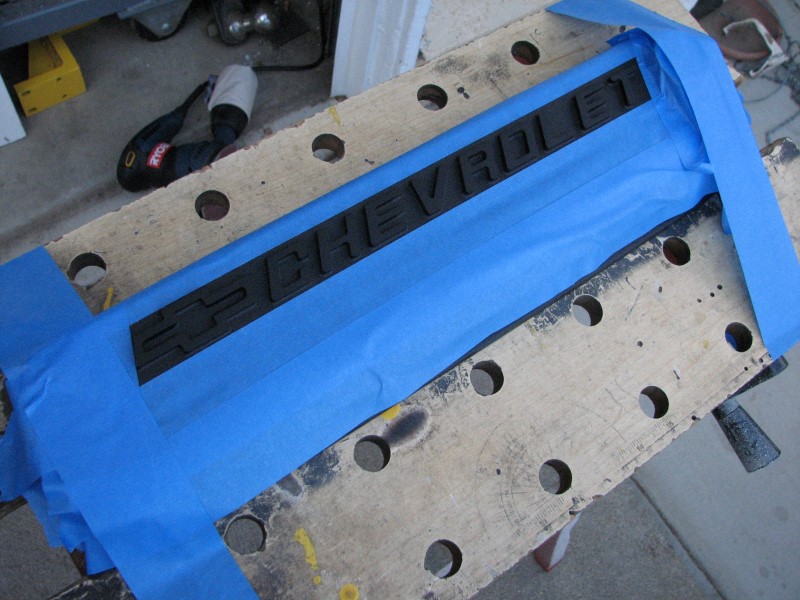
After I was sure the valve covers would fit, I took them to the local powdercoater, Applied Powdercoat in Oxnard. This place does a lot of work for Haas Automation (CNC machines) and I've used them in the past to coat my own automation equipment (the type of engineering I did before I got into medical devices). They do great work. I selected Cardinal BK59 textured black for the finish. It is a little shinier and more black than what the Proform covers came with and it makes a great match for the plastic intake cover. I thought about doing VHT wrinkle black paint at home, which would have been much less expensive, but I was worried I wouldn't get a consistent finish. I'm glad I went this route.


I did a lot of research before deciding how to finish the lettering. This is a common task for the Honda tuner people, so if you search "painting raised letter valve covers" you can find some videos and info, but hardly anything that actually shows the process of finishing the letters. From what I've read there are three common techniques: mask, vasoline (or variant), and sand. The masking method is tedious and can actually leave a bad edge. With vasoline, you coat the faces of the letters prior to painting, then wipe the paint off afterwards. Both of those methods seemed iffy to me, so I went with the sanding method. I used painters tape to protect from accidentally sanding the wrong part and loaded 220 grit into a 5" random orbital sander. It took about 5 minutes per cover to remove the powdercoat and leave a swirly-brushed finish. I would definitely recommend this method; as long as you are careful with the sander and let it do the work, it does a very nice job. The edges of the letters look very crisp.


Installed:

I'm extremely happy with the results. Now I better get back to making the car go.
I did a lot of research before deciding how to finish the lettering. This is a common task for the Honda tuner people, so if you search "painting raised letter valve covers" you can find some videos and info, but hardly anything that actually shows the process of finishing the letters. From what I've read there are three common techniques: mask, vasoline (or variant), and sand. The masking method is tedious and can actually leave a bad edge. With vasoline, you coat the faces of the letters prior to painting, then wipe the paint off afterwards. Both of those methods seemed iffy to me, so I went with the sanding method. I used painters tape to protect from accidentally sanding the wrong part and loaded 220 grit into a 5" random orbital sander. It took about 5 minutes per cover to remove the powdercoat and leave a swirly-brushed finish. I would definitely recommend this method; as long as you are careful with the sander and let it do the work, it does a very nice job. The edges of the letters look very crisp.
Installed:
I'm extremely happy with the results. Now I better get back to making the car go.
Bruce

 01-20-2014, 11:55 AM
#945
Thanks guys! I am really stoked. This is a look I have always loved and I'm happy I could pull it off. I thikk they look better than the Proform covers did.
Tony the intake tube clamp is a Specte piece. Its not particularly high quality.
Tony the intake tube clamp is a Specte piece. Its not particularly high quality.
 01-29-2014, 06:36 PM
#951

Great
job Clint.
01-30-2014, 09:27 PM
#952
I am using a 4th gen Camaro alternator bracket with the "truck" DR44 alternator. The bracket needs to be spaced to match the truck accessory spacing, so I picked up a pair of 19mm L x 19mm OD x 10mm ID spacers from aluminumspacers.com. You can make them out in the photo below. I think technically they should be 20mm to match the exact spacing between the truck and Camaro accessory spacing, but I don't think the belt will be sensitive to 1mm and this was an inexpensive off-the-shelf solution. If it doesn't work out I will get the exact right size from Misumi.

I also made a very simple wire harness hanger from a cushioned wire clamp and 3/4 x 1/8 flatbar which I drilled and twisted 90 degrees to mount on the lower alternator bolt.

Most of the engine wiring runs through this section along the top of the frame and then over the inner fenderwell where it will be hidden leading to the ECM.

I also made a very simple wire harness hanger from a cushioned wire clamp and 3/4 x 1/8 flatbar which I drilled and twisted 90 degrees to mount on the lower alternator bolt.
Most of the engine wiring runs through this section along the top of the frame and then over the inner fenderwell where it will be hidden leading to the ECM.
02-11-2014, 03:34 PM
#953
Great build! I have an LQ9 in my '67 Camaro and it's a ton of fun.
Do you have any pics of how the headers hang in relation to the subframe? I'm thinking about swapping out my cheapo eBay headers and am interested in the Doug's. I looked at the Dynatech's, but they seem to hang super low on some cars.
Do you have any pics of how the headers hang in relation to the subframe? I'm thinking about swapping out my cheapo eBay headers and am interested in the Doug's. I looked at the Dynatech's, but they seem to hang super low on some cars.
 02-11-2014, 10:46 PM
#956
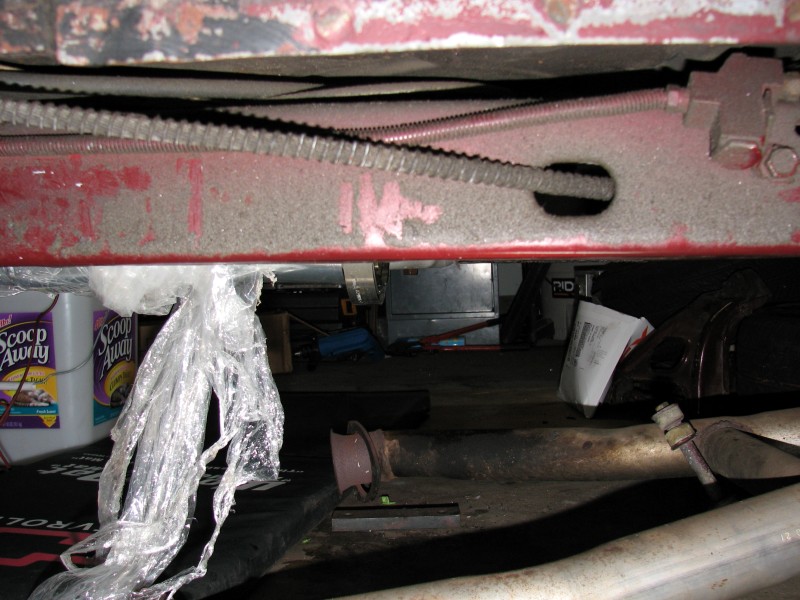
On my swap using Dougs headers, the collector tube sits just about 1/2" below the bottom of the subframe. If you use the band clamp style connectors (rather than a flange or v-band assembly) it will help maintain that clearance.
Here is a photo:
Speaking of exhaust, I finally got around to tacking up the passenger side and pulled both sides out for welding. I'll be adding an H pipe too but wanted to get the sides welded individually before connecting them. It is 3" with Dynomax VT muffers.

Here is a photo:
Speaking of exhaust, I finally got around to tacking up the passenger side and pulled both sides out for welding. I'll be adding an H pipe too but wanted to get the sides welded individually before connecting them. It is 3" with Dynomax VT muffers.
Last edited by -TheBandit-; 02-12-2014 at 04:48 PM.
02-12-2014, 12:15 PM
#959
My car isn't slammed, just the normal 2" drop up front, 1 1/2" in the rear. I just don't want something that's at risk of catching a speed bump or dragging going in or out of a driveway. Thanks again.
02-12-2014, 10:44 PM
#960
67rally - Glad I could help! I do really like the ground clearance and overall fabrication quality of these headers. Fitment may vary depending on your engine mounting and drivetrain angle etc, so it's hard to say if you'll get the same results, but I am a happy customer.
Tony -I am very happy with the header ground clearance. It is about as close as I'd want it to be to the transmission crossmember up top, so pretty much as tucked as it's going to get for 3" exhaust.
I will be MIG welding the exhaust. It's aluminized steel so there's really no reason to TIG weld it. The v-bands I'm using from the Boost Depot have an interlocking design that should seal very well. See below: