
'70 Nova LY6/TH400 6.0VVT
 01-03-2017, 02:02 PM
#1141

Jim - Yes I am using the stock solid LY6 intake valves with the Texas Speed dual valve springs that came in their VVT-2 cam kit (probably made by Comp Cams). I can't recall the specified spring pressures, but I did check installed height and they were in range without shimming. I'll ping TSP and see where they suggest I set redline.
 01-04-2017, 02:09 PM
#1142
I've been reading through your thread trying see what you did to make your lower A/C mount work. I think you changed directions and I lost track...
I'm a running a first gen camaro, which is similar to your set up. Actually the same subframe... I notched my subframe as you can see below.
I also have the trailblazer A/C mount and compressor that came with my engine. I think I'm going to fab a custom motor mount on the passenger side and shift it back to the factory LS mount location to get it out of the way of the bracket and notch my sub frame back further. But I'd rather run a different serpentine set up than what came with the truck or trail blazer.
Which accessory drive do you have that matches up to the A/C bracket you have? How far is your passenger head from your firewall? I'm curious how far you had to set your engine forward/back to make that compressor work?
I'm a running a first gen camaro, which is similar to your set up. Actually the same subframe... I notched my subframe as you can see below.

I also have the trailblazer A/C mount and compressor that came with my engine. I think I'm going to fab a custom motor mount on the passenger side and shift it back to the factory LS mount location to get it out of the way of the bracket and notch my sub frame back further. But I'd rather run a different serpentine set up than what came with the truck or trail blazer.
Which accessory drive do you have that matches up to the A/C bracket you have? How far is your passenger head from your firewall? I'm curious how far you had to set your engine forward/back to make that compressor work?
01-04-2017, 02:29 PM
#1143
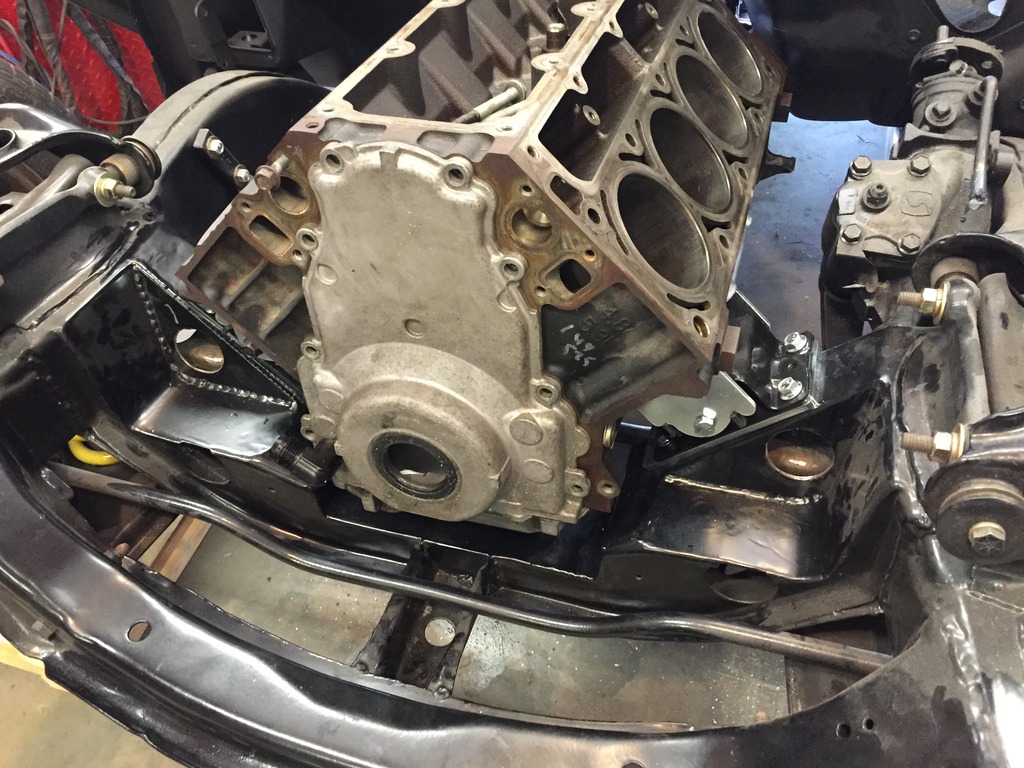
Sorry for the confusing paper trail, especially on the AC. I ended up trying out a number of combinations before I landed on what I am using. I am using Dougs SK100 adapters in the 1/2" setback position. This puts the front face of the block (the one the timing cover mounts to) about 1/2" behind the front of the subframe. Here is a photo of the mounts.

I decided not to use the trailblazer compressor and instead used a Denso 10S17 compressor, which is a fixed displacement that came on many Silverados, including my '07 LY6. The capacity is similar to the Sanden compressors used by Vintage Air. I was able to use the OEM bracket and tensioner, cutting out a bit to make clearance for the motor mount. This positions the compressor in the stock location with a dedicated belt, which is in the same location for Corvette, Camaro and Truck spacers balancers/FEADs.


I ended up having to cut the bottom rear mounting tab off of the compressor because it didn't quite clear.

And I lowered my swaybar 1/2" to give clearance with the AC tensioner
[img]http://cjnn.xtremefabricator.com/images/LY6swap/ly6swap405.JPG[.img]
And here's where everything ended up

Let me know if I can provide more help. I may still have the Trailblazer compressor, bracket, hose adapters, and 6 rib pulley I swapped onto it in case you need any of those parts for your setup. I swapped the 6 rib pulley onto it so it could be driven off the main accessory drive belt, assuming I was going to mount it onto custom brackets in a more forward position.
I decided not to use the trailblazer compressor and instead used a Denso 10S17 compressor, which is a fixed displacement that came on many Silverados, including my '07 LY6. The capacity is similar to the Sanden compressors used by Vintage Air. I was able to use the OEM bracket and tensioner, cutting out a bit to make clearance for the motor mount. This positions the compressor in the stock location with a dedicated belt, which is in the same location for Corvette, Camaro and Truck spacers balancers/FEADs.
I ended up having to cut the bottom rear mounting tab off of the compressor because it didn't quite clear.
And I lowered my swaybar 1/2" to give clearance with the AC tensioner
[img]http://cjnn.xtremefabricator.com/images/LY6swap/ly6swap405.JPG[.img]
And here's where everything ended up
Let me know if I can provide more help. I may still have the Trailblazer compressor, bracket, hose adapters, and 6 rib pulley I swapped onto it in case you need any of those parts for your setup. I swapped the 6 rib pulley onto it so it could be driven off the main accessory drive belt, assuming I was going to mount it onto custom brackets in a more forward position.
Last edited by -TheBandit-; 01-04-2017 at 02:54 PM.
01-04-2017, 03:02 PM
#1144
Yeah, it's like a large puzzle.
I'm not following why you swapped a 6 rib pulley onto the A/C compressor? I'm assuming it's still on it's dedicated belt that only runs on the crank and the A/C compressor?
Which alternator bracket is that? Is it an aftermarket or is it a piece that's with power steering bracket?
I think you said the water pump, idler pulley, and power steering pump and brackets are from an L99?
01-04-2017, 03:17 PM
#1145
The power steering bracket, power steering pump, waterpump, and tensioner are from a 2010+ Camaro L99. The L99 has the same FEAD spacing as the trucks, so it lined up with my truck balancer.
01-06-2017, 01:25 PM
#1148
I finally had a chance last night to get the car off the ground and crawl underneath to check into my transmission woes. Here's a recap of my issue:
Since the issue seemed to be engine load dependent, I figured I should inspect the vacuum modulator valve to see if the vacuum diaphragm was working right and look at the valve rod for signs of damage. The diaphragm/spring system seemed to be working just fine. The vacuum side was filled with accumulated engine oil, but it still responded to vacuum and seemed to hold/seal just fine.
So I turned my attention to the valve itself, which is a rod-shaped piece that slides into the transmission. This is a sort of spool valve that is moved outward by governor pressure and inward by a spring in the vacuum modulator. After much research, here is how I understand the operation of this modulator valve: as speed builds, the governor pressure increases, moving the spool outward and causing a 2-3 upshift. A spring in the vacuum modulator acts against the valve this to delay the upshift until enough governor pressure /speed is achieved. At lighter engine loads, vacuum acts to relieve the spring, allowing the governor to more easily move the valve and make the shift happen at lower speeds.
Attempting to use a magnet to pull it out, I found this modulator valve got stuck about 5/16" from the bottom of it's travel. I grabbed some pliers and found it took a considerable force to get it out - it was badly hung up in there, with a good 1/4" of travel feeling like a press fit. I think this is what caused my issue and may have contributed to a long-standing issue I've had with the transmission refusing to 2-3 up-shift under WOT. My guess is the valve has never moved out beyond this point as it was design to and this new engine / vacuum combination has been sticking and un-sticking the valve, resulting in the weird 2-3-2-3 back and forth shifting. That is my theory at least - I haven't had a chance yet to drive the car to test it out.
The fix was pretty easy. I cleaned out the bore with a pipe cleaner brush, then I worked the offending surface on the valve with emery cloth until it moved freely in the bore.


The photo below shows a shiny area where the valve was hanging up.

In the next photo, I've cleaned up the surface with emery cloth until it slid freely in the bore of the transmission.

Hope to get the car off jackstands tonight and give it a test drive.
With the car up to higher speeds, I discovered the transmission (TH400) was acting up. After up shifting to 3rd, it started cycling back and forth between 2nd and 3rd at light throttle. If I gave it a little more throttle it seemed to stay in 3rd, but in light throttle it was acting up. I tried playing with the vacuum modulator adjustment and replaced the vacuum line with some even thicker fuel line just to make sure it wasn't collapsing, but observed no change in behavior. The kickdown switch is completely disconnected. I checked the shifter cable adjustment and it was spot on. I talked to the tuner and we decided if we couldn't get it to hold 3rd, we could do the tune in 2nd. Theoretically it should not affect the tune, but would show lower numbers due to 2nd gear being a bit less efficient.
***SNIP***
With the car strapped down, we found the transmission would also downshift 3rd to 2nd under hard throttle. It would not hold 3rd unless it was at part load/part throttle - at light throttle it would cycle back and forth 2-3-2-3-2-3 and at hard throttle it would just downshift and stay in 2nd. We checked to make sure the kickdown was still disconnected (it was), we disconnected the vacuum modulator, and we tried starting at different rpms to see if it would hold 3rd, but no luck. So we had to use 2nd gear for WOT tuning.
So I turned my attention to the valve itself, which is a rod-shaped piece that slides into the transmission. This is a sort of spool valve that is moved outward by governor pressure and inward by a spring in the vacuum modulator. After much research, here is how I understand the operation of this modulator valve: as speed builds, the governor pressure increases, moving the spool outward and causing a 2-3 upshift. A spring in the vacuum modulator acts against the valve this to delay the upshift until enough governor pressure /speed is achieved. At lighter engine loads, vacuum acts to relieve the spring, allowing the governor to more easily move the valve and make the shift happen at lower speeds.
Attempting to use a magnet to pull it out, I found this modulator valve got stuck about 5/16" from the bottom of it's travel. I grabbed some pliers and found it took a considerable force to get it out - it was badly hung up in there, with a good 1/4" of travel feeling like a press fit. I think this is what caused my issue and may have contributed to a long-standing issue I've had with the transmission refusing to 2-3 up-shift under WOT. My guess is the valve has never moved out beyond this point as it was design to and this new engine / vacuum combination has been sticking and un-sticking the valve, resulting in the weird 2-3-2-3 back and forth shifting. That is my theory at least - I haven't had a chance yet to drive the car to test it out.
The fix was pretty easy. I cleaned out the bore with a pipe cleaner brush, then I worked the offending surface on the valve with emery cloth until it moved freely in the bore.
The photo below shows a shiny area where the valve was hanging up.
In the next photo, I've cleaned up the surface with emery cloth until it slid freely in the bore of the transmission.
Hope to get the car off jackstands tonight and give it a test drive.
01-12-2017, 12:01 PM
#1150
zboss86 - Yes, I am using a 4th gen Camaro OEM alternator/idler bracket and it only bolts on in two places. The lower mount was already there on the truck block, but I had to drill and tap the upper mount because it did not exist on the truck block. The truck alternator has no 3rd mounting point at the back like the F-body alternator so it was not used. I have 3/4" long spacers installed to reposition the alternator to align with the truck crank, but I discovered recently the belt is riding about 1/8" off the idler. If you don't already have an alternator, you might want to look into using a 2010 L99 alternator and bracket because it would have the 3rd mounting point and have the correct spacing already. I bought the bracket but it was not compatible with my truck alternator so I did not use it. If I ever have alternator issues, I may try the L99 alternator to see if it fits.
01-12-2017, 12:02 PM
#1151
My wife got me a GoPro for Christmas and I am really anxious to start using it. As it turns out, you have to buy a smattering of mounts/accessories before these things are useful, so I ordered a dual suction cup mount, helmet side mount, and an assortment of flat and curved-back sticky mounts. I hope to join a local autocross event at the end of February and since I was anxious to play with my new toy, I spent about an hour in the garage scouting potential camera locations. Below are the ones I came up with.
Over the hood:

Down low on the side. I expect to see a lot of speed from this angle down by the ground.

View from the quarter window. This would be cool in side-by-side road course racing so you can watch people pass me.

Helmet view. Hopefully will capture both the driver input and the course.

Driver view for entertainment purposes.

Over-the-shoulder view so you can see other cars pass me and see driver input.

What do you think of these? If you had to pick just two or three views for an autocross day, what would you like to see? I figure I can only use one location per run.
I am going to make some tethers for outside mounting in case the suction fails. The one down low on the front fender is a little sketchy.
01-12-2017, 01:41 PM
#1152
Driver view is good fun, especially with a passenger. I was able to borrow my buddy's GoPro for a weekend to get inside and outside views of my runs, but haven't spliced the videos yet. I also like rear quarter facing forward (just in front of the rear wheel). The roof view is nice to see the course, but it ultimately doesn't capture the sense of speed as well as the lower mounts. And I hadn't thought of the rear window mount, I like it!

 02-21-2017, 11:28 AM
#1154

It's been raining quite a bit the last few weeks, but I finally got a break in the skies to take the Nova for a spin around town. There's a great local restaurant with my namesake (no relation) and I just had to hop out and take a photo.

Driving impressions so far are:
(1) The engine runs great. Very crisp throttle response and plenty of power to set the tires loose at most around-town speeds. No sudden peak/burst in power - just very strong at all RPM. No issues with coming back to idle and it even runs quite well cold.
(2) The 2-3 shifting back & forth issue is driving me bat crazy and I have got to sort it out. It's especially bad around 40mph.
(3) The power steering is very weak. It was weak before the swap and the new pump hasn't improved matters, so perhaps the box needs a rebuild or replace - I am thinking about replacing with a new fast ratio box.
(4) The Dynomax VT mufflers are rattling like crazy at idle. They sound great otherwise and do suppress drone at low/part throttle, but it is not worth the constant clingy-clangy. They simply must go. I will probably replace them with turbo mufflers and tailpipes to quiet the car down.
(5) I can't get around the block or stop at the gas station without someone gesturing a thumbs up or rolling down their window to complement the car. It surprises me because my car has a fair amount of patina and I don't remember getting this much attention before. I think perhaps classic car sightings have just gotten more rare in the last few years.
(6) I LOVE driving this car. God I missed it. This is my happy place.
 03-07-2017, 12:56 PM
#1158
Thanks all. I have been wanting to get out in the car more and finally had a morning open to join a local cars & coffee. So Friday night I figured out how to get two child seats in the back. This was a pain because the buckles on these old lap belts are in the center, while newer belts put them on the sides. This means the buckles are buried somewhere in the child seat so they are hard to access for tightening and release. I have several different child seats for my wife and my daily drivers and fortunately a couple of them worked out.


This was the first trip out with the whole family: my wife, my 6yo son, and my 3yo daughter. My wife hasn't been in the car other than a very brief jaunt up the street and back, so this was her first time experiencing any town or freeway driving. She was nervous, especially when the transmission started doing it's voodoo shifting going down the freeway. I finally had to slow down and just lock it in 2nd gear when it started bucking between 2nd and 3rd going up a grade. It's a mess, but I just wanted to drive the damn car regardless. Maybe I'll get "lucky" and the stupid transmission will blow up on it's own.
Anyway, we managed to get to the cars and coffee and the kids had a good time looking at all the cars. To them every classic car is a Nova just like daddy's. I enjoyed talking to a couple people that were interested in the swap. One in particular complemented where I put the ignition coils, which I thought was cool given all the effort I put into that. But my car overall is just a mess - lots of patina, bad fitment of panels, loose ends that need to be cleaned up - it's not nearly as nice as it looks in the photos.


I noticed a few things on this trip that were troubling. One is that the idle oil pressure became lower than what I have been seeing on earlier drives. On previous drives, it tends to be around 30psi cold idle dropping to low 20s warm idle, but this trip it steadied out around 15psi warm. I am not sure how much stock I put in that number though, because at the same time on this trip the coolant gauge remained stuck at 200F, even when I first started the car and it was definitely cold. I need to confirm my gauges are setup and working properly - the pegging of the coolant gauge doesn't give me confidence. The gauges are Speedtech CAN-bus operated and depend on the signal from the ECM. I think I will try checking with the OBDII reader to see if they match. Maybe something is awry with the wiring of the gauges or the sensors themselves.
If the oil pressure is actually dropping, that is clearly a concern. It might be time to drain and check the oil, slice open the filter, and see if anything is going on.
This was the first trip out with the whole family: my wife, my 6yo son, and my 3yo daughter. My wife hasn't been in the car other than a very brief jaunt up the street and back, so this was her first time experiencing any town or freeway driving. She was nervous, especially when the transmission started doing it's voodoo shifting going down the freeway. I finally had to slow down and just lock it in 2nd gear when it started bucking between 2nd and 3rd going up a grade. It's a mess, but I just wanted to drive the damn car regardless. Maybe I'll get "lucky" and the stupid transmission will blow up on it's own.
Anyway, we managed to get to the cars and coffee and the kids had a good time looking at all the cars. To them every classic car is a Nova just like daddy's. I enjoyed talking to a couple people that were interested in the swap. One in particular complemented where I put the ignition coils, which I thought was cool given all the effort I put into that. But my car overall is just a mess - lots of patina, bad fitment of panels, loose ends that need to be cleaned up - it's not nearly as nice as it looks in the photos.
I noticed a few things on this trip that were troubling. One is that the idle oil pressure became lower than what I have been seeing on earlier drives. On previous drives, it tends to be around 30psi cold idle dropping to low 20s warm idle, but this trip it steadied out around 15psi warm. I am not sure how much stock I put in that number though, because at the same time on this trip the coolant gauge remained stuck at 200F, even when I first started the car and it was definitely cold. I need to confirm my gauges are setup and working properly - the pegging of the coolant gauge doesn't give me confidence. The gauges are Speedtech CAN-bus operated and depend on the signal from the ECM. I think I will try checking with the OBDII reader to see if they match. Maybe something is awry with the wiring of the gauges or the sensors themselves.
If the oil pressure is actually dropping, that is clearly a concern. It might be time to drain and check the oil, slice open the filter, and see if anything is going on.
 03-07-2017, 02:15 PM
#1160
Thanks for the kind reply. I like your thinking on the mechanical gauge check. I have half a mind to put the console and all the mechanical gauges I already have back in from the previous engine: oil pressure, coolant temp, voltage, and vacuum. They are 2-5/8" Autogage. I sprung for the CAN-bus gauges because they were simple to hook up and included idiot lights, but you can't beat the simplicity and trustworthy performance of mechanical gauges. I just hate running the required capillary tubes through the firewall and the required fittings/adapters. I would also like to have the original Nova temp/oil idiot lights working, but those require bulky switches to be adapted onto the engine. I'll have to think about where/how to do this.