
'70 Nova LY6/TH400 6.0VVT


 07-15-2011, 12:03 AM
#143
Thanks Beau! I appreciate the kind words.
Here are some pictures of the Dougs D3337 swap headers mounted finger-tight to the engine. Engine fitment looks great. I haven't tried putting in the starter, but I don't anticipate any problems there. Plug access looks good. Overall the quality of the headers is very good and the finish excellent, but equal length they certainly are not! They do not come with collector flanges either.


The area around my thick adapter plates was my biggest concern. Here you can see it clears the #1 and #3 primaries.


More progress hopefully to come this weekend. In the meantime here is a bit of nostalgia to enjoy. First picture is me porting my old iron small block heads circa 1998 when I was in high school. The girl near me is my then highschool girlfriend who came over to help out. You might recognize her from other pictures in the thread - today she's my wife!

Here is another picture for the history books; the old small block in roughly the same state as the new engine, just after I received my Dynomax ceramic coated headers. Oh the good old days!

And can you believe this is the same subframe that I've been "hacking" up lately? Used to be so purdy.

Okay enough fun for now...
Here are some pictures of the Dougs D3337 swap headers mounted finger-tight to the engine. Engine fitment looks great. I haven't tried putting in the starter, but I don't anticipate any problems there. Plug access looks good. Overall the quality of the headers is very good and the finish excellent, but equal length they certainly are not! They do not come with collector flanges either.
The area around my thick adapter plates was my biggest concern. Here you can see it clears the #1 and #3 primaries.
More progress hopefully to come this weekend. In the meantime here is a bit of nostalgia to enjoy. First picture is me porting my old iron small block heads circa 1998 when I was in high school. The girl near me is my then highschool girlfriend who came over to help out. You might recognize her from other pictures in the thread - today she's my wife!
Here is another picture for the history books; the old small block in roughly the same state as the new engine, just after I received my Dynomax ceramic coated headers. Oh the good old days!
And can you believe this is the same subframe that I've been "hacking" up lately? Used to be so purdy.
Okay enough fun for now...
Last edited by -TheBandit-; 07-15-2011 at 12:16 AM.
07-17-2011, 06:48 PM
#144

Looking great! Your moving right along now. Headers look slick!!! Hope you have better luck installing the drivers side than I did with the Dynatechs. I had to drop the steering box to get it to clear. Passenger side almost fell in from the top it was so easy. Keep the updates coming! I am at a stand still right now and need to see someone making progress if I am not.
07-17-2011, 10:58 PM
#145

[QUOTE=-TheBandit-;15153982The girl near me is my then highschool girlfriend who came over to help out. You might recognize her from other pictures in the thread - today she's my wife!
[/QUOTE]
Lucky you. You make her wear a gas mask and she sticks with you!
[/QUOTE]
Lucky you. You make her wear a gas mask and she sticks with you!
07-17-2011, 11:12 PM
#146
Actually, for a second there I thought you had repainted the subframe in Maroon and was a little releaved when I read otherwise. Looks good outside, though, but who am I to talk.
Nice headers and will you make me some of those plates, so I dont cringe everytime I see a bump in the road with my dynotechs?
07-20-2011, 11:07 AM
#147
Looking great! Your moving right along now. Headers look slick!!! Hope you have better luck installing the drivers side than I did with the Dynatechs. I had to drop the steering box to get it to clear. Passenger side almost fell in from the top it was so easy. Keep the updates coming! I am at a stand still right now and need to see someone making progress if I am not.
Unfortunately my plans for test fitting the engine this past weekend didn't go through. Mrs TheBandit kept me busy doing yardwork all weekend, clearing flower beds, digging trenches, and hauling off old plants. We're getting ready for our son's first birthday party next month and she wants the yard to be perfect for the BBQ.
I did get a little time in the garage on Monday and decided to map out the camber curve after doing the Guldstrand mod. Here are my results:

Here is how I measured:
- "Anglecube" digital angle finder (+/-0.1deg repetability) on the brake rotor
- tape measure to nearest 1/16th from the floor to a mark on the center of the wheel bearing cap
- cycle suspension with a jack, move to a new position and measure, repeat
- 0 determined by measuring the position where the LBJ is approximately 3/8" below the average position of the front and rear bolts of the LCA frame pivots
- data includes 3 cycles completely up and down with approximately even spacing between measurements to collect a locus of points
- max and min ride are where the bumpstops just made contact with the frame; there is likely a little more travel available as these get compressed
- frame supported by jackstands, suspension assembled and tight, approximately steered straight


It is interesting data, though I'm not sure yet what to make of it yet. I have been surfing the net hoping to find curves of other vehicles to compare, but haven't found much yet. There is a linear portion of the curve around estimated ride height with a camber gain of about 0.5deg for the first inch of bump. Beyond about 1.5" of droop the curve flattens out and even hooks back. I'm not sure what portion of this curve I'll be using most of the time after going to stiffer springs, bigger swaybar and good shocks. The camber curve is just one piece of whole suspension puzzle that I'm trying to put together - we'll see where I end up.
Last edited by -TheBandit-; 07-20-2011 at 11:17 AM.
07-20-2011, 03:00 PM
#148
Launching!

Join Date: Jan 2011
Location: Arizona
Posts: 200
Likes: 0
Received 0 Likes
on
0 Posts

if you could get a caster reading also, then you can graph in how the car will want to "turn in"(loose) or "out"(push) in a hard turn. it's a lot to do and we did it for a few of the IMCA dirt modifieds. it takes for ever but it pays off if extreme driving is what you're after. the camber makes the tires stick by trying to keep the tire flat and the caster makes it want to turn. the difference in caster swing during a tire up and tire down (body lean, suspension compression) makes one tire want to turn more than the other and pull the car into the turn or push it out depending. i am not that good at explaining it and only picked up a little of what the guys in the "know" explained. there's a lot going on up there and when it works good it's real good, but when it goes bad............. Good luck.
-wade-
-wade-

 07-23-2011, 01:21 AM
#150
Tonight after my son went to bed, I went to the garage and finally had some intimate time with a hoist and an LSx engine.


I couldn't imagine a smoother drop in. The spacing on the motor mounts was spot on and everything slid in without a hitch. I spent probably 80% of my time mating the TH400, mainly because I was doing it by myself and that sucker is heavy! Here is a closeup of the mounts:

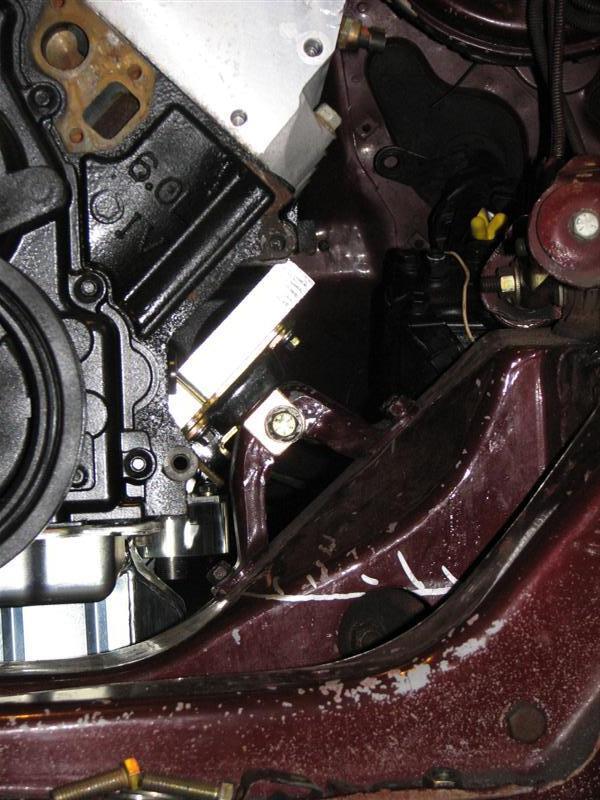
I got so giddy after putting it in, I decided to mockup the passenger header right away. Wouldn't you know it, somebody's looking out for me because this header is going to clear the factory AC suitcase with room to spare! I absolutely can't believe it.


Here is the clearance to the firewall. Plenty of room to tuck wiring.

Here you can sorta see the clearance with the brake booster and wiper motor. Nothing close to interfering. Only real concern I have in those areas is the coils.

And here's an overall from the front. This is going to look great!

I have lots of clearances and dimensions to check while the engine is in. Would anyone like to add to my checklist?
-Pass header to ac
-Driver header to steering box
-Headers to steering lock-to-lock
-Headers to floor
-Orientation for header flanges & O2 bungs
-Accessory clearance and needs for frame notching
-Driveline angles
-Required tranny crossmember movement
-Flexplate mating to stall converter
-?
For now I'm just celebrating having it in there. Things went so smoothly today I fully expect a show stoppper once I dig further.
I couldn't imagine a smoother drop in. The spacing on the motor mounts was spot on and everything slid in without a hitch. I spent probably 80% of my time mating the TH400, mainly because I was doing it by myself and that sucker is heavy! Here is a closeup of the mounts:
I got so giddy after putting it in, I decided to mockup the passenger header right away. Wouldn't you know it, somebody's looking out for me because this header is going to clear the factory AC suitcase with room to spare! I absolutely can't believe it.
Here is the clearance to the firewall. Plenty of room to tuck wiring.
Here you can sorta see the clearance with the brake booster and wiper motor. Nothing close to interfering. Only real concern I have in those areas is the coils.
And here's an overall from the front. This is going to look great!
I have lots of clearances and dimensions to check while the engine is in. Would anyone like to add to my checklist?
-Pass header to ac
-Driver header to steering box
-Headers to steering lock-to-lock
-Headers to floor
-Orientation for header flanges & O2 bungs
-Accessory clearance and needs for frame notching
-Driveline angles
-Required tranny crossmember movement
-Flexplate mating to stall converter
-?
For now I'm just celebrating having it in there. Things went so smoothly today I fully expect a show stoppper once I dig further.
07-23-2011, 07:54 AM
#151
So in 5 inches of suspension travel you only moved 1 1/2 to 1 3/4 degrees on camber? That is alot better than my factory setup. I would hate to know the range of degree's of camber my suspension moves during a 5" cycle.
Headers look great and its awesome to hear you get to keep the Evap box.
Headers look great and its awesome to hear you get to keep the Evap box.
07-25-2011, 09:46 AM
#152
Most of that camber change is happening over about a 4" range of travel. You can see near the last couple of inches of droop the curve flattens out and begins to hook back. If I removed the jounce bumpstop I could see more of the uptravel curve. I may want to go to a shorter bump if the ride height gets low. I only took data until the bump just made contact.
I am in total shock about the evap box clearing these headers. I fully expected having to cut and reglass the box for clearance. When I started this thread the response from a couple that had done it indicated there would need to be some cutting/clearancing. I'll have to post a picture there to show this indeed can work. Changing plugs will be challenging, but probably not much worse than when I had the small block in there.
I am in total shock about the evap box clearing these headers. I fully expected having to cut and reglass the box for clearance. When I started this thread the response from a couple that had done it indicated there would need to be some cutting/clearancing. I'll have to post a picture there to show this indeed can work. Changing plugs will be challenging, but probably not much worse than when I had the small block in there.
Last edited by -TheBandit-; 07-25-2011 at 10:12 AM.
07-25-2011, 09:55 PM
#153
Hopefully the plugs will not need changing similar to the factory. I think they recommend every 100,000 miles. If you get that kind of mileage out of a set then it wont be that big of a deal. I still say get a VA setup and cleanup the firewall. Great work and alot of time and thought went into it thus far! Pat yourself on the back. Now get back to work we want to see this thing fire up.
07-26-2011, 12:57 PM
#155
If I can get 100k miles out of plugs, I may never have to change them! I think in the last five years I've put less than 3000 miles on this car. But then again, with the new engine, I may end up driving this a lot more. We'll see.
Regarding VA, that is always an option but I really like the original firewall mounted AC system. It brings in fresh air, which is important for defrost, and it has a large fan and evaporator. I also appreciate the original ductwork and control integration. VA makes a very nice setup now (Gen IV) for integrating with the factory controls & vents. It has a continuously variable fan which is a huge plus in my book. But I don't like taking up room in the cab, using recirc air, and being stuck with single-source parts directly from VA if it needs service. My factory AC will be largely improved by using a modern compressor, condensor, etc. The cooling performance should be good once I have it put together and working. Even if it doesn't match the performance of the VA system, I love that my car has original factory AC and I think integrating it with the LSx is going to be an interesting talking point at cruise nights. I still can't believe it fits!
That said, here's the alternative I'm considering if things don't work out:

The header should still come off okay without pulling the box, but I will try that before I pull the engine.
Thanks for the kind words. Tons of work yet to do...
Regarding VA, that is always an option but I really like the original firewall mounted AC system. It brings in fresh air, which is important for defrost, and it has a large fan and evaporator. I also appreciate the original ductwork and control integration. VA makes a very nice setup now (Gen IV) for integrating with the factory controls & vents. It has a continuously variable fan which is a huge plus in my book. But I don't like taking up room in the cab, using recirc air, and being stuck with single-source parts directly from VA if it needs service. My factory AC will be largely improved by using a modern compressor, condensor, etc. The cooling performance should be good once I have it put together and working. Even if it doesn't match the performance of the VA system, I love that my car has original factory AC and I think integrating it with the LSx is going to be an interesting talking point at cruise nights. I still can't believe it fits!
That said, here's the alternative I'm considering if things don't work out:
The header should still come off okay without pulling the box, but I will try that before I pull the engine.
Thanks for the kind words. Tons of work yet to do...
Last edited by -TheBandit-; 07-26-2011 at 01:08 PM.
07-26-2011, 09:16 PM
#156
I wonder how the generator would look strapped to the deck lid of my car? Thats a great pic. I have seen vans done this way around where I live but I just thought it was what us rednecks do. There I go stereotyping again!
Kind words are for those who deserve them. You my friend deserve any and all compliments!!! Keep at it and you will be done before you know it. I do like the retro look of the factory air. The only issue I ever had with mine was the space it occupied. They make a replacement for R-12 its called HotShot and is available at most HVAC supply houses. Of course you could use 134a but dont forget to cut the volume down to 80-85%. I seen some sort of valve that you will need to buy to convert it to 134a but I cannot remember what its called. Something like a PVAP valve.
Kind words are for those who deserve them. You my friend deserve any and all compliments!!! Keep at it and you will be done before you know it. I do like the retro look of the factory air. The only issue I ever had with mine was the space it occupied. They make a replacement for R-12 its called HotShot and is available at most HVAC supply houses. Of course you could use 134a but dont forget to cut the volume down to 80-85%. I seen some sort of valve that you will need to buy to convert it to 134a but I cannot remember what its called. Something like a PVAP valve.
The following users liked this post:
ckltrk (02-11-2020)
07-28-2011, 12:10 PM
#157

Started fitting the driver's side header yesterday and it hits both the steering box and pitman arm. Thinking I could get it to work, I started adding a dent to the #5 primary - got it pretty close and it probably can fit with a little more. However at this point the headers fit well enough that I decided I should check steering, only to find when steered full left and right the tie rods hit the pan with more than 1/2" between the steerng arms and stops. I should have checked that before pounding on brand new headers!
Next I tried raising the tranny end off the crossmember a bit to see if engine tilt would help, but even at approximately the same lift as the motor adapters, no luck. Neither the headers or the tie rods look like they would clear even if I didn't have the engine 1/4" forwad - seems like something is off and I'm not sure what yet. I went to bed last night just feeling sick over it. I'm sure I'll figure it out, but for now I have one of those dark storm clouds over my head. I'm sure you all know that feeling. 
In these pictures from futureuser using the Autokraft plates he had plenty of clearance between the pan and TREs. Sure looks like it could move 1/4" foward and still be fine. Maybe I have a shorter pitman & idler on my Nova.
Last edited by -TheBandit-; 07-28-2011 at 01:18 PM.
07-28-2011, 12:37 PM
#158
On The Tree
iTrader: (4)

Join Date: Mar 2009
Location: British Columbia, Canada
Posts: 132
Likes: 0
Received 0 Likes
on
0 Posts
Great build so far Clint. Very jealous of the mill. The one thing with these builds, if it seems to be going too smooth, there's likely something you've overlooked Atleast that's how it usually goes for me. Good luck with the steering and keep us posted.
Atleast that's how it usually goes for me. Good luck with the steering and keep us posted.
07-28-2011, 05:11 PM
#159
Teching In

Join Date: Nov 2005
Location: Plano,Tx
Posts: 12
Likes: 0
Received 0 Likes
on
0 Posts
Hey Bandit,
What are you looking at for the fuel pump setup on this car? I am working on an l92 setup 6l80 in my truck at the moment and at a point where i need to figure out my tank pump setup quickly so i can get it running?
thanks
Sean wolff
plano texas
What are you looking at for the fuel pump setup on this car? I am working on an l92 setup 6l80 in my truck at the moment and at a point where i need to figure out my tank pump setup quickly so i can get it running?
thanks
Sean wolff
plano texas
07-28-2011, 07:17 PM
#160
Started fitting the driver's side header yesterday and it hits both the steering box and pitman arm. Thinking I could get it to work, I started adding a dent to the #5 primary - got it pretty close and it probably can fit with a little more. However at this point the headers fit well enough that I decided I should check steering, only to find when steered full left and right the tie rods hit the pan with more than 1/2" between the steerng arms and stops. I should have checked that before pounding on brand new headers!
Next I tried raising the tranny end off the crossmember a bit to see if engine tilt would help, but even at approximately the same lift as the motor adapters, no luck. Neither the headers or the tie rods look like they would clear even if I didn't have the engine 1/4" forwad - seems like something is off and I'm not sure what yet. I went to bed last night just feeling sick over it. I'm sure I'll figure it out, but for now I have one of those dark storm clouds over my head. I'm sure you all know that feeling. In these pictures from futureuser using the Autokraft plates he had plenty of clearance between the pan and TREs. Sure looks like it could move 1/4" foward and still be fine. Maybe I have a shorter pitman & idler on my Nova.
I know our frames are supposed to be the same, but maybe you're right about different steering parts.
I could be wrong on this, but compared to my set up, your motor appears to be far more forward than 1/4 inch. It is noticable in the photo. As you recall, I am using the more rare short narrow/tall narrow combo and had an impossible time with the 1 inch back adaptors, so it actually might be me that's further back than normal. According to the dude at autokraft, and you (I think), I am the first that he knows of to use this combo with his pan. So it could be that I got lucky and had the motor a little further back than normal, giving me a little extra clearance there. At least your headers won't scrape all over the ground.