
Mike's 65 GTO Ls1 T56 Build
 12-30-2010, 07:36 AM
#21

Thanks Bob. I love the 65's also.
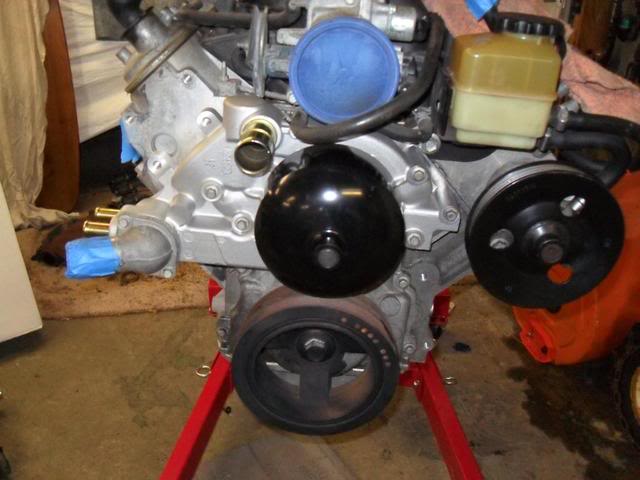
Just a couple of pics after we put the engine on a stand.
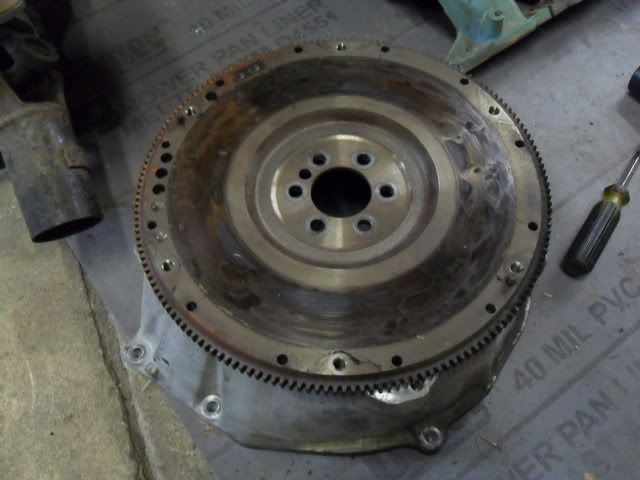
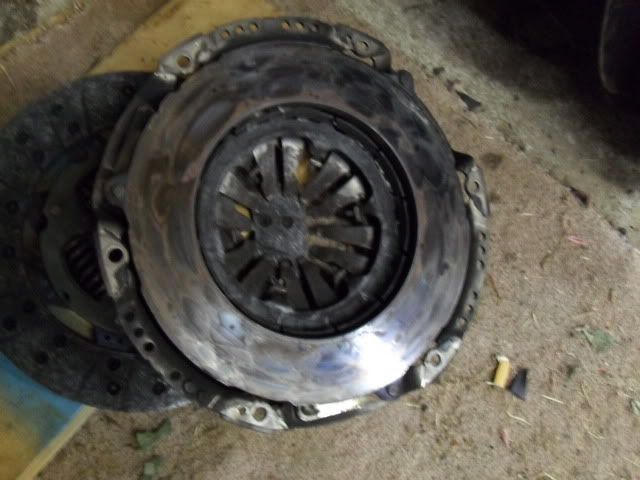
Do you think this car was beat on, or was the clutch ruined by slipping it too much? Looks bad, huh? I'll have to get the flywheel resurfaced, and I was going to buy a new clutch and pressure plate anyway.
Just a couple of pics after we put the engine on a stand.
Do you think this car was beat on, or was the clutch ruined by slipping it too much? Looks bad, huh? I'll have to get the flywheel resurfaced, and I was going to buy a new clutch and pressure plate anyway.
Hard to say, I have seen them look like yours from many cars. It could be that someone didn't know how to drive a stick. Bob
__________________
ATI ProCharger and Moser Sales 260 672-2076
PM's disabled, please e-mail me
E-mail: brutespeed@gmail.comob@brutespeed.com
https://brutespeed.com/ Link to website

ATI ProCharger and Moser Sales 260 672-2076
PM's disabled, please e-mail me
E-mail: brutespeed@gmail.comob@brutespeed.com
https://brutespeed.com/ Link to website
 01-13-2011, 09:04 PM
#22
Staging Lane
Thread Starter

Did a little work getting the engine ready to put in the car...
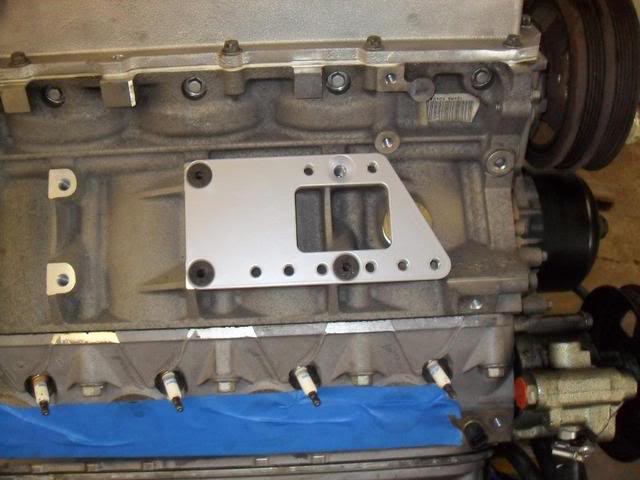
Moved the alternator to the upper passenger side using Rockytoppers bracket. It worked very well.
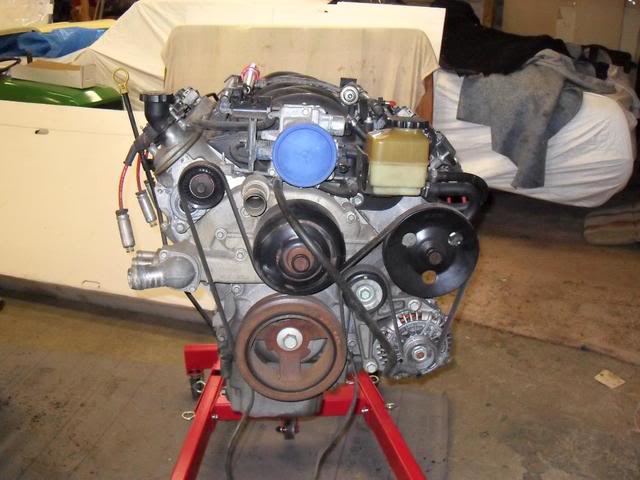
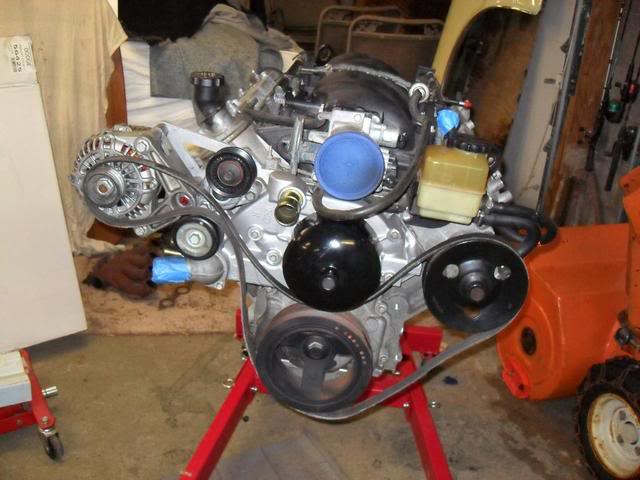
New water pump, the pulley on the old one showed some signs of impact, so I figured I would just change it now.
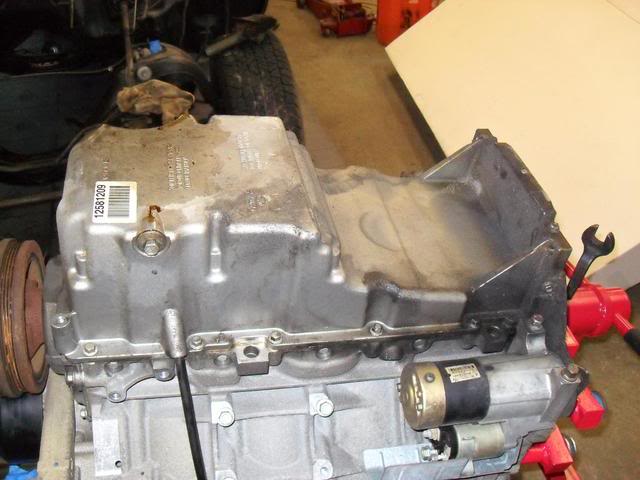
Changed the oil pan to a new JZ Motorworks pan.
The original pan
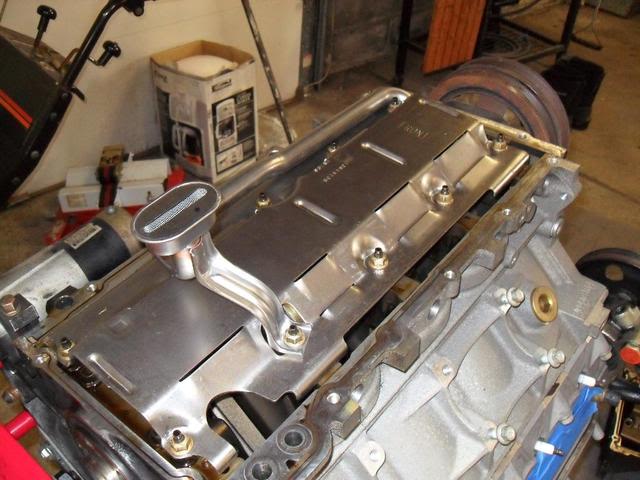
New windage tray and oil pump pick up installed
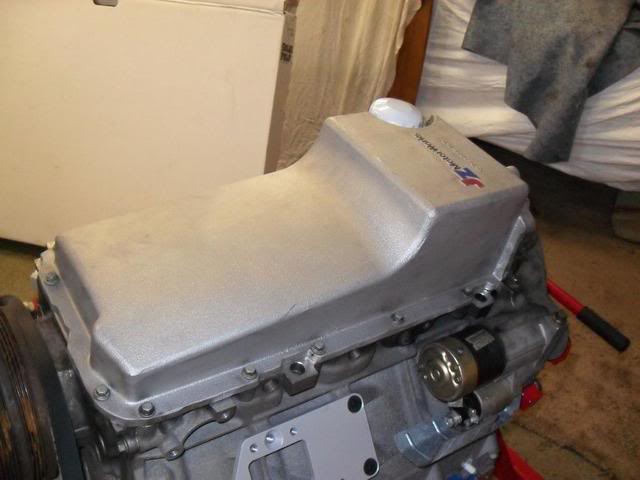
New pan
I also bought some small block Chevelle Frame mounts, and I am waiting for the Energy Suspension motor mounts.
Moved the alternator to the upper passenger side using Rockytoppers bracket. It worked very well.
New water pump, the pulley on the old one showed some signs of impact, so I figured I would just change it now.
Changed the oil pan to a new JZ Motorworks pan.
The original pan
New windage tray and oil pump pick up installed
New pan
I also bought some small block Chevelle Frame mounts, and I am waiting for the Energy Suspension motor mounts.
 01-28-2011, 12:20 PM
#25
TECH Resident
Join Date: Nov 2007
Location: Texas
Posts: 816
Likes: 0
Received 0 Likes
on
0 Posts
Mike, I seem to recall that most of the chevelle guys had to split their tunnels and reshape them to fit the 6 speeds in these A-bodies. If that be the case and you have to open yours up it might allow you to raise your engine slightly if the oil pan is an issue with clearing the steering links. Good luck, mine is an auto so I did not have to split the tunnel and my modified f-body pan that has the front corners recessed barely clears at full turn lock. My pan is set a 2x4 width (1-1/2 inch) above the cross member.
01-28-2011, 12:58 PM
#26
Staging Lane
Thread Starter
I was thinking that I would have to open up the tunnel, one good thing is that there is already a big hole there so locating the shifter should be easier.
Is your oil pan higher than you though it would have to be? You made your own frame mounts right? Thanks for the reminders of what might be problems with the install and what to watch out for.
Is your oil pan higher than you though it would have to be? You made your own frame mounts right? Thanks for the reminders of what might be problems with the install and what to watch out for.
01-28-2011, 02:42 PM
#27
TECH Resident
Join Date: Nov 2007
Location: Texas
Posts: 816
Likes: 0
Received 0 Likes
on
0 Posts
I was thinking that I would have to open up the tunnel, one good thing is that there is already a big hole there so locating the shifter should be easier.
Is your oil pan higher than you though it would have to be? You made your own frame mounts right? Thanks for the reminders of what might be problems with the install and what to watch out for.
Is your oil pan higher than you though it would have to be? You made your own frame mounts right? Thanks for the reminders of what might be problems with the install and what to watch out for.
I basically set my engine in for the first time and used the 2x4 to rest it on the cross member with a floor jack under the tail of the trans. It provided clearance for the factory f-body engine mounts and I got lucky the trans linkage for my 2 speed jet away aligned perfectly with the 4l60e so the first place I set the engine was my final positon. I am further forward than most of the guys that are using the after market kits. That is why I had to develope the Alt relocation bracket. There was no way mine could stay in the stock location it interfered with the steering box by over an inch. My throttle pedal linkage is also on the engine side of the fire wall and the engine had to be in the forward position just to gain clearance for the linkage. It is also easier for me to access the trans bell housing bolts and oil port on the back of the block. I think I am pretty close to the others chevelles as far as oil pan to cross member height clearance. Your question would be better ask to Bczee or some of the other guys running a standard and the after market mounts.
Last edited by rockytopper; 01-28-2011 at 02:48 PM.
02-07-2011, 04:33 PM
#29
Staging Lane
Thread Starter
Couple more pics.
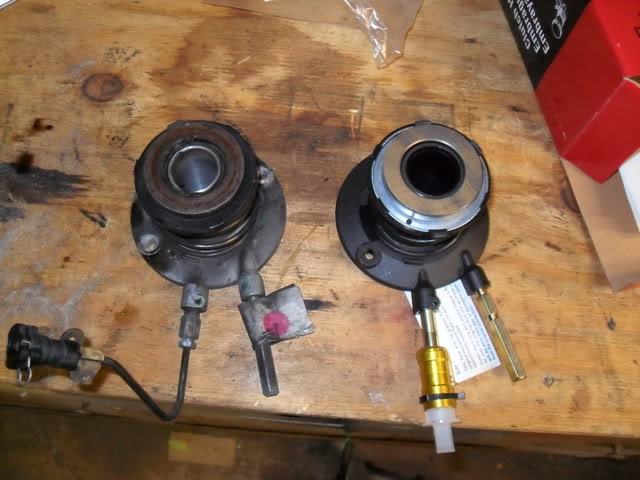
Used an F-Body clutch slave, couldn't find a GTO part and the Camaro one was $30 cheaper!! Just had to change the GTO's hydraulic fitting to the Camaro slave.
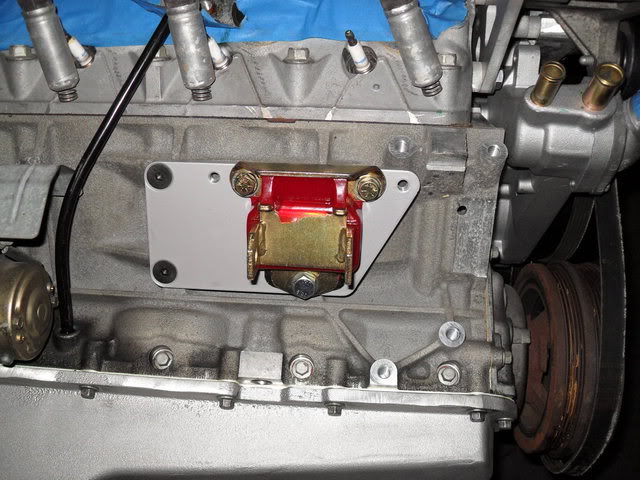
New motor mounts.
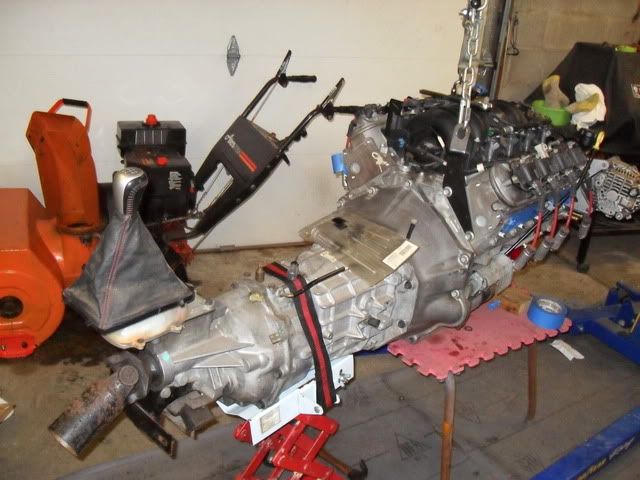
Engine and tranny with new clutch and flwheel.

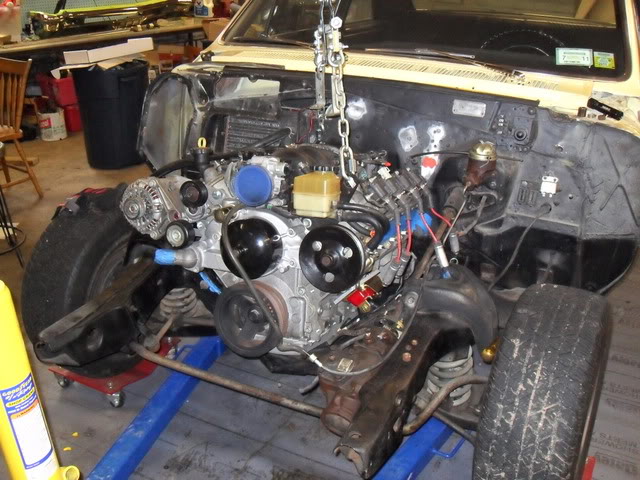
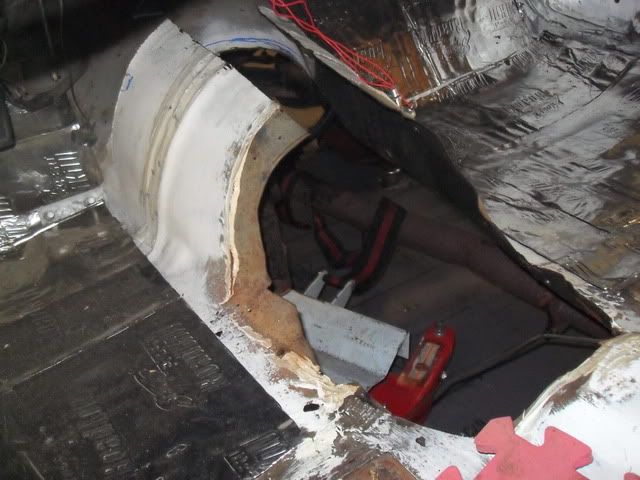
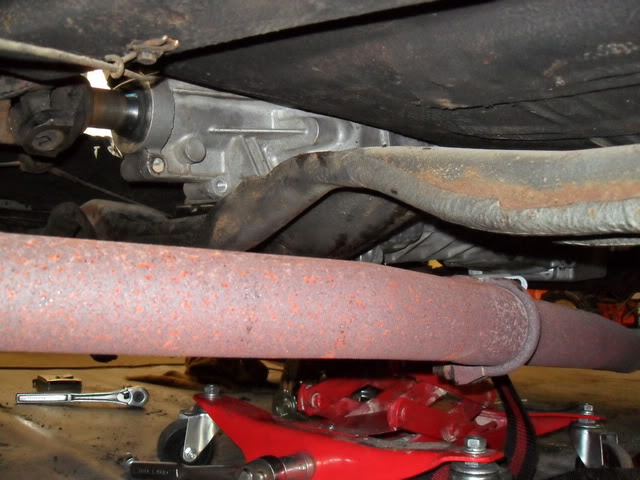
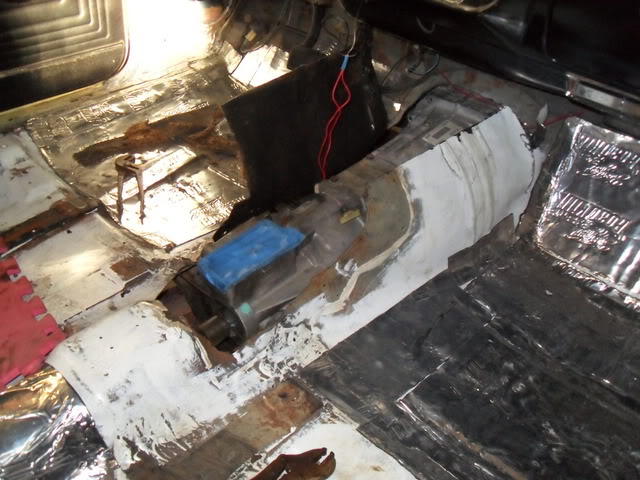
Test fitted the engine and tranny, had to cut the floor for the tranny. I still need to cut more toward the front of the car.

The engine sits too low and the steering center link hits the oil pan, so we are going to make up 1/2" spacers under the frame mounts.
More to come...
Used an F-Body clutch slave, couldn't find a GTO part and the Camaro one was $30 cheaper!! Just had to change the GTO's hydraulic fitting to the Camaro slave.
New motor mounts.
Engine and tranny with new clutch and flwheel.
Test fitted the engine and tranny, had to cut the floor for the tranny. I still need to cut more toward the front of the car.
The engine sits too low and the steering center link hits the oil pan, so we are going to make up 1/2" spacers under the frame mounts.
More to come...
 02-07-2011, 05:37 PM
#31
TECH Resident
Join Date: Nov 2007
Location: Texas
Posts: 816
Likes: 0
Received 0 Likes
on
0 Posts
Mike I see you had to get the can opener out. Just an FYI if your planning on using your factory hvac blower assembly on the fire wall whcih appears to be identical to the one in my 65 cutlass it barely clears the coils on mine. You might test fit it once you get your engine height established. Also are you planning on putting a/c in it. I see yours is a factory a/c car? Looking good.
02-07-2011, 07:17 PM
#32
Staging Lane
Thread Starter
Thanks, yeah the opener was out, and I've got the cuts on my arm to prove it.LOL
Rocky, it is an A/C car, I have an A/C delete plate that I'm putting on, at least for now. If I want air later, I may go for a Vintage Air system. I want to get the car going and drive it a while first.
I looked at your build thread, my A/C box is the same as yours. Nice and big!
Rocky, it is an A/C car, I have an A/C delete plate that I'm putting on, at least for now. If I want air later, I may go for a Vintage Air system. I want to get the car going and drive it a while first.
I looked at your build thread, my A/C box is the same as yours. Nice and big!
02-08-2011, 12:12 PM
#33

Couple more pics.
Used an F-Body clutch slave, couldn't find a GTO part and the Camaro one was $30 cheaper!! Just had to change the GTO's hydraulic fitting to the Camaro slave.

New motor mounts.
Engine and tranny with new clutch and flwheel.
Test fitted the engine and tranny, had to cut the floor for the tranny. I still need to cut more toward the front of the car.
The engine sits too low and the steering center link hits the oil pan, so we are going to make up 1/2" spacers under the frame mounts.

More to come...
Used an F-Body clutch slave, couldn't find a GTO part and the Camaro one was $30 cheaper!! Just had to change the GTO's hydraulic fitting to the Camaro slave.
New motor mounts.
Engine and tranny with new clutch and flwheel.
Test fitted the engine and tranny, had to cut the floor for the tranny. I still need to cut more toward the front of the car.
The engine sits too low and the steering center link hits the oil pan, so we are going to make up 1/2" spacers under the frame mounts.
More to come...
02-08-2011, 12:48 PM
#34
Staging Lane

Join Date: Feb 2010
Location: Dallas, TX
Posts: 80
Likes: 0
Received 0 Likes
on
0 Posts

Man I love this car. Digging the build too. I see we're using a lot of the same parts (pan, motor mounts, adapter plates). I'm anxious to see this one DONE!! Totally cool car. Let me know if you have any questions.
02-08-2011, 02:13 PM
#35
Staging Lane
Thread Starter
Yes the slave cylinder from a Fbody and a GTO are identical except the feed line fitting which are easily swapped out, If I understand correctly you are going to use the new Fbody slave and you installed the feed line fitting from the old GTO slave onto it? What are you using for a clutch master cylinder? I have a 66 GTO that I installed a 2006 GTO LS2 & T56 combo into and I had to swap out my GTO slave feed line fitting and install a Fbody feed line fitting onto so I could attach it to my 98-02 Fbody clutch master cylinder line that I am using, my Fbody clutch master cylinder is bolted to a adaptor plate that mounts behind my brake booster, so I think I had the opposite solution of what you did which made me curious as to how and which clutch master cylinder and set up you are using?
Man I love this car. Digging the build too. I see we're using a lot of the same parts (pan, motor mounts, adapter plates). I'm anxious to see this one DONE!! Totally cool car. Let me know if you have any questions.
02-08-2011, 02:37 PM
#36
Staging Lane
Join Date: Feb 2010
Location: Dallas, TX
Posts: 80
Likes: 0
Received 0 Likes
on
0 Posts
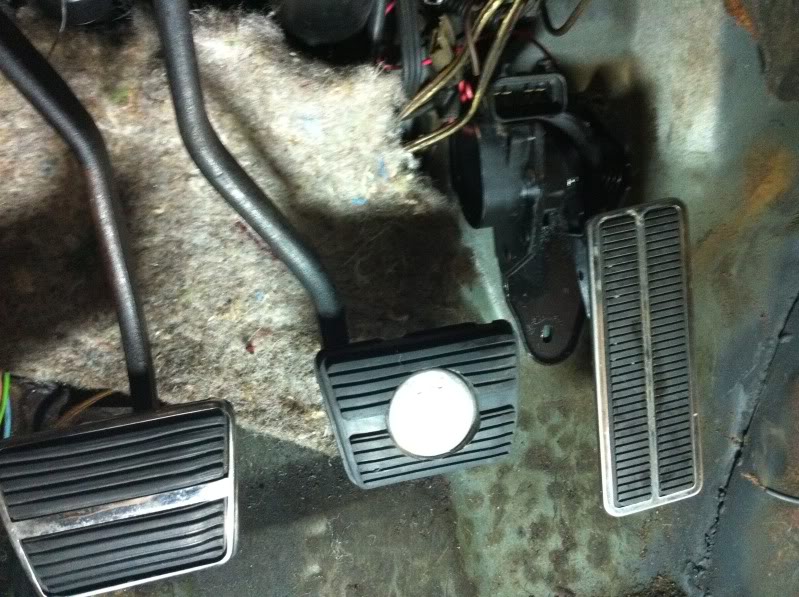
NOTE: the DBW pedal position sensor using my factory Chevelle pedal in the factory location.
 02-09-2011, 08:55 AM
#37
I also used my original clutch pedal on my 66 GTO there was a hole already on the pedal itself, it was for the original clutch rod since the car was originally a 4 speed but it aligned up perfectly with the Fbody clutch master cylinder as if it were made for it. I bought the firewall bracket from Street & Performance for around $70-80 I think, and that way I was able to use a 98-02 Fbody clutch master cylinder and braided line, and replacement parts are in stock at the local parts house, Although I did do what they call the "drill mod" to the braided line if you google "drill mod" it talks about a factory restriction that is in the original Fbody braided line that prevents multiple wide open shifting, I have had no problems with spirited driving and shifting so far. I also had the original 2006 GTO clutch master cylinder and line but after several attempts at mounting it which looked like it was going be quite involved with making brackets to get the right geometry, although I did use the 2006 GTO nuetral safety switch on my original pedal so it will not start unless the clutch pedal is depressed. I did have to make a bracket for that. I decided on the Fbody setup as it was pretty much plug and play, all I had to do was some trimming of the floor plate that attached to the floor board where the original clutch rod goes through because instead of a clutch rod going through you now have part of the Fbody master cylinder there.
02-15-2011, 07:20 PM
#39
Staging Lane
Thread Starter
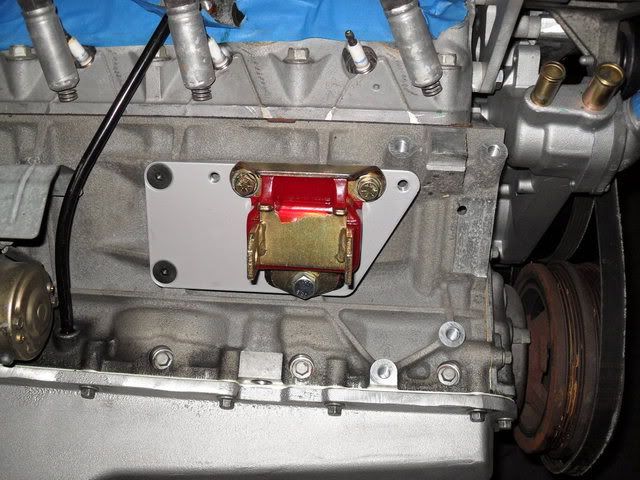
It's in!!! The engine and tranny are mounted. We had to put spacers under the frame mounts to raise the oil pan enough to clear the steering linkage, and they do clear by about a half inch. The best part is that we can use the original GTO trans cross member! We bolted on the transmission mount from the M22 that I removed and everything bolted right up. I am stoked, it looks great, and we have about 1 inch of clearance from the firewall. I still have to cut more from the tunnel believe it or not, just a little more at the front.
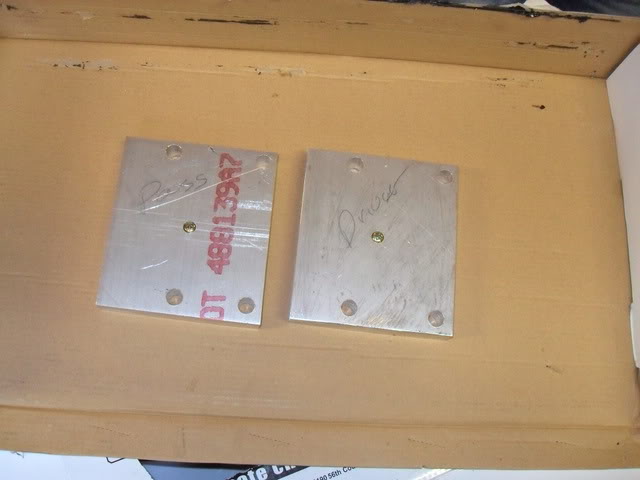
3/4" aluminum spacers.
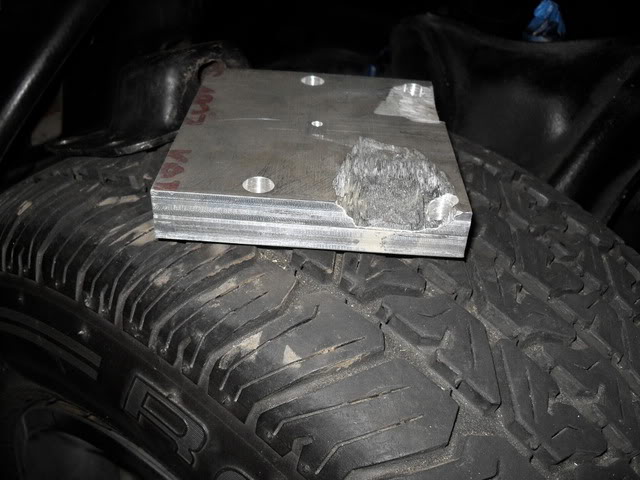
I had to grind on the spacer to clear a bump in my cross member.
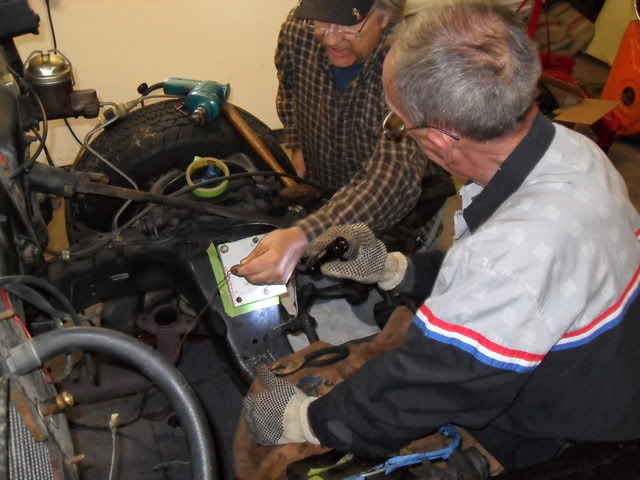
The boys discussing the project. Believe it or not neither fisticuffs nor swearing ensued.
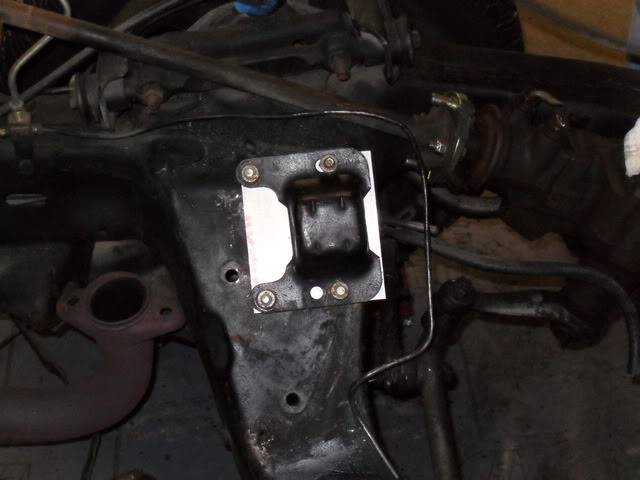
Drivers side installed.
Oil pan clearance.

View showing ground clearance. Lookin' good. Exhaust is hanging, so it looks low now.
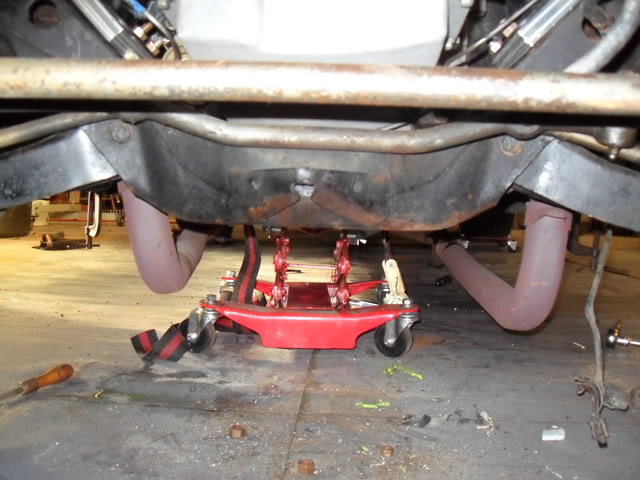
Original cross member and mount.
Tranny looks good in there. More work to do.
3/4" aluminum spacers.
I had to grind on the spacer to clear a bump in my cross member.
The boys discussing the project. Believe it or not neither fisticuffs nor swearing ensued.
Drivers side installed.
Oil pan clearance.
View showing ground clearance. Lookin' good. Exhaust is hanging, so it looks low now.
Original cross member and mount.
Tranny looks good in there. More work to do.
02-15-2011, 09:24 PM
#40
Looks great...I hope to catch up to you. If someone will just buy my LT1/6 speed, then I can get the LS. But to encourage you on those GTO seats, check out mine (recovered) in my 71 Cutlass Convertible. I drove 2400 miles across country in these, and boy are they nice!!!
The backs I had to shorten 3 in, and widen the center section 1.5 in to fit. The shortening was so convertible top would clear; maybe not necessary for you.
The backs I had to shorten 3 in, and widen the center section 1.5 in to fit. The shortening was so convertible top would clear; maybe not necessary for you.