
Mike's 65 GTO Ls1 T56 Build


 02-16-2011, 07:09 PM
#42
NOt hard...just $$. I paid the upholster who recovered the seats. Not really that much; he just cut the wire frame and welded it back together and cut out some of the cushion. for the widened center section, he cut a piece of plywood to shape, added cushion then recovered. Don't think it cost much in terms of the overall recovering. IIRC I paid about $800 total to recover the seats about 4 years ago (maybe a little less). But he was doing other work for me too ( a new convertible top).
03-14-2011, 07:27 AM
#44
Teching In

Join Date: Mar 2011
Location: Ontario Canada
Posts: 1
Likes: 0
Received 0 Likes
on
0 Posts
Hey Mike the car looks awesome. I am doing a 65 GTO that i bought in 1984. ( Wife /house /kids finally car )
Just picked up a 24000 mile 04 LS1 T56. could you hook me up with the alternator relocation bracket.
Just picked up a 24000 mile 04 LS1 T56. could you hook me up with the alternator relocation bracket.
03-14-2011, 11:19 AM
#45
Staging Lane
Thread Starter

Sounds like a sister project. Be sure to post some pics.
For the alternator bracket you need to send a PM to LS1 Tech member rockytopper, he designed it. It worked out real well. Be sure to check out his build thread also, it's awesome.
For the alternator bracket you need to send a PM to LS1 Tech member rockytopper, he designed it. It worked out real well. Be sure to check out his build thread also, it's awesome.
03-14-2011, 12:44 PM
#46

Looks great...I hope to catch up to you. If someone will just buy my LT1/6 speed, then I can get the LS. But to encourage you on those GTO seats, check out mine (recovered) in my 71 Cutlass Convertible. I drove 2400 miles across country in these, and boy are they nice!!!
The backs I had to shorten 3 in, and widen the center section 1.5 in to fit. The shortening was so convertible top would clear; maybe not necessary for you.
The backs I had to shorten 3 in, and widen the center section 1.5 in to fit. The shortening was so convertible top would clear; maybe not necessary for you.
As for the '65 Goat....LOVE it man...keep up the solid work!
Dave
05-17-2011, 09:33 AM
#48
Staging Lane
Thread Starter
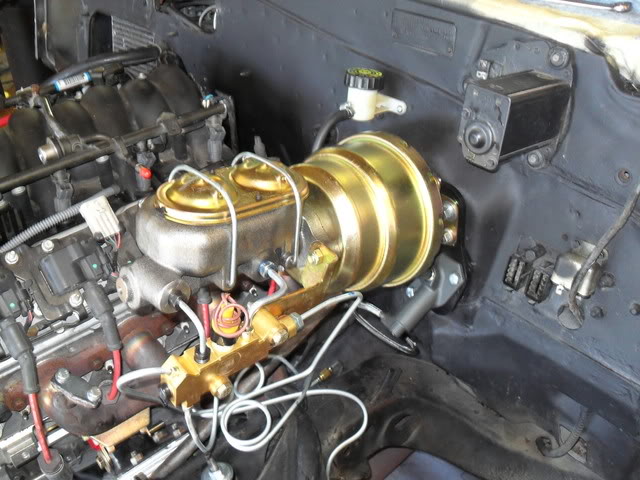
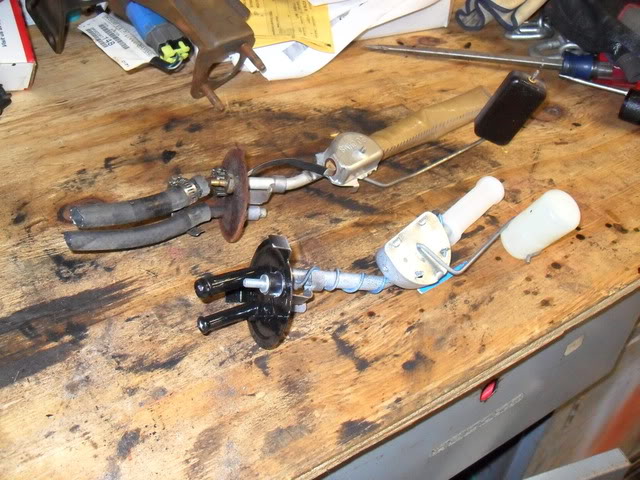
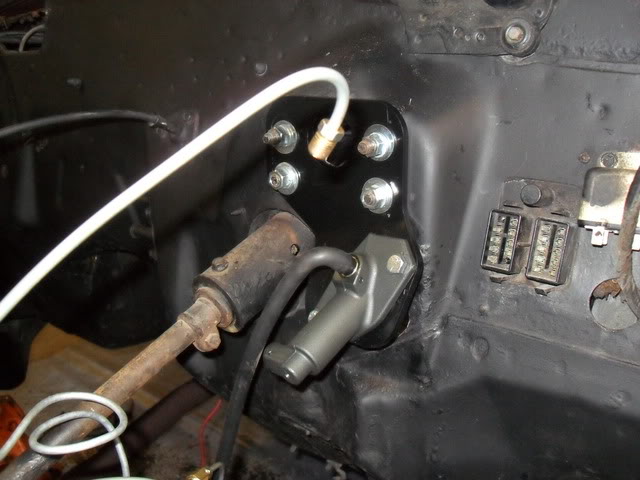
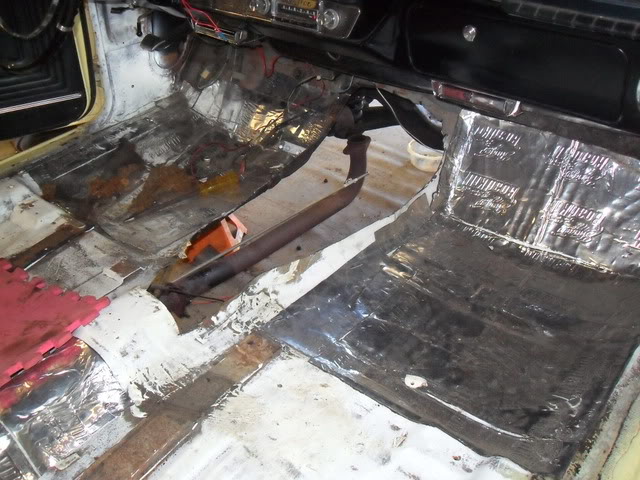
A little update on the Goat. The engine is in, hopefully for good. I had the ECM reconfigured for the swap, with the unnecessary O2 sensors, skip shift, emissions, and other sensors deleted. Front brake lines were run, disc brakes installed, new master cylinder and broke booster installed. The front coil springs were taken out and non A/C springs acquired from a friend were cut by one coil and put in. The gas tank was reinstalled with a new sending unit with the return line changed to 5/16 from 1/4. Here are some pics:
Disc brake conversion. I used brackets from Scarebird Brakes, along with Lumina Calipers, and Monte Carlo Rotors.

The brake booster, master cylinder, and proportioning valve are from Right Stuff Detailing. Clutch reservoir and hydraulic line are installed.
New gas tank sender, with a 3/8 supply and 5/16 return line.
Camaro clutch mater cylinder, I had to change the fitting on the clucth slave back to the Camaro fitting so I could use the Camaro hydraulic hose.
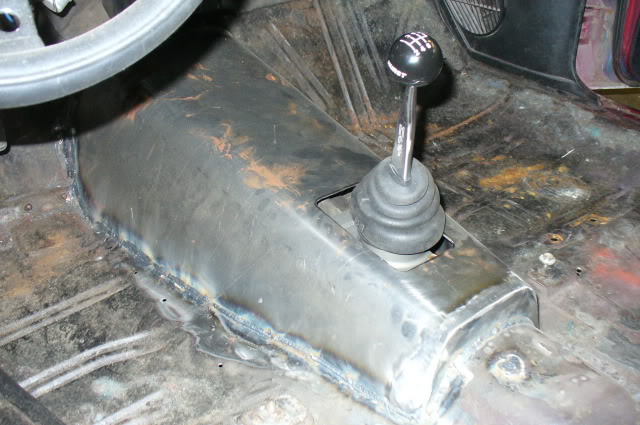
I decided to hack the whole tunnel out, I think it'll be much easier to form a new tunnel rather than weld the cut up tunnel.
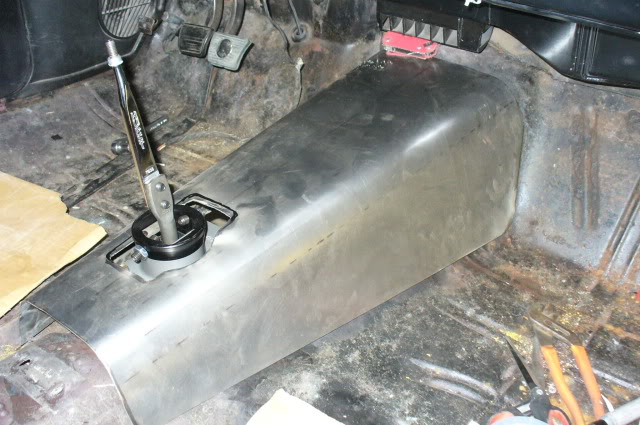
B&M Precision Sport Shifter.
More to come...
Disc brake conversion. I used brackets from Scarebird Brakes, along with Lumina Calipers, and Monte Carlo Rotors.
The brake booster, master cylinder, and proportioning valve are from Right Stuff Detailing. Clutch reservoir and hydraulic line are installed.
New gas tank sender, with a 3/8 supply and 5/16 return line.
Camaro clutch mater cylinder, I had to change the fitting on the clucth slave back to the Camaro fitting so I could use the Camaro hydraulic hose.
I decided to hack the whole tunnel out, I think it'll be much easier to form a new tunnel rather than weld the cut up tunnel.
B&M Precision Sport Shifter.
More to come...
05-17-2011, 12:17 PM
#49

Man your driveshaft is going to be tight to the floor. We've got my tailshaft as high as we could (yoke is roughly 1/2" from front lateral brace) and had to fab a crossmember that put the mount effectively 1" lower than my stocker. Maybe my poly mount is tall or something.. Guess your motor mounts also have your stuff installed 1-2" further forward than mine. If you don't mind, here's pics from mine (if you want me to delete these out of your thread just tell me).
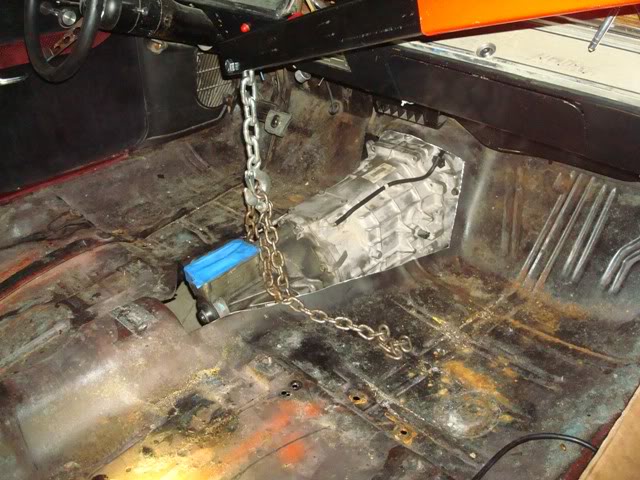
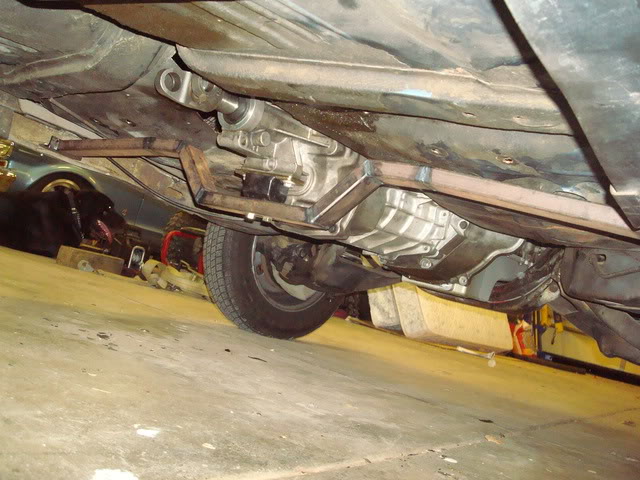

Carpet is going to be an issue, but we'll figure that out when we get there! Note, we've made a few of these tunnels for locals doing the same swap, if anyone wants one, PM me..
Carpet is going to be an issue, but we'll figure that out when we get there! Note, we've made a few of these tunnels for locals doing the same swap, if anyone wants one, PM me..
05-17-2011, 01:18 PM
#50
Staging Lane
Thread Starter
That cover is nice. I don't think clearance will be an issue. I sure hope not as I have used my original crossmember and the mount that I had on the M22 that came out of the car. If it is a problem, we'll have to adjust.
No problem posting the pics. Good luck with your build.
No problem posting the pics. Good luck with your build.
05-18-2011, 12:15 PM
#51

The brakes looks great! The stock '65 GTO brakes about killed me back in the late '70's. I had swapped the 389 in one of my '65's for a Pontiac 428, and I drove right through a redlight on an intersection on a thru-way after running the car up to around 120 mph. The brakes got hot and smoke was rolling out of the fenders when I finally came to a stop. Bob
__________________
ATI ProCharger and Moser Sales 260 672-2076
PM's disabled, please e-mail me
E-mail: brutespeed@gmail.comob@brutespeed.com
https://brutespeed.com/ Link to website

ATI ProCharger and Moser Sales 260 672-2076
PM's disabled, please e-mail me
E-mail: brutespeed@gmail.comob@brutespeed.com
https://brutespeed.com/ Link to website
05-18-2011, 12:47 PM
#52
Staging Lane
Thread Starter
Yeow! Close one. I took the car to a show that was at the end of a hilly ride. I could feel the brakes getting worse as I went.
One of the reasons for the disc brake is taking the car on trips. Last year we took our 68 Bonneville down Route 66 to California, we put disc brakes on that a couple of years ago.
One of the reasons for the disc brake is taking the car on trips. Last year we took our 68 Bonneville down Route 66 to California, we put disc brakes on that a couple of years ago.
05-18-2011, 12:57 PM
#53
Yeow! Close one. I took the car to a show that was at the end of a hilly ride. I could feel the brakes getting worse as I went.
One of the reasons for the disc brake is taking the car on trips. Last year we took our 68 Bonneville down Route 66 to California, we put disc brakes on that a couple of years ago.
One of the reasons for the disc brake is taking the car on trips. Last year we took our 68 Bonneville down Route 66 to California, we put disc brakes on that a couple of years ago.
__________________
ATI ProCharger and Moser Sales 260 672-2076
PM's disabled, please e-mail me
E-mail: brutespeed@gmail.comob@brutespeed.com
https://brutespeed.com/ Link to website
ATI ProCharger and Moser Sales 260 672-2076
PM's disabled, please e-mail me
E-mail: brutespeed@gmail.comob@brutespeed.com
https://brutespeed.com/ Link to website
 05-18-2011, 02:49 PM
#55
That looks sweet! Bob
__________________
ATI ProCharger and Moser Sales 260 672-2076
PM's disabled, please e-mail me
E-mail: brutespeed@gmail.comob@brutespeed.com
https://brutespeed.com/ Link to website
ATI ProCharger and Moser Sales 260 672-2076
PM's disabled, please e-mail me
E-mail: brutespeed@gmail.comob@brutespeed.com
https://brutespeed.com/ Link to website
05-18-2011, 08:46 PM
#56
TECH Enthusiast

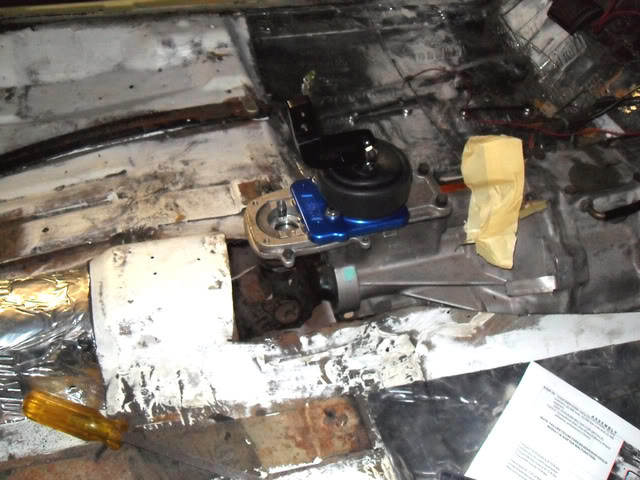
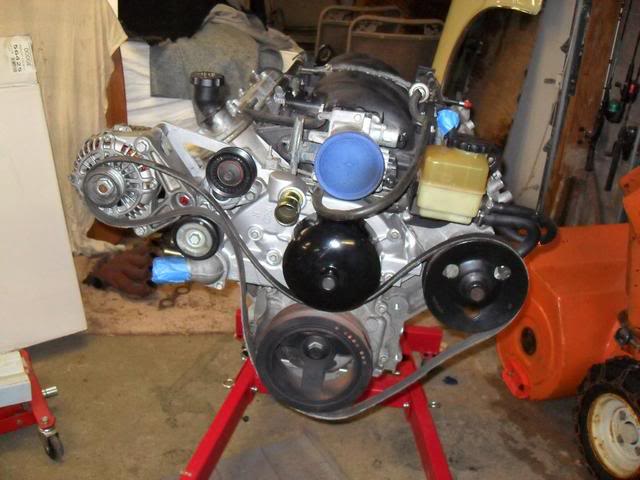
[QUOTE=darksider;14358456]Did a little work getting the engine ready to put in the car...
Moved the alternator to the upper passenger side using Rockytoppers bracket. It worked very well.
I can't find the alternator bracket
Moved the alternator to the upper passenger side using Rockytoppers bracket. It worked very well.
I can't find the alternator bracket
06-30-2011, 08:43 PM
#57
Staging Lane
Thread Starter
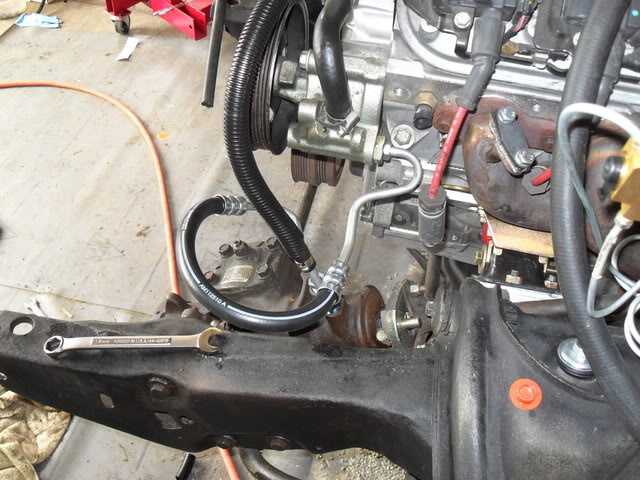
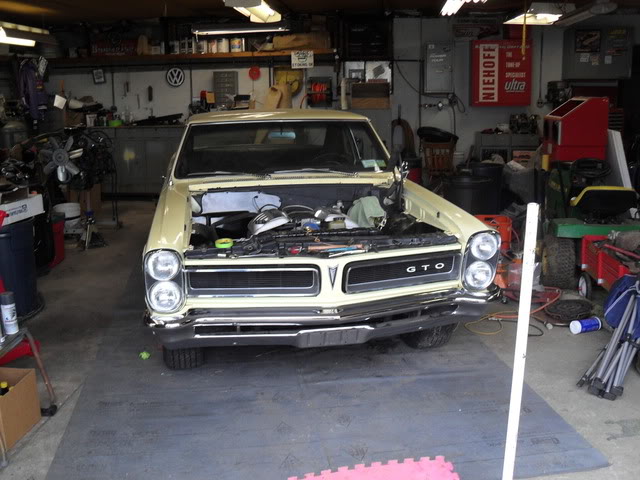
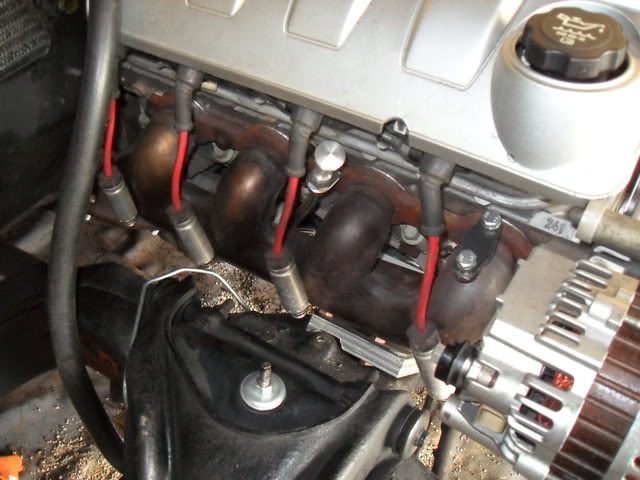
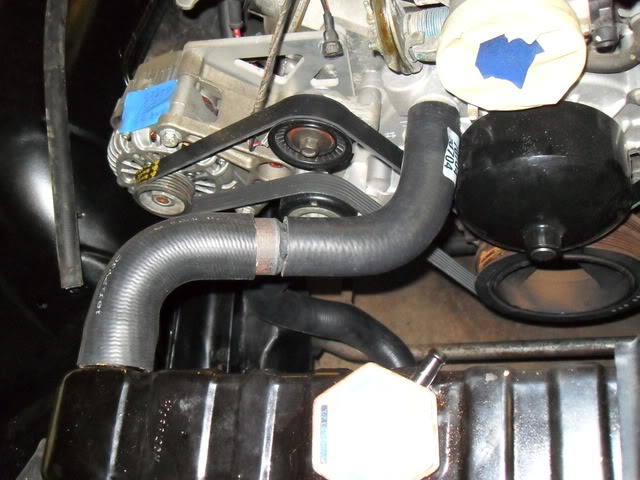
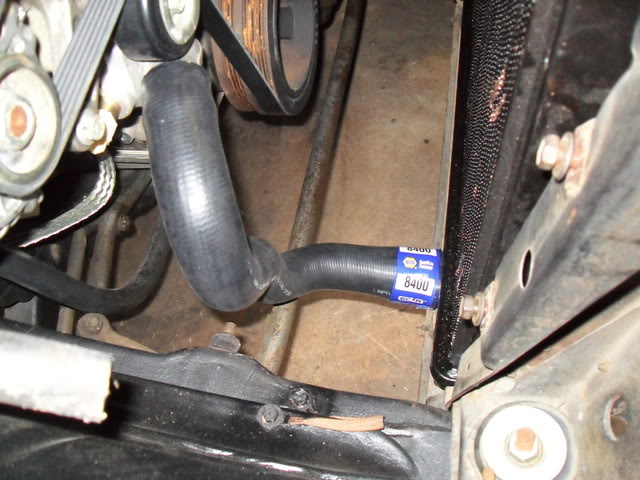
Time for some more updates. I mounted the fuel pump and Corvette filter/regulator in the drivers side frame rail. Put the fenders and bumper back on, installed the throttle cable and oil dipstick, and A/C delete box. All of the fuel lines are now run. Also I found power steering hoses and upper and lower radiator hoses. I had Mufflerman make up some exhaust pipes from the manifolds to my existing muffler and tail pipes. they also put in a crossover pipe and O2 bungs. I also have a new driveshaft installed. We're getting closer, but still quite a lot of work to do.
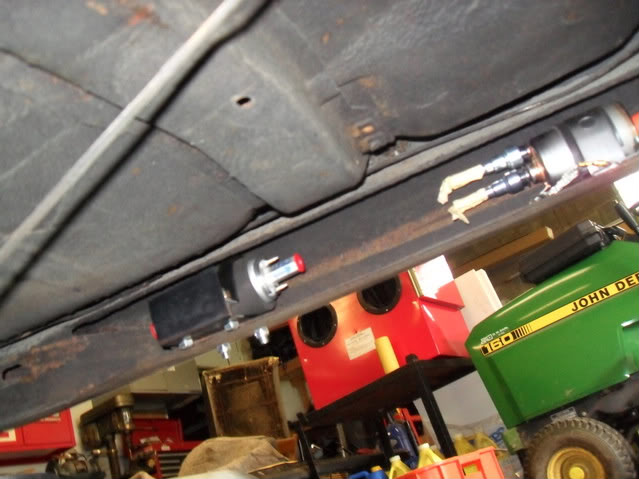
Walbro fuel pump and Corvette filter/regulator.
Power steering hoses. NAPA part numbers: 71832 pressure hose, and 71717 return hose. I had to cut the return hose to fit and tweak the pressure hose a little.
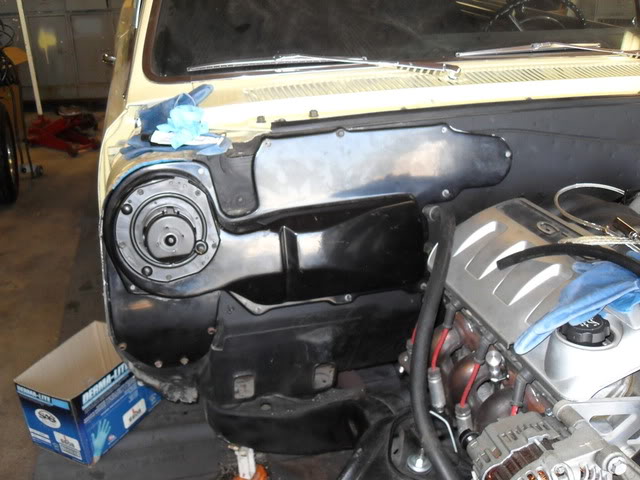
A/C delete box.
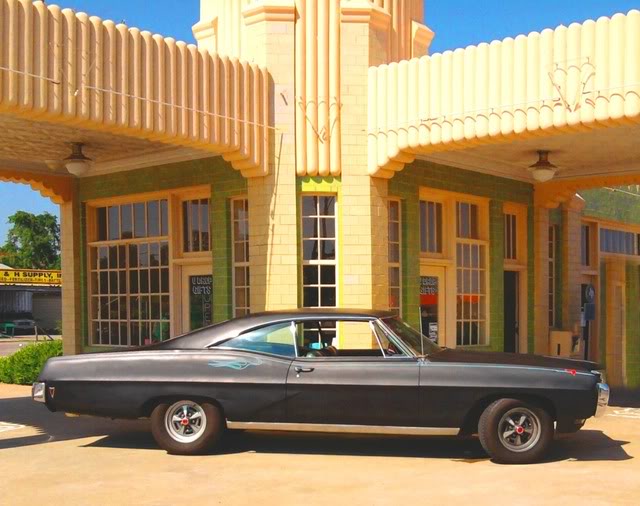
Fenders and bumper back on, engine looks great in there!
F-body exhaust manifolds and Lokar dipstick.
Adapter for upper radiator hose, the engine has a 1.25 inch outlet and the radiator has a 1.5 inch fitting. A friend of mine made the fitting for me and another friend machined the bigger side to fit my hose.
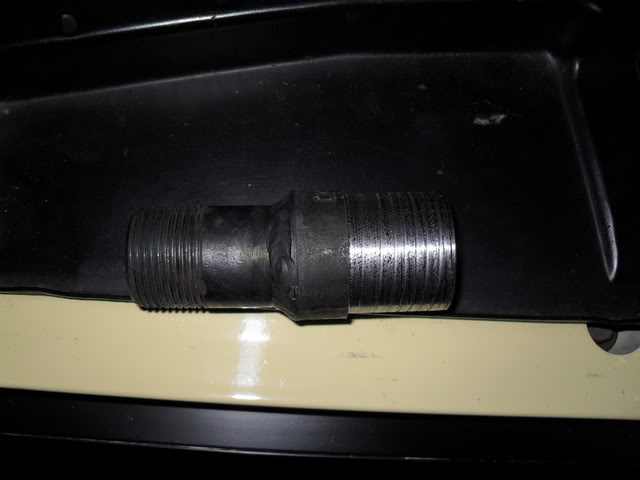
The water pump side of the hose is from a 2002 Camaro, Dayco number 70704. I had to cut it a little bit. The radiator side of the hose is actually the piece I cut from the lower hose.
Lower hose is Napa part number 8400. One end is 1.75" and the other is 1.5" which is just what I needed. I cut off the 90 degree bend and it fit perfectly.
Walbro fuel pump and Corvette filter/regulator.
Power steering hoses. NAPA part numbers: 71832 pressure hose, and 71717 return hose. I had to cut the return hose to fit and tweak the pressure hose a little.
A/C delete box.
Fenders and bumper back on, engine looks great in there!
F-body exhaust manifolds and Lokar dipstick.
Adapter for upper radiator hose, the engine has a 1.25 inch outlet and the radiator has a 1.5 inch fitting. A friend of mine made the fitting for me and another friend machined the bigger side to fit my hose.
The water pump side of the hose is from a 2002 Camaro, Dayco number 70704. I had to cut it a little bit. The radiator side of the hose is actually the piece I cut from the lower hose.
Lower hose is Napa part number 8400. One end is 1.75" and the other is 1.5" which is just what I needed. I cut off the 90 degree bend and it fit perfectly.
Last edited by darksider; 06-30-2011 at 09:01 PM.
 07-04-2011, 08:10 AM
#60
Its looking great, you're almost to the point of where you need the ProCharger! lol Bob
__________________
ATI ProCharger and Moser Sales 260 672-2076
PM's disabled, please e-mail me
E-mail: brutespeed@gmail.comob@brutespeed.com
https://brutespeed.com/ Link to website
ATI ProCharger and Moser Sales 260 672-2076
PM's disabled, please e-mail me
E-mail: brutespeed@gmail.comob@brutespeed.com
https://brutespeed.com/ Link to website