

LS into 190e 16v
 10-18-2012, 06:28 AM
#81
TECH Fanatic
This is so cool! I had an AMG 190 back in 1984 when they first came to the US. I love how this is coming together. You have improved on what was a pretty advanced pklatform in its day. Gotta keep up on this.
 10-19-2012, 12:11 AM
#82
TECH Enthusiast
iTrader: (4)
Join Date: Aug 2003
Location: Phoenix AZ
Posts: 633
Likes: 0
Received 0 Likes
on
0 Posts

Not driving yet, but I did drive it to the body shop to get paint. Had a temp driveshaft installed. Now i'm working on mounting an 8.8 ford explorer diff out back. Now your car is an inspiration to me!
10-20-2012, 09:24 PM
#83
On The Tree
Thread Starter
iTrader: (2)
Join Date: Mar 2008
Location: Nashvegas
Posts: 136
Likes: 0
Received 0 Likes
on
0 Posts
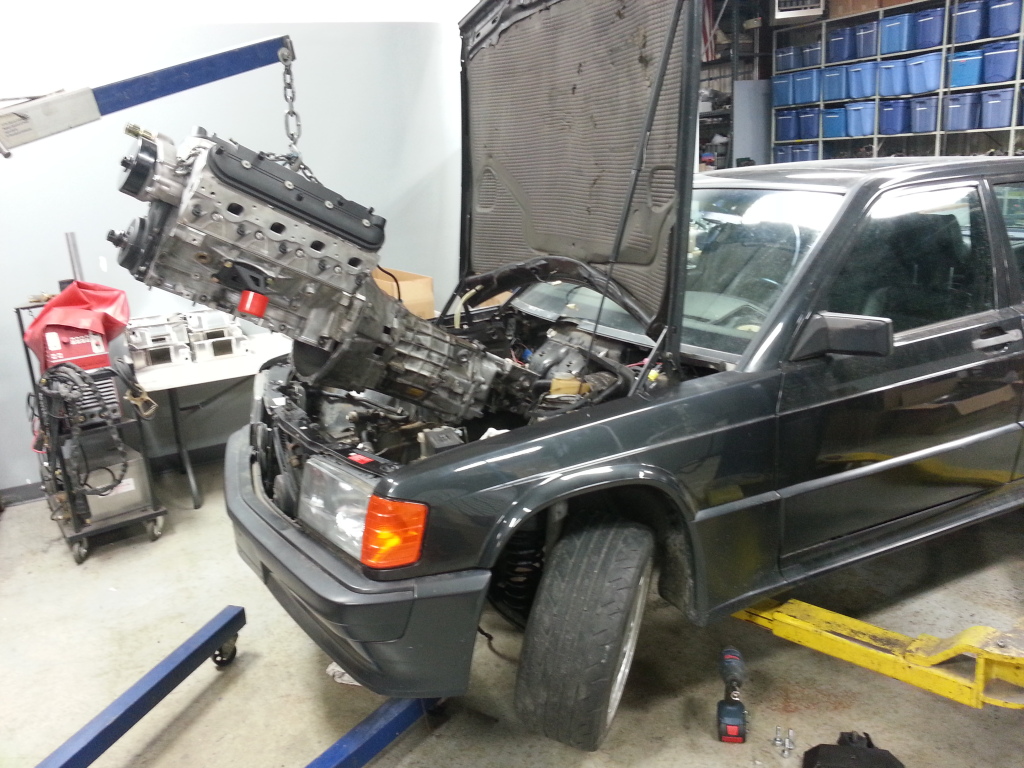
Well I didn't get as much done this weekend as I wanted to. I put the engine and trans back in the car and after getting the steering rack lined up, I realized that the e36 intermediate shaft would hit the motor mount. So that was a big flail, but I did get a cool picture of the engine and trans going into the car.
I did figure out another steering column solution. It only required $200 in new parts. FML
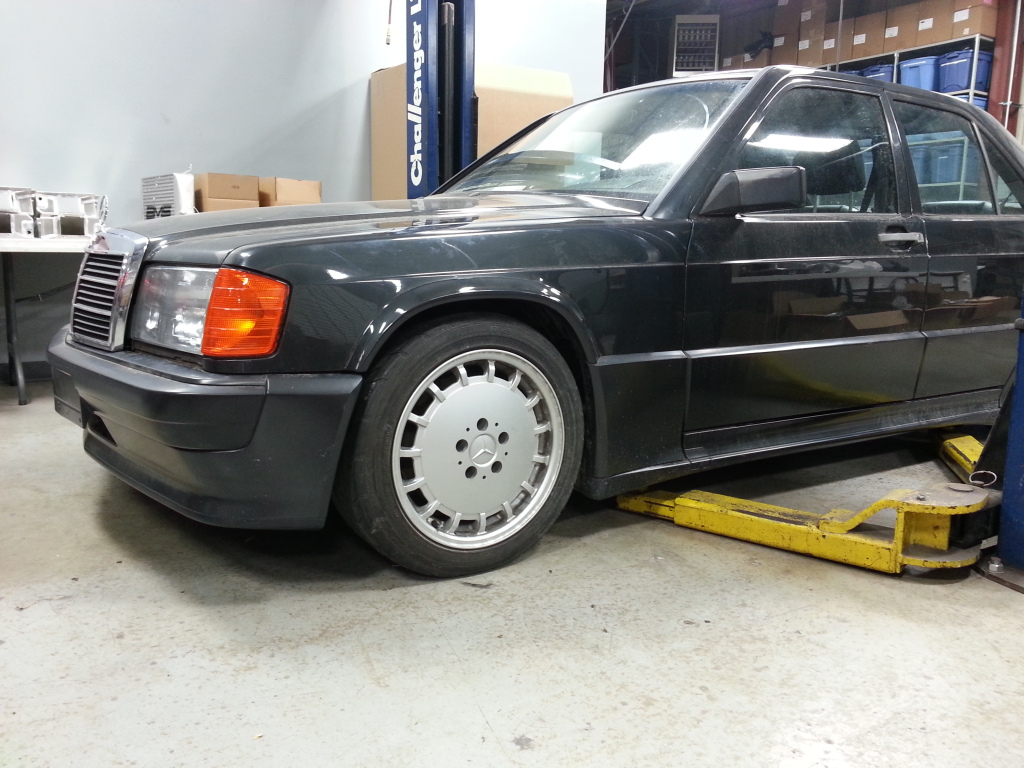
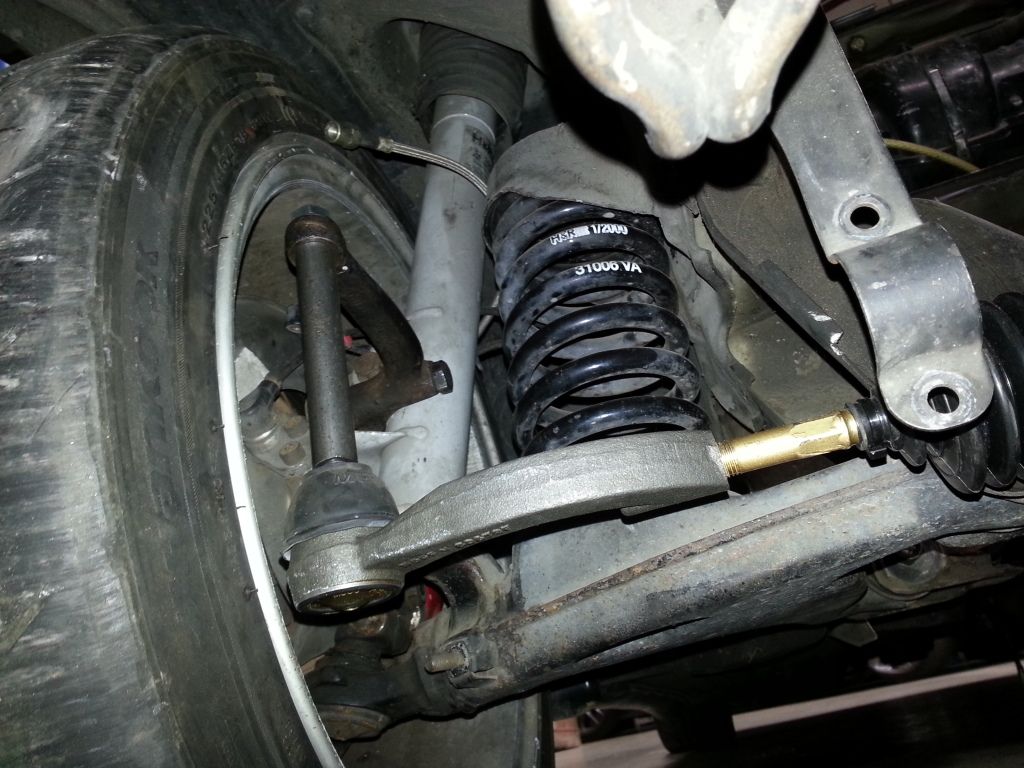
I decided to throw the front end back to together and I got a couple pictures of that too. The car should sit a little lower once I get everything in the car.
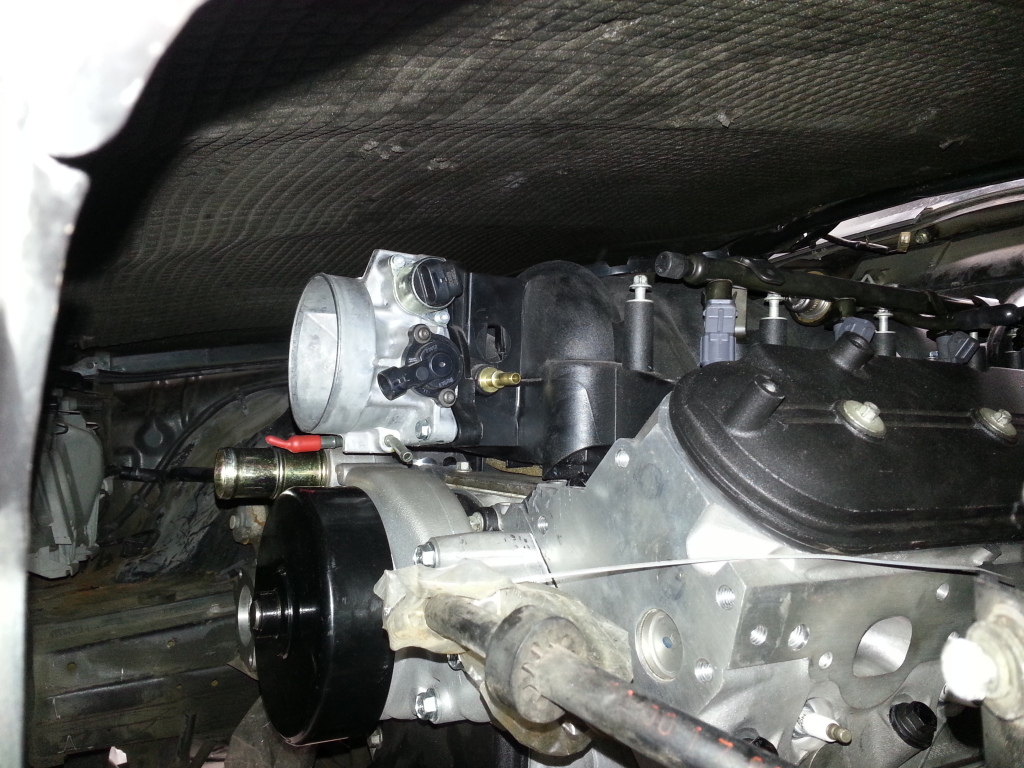
I was happy to see that I had tons of room under the hood for the intake and throttle body.
I was also able to figure out my fuel system line routing. I am going to use the corvette filter and regulator kit from Speedway. It's a hell of a deal. It comes with all the fittings needed to convert all the fittings on the vette filter/regulator to AN fittings. (LS1 Fuel Filter/Regulator Kit - Speedway Motors, America's Oldest Speed Shop). I need to fit some flare to AN fittings so that I can use the OEM lines.
I'm pretty busy for the next couple of weeks, I'm sure how much more I will get done. I'm taking tomorrow off so that I can drink tonight. I'll post more when I make some more progress
I did figure out another steering column solution. It only required $200 in new parts. FML
I decided to throw the front end back to together and I got a couple pictures of that too. The car should sit a little lower once I get everything in the car.
I was happy to see that I had tons of room under the hood for the intake and throttle body.
I was also able to figure out my fuel system line routing. I am going to use the corvette filter and regulator kit from Speedway. It's a hell of a deal. It comes with all the fittings needed to convert all the fittings on the vette filter/regulator to AN fittings. (LS1 Fuel Filter/Regulator Kit - Speedway Motors, America's Oldest Speed Shop). I need to fit some flare to AN fittings so that I can use the OEM lines.
I'm pretty busy for the next couple of weeks, I'm sure how much more I will get done. I'm taking tomorrow off so that I can drink tonight. I'll post more when I make some more progress
 10-23-2012, 06:41 AM
#85
On The Tree
Thread Starter
iTrader: (2)
Join Date: Mar 2008
Location: Nashvegas
Posts: 136
Likes: 0
Received 0 Likes
on
0 Posts
Toughy - the steering box will not clear. It sticks out to far into the center of the car. If you moved the engine forward like 3 inches and used an auto trans it might clear. Even still I think the drag link would crash into the trans. If you end up doing the swap plan on doing a front steer rack. I can sell you a set of motor and trans mounts if you want. I'm pretty sure that if you use my mounts and just notch the top of the subframe and use a f-body oil pan everything will clear. PM me if you want more information
 10-24-2012, 05:32 PM
#87
On The Tree
Thread Starter
iTrader: (2)
Join Date: Mar 2008
Location: Nashvegas
Posts: 136
Likes: 0
Received 0 Likes
on
0 Posts
Small Update:
I got my corvette fuel filter/regulator with AN fittings in today. It's a pretty nice set up
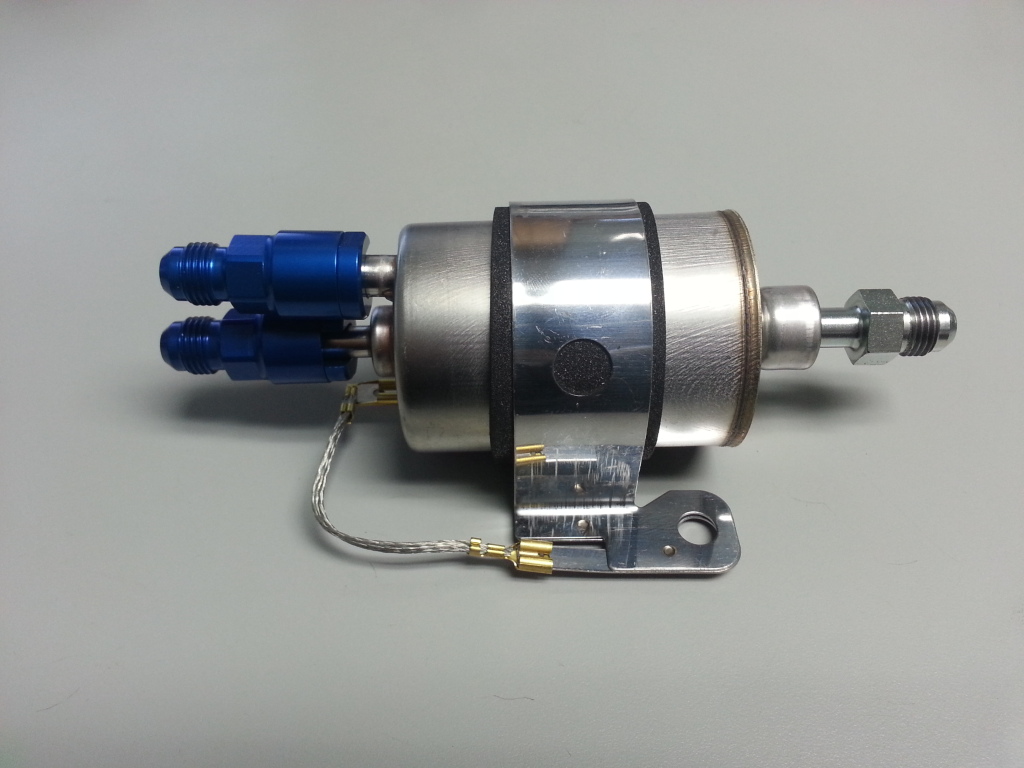
They included a -6 to 3/8 fitting for the fuel rail in the engine bay as well, but it is blue too. I want a black one so I will have to change that out.
I want to use the factory 190 fuel lines so I need to find some flare to AN fittings. I haven't been to find any on my internet. Any one got any good ideas?
I got my corvette fuel filter/regulator with AN fittings in today. It's a pretty nice set up
They included a -6 to 3/8 fitting for the fuel rail in the engine bay as well, but it is blue too. I want a black one so I will have to change that out.
I want to use the factory 190 fuel lines so I need to find some flare to AN fittings. I haven't been to find any on my internet. Any one got any good ideas?
10-25-2012, 02:05 PM
#88
On The Tree
Thread Starter
iTrader: (2)
Join Date: Mar 2008
Location: Nashvegas
Posts: 136
Likes: 0
Received 0 Likes
on
0 Posts
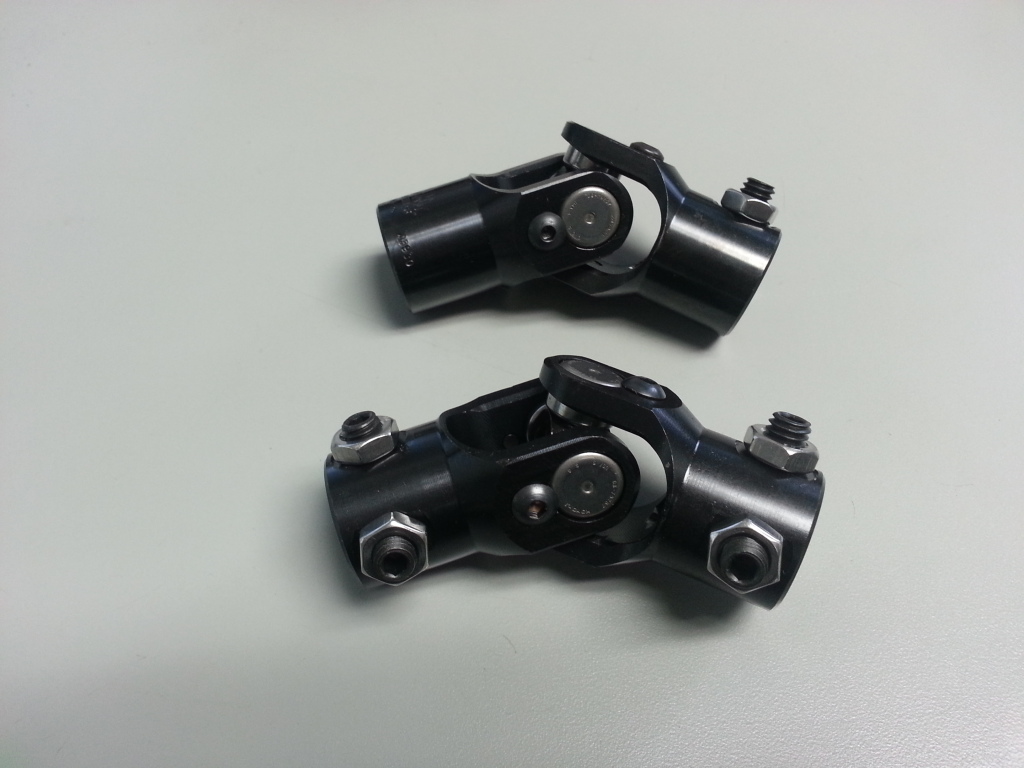
I got my flaming river u-joints today. They are chromly. The e36 rack is 17mm x 54 splines, so I got a u-joint that goes from that to 3/4 36 spline since that was the only u-joint flaming river offered and I happen to have some 3/4 shaft with a 36 splined end. I also got a 3/4 DD to 3/4 DD u-joint. I ordered a 36" 3/4 DD steering shaft from Borgson with a 1"DD to 3/4" DD coupler. I will use the coupler to go from the shaft on the 190 steering wheel to the 3/4 DD steering shaft. That will go through the firewall steering shaft mount I ordered Speedway Motors. Then the shaft will go into the 3/4 DD to 3/4 DD u-joint. That will point the shaft at the rack. I will cut the 3/4 shaft I already have down to length and notch the end to work with the 3/4 DD u-joint. I will put the 17mm x 54 spline u-joint on the rack and put the 3/4 shaft between the two. Hopefully it clears the motor mount. I have a bunch of my ******** friends coming in town this weekend for Halloween, so I won't get any work done and I am going to SEMA next week, so I probably won't post another update until next weekend.
10-27-2012, 02:23 PM
#89
Teching In

Join Date: Aug 2012
Location: Philadelphia
Posts: 10
Likes: 0
Received 0 Likes
on
0 Posts
Sick! if I only had my w202. I miss it and spanked everything with it but it wasnt fast enough and not a stick shift.
now im swapping a 1986 635csi, the steering box is an issue because the header clearance. i need to do custom headers now. I thought about swapping a z3 rack but e36 knuckles and e24 knuckles are different in the respect of where the tie rods connect. the e24 tie rods would connect towards the front, e36 toward the rear.
at a later time when this LS1 project is done i might peruse a e36 suspension setup or a hybrid version.
Your swap makes me want to buy a old benz or another w202 and and swap it and convert it to a stick while im at it.
also try a w202 steering box or both steering box and sub-frames. the w202 suspension wise is a tweaked version of the w201 and virtually identical, most replacement parts for the w202 had w201 part numbers.
Diff wise I would also look into a e36 M3 diff. 1995 is more stout and the bolt pattern is different than a 1996-99' M3 diff which isnt as bullet proof but still an awesome diff. the 96-99' you can find yoke adaptors:
http://www.vorshlag.com/index.php?cPath=1_4_63
they had something here, just can recall if they sold a Diff / D-shaft adaptors individually
http://www.jagsthatrun.com/Pages/Par...ft-flange.html
Bought it for mine, fits like a glove on my diff flange
http://www.jagsthatrun.com/Mercedes_Order.html they dont have a picture but prob similar to the BMW
even more simple find a diff from a w124 500e or change out the whole rear subframe from a wrecked w202 c43AMG. it will most likely bolt right into place since the w201 and w202 are sister cars
Last edited by benz-bimmerman; 10-27-2012 at 02:42 PM.
11-12-2012, 08:47 AM
#90
On The Tree
Thread Starter
iTrader: (2)
Join Date: Mar 2008
Location: Nashvegas
Posts: 136
Likes: 0
Received 0 Likes
on
0 Posts
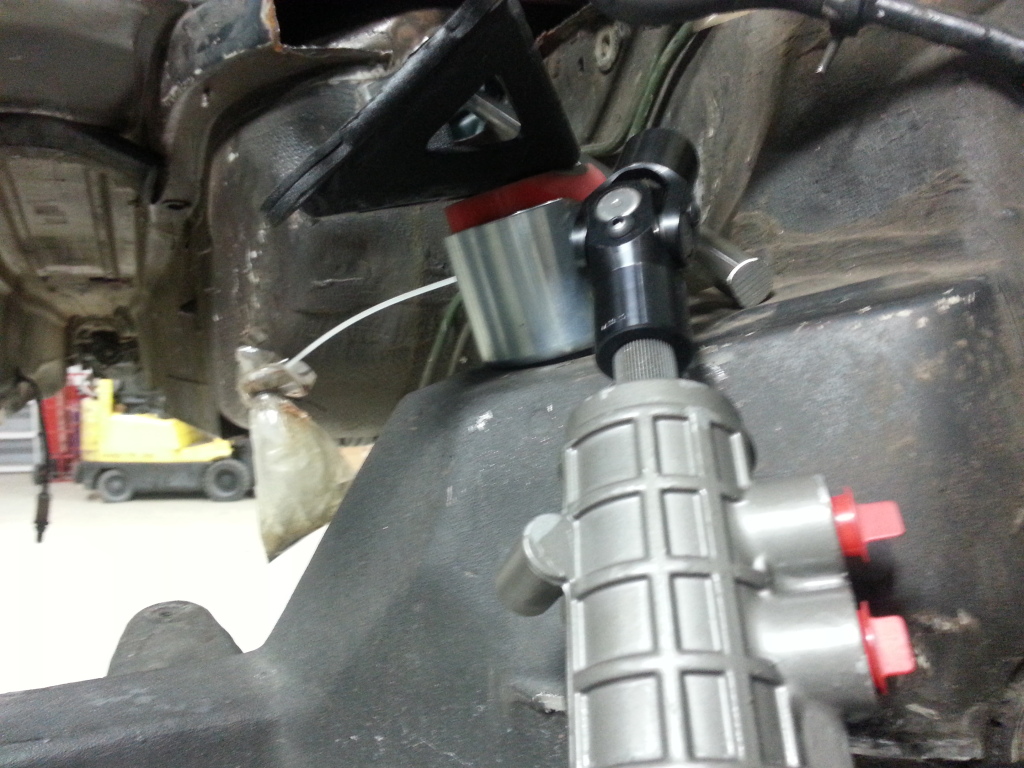
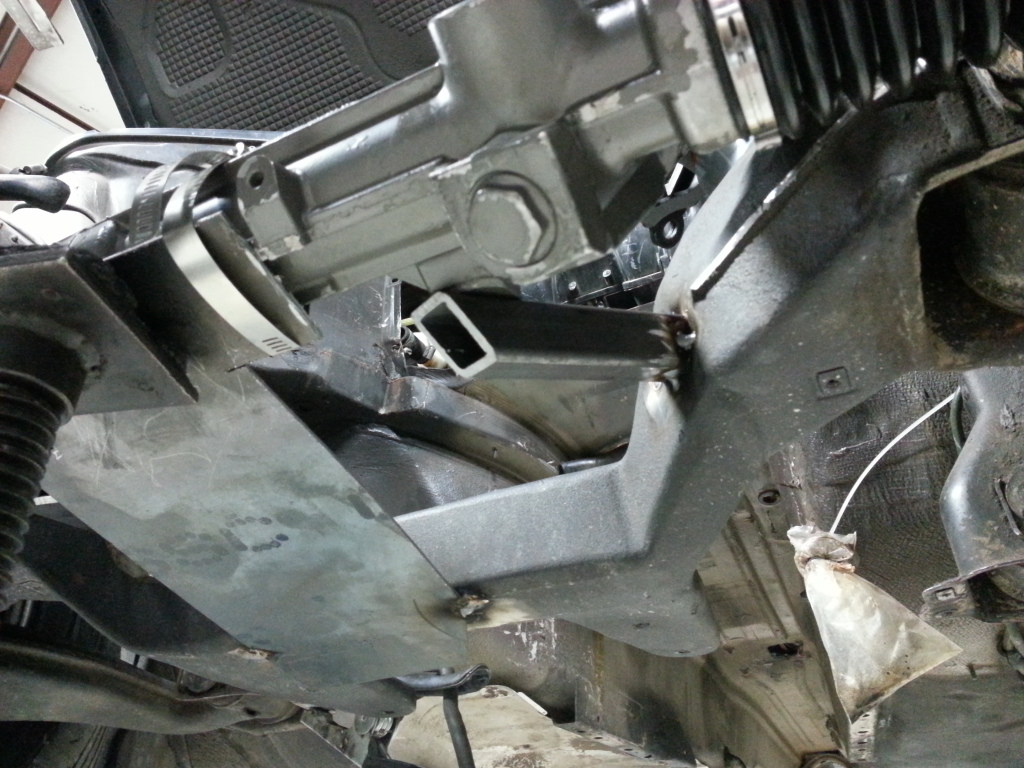
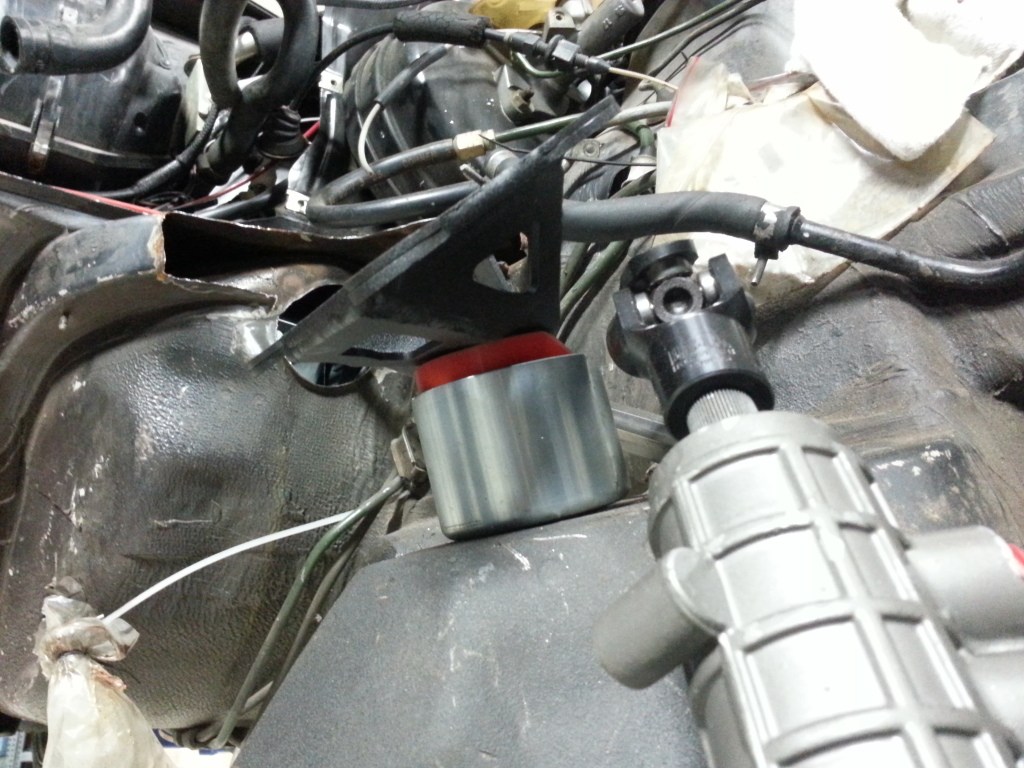
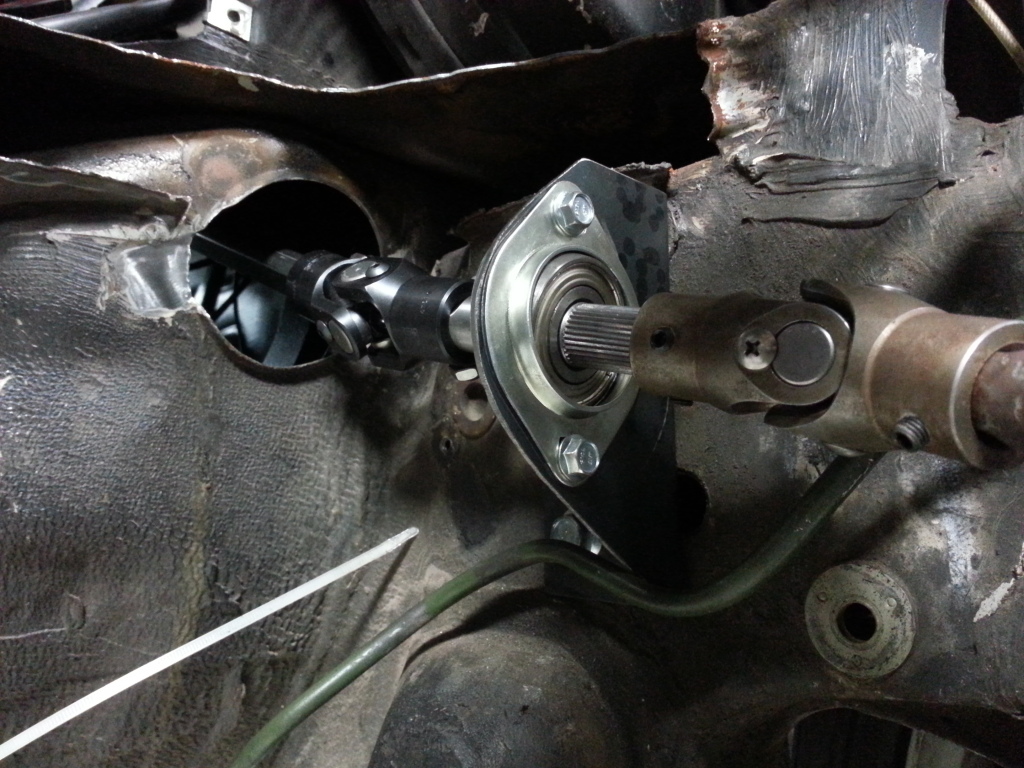
Well, I was able to come in this weekend and get the e36 rack mounted. Ended up going a little different then I thought it would. I was trying to use antoher member's install as a guide, but my dumbass forgot that the passenger side motor is farther to the outside of the car than the driver's side. So while the other member's steering column clears to the inside of the mount (his is rhd), on a lhd rack the steering column wants to crash right into the driver's side motor mount if you only want to use two shafts in the steering column. So, after a lot of head scratching and a couple beers, I decided to add a third shaft to my steering column. This would allow me to tip the rack up more and clear the motor mount. I'm almost positive it would be impossible to do this install in a lhd car with the factory motor mounts. You can see what I'm talking about in this pic. (Sorry all the pics are blurry. I took them in a hurry)
As you can see, I have Alke's poly mounts, and I had to trim of the corner of the poly mount and the cup, to get the column to clear. I was able to pretty much eyeball everything with the rack mounting. Since both the inner tie rod ball joint distance and the distance between the a-arm mounts is ~24.75", all I had to do is position the rack directly in front of the a-arm mounts and as close to the subframe as possible. I tack welded on a piece of sheet metal to the subframe, hose clamped the rack to that and then used a floor jack to position the rack.
I couldn't come up with a clean way to build rack mounts that would flow with my subframe modifications, so I just did something easy. I cut two pieces of 1" square tube, cut them to match the subframe angle and tacked them in place. I'll be adding more bracing in the future.
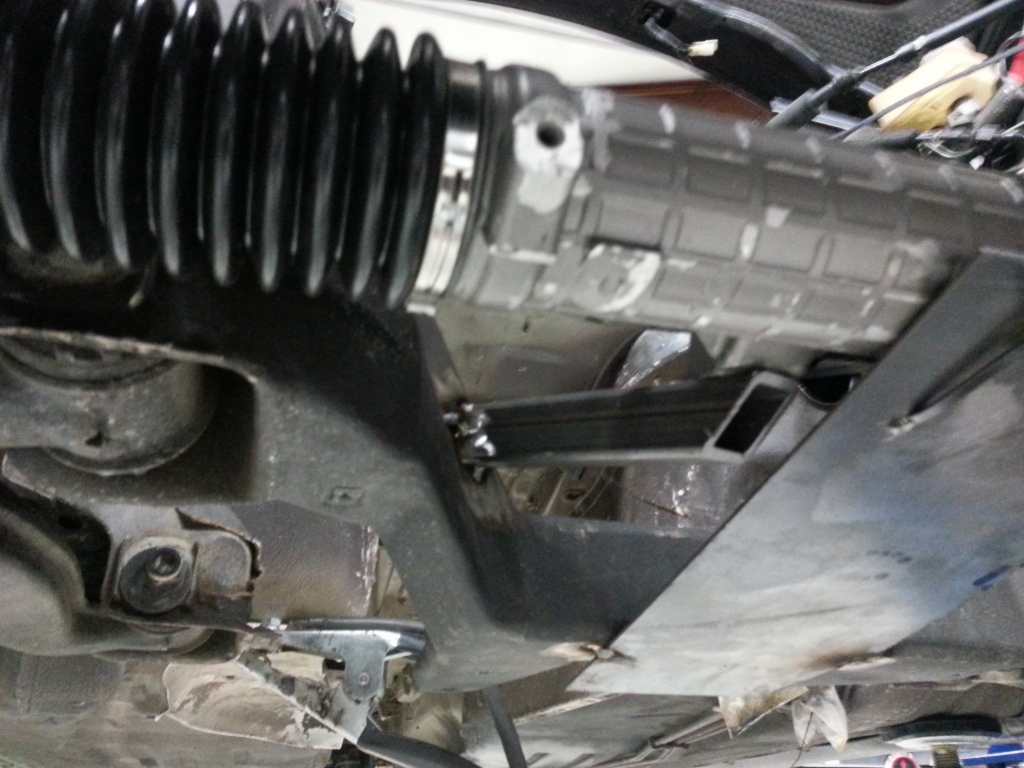
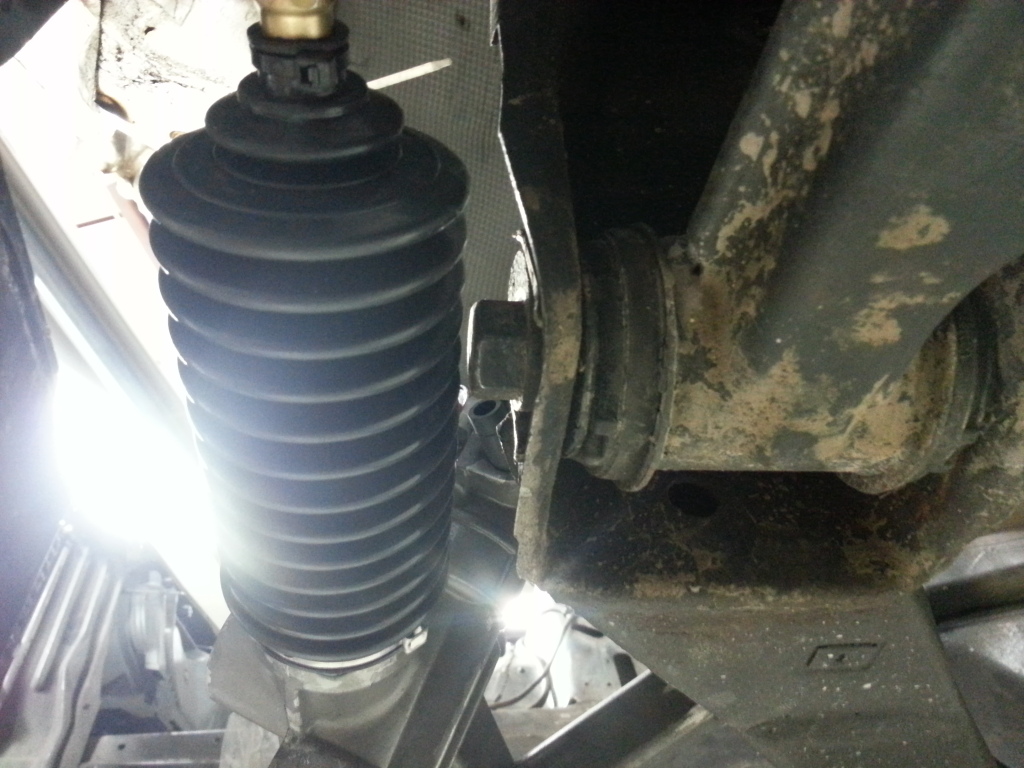
I will have to shave a little of the bolt head off of the a-arm bolts. They are a little close for comfort.
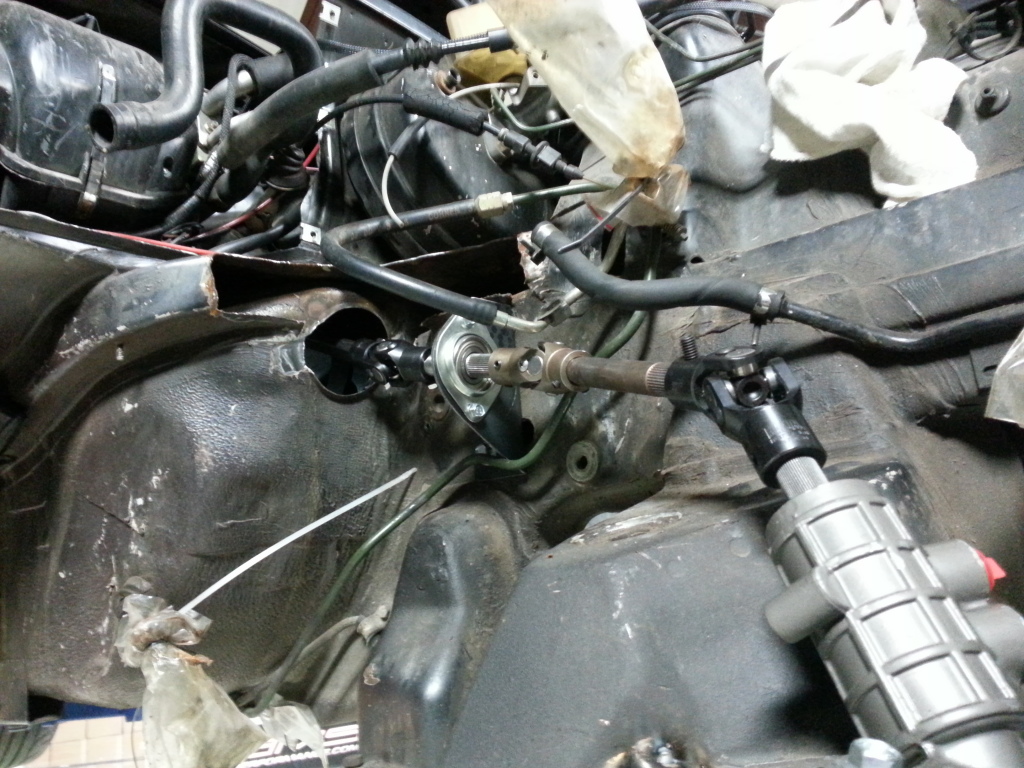
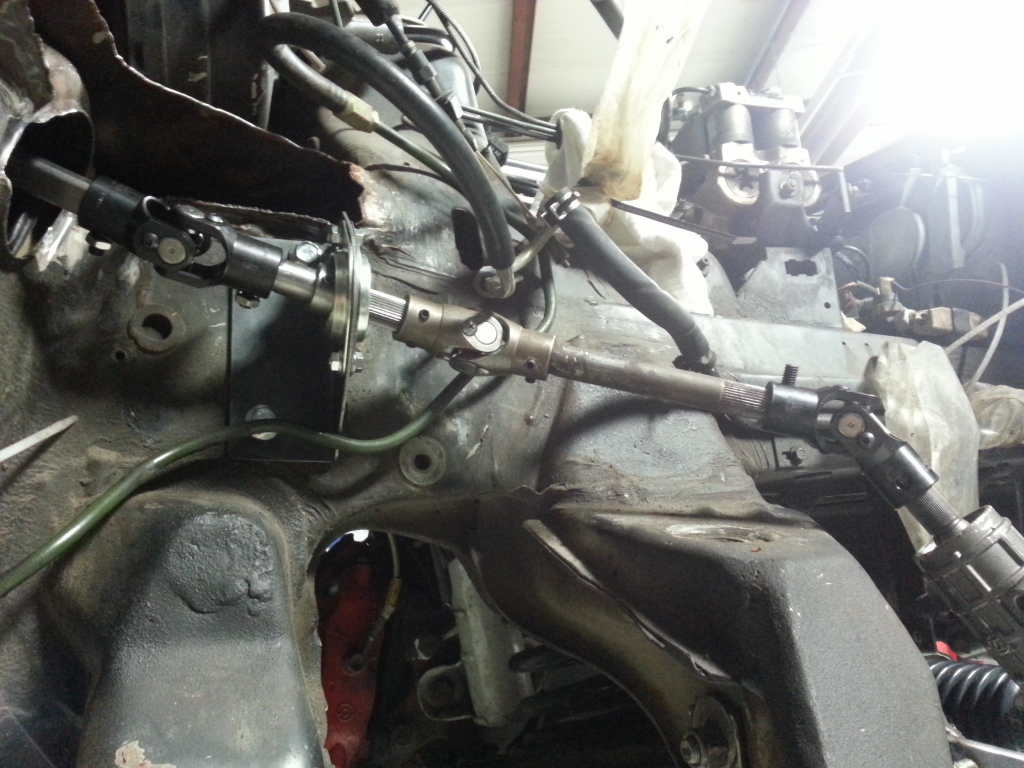
With the rack tipped up more, I gained a lot of clearance around the mount
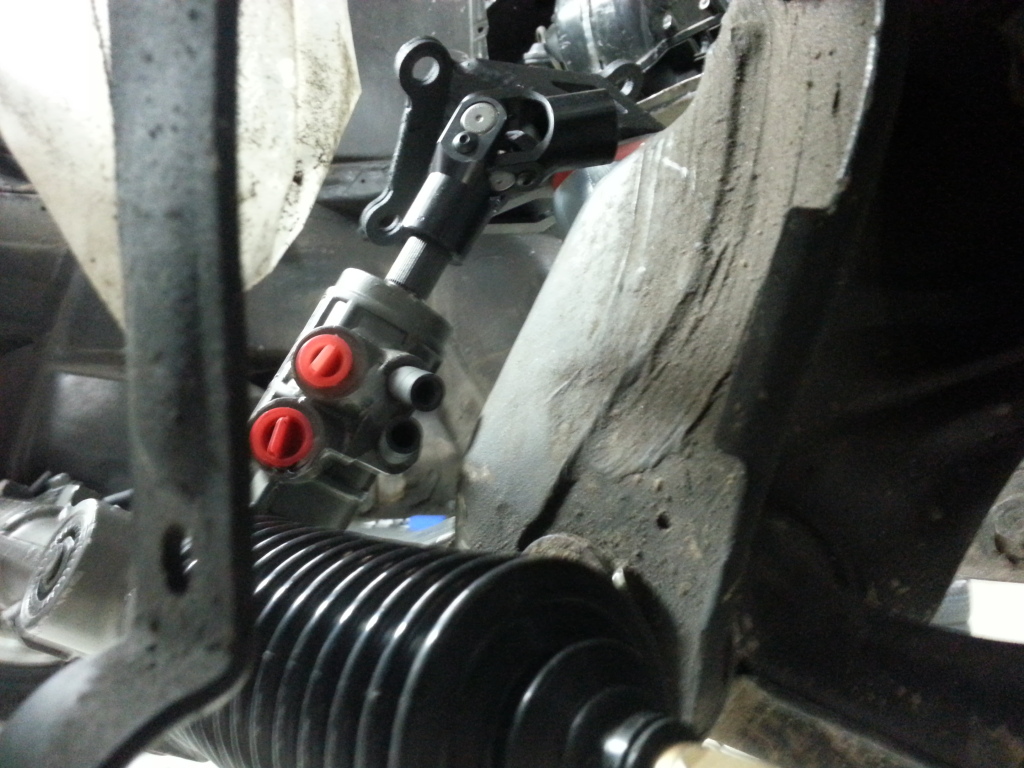
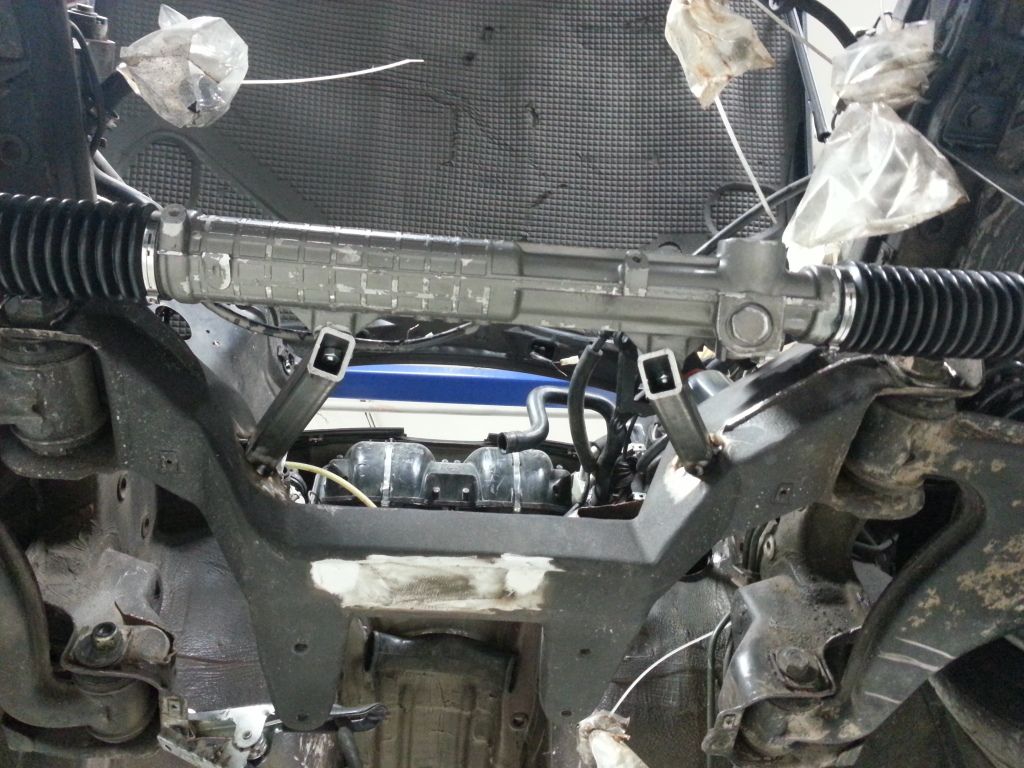
I ended up having to add third shaft to my steering column to make it clear everything. I was able to use left over shaft and a u-joint from the column I made for the EVO rack. I will order another u-joint from flaming river so that they all match. I also used a firewall wall steering column mount that I had lying around to support the column. I don't really like this design, plus I screwed up on my measurements (I put the firewall mount too low, so now all the u-joints angles are screwed up), so I will be re-doing it. I threw this together just to make the car a roller again.
I didn't get any pictures, but I flipped the stock steering arms (had to grind off a **** load of material to make it work) as a temporary solution until I get my CNCed steering arms made. I used 2000 Dodge Stratus tie rods with this rack. I had a set lying around and they worked. I'm not sure if I will use them in the future. I will try and get a pic of the angle the tie rods are at right now. It's pretty lolz. They point up at about a 45� angle. Bump steer shouldn't be an issue, Right? hahaha well it was, As I was pushing it of the shop, we went over a little dip in the parking lot and both wheels toed in so bad that we could hardly push it. haha. Guess I will be staying late tonight to make some spacers to fix that problem for now.
That's it for now. I hope to have some more progress on Wednesday night and this weekend.
As you can see, I have Alke's poly mounts, and I had to trim of the corner of the poly mount and the cup, to get the column to clear. I was able to pretty much eyeball everything with the rack mounting. Since both the inner tie rod ball joint distance and the distance between the a-arm mounts is ~24.75", all I had to do is position the rack directly in front of the a-arm mounts and as close to the subframe as possible. I tack welded on a piece of sheet metal to the subframe, hose clamped the rack to that and then used a floor jack to position the rack.
I couldn't come up with a clean way to build rack mounts that would flow with my subframe modifications, so I just did something easy. I cut two pieces of 1" square tube, cut them to match the subframe angle and tacked them in place. I'll be adding more bracing in the future.
I will have to shave a little of the bolt head off of the a-arm bolts. They are a little close for comfort.
With the rack tipped up more, I gained a lot of clearance around the mount
I ended up having to add third shaft to my steering column to make it clear everything. I was able to use left over shaft and a u-joint from the column I made for the EVO rack. I will order another u-joint from flaming river so that they all match. I also used a firewall wall steering column mount that I had lying around to support the column. I don't really like this design, plus I screwed up on my measurements (I put the firewall mount too low, so now all the u-joints angles are screwed up), so I will be re-doing it. I threw this together just to make the car a roller again.
I didn't get any pictures, but I flipped the stock steering arms (had to grind off a **** load of material to make it work) as a temporary solution until I get my CNCed steering arms made. I used 2000 Dodge Stratus tie rods with this rack. I had a set lying around and they worked. I'm not sure if I will use them in the future. I will try and get a pic of the angle the tie rods are at right now. It's pretty lolz. They point up at about a 45� angle. Bump steer shouldn't be an issue, Right? hahaha well it was, As I was pushing it of the shop, we went over a little dip in the parking lot and both wheels toed in so bad that we could hardly push it. haha. Guess I will be staying late tonight to make some spacers to fix that problem for now.
That's it for now. I hope to have some more progress on Wednesday night and this weekend.
Last edited by clainhart3; 11-12-2012 at 08:54 AM.
 11-15-2012, 07:20 AM
#92
On The Tree
Thread Starter
iTrader: (2)
Join Date: Mar 2008
Location: Nashvegas
Posts: 136
Likes: 0
Received 0 Likes
on
0 Posts
Small update
I dropped a bolt in the subframe when I was putting my motor mounts and I couldn't get it out, so I had to cut into the subframe. Really sucks because I spent so much time making it look nice...

But actually I had to cut the old steering mounts off to clear the new pan. I'll finish this up this weekend. Also still learning how to use the plasma torch, so the cuts all came out pretty nasty.
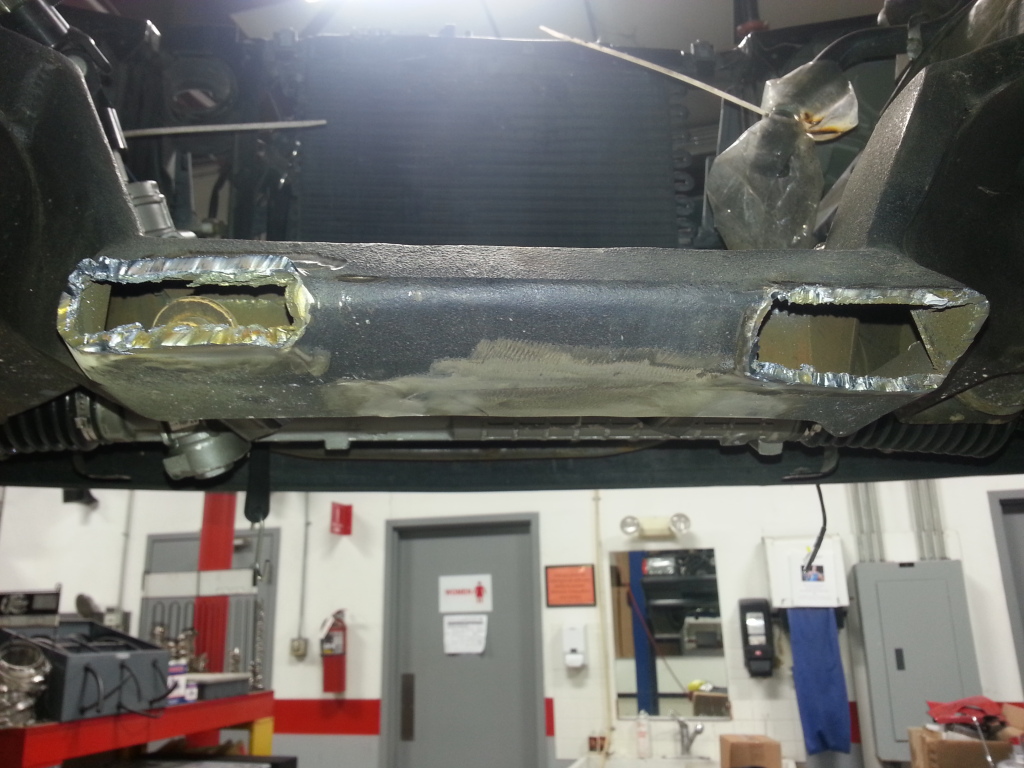
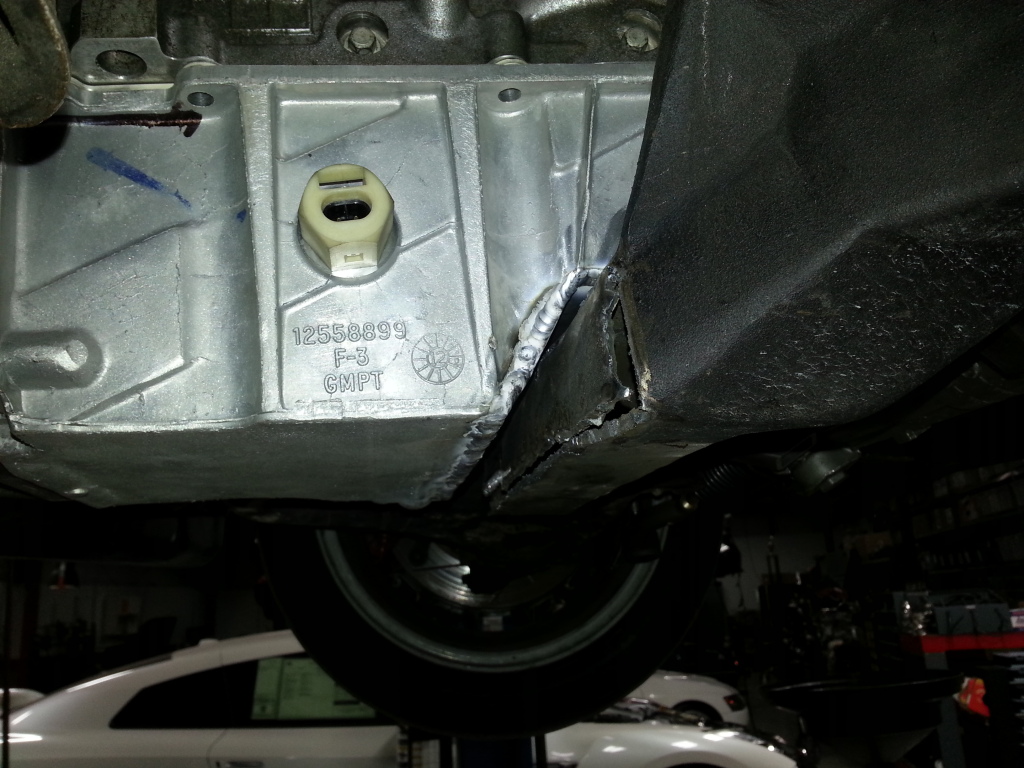
I then started notching the oil pan too clear what's left of the subframe. I still have a little more trimming left to do. If my calculations are right, it will remove about a quart of capacity from the pan. I'm not sure if I'm going to try and add that back somewhere or just baffle the **** out if the purck up and run the thing a quart over full. I'm also going to have an oil cooler, and eventually an accusump, so I'm thinking I'll be fine. I also have to make my own pick up since I cut out the area where the f-body one goes. Anyone have any advice or suggestions? Thanks
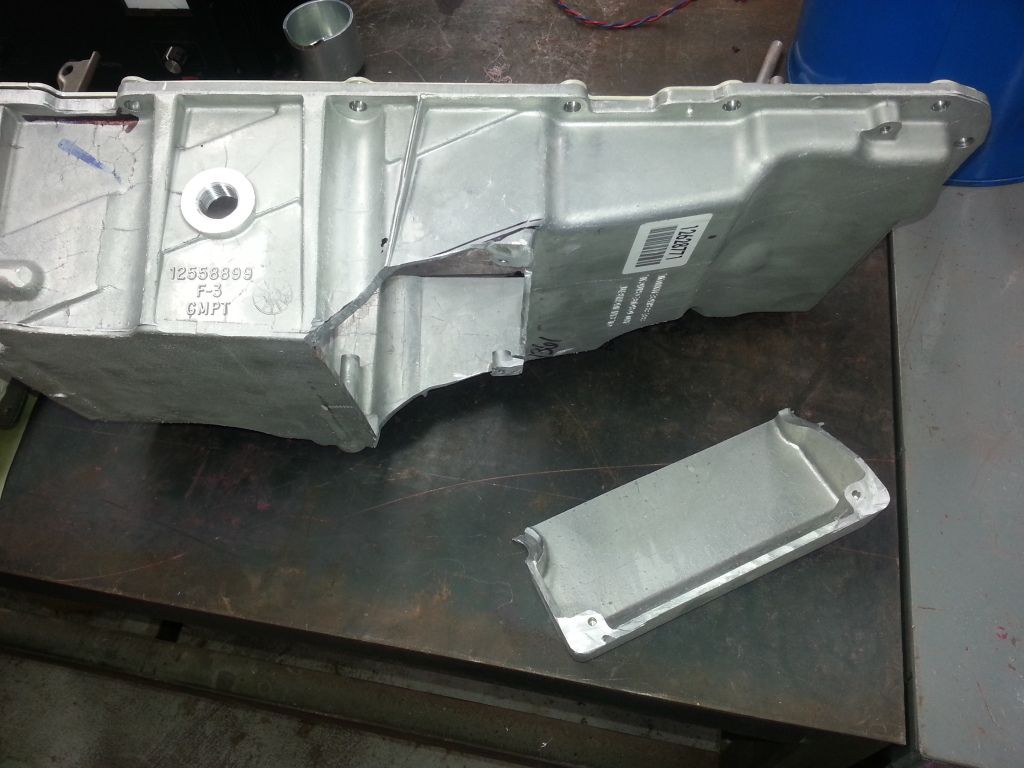
I hope to be in the shop again on Saturday, so maybe I can get the subframe clearanced and the oil pan patched up.
I dropped a bolt in the subframe when I was putting my motor mounts and I couldn't get it out, so I had to cut into the subframe. Really sucks because I spent so much time making it look nice...
But actually I had to cut the old steering mounts off to clear the new pan. I'll finish this up this weekend. Also still learning how to use the plasma torch, so the cuts all came out pretty nasty.
I then started notching the oil pan too clear what's left of the subframe. I still have a little more trimming left to do. If my calculations are right, it will remove about a quart of capacity from the pan. I'm not sure if I'm going to try and add that back somewhere or just baffle the **** out if the purck up and run the thing a quart over full. I'm also going to have an oil cooler, and eventually an accusump, so I'm thinking I'll be fine. I also have to make my own pick up since I cut out the area where the f-body one goes. Anyone have any advice or suggestions? Thanks
I hope to be in the shop again on Saturday, so maybe I can get the subframe clearanced and the oil pan patched up.
Last edited by clainhart3; 11-15-2012 at 08:03 AM.
11-17-2012, 07:36 PM
#93
On The Tree
Thread Starter
iTrader: (2)
Join Date: Mar 2008
Location: Nashvegas
Posts: 136
Likes: 0
Received 0 Likes
on
0 Posts
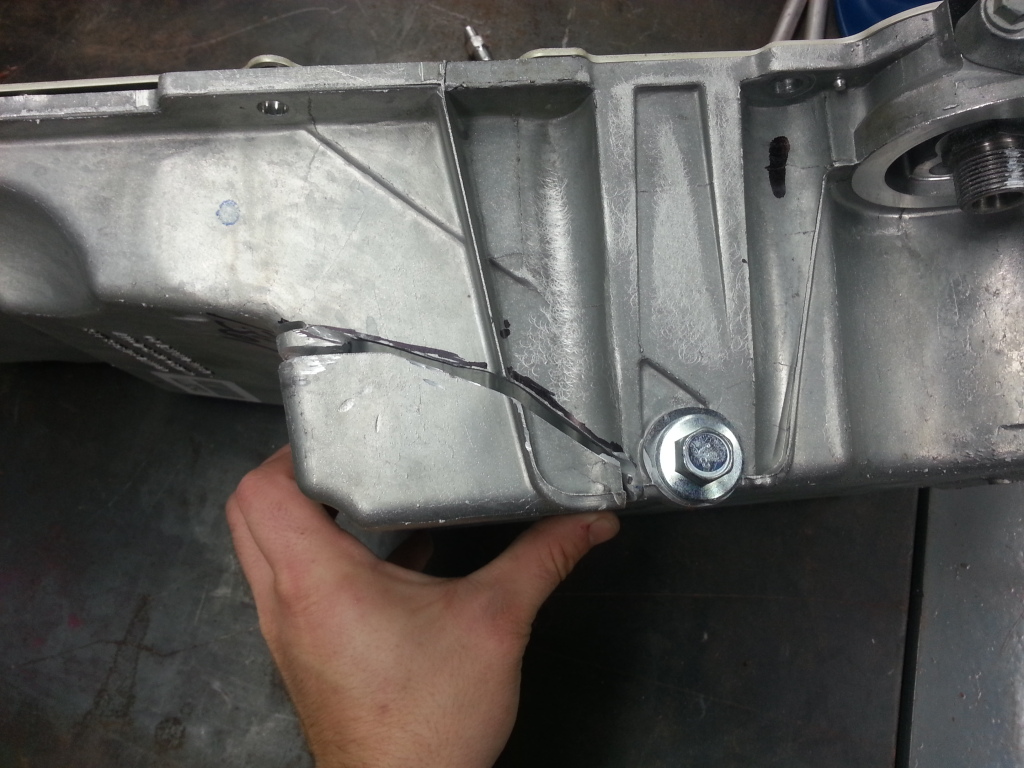
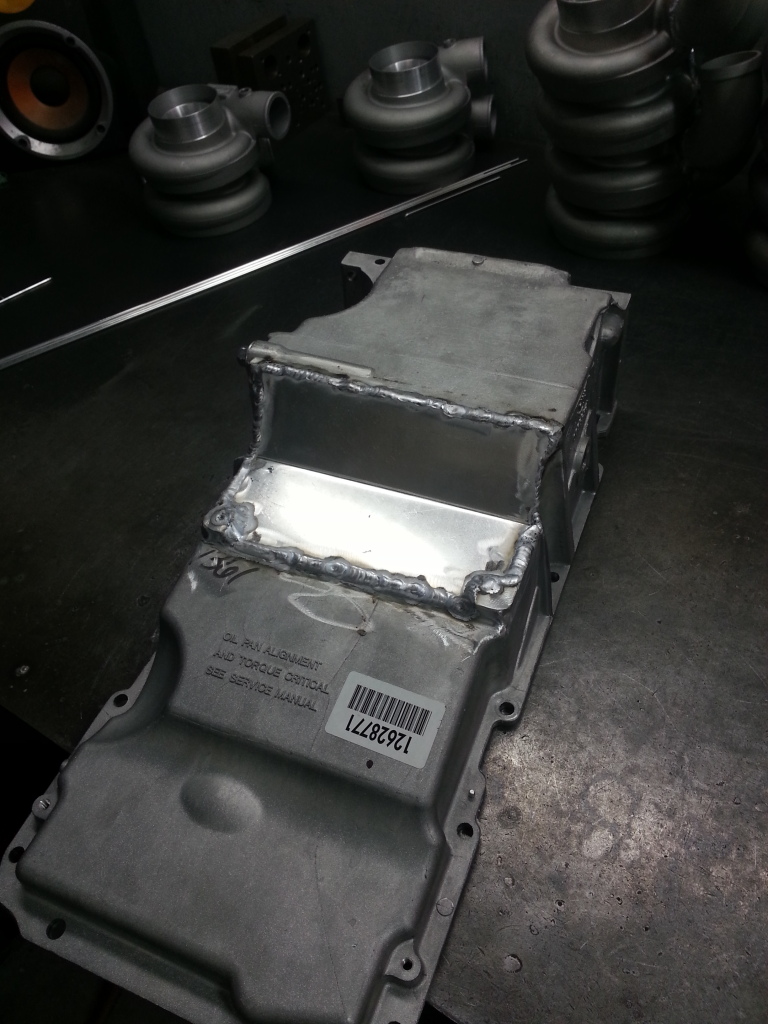
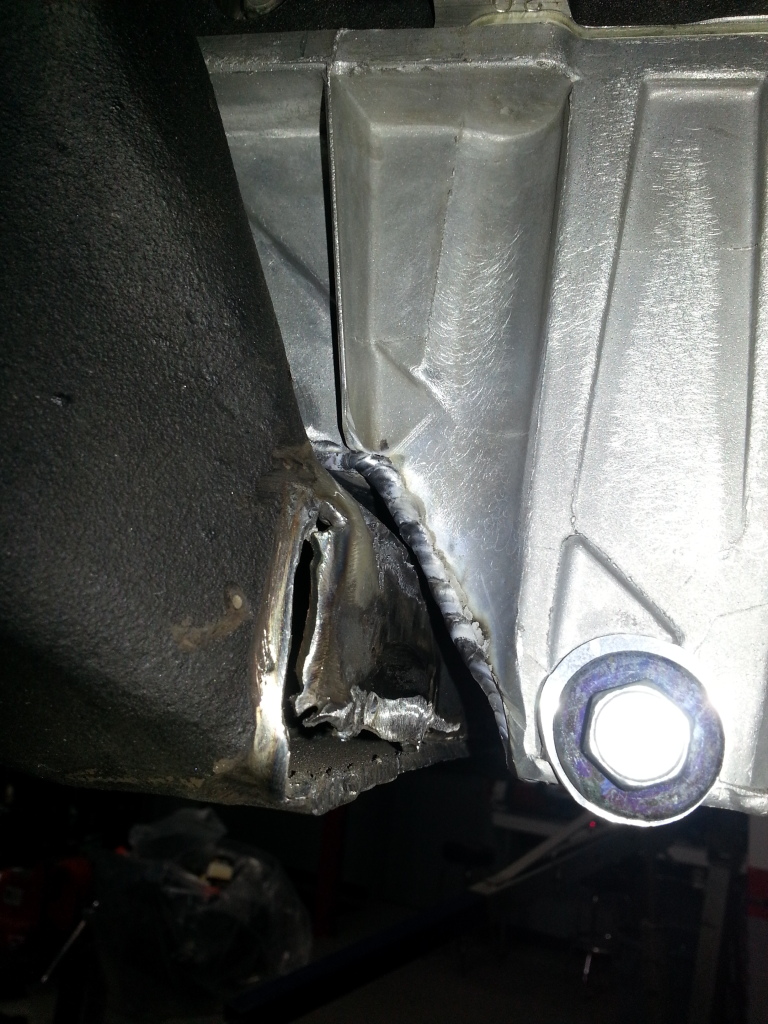
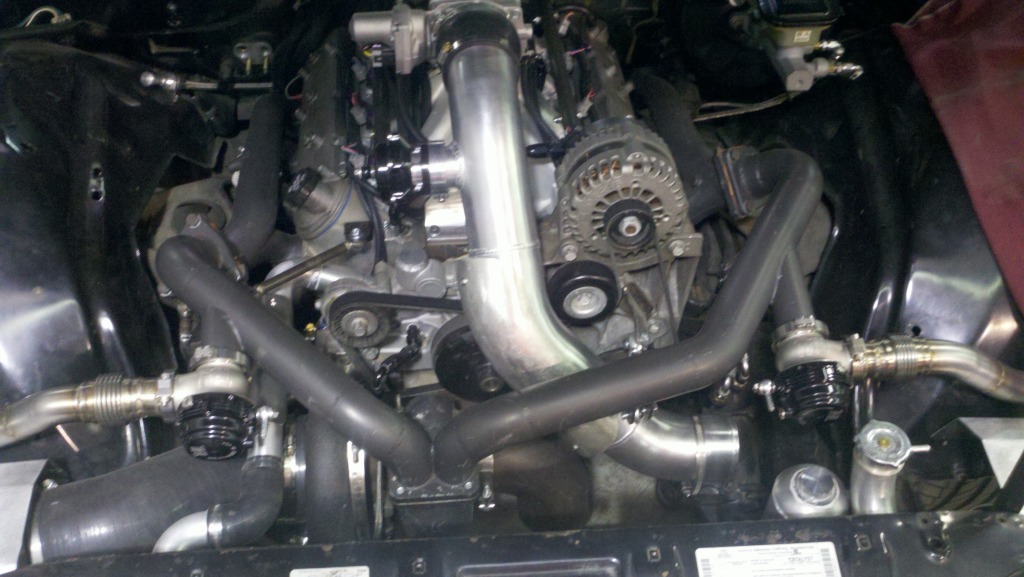
I made some more progress today. I cut out some more of the subframe so that it would clear the oil pan better. I then finished cutting the oil pan, and I built a patch for the hole in the oil pan.
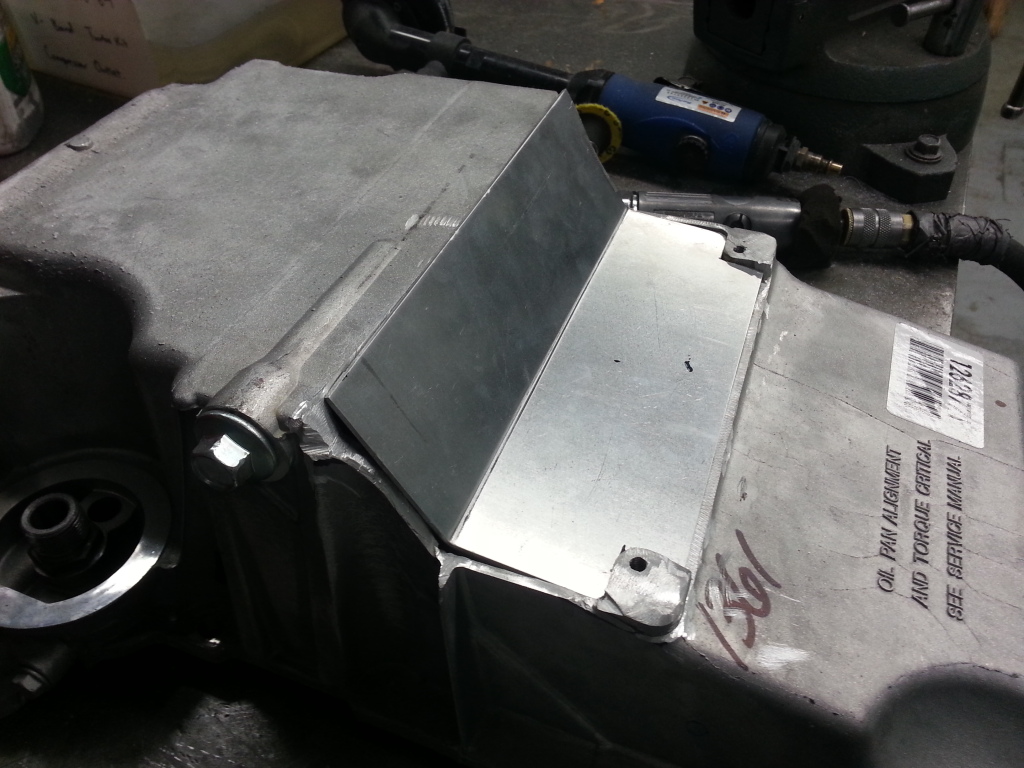
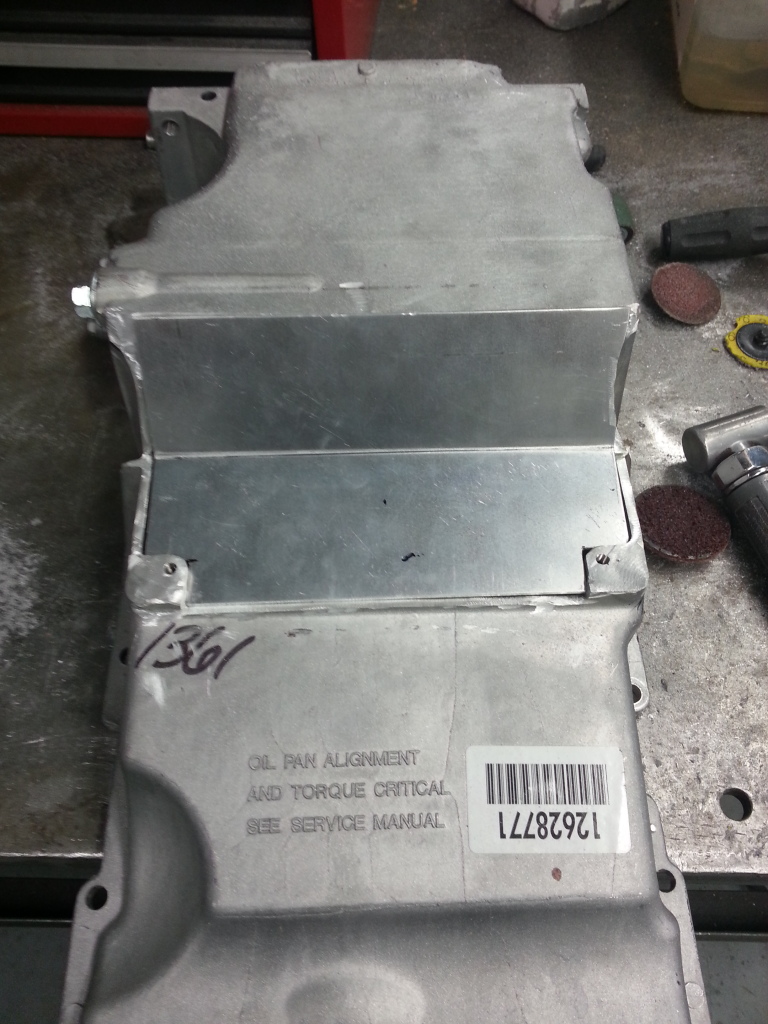
Once again, don't make too much fun of my welds. I'm probably going to grind them down and get the pan powder coated.
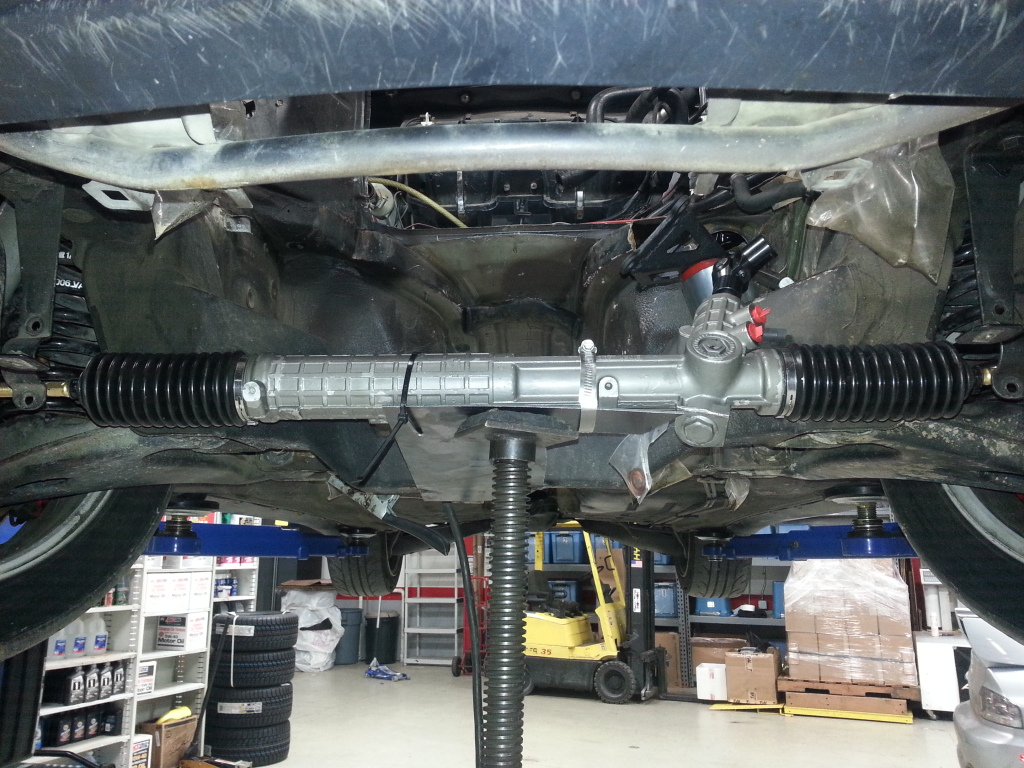
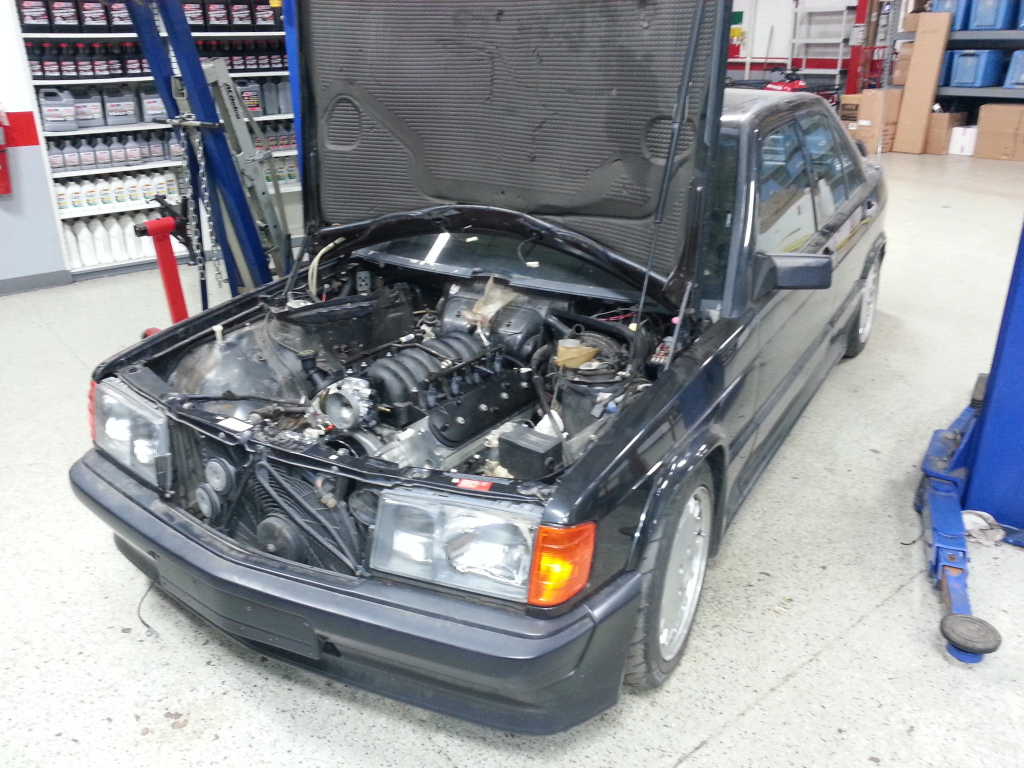
Then I threw the motor and trans in the car with the oil pan on. I think it clears nicely. I will have to grind a bit more on the driver's side to gain a little more clearance.
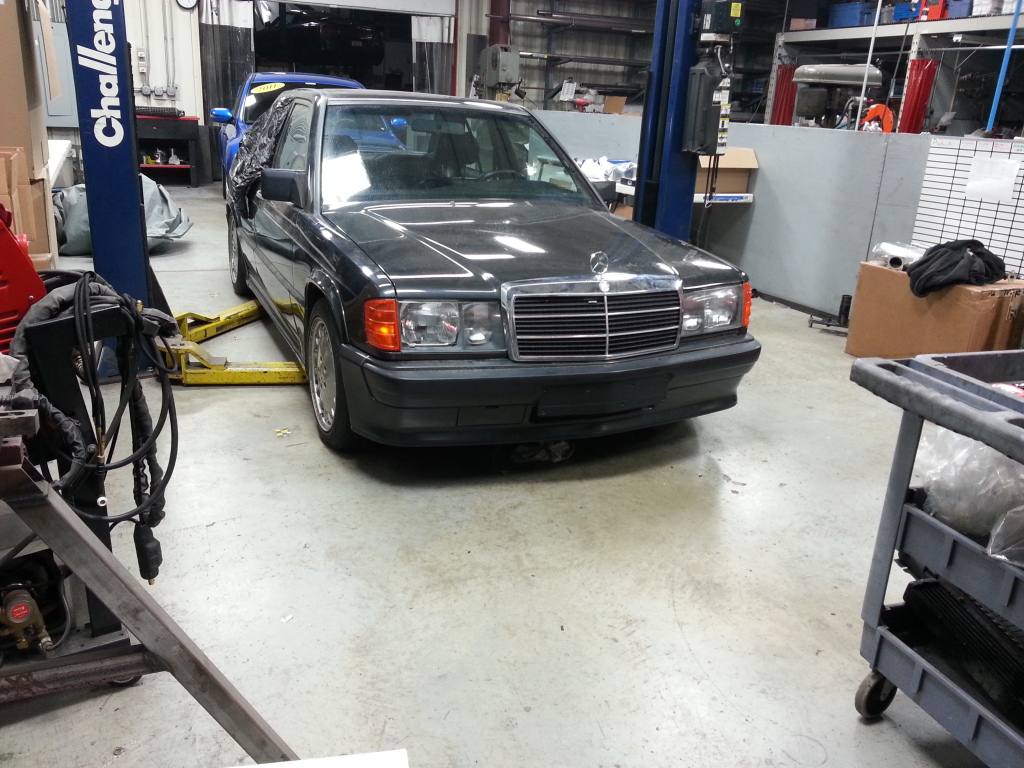
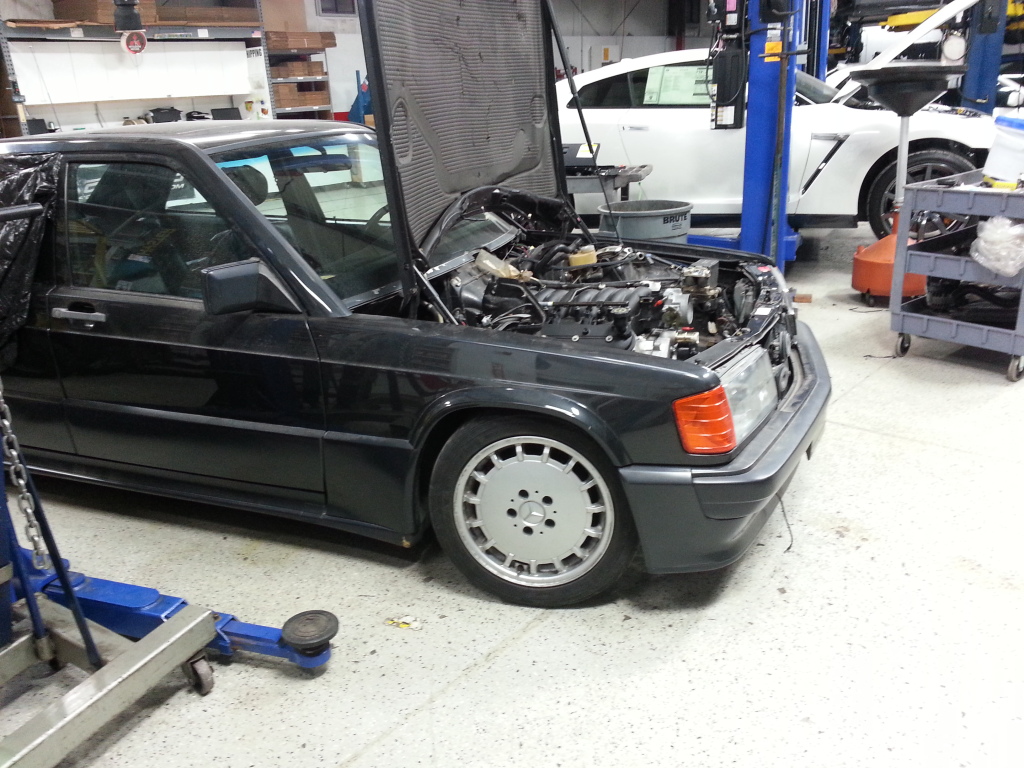
Looks pretty good with the front end back together and everything installed. I still have a long way to go though.

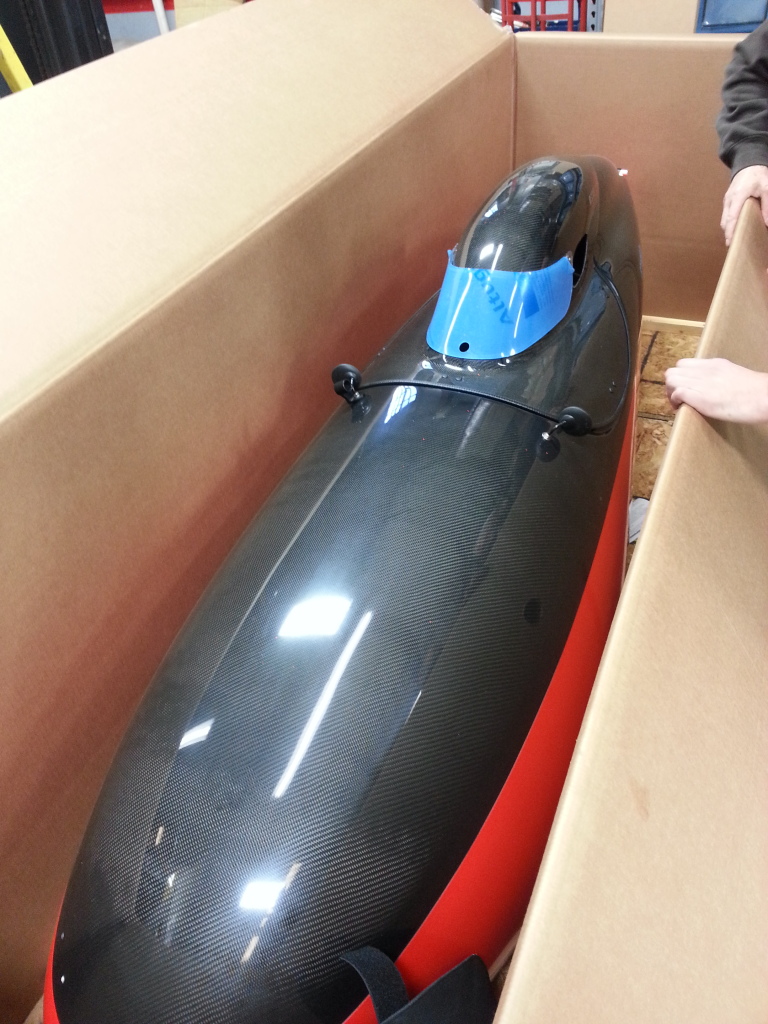
And just cause, this is bossman's new recumbent bike. It's got a full carbon body and only weighs 65lbs. Pretty lolz.
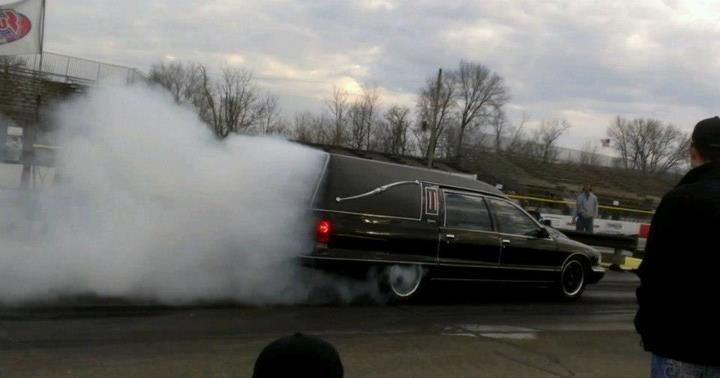
He also owns this badass TT LS hearse that went 10.7 @127mph today. It's street legal BTW.
That's it for now. I may get some more work done this week, but I doubt it. Then it's back home for Thanksgiving and I'm going to Athens, GA to watch Tech stomp U(sic)GA.... or at least to get really drunk. Then, as long as Miami backs out of the ACC championship game, I'll be going to Charlotte to watch Tech stomp FSU.... or at least to get really drunk.
Once again, don't make too much fun of my welds. I'm probably going to grind them down and get the pan powder coated.
Then I threw the motor and trans in the car with the oil pan on. I think it clears nicely. I will have to grind a bit more on the driver's side to gain a little more clearance.
Looks pretty good with the front end back together and everything installed. I still have a long way to go though.
And just cause, this is bossman's new recumbent bike. It's got a full carbon body and only weighs 65lbs. Pretty lolz.
He also owns this badass TT LS hearse that went 10.7 @127mph today. It's street legal BTW.
That's it for now. I may get some more work done this week, but I doubt it. Then it's back home for Thanksgiving and I'm going to Athens, GA to watch Tech stomp U(sic)GA.... or at least to get really drunk. Then, as long as Miami backs out of the ACC championship game, I'll be going to Charlotte to watch Tech stomp FSU.... or at least to get really drunk.
11-20-2012, 09:21 PM
#94
On The Tree
Thread Starter
iTrader: (2)
Join Date: Mar 2008
Location: Nashvegas
Posts: 136
Likes: 0
Received 0 Likes
on
0 Posts
Another update. I don't have many pictures from tonight. I started out by pressing out all the stock pins and bearings from the stock rockers. I'm going to be installing the Comp cams trunuion kit. I will install that after thanksgiving break. I'll reinstall the rockers and Comp cams push rods when I have the motor out next.
I was able to figure out the line lengths and fittings for the fuel system. I am going to eliminate the factory filter and accumulator and mount the corvette filter/regulator in their place. I'm going to get one of my work's line suppliers to build me the lines. I will be using OEM style quick disconnect fittings and crimp collars with braided line. They should be pretty nice. I'm excited with the way the routing came out. I should have them the week after thanksgiving.
I also took my 190 driveshaft to a local driveshaft shop. They are going to build me a one piece driveshaft. I was happy to find out that I had screwed up one of the mates in my CAD model which placed the diff 10" closer to the trans then it actually was. With that geometry there was a 5� angle between the trans center line and the driveshaft. That meant that I was going to have to use a CV and spend mega bucks on a driveshaft. Well with the mate corrected, there is only a 2.5� which means I should be able to use a u-joint without any problem. Hopefully I will get the quote back on the driveshaft after thanksgiving.
One last thing. I got tried of waiting to finish my LS swapped sedan, so I went ahead and bought one that came with an LS from the factory.
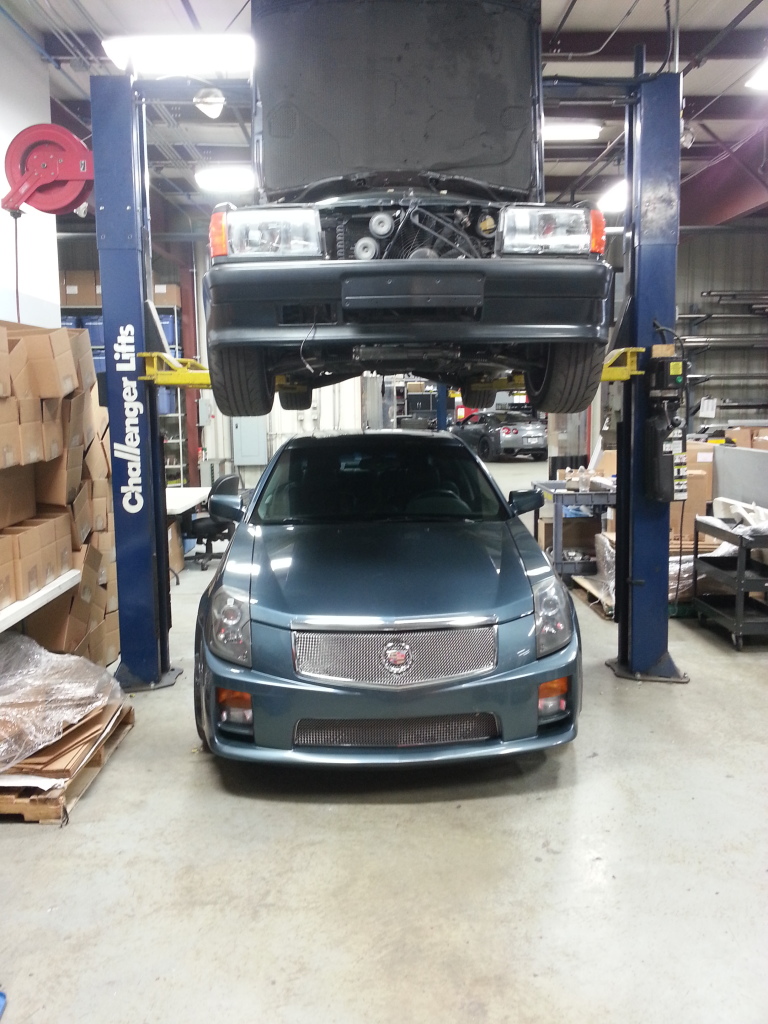
It's an 05 with 117k on it. Yeah I'm dumbass.
I was able to figure out the line lengths and fittings for the fuel system. I am going to eliminate the factory filter and accumulator and mount the corvette filter/regulator in their place. I'm going to get one of my work's line suppliers to build me the lines. I will be using OEM style quick disconnect fittings and crimp collars with braided line. They should be pretty nice. I'm excited with the way the routing came out. I should have them the week after thanksgiving.
I also took my 190 driveshaft to a local driveshaft shop. They are going to build me a one piece driveshaft. I was happy to find out that I had screwed up one of the mates in my CAD model which placed the diff 10" closer to the trans then it actually was. With that geometry there was a 5� angle between the trans center line and the driveshaft. That meant that I was going to have to use a CV and spend mega bucks on a driveshaft. Well with the mate corrected, there is only a 2.5� which means I should be able to use a u-joint without any problem. Hopefully I will get the quote back on the driveshaft after thanksgiving.
One last thing. I got tried of waiting to finish my LS swapped sedan, so I went ahead and bought one that came with an LS from the factory.
It's an 05 with 117k on it. Yeah I'm dumbass.
11-20-2012, 11:53 PM
#95

Hi Clayton. Glad I found this thread, really puts into perspective how much work has gone into this little hotrod. Like I have said from the beginning I cant wait to hear it running around with the thump of an LS1 under the hood!
-Scott (The d-bag from work)
-Scott (The d-bag from work)

 12-25-2012, 12:50 PM
#99
Registered User

Join Date: Dec 2012
Posts: 1
Likes: 0
Received 0 Likes
on
0 Posts
Great project! I had a 2.3/16v back in the day, fun car. I've considered doing this swap on my 300k mi '92 500E, but I was told by some people who may or may not have any idea what they're talking about that integrating the CAN-BUS system controlling all the various electronics of the car with an LSx swap would be horribly difficult. Do you know anything about that? I'm not sure if the 190E uses the same systems.
Good luck on the project!
Brian Flanagan
Good luck on the project!
Brian Flanagan
12-25-2012, 03:27 PM
#100
Man, I'm all about LS swaps in everything, but this is one that should not have been done. My friend has one, and I know 16v's are EXTREMELY rare in the US. you should have left it alone and done this to a base 190. but too late now... this is probably one of a few vehicles to actually lose value from an LS swap