

GM A-body trans crossmember, flip??
 12-14-2011, 02:17 PM
#1
TECH Apprentice
Thread Starter

Join Date: Jul 2011
Posts: 393
Likes: 0
Received 0 Likes
on
0 Posts
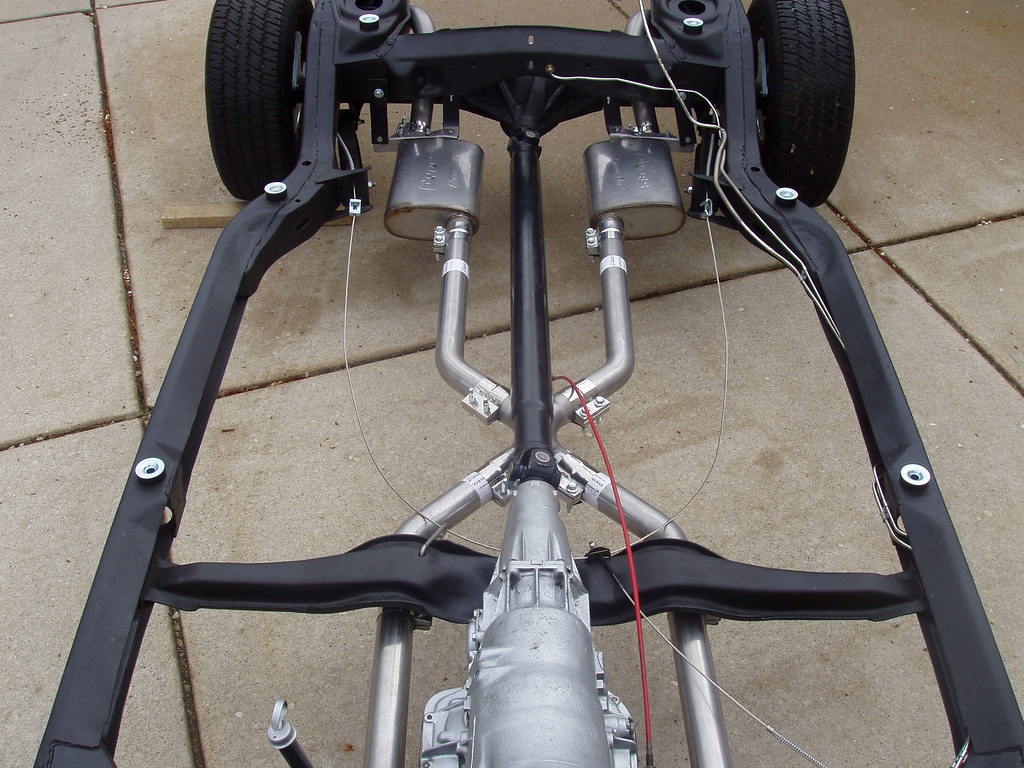
So I have a question hopefully someone with more engineering experience can give an opinion. Basically I need to get the rear of my trans higher since I did the swap, (LY6, 4l80) I have already shimmed up the crossmember a 1/4"+ but it need to go higher. I don't really like the shims idea. Now I have been looking at what I have and I'm starting to think I could flip it upside down... I don't know for sure how much height I would gain but there is another advantage to this. The dougs swap headers are so close to the floorpan I had to have offsets bent up to get below my crossmember. If the crossmember were upside down I could eliminate those offsets and run straight back off the collector as well as possibly raise the rear of the trans. Is the crossmember strong enough to support this?? Here is a picture prior to the swap of what I'm working with.
 12-14-2011, 03:59 PM
#2
Why not just cut/notch out and weld in a new section that would be the correct height for what you need.
If you flip that crossmember, you would loose the notches for the exhaust pipes.
What year and make is your A-Body.. On my 71' chevelle, it has a tube crossmember..!? I was able to cut the tab off, flip it 180 (not upside down) and just weld the tab back on.
If you flip that crossmember, you would loose the notches for the exhaust pipes.
What year and make is your A-Body.. On my 71' chevelle, it has a tube crossmember..!? I was able to cut the tab off, flip it 180 (not upside down) and just weld the tab back on.
12-14-2011, 08:06 PM
#3
he's got a '66 goat -- easily the best year. And I agree that while I don't see it having any effect on the strength of the x-member, you'd lose the exhaust cutouts. What is telling you your pinion angle is off? Is it vibrating on the highway or something?
12-14-2011, 08:54 PM
#4
TECH Apprentice
Thread Starter
Join Date: Jul 2011
Posts: 393
Likes: 0
Received 0 Likes
on
0 Posts
My theory in my head is that instead of having the exhaust go under the x-member like normal the x-member could run under the exhaust... I know that sounds absolutely crazy but the collectors on the Dougs headers are 3/8" off my floorpan so I had a exhaust pipes bent with a 2" center to center offset to get them to go underneath my x-member instead of running right into it.
As for angles I don't have a vibration I'm just concerned about u-joint wear and other wear. With the car on the ground in the gargage I'm at 5* down on my engine/trans assy the driveshaft is running at 0* and the rear end is up 1* currently. So if I understand driveline angle theory correctly i'm 4* off of the ideal between the two...
As for angles I don't have a vibration I'm just concerned about u-joint wear and other wear. With the car on the ground in the gargage I'm at 5* down on my engine/trans assy the driveshaft is running at 0* and the rear end is up 1* currently. So if I understand driveline angle theory correctly i'm 4* off of the ideal between the two...
12-14-2011, 09:05 PM
#5
Launching!
iTrader: (5)

Join Date: Mar 2004
Location: Chippewa Falls, WI
Posts: 292
Likes: 0
Received 0 Likes
on
0 Posts

instead of shimming, could you make some spacers for the bolts on the frame to crossmemeber? or a shim out of square tube? Ultimately depending on your fabrication skill level you could make a new crossmember as well.
12-14-2011, 09:14 PM
#6
TECH Apprentice
Thread Starter
Join Date: Jul 2011
Posts: 393
Likes: 0
Received 0 Likes
on
0 Posts
^^ Yep that is what I have done already is shim the whole thing up at the frame rails with some 1/4" steel plate. I could add another set of 1/4" steel plate but for some reason that is bothering me and it really shouldn't. I just don't like how now the crossmember is starting to run into my fuel and brake lines along the drivers side as it raises up. I wish I had the skill to make a new one but right now I don't, hopefully someday when I buy a welder I can start working on things like this.
12-15-2011, 05:44 AM
#7
TECH Fanatic
I ran into a similar issue with my 69. The exhaust ran into the crossmember. To remedy the situation I removed the cross member. Set the tailshaft height. Cut the center section out of the crossmember. Bolted it to the trans. Attached the remaining ends to the frame rails. Made a pair of flat stock pieces profiled to the vertical face of the crossmemver and used them to join the 3 sections back together. This solved the driveshaft angle question and gave me all the room I needed for the exhaust. It took about 2 hours and $10.00 worth of material. It is not the prettiest bit of fab I have done but it worked out great.
Trending Topics
12-15-2011, 06:50 AM
#8
Launching!
Join Date: Jun 2011
Posts: 213
Likes: 0
Received 0 Likes
on
0 Posts
when I got my crossmember from brp for my 4L80E. They sent me a "normal" 4L60E crossmember and a metal block to adapt it for the 4L80E. It's a couple inches tall and just mounts between your crossmember and your transmission mount. Worked fine.
12-15-2011, 07:55 AM
#9
On The Tree

We dealt with this issue when my son and I installed the LQ9/T56 in his 66 GTO. I boxed the frame in that area and made a drop-out cross member. We cut two pieces of steel for each side, clamped the two pieces together, then drilled four 3/8ths holes. We ran 3/8 bolts through the holes with a nut on the back of the plate that would be welded to the frame. We then tack welded the nuts to the plate. We then welded the "frame" plate to the frame (leaving the "cross member" plate bolted to it). After the plates were welded in on both sides of the frame, I measured the distance between the "Cross member" plates, and then cut the cross member to that length. We bolted the cross member to the tranny, adjusted the angle of the tyranny (Driveshaft angle) by jacking the cross member up on each side until the angle was right, and then welded the cut cross member to the "cross member" plates. We now have a solidly bolted in cross member that helps tie in the frame of the car, and can be dropped out by taking out four bolts on each side, and unbolting it from the tranny.
If my explanation needs a picture, we documented the build at Hotrodders.com in the “project journals”. At that website, look for “all“ journals. Then look for 1966GTO. Entry #14 in that journal shows a picture of how we did it.
On a side note, I saw pictures of your gages, and they do look cool. Eric and I will be tackling that part of his rebuild shortly after the first of the year, and I plan to contact you to get additional information on how your dash turned out.
Ricky