
LQ4/T56 into 2001 BMW 540i
 06-09-2015, 09:26 PM
#441

cleaning up heads by hand is completely different from having a shop go through them. You could spend days cleaning and polishing a set of heads only to have a shop pull a vacuum on the ports and find that all of your valve seats leak. If you're confident that they're low mileage clean units then go nuts, but if you're unsure, the only way to tell if they're good is to have a pro look at them. The last thing you want to happen is to bolt them up and have running issues because of random leakdown.
 06-10-2015, 12:30 PM
#442
hmmm that is a good point, i may just clean them up myself, then bring them to the shop to have them checked and springs installed when i bring the block. just trying to save money where i can. anyways sorry for the hijack, cant wait to see it back together and driving again!
06-16-2015, 08:33 AM
#443
Top End Assembly
I flipped her over on the stand and went to town.
Brand new OEM LS7 lifters got an oil bath for 2 weeks prior to assembly.
 _DSC3885 by Norbert Ogiba, on Flickr
Pre-assemble into lifter trays, which were scrubbed clean and blown out with compressed air prior to use
 _DSC3887 by Norbert Ogiba, on Flickr
Cylinder head dowels installed, headgaskets laid in place. I chose an OEM MLS LS3 6.2 headgasket to match the .030" overbore.
 _DSC3889 by Norbert Ogiba, on Flickr
 _DSC3890 by Norbert Ogiba, on Flickr
 _DSC3891 by Norbert Ogiba, on Flickr
 _DSC3892 by Norbert Ogiba, on Flickr
Ready for a fresh head (love this shot)
 _DSC3893 by Norbert Ogiba, on Flickr
Get her down into place, making sure not to snag the surface with the corner of a dowel.
 _DSC3894 by Norbert Ogiba, on Flickr
ARP head bolts (varying length design) were torqued in sequence and in 3 stages to the appropriate spec using the required thread lube on the threads, washers, and under the head of the bolts.
 _DSC3895 by Norbert Ogiba, on Flickr
Once both heads were on, they got new plugs:
 _DSC3896 by Norbert Ogiba, on Flickr
Since I was in a time crunch to get the car done, the rest went together fairly quickly, so I will let the pictures tell the story.
I flipped her over on the stand and went to town.
Brand new OEM LS7 lifters got an oil bath for 2 weeks prior to assembly.
_DSC3885 by Norbert Ogiba, on FlickrPre-assemble into lifter trays, which were scrubbed clean and blown out with compressed air prior to use
_DSC3887 by Norbert Ogiba, on FlickrCylinder head dowels installed, headgaskets laid in place. I chose an OEM MLS LS3 6.2 headgasket to match the .030" overbore.
_DSC3889 by Norbert Ogiba, on Flickr_DSC3890 by Norbert Ogiba, on Flickr_DSC3891 by Norbert Ogiba, on Flickr_DSC3892 by Norbert Ogiba, on FlickrReady for a fresh head (love this shot)
_DSC3893 by Norbert Ogiba, on FlickrGet her down into place, making sure not to snag the surface with the corner of a dowel.
_DSC3894 by Norbert Ogiba, on FlickrARP head bolts (varying length design) were torqued in sequence and in 3 stages to the appropriate spec using the required thread lube on the threads, washers, and under the head of the bolts.
_DSC3895 by Norbert Ogiba, on FlickrOnce both heads were on, they got new plugs:
_DSC3896 by Norbert Ogiba, on FlickrSince I was in a time crunch to get the car done, the rest went together fairly quickly, so I will let the pictures tell the story.
06-16-2015, 08:59 AM
#444
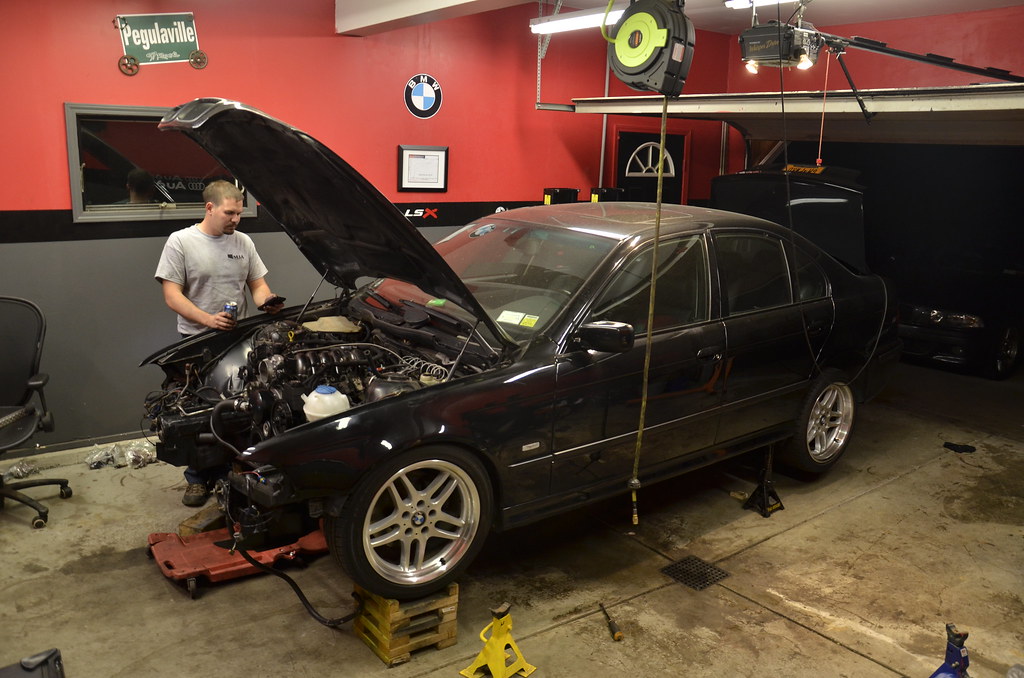
Engine/Trans Assembly and Installation into car
Bolted on a bunch of crap like the front accessories, starter, manifolds, coolant sensors, etc. Cleaned the pressure plate and flywheel with isopropyl alcohol to remove any fingerprints or grease, installed both with ARP hardware, torqued to spec. Joining these two bastards was super fun on my own!
 _DSC3923 by Norbert Ogiba, on Flickr
 _DSC3924 by Norbert Ogiba, on Flickr
 _DSC3925 by Norbert Ogiba, on Flickr
 _DSC3926 by Norbert Ogiba, on Flickr
and, in ya go
 _DSC3927 by Norbert Ogiba, on Flickr
Workspace = filthy
 _DSC3928 by Norbert Ogiba, on Flickr
Finally got it in (without removing the driveshaft no less)
_DSC3928 by Norbert Ogiba, on Flickr
Technician117 doing what he does best
 _DSC3929 by Norbert Ogiba, on Flickr
 _DSC3930 by Norbert Ogiba, on Flickr
 _DSC3931 by Norbert Ogiba, on Flickr
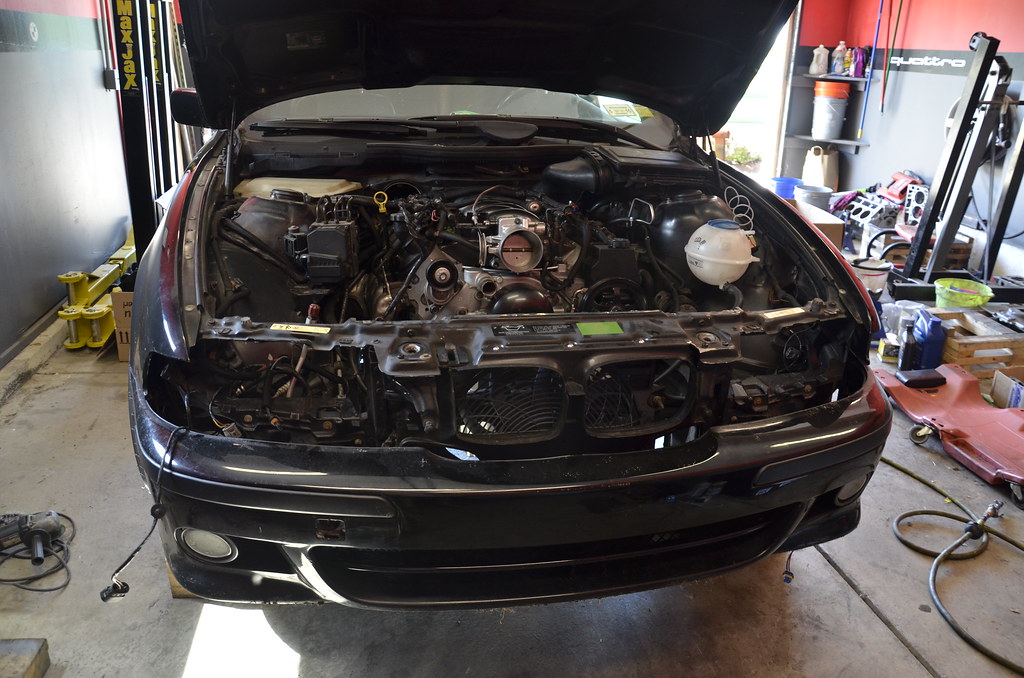
Reconnecting vacuum lines and wiring
 _DSC3932 by Norbert Ogiba, on Flickr
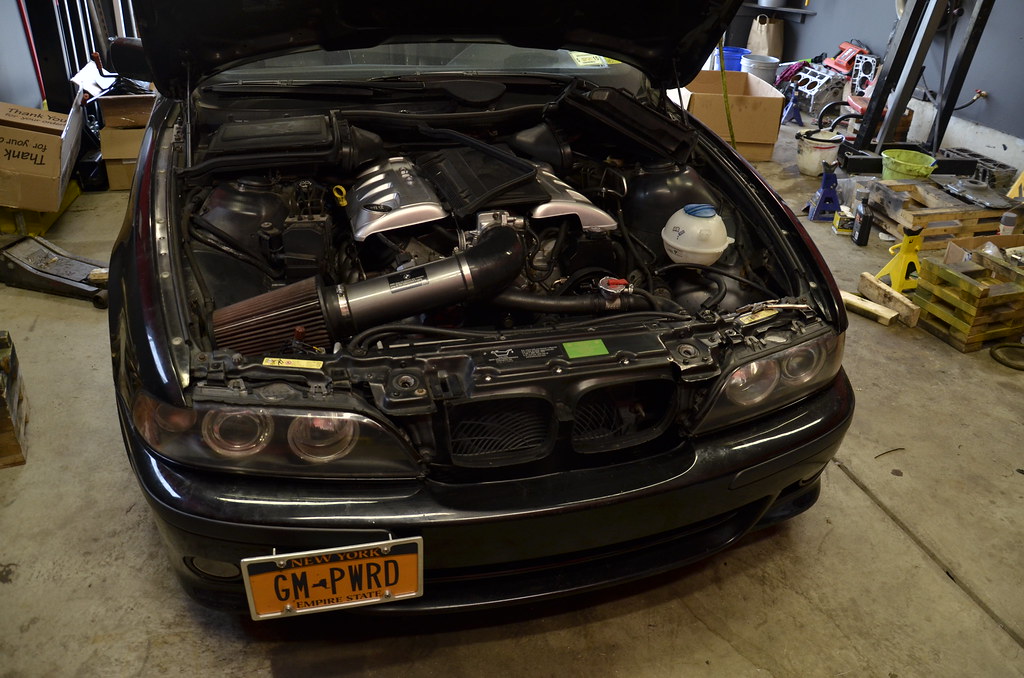
Final reassembly
 _DSC3933 by Norbert Ogiba, on Flickr
Interior back together
 _DSC3937 by Norbert Ogiba, on Flickr
Done!
 _DSC3934 by Norbert Ogiba, on Flickr
Fired it up and let it idle while checking oil pressure, coolant temps, and general leaks. Some minor things but no deal breakers. The biggest "oh crap" moments were a minor miss due to a loose plug wire, and a leak from the OPSU (replaced with an appropriate plug). As I walked out to hop in and take it for the maiden voyage, it started puking coolant out of the overflow bottle, where a nipple had cracked and broken on a nearly new tank
 _DSC3935 by Norbert Ogiba, on Flickr
 _DSC3936 by Norbert Ogiba, on Flickr
Naturally only one store had one in stock locally and they had closed for the day, so it pushed back my schedule by another day. However, I tossed a new one in, and took the car to be tuned.
Mileage at the time of engine rebuild for future reference.
 _DSC3939 by Norbert Ogiba, on Flickr
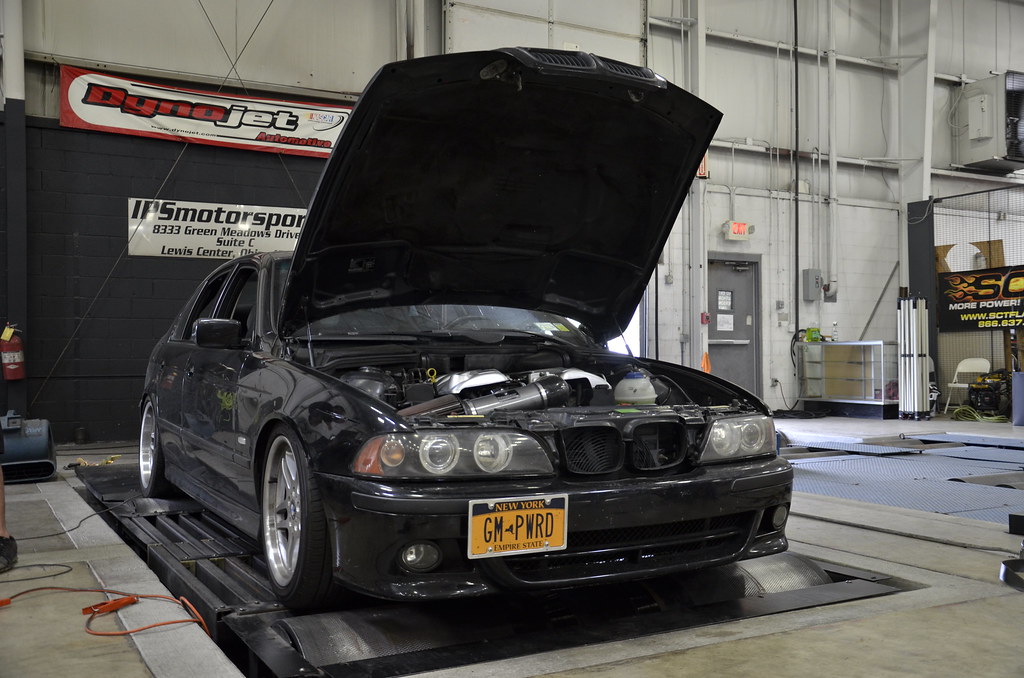
Met my goal and made it out to Columbus, OH for Timmayfest - got it strapped down on the dyno (very high heat and humidity).
 _DSC3970 by Norbert Ogiba, on Flickr
Fairly disappointed at the numbers - 360whp and 349 lbft. The only change was a more restrictive exhaust in the form of cats, a resonator, and slightly smaller diameter piping. Last year I made 427whp/400lbft on a local dyno. Go figure.
 _DSC3971 by Norbert Ogiba, on Flickr
Had to make a stop on the way home:
 _DSC4064 by Norbert Ogiba, on Flickr
Bolted on a bunch of crap like the front accessories, starter, manifolds, coolant sensors, etc. Cleaned the pressure plate and flywheel with isopropyl alcohol to remove any fingerprints or grease, installed both with ARP hardware, torqued to spec. Joining these two bastards was super fun on my own!
_DSC3923 by Norbert Ogiba, on Flickr_DSC3924 by Norbert Ogiba, on Flickr_DSC3925 by Norbert Ogiba, on Flickr_DSC3926 by Norbert Ogiba, on Flickrand, in ya go
_DSC3927 by Norbert Ogiba, on FlickrWorkspace = filthy
_DSC3928 by Norbert Ogiba, on FlickrFinally got it in (without removing the driveshaft no less)
_DSC3928 by Norbert Ogiba, on FlickrTechnician117 doing what he does best
_DSC3929 by Norbert Ogiba, on Flickr_DSC3930 by Norbert Ogiba, on Flickr_DSC3931 by Norbert Ogiba, on FlickrReconnecting vacuum lines and wiring
_DSC3932 by Norbert Ogiba, on FlickrFinal reassembly
_DSC3933 by Norbert Ogiba, on FlickrInterior back together
_DSC3937 by Norbert Ogiba, on FlickrDone!
_DSC3934 by Norbert Ogiba, on FlickrFired it up and let it idle while checking oil pressure, coolant temps, and general leaks. Some minor things but no deal breakers. The biggest "oh crap" moments were a minor miss due to a loose plug wire, and a leak from the OPSU (replaced with an appropriate plug). As I walked out to hop in and take it for the maiden voyage, it started puking coolant out of the overflow bottle, where a nipple had cracked and broken on a nearly new tank
_DSC3935 by Norbert Ogiba, on Flickr_DSC3936 by Norbert Ogiba, on FlickrNaturally only one store had one in stock locally and they had closed for the day, so it pushed back my schedule by another day. However, I tossed a new one in, and took the car to be tuned.
Mileage at the time of engine rebuild for future reference.
_DSC3939 by Norbert Ogiba, on FlickrMet my goal and made it out to Columbus, OH for Timmayfest - got it strapped down on the dyno (very high heat and humidity).
_DSC3970 by Norbert Ogiba, on FlickrFairly disappointed at the numbers - 360whp and 349 lbft. The only change was a more restrictive exhaust in the form of cats, a resonator, and slightly smaller diameter piping. Last year I made 427whp/400lbft on a local dyno. Go figure.
_DSC3971 by Norbert Ogiba, on FlickrHad to make a stop on the way home:
_DSC4064 by Norbert Ogiba, on Flickr
06-16-2015, 12:04 PM
#446
honestly it feels just like it did before the swap - maybe a bit peppier. I don't really recall since the last time I drove it in anger before the motor swap, was last October.
The real test will be to get it on my local tuner's dyno and do some pulls there, that'll be the best apples to apples comparison.
The real test will be to get it on my local tuner's dyno and do some pulls there, that'll be the best apples to apples comparison.
06-16-2015, 10:14 PM
#447
TECH Addict
iTrader: (19)
Join Date: Aug 2007
Location: Where the Navy tells me to go
Posts: 2,404
Received 106 Likes
on
88 Posts

Congrats on getting it all back together!
Your garage cleanliness is a helluva lot better than mine if that's your idea of "filthy"!  I'd be thrilled if my work space looked 1/2 that orderly!
06-17-2015, 06:25 AM
#448
My problem is the half started projects everywhere...I get sidetracked and leave crap everywhere ("where did I just put that beer?")
I banged out a quick exhaust job last night on my father's Lexus, so today I'll spend some time cleaning up the garage. Maybe I'll snap some pics.
I banged out a quick exhaust job last night on my father's Lexus, so today I'll spend some time cleaning up the garage. Maybe I'll snap some pics.
 06-17-2015, 06:51 AM
#450
^ exactly - we had a bone stock M5 that dyno'd there last year, and made 20whp more in identical trim - no changes. It had to be 90F in that shop, with humidity to match.
The best comparison will be running it on my local dyno, where I made 427/400 last year.
The best comparison will be running it on my local dyno, where I made 427/400 last year.

 06-20-2015, 07:28 AM
#454

Were both dynos Dynojets?
Even if it's "yes", still could be enough swing to account for it. More likely, a chunk of that is from your exhaust restrictions, especially the smaller diameter tubing. If you tune for it, it's hard to go too big on LS motor exhaust.
I know you know how inaccurate butt dynos are. Would be VERY easy to be biased based on the beautiful and meticulous work you do. Really nice job! In for the apples to apples dyno! (Re-do that exhaust!)
Even if it's "yes", still could be enough swing to account for it. More likely, a chunk of that is from your exhaust restrictions, especially the smaller diameter tubing. If you tune for it, it's hard to go too big on LS motor exhaust.
I know you know how inaccurate butt dynos are.
Would be VERY easy to be biased based on the beautiful and meticulous work you do. Really nice job! In for the apples to apples dyno! (Re-do that exhaust!)  06-20-2015, 08:24 AM
#455
i think a lot of it has to do with the head swap too. I couldn't use the 317s I had on before since one of them was destroyed by the valve, so I picked up a set of used 241s which don't flow nearly as well. I am on the hunt for some 799s which I may try some light porting on.
07-11-2015, 06:29 PM
#456
Registered User

Join Date: Jul 2015
Posts: 1
Likes: 0
Received 0 Likes
on
0 Posts
I'm doing a ls1 swap into my 2001 bmw 540i and I was wondering what kind of transmission would I have to run with it because my cousin told me I could get an adapter to mount the bmw trans up to the ls1. Need all the help I can get. Thanks
07-13-2015, 10:26 AM
#459

Whish I had the spare cash. Nice swap !!!
