


How to make an accessory drive
or buy mine for $100 less.
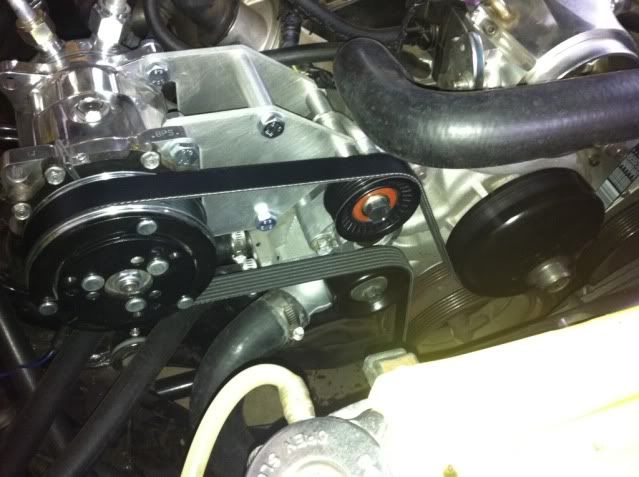
since you can't space it too far out though, I'd recommend removing the current idler and running the belt from the AC compressor to the water pump, then to the alternator. You can use an f-body tensioner like Kwik's (and my) kit. I made spacers to space it out from the water pump mount, and flipped it upside-down to run it like in blue in your pic. the power steering pump pulley contact patch is less than ideal, but I haven't had any issues.
since you can't space it too far out though, I'd recommend removing the current idler and running the belt from the AC compressor to the water pump, then to the alternator. You can use an f-body tensioner like Kwik's (and my) kit. I made spacers to space it out from the water pump mount, and flipped it upside-down to run it like in blue in your pic. the power steering pump pulley contact patch is less than ideal, but I haven't had any issues.
Launching!
Joined: May 2012
Posts: 205
Likes: 2
From: Mobile, Alabama
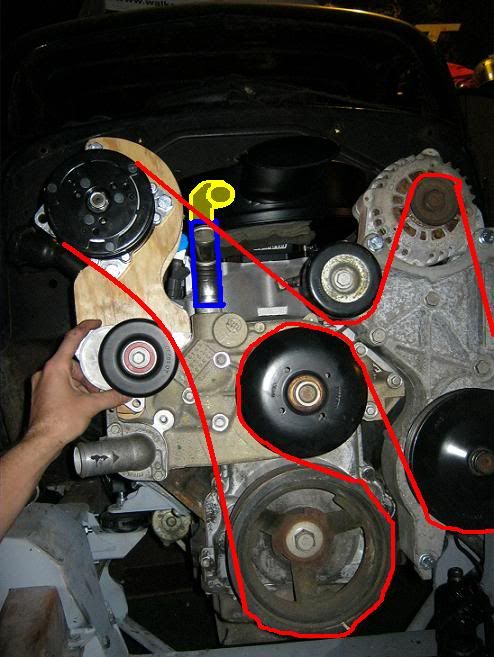
OK, I made some progress today. My question is this: I've made this drawing of how my belt set up will be (RED). After I install the tensioner the belt will move inward (BLUE). How do I know how far in to mount the tensioner, or where to mount it, to make sure I get the correct amount of tension on the belt, not too little or too much.
Thanks,
Brandon
Thanks,
Brandon
Thanks for the replies.
Is there anyway ahead of time to know how much movement a certain location of the tensioner will cause on the marker. If it were possible I would just put a belt on and push the tensioner against it until the marker were at the appropriate setting, but I think the tensioners are far too strong to allow this to be done by hand. The only alternative I know is to guess and drill holes and see how it it works then adjust and redrill new holes accordingly.
Thanks,
Brandon
Launching!
Joined: May 2012
Posts: 205
Likes: 2
From: Mobile, Alabama
Thanks for the replies.
Is there anyway ahead of time to know how much movement a certain location of the tensioner will cause on the marker. If it were possible I would just put a belt on and push the tensioner against it until the marker were at the appropriate setting, but I think the tensioners are far too strong to allow this to be done by hand. The only alternative I know is to guess and drill holes and see how it it works then adjust and redrill new holes accordingly.
Thanks,
Brandon
Is there anyway ahead of time to know how much movement a certain location of the tensioner will cause on the marker. If it were possible I would just put a belt on and push the tensioner against it until the marker were at the appropriate setting, but I think the tensioners are far too strong to allow this to be done by hand. The only alternative I know is to guess and drill holes and see how it it works then adjust and redrill new holes accordingly.
Thanks,
Brandon
Just one note on what I discoved while building mine, these serpentine belt setups are very sensitive to alignment and pulley angle. If you're off a little the belt can walk off the pulley.
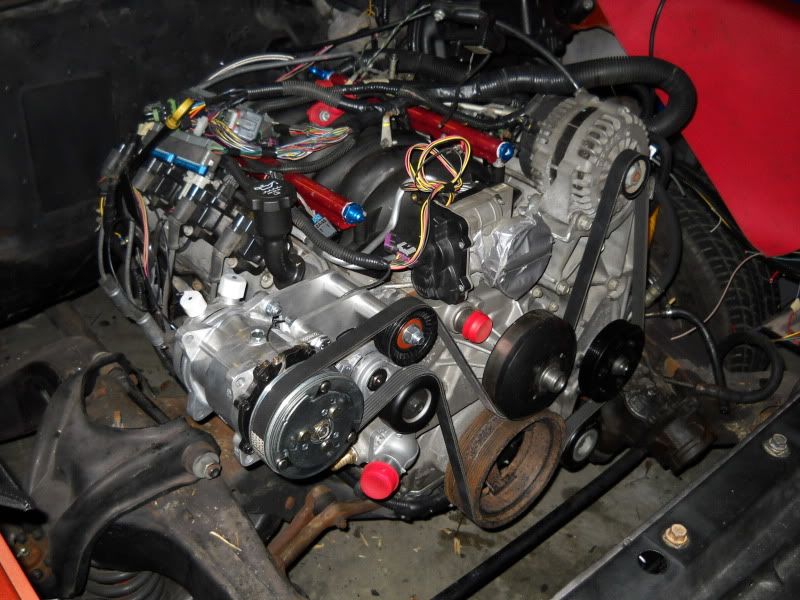
OK fellas, I have a question. In the previous picture I showed the belt running through a new idler pulley. After working with it a lot today I may have found a better solution. The F-body water pump has a straight water neck sticking out and the truck has a bent water neck. What if I took an F-body water neck and installed it in my truck pump, which would point it straight up. That would allow me to run the radiator hose over the belt and eliminate the need for the extra idler, which has been causing me a lot of trouble today.
Hopefully this picture will make sense. So will an F-body pump straight-style water neck fit into a truck pump?
Thanks,
Brandon
Hopefully this picture will make sense. So will an F-body pump straight-style water neck fit into a truck pump?
Thanks,
Brandon
LS1 Tech Stories
The Best V8 Stories One Small Block at Time

Gas Monkey Built a 6-Wheel Ferrari Testarossa With a Corvette LT4 Engine
Verdad Gallardo
7 Most Reliable High-Performance Engines GM Has Ever Built
Verdad Gallardo
Amazing '71 Camaro Restomod Is Modern Muscle Car Under the Skin
Verdad Gallardo
6 Common C5 Corvette Failures and What's Involved In Repairing Them
Pouria Savadkouei
Retro Modern Bandit Pontiac Trans AM Comes With Burt Reynolds' Autograph
Verdad Gallardo
Top 10 Greatest Cadillac V Series Performance Models Ever, Ranked
Pouria Savadkouei
Top 10 Most Powerful Chevy Trucks Ever Made!

Hennessey's New Supercharged Silverado ZR2 Has 700 HP
Verdad Gallardo
Coachbuilt N2A Anteros Is an LS2-Powered C6 Corvette In Italian Clothes
Verdad Gallardo The first problem I see in your picture is something I mentioned in my original post. In this setup you will have to drain the radiator to change belts because the upper hose will be trapped by the belt.
Why not place the AC unit lower and use a stock truck water pump? I prefer to use unmodified consumable parts (water pumps, etc.) for the potential problems on a road trip miles from nowhere.
Why not place the AC unit lower and use a stock truck water pump? I prefer to use unmodified consumable parts (water pumps, etc.) for the potential problems on a road trip miles from nowhere.
I'm not sure what you mean about draining the radiator. The hoses run on the outside of the belt in both setups. The top hose runs over the belt and the bottom hose runs to the passenger side of the belt.
I can't move the compressor lower. It is almost hitting the valve cover now.
Brandon
I can't move the compressor lower. It is almost hitting the valve cover now.
Brandon
Launching!
Joined: May 2012
Posts: 205
Likes: 2
From: Mobile, Alabama
Off the top of my head I cant remember if the dimensions are the same. I think it could have a chance of leaking after being pulled and pressed back in. You might think of tapping and using a threaded outlet. If you end up going this way you may find this hose will be the highest point in the system and needs a bleed to eliminate air.
Here is a bleed and adapters for hose fitment. http://www.jagsthatrun.com/Cooling-S...r.html#Datsun6

Here is a bleed and adapters for hose fitment. http://www.jagsthatrun.com/Cooling-S...r.html#Datsun6
You're going to try to knock out the water neck from both a truck AND f body pump...then install the f body tube into the truck pump and hope it doesnt come out or leak? There are several other options that would be more reliable.

There is definitely not room for a low mount kit. I had not considered if the hose were the highest part of the system it would need an air bleed system, that's good to know.
I already removed the water neck from the truck pump. It was very easy to get out with a non-metal hammer and didn't leave any dents. I assumed the f-body would come out the same way. I've reinstalled the truck pump at a different angle. I assumed when I put it back the final time I would use a sealer. What other options would be better than switching water necks? I'm trying to find the best options so I'm open to any suggestions.
Thanks,
Brandon
If you're set on using the truck pump, tap the inlet and put an NPT fitting. I've removed and tapped the heater hose fittings, but dont think I would trust anything pressed in that might be distorted.
Otherwise,
use an fbody LS1 pump with ebay spacers
or an L99 pump
or swap the truck pulley on f body pump
or buy one already done
http://www.foxlinders.com/accessories/waterpump.html
you might also consider routing the belt differently.
Otherwise,
use an fbody LS1 pump with ebay spacers
or an L99 pump
or swap the truck pulley on f body pump
or buy one already done
http://www.foxlinders.com/accessories/waterpump.html
you might also consider routing the belt differently.
Not if you route the belt under the water pump pulley.
But even if you keep the current routing, belts are typically good for over 50k miles. How often are you going to have to drain a gallon to swap it?
Btw, if you go up too high with the inlet tube on the water pump, it will end up being higher than the radiator cap and you'll have a hard time getting all the air out.
Last edited by garys 68; Sep 1, 2012 at 10:29 AM.
Launching!
Joined: May 2012
Posts: 205
Likes: 2
From: Mobile, Alabama
Vetteman 61 - Zipster93's photobucket shows the low buck truck WP modification like you started (page 5)
http://s392.photobucket.com/albums/p...cpZZ5QQtppZZ24
http://s392.photobucket.com/albums/p...cpZZ5QQtppZZ24
Last edited by 74modified; Sep 1, 2012 at 09:09 AM.
Take a look at the attached threads. My mini sanden compressor mount works with the truck offset. I've made my own drive using an inexpensive alternator and is compatible with the truck accessories. It's pretty simple too compared to all the cantilevered brackets. It won't work with the larger Sanden compressor you already have though.
https://ls1tech.com/forums/conversio...available.html
https://ls1tech.com/forums/conversio...l#post16242884
https://ls1tech.com/forums/conversio...available.html
https://ls1tech.com/forums/conversio...l#post16242884
Last edited by fox12303; Sep 1, 2012 at 06:44 PM.
