

1985 Monte Carlo SS 6.2l (ls3) / 4l80e swap


 12-08-2013, 05:13 PM
#103
Fuel gauge should be fine with a stock sending unit, voltage will pick up on its own, depends if it has temp and oil pressure in the dash cluster. Oil pressure sender can be swapped out or adapted to the original one, and temp sender should not be that hard at all. If not, they have some cool digital gauges that can be mounted on the passenger side head by removing the plug over there and replacing it with an adapted sending unit to fit the head. That bolt hole is 12mm and auto meter sells an adapter to fit that 12mm down to 1/8 npt. I have one in my passenger head and cheap digital gauge and it reads from 104 to 300+ degrees...
http://www.ebay.com/itm/290784363648...84.m1439.l2649
http://cgi.ebay.com/ws/eBayISAPI.dll...m=151175263317
http://www.ebay.com/itm/290784363648...84.m1439.l2649
http://cgi.ebay.com/ws/eBayISAPI.dll...m=151175263317
12-08-2013, 05:35 PM
#104
TECH Apprentice
iTrader: (12)
Join Date: Oct 2011
Location: Denton Md
Posts: 381
Likes: 0
Received 0 Likes
on
0 Posts
Trans, yes .....motor probably not. I get heckled for saying I will put a coat of paint on a aluminum block. But I am going to get the valve covers, water pump, front accesorires/brackets all painted matte black so it should clean up alot better. That will happen when the rest of the car is at the body shop getting the bay sprayed same matte black. Right now just worried about mocking this heavy combo.
12-08-2013, 05:46 PM
#105
TECH Enthusiast
Thread Starter
iTrader: (5)
Join Date: Aug 2008
Location: Middletown, DE
Posts: 696
Likes: 0
Received 0 Likes
on
0 Posts

Fuel gauge should be fine with a stock sending unit, voltage will pick up on its own, depends if it has temp and oil pressure in the dash cluster. Oil pressure sender can be swapped out or adapted to the original one, and temp sender should not be that hard at all. If not, they have some cool digital gauges that can be mounted on the passenger side head by removing the plug over there and replacing it with an adapted sending unit to fit the head. That bolt hole is 12mm and auto meter sells an adapter to fit that 12mm down to 1/8 npt. I have one in my passenger head and cheap digital gauge and it reads from 104 to 300+ degrees...
http://www.ebay.com/itm/290784363648...84.m1439.l2649
http://cgi.ebay.com/ws/eBayISAPI.dll...m=151175263317
http://www.ebay.com/itm/290784363648...84.m1439.l2649
http://cgi.ebay.com/ws/eBayISAPI.dll...m=151175263317
Believe me too, my pops and brother both say ''Fvck'' what others want its your car. lol.
12-10-2013, 08:50 AM
#107
TECH Regular
iTrader: (5)

Join Date: Aug 2009
Location: Swedesboro, NJ
Posts: 425
Likes: 0
Received 0 Likes
on
0 Posts
I've said it once, I'll say it a million more times before you listen to me: http://www.ultra-gauge.com/ultragauge/
or
http://www.scangauge.com/
Sorry I wasn't there last Friday, I would have spotted the mounts being backwards and might have saved you this headache...damn me and my Monday-Friday morning friendship!!!
To get the Monte speedo to work with the 80 will probably cost more than buying a gauge.
or
http://www.scangauge.com/
Sorry I wasn't there last Friday, I would have spotted the mounts being backwards and might have saved you this headache...damn me and my Monday-Friday morning friendship!!!
To get the Monte speedo to work with the 80 will probably cost more than buying a gauge.
12-11-2013, 06:57 PM
#108
TECH Enthusiast
Thread Starter
iTrader: (5)
Join Date: Aug 2008
Location: Middletown, DE
Posts: 696
Likes: 0
Received 0 Likes
on
0 Posts
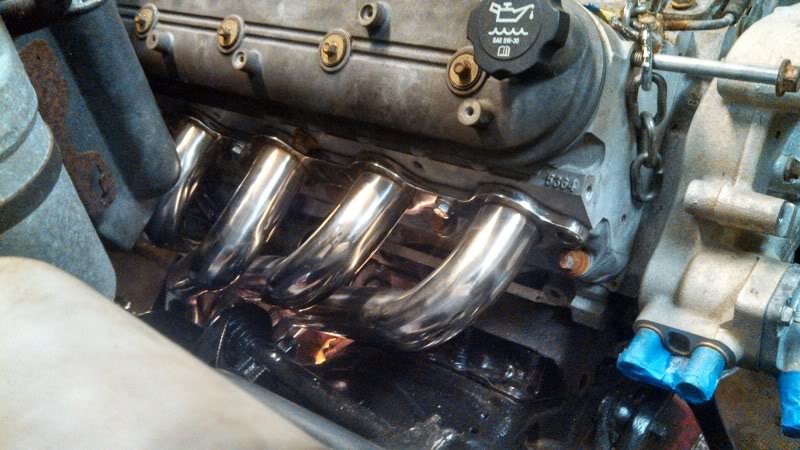
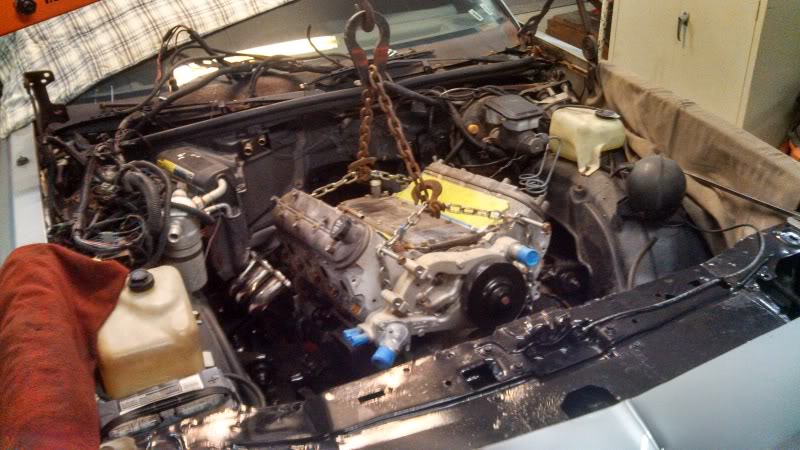
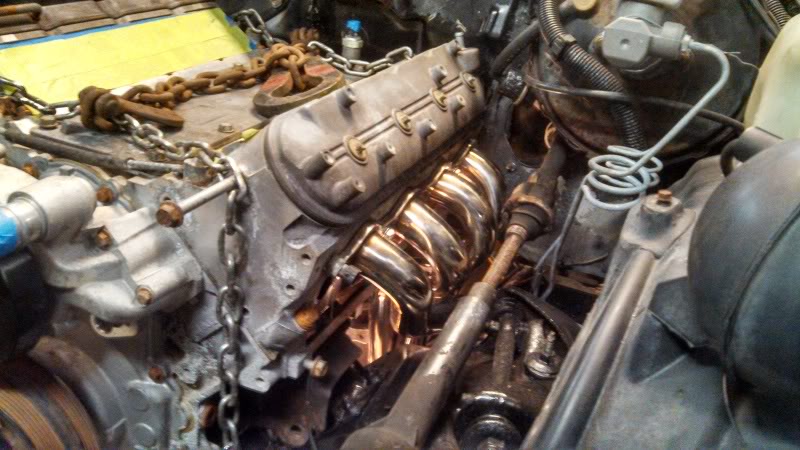
Well today was a very successful day in the fact in three hours we got a whole heck of a lot more done than the last three days that I had done to the car. I will let the pictures speak for themselves but I will say that you guys with ceramic coated or painted headers will be jealous! lol
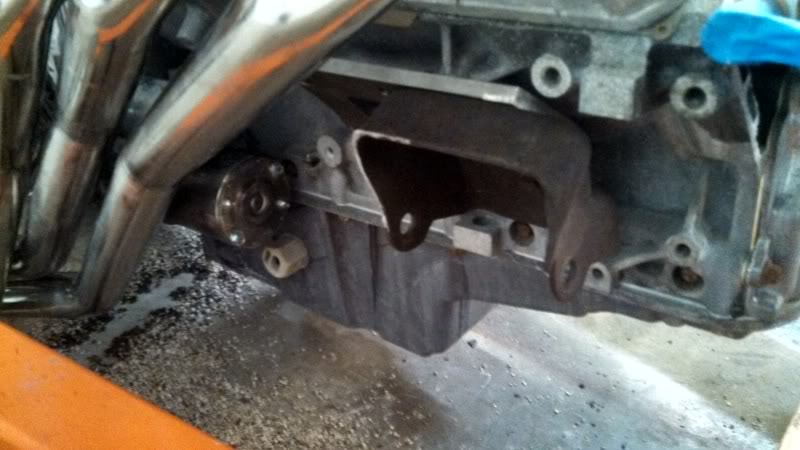
Passenger side mount clearance with the CORRECT location

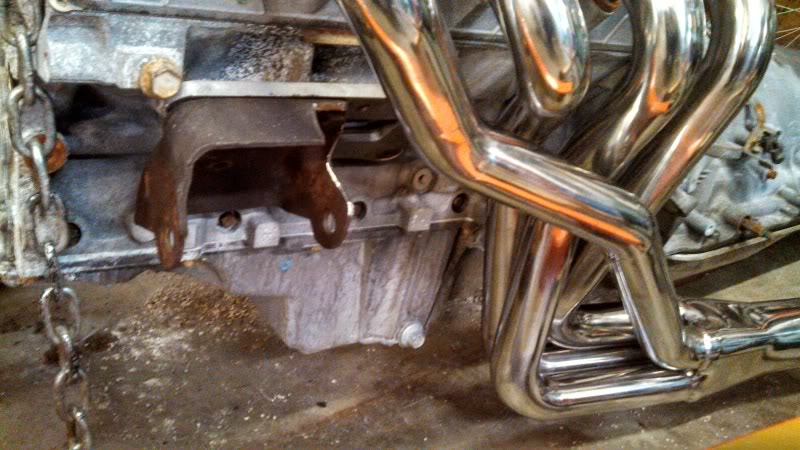
Driver side.....NOTE TO OTHERS, no modding to brackets needed as you can see

Shes in! 95% of the way, not fully in but as close as we could without the further fitment issues we need to resolve


Headers bolted in! Seriously!


Well I have more but my phone has yet to upload them but I will post them when they do....I took as many pictures for other people on the fitment of these headers. But I will say this for you guys, small small small things needed to be done for a complete fit but these are a great buy for any g body doing this swap.
NOTE: I have 1 inch set back plates with the TSP 1-3/4 long tubes. With this combo and pictured trans mods, these headers fit! Best part is they are Stainless Steel.
Only mods needed to fit perfect is a small, half dollar size dent on the passenger side header. One primary that is closest to the rear bracket on the LCA needs to be dented. Other than that, the driver side has a brake line that needs re-routing. Other than that, these fit great!
So as a recap, besides the header mods, we cut the flat tabs on the rubber mounts so the brackets fit better for final install. Oil pan needs some grinding on the front side that sits in the engine cradle. Its very tight on the front corners, so they will need a little clearance. Other than that, the thing sits in good. Only other concern is the passenger side rear most coil pack.
But anyways, Saturday I plan to go down and fix the last issues to resolve the motor sitting in perfect and than its off to get the engine bay painted. So stoked right now!
Passenger side mount clearance with the CORRECT location

Driver side.....NOTE TO OTHERS, no modding to brackets needed as you can see

Shes in! 95% of the way, not fully in but as close as we could without the further fitment issues we need to resolve


Headers bolted in! Seriously!


Well I have more but my phone has yet to upload them but I will post them when they do....I took as many pictures for other people on the fitment of these headers. But I will say this for you guys, small small small things needed to be done for a complete fit but these are a great buy for any g body doing this swap.
NOTE: I have 1 inch set back plates with the TSP 1-3/4 long tubes. With this combo and pictured trans mods, these headers fit! Best part is they are Stainless Steel.
Only mods needed to fit perfect is a small, half dollar size dent on the passenger side header. One primary that is closest to the rear bracket on the LCA needs to be dented. Other than that, the driver side has a brake line that needs re-routing. Other than that, these fit great!
So as a recap, besides the header mods, we cut the flat tabs on the rubber mounts so the brackets fit better for final install. Oil pan needs some grinding on the front side that sits in the engine cradle. Its very tight on the front corners, so they will need a little clearance. Other than that, the thing sits in good. Only other concern is the passenger side rear most coil pack.
But anyways, Saturday I plan to go down and fix the last issues to resolve the motor sitting in perfect and than its off to get the engine bay painted. So stoked right now!
12-11-2013, 06:57 PM
#109
TECH Enthusiast
Thread Starter
iTrader: (5)
Join Date: Aug 2008
Location: Middletown, DE
Posts: 696
Likes: 0
Received 0 Likes
on
0 Posts
Well today was a very successful day in the fact in three hours we got a whole heck of a lot more done than the last three days that I had done to the car. I will let the pictures speak for themselves but I will say that you guys with ceramic coated or painted headers will be jealous! lol
Passenger side mount clearance with the CORRECT location
Driver side.....NOTE TO OTHERS, no modding to brackets needed as you can see
Shes in! 95% of the way, not fully in but as close as we could without the further fitment issues we need to resolve

Headers bolted in! Seriously!


Well I have more but my phone has yet to upload them but I will post them when they do....I took as many pictures for other people on the fitment of these headers. But I will say this for you guys, small small small things needed to be done for a complete fit but these are a great buy for any g body doing this swap.
NOTE: I have 1 inch set back plates with the TSP 1-3/4 long tubes. With this combo and pictured trans mods, these headers fit! Best part is they are Stainless Steel.
Only mods needed to fit perfect is a small, half dollar size dent on the passenger side header. One primary that is closest to the rear bracket on the LCA needs to be dented. Other than that, the driver side has a brake line that needs re-routing. Other than that, these fit great!
So as a recap, besides the header mods, we cut the flat tabs on the rubber mounts so the brackets fit better for final install. Oil pan needs some grinding on the front side that sits in the engine cradle. Its very tight on the front corners, so they will need a little clearance. Other than that, the thing sits in good. Only other concern is the passenger side rear most coil pack.
But anyways, Saturday I plan to go down and fix the last issues to resolve the motor sitting in perfect and than its off to get the engine bay painted. So stoked right now!
Passenger side mount clearance with the CORRECT location
Driver side.....NOTE TO OTHERS, no modding to brackets needed as you can see
Shes in! 95% of the way, not fully in but as close as we could without the further fitment issues we need to resolve
Headers bolted in! Seriously!
Well I have more but my phone has yet to upload them but I will post them when they do....I took as many pictures for other people on the fitment of these headers. But I will say this for you guys, small small small things needed to be done for a complete fit but these are a great buy for any g body doing this swap.
NOTE: I have 1 inch set back plates with the TSP 1-3/4 long tubes. With this combo and pictured trans mods, these headers fit! Best part is they are Stainless Steel.
Only mods needed to fit perfect is a small, half dollar size dent on the passenger side header. One primary that is closest to the rear bracket on the LCA needs to be dented. Other than that, the driver side has a brake line that needs re-routing. Other than that, these fit great!
So as a recap, besides the header mods, we cut the flat tabs on the rubber mounts so the brackets fit better for final install. Oil pan needs some grinding on the front side that sits in the engine cradle. Its very tight on the front corners, so they will need a little clearance. Other than that, the thing sits in good. Only other concern is the passenger side rear most coil pack.
But anyways, Saturday I plan to go down and fix the last issues to resolve the motor sitting in perfect and than its off to get the engine bay painted. So stoked right now!

 12-22-2013, 12:17 AM
#114

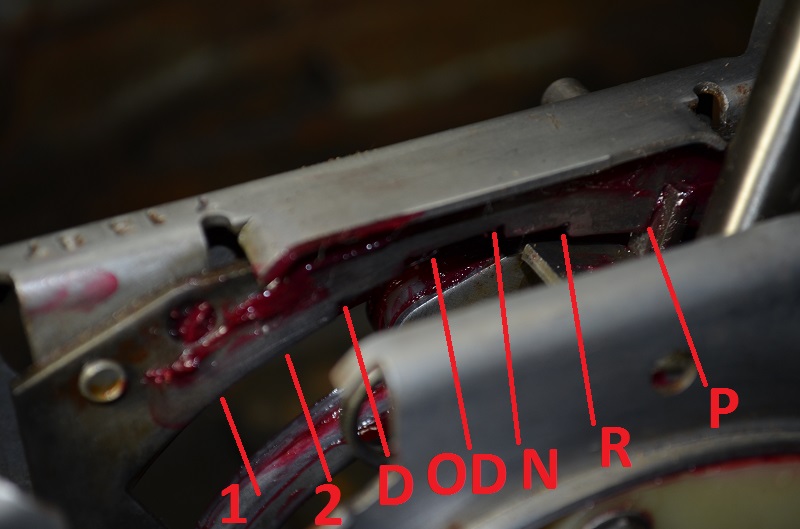
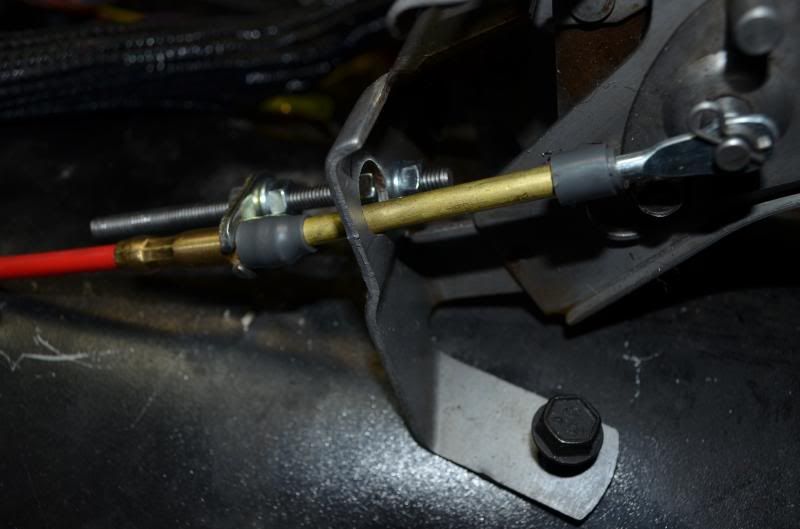
My stock cable wouldn't even reach my 4l60e, doubt it will with a 4l80e. And you are using 1" setback plates like me.
I bought and used a 5ft B&M cable with the factory shifter.
M6 threaded rod, few nuts and washers.

There is just no detent for 1st and 2nd. Could drill out the rivets to remove the plate and notch it myself or just make a new detent plate.
 12-22-2013, 09:41 AM
#116
So, your working combination consists of the 1" eBay mounts, ls1 Fbody pan, & TSP headers... How does the oil pan sump fitment look around the crossmember? Can you post the part # for the headers? Also, what was the verdict on the coilpack to AC box clearance?
Thanks!
Thanks!
12-22-2013, 04:39 PM
#117
TECH Enthusiast
Thread Starter
iTrader: (5)
Join Date: Aug 2008
Location: Middletown, DE
Posts: 696
Likes: 0
Received 0 Likes
on
0 Posts
And here is the link ....
http://www.texas-speed.com/p-3516-te...e-headers.aspx
12-22-2013, 04:44 PM
#118
TECH Enthusiast
Thread Starter
iTrader: (5)
Join Date: Aug 2008
Location: Middletown, DE
Posts: 696
Likes: 0
Received 0 Likes
on
0 Posts
My stock cable wouldn't even reach my 4l60e, doubt it will with a 4l80e. And you are using 1" setback plates like me.
I bought and used a 5ft B&M cable with the factory shifter.
M6 threaded rod, few nuts and washers.
There is just no detent for 1st and 2nd. Could drill out the rivets to remove the plate and notch it myself or just make a new detent plate.

I bought and used a 5ft B&M cable with the factory shifter.
M6 threaded rod, few nuts and washers.
There is just no detent for 1st and 2nd. Could drill out the rivets to remove the plate and notch it myself or just make a new detent plate.
01-04-2014, 01:39 PM
#120
TECH Enthusiast
Thread Starter
iTrader: (5)
Join Date: Aug 2008
Location: Middletown, DE
Posts: 696
Likes: 0
Received 0 Likes
on
0 Posts
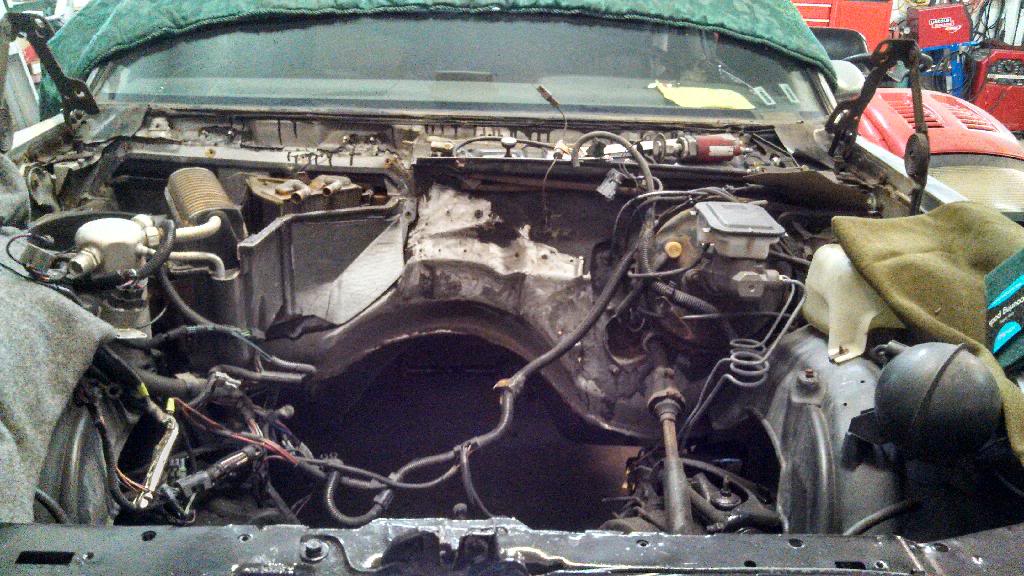
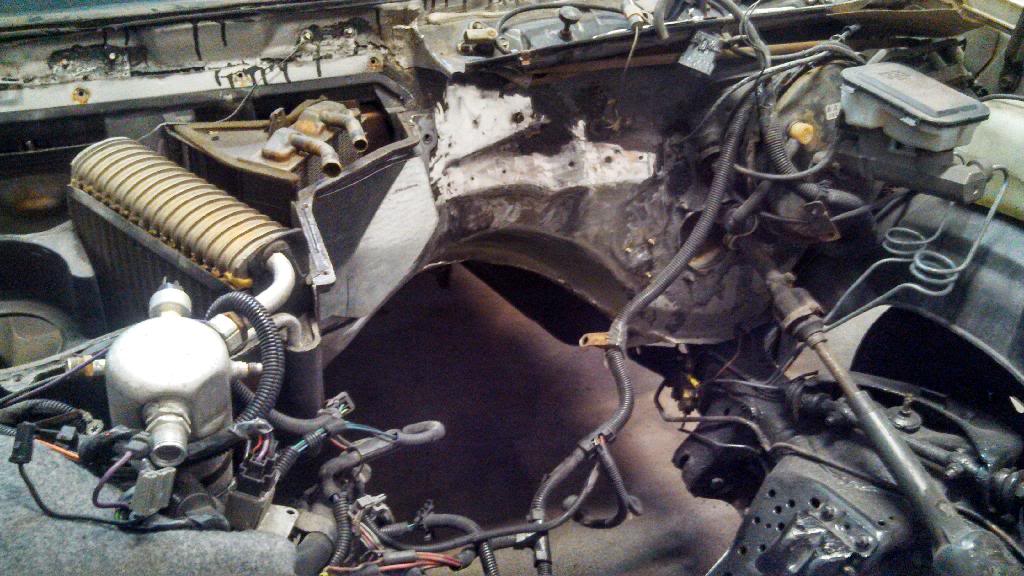
Well, slow progress is better than no progress so here is what has happened since the last update. Since dropping the motor and trans into the engine bay, we found out that the HVAC box needed to be notched so we are just finishing up on that. Notch is coming out pretty good, and following that I have started to strip the firewall of all that junk on the wall. Contemplating pulling the brake booster setup to get more access to the firewall. But for now I will keep at it til that comes up.
I am going to buy the Summit Racing urethane matte black paint to paint the firewall and everything else attached to it. As for the wheel tubs and heater box, any suggestions on adhesive promoter for the paint to stick to the plastic? I did order some feather lite body filler to try and smooth out the firewall a little bit more than it is.
This coming Friday I will be back down there to get more done to the firewall. Hopefully he will be finished up with the notch. Still going to try and get the engine in the car by months end. Really need this project to move a lot quicker since it is going to be February soon enough and than March, April, MAY! lol. Anyways, heres some pictures .....
Before notch
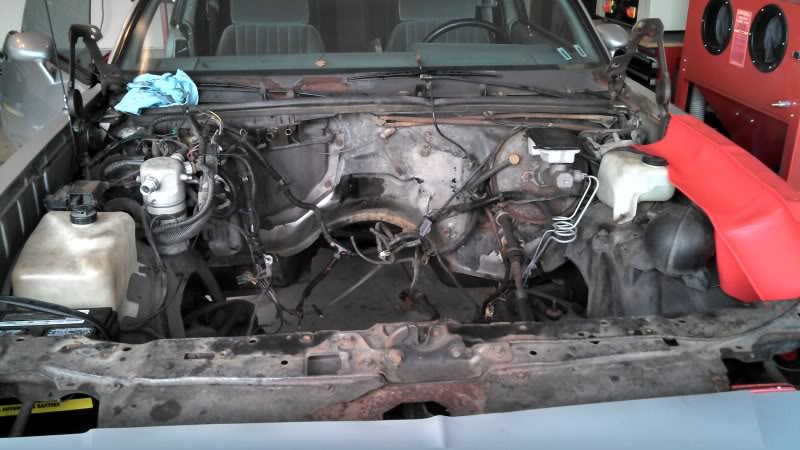
During

Almost after.....

