
1985 Monte Carlo SS 6.2l (ls3) / 4l80e swap
 01-30-2014, 09:03 PM
#121
TECH Apprentice
Join Date: Aug 2010
Location: Melbourne, FL.
Posts: 381
Likes: 0
Received 0 Likes
on
0 Posts
Hey Justin,
Is the notch to clear the #8 coil or do you need it to also clear the valve cover (even without the coil) to keep it from hitting?
Also in your opinion would the TSP headers fit if you went forward an inch or would two tubes (instead of just one) be a problem? From the pic above it looks like it would be close but I figured I'd ask since you were there.
Thanks,
 01-31-2014, 08:17 AM
#122
TECH Enthusiast
Thread Starter
iTrader: (5)
Join Date: Aug 2008
Location: Middletown, DE
Posts: 696
Likes: 0
Received 0 Likes
on
0 Posts

Hey Justin,
Is the notch to clear the #8 coil or do you need it to also clear the valve cover (even without the coil) to keep it from hitting?
Also in your opinion would the TSP headers fit if you went forward an inch or would two tubes (instead of just one) be a problem? From the pic above it looks like it would be close but I figured I'd ask since you were there.
Thanks,
Is the notch to clear the #8 coil or do you need it to also clear the valve cover (even without the coil) to keep it from hitting?
Also in your opinion would the TSP headers fit if you went forward an inch or would two tubes (instead of just one) be a problem? From the pic above it looks like it would be close but I figured I'd ask since you were there.
Thanks,
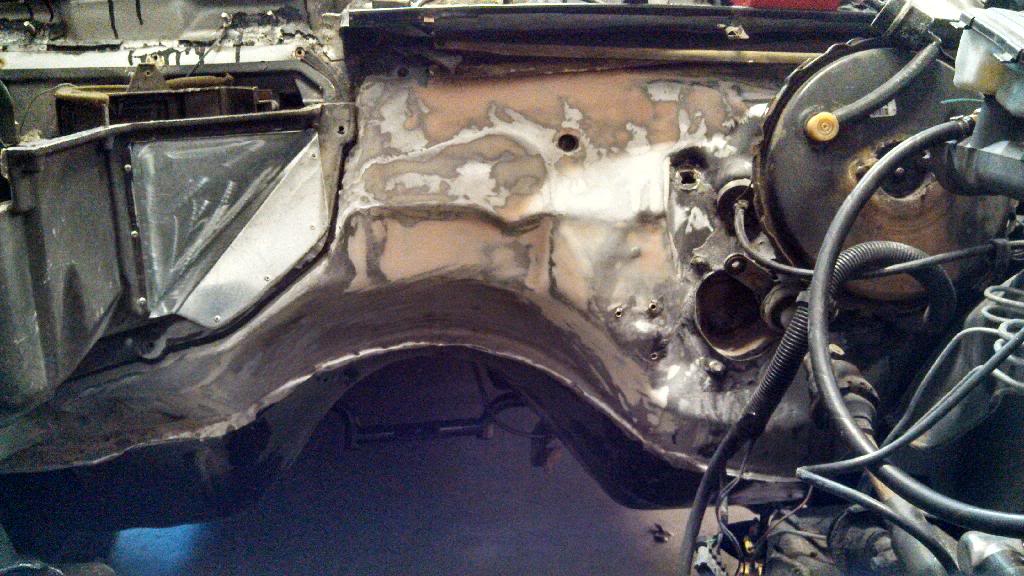
When we initially put the motor in for mock up, the one bolt we had holding the chain to the back of the head hit the box when installing. The valve cover iirc was close but not hitting but one of the mounting nubs on the cover for the coil pack brackets was just about touching. Could we have mounted it and maybe cleared ,possibly, but I wanted extra clearance just for additional room if needing to remove anything .
As for the headers, I am not totally sure to be completely honest. We only had it in there. For maybe 10 minutes and than yanked it back out .....he wanted to be out if the garage quickly so we had to haul *** pulling the drive train back out. All I can say is if you have time to wait we are still finishing up the notch and painting. So hopefully by The second week of February the motor and trans will be in for good.
01-31-2014, 11:53 AM
#123
TECH Apprentice
Join Date: Aug 2010
Location: Melbourne, FL.
Posts: 381
Likes: 0
Received 0 Likes
on
0 Posts
Thanks for the response. No hurry here. My car is getting the paint done now and I have two other swaps in front of mine that need to be finished so a couple of weeks won't kill me for sure.
Regards,
Regards,
02-06-2014, 06:36 PM
#124
TECH Enthusiast
Thread Starter
iTrader: (5)
Join Date: Aug 2008
Location: Middletown, DE
Posts: 696
Likes: 0
Received 0 Likes
on
0 Posts
Well today was the day I have been waiting for the entire month of January.....and it finally happened. Worth the wait in a sense I guess, right? lol. Well Monday I have off so we plan to drop the drivetrain in and bolt it down so the real work can start going. Anyways, here you go, I will let the pictures speak for themselves.
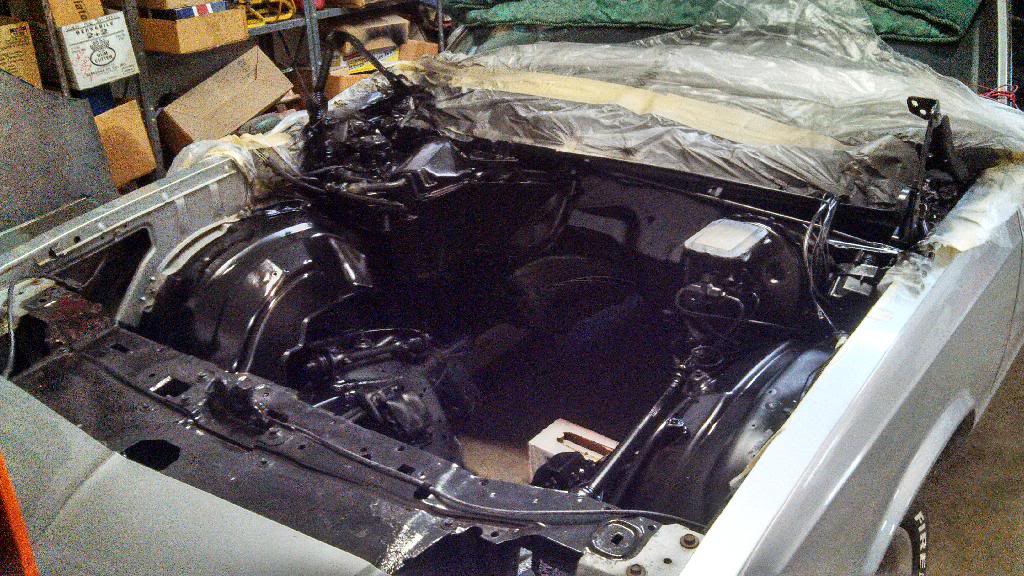
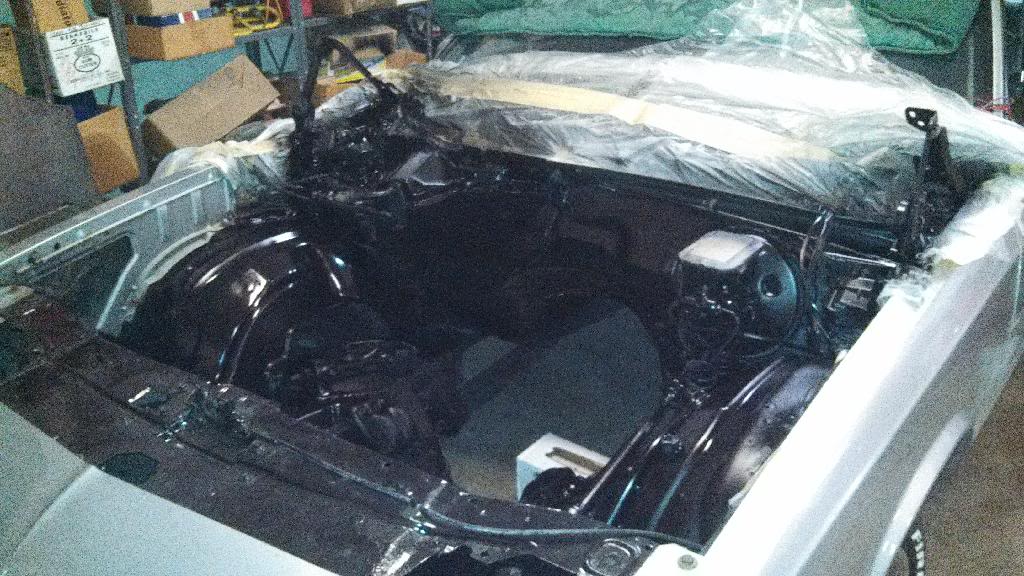
Well, theres the progress but I am completely pleased with the Summit Racing brand single stage paint. Well worth it. Anyways, hopefully Monday night will have the motor and trans in for good.


Well, theres the progress but I am completely pleased with the Summit Racing brand single stage paint. Well worth it. Anyways, hopefully Monday night will have the motor and trans in for good.


 02-20-2014, 07:02 AM
#132
TECH Apprentice
Join Date: Aug 2010
Location: Melbourne, FL.
Posts: 381
Likes: 0
Received 0 Likes
on
0 Posts
Hi Justin,
When you get a chance please update on the clearances of the TSP headers. I'm curious if I go a little further forward than you what problems I should expect.
Thanks,
When you get a chance please update on the clearances of the TSP headers. I'm curious if I go a little further forward than you what problems I should expect.
Thanks,
02-20-2014, 07:51 PM
#134
TECH Enthusiast
Thread Starter
iTrader: (5)
Join Date: Aug 2008
Location: Middletown, DE
Posts: 696
Likes: 0
Received 0 Likes
on
0 Posts
Docked wage, from what we can see the headers should fit with the motor in the stock location but some areas will be very close and or need to be clearanced.
As for today we got the motor mounts welded the trans dipstick bushing installed and the c clips for the trans cooler lines installed. I also started pulling 3/4 of the stock fuel lines and they are the biggest PITA in some spots.
Heading back Monday to finish painting parts pulling the rest of the stock fuel lines . Friday install painted parts and start routing the new fuel lines
02-21-2014, 06:52 AM
#135
TECH Apprentice
Join Date: Aug 2010
Location: Melbourne, FL.
Posts: 381
Likes: 0
Received 0 Likes
on
0 Posts
Thanks Justin. I wanted to make sure they would be good as I will order them and they will sit around for a few months before I can get the swap going. Don't want to deal with any return hassles down the road.
Thanks again,
Thanks again,
03-01-2014, 03:39 PM
#136
TECH Enthusiast
Thread Starter
iTrader: (5)
Join Date: Aug 2008
Location: Middletown, DE
Posts: 696
Likes: 0
Received 0 Likes
on
0 Posts
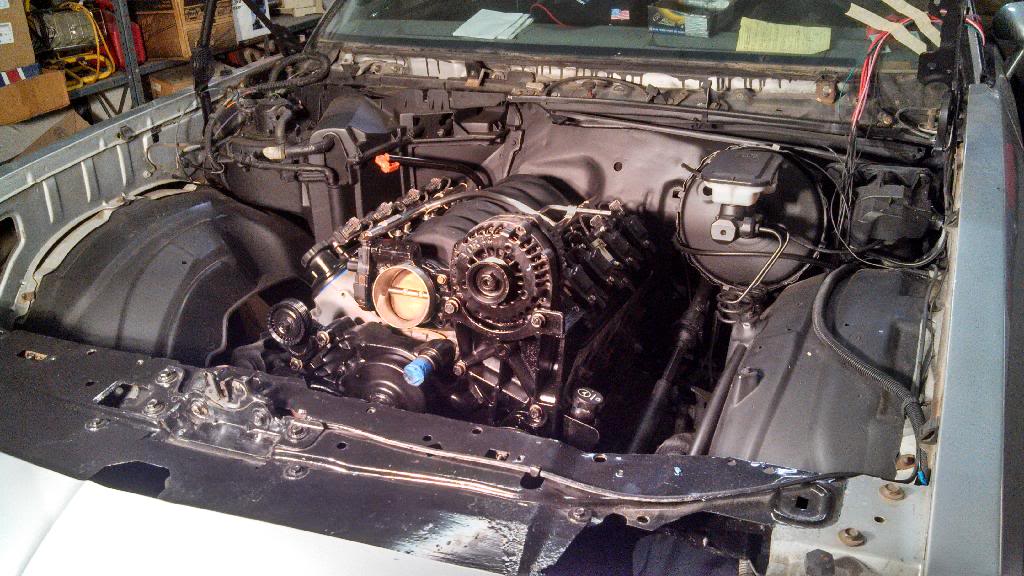
Well, made some progress the last few days down there. Motor mounts are welded and painted, old shift linkage is out and new one is in (due to a yank job on the removal of the shifter linkage causing a new one to be ordered), and a lot of small parts painted. From my perspective in the past, it seemed like nothing got done but now that you think about it, all this little stuff is good to get out of the way now and not worry about it later one.
But anyways, on top of the drivetrain being installed fully, I went ahead and took off the intakes fuel rails polished them up (loads of difference) and cleaned the intake as much as I could with simple green. After that, we installed the newer injectors and bolted down the intake. I got a nice set of bolts off eBay that really look nice on the motor replacing the stock style bolts to clean up the look of the motor.
Once that was done, it was time for painting. Went a head and bit the bullet in purchasing a new GM PS pump and Alternator. CLeaned those guys up on top of the throttle body, Valve covers, Water pump, Tensioner pulley, Alternator bracket Crank pulley, and the Z bar for the shifter to than paint.
So now the motor is all buttoned up besides the A/C which I plan to do later down the road and now I can focus on getting the rest of the shift linkage dialed in and move on to the gas pedal. Once my guy is done fabbing the pedal, me and my buddy Mike can move into the cabin and start pulling the gauges for the new gauges that are yet to be ordered.
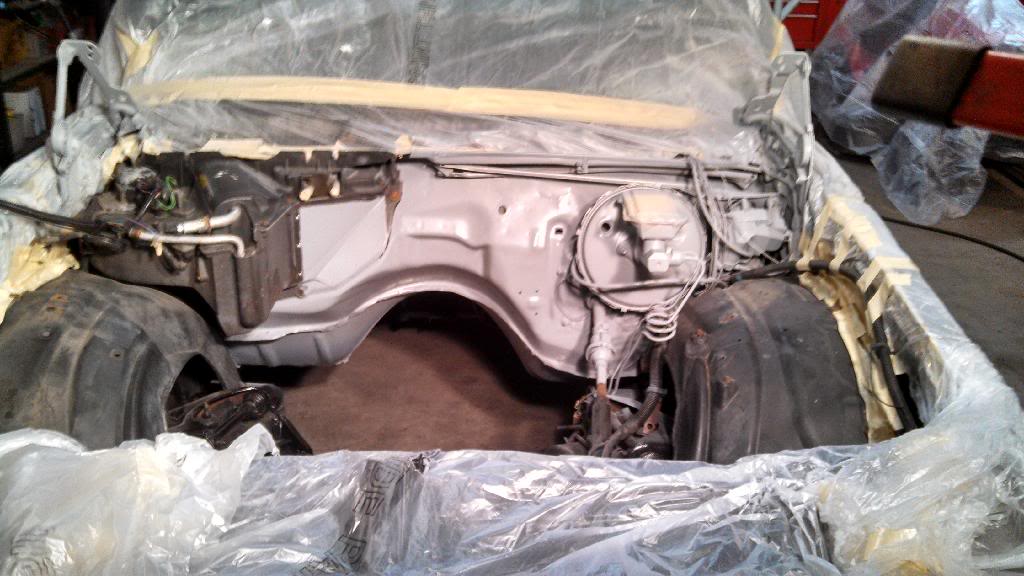
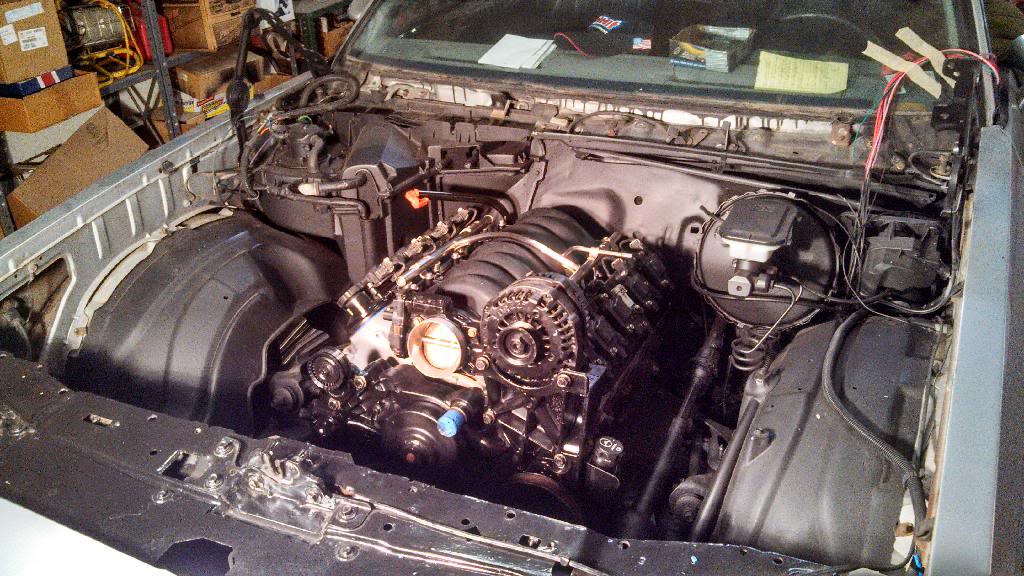
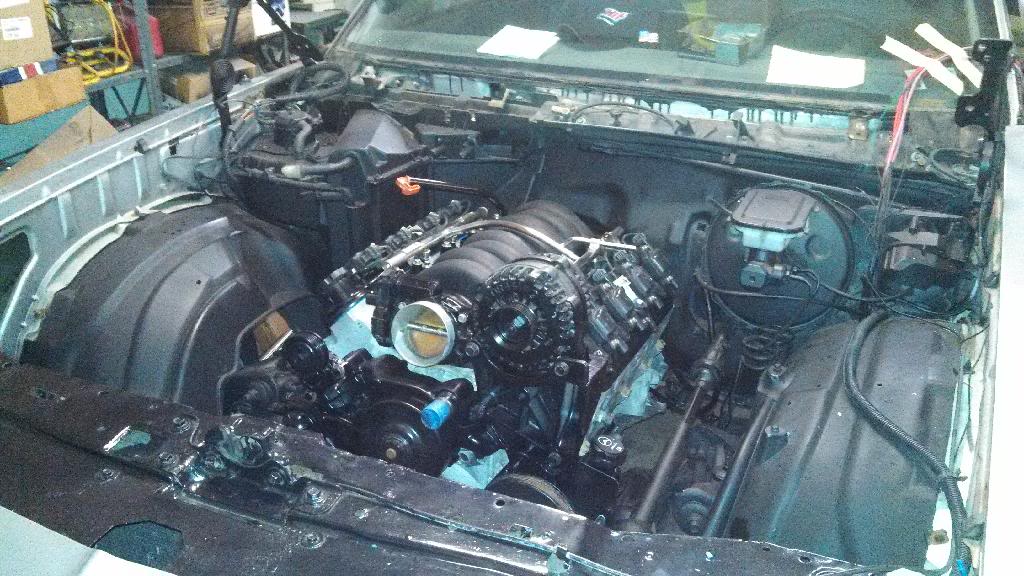
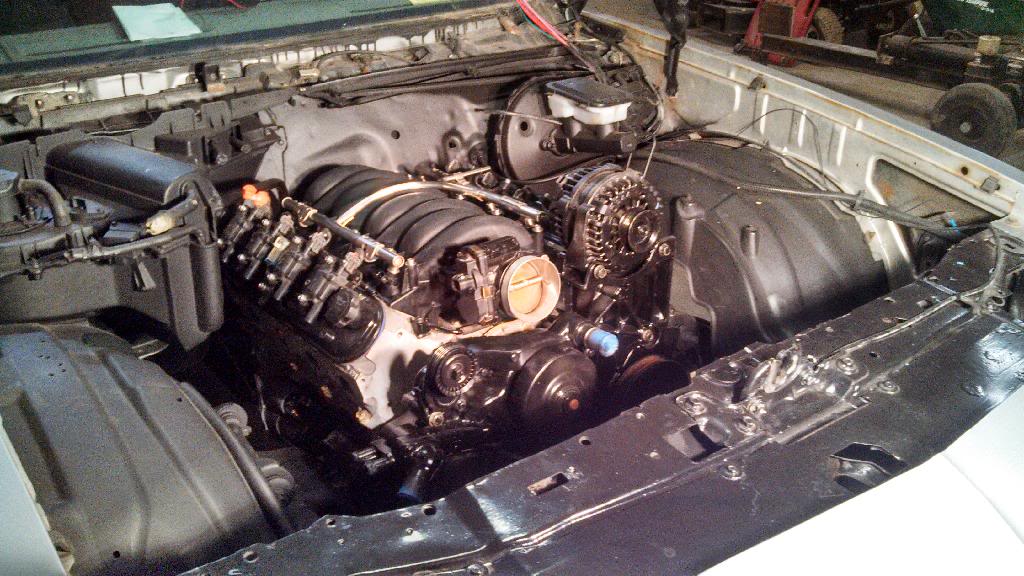
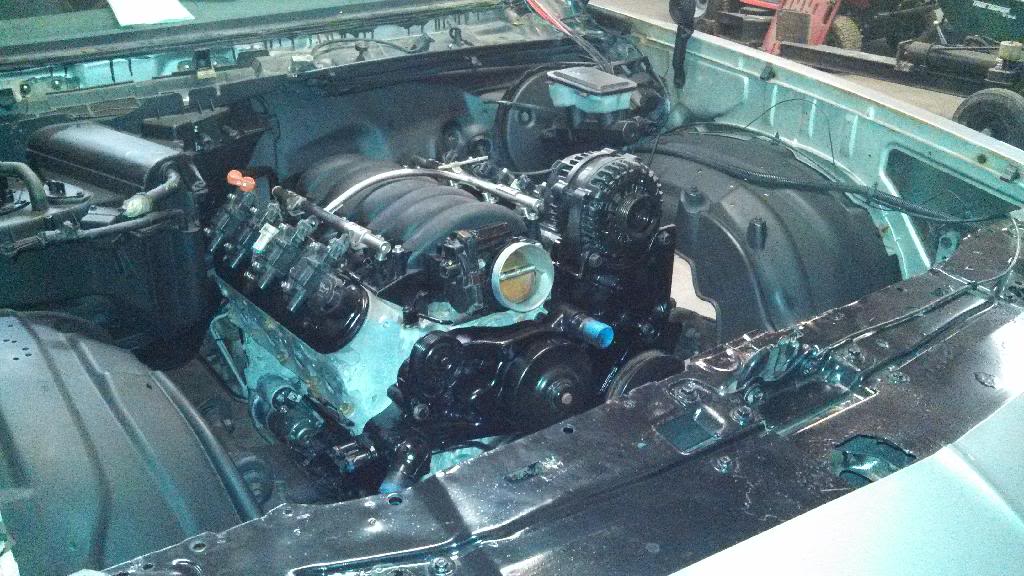
In the mean time, I am going to try and source out two lower radiator rubber mounts and start working on the cooling system and get that figured out. After that, fuel lines (which I need help on what fittings to get with my -6 AN fitting setup and SS flex hose) and start laying out the wiring. Than reinstall the headers and lets try and see if this pupppy will fire! But I am getting ahead of my self....lol ANyways, heres some pictures to hold you over.
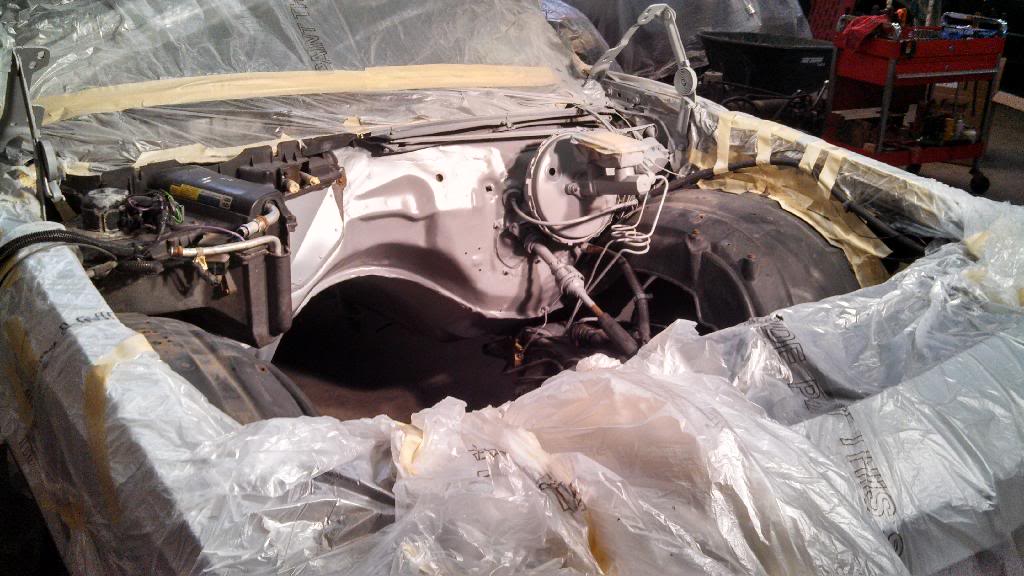
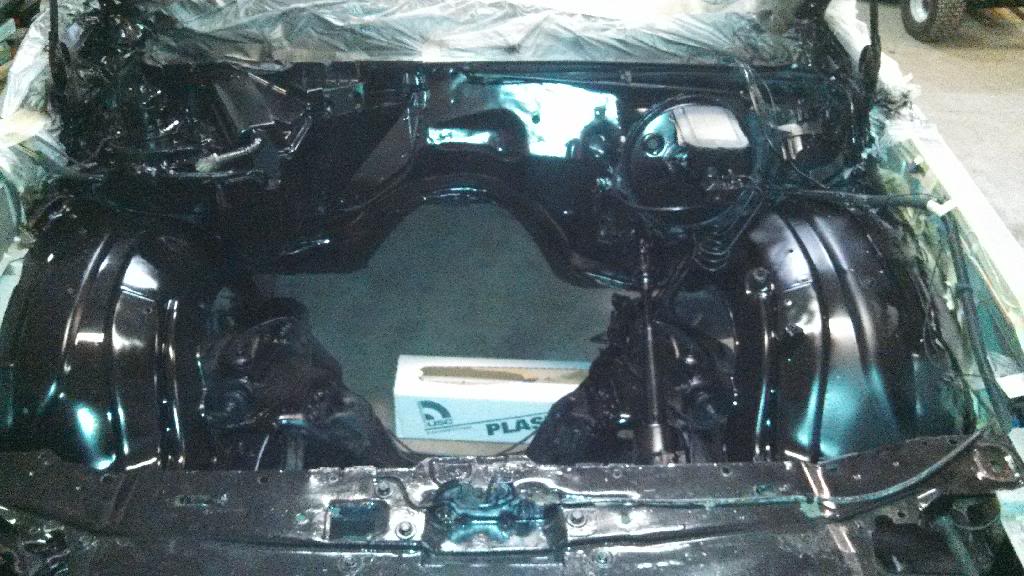
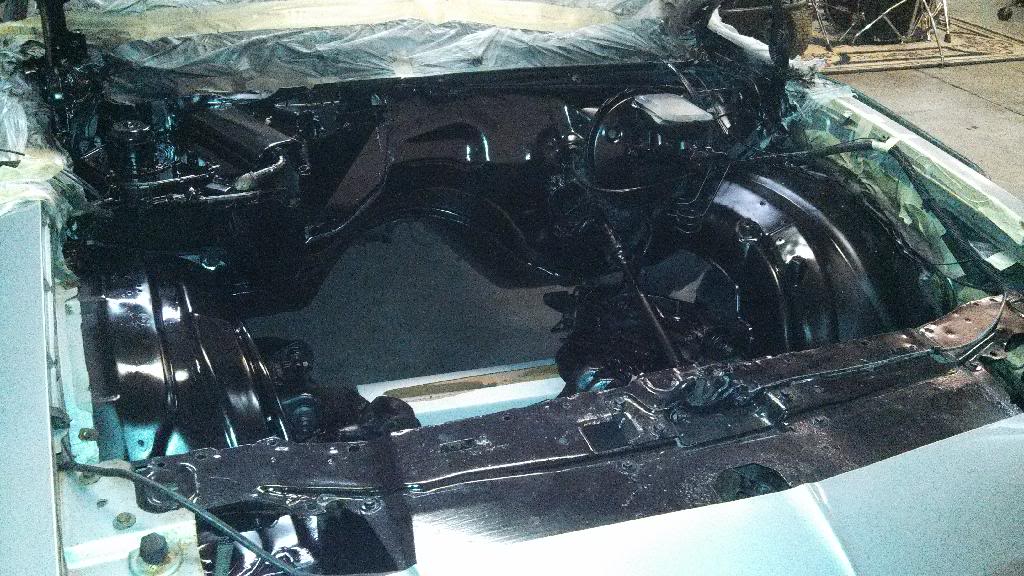
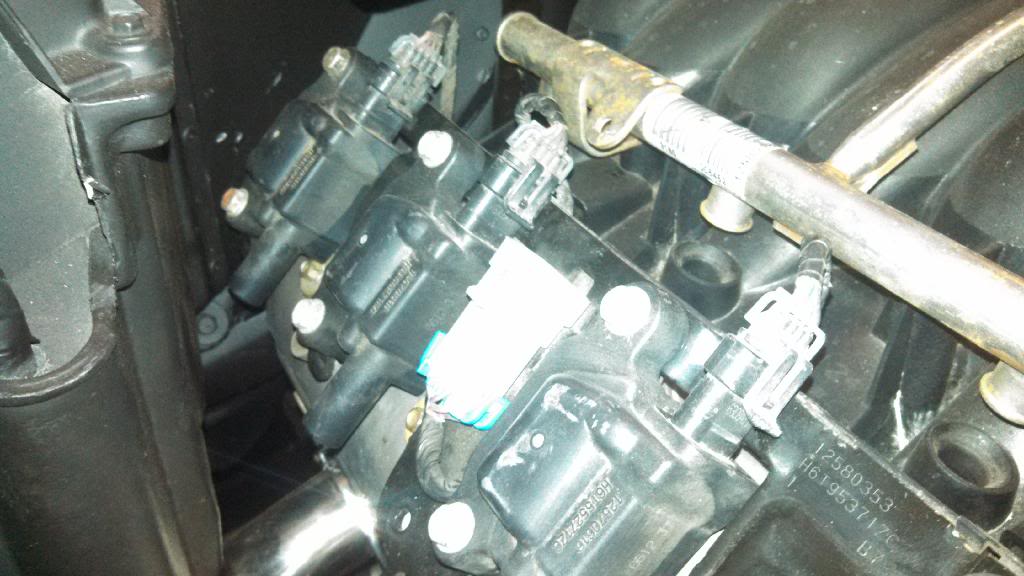
Coil packs installed
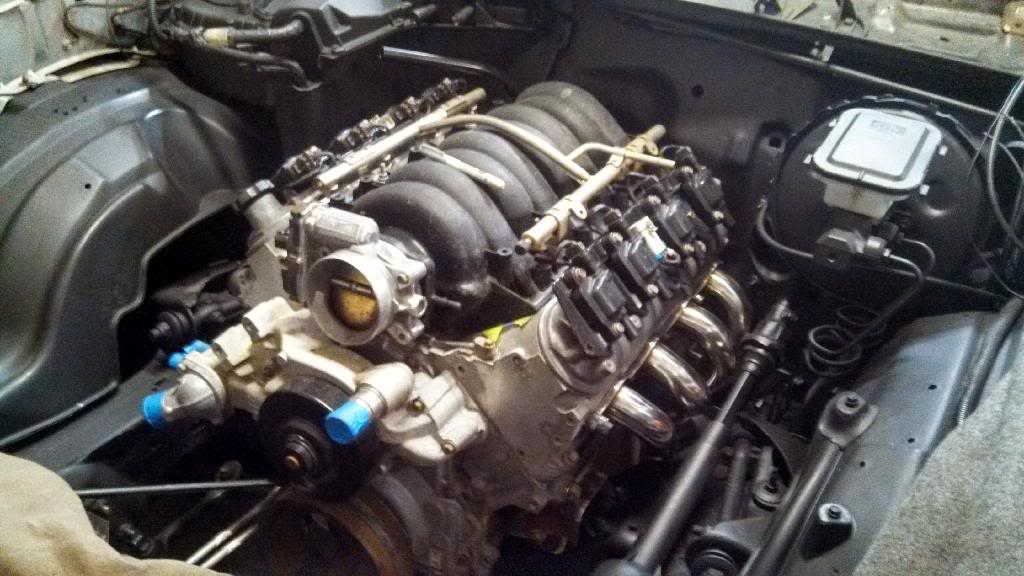
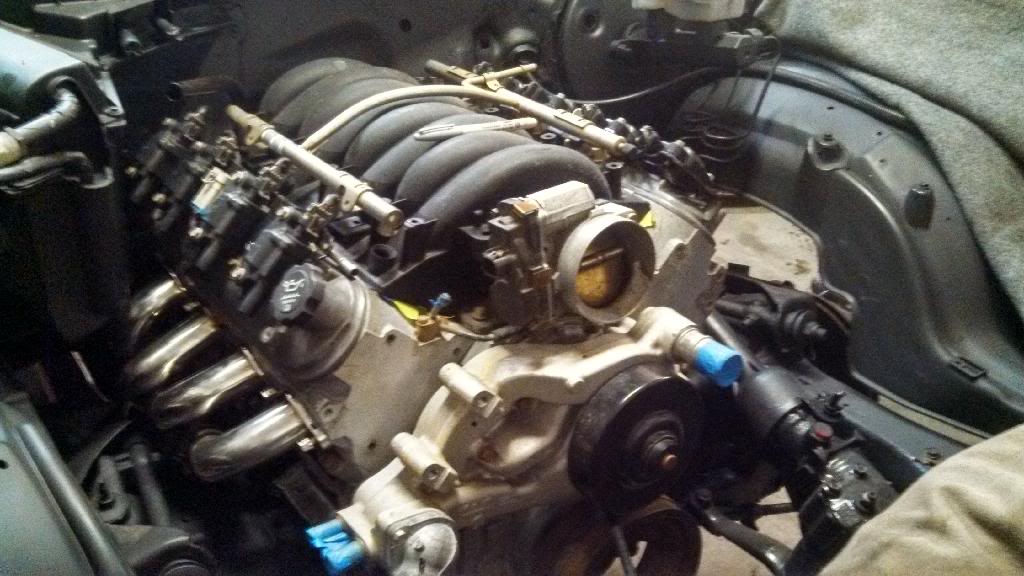
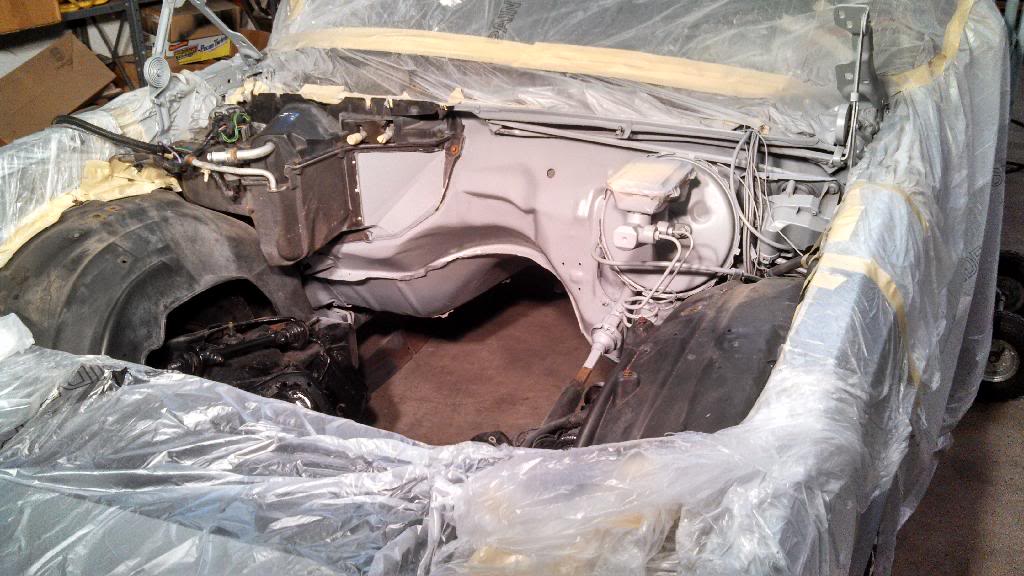
Stock 2500 HD 4l80e dip stick tube clears with a little more than 1 inch motor mount set back with us moving engine back a little more than a inch
Coil pack clearance to A/C box notch. Only other thing needed was cut off the rear bracket on a straight angle along side the rear most coil and it clearances no problem.
Painted
So my next question is, is there a prefered style of AN fittings that work better than others or no? I already have three fittings off the FPR from my buddy so I just would need the one off the fuel rail ones to that fitting I guess, to the three fittings on the FPR and 2 for each line off the sending unit?
Newbie here so need the help! lol
But anyways, on top of the drivetrain being installed fully, I went ahead and took off the intakes fuel rails polished them up (loads of difference) and cleaned the intake as much as I could with simple green. After that, we installed the newer injectors and bolted down the intake. I got a nice set of bolts off eBay that really look nice on the motor replacing the stock style bolts to clean up the look of the motor.
Once that was done, it was time for painting. Went a head and bit the bullet in purchasing a new GM PS pump and Alternator. CLeaned those guys up on top of the throttle body, Valve covers, Water pump, Tensioner pulley, Alternator bracket Crank pulley, and the Z bar for the shifter to than paint.
So now the motor is all buttoned up besides the A/C which I plan to do later down the road and now I can focus on getting the rest of the shift linkage dialed in and move on to the gas pedal. Once my guy is done fabbing the pedal, me and my buddy Mike can move into the cabin and start pulling the gauges for the new gauges that are yet to be ordered.
In the mean time, I am going to try and source out two lower radiator rubber mounts and start working on the cooling system and get that figured out. After that, fuel lines (which I need help on what fittings to get with my -6 AN fitting setup and SS flex hose) and start laying out the wiring. Than reinstall the headers and lets try and see if this pupppy will fire! But I am getting ahead of my self....lol ANyways, heres some pictures to hold you over.
Coil packs installed


Stock 2500 HD 4l80e dip stick tube clears with a little more than 1 inch motor mount set back with us moving engine back a little more than a inch
Coil pack clearance to A/C box notch. Only other thing needed was cut off the rear bracket on a straight angle along side the rear most coil and it clearances no problem.

Painted


So my next question is, is there a prefered style of AN fittings that work better than others or no? I already have three fittings off the FPR from my buddy so I just would need the one off the fuel rail ones to that fitting I guess, to the three fittings on the FPR and 2 for each line off the sending unit?
Newbie here so need the help! lol
 03-02-2014, 09:42 PM
#139
TECH Enthusiast
Thread Starter
iTrader: (5)
Join Date: Aug 2008
Location: Middletown, DE
Posts: 696
Likes: 0
Received 0 Likes
on
0 Posts
I don't have a picture of it on all fours, but you can see the one view of the collectors height compared to the frame under the doors. Seems that they are for a Camaro, they shouldn't hang down very much if any below the frame rail.
03-02-2014, 09:43 PM
#140
TECH Enthusiast
Thread Starter
iTrader: (5)
Join Date: Aug 2008
Location: Middletown, DE
Posts: 696
Likes: 0
Received 0 Likes
on
0 Posts
the motors actually set back more than an inch, we actually well did the motor mounts to the adapter set back plates. It's probably an inch and a third to an inch and a half set back now. But everything clears, I can still get to all the bell housing bolts.