When you click on links to various merchants on this site and make a purchase, this can result in this site earning a commission. Affiliate programs and affiliations include, but are not limited to, the eBay Partner Network.
I am in true amazement and thoroughly impressed at the work you have been able to accomplish. I admire your work and have been following this thread for only a few days, but I have read it all. I am in the same boat you are. I recently replaced my entire brake system (chrome booster/master/prop, stainless hardlines, steel braid hoses, slotted and drilled rotors/pads/drums/shoes, etc...) and electrical (HID & LED lighting/plugs/cables/starter/alt/bat) for the most part. I have started to gather all new suspension and steering components (spindles/control arms/ jeep shaft). I am also interested in doing a lot of the work you have been able to accomplish. What do you do for a living? Are you a mechanic? or just a savvy DIYer? Either way you provide me with more inspiration that I can too complete these jobs on my own. Thank you and keep up the great work!
Well I got the rear suspension pulled in a couple hours earlier this week.
What a mess, gotta clean and organize sometime soon.
All apart; I'll pull it outside flip it and then clean the bottom at some point.
The "local" blaster has a couple week back log so I'll be stuck until then.
Jessica
**Edit**
I got my Dad to come over and help me flip the frame; I spent a good few hours scrubbing and pressure washing the top and bottom of the frame. There isn't any thick nasty grease or grime on it anywhere and I think its just about ready to head off to the media blaster.
When it gets back (not sure on a schedule yet) I'll box the center section of the frame, build some bracing, and maybe notch the rear for tire clearance.
I am in true amazement and thoroughly impressed at the work you have been able to accomplish. I admire your work and have been following this thread for only a few days, but I have read it all. I am in the same boat you are. I recently replaced my entire brake system (chrome booster/master/prop, stainless hardlines, steel braid hoses, slotted and drilled rotors/pads/drums/shoes, etc...) and electrical (HID & LED lighting/plugs/cables/starter/alt/bat) for the most part. I have started to gather all new suspension and steering components (spindles/control arms/ jeep shaft). I am also interested in doing a lot of the work you have been able to accomplish. What do you do for a living? Are you a mechanic? or just a savvy DIYer? Either way you provide me with more inspiration that I can too complete these jobs on my own. Thank you and keep up the great work!
Thanks! I'm on a budget so I tend to just decide to try doing things myself and I find a lot of times it cheaper to buy a tool or a used setup and do something myself instead of having it done. Of course there are some things I don't feel like trying or are not going to be cheaper to do myself so I figure out the best way to get them done for me.
I really want to replace all my old suspension parts with tubular arms and stuff but I'm not sure if that will happen now or if I'll revisit the suspension later. I figure I can always take all the front suspension and put it on my S10 (it has 190K miles and other than 2 parts I've replaced it is all original). I redid all my bushings and ball joints (with polyurethane and moog parts) back in 2004 and new shocks in 2007 and I've only got less than 40K miles on these parts.
I hear ya loud and clear! I recently completed a full brake system with a mechanic buddy of mine. (chrome booster/master/ and prop valve/ stainless steel hardlines and braided hoses/ slotted and drilled rotors, and new drums shoes etc.) I also took out my AC. It wasn't even hooked up and was garbage so I'm going to delete it.
I have several projects in the works! I have new control arms upper and lower with energy suspension bushings and ball joints. I also have new spindles to throw on. I'm waiting to get my drop springs and bilstein shocks before throwing it together. I already did the jeep steering shaft upgrade and soon to get the MCSS quick ratio box.
You should also check out some bracing. I picked up some fender braces in the engine bay from a buddy of mine who owns a GBODY salvage yard (ctgbody.com). He's great for info and parts. also look into these:
Rear Shock Tower Brace:http://scandc.com/new/node/997
Heavy Duty Chassis Brace: http://scandc.com/new/node/632
check em out and let me know what you think!?
Yeah I am debating on if I want to do the suspension and steering stuff now or just get this all back together quick and start reassembling the car.
I've got a full set of steering parts in may attic but I'm not sure I'll really want to use stock replacement stuff or go aftermarket fancy things. I really would like the car to handle better but its a pretty involved process with g-bodys.
I've got the full F41 suspension and large sway bars I pulled at the junk yards back in the day but I think I'll be doing some further modifications and bracing. I like that rear shock brace, I'm thinking of building one like that with two bars that tie into the top of the crossmember to create a triangle. I think I can make something ok with the tools I have. Plus I'm still thinking a small frame notch would be good for tire clearance and not hurt the overall stiffness of the frame. Like I said I'd rather have a car that can handle than a car that just goes in a straight line.
Well I'm probably not going to get the frame blasted till after the holidays so I've decided to focus on making the mounting points for the shifter, parking brake, console, and dash. This is as far as I got. First I thought I'd locate the shifter based on the seat; then I realized the front of the console needs to be located from the lower dash (there is some wiggle room there but its got to be close).
Its literally just sitting in there and it fits like a glove
I'm also thinking of using the Camaro steering column; I won't be using the wheel though. I really want to go with a Sparco 3 spoke wheel. The advantage of the steering column from the Camaro is that they are easier to get and are all floor shifts with tilt. Its about impossible to find a reasonable priced floor shift tilt column for a G-body.
So progress on the dash install.
I want to get all the welding and bracket making done before I start to finish up and paint the interior or bottom of the pans.
The Camaro column bolts up to the hanger just fine. The firewall flange is different and the black brace from the Camaro needed some grinding to work. The sides of the brace are totally different and will need a lot more work.
Here the brace fits, once its made narrower on both sides and then new tabs are bent and welded onto it.
So now the dash can be bolted back onto that brace and it can bolt up to the factory El Camino mounts. I've still got to figure out the top mounts under the glass. I also have a large gap under the dash above the console but I think it looks fine, if anything I could hang some gauges there if I needed them in the future (boost gauge, maybe?). The only other issue is the gap near the door by the fuse box cover, Its equal ly bad on the other side but I guess I can fill it with a piece of ABS.
As you can see everything pretty much fits how it should. The console and shifter stuff is just sitting in there at this point. I need to decide what shifter I'll be using (not sold on the LS1 stock shifter) and then I can finish that all up.
Thats where I left it, I pulled everything but the dash back out and I'm going to work on the upper dash mounts then I'll work on the console mounts. I'll figure out the firewall side of the column mounting once I have the frame under the car and know where the steering box is so I don't mount it pointing at an odd angle.
Time for the weekly update on the small progress of the car
I finished mounting the dash, I made some brackets to adapt the mounting holes on the top of the dash to the firewall of the car.
So nothing has been seriously changed or permanently modified.
So I made up 4 of these and they are a complete pain in the neck to do. When I pull the dash I'll grind the welds and corners down and paint them up.
I started to work on mounting the console and other stuff. I made a little bracket that I spot welded to the tunnel. Its pretty sturdy and the back of the console is now mounted where it should be and I can use it and the dash to figure out where everything else needs to mount.
As you can see because of the shifter the front of the console has to be pretty high off the tunnel. That works well because it makes it more comfortable and I can just make up some side panels to fill the gaps. I'm going to mount my window switches in the ash tray so I'll need to be able to reach them easily.
I tried to start mounting the shifter and something with my mount went wrong and it needed a lot of hammering on the bracket to fit and in all honesty I'm not pleased with how it looks or fits so I'll be cutting it out and trying again. So there isn't a picture of it
Having the shifter mounted in the car made me remember why I really didn't like it in the Camaro I had. Its just not a very solid shifter and the detentes are sloppy and the lockout isn't all that great either. So I may cut my mount out and hold off till I get a ratchet shifter I really like and I'll fab my mounts up to fit that. My plan at this point is to just try and do the best job I can so I only have to do things once on this project.
The weather here has been pretty cooperative lately so I've been working on the frame a little. I spent about 2 hours with a wire brush on an angle grinder and I've got most of the front clip of the frame stripped.
There was a ton of gunk on the front of the frame even after pressure washing it twice and soaking it in simple green and degreaser. I think all those years of oil leaking kept the frame rust free though
I can't fit an angle grinder into all the crazy spaces on the frame so I'll still have to blast some of it. If the weather holds and I get both the top and bottom finished with the grinder I'll try to get some blasting done.
The C-channel section took a ton of time, but I think it must have had two cots of paint, undercoat, rust, spray paint and junk on it.
I spent about 3 hours today working on the rear section. I got one side finished but its windy and about 40* or less outside so that puts a damper on this project. No amount of bundling up or music on the head phones can help in the long run
So I'll hit it again tomorrow if I can and then it'll be ready to flip and I can get started on the top
I also picked up 300 pounds of blasting media so I can hit the spots I can't get to with the grinder with that.
I'm getting super excited to start welding and finishing the frame.
Jessica
Oh also I can't believe the factory welds! I have always been worried my welds aren't up to snuff, but these things make mine look like works of art! I'm probably going to grind and fix some of the worst ones.
Well I finished going over the frame with a wire wheel.
I had my Dad come out and help me flip it over last night. I had all the intentions of trying to get the other side started/finished today and then this happened!
So I'm on hold with cleaning until this white stuff disappears
So here is what I'm starting with on the top of the frame. It looks to have a lot less undercoat and since I already did the sides and the bottom so the top should get finished really quick! The front frame horns I already did while it was still under the body.
We've got some nice weather here through the weekend; I'm really hopeful I can get this thing blasted and start welding.
Got an hour to work on the car this weekend; not too great of weather and I've been slammed with work and thats keeping me away during the nice days we've been having so far this year. Its also so darn cold in my garage it really limits how long I want to be out there. Also as an added bonus at this temp paint just doesn't dry right/at all so I'm kind of dead in the water for the foreseeable future (and I just need to complain about it apparently).
Here is what I was able to do:
It at least makes me really happy that the frame is looking this amazing all clean and ready for paint
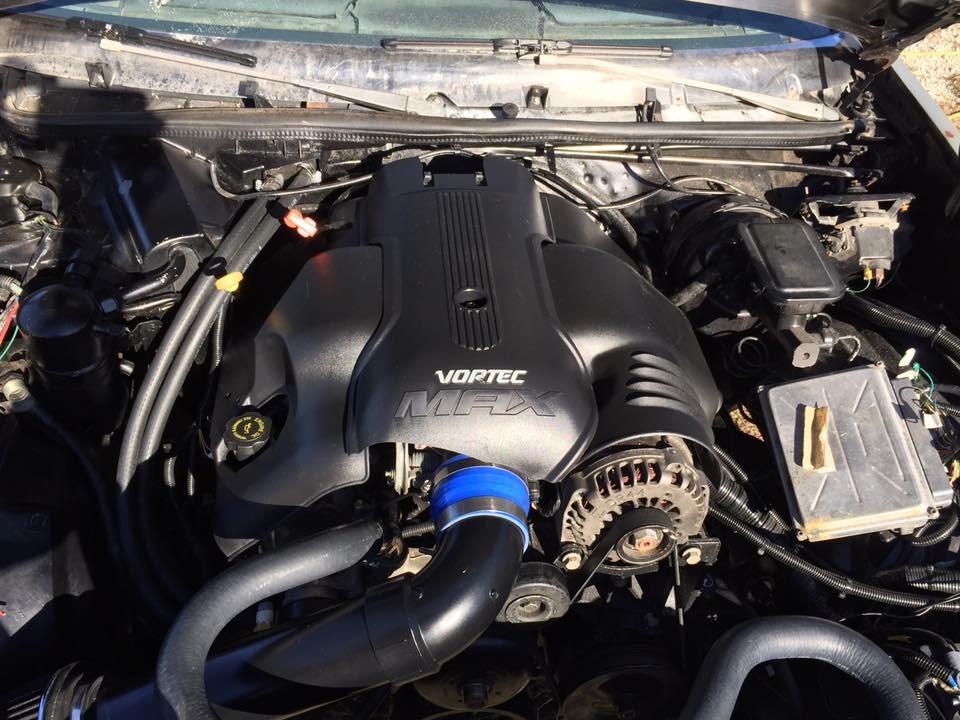
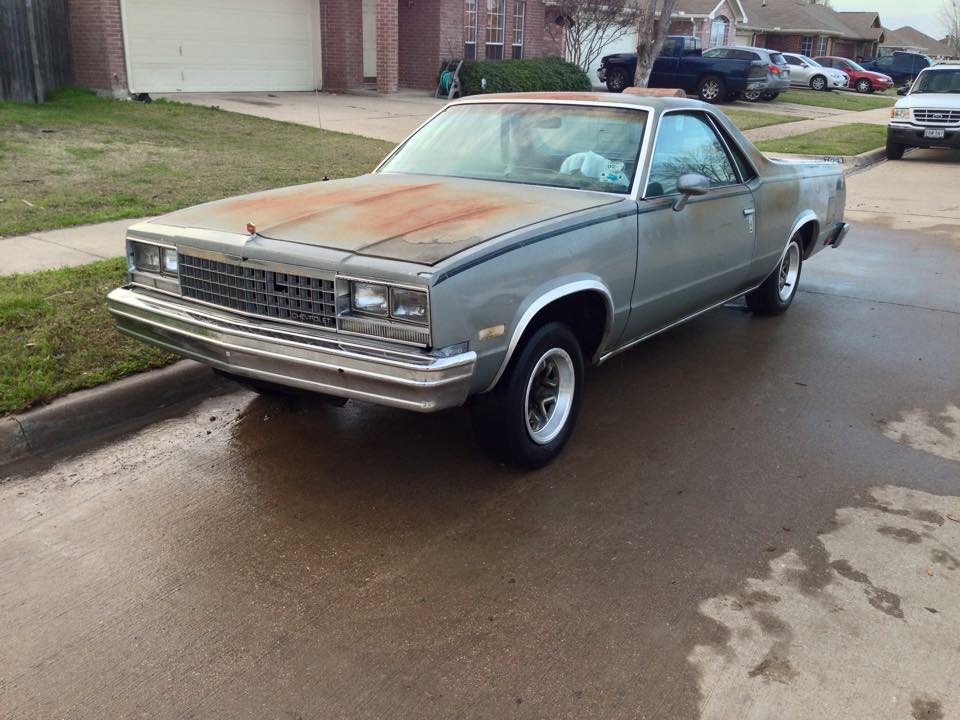
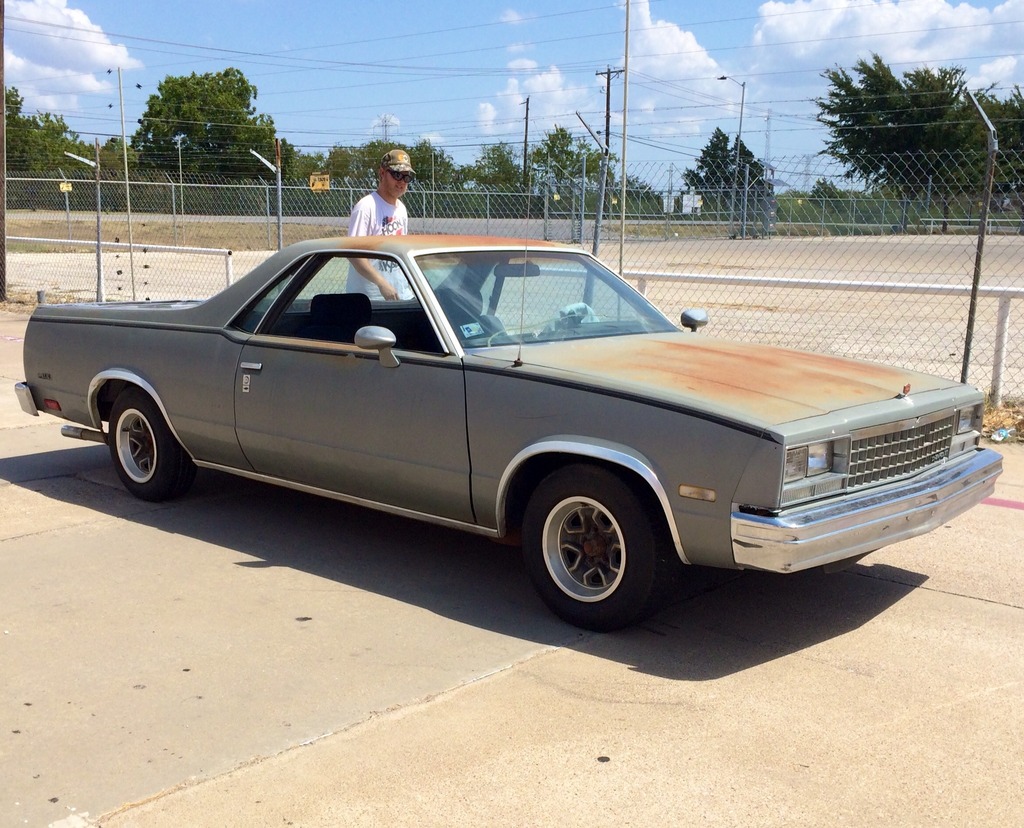
just finished my 83
heres a couple pics of it.
its a fresh 5.3/4l60e
z06 cam
truck accessories.
gets 20mpg
maybe this is motivation?
you're doing a great job can't wait to see yours finished!!!
just finished my 83
heres a couple pics of it.
its a fresh 5.3/4l60e
z06 cam
truck accessories.
gets 20mpg
maybe this is motivation?
you're doing a great job can't wait to see yours finished!!!
Yeah thats really great motivation! I'll have to maybe send you a message as I get closer to figure out how you handled some of the issue I'm running into. I'm still unclear on how I'll go about doing the fuel system. I've got a lot of the big parts figured out but I've not got a concise plan yet.
I love the rough exterior and that really nice and black engine bay, very cool
thanks man, i plan to put some nice wheels on it and flat clear over the patina ( people are starting to dig that more and more)
fuel's easy.
i bought a caprice tank (suppose to buy caprice wagon tank) but i bought a intank walbro 255, ran the feed to a corvette filter/reg. at the stock location of the fuel filter. returned back to tank, then used the hardline that was already there to the front, then -6 hose to the fuel inlet on the truck intake, easy
thats how i do all my swaps
obviously if you plan to make so power you would do it differently, but for stockish applications like mine it works
Love the build, always wanted an Elky. What I like best, is taking the build to a different level by swapping in a different dash to make it different. This ride will truly be a one of a kind. Sorta what I did with my Ranger by closing up the rear cab side windows. Makes it different.
Cleaning all the crude from the frame sucks huh? I'm curently stalled at cleaning the under floor of the cab to prep for paint, just can't get motivated to do it. Then the frame next, uggh.
thanks man, i plan to put some nice wheels on it and flat clear over the patina ( people are starting to dig that more and more)
fuel's easy.
i bought a caprice tank (suppose to buy caprice wagon tank) but i bought a intank walbro 255, ran the feed to a corvette filter/reg. at the stock location of the fuel filter. returned back to tank, then used the hardline that was already there to the front, then -6 hose to the fuel inlet on the truck intake, easy
thats how i do all my swaps
obviously if you plan to make so power you would do it differently, but for stockish applications like mine it works
This sounds exactly like what I have planned. I've got a 4.3L fuel injected elky tank and a sender unit that has a supply and return and vent as well as a corvette filter/reg. Its setup for an intank pump. I was planning on using a walbro or similar. I'm stuck on how to adapt the fittings on the sender to -6an lines. At this point I'd still love to make a bunch of power but I think I just want to have a good running NA engine. If that filter regulator is a limiting factor I'll deal with it after its running Its been in pieces for just over a year now and I am really hoping to get as a roller this spring or summer.
Love the build, always wanted an Elky. What I like best, is taking the build to a different level by swapping in a different dash to make it different. This ride will truly be a one of a kind. Sorta what I did with my Ranger by closing up the rear cab side windows. Makes it different.
Cleaning all the crude from the frame sucks huh? I'm curently stalled at cleaning the under floor of the cab to prep for paint, just can't get motivated to do it. Then the frame next, uggh.
I hear you on cleaning! I refuse to do any more wire wheel or scraping work inside my garage. I already had to move everything (and I mean all my big tools compressor, bench, etc) to mop the entire floor after I did my floor pans. It was so nasty in the garage you couldn't touch anything on the floor without looking like you fell in a vat of oil. I've got the majority of my frame stripped but we've been getting some pretty solid rain the last few weeks and between that and traveling for work I'm pretty well stalled. I think I've got another 3 or 4 hours left before I'll have the frame all stripped of old junk and ready to blast.
I got sort of lucky with my floors I guess, I had to cut out the majority of them and that was the messiest section. The rear is mostly dry and still painted in red oxide.
That sounds cool with a ranger to have the back windows closed. kind of like a secure sleeper cab. I hope my dash turns out alright in the end, I spent less on it, the console, and the column than a GPS/electronic speedometer so I look at it as a good investment just in regards to having gauges that work with the new PCM.

 11-12-2015, 02:46 PM