

My track/street 240sx LS Swap

 01-14-2014, 07:21 PM
#203
On The Tree
Thread Starter
iTrader: (2)
Join Date: Nov 2012
Posts: 117
Likes: 0
Received 0 Likes
on
0 Posts
Alright so I've been way over due on an update so I'll get right to it!
400lph walbro installed

I finished the chassis harness. It tucks away nicely inside the car. I still have to tape it up and get some wire loom on it.


I started plumbing my intake but it still needs a little trimming

And I decided to go a different route with the headlights again, instead of the buckets I am going to do something like this


And this requires a hood from a silvia (japanese 240sx) so I picked up one of those.

Finished up most of my engine bay harness. I deleted the whole passenger side box and only had to extend three wires


The body kit finally came in! Unfortunately there was a confusion and the front bumper was wrong. But the guys over at enjuku racing are awesome and are sending me the right one!


Aftermarket sway bars

All my oil line and fuel line stuff came in


And I decided to go with even bigger brakes. I needed to space the caliper out more so i didnt have to run such a big wheel spacer. So I got rotors from the 350z's with brembos. I plan on upgrading to thos front calipers when i get better wheels. But they are quite a bit bigger than the already bigger than stock 300zx brakes.


Also picked up an optima battery and billet tray


400lph walbro installed
I finished the chassis harness. It tucks away nicely inside the car. I still have to tape it up and get some wire loom on it.
I started plumbing my intake but it still needs a little trimming
And I decided to go a different route with the headlights again, instead of the buckets I am going to do something like this
And this requires a hood from a silvia (japanese 240sx) so I picked up one of those.
Finished up most of my engine bay harness. I deleted the whole passenger side box and only had to extend three wires
The body kit finally came in! Unfortunately there was a confusion and the front bumper was wrong. But the guys over at enjuku racing are awesome and are sending me the right one!
Aftermarket sway bars
All my oil line and fuel line stuff came in
And I decided to go with even bigger brakes. I needed to space the caliper out more so i didnt have to run such a big wheel spacer. So I got rotors from the 350z's with brembos. I plan on upgrading to thos front calipers when i get better wheels. But they are quite a bit bigger than the already bigger than stock 300zx brakes.
Also picked up an optima battery and billet tray
06-30-2014, 02:27 PM
#207
On The Tree
Thread Starter
iTrader: (2)
Join Date: Nov 2012
Posts: 117
Likes: 0
Received 0 Likes
on
0 Posts
Accessories all done
[IMG] Untitled by cosmo22nov, on Flickr[/IMG]
Radiator mounts, Im not the best welder but they arent going anywhere!
 Untitled by cosmo22nov, on Flickr
 Untitled by cosmo22nov, on Flickr
 Untitled by cosmo22nov, on Flickr
 Untitled by cosmo22nov, on Flickr
 Untitled by cosmo22nov, on Flickr
 Untitled by cosmo22nov, on Flickr
 Untitled by cosmo22nov, on Flickr
Remote oil filter
 Untitled by cosmo22nov, on Flickr
 Untitled by cosmo22nov, on Flickr
 Untitled by cosmo22nov, on Flickr
 Untitled by cosmo22nov, on Flickr
 Untitled by cosmo22nov, on Flickr
Intake tube. You can see where I trimmed the metal to make room for it.
 Untitled by cosmo22nov, on Flickr
 Untitled by cosmo22nov, on Flickr
 Untitled by cosmo22nov, on Flickr
 Untitled by cosmo22nov, on Flickr
The battery location in the trunk, I tucked it back in there pretty good. And you can see the main power wire that has a kill switch circuit breaker and the power distribution block.
 Untitled by cosmo22nov, on Flickr
 Untitled by cosmo22nov, on Flickr
 Untitled by cosmo22nov, on Flickr
 Untitled by cosmo22nov, on Flickr
[IMG]
Untitled by cosmo22nov, on Flickr[/IMG]Radiator mounts, Im not the best welder but they arent going anywhere!
Untitled by cosmo22nov, on FlickrUntitled by cosmo22nov, on FlickrUntitled by cosmo22nov, on FlickrUntitled by cosmo22nov, on FlickrUntitled by cosmo22nov, on FlickrUntitled by cosmo22nov, on FlickrUntitled by cosmo22nov, on FlickrRemote oil filter
Untitled by cosmo22nov, on FlickrUntitled by cosmo22nov, on FlickrUntitled by cosmo22nov, on FlickrUntitled by cosmo22nov, on FlickrUntitled by cosmo22nov, on FlickrIntake tube. You can see where I trimmed the metal to make room for it.
Untitled by cosmo22nov, on FlickrUntitled by cosmo22nov, on FlickrUntitled by cosmo22nov, on FlickrUntitled by cosmo22nov, on FlickrThe battery location in the trunk, I tucked it back in there pretty good. And you can see the main power wire that has a kill switch circuit breaker and the power distribution block.
Untitled by cosmo22nov, on FlickrUntitled by cosmo22nov, on FlickrUntitled by cosmo22nov, on FlickrUntitled by cosmo22nov, on Flickr
06-30-2014, 02:54 PM
#208
On The Tree
Thread Starter
iTrader: (2)
Join Date: Nov 2012
Posts: 117
Likes: 0
Received 0 Likes
on
0 Posts
engine coming back out to do some engine bay shaving before the chassis goes off for paint. Big thanks to my dad helping with all this too, thats him in the pics.
 Untitled by cosmo22nov, on Flickr
 Untitled by cosmo22nov, on Flickr
 Untitled by cosmo22nov, on Flickr
 Untitled by cosmo22nov, on Flickr
Setting up the power steering lines
 Untitled by cosmo22nov, on Flickr
 Untitled by cosmo22nov, on Flickr
 Untitled by cosmo22nov, on Flickr
 Untitled by cosmo22nov, on Flickr
New OEM parts from Nissan
 Untitled by cosmo22nov, on Flickr
 Untitled by cosmo22nov, on Flickr
 Untitled by cosmo22nov, on Flickr
 Untitled by cosmo22nov, on Flickr
Finishing up the engine bay and transmission tunnel
 Untitled by cosmo22nov, on Flickr
 Untitled by cosmo22nov, on Flickr
 Untitled by cosmo22nov, on Flickr
 Untitled by cosmo22nov, on Flickr
Got some more pieces back from my sand blaster after being refinished.
 Untitled by cosmo22nov, on Flickr
 Untitled by cosmo22nov, on Flickr
 Untitled by cosmo22nov, on Flickr
Car all taped off and ready to go off to paint.
 Untitled by cosmo22nov, on Flickr
 Untitled by cosmo22nov, on Flickr
 Untitled by cosmo22nov, on Flickr
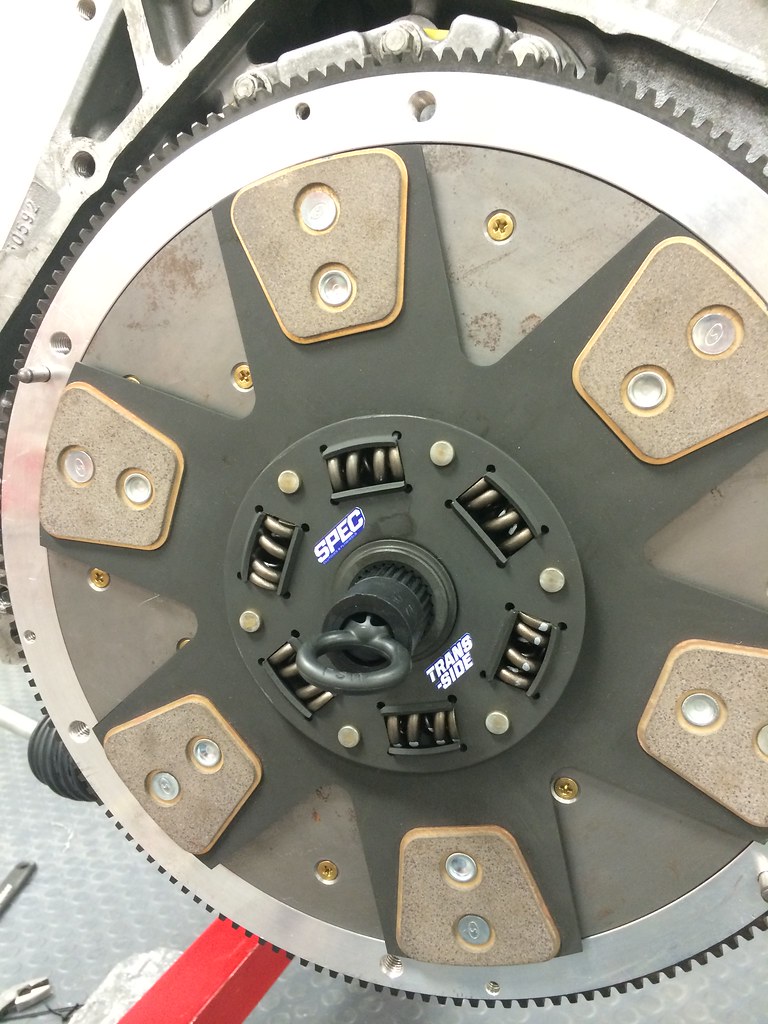
Getting the drivetrain ready while the chassis is away.
 Untitled by cosmo22nov, on Flickr
 Untitled by cosmo22nov, on Flickr
 Untitled by cosmo22nov, on Flickr
 Untitled by cosmo22nov, on Flickr
 Untitled by cosmo22nov, on Flickr
 Untitled by cosmo22nov, on Flickr
 Untitled by cosmo22nov, on Flickr
Untitled by cosmo22nov, on FlickrUntitled by cosmo22nov, on FlickrUntitled by cosmo22nov, on FlickrUntitled by cosmo22nov, on FlickrSetting up the power steering lines
Untitled by cosmo22nov, on FlickrUntitled by cosmo22nov, on FlickrUntitled by cosmo22nov, on FlickrUntitled by cosmo22nov, on FlickrNew OEM parts from Nissan
Untitled by cosmo22nov, on FlickrUntitled by cosmo22nov, on FlickrUntitled by cosmo22nov, on FlickrUntitled by cosmo22nov, on FlickrFinishing up the engine bay and transmission tunnel
Untitled by cosmo22nov, on FlickrUntitled by cosmo22nov, on FlickrUntitled by cosmo22nov, on FlickrUntitled by cosmo22nov, on FlickrGot some more pieces back from my sand blaster after being refinished.
Untitled by cosmo22nov, on FlickrUntitled by cosmo22nov, on FlickrUntitled by cosmo22nov, on FlickrCar all taped off and ready to go off to paint.
Untitled by cosmo22nov, on FlickrUntitled by cosmo22nov, on FlickrUntitled by cosmo22nov, on FlickrGetting the drivetrain ready while the chassis is away.
Untitled by cosmo22nov, on FlickrUntitled by cosmo22nov, on FlickrUntitled by cosmo22nov, on FlickrUntitled by cosmo22nov, on FlickrUntitled by cosmo22nov, on FlickrUntitled by cosmo22nov, on FlickrUntitled by cosmo22nov, on Flickr
06-30-2014, 04:32 PM
#209
On The Tree
Thread Starter
iTrader: (2)
Join Date: Nov 2012
Posts: 117
Likes: 0
Received 0 Likes
on
0 Posts
Got the chassis back from paint
 Untitled by cosmo22nov, on Flickr
 Untitled by cosmo22nov, on Flickr
 Untitled by cosmo22nov, on Flickr
 Untitled by cosmo22nov, on Flickr
 Untitled by cosmo22nov, on Flickr
 Untitled by cosmo22nov, on Flickr
Getting the engine and other things back in the car
 Untitled by cosmo22nov, on Flickr
 Untitled by cosmo22nov, on Flickr
 Untitled by cosmo22nov, on Flickr
 Untitled by cosmo22nov, on Flickr
 Untitled by cosmo22nov, on Flickr
 Untitled by cosmo22nov, on Flickr
 Untitled by cosmo22nov, on Flickr
 Untitled by cosmo22nov, on Flickr
finished up shaving the engine bay chassis harness
 Untitled by cosmo22nov, on Flickr
 Untitled by cosmo22nov, on Flickr
 Untitled by cosmo22nov, on Flickr
 Untitled by cosmo22nov, on Flickr
 Untitled by cosmo22nov, on Flickr
Untitled by cosmo22nov, on FlickrUntitled by cosmo22nov, on FlickrUntitled by cosmo22nov, on FlickrUntitled by cosmo22nov, on FlickrUntitled by cosmo22nov, on FlickrUntitled by cosmo22nov, on FlickrGetting the engine and other things back in the car
Untitled by cosmo22nov, on FlickrUntitled by cosmo22nov, on FlickrUntitled by cosmo22nov, on FlickrUntitled by cosmo22nov, on FlickrUntitled by cosmo22nov, on FlickrUntitled by cosmo22nov, on FlickrUntitled by cosmo22nov, on FlickrUntitled by cosmo22nov, on Flickrfinished up shaving the engine bay chassis harness
Untitled by cosmo22nov, on FlickrUntitled by cosmo22nov, on FlickrUntitled by cosmo22nov, on FlickrUntitled by cosmo22nov, on FlickrUntitled by cosmo22nov, on Flickr
06-30-2014, 05:21 PM
#210
On The Tree
Thread Starter
iTrader: (2)
Join Date: Nov 2012
Posts: 117
Likes: 0
Received 0 Likes
on
0 Posts
And one thing I was really excited about was the new thing I have going on with the front brakes. I had that bracket that spaced the 300zx caliper out far enough to fit the 350z 12.75" track pack rotor. The bad thing about this is that the pad only contacts a fraction of the rotor surface as you can see in this picture.
 Untitled by cosmo22nov, on Flickr
So I know a bunch of you LS guys can actually bolt on ctsv brakes to your f-body's, gto's, and g8's etc. And Ive heard of the Mazworks kit they have to bolt these to the 240's but was always turned off to the idea because I thought those calipers must cost a small fortune. But to my surprise you can pick the up from gmparsdirect.com for $145 a piece!
Now the mazworx bracket just looks like a laser cut piece of steel with three holes in it. It uses an Evo 8/9 brake rotor, and requires a ton of grinding on the back of the caliper. So a buddy and I decided to design our own bracket around the 350z track rotor that I already had that has the correct hub bore size, is 4 mm taller, and almost 2 pounds lighter per rotor. and this is what we came up with.
 Untitled by cosmo22nov, on Flickr
And these are much larger than the stock 240 brakes and the stock 300zx brakes that a lot of guys upgrade to.
 Untitled by cosmo22nov, on Flickr
I then got a prototype piece in plastic made and did some test fitting. everything bolts up great! There is still some grinding to do on the caliper but very very little.
 Untitled by cosmo22nov, on Flickr
 Untitled by cosmo22nov, on Flickr
 Untitled by cosmo22nov, on Flickr
 Untitled by cosmo22nov, on Flickr
 Untitled by cosmo22nov, on Flickr
The CTS-V pad also makes full contact on the rotor and the caliper is centered correctly.
 Untitled by cosmo22nov, on Flickr
 Untitled by cosmo22nov, on Flickr
 Untitled by cosmo22nov, on Flickr
I then went ahead and had a set made in T6 6061 aluminum for my car.
 Untitled by cosmo22nov, on Flickr
 Untitled by cosmo22nov, on Flickr
And here they are on the car! They even fit inside my 17's.
 Untitled by cosmo22nov, on Flickr
 Untitled by cosmo22nov, on Flickr
 Untitled by cosmo22nov, on Flickr
 Untitled by cosmo22nov, on Flickr
Now I shared this on a couple 240sx facebook pages and quite a few people wanted some so I ended up getting a kit together and having more made up.
 Untitled by cosmo22nov, on Flickr
 Untitled by cosmo22nov, on Flickr
Untitled by cosmo22nov, on FlickrSo I know a bunch of you LS guys can actually bolt on ctsv brakes to your f-body's, gto's, and g8's etc. And Ive heard of the Mazworks kit they have to bolt these to the 240's but was always turned off to the idea because I thought those calipers must cost a small fortune. But to my surprise you can pick the up from gmparsdirect.com for $145 a piece!
Now the mazworx bracket just looks like a laser cut piece of steel with three holes in it. It uses an Evo 8/9 brake rotor, and requires a ton of grinding on the back of the caliper. So a buddy and I decided to design our own bracket around the 350z track rotor that I already had that has the correct hub bore size, is 4 mm taller, and almost 2 pounds lighter per rotor. and this is what we came up with.
Untitled by cosmo22nov, on FlickrAnd these are much larger than the stock 240 brakes and the stock 300zx brakes that a lot of guys upgrade to.
Untitled by cosmo22nov, on FlickrI then got a prototype piece in plastic made and did some test fitting. everything bolts up great! There is still some grinding to do on the caliper but very very little.
Untitled by cosmo22nov, on FlickrUntitled by cosmo22nov, on FlickrUntitled by cosmo22nov, on FlickrUntitled by cosmo22nov, on FlickrUntitled by cosmo22nov, on FlickrThe CTS-V pad also makes full contact on the rotor and the caliper is centered correctly.
Untitled by cosmo22nov, on FlickrUntitled by cosmo22nov, on FlickrUntitled by cosmo22nov, on FlickrI then went ahead and had a set made in T6 6061 aluminum for my car.
Untitled by cosmo22nov, on FlickrUntitled by cosmo22nov, on FlickrAnd here they are on the car! They even fit inside my 17's.
Untitled by cosmo22nov, on FlickrUntitled by cosmo22nov, on FlickrUntitled by cosmo22nov, on FlickrUntitled by cosmo22nov, on FlickrNow I shared this on a couple 240sx facebook pages and quite a few people wanted some so I ended up getting a kit together and having more made up.
Untitled by cosmo22nov, on FlickrUntitled by cosmo22nov, on Flickr
06-30-2014, 05:32 PM
#212
On The Tree
Thread Starter
iTrader: (2)
Join Date: Nov 2012
Posts: 117
Likes: 0
Received 0 Likes
on
0 Posts
So then I got wheels and tires back on it so I could get it off to have the custom dual exhaust made. I used a dynomax internal x pipe muffler to save room and head ache of trying to fit both up there seperate. This was also the first time having it move under its own power so I had a little trouble getting it in the trailer. (notice the tire marks)
 Untitled by cosmo22nov, on Flickr
 Untitled by cosmo22nov, on Flickr
 Untitled by cosmo22nov, on Flickr
 Untitled by cosmo22nov, on Flickr
 Untitled by cosmo22nov, on Flickr
 Untitled by cosmo22nov, on Flickr
The exhaust turned out amazing! It was done by Strictly Import Motorsports in Portage Michigan.
 Untitled by cosmo22nov, on Flickr
 Untitled by cosmo22nov, on Flickr
Untitled by cosmo22nov, on FlickrUntitled by cosmo22nov, on FlickrUntitled by cosmo22nov, on FlickrUntitled by cosmo22nov, on FlickrUntitled by cosmo22nov, on FlickrUntitled by cosmo22nov, on FlickrThe exhaust turned out amazing! It was done by Strictly Import Motorsports in Portage Michigan.
Untitled by cosmo22nov, on FlickrUntitled by cosmo22nov, on Flickr
06-30-2014, 05:53 PM
#213
On The Tree
Thread Starter
iTrader: (2)
Join Date: Nov 2012
Posts: 117
Likes: 0
Received 0 Likes
on
0 Posts
Got the radiator installed and took it up and down my street to test things out a little.
 Untitled by cosmo22nov, on Flickr
 Untitled by cosmo22nov, on Flickr
Untitled by cosmo22nov, on FlickrUntitled by cosmo22nov, on Flickr
06-30-2014, 06:10 PM
#214
On The Tree
Thread Starter
iTrader: (2)
Join Date: Nov 2012
Posts: 117
Likes: 0
Received 0 Likes
on
0 Posts
Ok and this is the most recent update.
Got the custom LED tailights from Status LEDs.
 Untitled by cosmo22nov, on Flickr
 Untitled by cosmo22nov, on Flickr
And I got the body kit all mounted up before it went off to paint. I removed everything before paint so everything behind the kit would get hit. I just wanted the holes drilled first.
 Untitled by cosmo22nov, on Flickr
 Untitled by cosmo22nov, on Flickr
 Untitled by cosmo22nov, on Flickr
 Untitled by cosmo22nov, on Flickr
 Untitled by cosmo22nov, on Flickr
 Untitled by cosmo22nov, on Flickr
 Untitled by cosmo22nov, on Flickr
Got the custom LED tailights from Status LEDs.
Untitled by cosmo22nov, on FlickrUntitled by cosmo22nov, on FlickrAnd I got the body kit all mounted up before it went off to paint. I removed everything before paint so everything behind the kit would get hit. I just wanted the holes drilled first.
Untitled by cosmo22nov, on FlickrUntitled by cosmo22nov, on FlickrUntitled by cosmo22nov, on FlickrUntitled by cosmo22nov, on FlickrUntitled by cosmo22nov, on FlickrUntitled by cosmo22nov, on FlickrUntitled by cosmo22nov, on Flickr
06-30-2014, 07:53 PM
#216

 07-01-2014, 02:08 PM
#220
And ya, like is your paint like chassis coat (extra durable/scratch resistant) or is it just regular automotive topcoat?