
1950 Chevy Short Box w/ 5.3


 01-17-2016, 10:57 PM
#102
Just a short update. I got my engine all reassembled and painted up. My heads and covers were all corroded so I painted them silver and I painted the block black. I did some small things like upgrade to the LS6 PCV and I put on an LS6 intake. I smoothed the intake and painted it gloss black. I think it looks pretty good. I hope to get the block and tranny mounted in the frame soon and get the whole things brought home. Then I will be posting a lot more since I have a ton of questions about accessory drive, cooling, and exhaust.
One little disappointing thing did happen. I went to mount my intake (got it used) and I opened the envelope that was supposed to have the intake bolts. There were 7 of one length and 3 of another length. I was pretty sure all 10 were supposed to be the same length. I called the dealer to see how much they were because I was just going to buy the missing ones. The dealer wanted $25 per bolt. WTF! That was crazy. I just ordered a whole set of 10 from ARP for less than $40.
One question... So I got some TR55 NGK plugs. The came gapped around .055. The I read that they were supposed to be gapped to .060 but that there was a service bulleting put out that said to gap them to .040. Its a stock 5.3 mostly.. I put them around .045 and installed the plugs. Do you guys think that's ok?


Last edited by Root2812; 01-17-2016 at 11:04 PM.

 01-29-2016, 10:06 PM
#105
Thanks DKO. I will have the motor in the frame tomorrow and have the cab mocked up. I also picked up a 1974 Roadrunner with the hi-performance 360 this week. I wanted something to play with while I built my truck. I'll have to shift gears to getting that ready for spring but I still plan on hearing my engine run in the truck by sometime this summer.
02-02-2016, 10:15 PM
#106
Well its never easy but atleast the motor is in.. for now. I had a hell of a time and it seemed like nothing wanted to work this weekend. Some of it was my mistake and some was just fate. Either way there was a lot of learning and everything can be fixed with money.
Lets start with my transmission mistake. A while back I bought a can of VHT exhaust manifold paint for my manifolds. It was late and the stores were closed so I used it to paint my heads instead. Stuff worked great and looked good. This weekend I wanted to paint my transmission and decided to use the same stuff except I didn't have enough left. I went to the store and they didn't have the VHT brand so I got exhaust manifold paint from another brand. I didn't read the can, I just assumed it would work. I sprayed it on and it never dried. The crap had to cure with heat. The transmission would never get hot enough so I had to get the paint off. The paint came off super easy with the pressure washer. I took extra care to not spray near any openings or ports just incase. I let it dry and painted it with a different stuff which worked. Yay..... or not...
I pressure washed the transmission over a drain in the shop and muddy dirt flew up into the bell housing. We wiped if off the input shaft and I blew dirt and water out with an air hose. My dad had replaced the front seal with a new one recently so hopefully that helps but I am afraid some dirt got up past the seal. Only time will tell and my dad assures me its fine but I am a worry wart so I'll worry about it until I have a few thousand miles on the truck. Since the shaft was clean we put in the converter and installed the transmission. I felt like a total fool for not thinking about the dirt in the drain, I was just distracted by the paint. I might be screwed but I look at it as I can't do anything about it now because I am not going to rebuild it just incase I got dirt in it and if it blows shortly after the truck hits the road then its a lesson learned and I'll upgrade it with fun stuff. Maybe nothing got in or maybe only a grain or two did and a new tranny filter will do the trick. I guess we will see.
So I got the drive train installed!

Still more issues popped up that I thought were solved. This was the first time the cab and drivetrain were together on my new suspension. The weight threw my driveline angles all out of wack. This is minor but I may need to shim the transmission mount and the rear end to adjust the pinion angle. Minor but still a problem but atleast I identified it. Something told me to check.
Now I know you guys like low and mean so here is a pic to show how low it will be. This is the front of the frame where the bumper bracket will go.

Moving along, I think I am going to have to raise the motor. I am concerned about both the crank pulley clearance to the steering rack and the oil pan to the ground. I thought I had this covered but with weight on the suspension I have problems. Raising the motor might do it but I may also need to swap oil pans.
Last bugger issue is exhaust. I had bought and test fit 2002 corvette exhaust manifolds and after trimming up my boxing plates they fit, barely. I wasn't comfortable with the small amount of clearance to the frame but the deal breaker was that there was no easy way to make the steering linkage. Has anyone tried these.. http://www.speedwaymotors.com/LS1-Ti...FQcOaQodwwcLbg
I think they will work but at that price I am more concerned about quality. Who can recommend a good block hugger header for an LS?
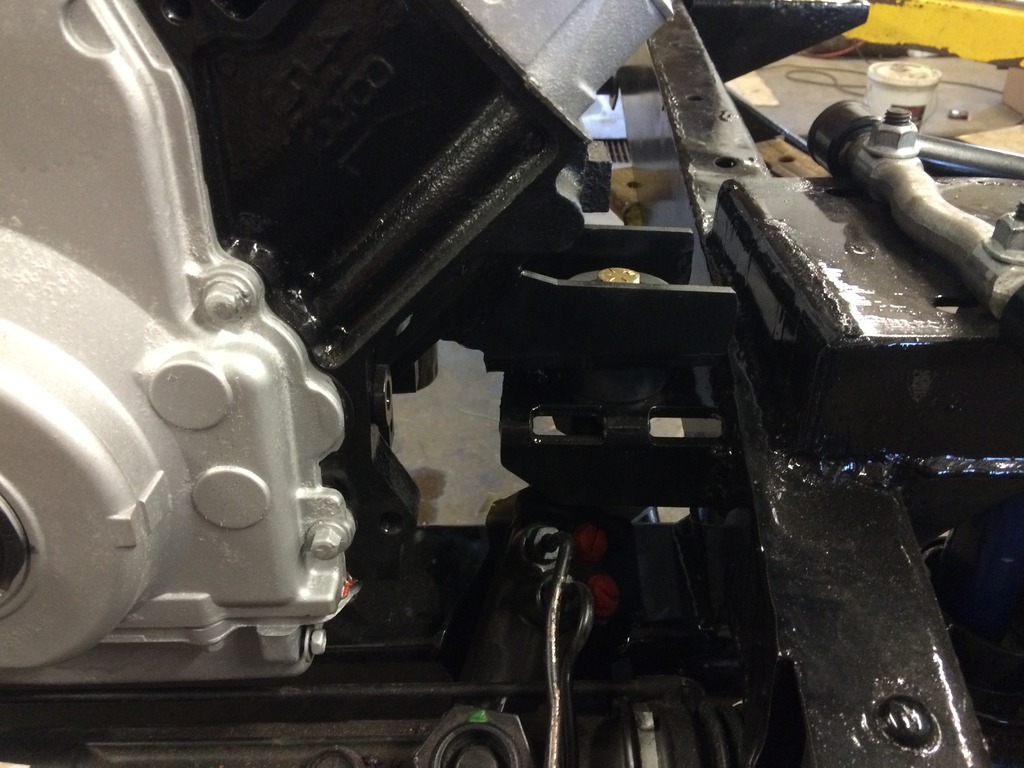
Here is a pic of my engine mounts. I should be able to raise them easy.
Well it looks like I have my work cut out for me but I'll get it. Wish me luck.
On a side note, I knew my build will take time and I wanted to get something fun to drive in the mean time. I picked up a nearly rust free (rare for a mopar) 74 Roadrunner with the high performance 360 engine. I'll throw up a pic or two later but keep it to a minimum since this is a LS forum and its just a dirty old Plymouth.
Lets start with my transmission mistake. A while back I bought a can of VHT exhaust manifold paint for my manifolds. It was late and the stores were closed so I used it to paint my heads instead. Stuff worked great and looked good. This weekend I wanted to paint my transmission and decided to use the same stuff except I didn't have enough left. I went to the store and they didn't have the VHT brand so I got exhaust manifold paint from another brand. I didn't read the can, I just assumed it would work. I sprayed it on and it never dried. The crap had to cure with heat. The transmission would never get hot enough so I had to get the paint off. The paint came off super easy with the pressure washer. I took extra care to not spray near any openings or ports just incase. I let it dry and painted it with a different stuff which worked. Yay..... or not...
I pressure washed the transmission over a drain in the shop and muddy dirt flew up into the bell housing. We wiped if off the input shaft and I blew dirt and water out with an air hose. My dad had replaced the front seal with a new one recently so hopefully that helps but I am afraid some dirt got up past the seal. Only time will tell and my dad assures me its fine but I am a worry wart so I'll worry about it until I have a few thousand miles on the truck. Since the shaft was clean we put in the converter and installed the transmission. I felt like a total fool for not thinking about the dirt in the drain, I was just distracted by the paint. I might be screwed but I look at it as I can't do anything about it now because I am not going to rebuild it just incase I got dirt in it and if it blows shortly after the truck hits the road then its a lesson learned and I'll upgrade it with fun stuff. Maybe nothing got in or maybe only a grain or two did and a new tranny filter will do the trick. I guess we will see.
So I got the drive train installed!

Still more issues popped up that I thought were solved. This was the first time the cab and drivetrain were together on my new suspension. The weight threw my driveline angles all out of wack. This is minor but I may need to shim the transmission mount and the rear end to adjust the pinion angle. Minor but still a problem but atleast I identified it. Something told me to check.
Now I know you guys like low and mean so here is a pic to show how low it will be. This is the front of the frame where the bumper bracket will go.

Moving along, I think I am going to have to raise the motor. I am concerned about both the crank pulley clearance to the steering rack and the oil pan to the ground. I thought I had this covered but with weight on the suspension I have problems. Raising the motor might do it but I may also need to swap oil pans.
Last bugger issue is exhaust. I had bought and test fit 2002 corvette exhaust manifolds and after trimming up my boxing plates they fit, barely. I wasn't comfortable with the small amount of clearance to the frame but the deal breaker was that there was no easy way to make the steering linkage. Has anyone tried these.. http://www.speedwaymotors.com/LS1-Ti...FQcOaQodwwcLbg
I think they will work but at that price I am more concerned about quality. Who can recommend a good block hugger header for an LS?
Here is a pic of my engine mounts. I should be able to raise them easy.

Well it looks like I have my work cut out for me but I'll get it. Wish me luck.
On a side note, I knew my build will take time and I wanted to get something fun to drive in the mean time. I picked up a nearly rust free (rare for a mopar) 74 Roadrunner with the high performance 360 engine. I'll throw up a pic or two later but keep it to a minimum since this is a LS forum and its just a dirty old Plymouth.
 10-05-2016, 07:35 PM
#108
Jacko, not too much progress lately. I did swap to a Camaro oil pan to gain some ground clearance and started putting the accessory drive on. The summer got away from me and now I am in the process of moving. Progress will be slow for a while yet.