

67 Chevelle - LS7, T56 & Schwartz Chassis
 11-02-2013, 10:56 AM
#1
Teching In
Thread Starter

Join Date: May 2012
Posts: 23
Likes: 0
Received 0 Likes
on
0 Posts
In April of 2012, I found this:

I drove it for a while in all of it's stock 283, 2 speed powerglide glory while I investigated options. It looked OK from 50 feeet but it was hiding a lot of issues I would soon discover. Eventually I added a Schwartz Performance chassis to the equation:

Once I'd stepped up on the chassis, I had to step up on the power plant, so I opted for a Mast Motorsports Black Label LS7:

Then it was time to get busy:

Eventually, I was left with a shell and off to the body shop it went:

It ended up needing new inner and outer fenders in the rear as well as quarters, floor and trunk as well as new front fenders.
In a few months, things were looking up:

Then it was off for cage:

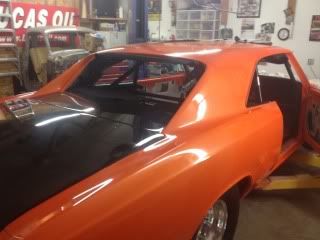
Then back to the paint shop:

While she was getting painted I was converting the LS7 back to dry sump, installing the Centerforce DYAD clutch and mating it up to the T56 trans:


Eventually, I ended up with what looks a lot like a car:

And I brought it home to begin final assembly:

I've left out a lot of small details but of note was an upgrade to RideTech 3 way adjustable coilovers and LED headlights. I still need to install the Rick's Custom tank with CTS-V pumps, figure out the dry sump tank location, plumb and wire it. Hopefully by Spring time, it should be on the road.
I drove it for a while in all of it's stock 283, 2 speed powerglide glory while I investigated options. It looked OK from 50 feeet but it was hiding a lot of issues I would soon discover. Eventually I added a Schwartz Performance chassis to the equation:
Once I'd stepped up on the chassis, I had to step up on the power plant, so I opted for a Mast Motorsports Black Label LS7:
Then it was time to get busy:
Eventually, I was left with a shell and off to the body shop it went:
It ended up needing new inner and outer fenders in the rear as well as quarters, floor and trunk as well as new front fenders.
In a few months, things were looking up:
Then it was off for cage:
Then back to the paint shop:
While she was getting painted I was converting the LS7 back to dry sump, installing the Centerforce DYAD clutch and mating it up to the T56 trans:
Eventually, I ended up with what looks a lot like a car:
And I brought it home to begin final assembly:
I've left out a lot of small details but of note was an upgrade to RideTech 3 way adjustable coilovers and LED headlights. I still need to install the Rick's Custom tank with CTS-V pumps, figure out the dry sump tank location, plumb and wire it. Hopefully by Spring time, it should be on the road.


Trending Topics
 11-02-2013, 05:55 PM
#9
Teching In
Thread Starter
Join Date: May 2012
Posts: 23
Likes: 0
Received 0 Likes
on
0 Posts
The LED headlights are Harley Davidson Daymaker 5 3/4" LED lights. I happened across the possible swap by accident during the disassembly. While I was putting the bulbs away for safekeeping in my cabinet next to a removed Harley bulb I noticed they were the same exact configuration as a 5 3/4" H4 bulb I'd recently upgraded to LED on my Dyna low rider and the wheels in my head started turning. J&W Speaker now makes a Muscle Car kit as well, but the Harley bulbs are cheaper than the Muscle car kit and they give me 4 High beams and 4 Low beams opposed to the 2 Hi and 2 Low of the Muscle Car kit. I would have never guessed anything with Harley on it would be cheaper than the same product without Harley Davidson on it, :-) This exact same bulb on my 2005 Dyna was the best money I ever spent on a motorcycle. Be forewarned, you really have to trim the bucket, I mean until there's almost nothing left but the outside ring.
Last edited by fxdlryan; 11-04-2013 at 05:07 AM.
11-02-2013, 05:59 PM
#10
Teching In
Thread Starter
Join Date: May 2012
Posts: 23
Likes: 0
Received 0 Likes
on
0 Posts
Thanks, I thought about shaving the door handles but I've seen it done on 66 and 67s and I personally think it's too big of a long slab of sheet metal to have nothing to break it up. I've seen too many door popper nightmares and I decided to keep the door handles.
 11-03-2013, 05:03 AM
#13
Teching In
Thread Starter
Join Date: May 2012
Posts: 23
Likes: 0
Received 0 Likes
on
0 Posts
Thanks. I need to finish up the mechanicals, plumbing and wiring done before I move on to the interior. I have a very long To Do list. However, when I had the cage put in, the seats were in and the shift position felt very comfortable for me.
11-12-2013, 02:46 PM
#15
Teching In
Thread Starter
Join Date: May 2012
Posts: 23
Likes: 0
Received 0 Likes
on
0 Posts
Thanks.
My progress is slow, but it's moving forward. I got the accessory drive all mounted up, the dry sump pulley and belt on, the ac condenser in, then back out to put the radiator in. The Mattsons unit mounts from the grill side and not the engine side like the stock unit, . Went to install the Spectre Performance cold air intake last night and it looks like it's not going to fit, I have interference with the alternator pulley as well as the driver's side fan. If I can make it fit, it looks like the radiator has to come back out, which means the condenser has to come back out. 3 steps forward, 2 steps back but I'm still stepping.
I'm wondering if dimpling the air intake tube on two sides to clear the alternator and fan will offset the advantages of a cold air intake by restricting the air flow, anybody care to share thoughts on that?
11-12-2013, 07:20 PM
#16
I'm wondering if dimpling the air intake tube on two sides to clear the alternator and fan will offset the advantages of a cold air intake by restricting the air flow, anybody care to share thoughts on that?
01-19-2014, 07:31 AM
#17
Teching In
Thread Starter
Join Date: May 2012
Posts: 23
Likes: 0
Received 0 Likes
on
0 Posts
The 3 inch exhaust is in with Borla XR1 Mufflers. We ended up deleting the inner portion of one of the cross members to make for a cleaner exhaust. There's roll bar almost directly above this location so I don't think we've lost any structural rigidity over the standard Schwartz chassis:


The Aerocatch hood pins are in and the air funnels replacing the inner headlights are all buttoned up:

A detailed shot of the brackets underneath for the hood pins, below this bracket is the remote oil filter and air cooler:

The drysump tank is in:


The oil cooler and remote oil filter:

Remote Power Steering Reservoir:

Plates in the trunk to get the remote reservoirs thru the trunk floor:


A shot of the driver's side showing the exhaust:

The Aerocatch hood pins are in and the air funnels replacing the inner headlights are all buttoned up:
A detailed shot of the brackets underneath for the hood pins, below this bracket is the remote oil filter and air cooler:
The drysump tank is in:
The oil cooler and remote oil filter:
Remote Power Steering Reservoir:
Plates in the trunk to get the remote reservoirs thru the trunk floor:
A shot of the driver's side showing the exhaust:
 01-20-2014, 09:42 PM
#19
Staging Lane

Join Date: Apr 2013
Posts: 71
Likes: 0
Received 0 Likes
on
0 Posts
Very nice. I have a question about the lights.
You said you now have 4 hi and 4 lo beams. Do they have two high and low per bulb? I may look into swapping my 66 lights, but I would do all 4 bulbs. Would I end up with 8 hi and 8 lo beams? May be interesting.
Thanks for the ideas and great build. I can't wait to get mine back from alignment so I can get it on the road a little. May even steal your color. I was thinking Maximum Steel 2014 Jeep color but not really sure. Your outside pic looks very nice and dark, almost a black chrome, but inside pics look much lighter. Which is more accurate to how it "really" looks?
01-21-2014, 04:15 AM
#20
Very nice. I have a question about the lights.
You said you now have 4 hi and 4 lo beams. Do they have two high and low per bulb? I may look into swapping my 66 lights, but I would do all 4 bulbs. Would I end up with 8 hi and 8 lo beams? May be interesting.
Thanks for the ideas and great build. I can't wait to get mine back from alignment so I can get it on the road a little. May even steal your color. I was thinking Maximum Steel 2014 Jeep color but not really sure. Your outside pic looks very nice and dark, almost a black chrome, but inside pics look much lighter. Which is more accurate to how it "really" looks?
You said you now have 4 hi and 4 lo beams. Do they have two high and low per bulb? I may look into swapping my 66 lights, but I would do all 4 bulbs. Would I end up with 8 hi and 8 lo beams? May be interesting.
Thanks for the ideas and great build. I can't wait to get mine back from alignment so I can get it on the road a little. May even steal your color. I was thinking Maximum Steel 2014 Jeep color but not really sure. Your outside pic looks very nice and dark, almost a black chrome, but inside pics look much lighter. Which is more accurate to how it "really" looks?
LK