

Dash Rebuild, Speedhut Can-bus.
 12-06-2013, 06:09 AM
#1
TECH Fanatic
Thread Starter

OK, so I am not real good at documenting any of the mods I have done to my car up to this point. We will see how well I do with this episode.
I was never happy with the mechanical gauge alternative when all of the data is readily available off the serial data link.
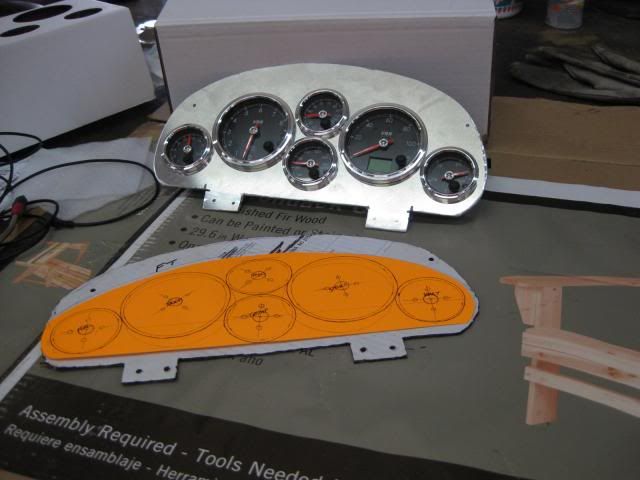
After exhaustive research I have concluded that the Speedhut Freedom Can-Bus series is the best answer. Not one to do things in the conventional manner I ordered a customized set with red faces and white numerals and tick. Speedo, Tach, same size fuel level, 2-1/16 volt, temp and oil pressure. I am also gutting the inoperative hood tach and replacing it with a boost gauge.
I have wanted to pull the instrument cluster and clean up the wiring on the back side of the last few years. To pull the cluster requires removal of the entire dash assembly, a 69 only thing. So far I am in the project just better than an hour and have a pan full of screws and lots of small parts scattered about, but the dash is still in place.
So here is a picture of the current layout, more to follow.
I was never happy with the mechanical gauge alternative when all of the data is readily available off the serial data link.
After exhaustive research I have concluded that the Speedhut Freedom Can-Bus series is the best answer. Not one to do things in the conventional manner I ordered a customized set with red faces and white numerals and tick. Speedo, Tach, same size fuel level, 2-1/16 volt, temp and oil pressure. I am also gutting the inoperative hood tach and replacing it with a boost gauge.
I have wanted to pull the instrument cluster and clean up the wiring on the back side of the last few years. To pull the cluster requires removal of the entire dash assembly, a 69 only thing. So far I am in the project just better than an hour and have a pan full of screws and lots of small parts scattered about, but the dash is still in place.
So here is a picture of the current layout, more to follow.
 12-20-2013, 05:58 AM
#2
TECH Fanatic
Thread Starter
I was down and out with the flu for 2 weeks, little to no progress. ls71nova was good enough to provide an oil pressure sender plug that I was missing.
The gauges showed up yesterday, better than I had hoped for. The plan is to have the dash out in the next evening or so and start the rebuild.
The gauges showed up yesterday, better than I had hoped for. The plan is to have the dash out in the next evening or so and start the rebuild.
12-20-2013, 12:49 PM
#3
TECH Resident
I was very happy with my Speedhut gauges too. But I had a problem when ordering mine....took them 6 weeks to make them and ship them. Still, very nice. Excited to see what you do with them
12-21-2013, 05:48 AM
#4
TECH Fanatic
Thread Starter
I placed the order Black Friday, received them Thursday. Gotta say that I am very impressed with the quality. We will see if my plan comes together as I have envisioned.
12-22-2013, 11:40 AM
#5
TECH Fanatic
Thread Starter
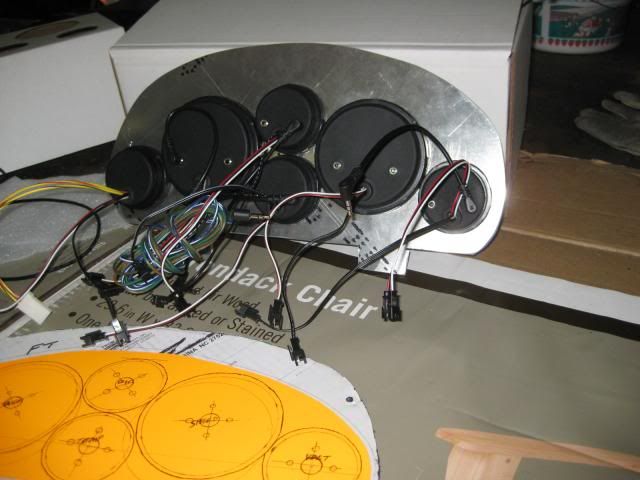
After another 2 hours this is the scene I am left with. The wiring looks far better than I had expected, no broken plugs and very few splices. I figure about 10 hours to get any "extra wires" culled and the balance cleaned up.
12-22-2013, 01:09 PM
#6
Staging Lane
Join Date: Sep 2013
Location: Liberty SC
Posts: 71
Likes: 0
Received 0 Likes
on
0 Posts
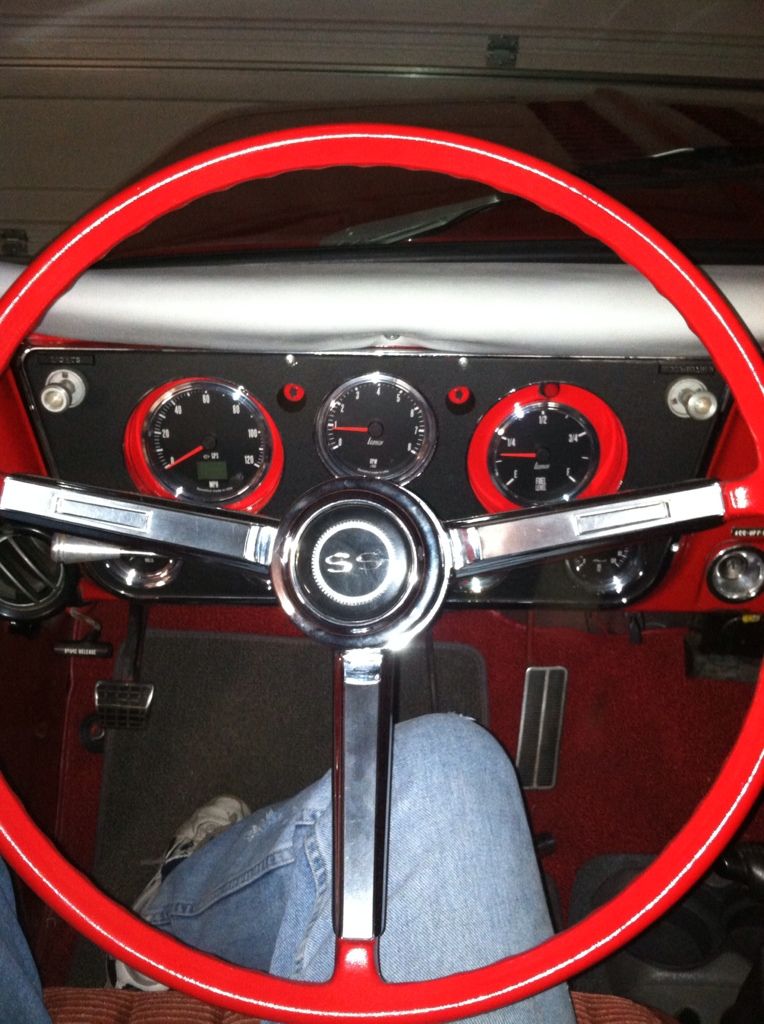
I have had the speed hut guages now for a year. I like the GPS speedo in my 71 Chevy C-10. I tied everything into the stock harness.
GPS speedo
Tach
Gas
Oil
AIR & Fuel ratio
Volts
Water temp

GPS speedo
Tach
Gas
Oil
AIR & Fuel ratio
Volts
Water temp
12-22-2013, 02:59 PM
#7
TECH Resident
How did you tie in the water and oil into the stock harness? You didn't use the Speedhut senders and run your own wires to them?
Trending Topics
12-22-2013, 03:11 PM
#8
Staging Lane
Join Date: Sep 2013
Location: Liberty SC
Posts: 71
Likes: 0
Received 0 Likes
on
0 Posts
I used the stock harness from motor senors to gauges. The oil is mechanical so it was seperate anyway. The fuel & oxegen was a vacum line.
On the back of the dash I just left the circuit boad off of the volt meter and water everything else is running through the pigtail.
This isn't the finished product. I left the factory turn signals in the dash as the regular lights I just pulled all the bulbs out. The speed hut lights are just wired to the pigtail.
Last edited by Andy4639; 12-22-2013 at 03:20 PM.
12-30-2013, 06:13 AM
#10
TECH Fanatic
Thread Starter
I will provide more pictures as move forward. Right now I am cleaning up the factory underdash harness, removing things that will never be used again. I also want to use a series of quick disconnects to make installation and removal in the future less of a project.
I do plan to have the volt, temp and oil pressure mounted to the A-pillar instead of hanging under the dash. The boost gauge will be in the hood tach pod after a bit of modification.
I did reinstall the oil pressure sender and rewired to the PCM, as well as install the boost sensor in the intake.
Nest step is to verify the oe wiring harness and fit the large gauges to the oe pod.
01-13-2014, 06:04 AM
#11
TECH Fanatic
Thread Starter
Finally had a some time to take the next step. A trip to Metal Supermarket, $11.70 later and i have the rough out for the Boost, Temp, Oil and Volt plate. This will go in the spot originally occupied by the radio.
I also need opinions. I am looking at options for finish on the 2 face plates and the top of the console. The original is a fake woodgrain, never really like it much.
My thought is a carbon fiber look, or possibly engine turned. I can also brush and clear coat or polish. Your input is encouraged.
I also need opinions. I am looking at options for finish on the 2 face plates and the top of the console. The original is a fake woodgrain, never really like it much.
My thought is a carbon fiber look, or possibly engine turned. I can also brush and clear coat or polish. Your input is encouraged.
01-13-2014, 06:26 AM
#12
My Speedhuts are finally in the mail as of Friday. I ordered Dec. 24th. They're a small operation that builds to order, so this was expected. I grabbed some thick textured plastic to make the panel. I'm doing a black face, red letter, 3-3/8" GPS speedo and matching quad guage. Keeping my pillar mounted 5" tach. Also, saw your 'blood red' set on facebook the other day. They're nice.
01-13-2014, 04:52 PM
#13
Teching In
Join Date: Oct 2012
Posts: 26
Likes: 0
Received 0 Likes
on
0 Posts
Started working with my Can Bus Speedhut gauges yesterday! Received them back in the fall for this Miata LS2 conversion. The only gauge wired separately will be the fuel level which works off the factory Mazda sending unit.
Build thread here! I hope to create a LS1Tech thread here when it's wrapped up... http://www.v8miata.net/build-threads...na-794/page15/
Build thread here! I hope to create a LS1Tech thread here when it's wrapped up... http://www.v8miata.net/build-threads...na-794/page15/
01-13-2014, 08:10 PM
#14
Started working with my Can Bus Speedhut gauges yesterday! Received them back in the fall for this Miata LS2 conversion. The only gauge wired separately will be the fuel level which works off the factory Mazda sending unit.
Build thread here! I hope to create a LS1Tech thread here when it's wrapped up... www.v8miata.net/build-threads-23/v8r-sloooww-build-94-miata-north-carolina-794/page15/
Build thread here! I hope to create a LS1Tech thread here when it's wrapped up... www.v8miata.net/build-threads-23/v8r-sloooww-build-94-miata-north-carolina-794/page15/
01-14-2014, 06:15 AM
#16
TECH Fanatic
Thread Starter
As far as the wiring goes, I plan to have 3 weatherpak connectors from the car to the dash, 1 - 6, 1 -3, and a 2. I will expand on this a bit later.
 01-15-2014, 06:04 AM
#18
TECH Fanatic
Thread Starter
Made a bit more progress last evening. Dry fit the 4 2" gauges and fit the lower left panel. Still trying to figure a solution for fitting the tach, speedo and fuel into the tapered housing, maybe hub centric rings?
I really like the pass through. I am using the OEM bulkhead connector since it is in such good shape.
I really like the pass through. I am using the OEM bulkhead connector since it is in such good shape.
01-15-2014, 06:22 AM
#19
Staging Lane
Join Date: Sep 2013
Location: Liberty SC
Posts: 71
Likes: 0
Received 0 Likes
on
0 Posts
All the Speed hut gauges come with a hot & ground wire for the lights. I tied these wires into the factory harness. The fuel gauge wire I tied into the harness along with the voltmeter. I left the turn signals as is. Speedo is GPS.

http://www.speedhut.com/gauges/freedom-gauges/36:5
This was while I was working on it.
01-16-2014, 06:02 AM
#20
TECH Fanatic
Thread Starter
Very clean, I am a nut for red interiors. The 69 will change to red when I finally get around to doing the body and paint.
Not much progress last night. I went on a hunt to find my soldering gun which required unpacking boxes from the last major relocation. WOW I really do have a bunch of cool tools.
Not much progress last night. I went on a hunt to find my soldering gun which required unpacking boxes from the last major relocation. WOW I really do have a bunch of cool tools.