


1974 Nova Hatchback LS2 Conversion
Thread Starter
Staging Lane
Joined: Jan 2014
Posts: 52
Likes: 0
From: GA
This is my build thread for a 1974 Nova Hatchback that I've owned since I was a kid. It's been sitting for about 20 years, rusting away. I'm going for a total modernization of the car with a complete LS2/4L60E drivetrain I got from an '06 GTO. It's going to lose the hood scoop and rear fin, the side trim, and maybe some of the chrome. This will not be a full on high dollar conversion, but it's not going to be a budget build, either.
The project is well under way, with lots of documentation over on StevesNovaSite. Here on LS1Tech I want to focus on the LS aspect of the build, which I just recently started.
For reference, though, here is the mess I started with...


And here's how the new drivetrain arrived at my house...


The body work is mostly done, front suspension rebuilt, and several other various parts of the project are done. This is how the car sits as I start to work on the engine transplant...


I had a friend do all the welding for me. There were lots of panels to patch and replace. I did the body filler, paint, and everything else myself.
Thread Starter
Staging Lane
Joined: Jan 2014
Posts: 52
Likes: 0
From: GA
Yes. I have all the original components, but I'll probably have to replace some parts along the way. I had to rebuild the HVAC control unit in the dash because it had a broken control stalk and was really hard to work. That was a nightmare.
Thread Starter
Staging Lane
Joined: Jan 2014
Posts: 52
Likes: 0
From: GA
The first part of the engine conversion was to install a new oil pan. The LS2 is a front sump, and I needed a rear sump for my car. There were several routes I could have taken with this, and I did a lot of research before making my decision.
The number one priority for me regarding an oil pan was ground clearance. From what I could gather, the two best pans on the market for ground clearance are the AutoKraft and the Holley. Both had the same price tag (at the time of my research - more on this in a minute). The Holley, however, had the more finished look. I just don't like the fabbed-together look of the AutoKraft, even though I've heard many people are very happy with that pan.
Fortunately for me, literally right before I ordered the Holley pan, Holley came out with the 302-2 pan, which is specifically targeted at 3rd Gen Nova's (and 1st Gen Camaro's). It was also $50 cheaper than the original pan I was looking at.
I had to buy an LS3 oil dipstick tube and corresponding dipstick, a new pan gasket, some RTV sealer, and a new oil filter to complete the swap. I also had to modify the stock LS2 windage tray per Holley's instructions.
The stock LS2 windage try is full length...

The front quarter of the tray has to be removed, and a small notch put in one corner to accommodate the new oil pickup tube. I used a grinder and cutoff wheel to do the work, then sanded it smooth by hand with 80 grit paper...

I had minor clearance issues with the oil pickup tube. I had to wallow out the hole in the pickup brace to make it fit on the engine bolt...

Also, it wasn't possible to put a standard socket on one of the windage tray bolts to torque it down. If I had crow's feet tools, that might have worked. As it was, I torqued it by feel...

I also had to knock out a plug on the engine block for the new oil dipstick tube - the LS2 tube fits directly into the LS2 pan, and the Holley pan is not designed the same way.
The new oil pan has been installed, and I'm now waiting on next month's budget to buy the engine mounts and tranny crossmember. I'm going with Hooker components because I like the driveline angle engineering they've done - even though there will be some custom work with the mounts to make them fit my car.

The number one priority for me regarding an oil pan was ground clearance. From what I could gather, the two best pans on the market for ground clearance are the AutoKraft and the Holley. Both had the same price tag (at the time of my research - more on this in a minute). The Holley, however, had the more finished look. I just don't like the fabbed-together look of the AutoKraft, even though I've heard many people are very happy with that pan.
Fortunately for me, literally right before I ordered the Holley pan, Holley came out with the 302-2 pan, which is specifically targeted at 3rd Gen Nova's (and 1st Gen Camaro's). It was also $50 cheaper than the original pan I was looking at.
I had to buy an LS3 oil dipstick tube and corresponding dipstick, a new pan gasket, some RTV sealer, and a new oil filter to complete the swap. I also had to modify the stock LS2 windage tray per Holley's instructions.
The stock LS2 windage try is full length...

The front quarter of the tray has to be removed, and a small notch put in one corner to accommodate the new oil pickup tube. I used a grinder and cutoff wheel to do the work, then sanded it smooth by hand with 80 grit paper...

I had minor clearance issues with the oil pickup tube. I had to wallow out the hole in the pickup brace to make it fit on the engine bolt...
Also, it wasn't possible to put a standard socket on one of the windage tray bolts to torque it down. If I had crow's feet tools, that might have worked. As it was, I torqued it by feel...
I also had to knock out a plug on the engine block for the new oil dipstick tube - the LS2 tube fits directly into the LS2 pan, and the Holley pan is not designed the same way.
The new oil pan has been installed, and I'm now waiting on next month's budget to buy the engine mounts and tranny crossmember. I'm going with Hooker components because I like the driveline angle engineering they've done - even though there will be some custom work with the mounts to make them fit my car.

Thread Starter
Staging Lane
Joined: Jan 2014
Posts: 52
Likes: 0
From: GA
Yeah, the body was a total wreck. New roof, patch panels behind all 4 wheels, trunk replacement, tail light panel replacement, passenger floor pan replacement, driver floor pan patching, drip rail rebuild, passenger door smashed in, radiator support rebuilt, passenger front inner fender replaced. A friend of mine spent 300 hours doing the welding. Here are some shots of the process...


Sandblasted the frame with it still attached to the body...


Notched the subframe for low-mount A/C and alternator...

Letting my daughter play with the sandblaster...

Below are some of the "after" pictures ("After" hours, and hours, and hours, and hours of body filler and sanding over and over and over again)...


Urethane frame mounts done without fully removing the frame...

Partially smoothed the firewall...

There's tons more pictures than this. Let me know if you want to see anything specific.
Trending Topics
Thread Starter
Staging Lane
Joined: Jan 2014
Posts: 52
Likes: 0
From: GA
I have the complete drivetrain dropout from the GTO, so it has all the accessories (including A/C compressor), electronics, airflow sensor, cables, etc. So, I'm using the stock GTO compressor in the stock low-mount position.
I would like to use the stock GTO alternator as well, but Hooker (I plan to use their engine mounts) says it won't work. I can't figure out why because the alternator is smaller than the A/C compressor, and is further away from the engine mounts than the compressor is. I can see where the A/C bracket may be in the way, but it seems like it would be easier/cheaper to have a new A/C bracket fabbed up than to go with an F-body alternator like they recommend. We'll see what happens when I start test-fitting the engine.
LS1 Tech Stories
The Best V8 Stories One Small Block at Time

6 Common C5 Corvette Failures and What's Involved In Repairing Them
Pouria Savadkouei
Retro Modern Bandit Pontiac Trans AM Comes With Burt Reynolds' Autograph
Verdad Gallardo
Top 10 Greatest Cadillac V Series Performance Models Ever, Ranked
Pouria Savadkouei
Top 10 Most Powerful Chevy Trucks Ever Made!

Hennessey's New Supercharged Silverado ZR2 Has 700 HP
Verdad Gallardo
Coachbuilt N2A Anteros Is an LS2-Powered C6 Corvette In Italian Clothes
Verdad Gallardo
Awesome K5 Blazer Restomod Comes With C7 Corvette Power
Verdad Gallardo
10 Camaros You Should Never Buy

10 LS Engine Myths That Refuse to Die
Verdad Gallardo
Banned
Joined: Feb 2013
Posts: 3,540
Likes: 207
I bought the frame notch kits from BCP Hotrods, and had my friend weld them in.
I have the complete drivetrain dropout from the GTO, so it has all the accessories (including A/C compressor), electronics, airflow sensor, cables, etc. So, I'm using the stock GTO compressor in the stock low-mount position.
I would like to use the stock GTO alternator as well, but Hooker (I plan to use their engine mounts) says it won't work. I can't figure out why because the alternator is smaller than the A/C compressor, and is further away from the engine mounts than the compressor is. I can see where the A/C bracket may be in the way, but it seems like it would be easier/cheaper to have a new A/C bracket fabbed up than to go with an F-body alternator like they recommend. We'll see what happens when I start test-fitting the engine.
Please let me know if it fits once you get your set-up in and I can then include it in the parts compatibility section of the instructions.
Be sure to include an asterik if your only test-fit vehicle has a notched crossmember. Would suck to find out it doesn't work when the frame isn't notched.
Thread Starter
Staging Lane
Joined: Jan 2014
Posts: 52
Likes: 0
From: GA
Hey rquad, you very well might be able to use the GTO alternator with your set-up, we've just not been able to confirm its fitment first-hand and therefore were not able to conclusively list it for fitment in the application.
Please let me know if it fits once you get your set-up in and I can then include it in the parts compatibility section of the instructions.
Please let me know if it fits once you get your set-up in and I can then include it in the parts compatibility section of the instructions.
I haven't laid eyes on the Hooker mounts, but just looking at the mounting bracket for my alternator I'm betting it won't work as-is. However, if the bracket is modded to hug the engine block, I'm thinking it will work.
I'll try to remember to post up a picture of the alternator and bracket position to show what I'm facing.
Thread Starter
Staging Lane
Joined: Jan 2014
Posts: 52
Likes: 0
From: GA
I think you meant BRP hotrods. Keep in mind their notch kit is designed for use with their mounts which IIRC position the engine higher and more forward than most, though I have no idea how they compare with the mounts you will be using.
I think the GTO uses a variable displacement compressor. They can be made to work, you just need to do your homework because it's not quite as simple as just providing power to the clutch like with a fixed displacement compressor. Alternatively you could swap in a truck or trailblazer fixed displacement pump; I am using a truck compressor on my swap. I believe the AC compressor spacing is identical across all the accessory families (vette, car, truck) unlike the other accessories (waterpump, alternator, ps) which are spaced differently.
I'll bet $1 it works fine since you notched your frame. It would be iffy if the frame is not notched.
Be sure to include an asterik if your only test-fit vehicle has a notched crossmember. Would suck to find out it doesn't work when the frame isn't notched.
Thanks a ton for the heads-up on the A/C compressor. I will do the research.
Thread Starter
Staging Lane
Joined: Jan 2014
Posts: 52
Likes: 0
From: GA
I finally got the the Hooker LS engine mounts in, and found some time to play around a bit. The instructions say a moderate amount of customization is needed on 73/74 models to make them work, and at least one user thread I saw echoed that. I'm still not convinced. I looked at the stock frame holes in my car, and I compared those to a '72 model. They look identical.
I took the "spacer plates" that the clamshells sit on, and held them up to the frame to see if I could match up any holes. Driver side first, then passenger...


You can't see anything on the driver's side, and it's hard to see much on the passenger side, but the two larger holes in the spacers line up perfectly with two of the factory holes. That makes me wonder why Hooker/Holley says this needs custom fitting. I also wonder why others had to re-drill the holes. That said, I don't have the headers or tranny crossmember yet to try a test-fit, so I still have questions, but I'm a little optimistic. The 4 smaller holes for the clamshells have to be drilled for sure. Also, I had to remove the power steering lines, and it looks like custom lines will be needed.
On the passenger side of the engine (it's still upside down), here's the spot where one of the engine brackets will go...

I had to remove the exhaust manifold to get into that area. Also, I found that the LS3 oil dipstick interferes with 2 of the exhaust manifold bolts - there's no way to get to the bolts with a socket. Easy solution was to pull the dipstick and set it aside.
Initial test-fitting of the engine bracket shows why Hooker says you cannot use the stock low-mount A/C compressor...

I removed the compressor and set it aside, and the mounting bracket slipped right into place. I just put the bolts in about halfway for now since the bracket will be coming right back off to get the LS2 cleaned up.
Before I can begin to think about installing the engine, I need the front brake lines installed (because one crosses under the engine). I ordered a stainless steel front brake line kit today.
I also have to buy the tranny crossmember (will do this month if the budget allows), and then the big hit will be the headers. I'm going with stainless headers, so that's some big $$$.
And, finally, I have to clean up my garage because it's so packed with car parts and tools that there's no way an engine hoist will fit in there.
I bought some urethane replacement bushings to go with new motor mounts I also purchased. I think there's a little massaging involved to get the urethane bushings installed.
Thread Starter
Staging Lane
Joined: Jan 2014
Posts: 52
Likes: 0
From: GA
I did, indeed, snap the 2nd photo with the plate oriented the wrong way - not upside down, but rotated 180 degrees out. The first photo has the plate oriented correctly.
Continuing with the motor mount saga, I bought the Anchor 2292 mounts, which are the ones recommended by Hooker, and are really cheap. I found them for $5 each. They're made in China, but the quality seems OK.
I spent the extra bucks and got urethane bushings for the motor mounts. I don't want cracked rubber bushings after a few years. The bushings turn $5 mounts into $30 mounts.
To put in the Energy Suspension bushings, you have to drill out the rivets in the motor mounts...

Drilling the rivets leaves some material to be cleaned up...

I tapped off the burrs with a screwdriver, then hand-sanded both sides of the mount with 80-grit. I also rolled up the sandpaper and sanded inside the hole. The instructions mention multiple times how important it is for the mounts to be clean. I went over the finished product with wax & grease remover to be sure.
To eliminate squeaks I applied lithium grease to all contact points between the bushing and mount. When assembling the bushing into the mount, you have to be careful of the orientation. One end of the mount has holes that are wider than the other, and also the indentions around the rivets are different widths. Then, after looking closely at the new bushings you can see the metal tabs are of different sizes. You have to put the widest metal tab in the bushing toward the widest indention in the mount. I couldn't see any obvious reason for this, but I followed the instructions.
After installing the bushing, the two halves of the clamshell are put back together with zip ties. You have to compress the shell pieces slightly in a vise, then pull the ties as tight as you can to hold the two metal pieces flush. I used a flat-head screwdriver to push the head of the zip time against the mount to minimize gaps. The zip ties are to be clipped before installation, and can optionally be removed after the engine is bolted in. Here's the finished product...

I had too many other things going on to get any further with the car, but I did order the stainless steel brake line kit, and it should arrive sometime later in the week. I have to install the under-engine brake line before the engine can go in.
Thread Starter
Staging Lane
Joined: Jan 2014
Posts: 52
Likes: 0
From: GA
I bought a GTO brake pedal to match the LS2 gas pedal I already have (I actually got brake and clutch pedals - they came as a set). This should be a pretty awesome upgrade...

I've spent a lot of time cleaning the engine. I took off the intake manifold, cleaned up the intake galley, heads, coil packs, etc. I still need to clean up a lot of the aluminum, then bolt everything back together.
I've also spent a lot of time studying the alternator situation. The LS2 unit will not clear my frame notch, so I bought a used LS1 replacement...

The alternator came out of a '98 Firebird, but it had a sticker that said "remanufactured", so I'm hoping that means it's a low mileage replacement. I didn't take a final picture, but the alternator cleaned up really good with just a Scotch Brite pad, and some wax & grease remover. I also painted the pulley satin black.
The "new" alternator gives me an extra inch or so of clearance...

I took lots of measurements, and I'm still not sure if the new alternator will clear the frame. The BRP notch kit should have been installed somewhere between 1/2 inch and an inch lower. I won't know until I test-fit the engine how this is going to work out.
In the photo above, the back of the alternator is covered in a black plastic shroud. I can trim the shroud at the bottom for maybe an extra 1/4 inch of clearance. Even then, I think it's a crap shoot.
I can't use the LS2 rear alternator bracket because it interferes with the new engine mounts. I found a billet rear alternator brace on ebay that's made for F-body cars. I wasn't looking for billet or anything fancy, but choices were skimpy and it was only about $20 with shipping. I figured I'd pay close to that for a stock bracket from a junkyard (after shipping charges), so I pulled the trigger. This bracket will bolt to the engine beside the motor mount, so there's no interference.
Moving on, the new alternator slipped right into place of the old one, and the serpentine belt fit just fine - no need to measure for a new belt when doing this swap.
I still need to get a pigtail that fits the LS1 alternator, and I need to splice the wire(s) into the LS2 harness. Supposedly, I only have to use the "L" wire coming out of the LS1 alternator, but I don't know what wire to connect that to in the LS2 harness (there are 2). I also don't know what to do with the 2nd wire from the LS2 harness - just cap it off? I've also read somewhere that you have to hook a 2nd wire to get this swap to work on an LS2.
If anyone has detailed instructions on hooking the 4-wire LS1 alternator to the 2-wire LS2 harness, I should would appreciate the input.

I've spent a lot of time cleaning the engine. I took off the intake manifold, cleaned up the intake galley, heads, coil packs, etc. I still need to clean up a lot of the aluminum, then bolt everything back together.
I've also spent a lot of time studying the alternator situation. The LS2 unit will not clear my frame notch, so I bought a used LS1 replacement...

The alternator came out of a '98 Firebird, but it had a sticker that said "remanufactured", so I'm hoping that means it's a low mileage replacement. I didn't take a final picture, but the alternator cleaned up really good with just a Scotch Brite pad, and some wax & grease remover. I also painted the pulley satin black.
The "new" alternator gives me an extra inch or so of clearance...
I took lots of measurements, and I'm still not sure if the new alternator will clear the frame. The BRP notch kit should have been installed somewhere between 1/2 inch and an inch lower. I won't know until I test-fit the engine how this is going to work out.
In the photo above, the back of the alternator is covered in a black plastic shroud. I can trim the shroud at the bottom for maybe an extra 1/4 inch of clearance. Even then, I think it's a crap shoot.
I can't use the LS2 rear alternator bracket because it interferes with the new engine mounts. I found a billet rear alternator brace on ebay that's made for F-body cars. I wasn't looking for billet or anything fancy, but choices were skimpy and it was only about $20 with shipping. I figured I'd pay close to that for a stock bracket from a junkyard (after shipping charges), so I pulled the trigger. This bracket will bolt to the engine beside the motor mount, so there's no interference.
Moving on, the new alternator slipped right into place of the old one, and the serpentine belt fit just fine - no need to measure for a new belt when doing this swap.
I still need to get a pigtail that fits the LS1 alternator, and I need to splice the wire(s) into the LS2 harness. Supposedly, I only have to use the "L" wire coming out of the LS1 alternator, but I don't know what wire to connect that to in the LS2 harness (there are 2). I also don't know what to do with the 2nd wire from the LS2 harness - just cap it off? I've also read somewhere that you have to hook a 2nd wire to get this swap to work on an LS2.
If anyone has detailed instructions on hooking the 4-wire LS1 alternator to the 2-wire LS2 harness, I should would appreciate the input.
Thread Starter
Staging Lane
Joined: Jan 2014
Posts: 52
Likes: 0
From: GA
I got the tranny crossmember in (Hooker 12625HKR), and also a pigtail for the new alternator (Holley 197-400). I just ordered stainless steel headers (Hooker 2275-7), but they may take a week to ship.
In the meantime, I cleaned up the engine...
Intake before...


Intake after...


I bought a billet rear bracket for the F-body alternator (found it on ebay)...

And I cleaned up the engine and painted the front pulleys:
Engine before...


Engine after...


I borrowed an engine hoist from a former neighbor, and an engine leveler from a friend. I'll start playing around with engine placement pretty soon.
Thread Starter
Staging Lane
Joined: Jan 2014
Posts: 52
Likes: 0
From: GA
When doing the final fitting of the F-body alternator, I had to notch the alternator's plastic shell because I found it was impossible to install a bolt through the center of the clamshell mount with the alternator in place. Keep in mind this is a problem that is likely specific to the Hooker engine mounts I'm using. Here is the clearance problem...

In the picture above, the head of the bolt extends right into the area occupied by the plastic shroud on the back of the alternator. It takes a funny-shapped channel to allow the alternator to swing into place once the bolt is installed. It's hard to describe the cutout shape needed, and why it needs to be that way - but it has to do with the way the alternator swings through a curve around the motor mount bolt. I used a bench grinder to rough out the shape, then with *lots* of installations and removals, honed down the exact shape needed with a tight-space hack saw. Then I sanded the rough edges with 180 grit paper. Here are shots from 3 different angles of the end result...


Now, the alternator is mounted to the bottom-most bolt, and swings up into place around the top bolt, clearing the motor mount bolt through the new channel I cut. Here is the alternator installed, with the motor mount bolt centered in the cutout...

With the alternator notch I've cut, there is room for a crescent wrench to fit onto the bolt head while turning the nut at the other end with a socket. I'll probably cover the channel I cut with black duct tape because I'm pretty sure the shroud is there to keep water out of the alternator.
Here's a little closer shot of the end result...

Thread Starter
Staging Lane
Joined: Jan 2014
Posts: 52
Likes: 0
From: GA
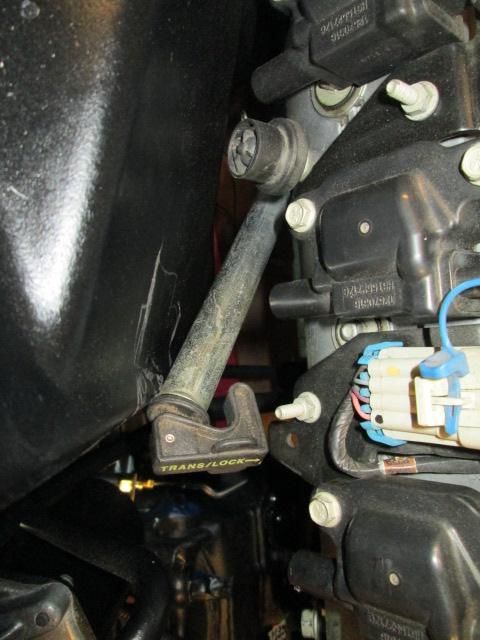
I started the engine installation Saturday. Before connecting the engine and transmission, I took a few photos. Not sure what the line is below - looks like maybe vacuum, but I'm not sure where it's supposed to go...

Also, if the coolant lines go where the red plastic covers are in the above picture, then I don't know how I'm going to get them in place. Those plugs end up way up inside the tranny tunnel. I'm also not sure what kind of adapters, if any will be needed. Are those things metric???
After cleaning up the tranny with wax & grease remover, I put the engine on a hoist, but had to take off the power steering reservoir to get to one of the head bolts...

The reservoir slides right out of place if you pull out the clip on the left side as you face the engine...

Engine and tranny hooked together, ready to install...

I found three electronic connections that had to be made to the tranny. There's a circular one on the passenger side, then a big rectangular one where the shifter goes, and finally a tiny connector above the circular one. There are also 4-prong adapters on either side of the tranny that I assume will go to the O2 sensors. There's also a bunch of connections all around the engine that I have no idea what they are - I'll have to study more on this.
Getting everything over into the car was a continuous cycle of pushing the engine forward, changing the angle with the leveler, then lowering the engine an inch or two. I did this maybe a dozen times or more before finally getting the engine in place. I don't see how anyone does this without and engine leveler.
The next part of the install was putting the Hooker tranny crossmember in place, then settling the tranny into it. The tranny tailshaft has to be jacked up as high as it will go in the tunnel. Then the crossmember is set above the frame on the passenger side. Next is to put an adapter onto the driver's side, and pull the crossmember up and bolt it to the adapter. Since I was using a urethane tranny mount, there is an extra spacer that has to be installed between the crossmember and the mount. The crossmember came with the spacer, but it isn't needed if you use the stock rubber mount.
I should have installed the urethane mount before getting the tranny under the car - it was a bit more of a pain to do while under the car. Also, the Energy Suspension instructions for the tranny mount were not clear in that I needed to re-use the stock mount bolts, then use the bolts that came with the mount to hook it to the crossmember. And here's an important note - the bolts that come with the crossmember will not fit the Energy Suspension mount - they are too small. You have to use the larger bolts that come with the urethane mount, but these are too short to allow a washer. I temporarily used the Energy Suspension bolts, but I'm going to have to buy longer replacements so that I can put the supplied lock washers in place.
With the tranny bolted in, I turned my attention to the engine mounting plates. I ran into an interesting situation here in that the driver's side plate fit perfectly to the frame holes , but the passenger side sat about 1/2 inch high on the frame - the holes were all lined up front to back, but there was no way to get them lined up side to side. I could have mounted the engine this way and just let it sit about 1/2 inch high on one side but I thought it made more sense to bite the bullet, drill all new holes on both sides, and get the thing perfectly level. It's a shame it's so close without actually working out. However, this situation was warned about in the instructions. With 72 and earlier cars the mounts would have worked fine. The 73/74 cars are just different.
I ran into a problem in that the tranny fill tube is not fitting right. Here are a couple of photos of it from different angles where it's scrubbing up against my A/C suitcase...

The tranny tube also interferes with where the last header bolt will go. I suspect (and I'm hoping) that the tube is not properly oriented. But, it's in a bind and there's no way to change the orientation without getting the engine at least halfway out, if not all the way out. I have to do this anyway to drill new holes for the engine mounts, so that's not too big of a deal. If I can't rotate the tube, then I'll need to see if I can bend it to fit. Failing that, I have to buy a flexible tube, but I'd like to avoid spending $90 on a stupid filler tube.
I test-fitted both headers, and they look to be perfect with no interference whatsoever. It's a pain to install the driver's side header because the engine needs to be lifted about two inches to put it in place, then dropped down while working the header into position. This is mentioned in the header instructions.
Here's how I left it...

My next step is to mark the motor mount holes, pull the engine, drill the holes, then put everything back together.

Also, if the coolant lines go where the red plastic covers are in the above picture, then I don't know how I'm going to get them in place. Those plugs end up way up inside the tranny tunnel. I'm also not sure what kind of adapters, if any will be needed. Are those things metric???
After cleaning up the tranny with wax & grease remover, I put the engine on a hoist, but had to take off the power steering reservoir to get to one of the head bolts...

The reservoir slides right out of place if you pull out the clip on the left side as you face the engine...

Engine and tranny hooked together, ready to install...

I found three electronic connections that had to be made to the tranny. There's a circular one on the passenger side, then a big rectangular one where the shifter goes, and finally a tiny connector above the circular one. There are also 4-prong adapters on either side of the tranny that I assume will go to the O2 sensors. There's also a bunch of connections all around the engine that I have no idea what they are - I'll have to study more on this.
Getting everything over into the car was a continuous cycle of pushing the engine forward, changing the angle with the leveler, then lowering the engine an inch or two. I did this maybe a dozen times or more before finally getting the engine in place. I don't see how anyone does this without and engine leveler.
The next part of the install was putting the Hooker tranny crossmember in place, then settling the tranny into it. The tranny tailshaft has to be jacked up as high as it will go in the tunnel. Then the crossmember is set above the frame on the passenger side. Next is to put an adapter onto the driver's side, and pull the crossmember up and bolt it to the adapter. Since I was using a urethane tranny mount, there is an extra spacer that has to be installed between the crossmember and the mount. The crossmember came with the spacer, but it isn't needed if you use the stock rubber mount.
I should have installed the urethane mount before getting the tranny under the car - it was a bit more of a pain to do while under the car. Also, the Energy Suspension instructions for the tranny mount were not clear in that I needed to re-use the stock mount bolts, then use the bolts that came with the mount to hook it to the crossmember. And here's an important note - the bolts that come with the crossmember will not fit the Energy Suspension mount - they are too small. You have to use the larger bolts that come with the urethane mount, but these are too short to allow a washer. I temporarily used the Energy Suspension bolts, but I'm going to have to buy longer replacements so that I can put the supplied lock washers in place.
With the tranny bolted in, I turned my attention to the engine mounting plates. I ran into an interesting situation here in that the driver's side plate fit perfectly to the frame holes , but the passenger side sat about 1/2 inch high on the frame - the holes were all lined up front to back, but there was no way to get them lined up side to side. I could have mounted the engine this way and just let it sit about 1/2 inch high on one side but I thought it made more sense to bite the bullet, drill all new holes on both sides, and get the thing perfectly level. It's a shame it's so close without actually working out. However, this situation was warned about in the instructions. With 72 and earlier cars the mounts would have worked fine. The 73/74 cars are just different.
I ran into a problem in that the tranny fill tube is not fitting right. Here are a couple of photos of it from different angles where it's scrubbing up against my A/C suitcase...


The tranny tube also interferes with where the last header bolt will go. I suspect (and I'm hoping) that the tube is not properly oriented. But, it's in a bind and there's no way to change the orientation without getting the engine at least halfway out, if not all the way out. I have to do this anyway to drill new holes for the engine mounts, so that's not too big of a deal. If I can't rotate the tube, then I'll need to see if I can bend it to fit. Failing that, I have to buy a flexible tube, but I'd like to avoid spending $90 on a stupid filler tube.
I test-fitted both headers, and they look to be perfect with no interference whatsoever. It's a pain to install the driver's side header because the engine needs to be lifted about two inches to put it in place, then dropped down while working the header into position. This is mentioned in the header instructions.
Here's how I left it...

My next step is to mark the motor mount holes, pull the engine, drill the holes, then put everything back together.
Thread Starter
Staging Lane
Joined: Jan 2014
Posts: 52
Likes: 0
From: GA
I found that there are two sets of holes in the frame where the tranny mount can go. I chose the rearward set, and that seems to be the right place for the engine. Using the front set of holes would move the engine forward maybe 1/2 inch, and would provide more clearance for the alternator, transmission filler tube, and clearance to firewall. But, I'm not sure what the forward position would do for driver's side header fitment, and for any radiator and fan clearance issues.
My alternator frame notch is going to work out OK, but I wish it was an inch lower - then maybe I could have used the stock LS2 alternator. As it is, with the engine mounts fully resting on the frame, the plastic shroud for the F-body alternator gets squashed a little, but there's no contact with the actual alternator housing. I trimmed the shroud a little, and it was good.
Per the Hooker tranny crossmember instructions I ended up having to wallow out the crossmember mounting holes a good 1/8 inch to get the tranny tailshaft centered between the subframe rails. Even after doing that I think the engine sat about 1/8 inch off center - I called it good enough.
Not having a welder, I used JB Weld to make a bead around the engine mount frame plates. I also marked the holes that needed to be drilled with paint. Both of these measures were to make sure I got the plates *exactly* back in the right place after removing everything to drill my frame holes.
On a side note, in the midst of all this I researched the proper wiring connectors for the O2 sensors I would eventually be using. The stock LS2 has both front and rear sensors. I found that it's the upstream ones that I need to keep, which look like this...

This is how I marked the frame plates for drilling...


Where the plate holes just missed lining up with existing frame holes was a problem for a drill. I ended up using a die grinder to wallow out the holes. After getting all the mounting holes where I needed them, I found it was impossible to get to the underside of a couple of the bolts. I ended up having to create access holes in the frame notches. I'm not sure if this would be necssary if the frame wasn't notched..

I'm simply not going to post all the details of what happened next. I ended up with 21 hours in the engine installation, pulling the engine out and putting it back in multiple times, fighting alignment issues, fighting firewall clearance, removing the alternator so I could get to the engine mount bolts, etc. etc. It was a total pain in the neck. Getting the nuts on the underside of the motor mounts was especially fun.
For anyone who attempts this same installation with these same parts, a few things would make your life a whole lot easier:
1) Don't use urethane replacement motor mount bushings. This caused the clamshells to float around a lot (before being tightened down) and I had to wallow out some of the mounting holes because of it.
2) Go ahead and do the high-mount alternator. It's just a time-consuming pain to mount it down low. Plus, you'll save the time of a frame notch.
3) If you don't have ratcheting box wrenches, then get the $25 metric set from Harbor Freight. They make reaching the engine mount bolts and header bolts 5 or 10 times easier. I ended up buying them, and am extremely please with the difference they made.
One other thing I learned - the tranny crossmember comes with a spacer. Don't use it if you have the Energy Suspension brand transmission mount. It causes the tranny to wedge against the tunnel. If you use Prothane, my understanding is that you will need the spacer.