
1967 Cougar build (over 500 pictures and videos)
 03-04-2015, 09:43 AM
#281
TECH Senior Member
Thread Starter
iTrader: (7)

I am going with the brackets from Mustang Steve:
http://www.mustangsteve.com/cobrabrakes.html
He offers a bracket that will mount the 2005-2010 Mustang GT brakes. However, I am going with the brakes that went on the v-6 version. The GT and the base Mustang used the same caliper with the difference being a different caliper abutment. The base mustang used a smaller 11.5" rotor instead of the GT's 12.5" rotor.
I am choosing the smaller package so that I can still have modern dual piston calipers but with the smaller rotor, which will hopefully fit inside 15" wheels.
Andrew
 03-05-2015, 10:59 AM
#282
TECH Senior Member
Thread Starter
iTrader: (7)
Got the calipers today. I am going with the brackets from Mustang Steve that are designed for the 2005-2010 Mustang GT, but instead of using the GT brakes that have a 12.5" rotor, I am using the v-6 brakes. The v-6 brakes use the same caliper but with a different abutment, and use an 11.5" rotor, which will fit better with 15" wheels.
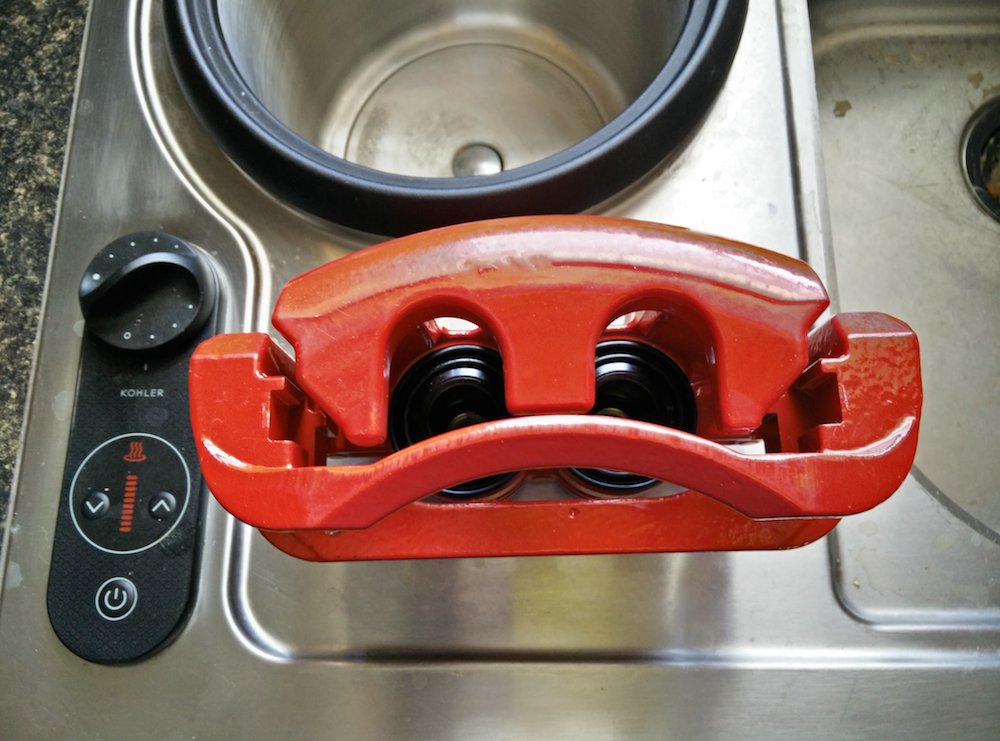
Wheels should be here tomorrow so I'll be able to see how well the brakes fit (or not)...
Andrew
Wheels should be here tomorrow so I'll be able to see how well the brakes fit (or not)...
Andrew
03-05-2015, 09:08 PM
#283
TECH Senior Member
Thread Starter
iTrader: (7)
Got my wheels today. If anyone is looking for a new set of reasonably priced vintage style wheels, check out Rocket Racing Wheels. I got mine from Newstalgia Wheels. I dealt with Shawn Johnson over there and the transaction couldn't be easier. Got the wheels in 4 days to my door.
On the front I am going with a gasser style wheel called the Rocket Launcher:

The front wheel is 15x4.5 with 2.25" backspacing.
For the rear, I chose the Rocket Injector:

I went with the as cast finish, but may have these hard anodized black. They are 15x8 with 4.5" of backspacing.
The fronts may need a small spacer to work with my brakes, but I'll know more after I get my rotors next week.
Andrew
On the front I am going with a gasser style wheel called the Rocket Launcher:
The front wheel is 15x4.5 with 2.25" backspacing.
For the rear, I chose the Rocket Injector:
I went with the as cast finish, but may have these hard anodized black. They are 15x8 with 4.5" of backspacing.
The fronts may need a small spacer to work with my brakes, but I'll know more after I get my rotors next week.
Andrew
03-09-2015, 04:34 PM
#284
TECH Senior Member
Thread Starter
iTrader: (7)
Ordered what will hopefully be some of the last few parts that I need to get this car on the road.
Got a gas tank from Tanks, Inc. with a Walbro 255l/hr pump and new sending unit.
http://www.tanksinc.com/index.cfm/pa...rod/prd345.htm
Ordered a hydraulic clutch kit from Modern Driveline:
http://moderndriveline.com/catalog/h...ic_masters.htm
I mocked up the rotors and calipers with the wheels, and it looks like I may have to run a .500" spacer in the front to clear the face of the caliper, so I ordered some long ARP studs for both the front and rear:
I also ordered a bunch of fittings for the brakes, fuel, and clutch lines. I'll post more details about that as the project moves along.
My last big ticket item will be the front end kit from Ridetech:
http://www.ridetech.com/store/muscle...hash=V312.V328
In the rear I plan on keeping the leaf springs, but I will install new Ridetech shocks and see what else is worn out.
Andrew
03-09-2015, 05:58 PM
#285
TECH Resident

AWESOME!! that's got to feel good.
I bought Eastwood's tubing flaring tool and it is killer. Using that with NiCu brake tubing has never made life so easy when making brake hardlines. You could use the same tool for hard fuel and clutch lines, too. They have dies for AN flare to use with tube nuts, which I didn't use, but would on the next project.
If you didn't buy Ridetech's rear shocks, I recommend viking (Founders left QA1). You can buy their double adjustable for the same cost as QA1 or Ridetech's single adjustable.
Doug
03-09-2015, 09:05 PM
#287
TECH Senior Member
Thread Starter
iTrader: (7)
Me too...hopefully it won't be like the bullshit below...
So...not that many of you will care, but I have to rant a little bit. A while back I ordered a remote bleeder kit from Speedway. This was supposed to be a direct fit kit to be used with the stock 4th Gen f-body slave. I posted about the parts a while back but today I decided to take a closer look.
Here is the stock slave where the factory bleeder screws into. The threads are 10mm x 1.5 and you can see down inside that there is a concave sealing surface, which makes sense for a bleeder.

Here is the tip of the stock bleeder that seals against that seat:

Well, the adapter that I get from Speedway is 10mm x 1.5 but instead of a cone it has the same concave seat:

So how is that supposed to work? Well, in the brilliant minds of whoever put this kit together at Speedway, they give you some aluminum crush washers:

While there is nothing wrong with crush washers, they are: a) designed to mate with a flat machined surface, and b) the fitting isn't supposed to bottom out before the washer gets crushed, like this one does. It's no wonder people have leaks!
Moving to the other side of the -3 hose we have another fitting that is supposed to transition from -3 male to 1/8 NPT...or so I thought. Here is the fitting:

If you look down inside, you can see that it too has a concave seat. To make matters worse, the threads are not NPT, but are straight 3/8" x 24, whereas 1/8" NPT threads are 3/8" x 27. Presumably, the little fitting that screws in that adapter is supposed to seal against the 3 threads that actually engage, and then seal on the red "monkey spunk" that is on the fitting:

Here are both ends of the crappy bleeder "kit."

I ordered a proper fitting to go into the slave and seal against the seat, I will keep the hose, and the fitting on the end, but instead of that crappy NPT bleeder, I ordered an Earl's Solo Bleeder fitting that will seal against that seat. UGH...[end rant]
Andrew
So...not that many of you will care, but I have to rant a little bit. A while back I ordered a remote bleeder kit from Speedway. This was supposed to be a direct fit kit to be used with the stock 4th Gen f-body slave. I posted about the parts a while back but today I decided to take a closer look.
Here is the stock slave where the factory bleeder screws into. The threads are 10mm x 1.5 and you can see down inside that there is a concave sealing surface, which makes sense for a bleeder.
Here is the tip of the stock bleeder that seals against that seat:
Well, the adapter that I get from Speedway is 10mm x 1.5 but instead of a cone it has the same concave seat:
So how is that supposed to work? Well, in the brilliant minds of whoever put this kit together at Speedway, they give you some aluminum crush washers:
While there is nothing wrong with crush washers, they are: a) designed to mate with a flat machined surface, and b) the fitting isn't supposed to bottom out before the washer gets crushed, like this one does. It's no wonder people have leaks!
Moving to the other side of the -3 hose we have another fitting that is supposed to transition from -3 male to 1/8 NPT...or so I thought. Here is the fitting:
If you look down inside, you can see that it too has a concave seat. To make matters worse, the threads are not NPT, but are straight 3/8" x 24, whereas 1/8" NPT threads are 3/8" x 27. Presumably, the little fitting that screws in that adapter is supposed to seal against the 3 threads that actually engage, and then seal on the red "monkey spunk" that is on the fitting:
Here are both ends of the crappy bleeder "kit."
I ordered a proper fitting to go into the slave and seal against the seat, I will keep the hose, and the fitting on the end, but instead of that crappy NPT bleeder, I ordered an Earl's Solo Bleeder fitting that will seal against that seat. UGH...[end rant]
Andrew
03-10-2015, 08:49 AM
#288


How pricey are the TICK remote bleeders?
03-10-2015, 10:09 AM
#289
TECH Senior Member
Thread Starter
iTrader: (7)
Not sure...maybe 50 bucks?
I didn't choose the Speedway because of cost, I chose it because they offered different length hoses which appealed to me. The Tick kits seem to be better engineered but are designed for certain OEM applications while I wanted the ability to put the bleeder where I wanted without having extra line.
Andrew
03-10-2015, 07:52 PM
#290
TECH Senior Member
Thread Starter
iTrader: (7)
This evening I walked into the garage to see what can be done and I heard my TIG mocking me. So I decided to grow a pair and tackle the mounting of the fan to the radiator. As you might recall I got some little mounting tabs from C&R and it was time to see if I could weld them to the radiator.
Considering that I am a total newbie, I think I did alright.

Since I had to cut one of the tabs off the shroud to make room for the lower radiator outlet, I made a little mount at the very bottom to capture the shroud lip. Not super pretty, but it will work and it isn't visible at all.

I like the way it both holds the weight of the fan and also keeps it from moving.

Andrew
Considering that I am a total newbie, I think I did alright.
Since I had to cut one of the tabs off the shroud to make room for the lower radiator outlet, I made a little mount at the very bottom to capture the shroud lip. Not super pretty, but it will work and it isn't visible at all.
I like the way it both holds the weight of the fan and also keeps it from moving.
Andrew
03-12-2015, 07:38 PM
#291
TECH Senior Member
Thread Starter
iTrader: (7)
Got a bit of a cluster f**k happening with the wheels. I took them to the anodizer and we agreed on the coating to use, life was good. Today I get a call letting me know that they had a total fail. It turns out that my "as cast" wheels were clear coated on the front face, so naturally the anodizing didn't work. I double checked the website and nowhere does it say "clear coated." I get the fact as to why they clear a bare aluminum wheel, but it sure would have been nice to know that in advance so I could proceed accordingly. Had I known they were clear coated, I just would get them blasted and move on. Ugh...
A bunch of little parts showed up including the Earl's Solo Bleeders for both of the front calipers (not pictured) and the clutch bleeder:

Fits properly into the AN -3 to 3/8" x 24 concave flare fitting that came with the clutch bleeder kit. These are really slick. Crack the bleeder, step in the pedal, fluid comes out, but as soon as you release the pedal, the built in spring seats the plunger against the cone so air can't get back in. These will make life much easier when the time comes to bleed the clutch and the brakes.

The fitting for the slave cylinder is somewhere in UPS hell, but with some luck will show up on Monday.
Andrew
A bunch of little parts showed up including the Earl's Solo Bleeders for both of the front calipers (not pictured) and the clutch bleeder:
Fits properly into the AN -3 to 3/8" x 24 concave flare fitting that came with the clutch bleeder kit. These are really slick. Crack the bleeder, step in the pedal, fluid comes out, but as soon as you release the pedal, the built in spring seats the plunger against the cone so air can't get back in. These will make life much easier when the time comes to bleed the clutch and the brakes.
The fitting for the slave cylinder is somewhere in UPS hell, but with some luck will show up on Monday.
Andrew
03-14-2015, 01:35 PM
#292
TECH Senior Member
Thread Starter
iTrader: (7)
Big day today. I called the towing company and the Cougar will be coming to the house.
In the meantime, here is the fitting for the slave. The one on top has the proper seat the one below was the one that uses the crush washer.

Also picked up some Earl's braided brake lines. I got 17" long lines, which should hopefully work out. I plan on making new hard brake lines in the front, so I will have some control over where the fitting will terminate.

Andrew
In the meantime, here is the fitting for the slave. The one on top has the proper seat the one below was the one that uses the crush washer.
Also picked up some Earl's braided brake lines. I got 17" long lines, which should hopefully work out. I plan on making new hard brake lines in the front, so I will have some control over where the fitting will terminate.
Andrew
03-14-2015, 06:51 PM
#293
Looking real good Andrew. Keep up the great work!!!
03-15-2015, 10:59 AM
#294
TECH Senior Member
Thread Starter
iTrader: (7)
Thanks! With the warmer weather I am definitely getting more motivated.
Called a local towing company yesterday afternoon and they sent a flat bed to get the Cougar from the storage unit to my house. Here she is getting ready to get hooked up. Yes, I am keeping the stainless mud flaps...LOL

Got her home and pulled the hood. I was actually shocked to see how much lighter it was than my GTO hood.

I decided that the first order of business was to see about getting the radiator mocked up. The original radiator was taller but more narrow and has the tanks at the top and the bottom. The new radiator is wider, but a little shorter, and has the tanks on the sides.
I made some little spacers out of some aluminum channel that I had. This positioned the radiator higher and the radiator is sitting nicely in the original mounts at the bottom.

I also added some channel blocks to the top of the radiator, so the original top radiator mounts can capture the blocks and securely retain the radiator in its place.

Overall, the radiator fits pretty well.

I also mocked up the fan to see if there was room on the left side to build some mounts, and it looks like I have the space needed. The giant vacuum octopus will go bye bye as I am will eventually replace the headlight door actuators with electric motors.

I am digging a higher ride height in the front, so I am reconsidering the Ridetech set-up which is supposed to be lower than stock.

The temps are supposed to get above 60 today, so I am getting ambitious and the plan is to mock up the engine and trans and see what I have going there.
Andrew
Called a local towing company yesterday afternoon and they sent a flat bed to get the Cougar from the storage unit to my house. Here she is getting ready to get hooked up. Yes, I am keeping the stainless mud flaps...LOL
Got her home and pulled the hood. I was actually shocked to see how much lighter it was than my GTO hood.
I decided that the first order of business was to see about getting the radiator mocked up. The original radiator was taller but more narrow and has the tanks at the top and the bottom. The new radiator is wider, but a little shorter, and has the tanks on the sides.
I made some little spacers out of some aluminum channel that I had. This positioned the radiator higher and the radiator is sitting nicely in the original mounts at the bottom.
I also added some channel blocks to the top of the radiator, so the original top radiator mounts can capture the blocks and securely retain the radiator in its place.
Overall, the radiator fits pretty well.
I also mocked up the fan to see if there was room on the left side to build some mounts, and it looks like I have the space needed. The giant vacuum octopus will go bye bye as I am will eventually replace the headlight door actuators with electric motors.
I am digging a higher ride height in the front, so I am reconsidering the Ridetech set-up which is supposed to be lower than stock.
The temps are supposed to get above 60 today, so I am getting ambitious and the plan is to mock up the engine and trans and see what I have going there.
Andrew
 03-16-2015, 11:21 AM
#296
TECH Senior Member
Thread Starter
iTrader: (7)
Here is some more for you...
Yesterday was a beautiful day for opening the garage door and working on the car. I made it out around 11:00am and the temperature was about 50 degrees and as the day progressed it got up to about 62. I got the hoist and took the engine off the stand and attached the bellhousing and transmission. I don't have a clutch yet, so this was all for mock up.

It's amazing what one person can do with the help of levers and hydraulics. Up and over...

After a bit of pushing, shoving, and wiggling the engine dropped on the mounts.


These Fords sure don't have a lot of room. In fact, I think the RX7s have way more room. It's definitely a snug fit.
The good news is that the shifter came up right in the factory hole.

The bad news is that tunnel space is at a premium. With the transmission up as high as it will go, the side of the case makes contact with the reinforcing rib that served as the mount for the stock transmission crossmember. I also had to take a sawzall to a tab on the right side of the transmission case.
Just for reference I got my angle finder out and I measured the angle of the engine relative to the chassis and it came out to about 5 degrees. I don't know what the angle was with the Ford engine installed, but I suspect it was probably in the 3-4 degree range, so I am not too far off. There is room between the oil pan and the front crossmember and I notched the engine mount saddles to bring the engine down about 1/2" which will make the angle better. The angles don't much matter in this application because I will be using CV joints at both ends of the driveshaft, but having the engine lower in the chassis and also being closer to level with the chassis is better.
I threw on the intake for some inspiration before yanking everything out.

Here is a view from the inside. Please excuse the filthy windshield.

Andrew
Yesterday was a beautiful day for opening the garage door and working on the car. I made it out around 11:00am and the temperature was about 50 degrees and as the day progressed it got up to about 62. I got the hoist and took the engine off the stand and attached the bellhousing and transmission. I don't have a clutch yet, so this was all for mock up.
It's amazing what one person can do with the help of levers and hydraulics. Up and over...
After a bit of pushing, shoving, and wiggling the engine dropped on the mounts.
These Fords sure don't have a lot of room. In fact, I think the RX7s have way more room. It's definitely a snug fit.
The good news is that the shifter came up right in the factory hole.
The bad news is that tunnel space is at a premium. With the transmission up as high as it will go, the side of the case makes contact with the reinforcing rib that served as the mount for the stock transmission crossmember. I also had to take a sawzall to a tab on the right side of the transmission case.
Just for reference I got my angle finder out and I measured the angle of the engine relative to the chassis and it came out to about 5 degrees. I don't know what the angle was with the Ford engine installed, but I suspect it was probably in the 3-4 degree range, so I am not too far off. There is room between the oil pan and the front crossmember and I notched the engine mount saddles to bring the engine down about 1/2" which will make the angle better. The angles don't much matter in this application because I will be using CV joints at both ends of the driveshaft, but having the engine lower in the chassis and also being closer to level with the chassis is better.
I threw on the intake for some inspiration before yanking everything out.
Here is a view from the inside. Please excuse the filthy windshield.
Andrew
03-16-2015, 06:16 PM
#297

That was quick................
Ken
Ken
03-17-2015, 07:19 AM
#298
Andrew, I want to go back to your post about the remote bleeder. Son of a bitch, I am pissed off now. I bought the same remote bleeder from Speedway and I was confused because there were no directions with it and I couldn't figure out why there were crush washers. As of now, I can't even remember if I used them or not. Anyway, I finally figured out how to install it and bolted everything up. If you go to my build thread, you will see that I mated the engine to the trans out of the subframe and then bolted the whole subframe to the car to make it easy. After I bled the master, I couldn't figure out why I would be getting a small puddle of brake fluid under the car coming from the trans to engine interface. I thought maybe some fluid had dripped from the top bleed screw all the way down the hose or something stupid like that. After reading your post, I know now where it is leaking from and why. Motherf'r now I have to pull the trans from under the car and redo this stupid connection. I am pissed beyond belief. But....I do thank you enormously for helping me figure out what the problem was. I am going to call or write Speedway and tell them their kit is crap. This issue should probably be a sticky on the website.
03-17-2015, 09:30 AM
#299
TECH Senior Member
Thread Starter
iTrader: (7)
Andrew, I want to go back to your post about the remote bleeder. Son of a bitch, I am pissed off now. I bought the same remote bleeder from Speedway and I was confused because there were no directions with it and I couldn't figure out why there were crush washers. As of now, I can't even remember if I used them or not. Anyway, I finally figured out how to install it and bolted everything up. If you go to my build thread, you will see that I mated the engine to the trans out of the subframe and then bolted the whole subframe to the car to make it easy. After I bled the master, I couldn't figure out why I would be getting a small puddle of brake fluid under the car coming from the trans to engine interface. I thought maybe some fluid had dripped from the top bleed screw all the way down the hose or something stupid like that. After reading your post, I know now where it is leaking from and why. Motherf'r now I have to pull the trans from under the car and redo this stupid connection. I am pissed beyond belief. But....I do thank you enormously for helping me figure out what the problem was. I am going to call or write Speedway and tell them their kit is crap. This issue should probably be a sticky on the website.
I bought extra fittings for the slave. Shoot me a PM and I'll send you one.
Andrew
03-17-2015, 11:17 AM
#300
TECH Senior Member
Thread Starter
iTrader: (7)
My buddy Shaun stopped by last night and we wanted to see if the old 8-track still worked. Hooked up a spare battery directly to the head unit and magic happened.
Andrew
Andrew