
1967 Cougar build (over 500 pictures and videos)
 07-12-2016, 03:27 PM
#741


Congrats on the Wedding and Move.............
Ken
Ken


 07-13-2016, 05:38 AM
#743

Congrats on the move and new Wifeee!
Looks like Denmah has the same luck as you with those fuse holders.
https://ls1tech.com/forums/forced-in...l#post19232677
Looks like Denmah has the same luck as you with those fuse holders.
https://ls1tech.com/forums/forced-in...l#post19232677
07-13-2016, 06:18 PM
#744
TECH Senior Member
Thread Starter
iTrader: (7)
Congrats on the move and new Wifeee!
Looks like Denmah has the same luck as you with those fuse holders.
https://ls1tech.com/forums/forced-in...l#post19232677
Looks like Denmah has the same luck as you with those fuse holders.
https://ls1tech.com/forums/forced-in...l#post19232677
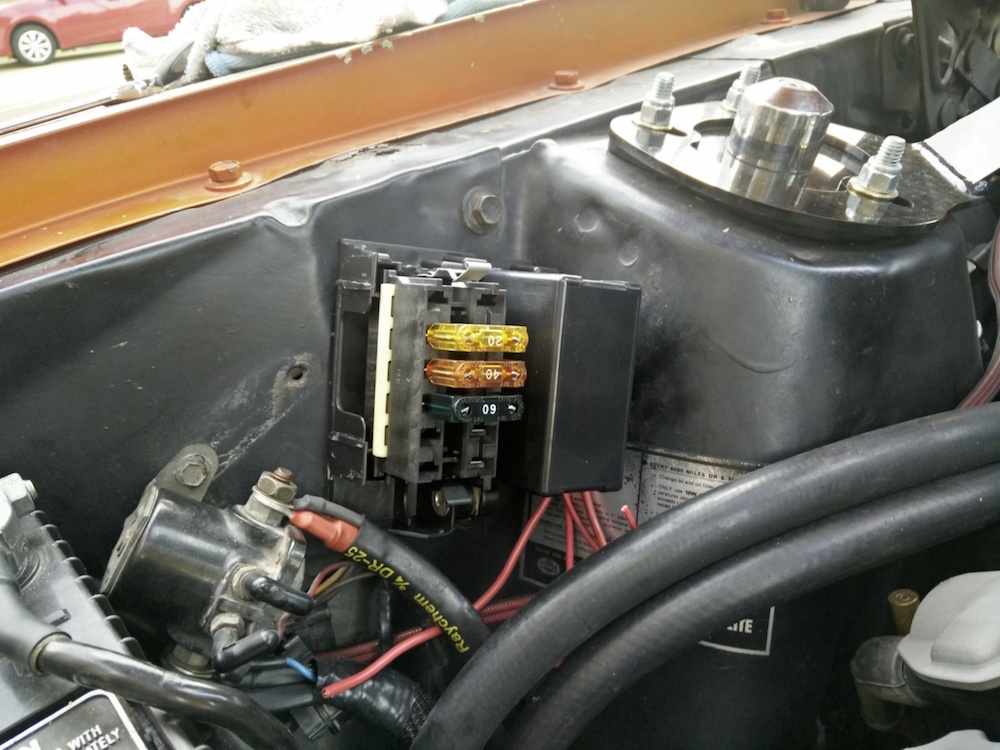
Nothing like going overboard after being stranded for a dumbass 1 dollar fuse holder. I needed up ordering one of these guys from Waytek Wire:
https://www.waytekwire.com/item/4632...AAAAC-PDM-AMI/
The idea is to use it as my main distribution point for all my high draw items. I'll connect it with a 4 gauge wire directly from the battery. One of the leads will then go to my relay under the dash that gets energized when the ignition key is in the run and crank positions. That relay powers the relay for the fuel pump and also provides power to the Holley Digital Dash. Another lead will feed my stereo amps. A third lead will be left open for a future electronic steering upgrade, which is said to draw as much as 60 amps. The forth will be a spare should I need something in the future.
Stay tuned...
Andrew
07-13-2016, 06:53 PM
#745
TECH Resident

That's a nice, stout looking distribution and fuse block.
Bussman makes nice stuff I'm sure you'll be happy with it and more importantly it won't leave you stranded. Blue Sea Systems makes quality products, too. I have had great experience with both of their products.
Unbelievable how much garbage exists out there. I look at your post - mortem on the fuse holder and just shake my head at how poorly made that is. I commend you too, for pealing the onion on that.
I've stayed away from the stereo installer type products even though many look really handy and even slick. Based on your experience, I'll continue to stay away!!
And congrats on your marriage and new home! Great news
07-13-2016, 10:49 PM
#747
TECH Senior Member
Thread Starter
iTrader: (7)
That's a nice, stout looking distribution and fuse block.
Bussman makes nice stuff I'm sure you'll be happy with it and more importantly it won't leave you stranded. Blue Sea Systems makes quality products, too. I have had great experience with both of their products.
Unbelievable how much garbage exists out there. I look at your post - mortem on the fuse holder and just shake my head at how poorly made that is. I commend you too, for pealing the onion on that.
I've stayed away from the stereo installer type products even though many look really handy and even slick. Based on your experience, I'll continue to stay away!!
And congrats on your marriage and new home! Great news
Bussman makes nice stuff I'm sure you'll be happy with it and more importantly it won't leave you stranded. Blue Sea Systems makes quality products, too. I have had great experience with both of their products.
Unbelievable how much garbage exists out there. I look at your post - mortem on the fuse holder and just shake my head at how poorly made that is. I commend you too, for pealing the onion on that.
I've stayed away from the stereo installer type products even though many look really handy and even slick. Based on your experience, I'll continue to stay away!!
And congrats on your marriage and new home! Great news
I am very happy with the marriage and the new home situation. The new house could have a bigger garage, but I think any hotrodder can say that describing any house.
Andrew
07-18-2016, 09:14 PM
#749
TECH Senior Member
Thread Starter
iTrader: (7)
Thanks Alex!
Nothing like going overboard after being stranded for a dumbass 1 dollar fuse holder. I needed up ordering one of these guys from Waytek Wire:
https://www.waytekwire.com/item/4632...AAAAC-PDM-AMI/
The idea is to use it as my main distribution point for all my high draw items. I'll connect it with a 4 gauge wire directly from the battery. One of the leads will then go to my relay under the dash that gets energized when the ignition key is in the run and crank positions. That relay powers the relay for the fuel pump and also provides power to the Holley Digital Dash. Another lead will feed my stereo amps. A third lead will be left open for a future electronic steering upgrade, which is said to draw as much as 60 amps. The forth will be a spare should I need something in the future.
Stay tuned...
Andrew
I decided to hit the localish Pull-A-Part in Birmingham. I don't know why I thought going to a junk yard at 2:00pm on a day when it was 99 degrees was a good idea, but that's what I did. I scored a bunch of electrical parts that I think will come in handy, but for the Cougar I am most excited about this:
Pulled that from under the back seat of a late 90s Buick Riviera. The two middle modules are all Maxi fuses and have a bus bar that connected right to the battery. I should be able to find a place for it and feed it directly from the battery and bring in the high draw circuits under the dash.
Andrew
07-20-2016, 01:43 PM
#751
TECH Senior Member
Thread Starter
iTrader: (7)
What's in the picture above was $25...I got some other power distribution modules as well, because I wanted to see what would work best, but I like these the best and will take the others back.
Decided to really clean some of this stuff today and see what I got here. I also downloaded the Delphi catalog (section 7) which really helped with sourcing the various parts that I need. These modules and parts are all available through Mouser.
Here is a 4 position base with the battery post connection.
The terminals are easily removable and have a secondary retaining clip (the white thing in the above photo). These are Delphi MetriPack 800 terminals and are rated at 60 amps.
The individual modules just pop in place and are retained by clips to the base.
I really don't have room for a 4 position box under the hood, so with a little creative trimming, I have a 2 position base with the battery lug (Delphi doesn't make such a beast).
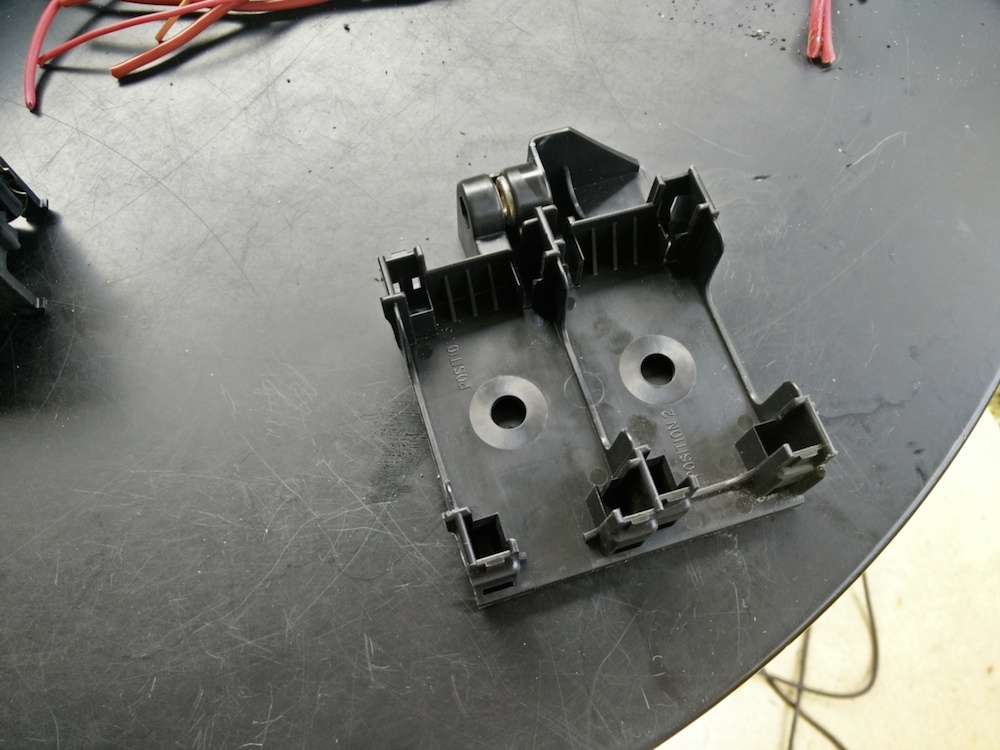
Presto...
In the Delphi catalog they have a 6 Maxi fuse module, but as I said, there is no appropriate base for it. Delphi does make a 8 fuse holder and a single position base with a battery lug, but it's longer than the 6 fuse module, so I like this better.
Andrew
Decided to really clean some of this stuff today and see what I got here. I also downloaded the Delphi catalog (section 7) which really helped with sourcing the various parts that I need. These modules and parts are all available through Mouser.
Here is a 4 position base with the battery post connection.
The terminals are easily removable and have a secondary retaining clip (the white thing in the above photo). These are Delphi MetriPack 800 terminals and are rated at 60 amps.
The individual modules just pop in place and are retained by clips to the base.
I really don't have room for a 4 position box under the hood, so with a little creative trimming, I have a 2 position base with the battery lug (Delphi doesn't make such a beast).
Presto...
In the Delphi catalog they have a 6 Maxi fuse module, but as I said, there is no appropriate base for it. Delphi does make a 8 fuse holder and a single position base with a battery lug, but it's longer than the 6 fuse module, so I like this better.
Andrew
07-22-2016, 07:07 PM
#752
TECH Senior Member
Thread Starter
iTrader: (7)
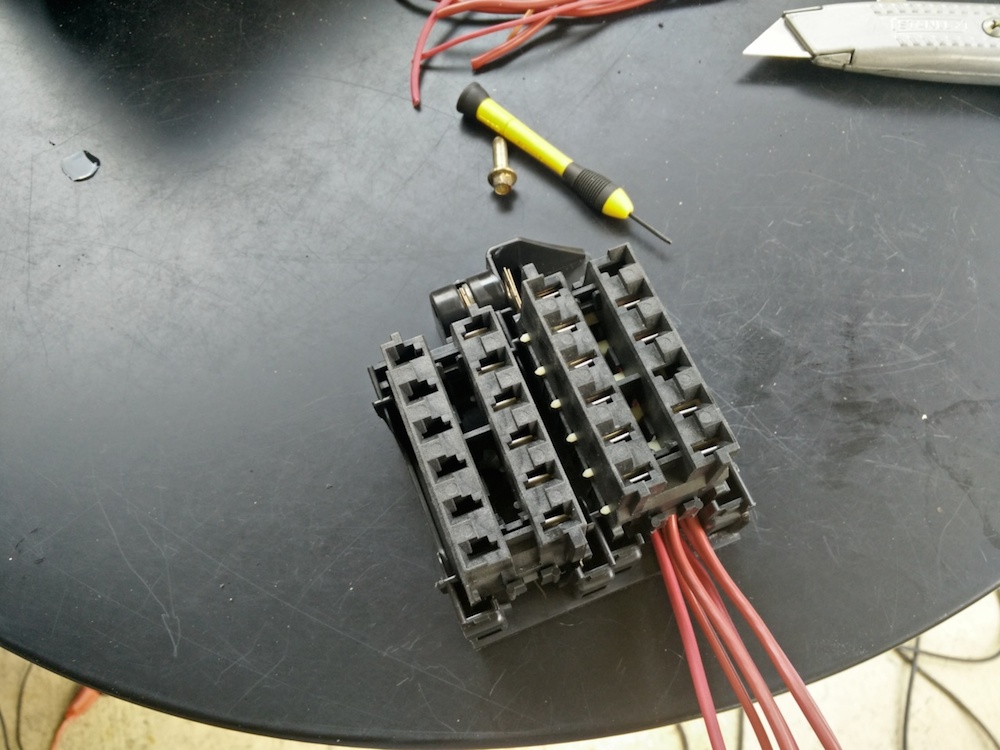
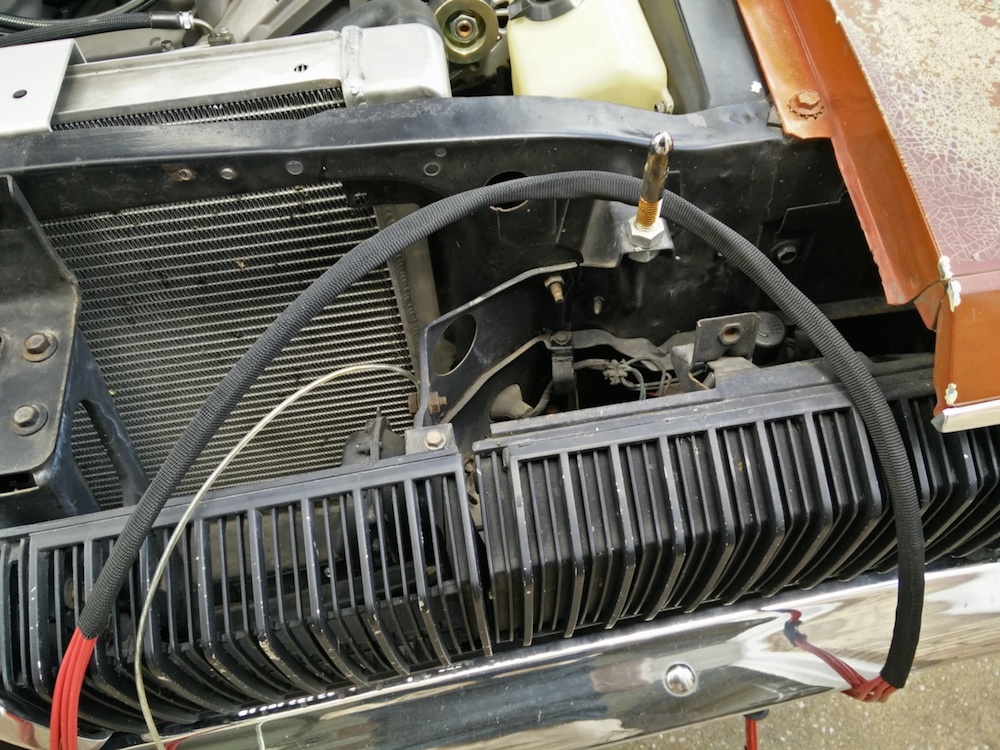
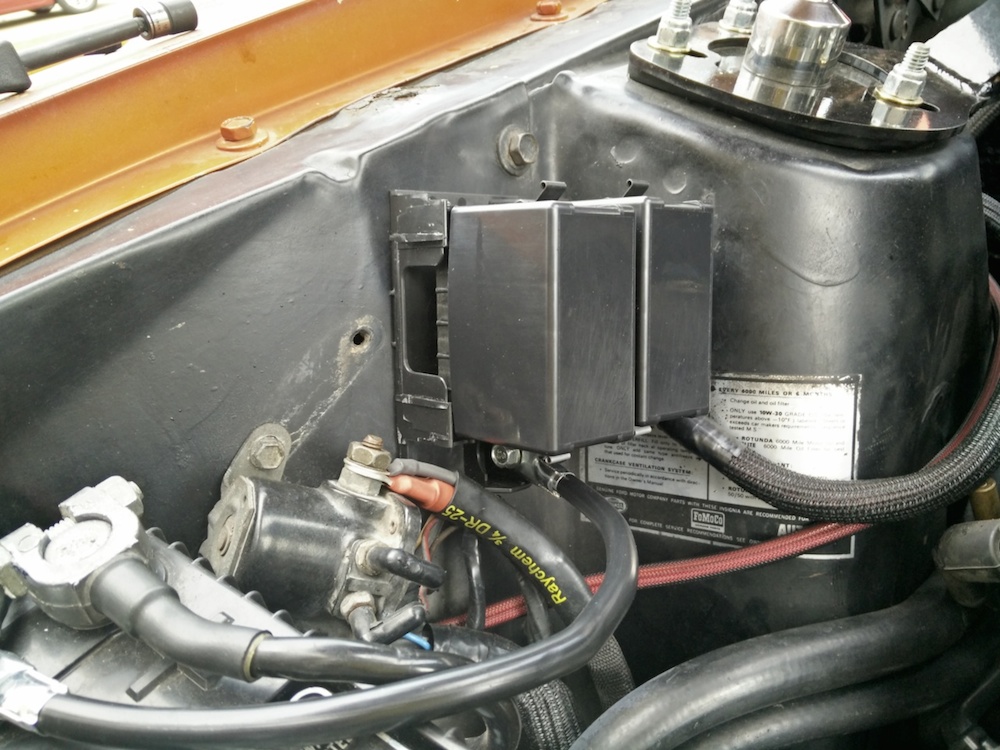
I got my little stash of goodies from Mouser today, so it was time to figure out where to mount my new power distribution box.
Initially I thought I would mount it to the front of the shock tower, something like this:

That looked OK but seemed to stick out a little too much and I really didn't want to drill any holes in the shock towers. So I started looking around and I realized that if I moved the starter solenoid a little forward, I will have room between it and the shock tower. Like this...
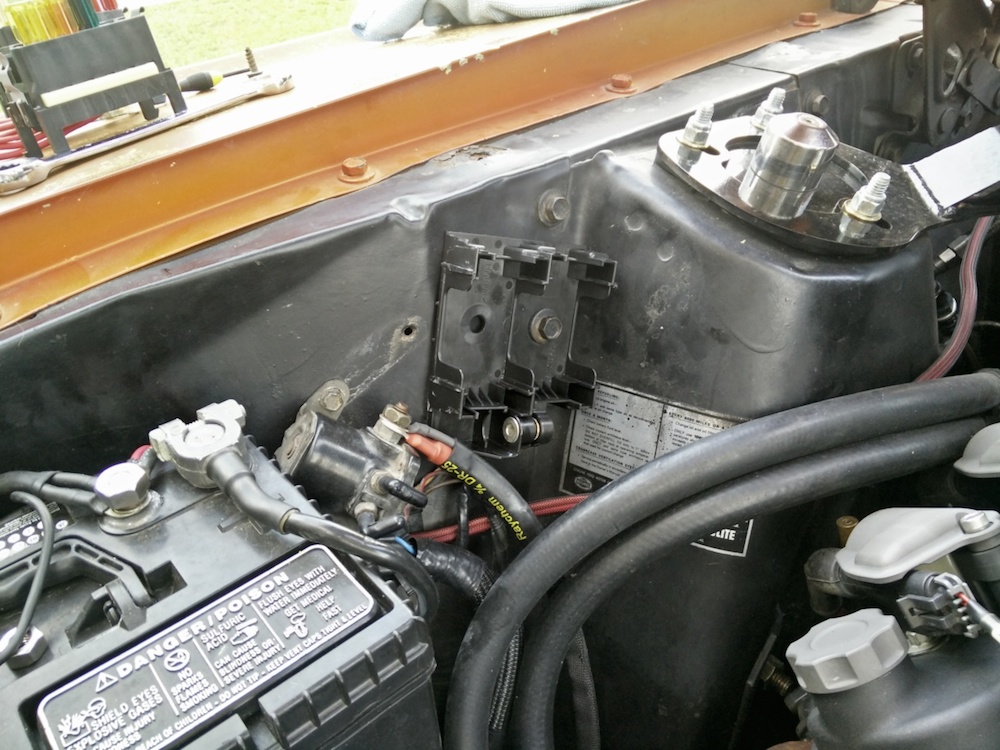
I like that better and I was even able to use one of the existing fasteners for the outside shock tower brace to hold the panel in place. The wires will exit tightly by the shock tower and be loomed along with the other wires that I already have in place.
The module on the right is functional, while the module on the left is there to hold spare fuses.
If I need more high draw runs than that, I can always replace the dummy module with one that is functional. I will run a 4 gauge battery cable from the auxiliary post on my battery directly to the bottom post of the power module. I plan to run 5 10 gauge leads from the box to under the dash. This will fix all my current issues and also give me a couple of spare runs for anything else that may need power down the line, like maybe electronic power steering. :-)
Andrew
Initially I thought I would mount it to the front of the shock tower, something like this:
That looked OK but seemed to stick out a little too much and I really didn't want to drill any holes in the shock towers. So I started looking around and I realized that if I moved the starter solenoid a little forward, I will have room between it and the shock tower. Like this...
I like that better and I was even able to use one of the existing fasteners for the outside shock tower brace to hold the panel in place. The wires will exit tightly by the shock tower and be loomed along with the other wires that I already have in place.
The module on the right is functional, while the module on the left is there to hold spare fuses.
If I need more high draw runs than that, I can always replace the dummy module with one that is functional. I will run a 4 gauge battery cable from the auxiliary post on my battery directly to the bottom post of the power module. I plan to run 5 10 gauge leads from the box to under the dash. This will fix all my current issues and also give me a couple of spare runs for anything else that may need power down the line, like maybe electronic power steering. :-)
Andrew
07-26-2016, 10:05 PM
#753
TECH Senior Member
Thread Starter
iTrader: (7)
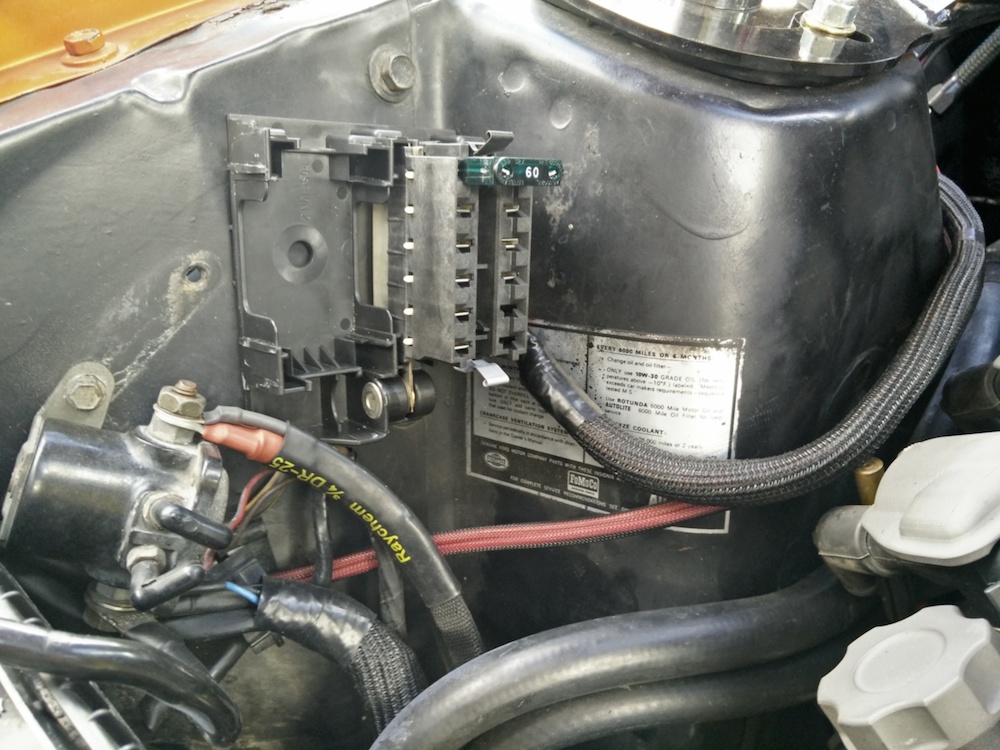
Today I decided it was time to get the wiring sorted out on the Cougar. The goal was to install the Delphi distribution blocks and run 5, 10 gauge leads under the dash. So having recently moved, I had to go through some boxes to find my wire, but I managed to dig up the 10 gauge primary wire that I bought from Waytek. I figured out how long each lead needed to be and I cut five pieces...
The up side to working in the hot Alabama sun is that the wire gets nice and soft and easy to work with. Drink lots of water kids, when working outside in 95 degree heat!
I made sure to make the wires long enough that I could reach all the way to the other side of the dash so that if I need to add anything in the future, there will be enough length. I also added some electrical tape to keep the wires together.

The wires were fed through an existing grommet in the firewall, on the driver's side by the master cylinder. In order to protect the wires and hold them together, I used some fabric style heat shrink for the portion that passes through the grommet and into the engine bay.
I wish I had more of that stuff, but I only had a small piece that was left over from my previous wiring jobs. I did however have some other loom that I used for the rest of the run along the firewall. This is woven polyester split loom that is easy to work with and looks a million times better than the split corrugated loom that you get at the local parts store.

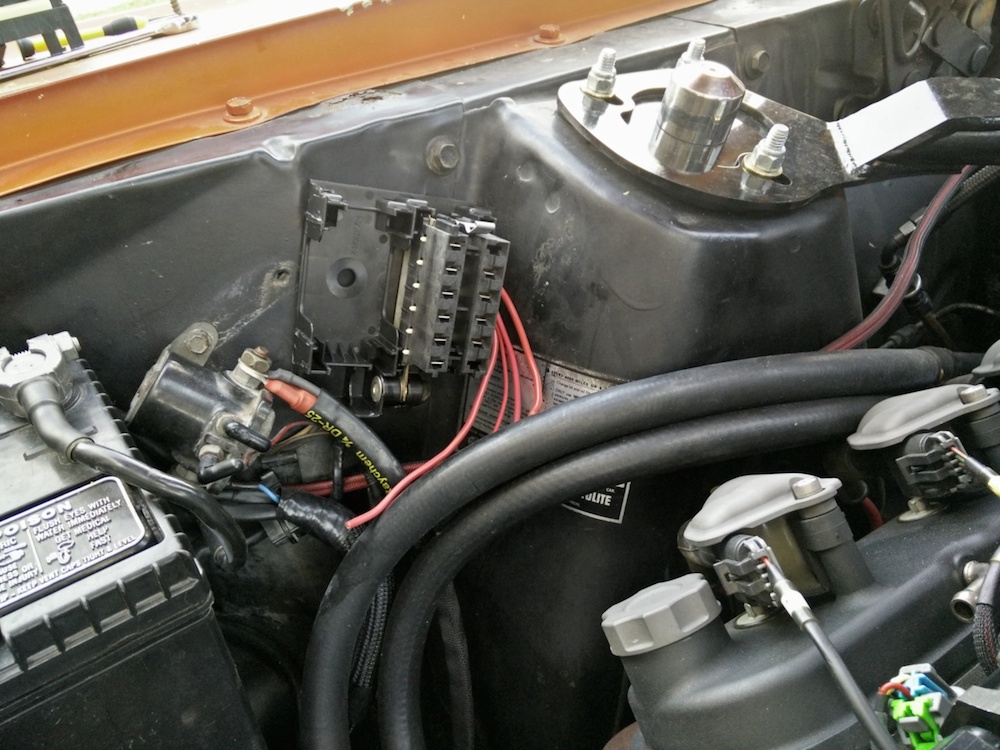
I ran the loom along the firewall, around the shock tower, and to the power distribution block.
To terminate the wires, I used Metri-Pack 800 terminals and a crimping tool from Waytek PN 560 with dies PN 567. Here is a video I made of the process (sorry about the wind noise...):
The block on the right is the one with the bus bar, while the block on the left is there to hold spare fuses. I can always replace it with another block that also has a bus bar if I need more leads inside the engine back.

Here is the finished product.
You can see the cable at the bottom of the box which attaches to the battery. I wish I would have done this when I first built the car, but lesson learned!
Andrew
The up side to working in the hot Alabama sun is that the wire gets nice and soft and easy to work with. Drink lots of water kids, when working outside in 95 degree heat!
I made sure to make the wires long enough that I could reach all the way to the other side of the dash so that if I need to add anything in the future, there will be enough length. I also added some electrical tape to keep the wires together.
The wires were fed through an existing grommet in the firewall, on the driver's side by the master cylinder. In order to protect the wires and hold them together, I used some fabric style heat shrink for the portion that passes through the grommet and into the engine bay.
I wish I had more of that stuff, but I only had a small piece that was left over from my previous wiring jobs. I did however have some other loom that I used for the rest of the run along the firewall. This is woven polyester split loom that is easy to work with and looks a million times better than the split corrugated loom that you get at the local parts store.
I ran the loom along the firewall, around the shock tower, and to the power distribution block.
To terminate the wires, I used Metri-Pack 800 terminals and a crimping tool from Waytek PN 560 with dies PN 567. Here is a video I made of the process (sorry about the wind noise...):
The block on the right is the one with the bus bar, while the block on the left is there to hold spare fuses. I can always replace it with another block that also has a bus bar if I need more leads inside the engine back.
Here is the finished product.
You can see the cable at the bottom of the box which attaches to the battery. I wish I would have done this when I first built the car, but lesson learned!
Andrew
07-27-2016, 06:31 AM
#754
Beautiful !!!!!.............................
07-28-2016, 08:00 PM
#756
TECH Senior Member
Thread Starter
iTrader: (7)
I still have the shimmy issue, so I installed a Burgesson vibration damper in the steering shaft:

This resulted in approximately zero change. I still plan on trying out a different set of front wheels and tires, and once I do, I will report back.
I am getting some little things done, mostly in preparation for the Holley LS Fest in September. I saw this being done on a another build and I thought I would follow suit. The other builder used some generic LED marker lights for interior lighting. So I bought some from Amazon to see if I can make them fit where the stock bulbs live under the dash. This is the stock light housing (minus the bulb socket):

It simply bolts to the bottom lip of the dash. Here are the LED marker lights that I bought (they were $20 for 10...I know...more cheap Chinese ****...sigh...)

Once I did a little creative trimming with a razor, they popped right into the stock housing...

It's not quite dark yet, but I will attempt to take a picture once it is...
Andrew
This resulted in approximately zero change. I still plan on trying out a different set of front wheels and tires, and once I do, I will report back.
I am getting some little things done, mostly in preparation for the Holley LS Fest in September. I saw this being done on a another build and I thought I would follow suit. The other builder used some generic LED marker lights for interior lighting. So I bought some from Amazon to see if I can make them fit where the stock bulbs live under the dash. This is the stock light housing (minus the bulb socket):
It simply bolts to the bottom lip of the dash. Here are the LED marker lights that I bought (they were $20 for 10...I know...more cheap Chinese ****...sigh...)
Once I did a little creative trimming with a razor, they popped right into the stock housing...
It's not quite dark yet, but I will attempt to take a picture once it is...
Andrew
 08-11-2016, 03:04 PM
#758
TECH Senior Member
Thread Starter
iTrader: (7)
Before I go on regarding the installation of the Baer Remaster MC, I want to give a big shout out to the the guys at Bad Obsession Motorsports. They YouTube channel can be found here:
http://www.youtube.com/user/badobsessionmsport
Richard and Nik are funny and are building an outrageous AWD Classic Mini.
I wanted to throw some support their way, so I bought some shwag.

For those that watch their videos, you'll understand...
More about the Baer MC install shortly...
Andrew
http://www.youtube.com/user/badobsessionmsport
Richard and Nik are funny and are building an outrageous AWD Classic Mini.
I wanted to throw some support their way, so I bought some shwag.
For those that watch their videos, you'll understand...
More about the Baer MC install shortly...
Andrew
08-11-2016, 03:51 PM
#759
TECH Senior Member
Thread Starter
iTrader: (7)
Now for the Baer Remaster installation. I did a review of this new MC a little while back, which can be seen here:
But due to life events, I really have not had a chance to install it before now. The reason for the swap is that my reman Maverick MC has steadily been getting worse. I noticed the problem first during last year's LSFest. The brake system would loose pressure when holding the pedal steadily pressed down. For instance, when parked on a hill I would have to keep pumping the pedal in order to not roll. There are no external leaks and the MC was not loosing fluid, so I suspect that there is an internal leak in the MC. So to add some more bling under the hood, and for obvious safety reason, yesterday I decided to make the swap. And here it is....

At this point you might be asking "where are all the detailed installation pictures?" Well, the installation was less than smooth and took way longer than expected. It started fine enough, I got the old MC off...

Seem like a simple remove and replace job, but then I had to get fancy...
The Baer Remaster has an integrated prop valve mount, which is a super clever feature, and this required the bending of some new lines. Luckily my W brand prop valve bolted right up...

I also had to be even more fancy and decided to use banjo fittings at the MC. This makes for a slick looking set-up and allows for a very easy 90* exit out of the MC. This of course required bending more lines with a 37* flare. No worries, I have a 37* flaring tool and I already had the right hardware from Earl's to make it all work. Details on making AN flares here:

Well, as we got deeper into the project we were running out of time and for the sake of expediency I decided to not do the banjo fittings on the rear port. Now you're asking yourself, "wait, there are banjo fittings on the rear port!?" Well, yes, and here is what happened...
In order to save time, I decided to just use the existing line from the rear port to my line-lock solenoid. Baer includes little inserts that must be installed in the port in order for the 45 degree flare fitting to seal. We installed it, and proceeded to tighten everything down and start filling the system with fluid. No matter what we did, the rear port kept spewing fluid. Long story short.....USER ERROR!

Pictured above is the insert that was installed into the rear port. During the bolting of the MC to the firewall, it must have gotten dislodged and was not seated squarely. As we tightened the fitting, instead of sealing, it just leaked. To make things worse, the brass fitting distorted it's seat and mangled the MC itself. The shop where I was working (big thanks to Brian and Tom!) happened to have a Snap-On flexible camera. I looked inside the MC port and my heart sank....
Luckily, banjo fittings don't seal on the seat, but instead seal against the aluminum crush washers that you see here...

So in the end we didn't save any time and had to make several new lines. Once it was all bolted up and all fittings tightened, it bled pretty easily and everything is working great.
Andrew
But due to life events, I really have not had a chance to install it before now. The reason for the swap is that my reman Maverick MC has steadily been getting worse. I noticed the problem first during last year's LSFest. The brake system would loose pressure when holding the pedal steadily pressed down. For instance, when parked on a hill I would have to keep pumping the pedal in order to not roll. There are no external leaks and the MC was not loosing fluid, so I suspect that there is an internal leak in the MC. So to add some more bling under the hood, and for obvious safety reason, yesterday I decided to make the swap. And here it is....
At this point you might be asking "where are all the detailed installation pictures?" Well, the installation was less than smooth and took way longer than expected. It started fine enough, I got the old MC off...
Seem like a simple remove and replace job, but then I had to get fancy...
The Baer Remaster has an integrated prop valve mount, which is a super clever feature, and this required the bending of some new lines. Luckily my W brand prop valve bolted right up...
I also had to be even more fancy and decided to use banjo fittings at the MC. This makes for a slick looking set-up and allows for a very easy 90* exit out of the MC. This of course required bending more lines with a 37* flare. No worries, I have a 37* flaring tool and I already had the right hardware from Earl's to make it all work. Details on making AN flares here:
Well, as we got deeper into the project we were running out of time and for the sake of expediency I decided to not do the banjo fittings on the rear port. Now you're asking yourself, "wait, there are banjo fittings on the rear port!?" Well, yes, and here is what happened...
In order to save time, I decided to just use the existing line from the rear port to my line-lock solenoid. Baer includes little inserts that must be installed in the port in order for the 45 degree flare fitting to seal. We installed it, and proceeded to tighten everything down and start filling the system with fluid. No matter what we did, the rear port kept spewing fluid. Long story short.....USER ERROR!
Pictured above is the insert that was installed into the rear port. During the bolting of the MC to the firewall, it must have gotten dislodged and was not seated squarely. As we tightened the fitting, instead of sealing, it just leaked. To make things worse, the brass fitting distorted it's seat and mangled the MC itself. The shop where I was working (big thanks to Brian and Tom!) happened to have a Snap-On flexible camera. I looked inside the MC port and my heart sank....
Luckily, banjo fittings don't seal on the seat, but instead seal against the aluminum crush washers that you see here...
So in the end we didn't save any time and had to make several new lines. Once it was all bolted up and all fittings tightened, it bled pretty easily and everything is working great.
Andrew
08-12-2016, 09:09 AM
#760
Those Mini Cooper guys are pretty funny.
Nice job on the flare fittings . I went on Baer's site to read the directions and I swore there was a specific warning about the brass fittings falling out. I could not find it on the website PDF so I dug my instructions out and it was on there. I knew I wasn't crazy. Either way the Remaster is a very nice piece and mine is working fantastic.
Nice job on the flare fittings
. I went on Baer's site to read the directions and I swore there was a specific warning about the brass fittings falling out. I could not find it on the website PDF so I dug my instructions out and it was on there. I knew I wasn't crazy. Either way the Remaster is a very nice piece and mine is working fantastic.