Conversions & Swaps LSX Engines in Non-LSX Vehicles
Sponsored by:
Sponsored by:

My Turbo LSX Z31 Build.

Thread Tools
 
Search this Thread
 
Old 06-02-2016, 04:44 PM
  #61  
TECH Enthusiast
Thread Starter
iTrader: (3)
 
Nismo Kid's Avatar
 
Join Date: Dec 2010
Location: San Antonio TX
Posts: 636
Likes: 0
Received 4 Likes on 4 Posts

Default

I tore it down & inspected immediately. This little 4.8 was pretty damn dirty on the outside. But it was rock solid inside.

Name:  20140630_093308.jpg
Views: 916
Size:  185.2 KB
Name:  20140630_093314.jpg
Views: 910
Size:  167.2 KB
Name:  20140630_093454.jpg
Views: 896
Size:  161.7 KB
Name:  20140630_093506.jpg
Views: 908
Size:  169.3 KB
Name:  20140701_095440.jpg
Views: 887
Size:  169.2 KB
Name:  20140701_095453.jpg
Views: 933
Size:  181.8 KB
Name:  20140701_100629.jpg
Views: 915
Size:  165.7 KB
Name:  20150714_173158.jpg
Views: 906
Size:  174.3 KB
Old 06-02-2016, 04:45 PM
  #62  
TECH Enthusiast
Thread Starter
iTrader: (3)
 
Nismo Kid's Avatar
 
Join Date: Dec 2010
Location: San Antonio TX
Posts: 636
Likes: 0
Received 4 Likes on 4 Posts

Default

So I cleaned it up & painted the block.
Name:  20150715_124654.jpg
Views: 844
Size:  173.9 KB
Name:  20150715_124706.jpg
Views: 907
Size:  127.8 KB
Name:  20150715_140149.jpg
Views: 917
Size:  194.6 KB
Name:  20150715_140200.jpg
Views: 832
Size:  178.4 KB
Name:  20150715_140206.jpg
Views: 891
Size:  164.4 KB
Name:  20150715_142144.jpg
Views: 916
Size:  148.9 KB
Name:  20150715_142159.jpg
Views: 885
Size:  146.1 KB
Name:  20150715_142240.jpg
Views: 854
Size:  157.0 KB
Name:  20150715_142247.jpg
Views: 851
Size:  133.1 KB
Old 06-02-2016, 04:47 PM
  #63  
TECH Enthusiast
Thread Starter
iTrader: (3)
 
Nismo Kid's Avatar
 
Join Date: Dec 2010
Location: San Antonio TX
Posts: 636
Likes: 0
Received 4 Likes on 4 Posts

Default

Name:  20150715_144547.jpg
Views: 903
Size:  150.8 KB
Name:  20150715_144555.jpg
Views: 868
Size:  142.4 KB
Name:  20150715_145154.jpg
Views: 895
Size:  169.8 KB
Name:  20150715_145202.jpg
Views: 904
Size:  165.3 KB
Name:  20150715_145327.jpg
Views: 892
Size:  165.6 KB
Name:  20150715_145335.jpg
Views: 890
Size:  184.0 KB
Old 06-02-2016, 04:48 PM
  #64  
TECH Enthusiast
Thread Starter
iTrader: (3)
 
Nismo Kid's Avatar
 
Join Date: Dec 2010
Location: San Antonio TX
Posts: 636
Likes: 0
Received 4 Likes on 4 Posts

Default

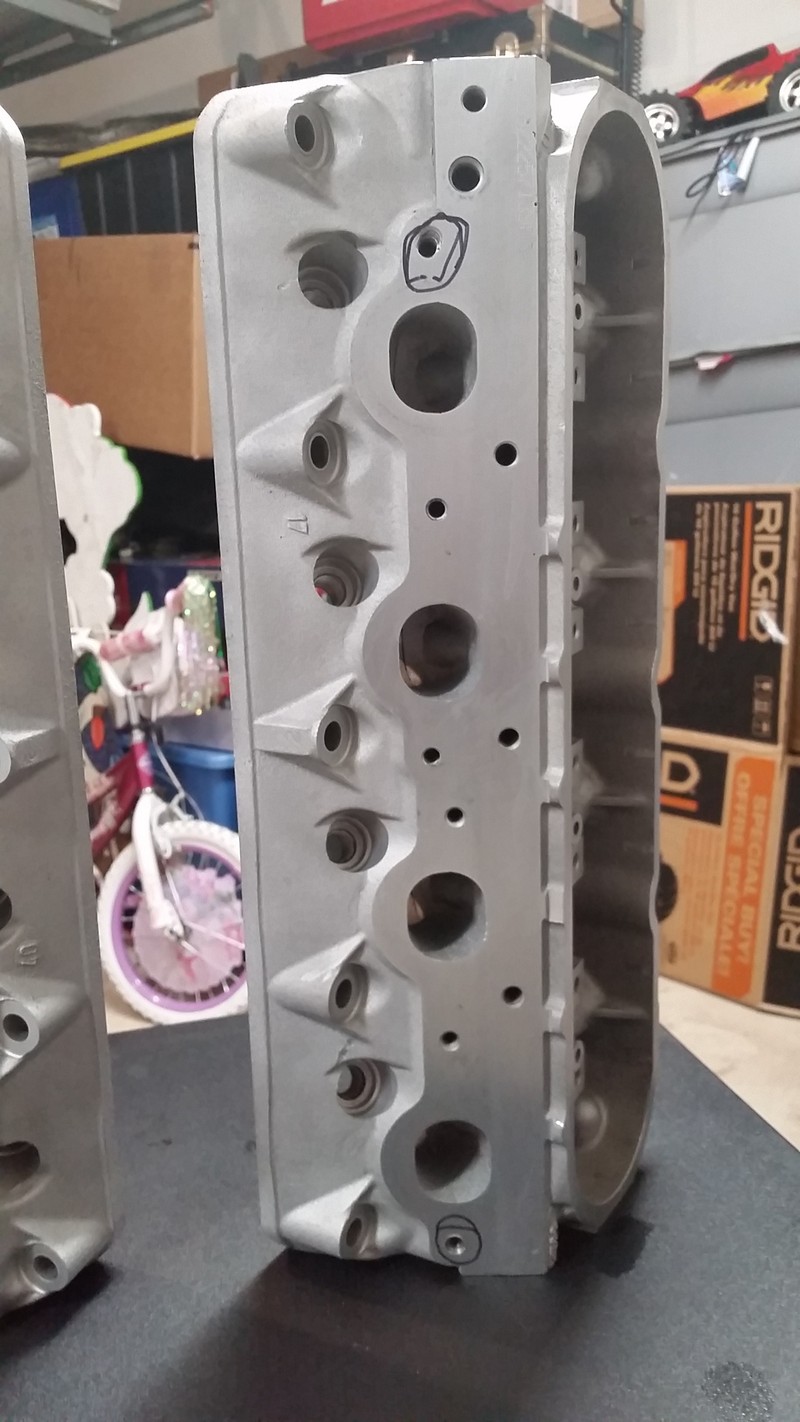
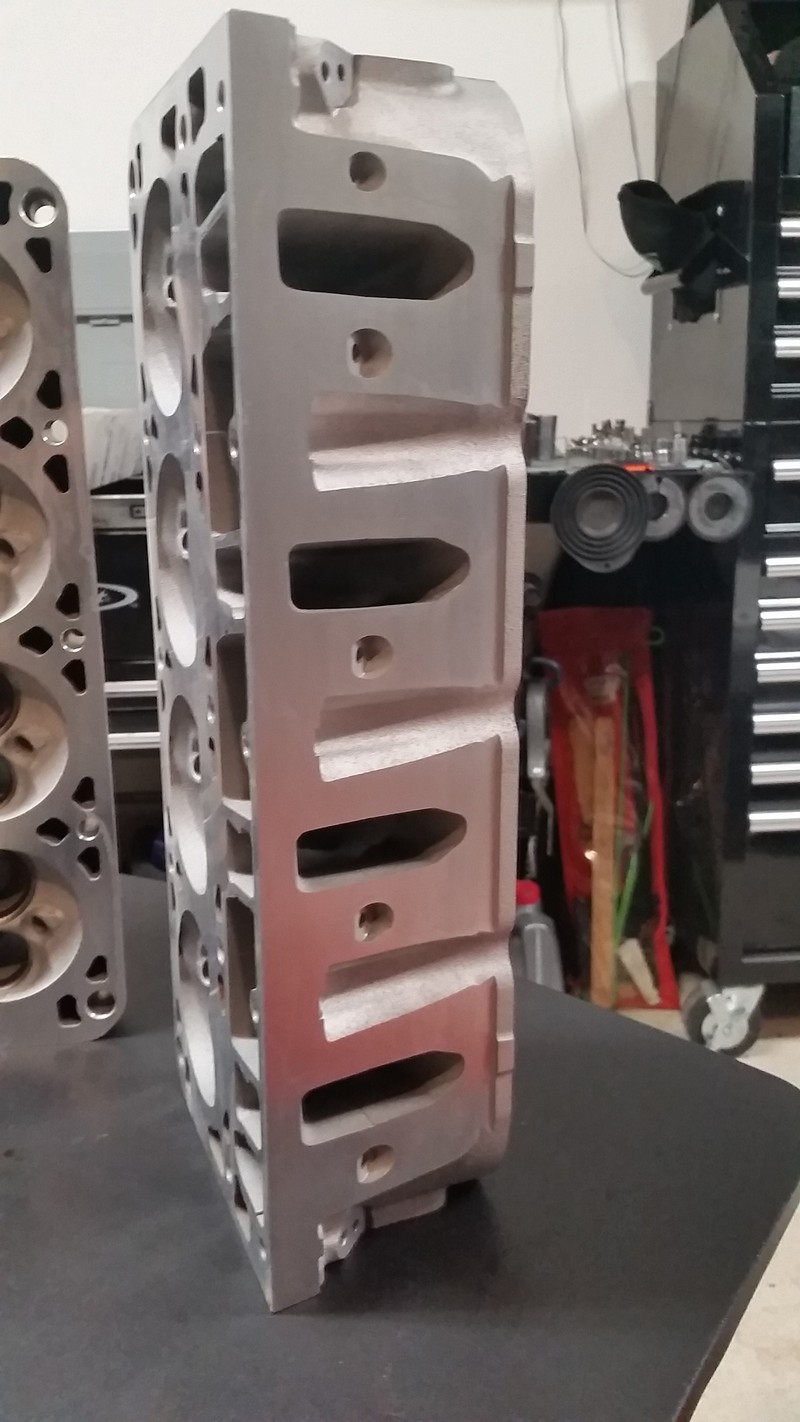
Dropped the heads of at the machine shop it have them cleaned & resurfaced. Also had the valve covers, oil pan, & timing cover media blasted. I also replaced the cam bearings. While I was doing this I figured "Why not step my engine bay game up?". I chose to shave the stand offs & weld -10an fittings on my valve covers.

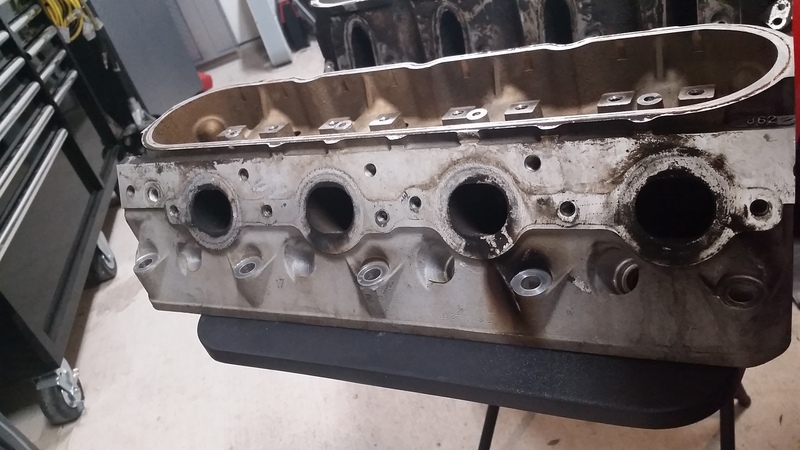
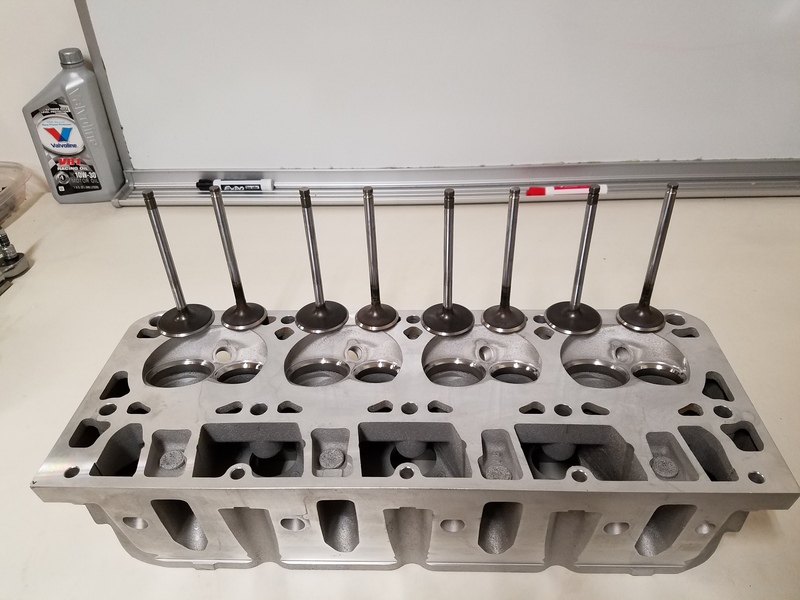
Cylinder Heads Before
Name:  20160111_000339.jpg
Views: 908
Size:  161.8 KB
Name:  20160111_000432.jpg
Views: 883
Size:  131.8 KB
Name:  20160111_000441.jpg
Views: 874
Size:  145.8 KB
Name:  20160111_000454.jpg
Views: 915
Size:  157.7 KB
Name:  20160111_000526.jpg
Views: 862
Size:  127.3 KB

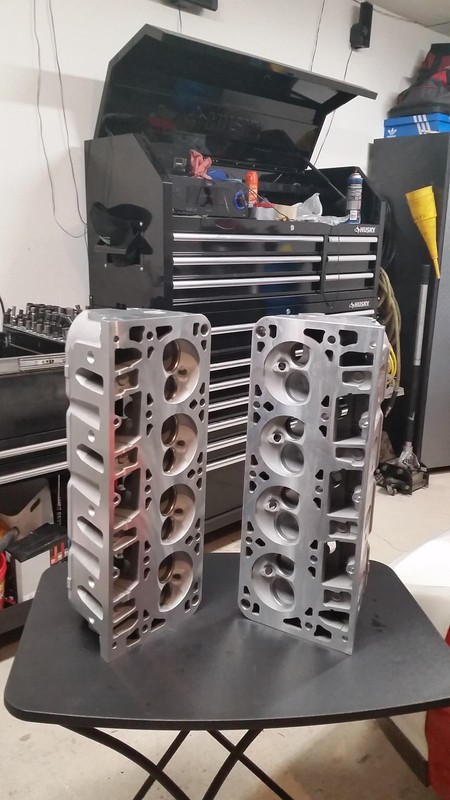
Cylinder Heads After
Name:  20160113_181916.jpg
Views: 890
Size:  135.9 KB
Name:  20160113_181933.jpg
Views: 908
Size:  191.7 KB
Name:  20160113_181945.jpg
Views: 887
Size:  218.5 KB
Name:  20160113_182004.jpg
Views: 903
Size:  204.0 KB
Name:  20160113_181954.jpg
Views: 889
Size:  199.1 KB
Old 06-02-2016, 04:49 PM
  #65  
TECH Enthusiast
Thread Starter
iTrader: (3)
 
Nismo Kid's Avatar
 
Join Date: Dec 2010
Location: San Antonio TX
Posts: 636
Likes: 0
Received 4 Likes on 4 Posts

Default

Timing Cover Before
Name:  20160111_003952.jpg
Views: 922
Size:  313.1 KB

Timing Cover After
Name:  20160113_182325.jpg
Views: 855
Size:  165.4 KB

Oil Pan Before
Name:  20160205_101344.jpg
Views: 899
Size:  139.5 KB
Name:  20160205_101357.jpg
Views: 884
Size:  146.2 KB
Name:  20160205_101411.jpg
Views: 878
Size:  139.4 KB

Valve Covers Before
Name:  20160111_000951.jpg
Views: 902
Size:  170.2 KB
Name:  20160111_002409.jpg
Views: 878
Size:  197.2 KB
Valve Covers After
Name:  20160113_182132.jpg
Views: 902
Size:  133.8 KB
Name:  20160113_182234.jpg
Views: 873
Size:  140.5 KB
Old 06-02-2016, 04:50 PM
  #66  
TECH Enthusiast
Thread Starter
iTrader: (3)
 
Nismo Kid's Avatar
 
Join Date: Dec 2010
Location: San Antonio TX
Posts: 636
Likes: 0
Received 4 Likes on 4 Posts

Default

Here's some pics of the valve cover stand off shaving process
Name:  20160114_110004.jpg
Views: 857
Size:  134.7 KB
Name:  20160114_110518.jpg
Views: 873
Size:  352.1 KB
Name:  20160114_111742.jpg
Views: 897
Size:  166.5 KB
Name:  20160114_112850.jpg
Views: 884
Size:  198.7 KB
Name:  20160114_130222.jpg
Views: 869
Size:  131.9 KB
Name:  20160114_125439.jpg
Views: 860
Size:  104.4 KB
Name:  20160114_132636.jpg
Views: 886
Size:  134.0 KB
Name:  20160114_133519.jpg
Views: 880
Size:  147.2 KB
Name:  20160114_134105.jpg
Views: 921
Size:  261.7 KB
Name:  20160125_211423.jpg
Views: 866
Size:  240.0 KB
Old 06-02-2016, 04:51 PM
  #67  
TECH Enthusiast
Thread Starter
iTrader: (3)
 
Nismo Kid's Avatar
 
Join Date: Dec 2010
Location: San Antonio TX
Posts: 636
Likes: 0
Received 4 Likes on 4 Posts

Default

Old Cam Bearings

Name:  20160219_232202.jpg
Views: 893
Size:  165.4 KB
Name:  20160219_231247.jpg
Views: 854
Size:  269.6 KB
Name:  20160219_231304.jpg
Views: 868
Size:  131.1 KB

New Cam Bearings
Name:  20160512_001222.jpg
Views: 914
Size:  247.6 KB

Then had my engine crossmember, valve covers, timing cover, oil pan, & a few other things powder coated.
Name:  20160318_174833.jpg
Views: 903
Size:  177.7 KB
Name:  20160323_113831.jpg
Views: 905
Size:  157.6 KB
Name:  20160323_113835.jpg
Views: 878
Size:  171.6 KB
Name:  20160323_113840.jpg
Views: 876
Size:  171.2 KB
Name:  20160323_113850.jpg
Views: 884
Size:  161.2 KB
Name:  20160323_114116.jpg
Views: 863
Size:  109.4 KB
Old 06-02-2016, 04:53 PM
  #68  
TECH Enthusiast
Thread Starter
iTrader: (3)
 
Nismo Kid's Avatar
 
Join Date: Dec 2010
Location: San Antonio TX
Posts: 636
Likes: 0
Received 4 Likes on 4 Posts

Default

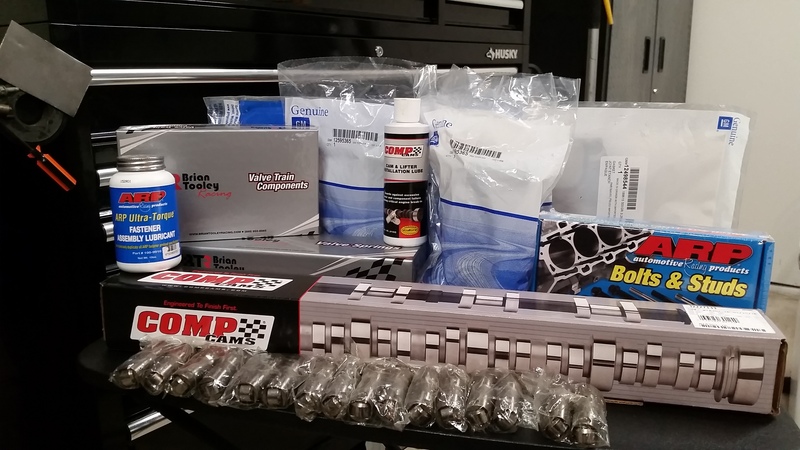
Purchased all these goodies for the 4.8
LJMS Stage 1 4.8 Turbo Cam
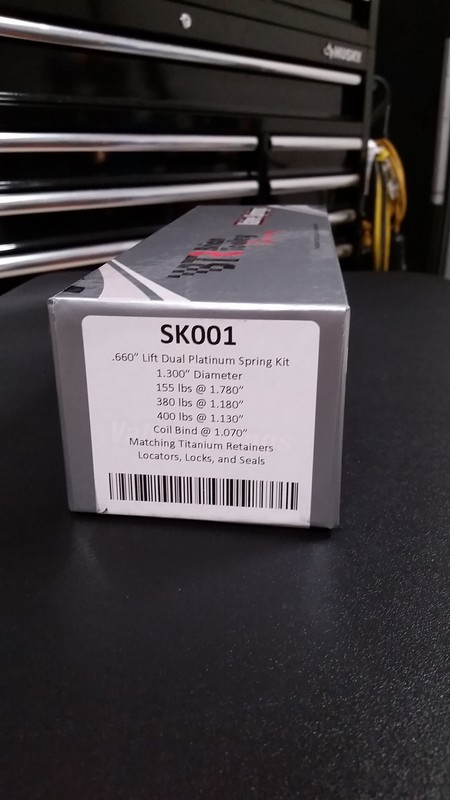
BTR 660 Dual Valve Springs with Titanium Retainers
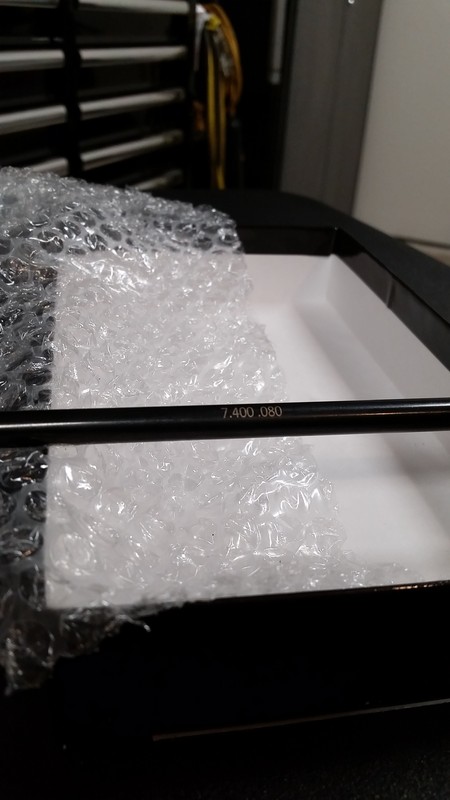
Comp 7.400 Hardened Push Rods
Straub Technologies Trunnion Kit
ARP Head Studs
ARP Stainless Steel Valve Cover Bolts
ARP Stainless Steel Water Pump Bolts
ARP Stainless Steel Intake Manifold Bolts
ARP Stainless Steel Oil Pan Bolts
ARP Stainless Steel Timing Cover Bolts
ARP Balancer Bolt
ARP Camshaft Bolts
Summit 25% Underdrive Balancer
Improved Racing Oil Pan Baffle
Meling 10295 High Oil Pressure Pump
Hinson Racing C7R Timing Chain
Billet EGR block Off Plate
LS7 Lifters
New Lifter Trays
GM Performance 12498544 Head Gasket
Dorman Drain Plug 65221(Deletes oil level sensor)
New GM 12589016 Camshaft Retainer
New Oil & Coolant Plugs
New Cylinder Head Dowels
Dorman 635-518 Rear Main Seal Cover Set
New Gaskets for the entire engine
MS3 Gold Box
Siemens Deka 80 LB/HR Fuel Injectors
3 Bar Map sensor
Fast Fuel Rails(Scored these for 50$)
12.9 grade Rocker Arm Bolts
Name:  20160215_101319.jpg
Views: 879
Size:  168.4 KB
Name:  20160215_095332.jpg
Views: 868
Size:  79.9 KB
Name:  20160215_095346.jpg
Views: 879
Size:  463.8 KB
Name:  20160215_095511.jpg
Views: 858
Size:  157.8 KB
Name:  20160215_095607.jpg
Views: 854
Size:  106.7 KB
Name:  20160215_095615.jpg
Views: 869
Size:  95.1 KB
Name:  20160215_095708.jpg
Views: 874
Size:  125.9 KB
Name:  20160215_095739.jpg
Views: 846
Size:  91.7 KB
Name:  20160215_095817.jpg
Views: 882
Size:  97.5 KB
Old 06-02-2016, 04:55 PM
  #69  
TECH Enthusiast
Thread Starter
iTrader: (3)
 
Nismo Kid's Avatar
 
Join Date: Dec 2010
Location: San Antonio TX
Posts: 636
Likes: 0
Received 4 Likes on 4 Posts

Default

Name:  20160215_095828.jpg
Views: 867
Size:  105.3 KB
Name:  20160215_100001.jpg
Views: 870
Size:  145.0 KB
Name:  20160215_100028.jpg
Views: 883
Size:  146.8 KB
Name:  20160215_100214.jpg
Views: 899
Size:  127.7 KB
Name:  20160215_100230.jpg
Views: 903
Size:  114.0 KB
Name:  20160215_100400.jpg
Views: 886
Size:  126.2 KB
Name:  20160215_100527.jpg
Views: 905
Size:  139.2 KB
Name:  20160215_100622.jpg
Views: 889
Size:  206.8 KB
Name:  20160218_204741.jpg
Views: 888
Size:  128.4 KB

Name:  20160504_204438.jpg
Views: 885
Size:  211.7 KB
Name:  20160504_204538.jpg
Views: 893
Size:  162.7 KB
Old 06-02-2016, 04:56 PM
  #70  
TECH Enthusiast
Thread Starter
iTrader: (3)
 
Nismo Kid's Avatar
 
Join Date: Dec 2010
Location: San Antonio TX
Posts: 636
Likes: 0
Received 4 Likes on 4 Posts

Default

Name:  20160504_205426.jpg
Views: 896
Size:  224.9 KB
Name:  20160505_205550.jpg
Views: 884
Size:  209.7 KB
Name:  20160505_205840.jpg
Views: 889
Size:  209.9 KB
Name:  20160505_205848.jpg
Views: 837
Size:  177.8 KB

Name:  20160505_205903.jpg
Views: 910
Size:  308.3 KB
Name:  20160511_154743.jpg
Views: 876
Size:  159.9 KB
Name:  20160511_231358.jpg
Views: 892
Size:  231.4 KB
Name:  20160512_141342.jpg
Views: 871
Size:  182.4 KB
Name:  20160512_120454.jpg
Views: 888
Size:  151.8 KB
Old 06-02-2016, 04:58 PM
  #71  
TECH Enthusiast
Thread Starter
iTrader: (3)
 
Nismo Kid's Avatar
 
Join Date: Dec 2010
Location: San Antonio TX
Posts: 636
Likes: 0
Received 4 Likes on 4 Posts

Default

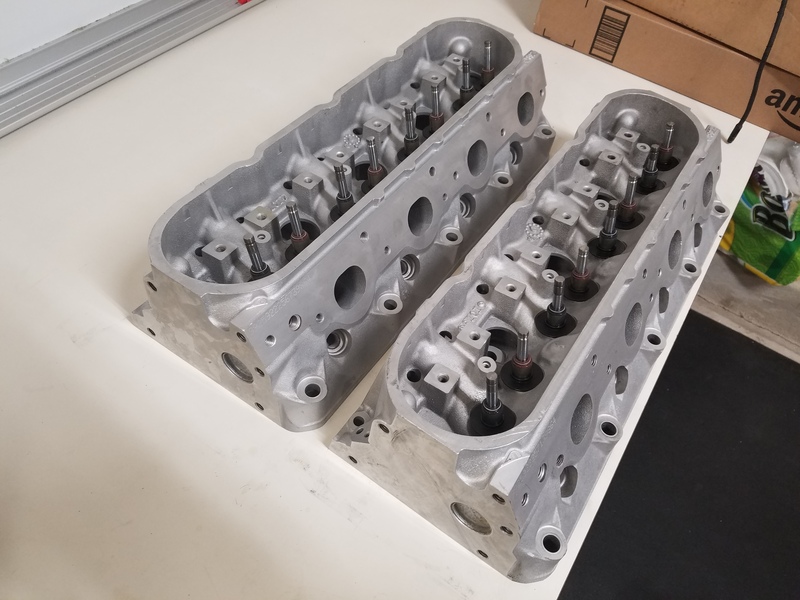
Now that I have my assortment of parts it was time for assembly.

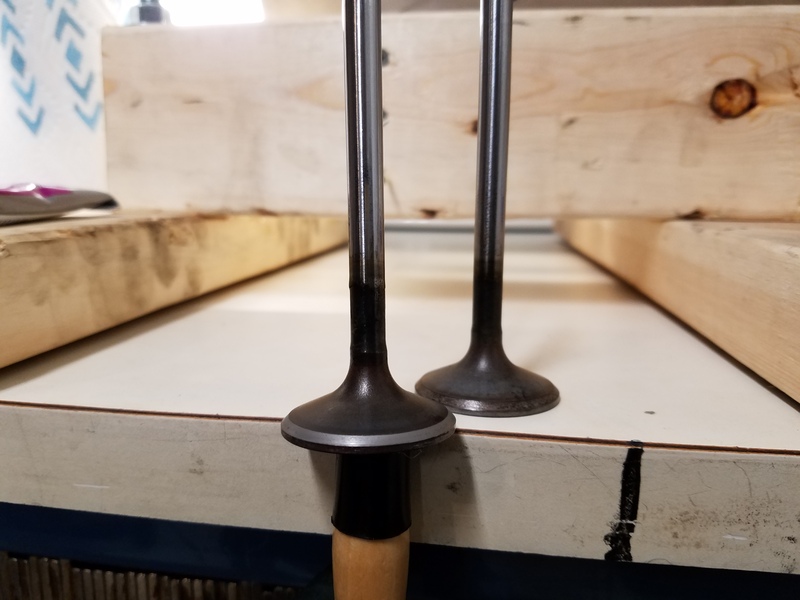
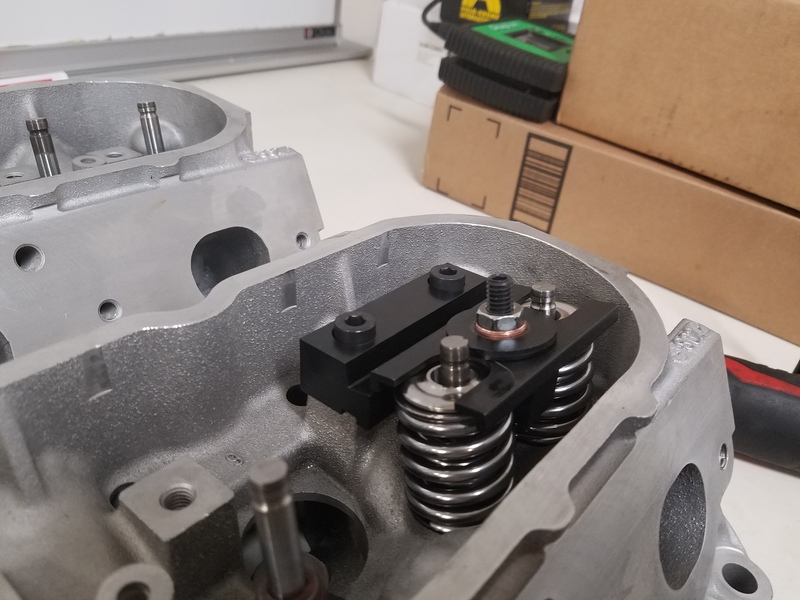
1st I cleaned & began to lap all the valves. After lapping a few I found a couple pits on the seat of the valve. So I decided to get valve job.
Name:  20160512_170737.jpg
Views: 846
Size:  132.8 KB
Name:  20160516_140826.jpg
Views: 904
Size:  168.3 KB
Name:  20160516_140950.jpg
Views: 889
Size:  161.1 KB
Name:  20160516_141002.jpg
Views: 900
Size:  148.0 KB

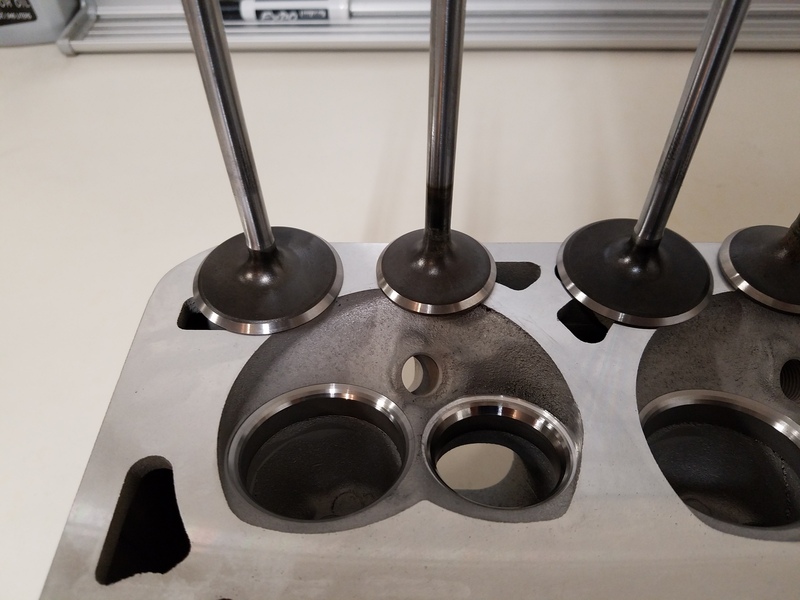
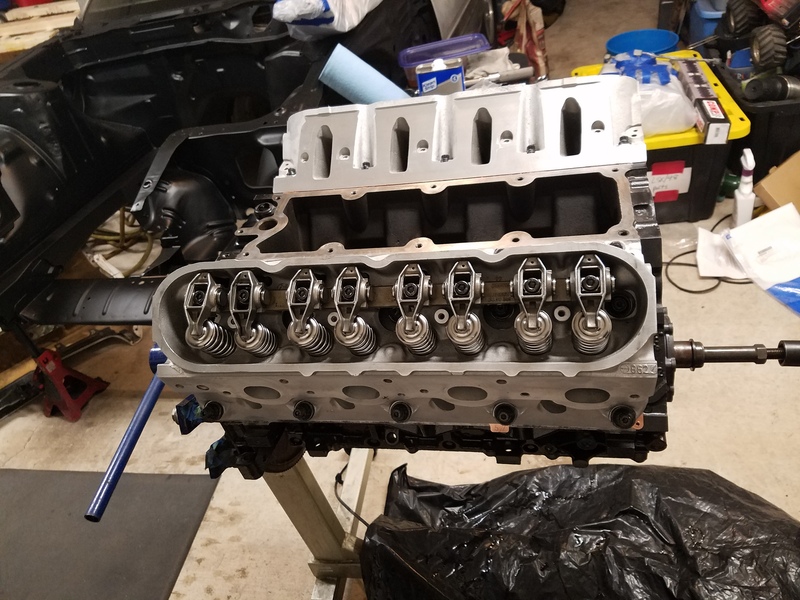
After that I installed the valves & Premium BTR 660 valve spring kit. Then set the cylinder heads off to the side.
Name:  20160516_151449.jpg
Views: 885
Size:  177.1 KB
Name:  20160516_151633.jpg
Views: 838
Size:  198.5 KB
Name:  20160516_151711.jpg
Views: 825
Size:  190.5 KB
Name:  20160516_151813.jpg
Views: 834
Size:  176.7 KB
Name:  20160516_152653.jpg
Views: 822
Size:  180.6 KB
Name:  20160516_155328.jpg
Views: 839
Size:  183.0 KB
Name:  20160516_155409.jpg
Views: 865
Size:  267.7 KB
Old 06-02-2016, 05:00 PM
  #72  
TECH Enthusiast
Thread Starter
iTrader: (3)
 
Nismo Kid's Avatar
 
Join Date: Dec 2010
Location: San Antonio TX
Posts: 636
Likes: 0
Received 4 Likes on 4 Posts

Default

Next up was installing my Straub Technologies Trunnion kit into my factory rocker arms. Thanks to the summit racing tool it was a breeze. I also set those to the side.
Name:  20160516_075418.jpg
Views: 837
Size:  127.5 KB
Name:  20160516_075459.jpg
Views: 838
Size:  120.8 KB
Name:  20160516_080301.jpg
Views: 843
Size:  104.0 KB
Name:  20160516_080316.jpg
Views: 836
Size:  102.6 KB
Name:  20160516_080423.jpg
Views: 849
Size:  96.5 KB
Name:  20160516_080618.jpg
Views: 843
Size:  180.5 KB
Name:  20160516_080712.jpg
Views: 843
Size:  160.9 KB
Name:  20160516_080844.jpg
Views: 820
Size:  88.1 KB
Name:  20160516_085453.jpg
Views: 825
Size:  81.6 KB
Name:  20160516_085520.jpg
Views: 828
Size:  95.4 KB
Old 06-02-2016, 05:01 PM
  #73  
TECH Enthusiast
Thread Starter
iTrader: (3)
 
Nismo Kid's Avatar
 
Join Date: Dec 2010
Location: San Antonio TX
Posts: 636
Likes: 0
Received 4 Likes on 4 Posts

Default

Name:  20160516_085349.jpg
Views: 835
Size:  100.1 KB
Name:  20160516_085424.jpg
Views: 829
Size:  95.1 KB
Name:  20160516_101032.jpg
Views: 844
Size:  143.0 KB

I grabbed my 4.8 cleaned all the bolt holes in the block. Then replaced all the oil & coolant plugs. After all that I proceeded installing the LJMS Stage 1 cam followed by a new camshaft retainer.
Name:  20160516_110607.jpg
Views: 834
Size:  296.2 KB
Name:  20160512_124935.jpg
Views: 837
Size:  201.3 KB
Name:  20160512_124942.jpg
Views: 824
Size:  210.5 KB
Name:  20160512_124951.jpg
Views: 826
Size:  254.7 KB
Name:  20160512_125020.jpg
Views: 822
Size:  214.8 KB


Name:  20160512_134955.jpg
Views: 822
Size:  200.8 KB
Name:  20160512_135006.jpg
Views: 820
Size:  194.7 KB
Name:  20160512_135016.jpg
Views: 827
Size:  245.2 KB
Name:  20160512_140037.jpg
Views: 826
Size:  204.5 KB
Old 06-02-2016, 05:03 PM
  #74  
TECH Enthusiast
Thread Starter
iTrader: (3)
 
Nismo Kid's Avatar
 
Join Date: Dec 2010
Location: San Antonio TX
Posts: 636
Likes: 0
Received 4 Likes on 4 Posts

Default

Name:  20160512_141952.jpg
Views: 840
Size:  335.6 KB
Name:  20160512_142250.jpg
Views: 851
Size:  227.8 KB
Name:  20160512_144413.jpg
Views: 844
Size:  203.8 KB

C7R Timing Chain vs the OEM
Name:  20160512_142808.jpg
Views: 830
Size:  221.9 KB
Name:  20160512_143046.jpg
Views: 833
Size:  106.9 KB

C7R timing chain installed
Name:  20160512_150700.jpg
Views: 841
Size:  215.7 KB


Degreed the cam
Name:  20160514_170632.jpg
Views: 825
Size:  269.3 KB

Tossed in the LS7 lifters & trays.
Name:  20160511_181251.jpg
Views: 812
Size:  164.3 KB
Name:  20160511_181306.jpg
Views: 825
Size:  170.9 KB
Name:  20160516_142557.jpg
Views: 828
Size:  204.7 KB
Old 06-02-2016, 05:04 PM
  #75  
TECH Enthusiast
Thread Starter
iTrader: (3)
 
Nismo Kid's Avatar
 
Join Date: Dec 2010
Location: San Antonio TX
Posts: 636
Likes: 0
Received 4 Likes on 4 Posts

Default

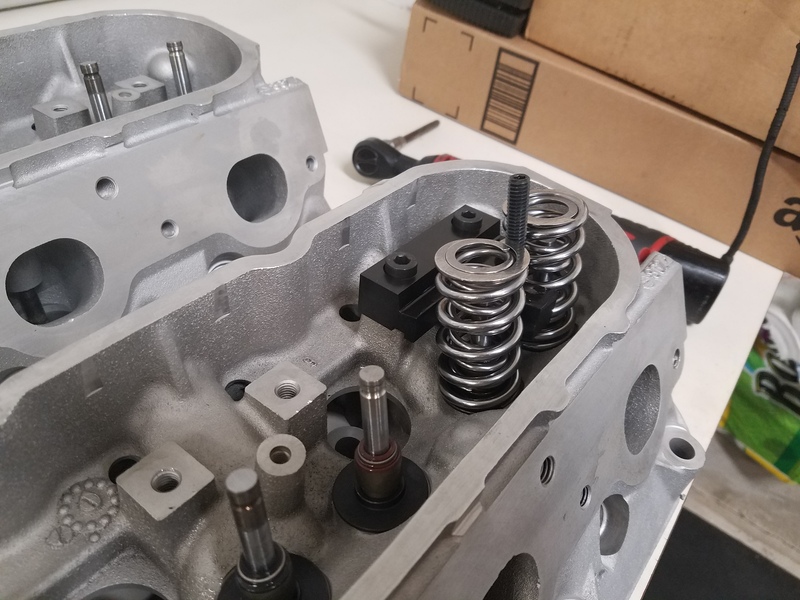
Installed cylinder head dowels. Lightly lubed the threaded sections of the ARP Head Stud with ARP lube. Then threaded them into the block hand tight.
Name:  20160516_164145.jpg
Views: 824
Size:  174.2 KB

After that I coated my head gaskets with copper spray & slid them over the studs.
Name:  20160516_165750.jpg
Views: 825
Size:  228.8 KB
Name:  20160516_172841.jpg
Views: 821
Size:  235.2 KB

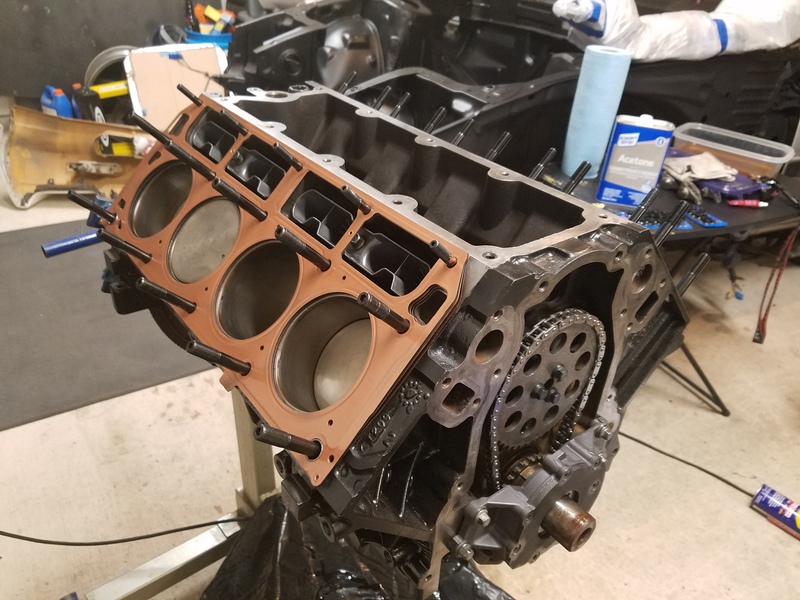
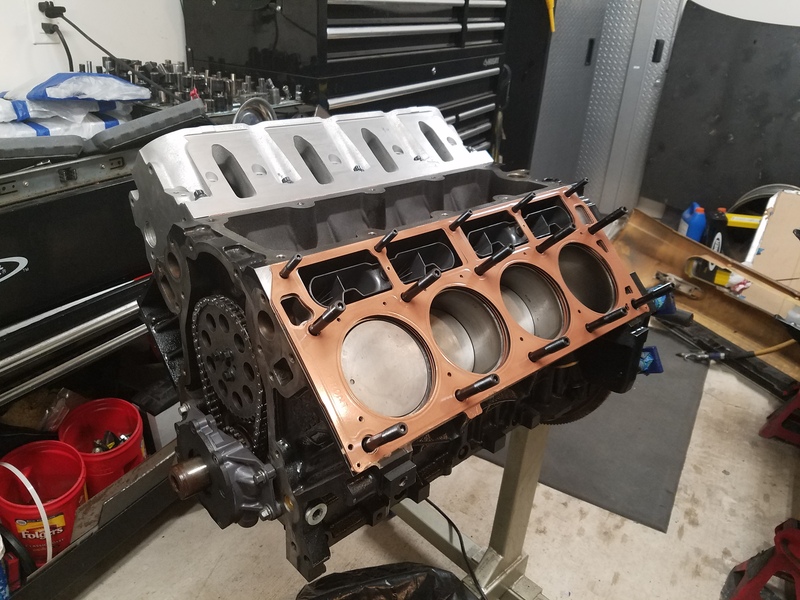
Carefully lowered the cylinder heads down over the head studs.
Name:  20160516_170144.jpg
Views: 833
Size:  227.5 KB

After that I lightly applied ARP lube to the washer & threads of the nuts. Then I installed the washers & threaded the nuts down hand tight. Following GM's recommended torque sequence I tightened the 7/16" nuts in 3 equal steps to 80 ft lbs. The 5/16" nuts were torqued to 25 ft lbs.
Name:  20160516_172304.jpg
Views: 824
Size:  235.7 KB
Name:  20160516_174854.jpg
Views: 822
Size:  237.2 KB

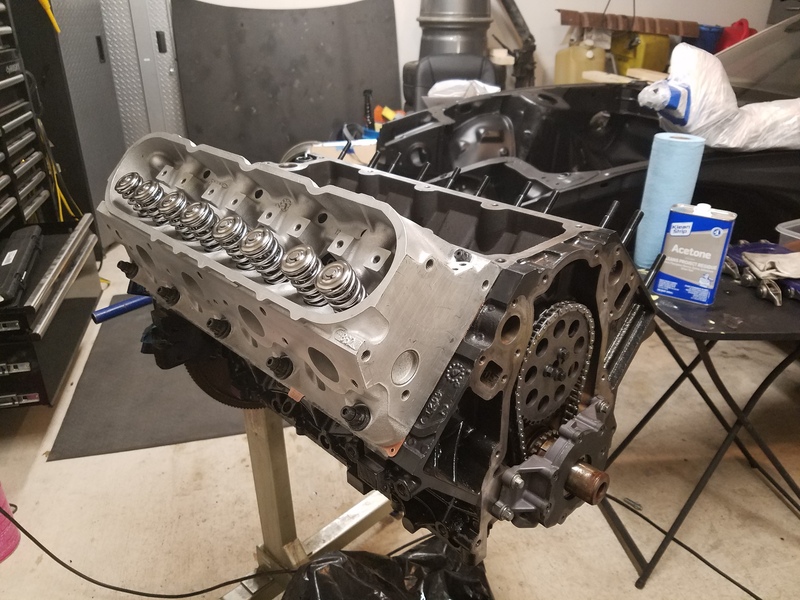
Continuing on I tossed in my pushrods & set the rockers in their respected places. With the engine in the number one firing position, I tightened exhaust valve rocker arm bolts 1, 2, 7, and 8 to 22 ft lbs. Then I tightened intake valve rocker arm bolts 1, 3, 4, and 5 to 22 ft lbs.
I rotated the crankshaft 360° & tightened exhaust valve rocker arm bolts 3, 4, 5, and 6 to 22 ft lbs. Last but not least I tightened intake valve rocker arm bolts 2, 6, 7, and 8 to 22 ft lbs.
Name:  20160516_204521.jpg
Views: 832
Size:  236.3 KB
Name:  20160516_204527.jpg
Views: 831
Size:  242.7 KB
Name:  20160516_205426.jpg
Views: 818
Size:  246.4 KB
Name:  20160516_205436.jpg
Views: 822
Size:  233.1 KB
Name:  20160516_205443.jpg
Views: 821
Size:  227.5 KB
Name:  20160516_205452.jpg
Views: 817
Size:  244.2 KB
Old 06-02-2016, 05:05 PM
  #76  
TECH Enthusiast
Thread Starter
iTrader: (3)
 
Nismo Kid's Avatar
 
Join Date: Dec 2010
Location: San Antonio TX
Posts: 636
Likes: 0
Received 4 Likes on 4 Posts

Default

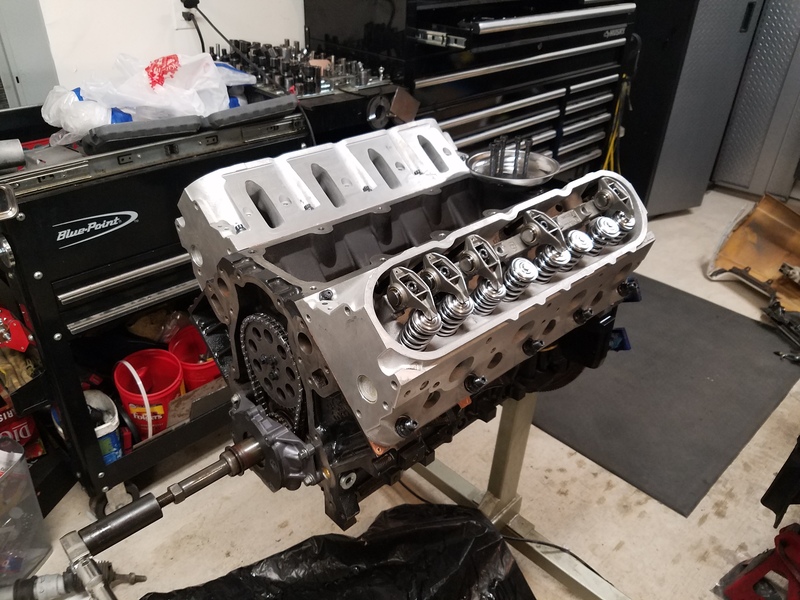
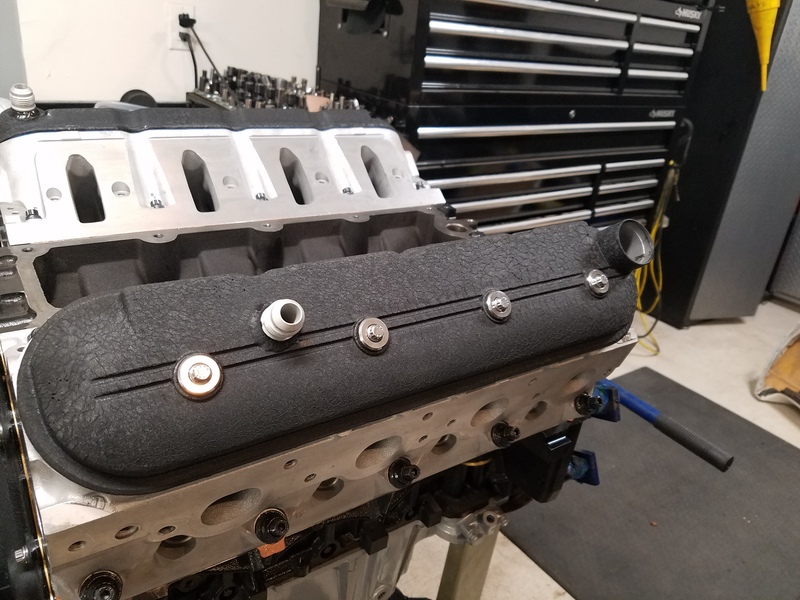
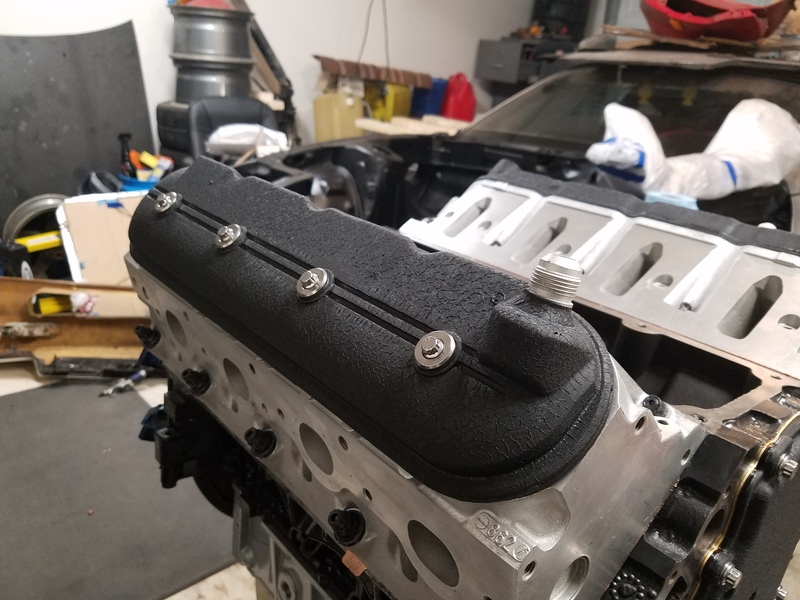
After a few rotations I double checked all the rocker arm bolts with my torque wrench. Now that made sure I had no binding issues it was time to install my valve covers & Meling oil pump. I installed the Meling oil pump following their directions. Using 3 .0025 feeler gauges equally spaced between each rotor. Plus 3 more equally spaced .0025 feeler gauges between the largest rotor & pump casing. Then torqued the pump bolts to 18 ft lbs. Then secured pump cover using supplied bolts with a bit Loctite 242.

Name:  20160516_122601.jpg
Views: 831
Size:  213.4 KB

Name:  20160516_122720.jpg
Views: 824
Size:  216.5 KB

Name:  20160516_123228.jpg
Views: 851
Size:  234.2 KB

Name:  20160516_123228.jpg
Views: 851
Size:  234.2 KB

Name:  20160516_123550.jpg
Views: 852
Size:  218.4 KB

Name:  20160516_215926.jpg
Views: 826
Size:  207.4 KB

Name:  20160516_221317.jpg
Views: 830
Size:  215.1 KB

Name:  20160516_220621.jpg
Views: 831
Size:  226.3 KB

Name:  20160516_221324.jpg
Views: 826
Size:  204.4 KB
Attached Images
File Type: jpg
20160516_123228.jpg (234.2 KB, 92 views)
Old 06-02-2016, 05:07 PM
  #77  
TECH Enthusiast
Thread Starter
iTrader: (3)
 
Nismo Kid's Avatar
 
Join Date: Dec 2010
Location: San Antonio TX
Posts: 636
Likes: 0
Received 4 Likes on 4 Posts

Default

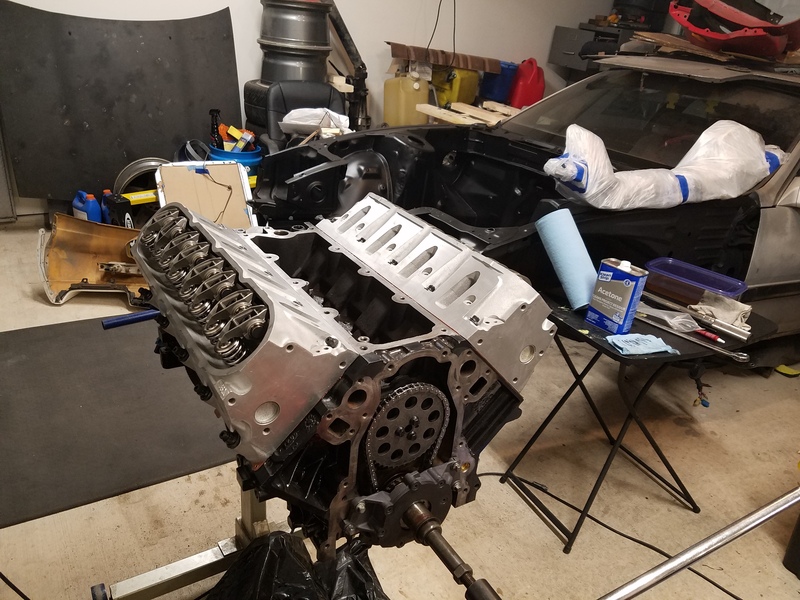
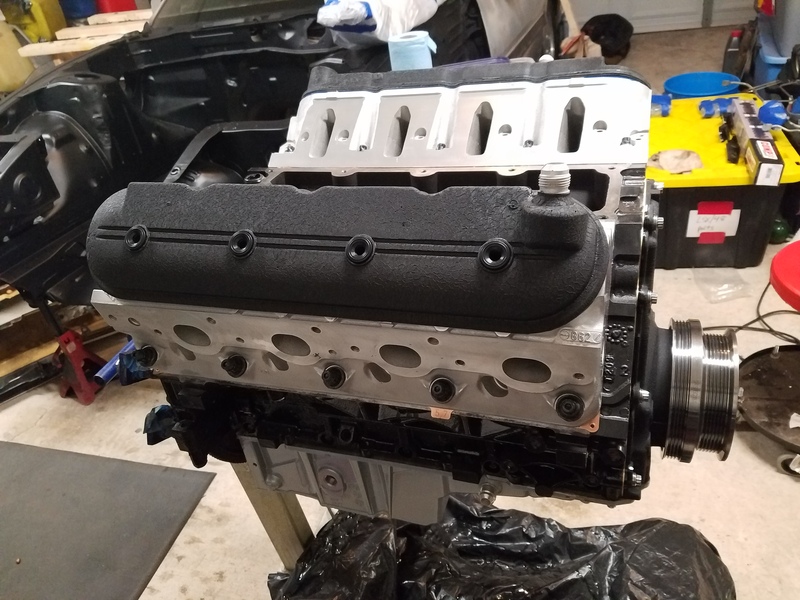
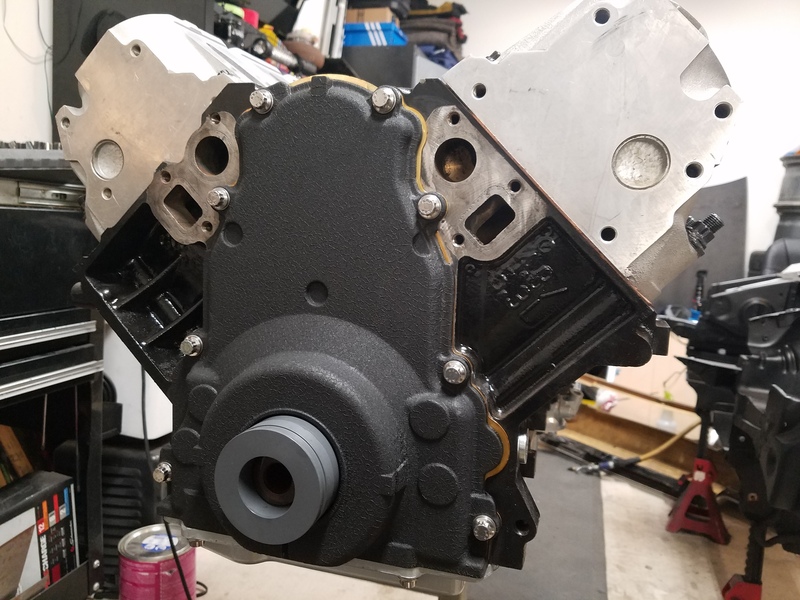
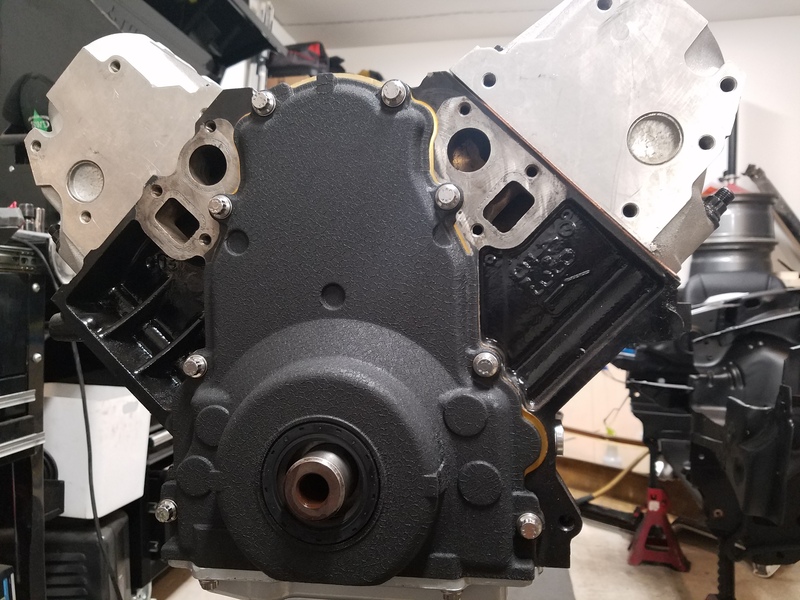
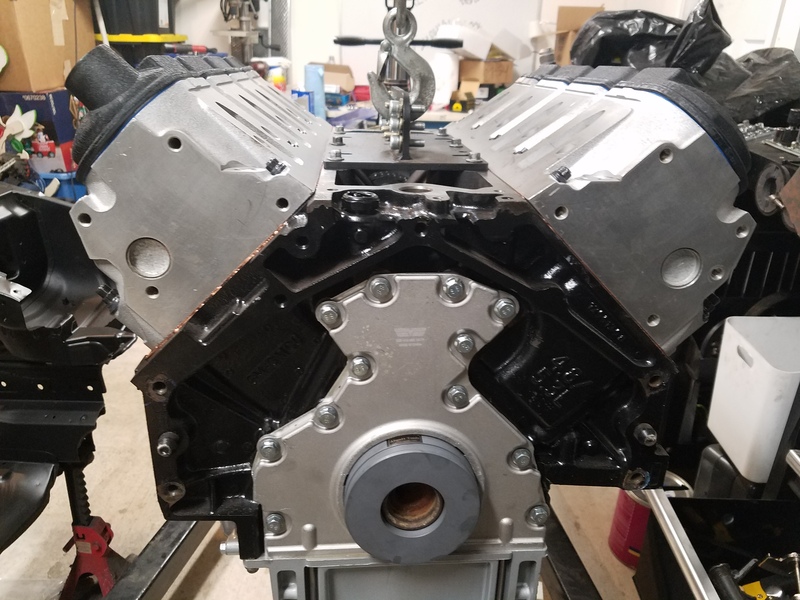
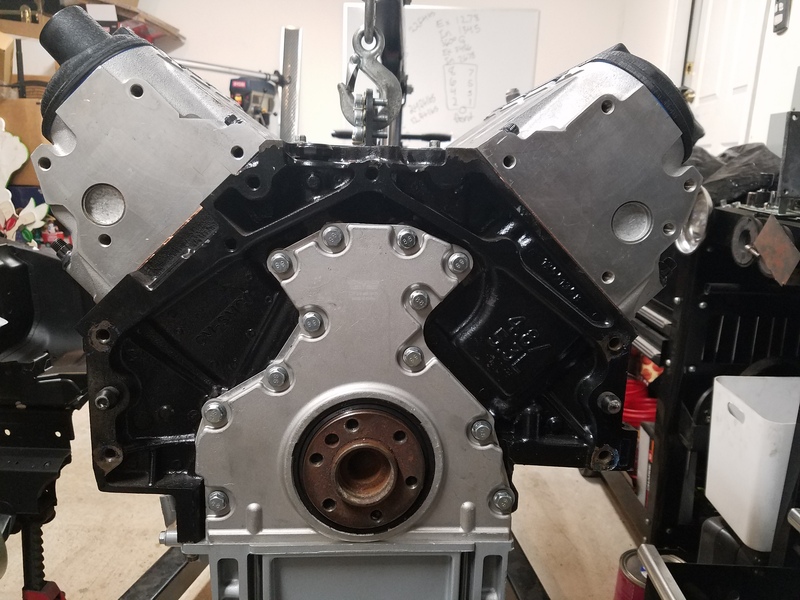
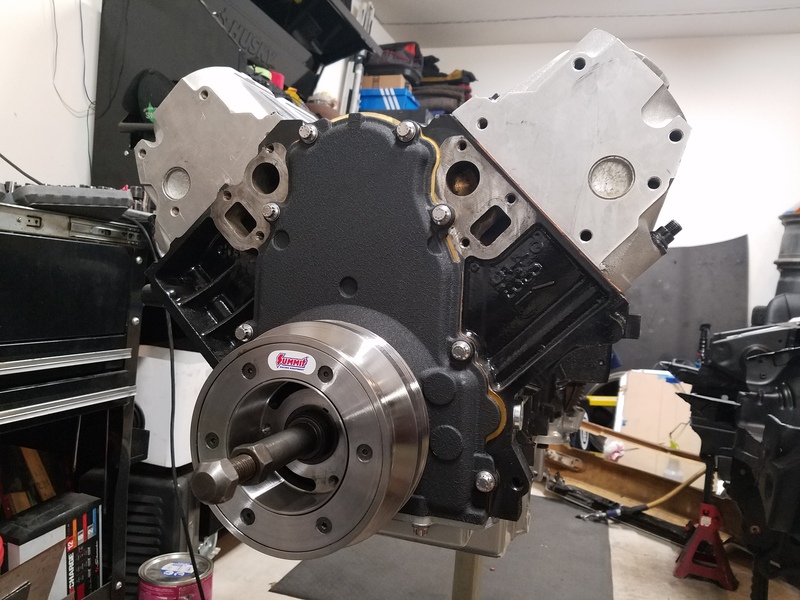
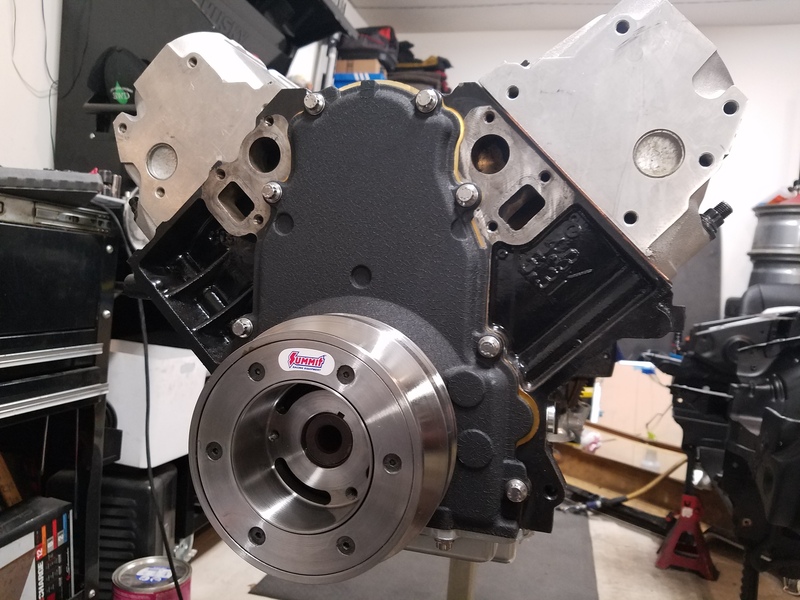
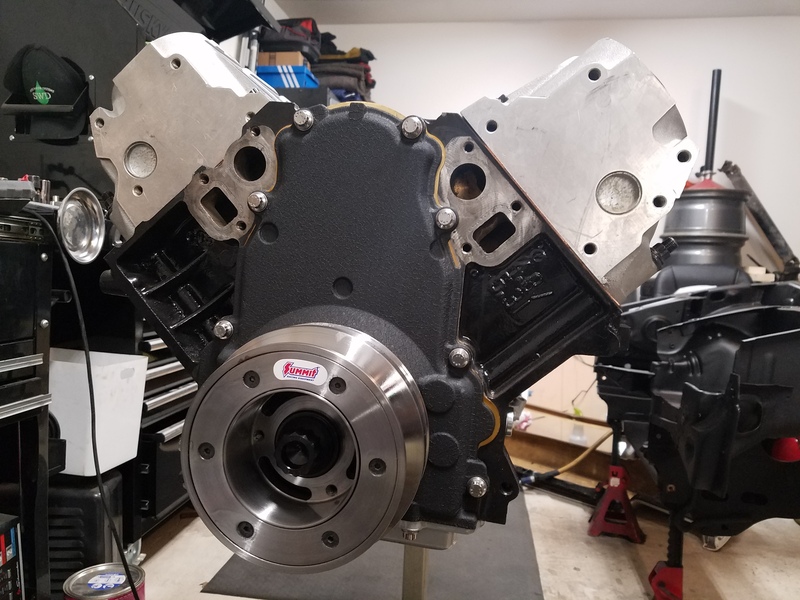
Next I installed my timing & rear main seal covers using some Alignit tools. These things come in handy. After the covers were aligned I installed the seals.
Name:  20160516_213640.jpg
Views: 836
Size:  221.7 KB
Name:  20160516_213934.jpg
Views: 830
Size:  222.2 KB
Name:  20160516_232753.jpg
Views: 817
Size:  220.0 KB
Name:  20160516_233350.jpg
Views: 837
Size:  212.0 KB

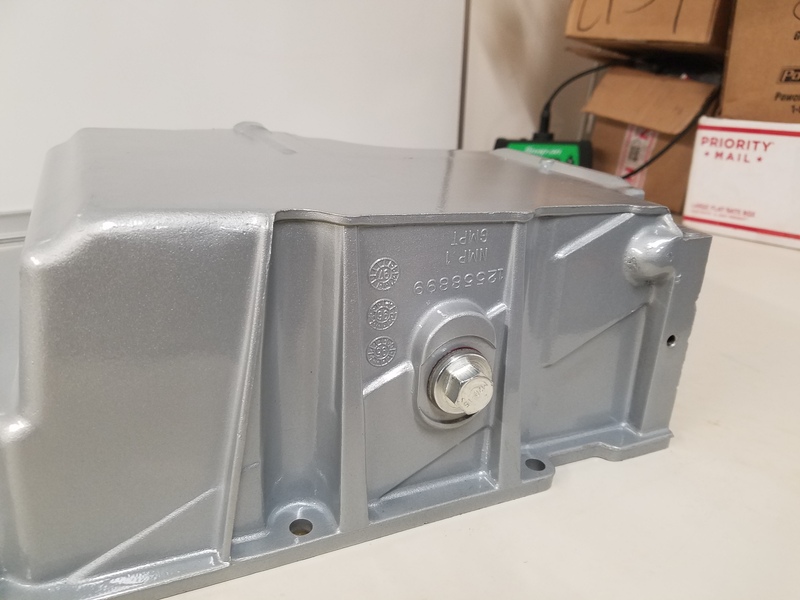
Moving on I installed the Improved Racing oil pan baffle into my F-Body oil pan. It's a shame that something so nice won't be seen.

Name:  20160517_001053.jpg
Views: 843
Size:  138.8 KB
Name:  20160517_001128.jpg
Views: 814
Size:  169.6 KB

I also deleted my oil level sensor but using Dorman Drain Plug 65221.
Name:  20160517_000012.jpg
Views: 821
Size:  133.9 KB
Name:  20160517_000016.jpg
Views: 825
Size:  173.6 KB

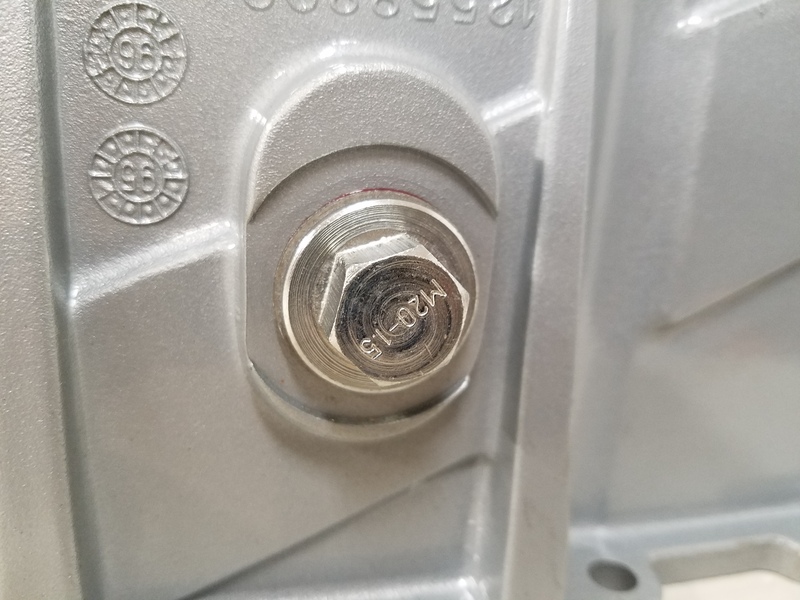
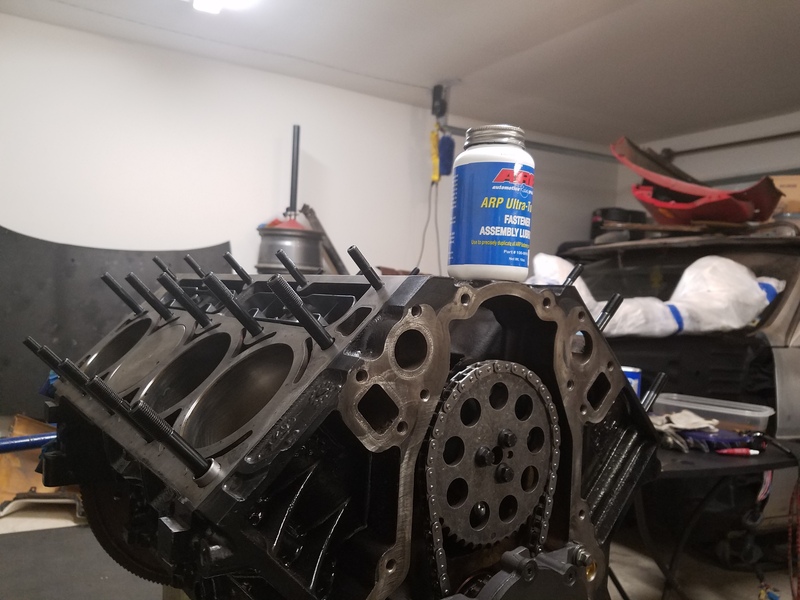
The balancer started looking lonely on my work bench so I slapped it on followed by the ARP Balancer Bolt.

Name:  20160516_214449.jpg
Views: 860
Size:  215.7 KB
Name:  20160516_214950.jpg
Views: 831
Size:  210.6 KB
Name:  20160516_215537.jpg
Views: 809
Size:  211.6 KB
Name:  20160516_215545.jpg
Views: 846
Size:  215.5 KB
Old 06-02-2016, 05:09 PM
  #78  
TECH Enthusiast
Thread Starter
iTrader: (3)
 
Nismo Kid's Avatar
 
Join Date: Dec 2010
Location: San Antonio TX
Posts: 636
Likes: 0
Received 4 Likes on 4 Posts

Default

Installed the F-Body windage tray & pick up tube. Rotated the engine a few more times to check for clearance. Then tossed the oil pan on.
Name:  20160517_001427.jpg
Views: 820
Size:  104.3 KB
Name:  20160517_001437.jpg
Views: 812
Size:  112.5 KB
Name:  20160517_001705.jpg
Views: 828
Size:  87.1 KB
Name:  20160517_003751.jpg
Views: 815
Size:  198.8 KB
Old 06-02-2016, 05:10 PM
  #79  
TECH Enthusiast
Thread Starter
iTrader: (3)
 
Nismo Kid's Avatar
 
Join Date: Dec 2010
Location: San Antonio TX
Posts: 636
Likes: 0
Received 4 Likes on 4 Posts

Default

Name:  20160517_010552.jpg
Views: 793
Size:  181.7 KB
Name:  20160517_010607.jpg
Views: 824
Size:  190.1 KB
Name:  20160517_010617.jpg
Views: 818
Size:  289.7 KB
Name:  20160517_010646.jpg
Views: 799
Size:  180.2 KB

Name:  20160517_010653.jpg
Views: 807
Size:  168.7 KB
Old 06-02-2016, 05:12 PM
  #80  
TECH Enthusiast
Thread Starter
iTrader: (3)
 
Nismo Kid's Avatar
 
Join Date: Dec 2010
Location: San Antonio TX
Posts: 636
Likes: 0
Received 4 Likes on 4 Posts

Default

To finish up the 4.8 I installed the water pump & valley cover.
Name:  20160517_012421.jpg
Views: 819
Size:  214.4 KB
Name:  20160518_205150.jpg
Views: 812
Size:  112.5 KB
Name:  20160518_210220.jpg
Views: 799
Size:  215.8 KB

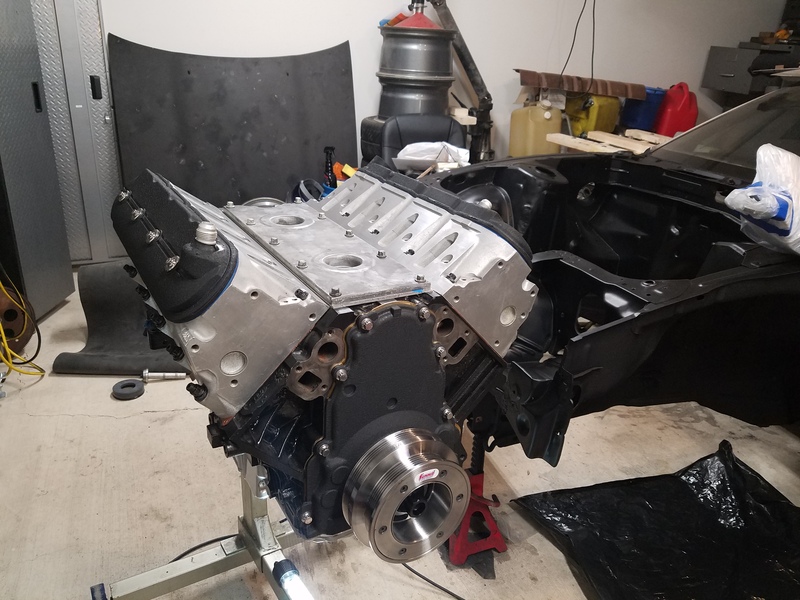
With the 4.8 together I needed to find a clutch. I originally ordered clutch but they requested I buy their flywheel. Which informed that would be useless for me. Well that struck a cord with them. So I explained my setup & they told me the LS wouldn't even fit in car. I told them to Google my car which must be mystical unicorn ROFL. Got my refund and began searching for another option. Found a couple options. In 1 hand there was an affordable 700-800$ clutch. In the other there was a 2100$ clutch that was way more than I needed. The 1st clutch appeared to fit my needs & had a nice price to match. So I gave the clutch maker a call. They informed me that my set up would be pushing to the limits of that clutch. They've had people make 800+hp but on less torque producing V6's. Not wanting to be held back by my clutch I went with option 2. It hurt in the beginning. Hell this clutch cost more than my car, turbo, engine & transmission combined lol. But it'll aid me obtain my goals & pay for itself in the long run. Due to the fact it's a twin disc & can be rebuilt. I went with Ceramic & Rigid Organic disc combination per Clutch Masters recommendation. The clutch comes with a custom flywheel that allows you to back the LSX with a Z32 transmission. With that said they're made to order. I was quoted 3-4 weeks for them to make it. I figured it was likely another week for shipping. Boy was I wrong. My clutch was delivered in just 10 days!

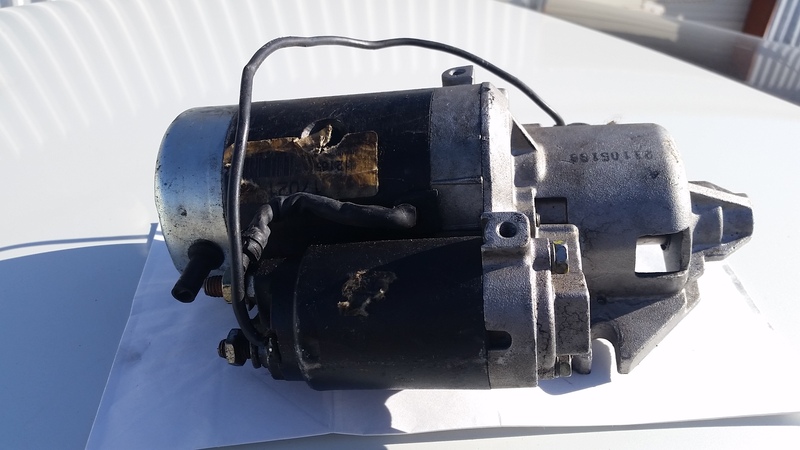
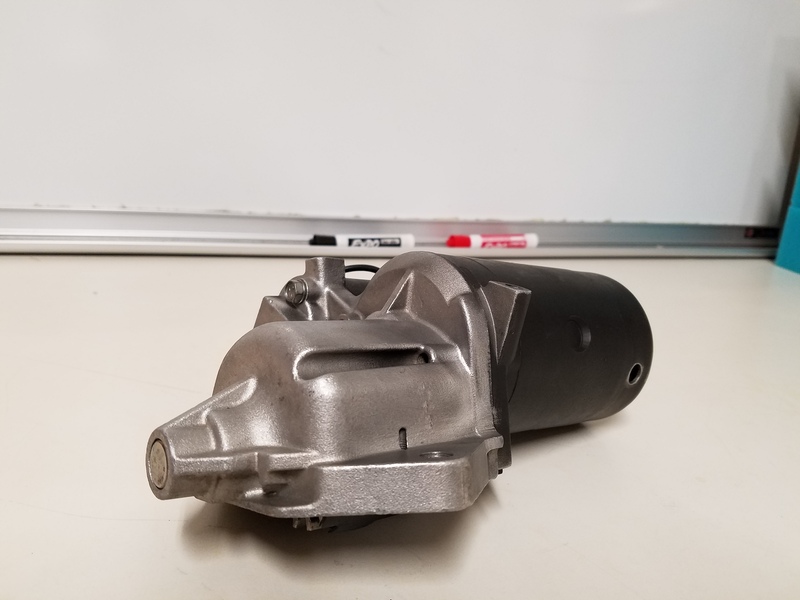
While I was waiting on my clutch I went ahead & had my starter rebuilt.
Name:  20160205_101255.jpg
Views: 822
Size:  123.8 KB
Name:  20160205_101308.jpg
Views: 822
Size:  121.7 KB
Name:  20160525_120134.jpg
Views: 821
Size:  109.9 KB
Name:  20160525_120248.jpg
Views: 808
Size:  108.3 KB

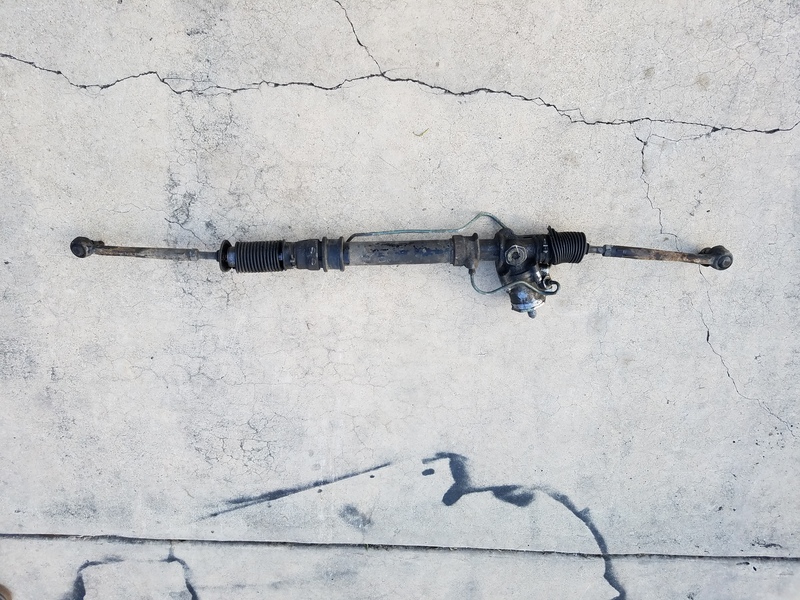
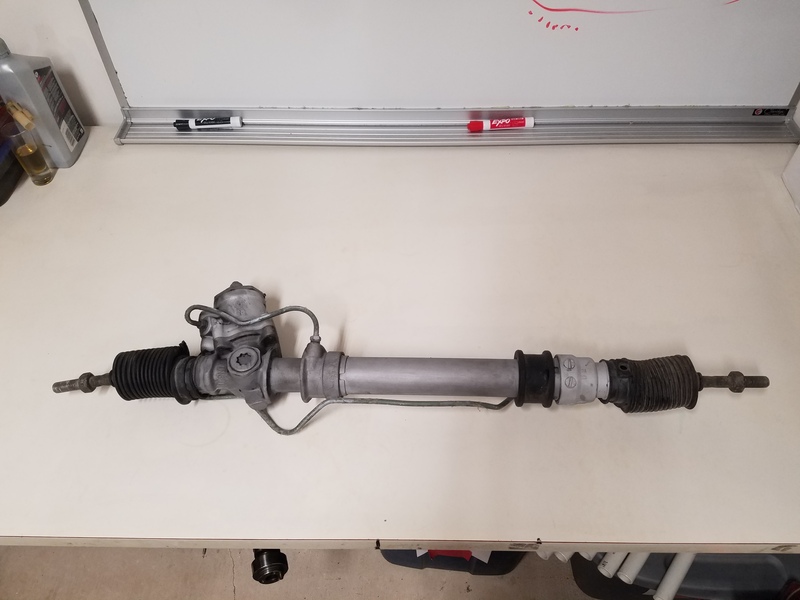
I also converted my power steering rack to manual. Here's how the rack started out.
Name:  20160513_184813.jpg
Views: 809
Size:  261.7 KB

After I hit it with some glass bead media
Name:  20160515_205339.jpg
Views: 810
Size:  115.9 KB


Quick Reply: My Turbo LSX Z31 Build.


All times are GMT -5. The time now is 03:42 AM.