

'90 5.3 240SX-LOJ Swap Kit w/Z32 5MT
 12-30-2016, 11:10 AM
#1
Teching In
Thread Starter

Join Date: Dec 2016
Location: Lebanon
Posts: 18
Likes: 0
Received 0 Likes
on
0 Posts
(Brought over from my thread on silviav8forums)
I am finally getting around to posting my swap experience with the LOJ Conversions LSx Basic Swap Kit. I used a 5.3 LM7 out of a '03 Cadillac Escalade. I have started a couple build threads with other builds and they never went any where. Either from lack of time or failed builds. I thought I would wait till I got mostly finished before I posted anything this time.
Here is a picture for proof.
So I had a S13 blacktop SR20DET in my car and it was a great motor, but I always wanted more power, and dollar for hp it is way cheaper doing the LS swap. I could go in to all the other benefits for doing this but there are plenty of other threads for that.
So it all started when a co-worker let me know that the local LKQ Pick-N-Pull was having a grand opening/labor day sale. 50% off all engines.

So there we were. We showed up 30min before they opened and by the time the doors opened we were the first of about 30 guys there waiting to strip some cars.
The truck had front end frame damage and no gauge cluster. So I have no idea on the mileage but overall the engine looked good, and with the frame damage it seemed we would have the best chance of a good running motor with this truck.

About 2 hours and $325 later.
$325 got me engine, coilpacks, ecu, coilpack harness, and a few odds and ends that I can't remember. No accessories included, wouldn't going to use them anyway. I just wish I would have brought home 3 more of these things for that price.
I am finally getting around to posting my swap experience with the LOJ Conversions LSx Basic Swap Kit. I used a 5.3 LM7 out of a '03 Cadillac Escalade. I have started a couple build threads with other builds and they never went any where. Either from lack of time or failed builds. I thought I would wait till I got mostly finished before I posted anything this time.
Here is a picture for proof.
So I had a S13 blacktop SR20DET in my car and it was a great motor, but I always wanted more power, and dollar for hp it is way cheaper doing the LS swap. I could go in to all the other benefits for doing this but there are plenty of other threads for that.
So it all started when a co-worker let me know that the local LKQ Pick-N-Pull was having a grand opening/labor day sale. 50% off all engines.
So there we were. We showed up 30min before they opened and by the time the doors opened we were the first of about 30 guys there waiting to strip some cars.
The truck had front end frame damage and no gauge cluster. So I have no idea on the mileage but overall the engine looked good, and with the frame damage it seemed we would have the best chance of a good running motor with this truck.
About 2 hours and $325 later.
$325 got me engine, coilpacks, ecu, coilpack harness, and a few odds and ends that I can't remember. No accessories included, wouldn't going to use them anyway. I just wish I would have brought home 3 more of these things for that price.
 12-30-2016, 11:13 AM
#2
Teching In
Thread Starter
Join Date: Dec 2016
Location: Lebanon
Posts: 18
Likes: 0
Received 0 Likes
on
0 Posts
So, plan was to pick the motor up and hold on to it for awhile and start piling parts up. Little did I know how good the Christmas specials were going to be last year.
I knew I was going to run a WiringSpecialties harness after previous good luck with those guys, but I wasn't sure on the mount kit. I was thinking about going Fueled Racing but I just hated the idea of sourcing a T56.
The T56 is way too expensive. So I watched this one take on youtube.
Its Matt Farah and the owner of LOJConversions, Stephen Dorrick, taking a customer's 6.0 300ZX out for a spin. So with his kit you can bolt any LS up to the 300ZX's FS5R30 5 speed and use the the factory accessories that came with the car.
What do you know they also sell a conversion kit for the 240SX which retains the factory front sway bar and uses the Z32's transmission.

So this was on sale, along with the steel driveshaft for a very good price. After I pulled the trigger on this, I bought the WiringSpecialties conversion harness for an equally good deal.
Per LOJ's website:
This basic kit uses a Z32 300ZX Manual Transmission
Kit Includes:
LOJ LSx to 240SX Motor Mounts (CNC Cut and Bent Motor Mount Brackets, Billet Aluminum Mount Pedestals with Energy Suspension Polyurethane Inserts, Brackets are powdercoated for durability and include hardware)
LOJ Transmission Mount for Z32 300ZX Transmission (CNC Cut and Bent, Powdercoated, and includes Hardware)
LOJ Oil Pan (6.5qt* Capacity, Road Race Baffling, Dipstick, Pickup Tube, Gasket Hardware)
LOJ 300ZX Shortened Shift Linkage
LOJ Heater Block
LOJ Z32 Transmission to LSx Adapter Plate
LOJ Billet Aluminum Flywheel manufactured by Clutchmasters (Flywheel accepts any Z32 NA or 350Z Clutch)
Steel Driveshaft Included (Aluminum available as an upgrade)
I thought I was going to wait and take my time on the swap but after making these purchases I went on a spending spree of parts.
I knew I was going to run a WiringSpecialties harness after previous good luck with those guys, but I wasn't sure on the mount kit. I was thinking about going Fueled Racing but I just hated the idea of sourcing a T56.
The T56 is way too expensive. So I watched this one take on youtube.
Its Matt Farah and the owner of LOJConversions, Stephen Dorrick, taking a customer's 6.0 300ZX out for a spin. So with his kit you can bolt any LS up to the 300ZX's FS5R30 5 speed and use the the factory accessories that came with the car.
What do you know they also sell a conversion kit for the 240SX which retains the factory front sway bar and uses the Z32's transmission.
So this was on sale, along with the steel driveshaft for a very good price. After I pulled the trigger on this, I bought the WiringSpecialties conversion harness for an equally good deal.
Per LOJ's website:
This basic kit uses a Z32 300ZX Manual Transmission
Kit Includes:
LOJ LSx to 240SX Motor Mounts (CNC Cut and Bent Motor Mount Brackets, Billet Aluminum Mount Pedestals with Energy Suspension Polyurethane Inserts, Brackets are powdercoated for durability and include hardware)
LOJ Transmission Mount for Z32 300ZX Transmission (CNC Cut and Bent, Powdercoated, and includes Hardware)
LOJ Oil Pan (6.5qt* Capacity, Road Race Baffling, Dipstick, Pickup Tube, Gasket Hardware)
LOJ 300ZX Shortened Shift Linkage
LOJ Heater Block
LOJ Z32 Transmission to LSx Adapter Plate
LOJ Billet Aluminum Flywheel manufactured by Clutchmasters (Flywheel accepts any Z32 NA or 350Z Clutch)
Steel Driveshaft Included (Aluminum available as an upgrade)
I thought I was going to wait and take my time on the swap but after making these purchases I went on a spending spree of parts.
12-30-2016, 11:20 AM
#3
Teching In
Thread Starter
Join Date: Dec 2016
Location: Lebanon
Posts: 18
Likes: 0
Received 0 Likes
on
0 Posts
Below is what an unknown mileage junkyard motor looks like.

Getting ready for a power wash.

The ugly car its going in.
So I cleaned it up, and aside from leaky gaskets the motor looked to be in good shape.

So I pulled the heads, and found just normal carbon buildup for a high mileage, neglected motor. Head gaskets were still in good shape.

A little rust on top of some of the cylinders.

This cylinder was the worst. I thought it was going to cause some issues, but it seems that this rust came from sitting in the junkyard. The truck didn't have a hood so there was quite a bit of water in the oil pan and this cylinder.


After a little bit of cleaning action. After I got the motor cleaned up I did a thorough inspection and found that the bores were in good shape, and there was no play anywhere that shouldn't be.
Getting ready for a power wash.
The ugly car its going in.
So I cleaned it up, and aside from leaky gaskets the motor looked to be in good shape.
So I pulled the heads, and found just normal carbon buildup for a high mileage, neglected motor. Head gaskets were still in good shape.
A little rust on top of some of the cylinders.
This cylinder was the worst. I thought it was going to cause some issues, but it seems that this rust came from sitting in the junkyard. The truck didn't have a hood so there was quite a bit of water in the oil pan and this cylinder.
After a little bit of cleaning action. After I got the motor cleaned up I did a thorough inspection and found that the bores were in good shape, and there was no play anywhere that shouldn't be.
12-30-2016, 11:25 AM
#4
Teching In
Thread Starter
Join Date: Dec 2016
Location: Lebanon
Posts: 18
Likes: 0
Received 0 Likes
on
0 Posts
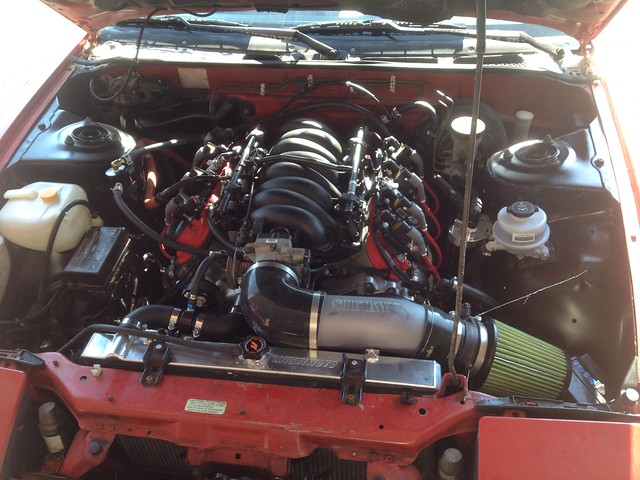
The final result.

I tried to use OEM parts or an upgraded aftermarket equivalent. I am going for a budget reliable swap. So I sourced a lot of used parts from Ebay and lots of money went to Summit,Jegs, and GMPartspro.com.
Parts List:
-LS1 GM Performance Headgaskets
-ARP head bolts
-GM valve cover gaskets and Camaro oil fill cap
-ARP valve cover bolts
-CTS-V front accessories minus A/C compressor #809-19299070
-CTS-V water pump
-ARP water pump bolts
-Melling LS Oil Pump
-GM LS2 timing kit, with upgraded chain
-Used factory '05 GTO cam
-New GTO replacement timing cover (To relocate the cam sensor)
-Racetronix cam sensor conversion harness
-Used Corvette LS1 intake manifold (without EGR)
-Used '01 Camaro fuel rail (pre-welded with -6 fitting)
-Used LS1 Corvette injectors
The CTS-V accessory kit is the best way to get accessories, if you aren't buying a complete motor.

Laying out the WiringSpecialties harness for the first time.
So the motor assembly was the easy part. The biggest problems I had to solve was exhaust manifold selection, exhaust routing and power steering line routing.
I went with a set of C6 Corvette factory manifolds, because no one had any information if any aftermarket setups fit this swap kit.
-One flaw with the LOJ kit. No selection of aftermarket headers as of this writing.

Left side manifold clearance.
I made it work but it took some major massaging of the downpipe flange, and I had to use a bolt instead of the stud. Now the manifold and down pipe comes out as one piece.
I tried to use OEM parts or an upgraded aftermarket equivalent. I am going for a budget reliable swap. So I sourced a lot of used parts from Ebay and lots of money went to Summit,Jegs, and GMPartspro.com.
Parts List:
-LS1 GM Performance Headgaskets
-ARP head bolts
-GM valve cover gaskets and Camaro oil fill cap
-ARP valve cover bolts
-CTS-V front accessories minus A/C compressor #809-19299070
-CTS-V water pump
-ARP water pump bolts
-Melling LS Oil Pump
-GM LS2 timing kit, with upgraded chain
-Used factory '05 GTO cam
-New GTO replacement timing cover (To relocate the cam sensor)
-Racetronix cam sensor conversion harness
-Used Corvette LS1 intake manifold (without EGR)
-Used '01 Camaro fuel rail (pre-welded with -6 fitting)
-Used LS1 Corvette injectors
The CTS-V accessory kit is the best way to get accessories, if you aren't buying a complete motor.
Laying out the WiringSpecialties harness for the first time.
So the motor assembly was the easy part. The biggest problems I had to solve was exhaust manifold selection, exhaust routing and power steering line routing.
I went with a set of C6 Corvette factory manifolds, because no one had any information if any aftermarket setups fit this swap kit.
-One flaw with the LOJ kit. No selection of aftermarket headers as of this writing.
Left side manifold clearance.
I made it work but it took some major massaging of the downpipe flange, and I had to use a bolt instead of the stud. Now the manifold and down pipe comes out as one piece.
12-30-2016, 11:33 AM
#5
Teching In
Thread Starter
Join Date: Dec 2016
Location: Lebanon
Posts: 18
Likes: 0
Received 0 Likes
on
0 Posts
Next up, fitting the Z32 transmission.
I sourced a used 5 speed off of Ebay for $300.

Adapter plate mounted up.


Shifter relocation kit installed.

LOJ lightweight flywheel with Z1 Heavy Duty NA clutch kit installed.
With this kit you have to use a NA 300ZX clutch. Which is good, because there are more options out there for this setup.


All pieced together.
Parts List:
-Z1 Premium Short Throw Shifter
-Z1 Upgraded Clutch Release Fork Assembly Kit
(350Z fork, new bearing sleeve, retainer, chromoly pivot ball)
-Z1 300Zx NA Heavy Duty Organic Clutch Kit
My next flaw with the LOJ kit is that you don't have full mating of the transmission to the engine and oil pan. All my reading has told me that the oil pan on these motors are structural members and that they should be bolted to the transmission. With this kit it is not, which you will see in my later pictures. Also there is no dust shield for the flywheel, so it is open under the car.
So far I have not noticed any issues with this, the good news is LOJ has come out with their V2 adapter which solves these issues.
I sourced a used 5 speed off of Ebay for $300.
Adapter plate mounted up.
Shifter relocation kit installed.
LOJ lightweight flywheel with Z1 Heavy Duty NA clutch kit installed.
With this kit you have to use a NA 300ZX clutch. Which is good, because there are more options out there for this setup.
All pieced together.
Parts List:
-Z1 Premium Short Throw Shifter
-Z1 Upgraded Clutch Release Fork Assembly Kit
(350Z fork, new bearing sleeve, retainer, chromoly pivot ball)
-Z1 300Zx NA Heavy Duty Organic Clutch Kit
My next flaw with the LOJ kit is that you don't have full mating of the transmission to the engine and oil pan. All my reading has told me that the oil pan on these motors are structural members and that they should be bolted to the transmission. With this kit it is not, which you will see in my later pictures. Also there is no dust shield for the flywheel, so it is open under the car.
So far I have not noticed any issues with this, the good news is LOJ has come out with their V2 adapter which solves these issues.
12-30-2016, 11:36 AM
#6
Teching In
Thread Starter
Join Date: Dec 2016
Location: Lebanon
Posts: 18
Likes: 0
Received 0 Likes
on
0 Posts
So the time finally came to pull the SR. I pulled it, cleaned and painted some of the bay and tucked some of the chassis harness. It took about 30 minutes to drop the motor and transmission in.
You have to have a load leveler, and with my manifold choice you had to leave the exhaust manifolds off. No hammering of the transmission was needed. My starter rests against the floor of the car but so far, it doesn't cause any issues and it didn't interfere with setting the engine in its new home.
The LOJ mounts use the existing holes in the front subframe and the factory bottom mount nuts to attach.

Waiting to be finished.


Another reason I went with this kit was the positioning of the shifter. I did not want to cut a whole lot of the car up, and I wanted to be able to use the factory trim. Once the shift boot is on, its looks like a factory install.
You have to have a load leveler, and with my manifold choice you had to leave the exhaust manifolds off. No hammering of the transmission was needed. My starter rests against the floor of the car but so far, it doesn't cause any issues and it didn't interfere with setting the engine in its new home.
The LOJ mounts use the existing holes in the front subframe and the factory bottom mount nuts to attach.
Waiting to be finished.
Another reason I went with this kit was the positioning of the shifter. I did not want to cut a whole lot of the car up, and I wanted to be able to use the factory trim. Once the shift boot is on, its looks like a factory install.
12-30-2016, 11:46 AM
#7
Teching In
Thread Starter
Join Date: Dec 2016
Location: Lebanon
Posts: 18
Likes: 0
Received 0 Likes
on
0 Posts
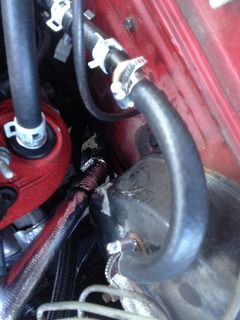
Next was hooking all the hoses up. This stuff took the longest.
Cooling
The cooling system was pretty easy. I used a Mishomoto set for a KA24DE S13. They don't make LS/S13 specific hoses yet, so I bent some clothes hangar wire where I needed it and took that to Advance auto parts and found some hoses that would fit.

I broke my heater core inlet and outlet during the install so I just looped the heater hoses up.

This piece is a nifty item. The LS series of engines need to have the coolant loop flowing freely to cool properly. With these cars when you close the heater core it blocks the flow of coolant through the heater core and the bypass is elsewhere on the engine.
So this block just gives the coolant somewhere to go when you turn your heat off, and it gives you somewhere to install a temp sensor.
Exhaust
Biggest pain of the whole swap.
So like I said earlier. C6 Corvette manifolds, and I bought piping from Summit and flanges from a guy on Ebay.
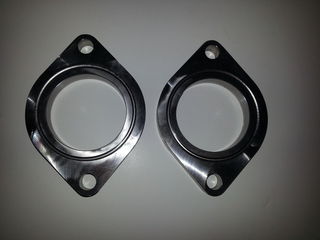
CNC cut and o-ringed for factory gaskets.

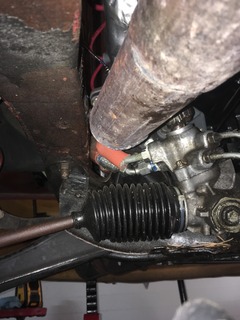
This is the clearance on the driver's side. Not much room to work. Manifold wants to dump straight in to the steering rack. So after a lot of measuring, grinding, beating and tigging, I got this side fabricated.


2.5" piping back to a ball flange. I did have to make an indentation around the steering column, to clear the joint.
Passenger side was much easier.

Much more room to work, but you had to watch your clearance around your starter, battery cable, and fuel lines.
So I have 2.5" pipes going to ball flanges, then I made a Y pipe to connect to my 3" Apex N1 catback.


I wish I had taking more pics of this while I was making it. Hard to get pics without being on a lift. My welds were rough, due to this being my first exhaust build, but I surprised my self.
Cooling
The cooling system was pretty easy. I used a Mishomoto set for a KA24DE S13. They don't make LS/S13 specific hoses yet, so I bent some clothes hangar wire where I needed it and took that to Advance auto parts and found some hoses that would fit.
I broke my heater core inlet and outlet during the install so I just looped the heater hoses up.
This piece is a nifty item. The LS series of engines need to have the coolant loop flowing freely to cool properly. With these cars when you close the heater core it blocks the flow of coolant through the heater core and the bypass is elsewhere on the engine.

So this block just gives the coolant somewhere to go when you turn your heat off, and it gives you somewhere to install a temp sensor.
Exhaust
Biggest pain of the whole swap.
So like I said earlier. C6 Corvette manifolds, and I bought piping from Summit and flanges from a guy on Ebay.

CNC cut and o-ringed for factory gaskets.
This is the clearance on the driver's side. Not much room to work. Manifold wants to dump straight in to the steering rack. So after a lot of measuring, grinding, beating and tigging, I got this side fabricated.

2.5" piping back to a ball flange. I did have to make an indentation around the steering column, to clear the joint.
Passenger side was much easier.
Much more room to work, but you had to watch your clearance around your starter, battery cable, and fuel lines.
So I have 2.5" pipes going to ball flanges, then I made a Y pipe to connect to my 3" Apex N1 catback.
I wish I had taking more pics of this while I was making it. Hard to get pics without being on a lift. My welds were rough, due to this being my first exhaust build, but I surprised my self.
Trending Topics
12-30-2016, 11:47 AM
#8
Teching In
Thread Starter
Join Date: Dec 2016
Location: Lebanon
Posts: 18
Likes: 0
Received 0 Likes
on
0 Posts
Power Steering
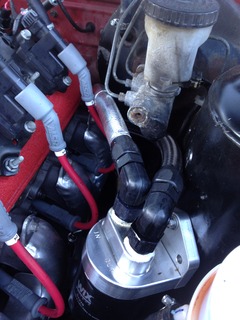
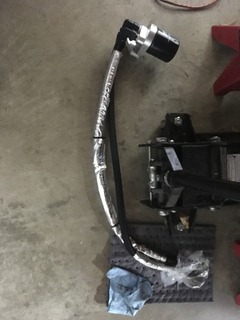
Another pain, I tried using AN fittings in to the rack, but I could only get the pressure line to seal, with copious amounts of teflon thread sealant. The CTS-V pump has a pressure reducer from TurnOne steering (Cadillac CTS-V AN-6 Flow Restrictor MFG@TUR18). The high pressure from the CTS-V pump will blow the seals on a S13 rack. Earl's -6 power steering fittings, and blue power steering braided line for pressure and return lines. I used some hoses and adapters from Advance auto parts for the pump feed line. I also mounted the CTS-V reservoir to the fender due to hood clearance.

I also used Earl's flame guard for heat protection, but my power steering fluid is still boiling. This is the biggest part of the swap that I still need to work on. The CTS-V power steering pump isn't known to be the best. Right now it is already whining, with only about 1500 miles on it. I think it is mostly due to the heat, but I am going to try and salvage it.

Oil
So the LOJ conversion pan does not have a provision for an oil filter. It has two -10 ports for a remote filter mount.

So I bought a remote oil filter boss, and Earl's -10 fittings with Earl's Pro-Lite black braided hose. I currently have this setup off to fix a leaky fitting and install more Flame Guard to help with heat issues, and eventually I want to add an oil cooler.
Removed for service.
Fuel
I already had a Walbro 255 in my tank for the SR20 swap, so I kept it. For the plumbing it self I went with the LS filter/regulator combo from a Corvette. I ran Earl's Pro-Lite -6 lines from the tank to Russell -6 EFI fittings on the filter/regulator, then the same -6 hose wrapped in Flame Guard up to the fuel rail which already had a -6 fitting welded on when I bought it.
Break down of the Filter/Regulator Kit
# LS9904 Fuel Filter/Fuel Regulator
# 640940 Russell 3/8" Male Quick Disconnect to -6AN Male Fitting (Fuel Feed to Engine Fitting)
# 640853 Russell 3/8" Female Quick Disconnect to -6AN Male Fitting (Fuel Feed from Pump Fitting)
# 640863 Russell 5/16" Female Quick Disconnect to -6AN Male Fitting (Return Line Fitting)
Another pain, I tried using AN fittings in to the rack, but I could only get the pressure line to seal, with copious amounts of teflon thread sealant. The CTS-V pump has a pressure reducer from TurnOne steering (Cadillac CTS-V AN-6 Flow Restrictor MFG@TUR18). The high pressure from the CTS-V pump will blow the seals on a S13 rack. Earl's -6 power steering fittings, and blue power steering braided line for pressure and return lines. I used some hoses and adapters from Advance auto parts for the pump feed line. I also mounted the CTS-V reservoir to the fender due to hood clearance.


I also used Earl's flame guard for heat protection, but my power steering fluid is still boiling. This is the biggest part of the swap that I still need to work on. The CTS-V power steering pump isn't known to be the best. Right now it is already whining, with only about 1500 miles on it. I think it is mostly due to the heat, but I am going to try and salvage it.

Oil
So the LOJ conversion pan does not have a provision for an oil filter. It has two -10 ports for a remote filter mount.


So I bought a remote oil filter boss, and Earl's -10 fittings with Earl's Pro-Lite black braided hose. I currently have this setup off to fix a leaky fitting and install more Flame Guard to help with heat issues, and eventually I want to add an oil cooler.

Removed for service.
Fuel
I already had a Walbro 255 in my tank for the SR20 swap, so I kept it. For the plumbing it self I went with the LS filter/regulator combo from a Corvette. I ran Earl's Pro-Lite -6 lines from the tank to Russell -6 EFI fittings on the filter/regulator, then the same -6 hose wrapped in Flame Guard up to the fuel rail which already had a -6 fitting welded on when I bought it.
Break down of the Filter/Regulator Kit
# LS9904 Fuel Filter/Fuel Regulator
# 640940 Russell 3/8" Male Quick Disconnect to -6AN Male Fitting (Fuel Feed to Engine Fitting)
# 640853 Russell 3/8" Female Quick Disconnect to -6AN Male Fitting (Fuel Feed from Pump Fitting)
# 640863 Russell 5/16" Female Quick Disconnect to -6AN Male Fitting (Return Line Fitting)
 12-30-2016, 11:59 AM
#9
Teching In
Thread Starter
Join Date: Dec 2016
Location: Lebanon
Posts: 18
Likes: 0
Received 0 Likes
on
0 Posts
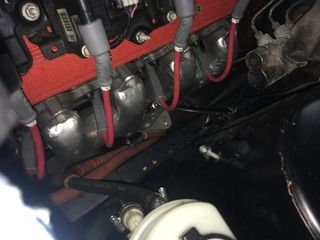
PCV and Vacuum
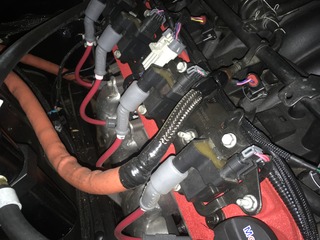
Another easy one. I am running a Mike Norris Billet PCV Catch Can, which seems to be a popular can to run on these LS engines. I wanted to do the LS6 PCV system, but I didn't found out about that until after I had my engine together. Running this system requires some grinding below the intake manifold and I didn't feel like doing that.

Rigged up master vacuum line. This is another area that needs some touching up.
Throttle System
So I grabbed a manual throttle body off of a 4.8L truck motor. My motor came with a DBW system but since WiringSpecialties at the time did not support this with their harness I went with this throttle body. I eventually want to upgrade to a bigger unit and a better intake manifold.

And this picture shows the simple bracket I fab'd up (that still needs paint) to make the S13 throttle cable work.
The harness from WiringSpecialties hooked up to the engine the way I thought it would, flawlessly. However, the transmission harness had some issues. Nothing major, they rectified it.
I'm sure there are a lot of small things I am forgetting, but here is the finished product again.


First Run
There are still a lot of little things I need to work on, but for the most part it is a complete running swap. I have put about 1500 miles on it and really the only problems I have had has been some leaky fittings and a whining power steering pump.
The only complaint I have about the swap is the massive amount of heat this thing puts out. I am going to have to install some coolers and do some more heat shielding to keep things from frying.
I also have to give the Stephen Dorrick at LOJConversions a big thumbs up for the quality of this kit. I know I am not the best case for pushing people his way, but this kit was excellent quality and there isn't much information out there for this kit, so I am hoping more people will go this way.
Another easy one. I am running a Mike Norris Billet PCV Catch Can, which seems to be a popular can to run on these LS engines. I wanted to do the LS6 PCV system, but I didn't found out about that until after I had my engine together. Running this system requires some grinding below the intake manifold and I didn't feel like doing that.

Rigged up master vacuum line. This is another area that needs some touching up.
Throttle System
So I grabbed a manual throttle body off of a 4.8L truck motor. My motor came with a DBW system but since WiringSpecialties at the time did not support this with their harness I went with this throttle body. I eventually want to upgrade to a bigger unit and a better intake manifold.
And this picture shows the simple bracket I fab'd up (that still needs paint) to make the S13 throttle cable work.
The harness from WiringSpecialties hooked up to the engine the way I thought it would, flawlessly. However, the transmission harness had some issues. Nothing major, they rectified it.
I'm sure there are a lot of small things I am forgetting, but here is the finished product again.
First Run
There are still a lot of little things I need to work on, but for the most part it is a complete running swap. I have put about 1500 miles on it and really the only problems I have had has been some leaky fittings and a whining power steering pump.
The only complaint I have about the swap is the massive amount of heat this thing puts out. I am going to have to install some coolers and do some more heat shielding to keep things from frying.
I also have to give the Stephen Dorrick at LOJConversions a big thumbs up for the quality of this kit. I know I am not the best case for pushing people his way, but this kit was excellent quality and there isn't much information out there for this kit, so I am hoping more people will go this way.
01-03-2017, 12:09 PM
#12

Could you provide any feedback on what the setup feels like with the Z32 trans? As you noted i was not a fan of sourcing out a T56 especially with the cost and condition of these trans. I thought about the Z33 setup for my next build but the design of those kits concerns me a bit for the power I am hoping to make next time around.
Nice job on the swap and thank you for the info you have provided.
Nice job on the swap and thank you for the info you have provided.
01-03-2017, 12:49 PM
#13
Teching In
Thread Starter
Join Date: Dec 2016
Location: Lebanon
Posts: 18
Likes: 0
Received 0 Likes
on
0 Posts
Thanks for the compliment. So I think the Z32 transmission is the best bang for your buck. You can buy four or five used Z transmissions for the typical cost of a used T56. If I would have went with a reliable T56 (which seems like you have to get a built one for it to be called reliable) I would have been well over $10k for my swap cost. I couldn't justify spending that, just to get the swap in done. A sixth gear would be nice for highway driving. You can get a CD009 from a Z33/Z34 for about $1900 new. To me if I had a bigger budget that is the route I would have chosen. For now the Z32 trans gearing and stock 4.08 rear gear make it an absolute demon to drive around town. With 205 chinese tires on stock size S13 wheels, you won't get traction until third gear. I have 5 lug hubs coming this month and I plan on getting some sticky rubber to go on a set of Z32 TT wheels. I am hoping I will at least be able to hook then. Now for highway driving, you can pull on people in 5th gear all day long, but I was running out of gear at about 125. At 80mph the engine is turning about 3500ish rpm. So you can literally watch the gas gauge move. I don't have any technical data yet. I have a 300ZX that I drive daily, that I am working on, so once I am through with that project I am hoping to post some performance data.
So I don't like "trailblazing" new projects. I like replicating projects that are proven and well documented. You save a lot of money, and headaches that way. There isn't a build thread on the web right now using this drivetrain combo with the LOJ kit for the S13. For a decent mechanic this swap is super simple but there were a few problems that required some experience to solve. So I wanted to create a reference for anyone using this kit, or anyone thinking about buying this kit. The owner of LOJ is doing some pretty cool stuff, and I think his products are very well made, so I want to let people know there is an alternative to Sikky, Fueled Racing, and the others.
So I don't like "trailblazing" new projects. I like replicating projects that are proven and well documented. You save a lot of money, and headaches that way. There isn't a build thread on the web right now using this drivetrain combo with the LOJ kit for the S13. For a decent mechanic this swap is super simple but there were a few problems that required some experience to solve. So I wanted to create a reference for anyone using this kit, or anyone thinking about buying this kit. The owner of LOJ is doing some pretty cool stuff, and I think his products are very well made, so I want to let people know there is an alternative to Sikky, Fueled Racing, and the others.
01-04-2017, 10:22 AM
#14
Awesome thanks for the info. I have seen these trans behind high HP Z32 obviously but also a few RB setups well into the 600+ ft/lbs so it seems like a reasonable option. As you noted the cost of these trans can be had for $500 or less where the average T56 (which i hated even with a fresh rebuild) is above $1600 now. I did look into the CD009 but what I do not like is the mechanics and design between the adapter plates and the transmission. If money is no issue for my next swap I plan to go Magnum hands down but if not I would be interested in seeing how this turns out.
Thanks again bud will keep my eye on this build.
Thanks again bud will keep my eye on this build.
 02-12-2017, 02:49 AM
#17
Registered User

Join Date: Feb 2017
Posts: 5
Likes: 0
Received 0 Likes
on
0 Posts
Sorry not trying to bump the thread I know its about a month old im about to start a z32 5.3 using the loj conversion also, i was just curious why you think the CTV-S accessory kit is better? Cheaper parts? My mind is a sponge right now so bless me with you knowledge. lol 
02-12-2017, 08:28 AM
#18
Teching In
Thread Starter
Join Date: Dec 2016
Location: Lebanon
Posts: 18
Likes: 0
Received 0 Likes
on
0 Posts
Sorry not trying to bump the thread I know its about a month old im about to start a z32 5.3 using the loj conversion also, i was just curious why you think the CTV-S accessory kit is better? Cheaper parts? My mind is a sponge right now so bless me with you knowledge. lol
02-13-2017, 03:07 PM
#19
Registered User
Join Date: Feb 2017
Posts: 5
Likes: 0
Received 0 Likes
on
0 Posts
It was the cheapest and fastest way to get accessories. I wanted a new alternator and power steering pump, and the used f-body kits were selling for only slightly less than what GM was selling the CTS-V kit for. I think the CTS-V alternator puts out a few more amps too, and last thing is the kit has all the fasteners you need. If you hunt long enough you can probably get an used f-body kit for cheaper, but I was impatient.
02-13-2017, 04:26 PM
#20
Teching In
Thread Starter
Join Date: Dec 2016
Location: Lebanon
Posts: 18
Likes: 0
Received 0 Likes
on
0 Posts
I just spray painted mine. The VHT wrinkle paint isn't holding up the best, but I am sure some normal high heat paint what have held up better. It's hard to beat $10 in spray paint. I eventually will get some holley valve covers once I get the outside of the car looking decent. As long as you get center bolt LS1 covers they shouldn't be much different. The only thing I can possibly see is the rear pcv port being slightly different. I don't know about the coil brackets. The answer is on this site somewhere though.