
1984 Monte Carlo SS 6.0l & T56 Build
 10-05-2019, 09:27 AM
#1

This thread is to document the build on my SS and show what it took to build this car.
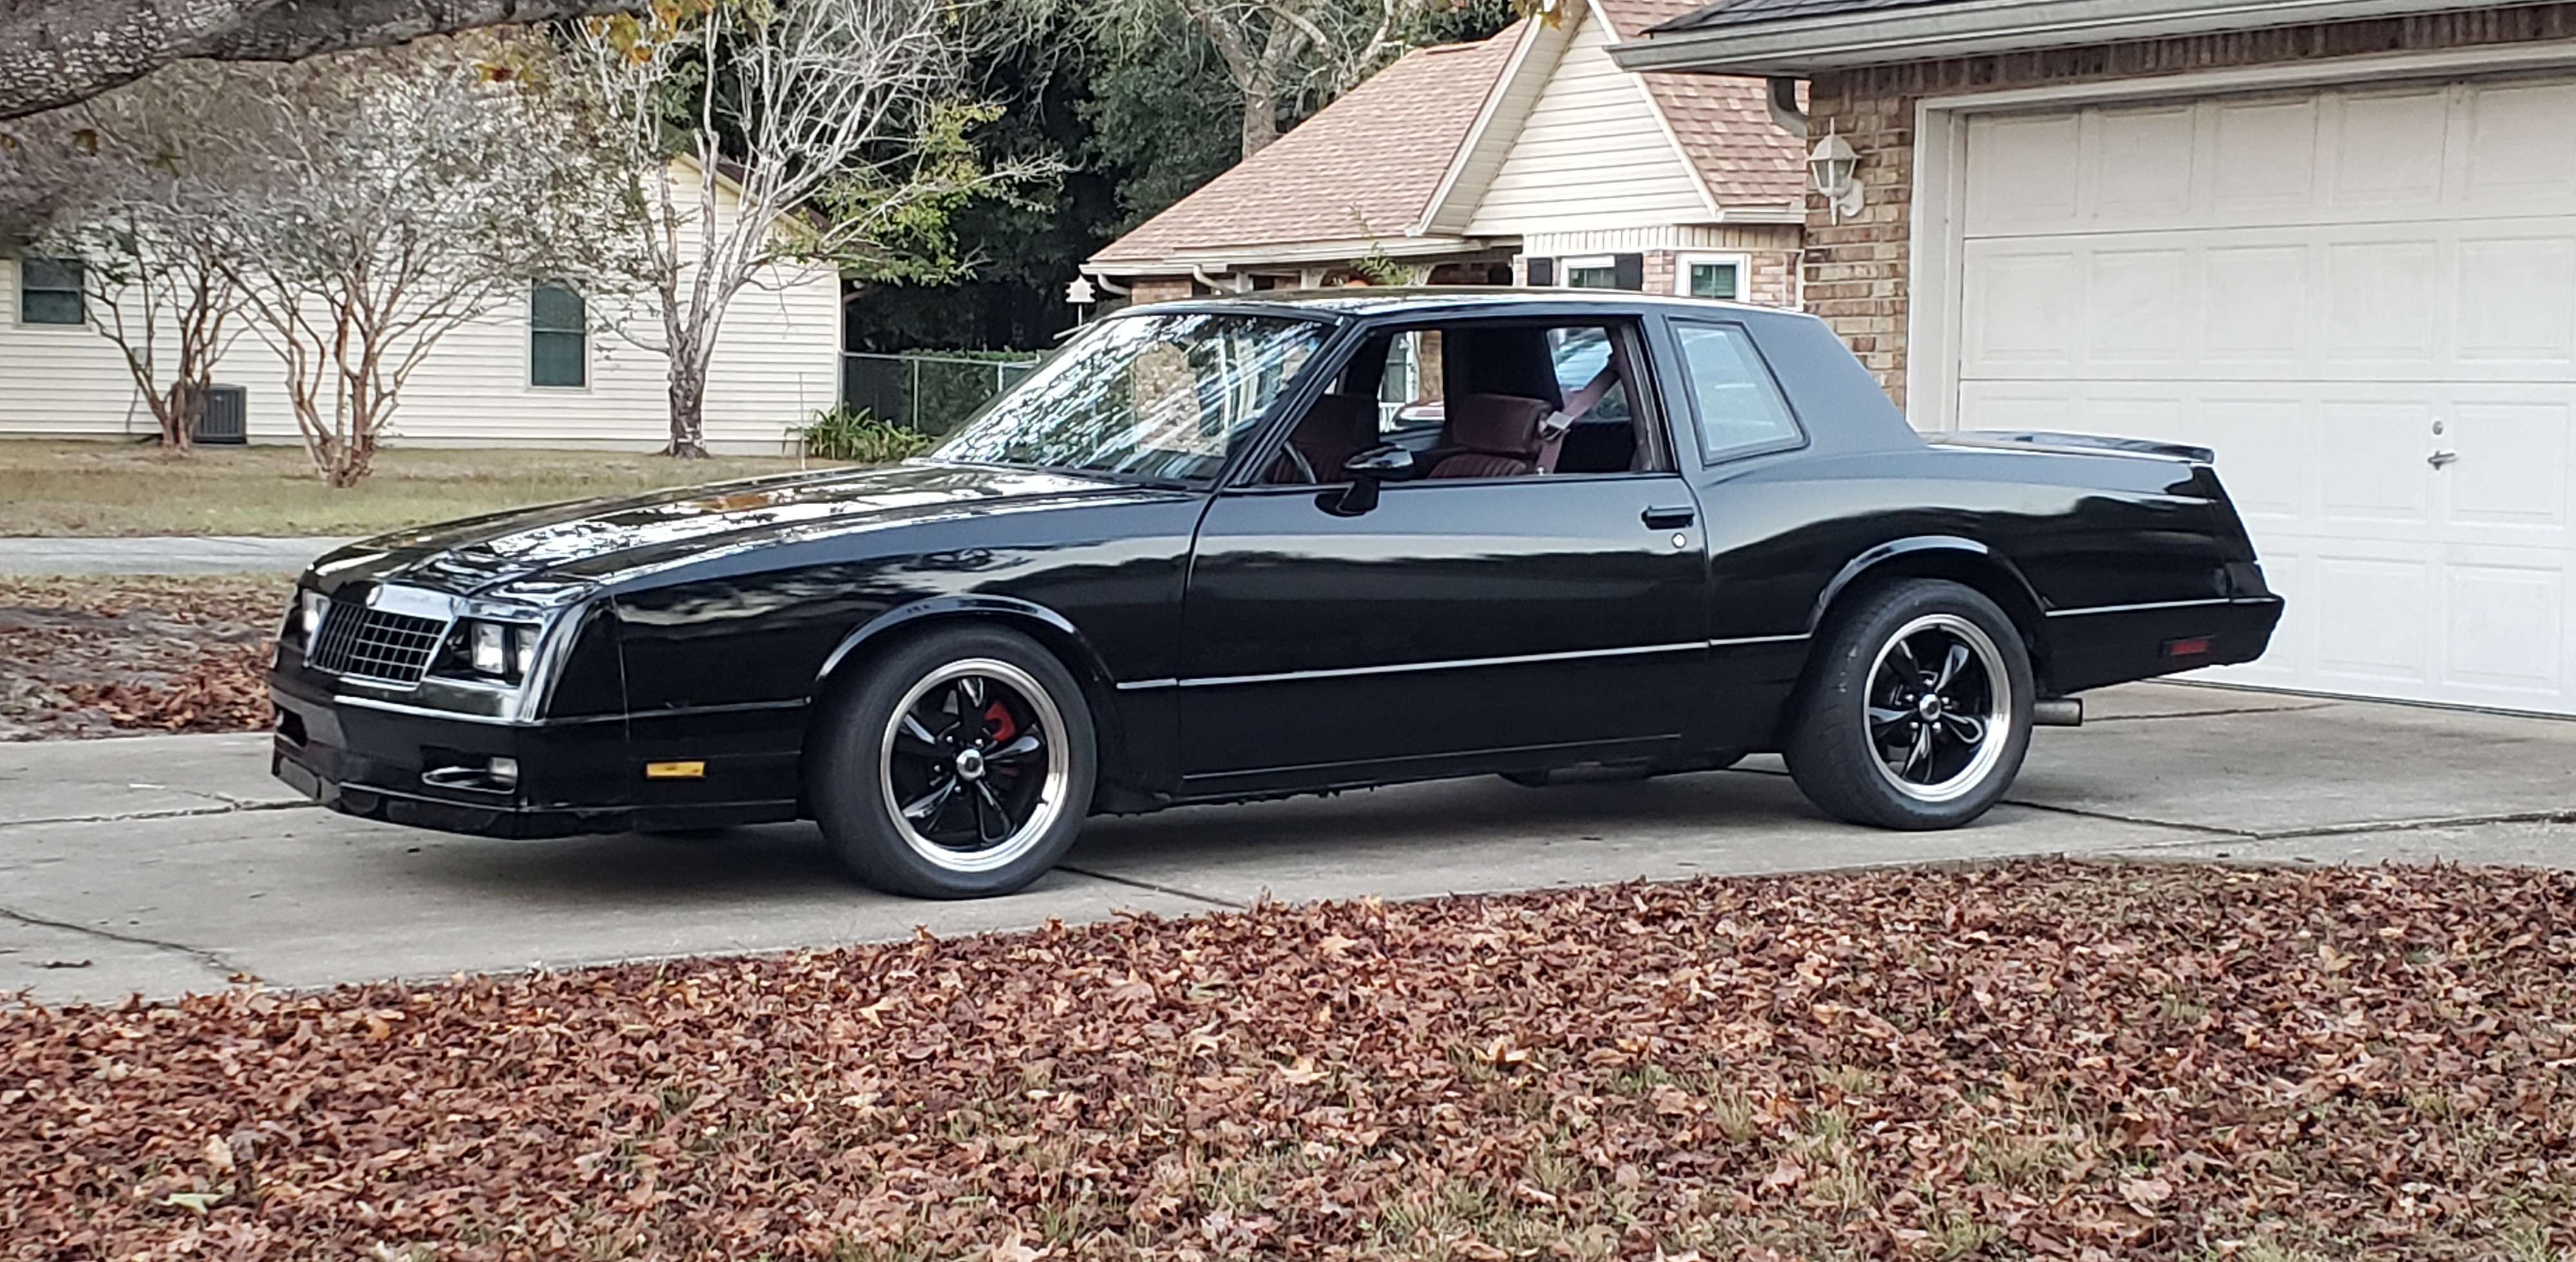
I did the initial build on this car in Dec 2010, and in the last couple weeks overhauled the car installing new parts and modifying others to make the build more refined.
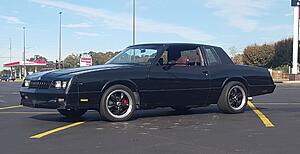
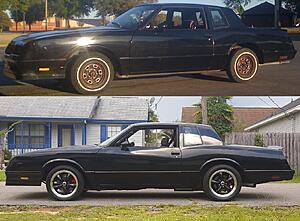
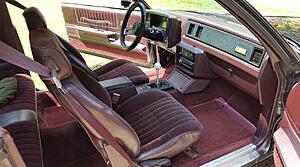
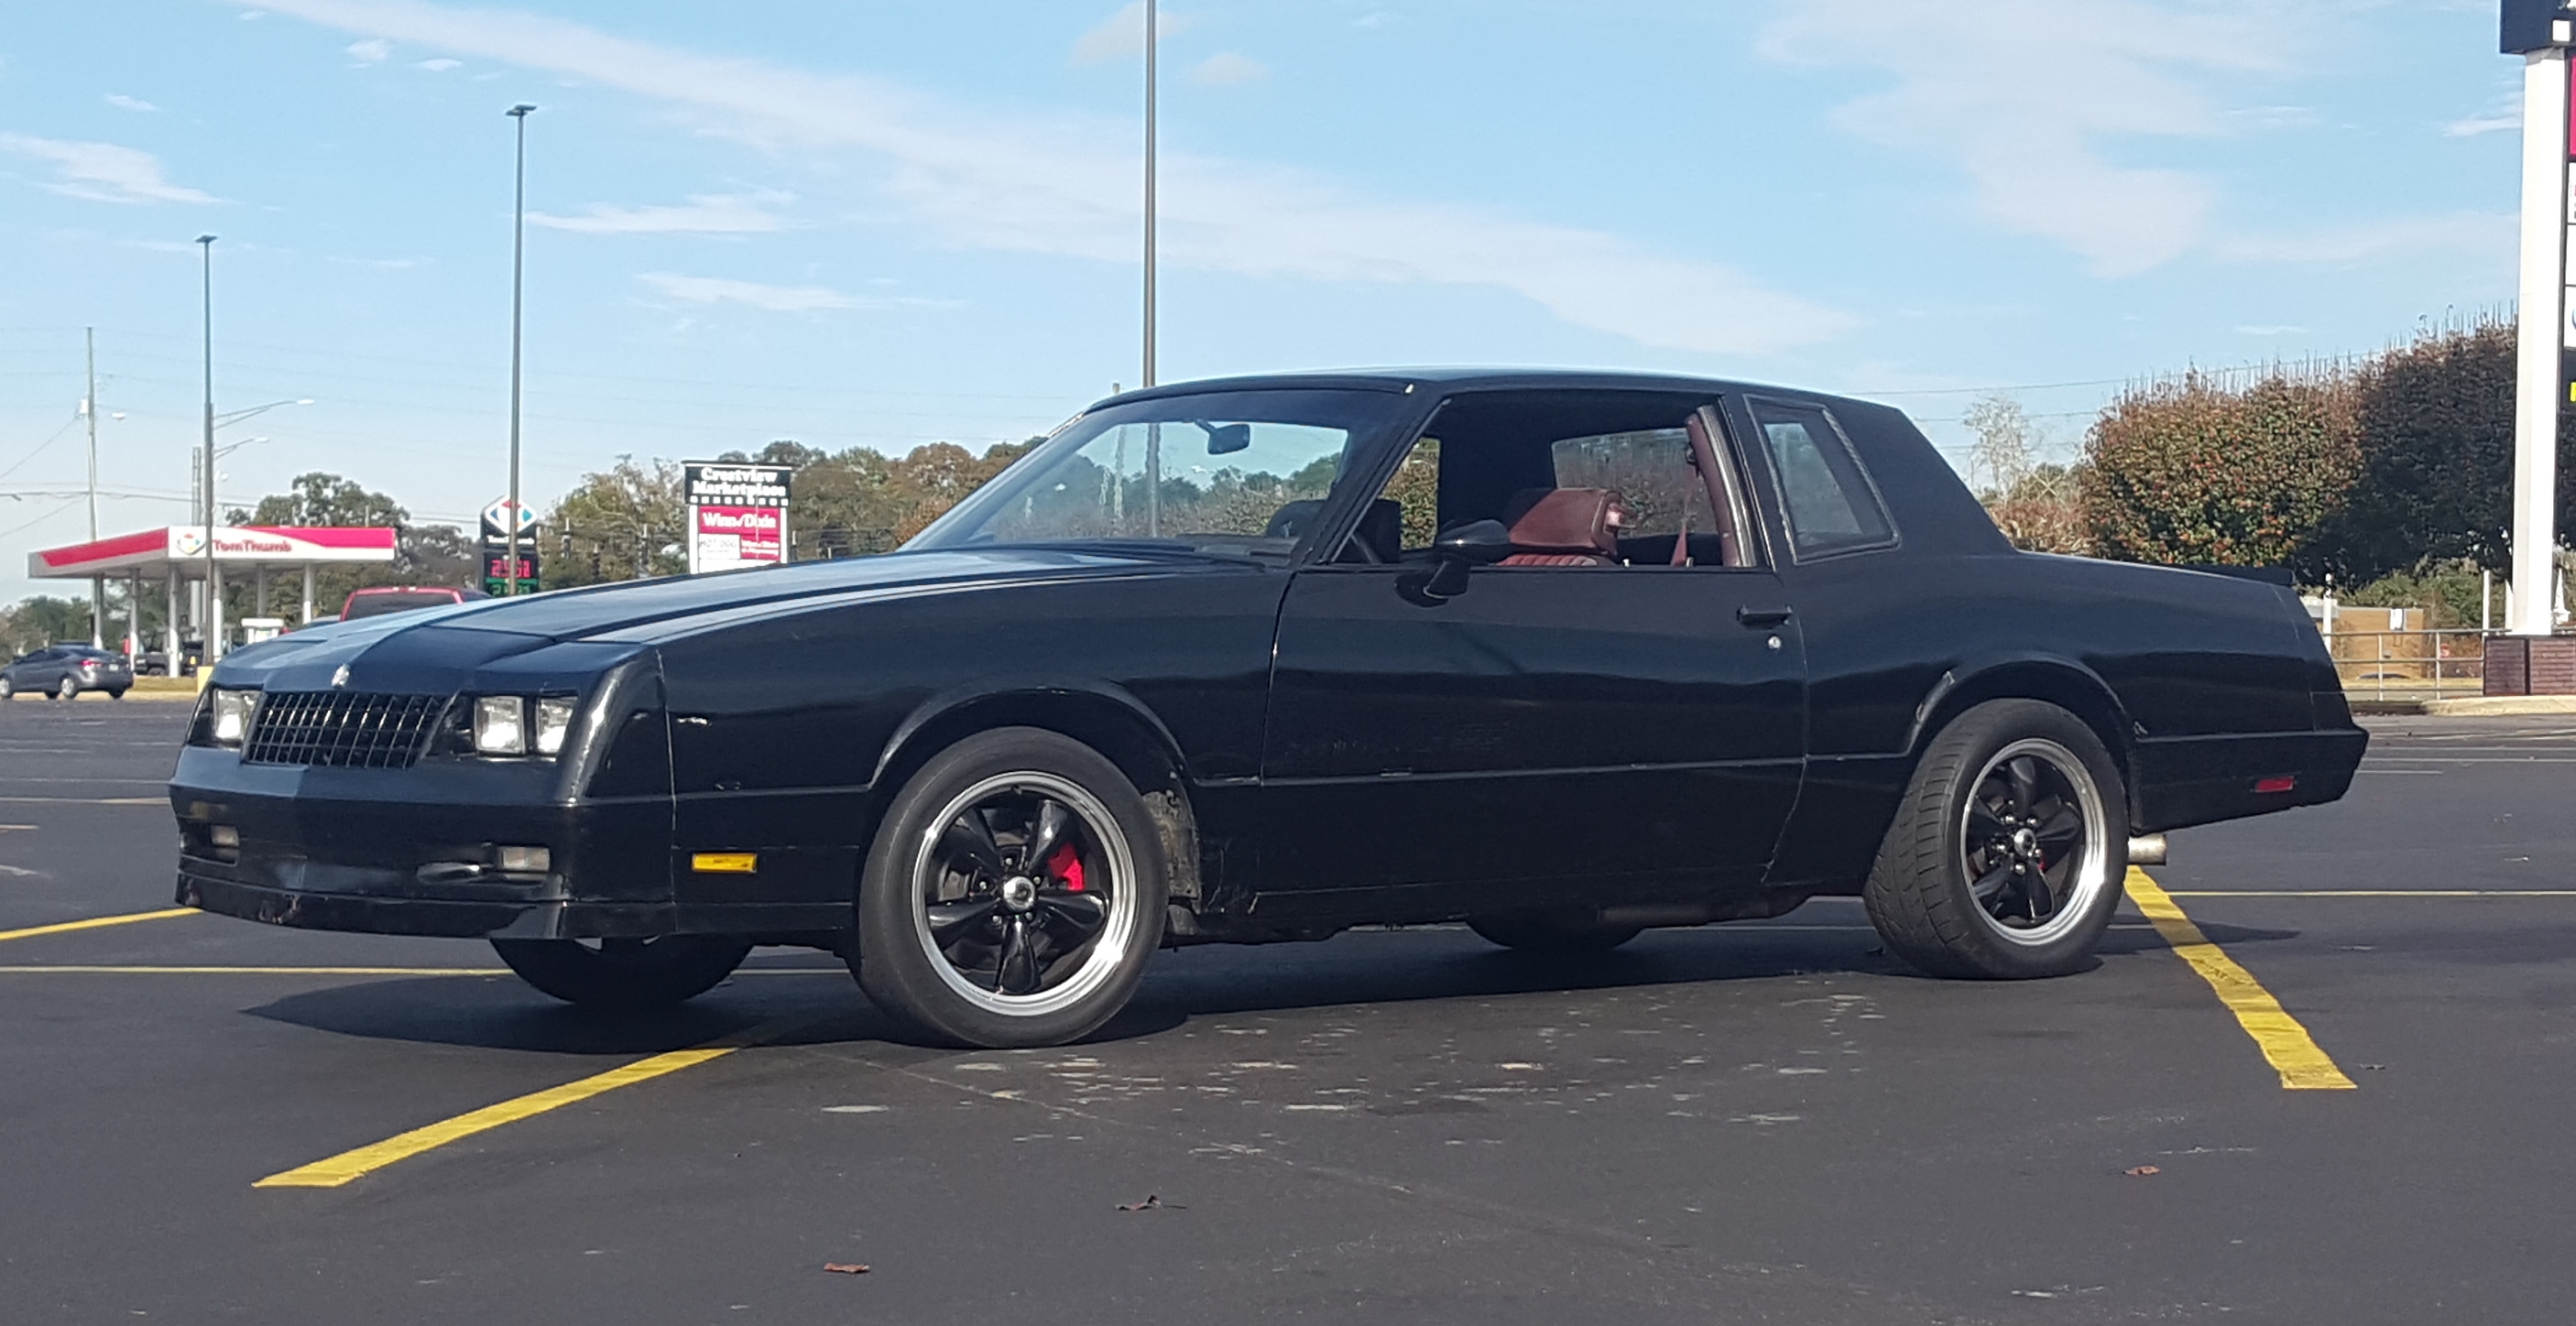
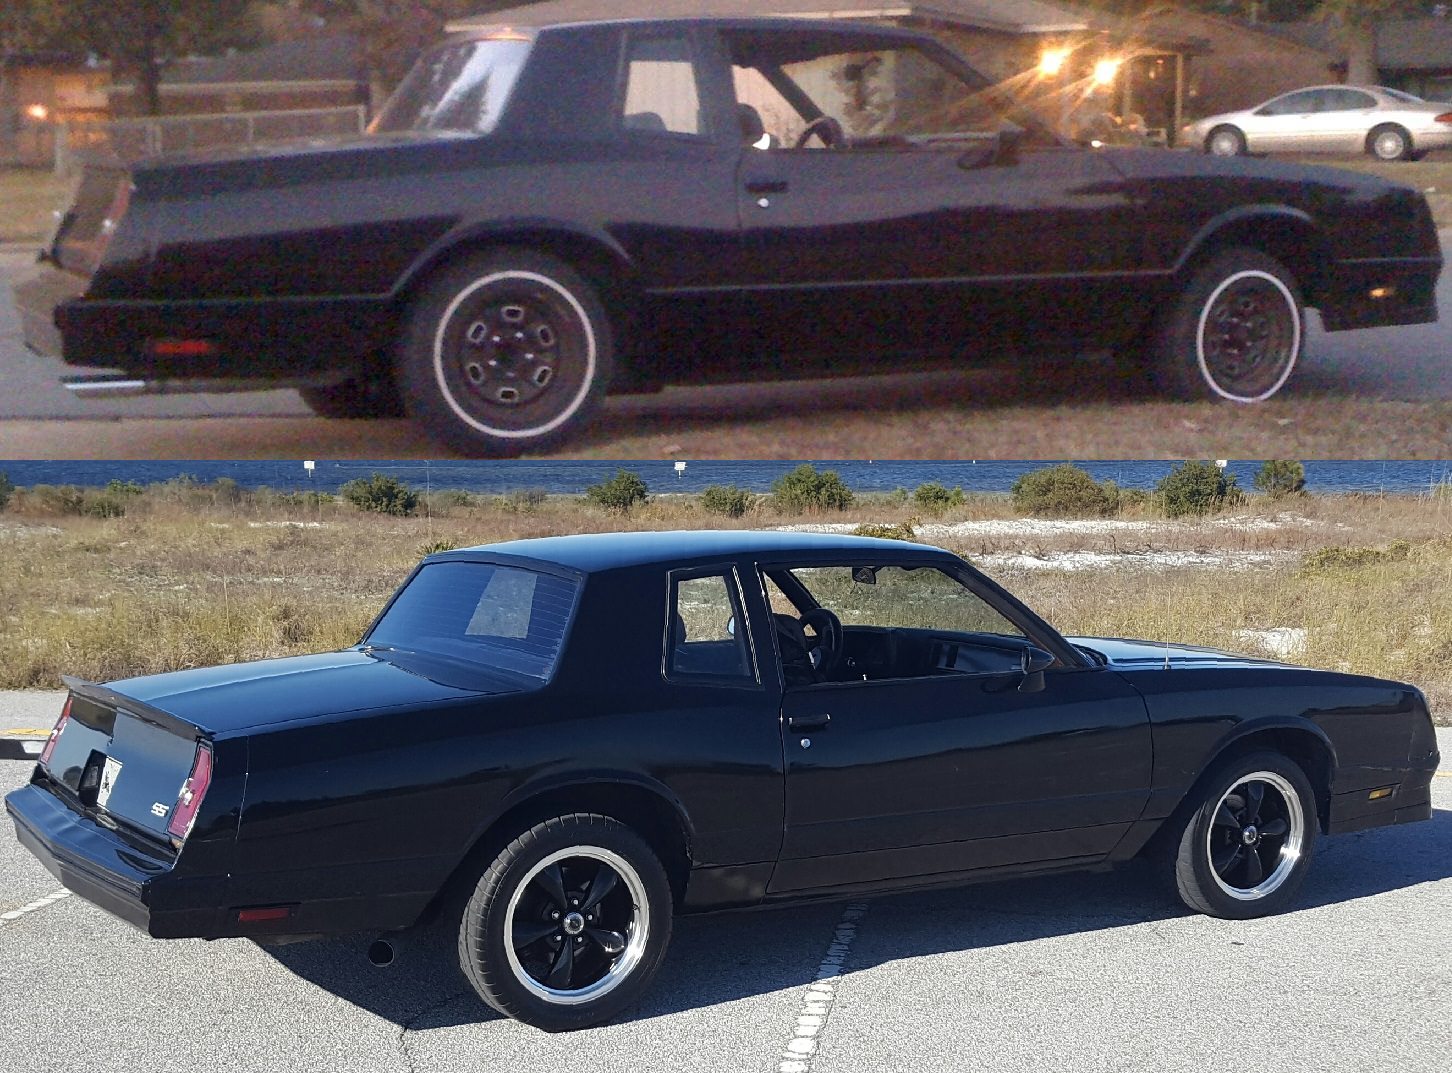
This is what the car currently looks like, has come a long ways in 9 years since I bought it.

MOD LIST:
1984 Monte SS
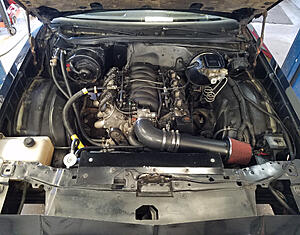
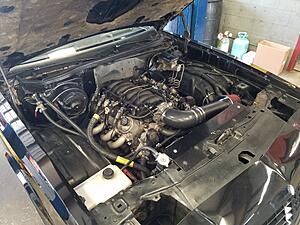
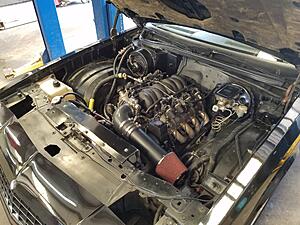
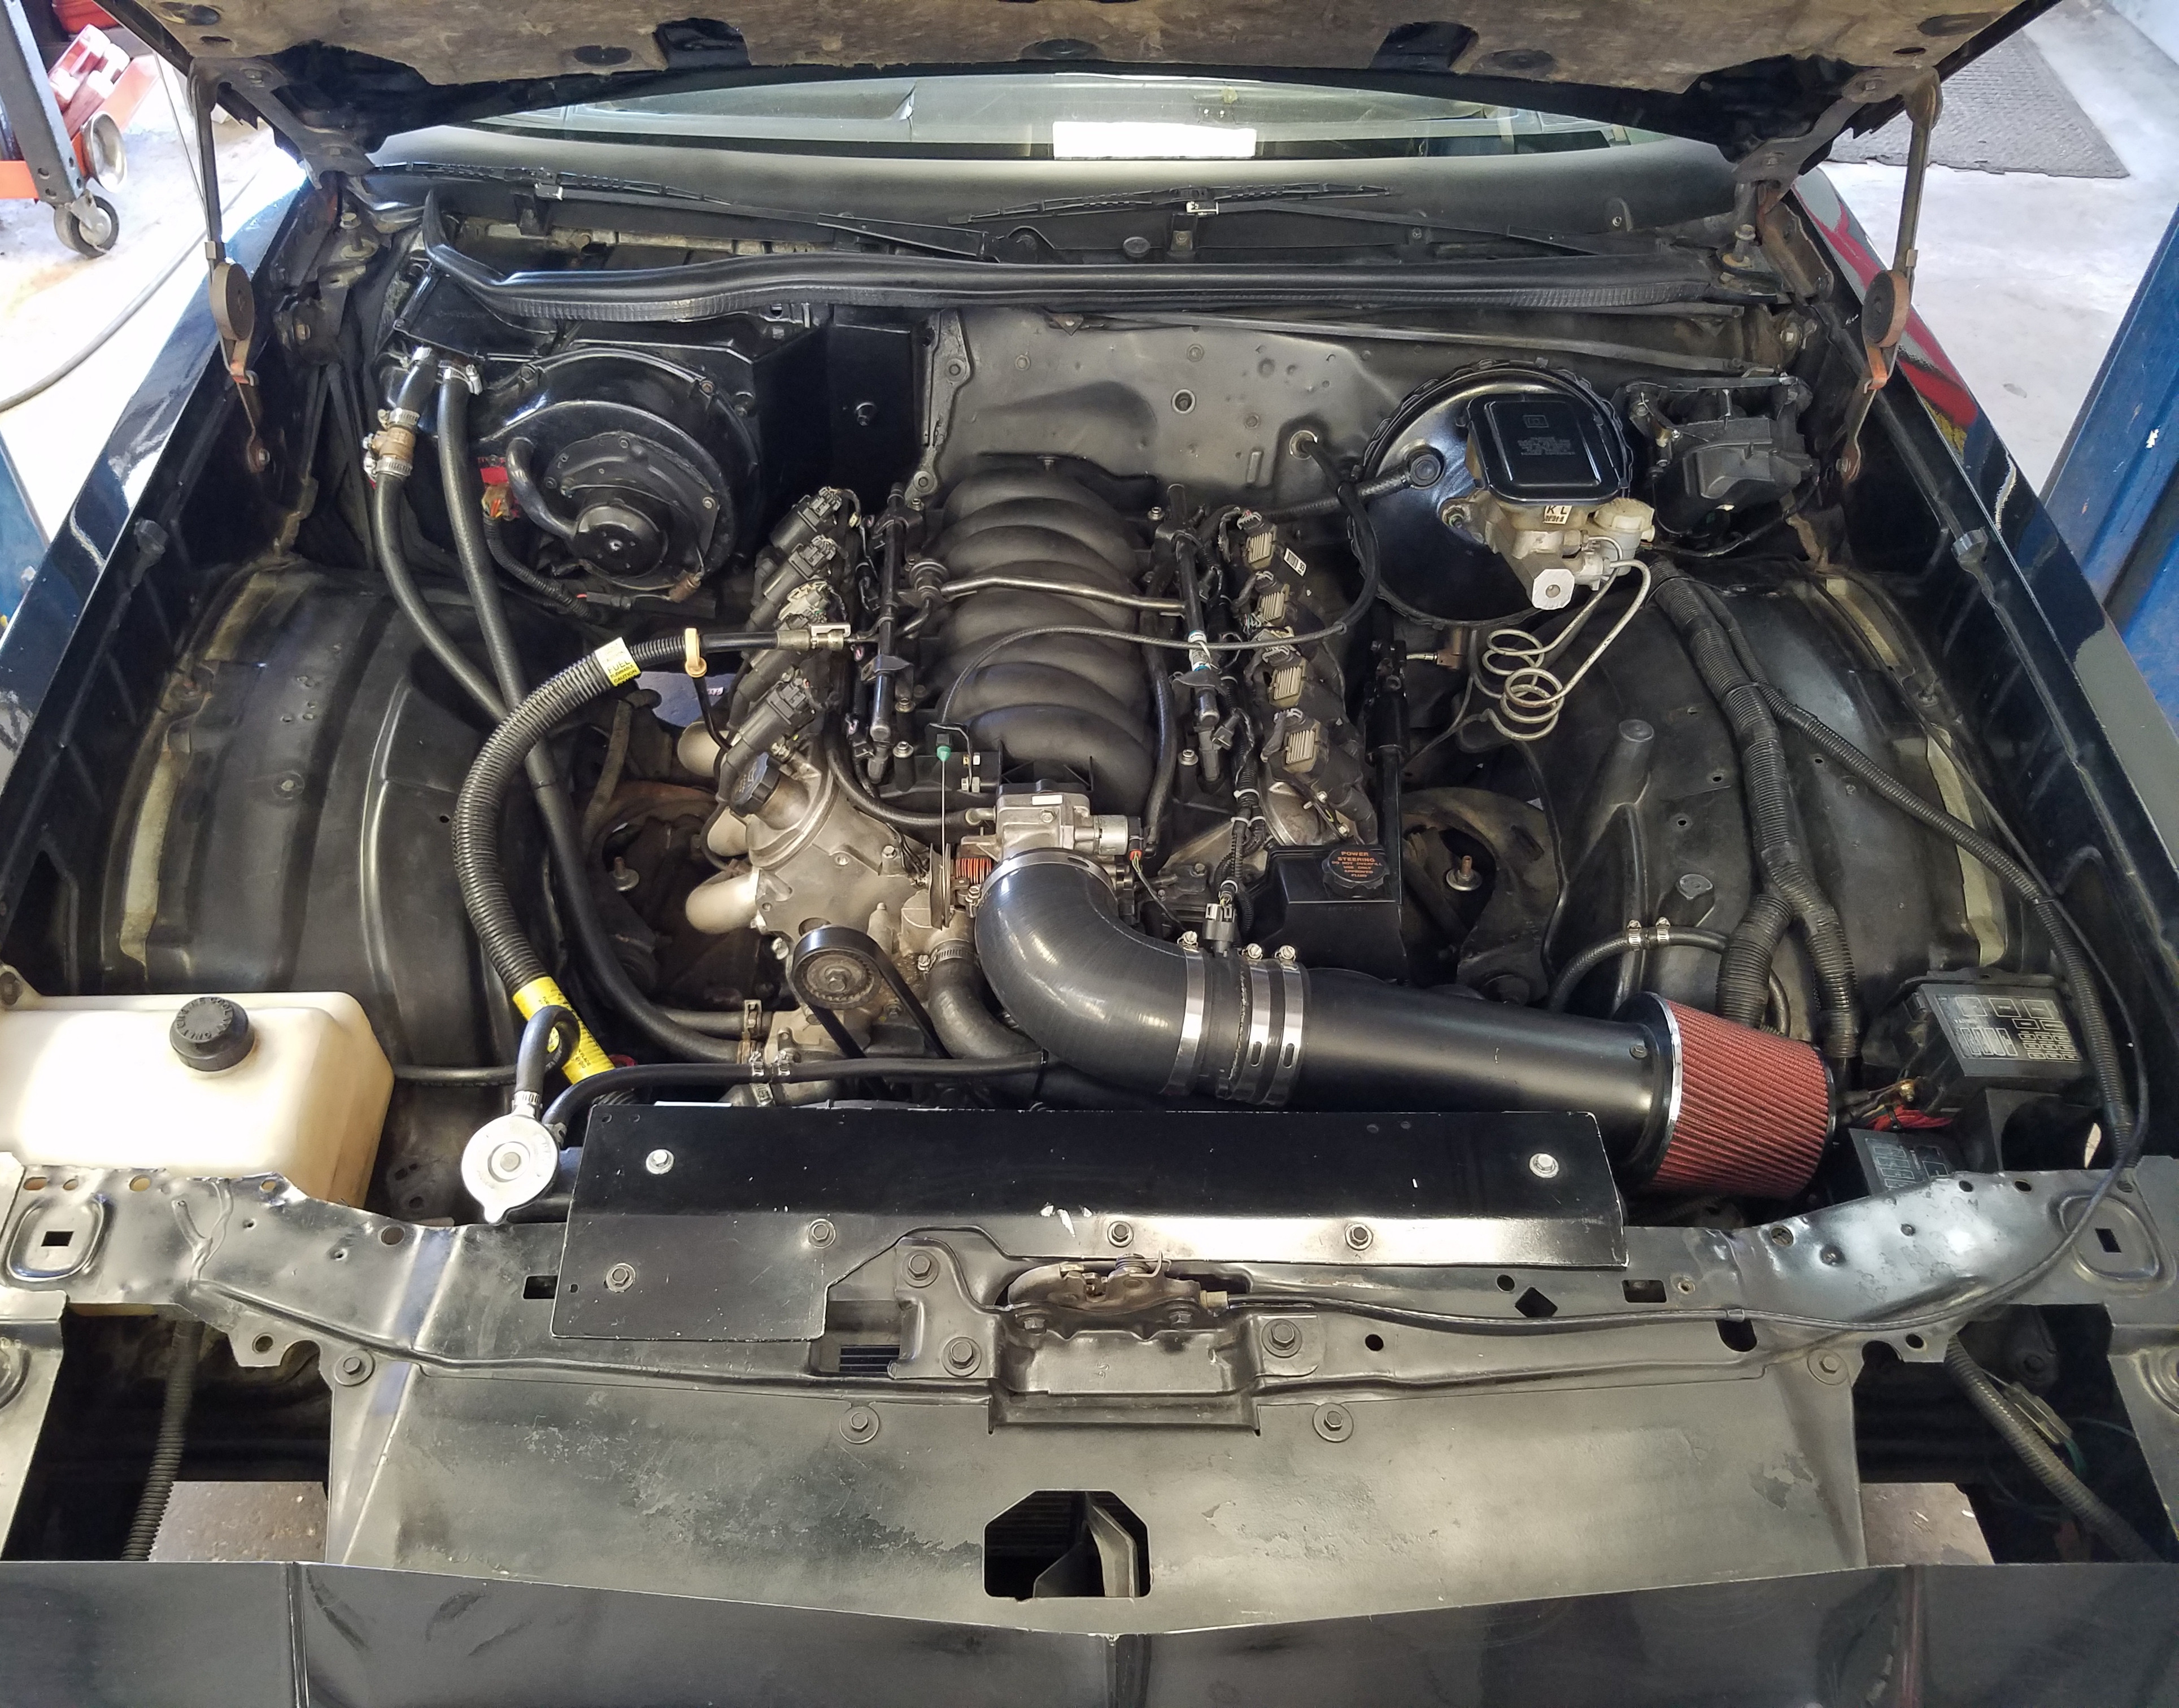
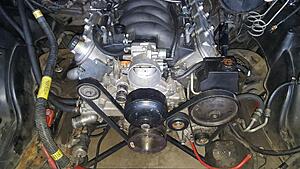
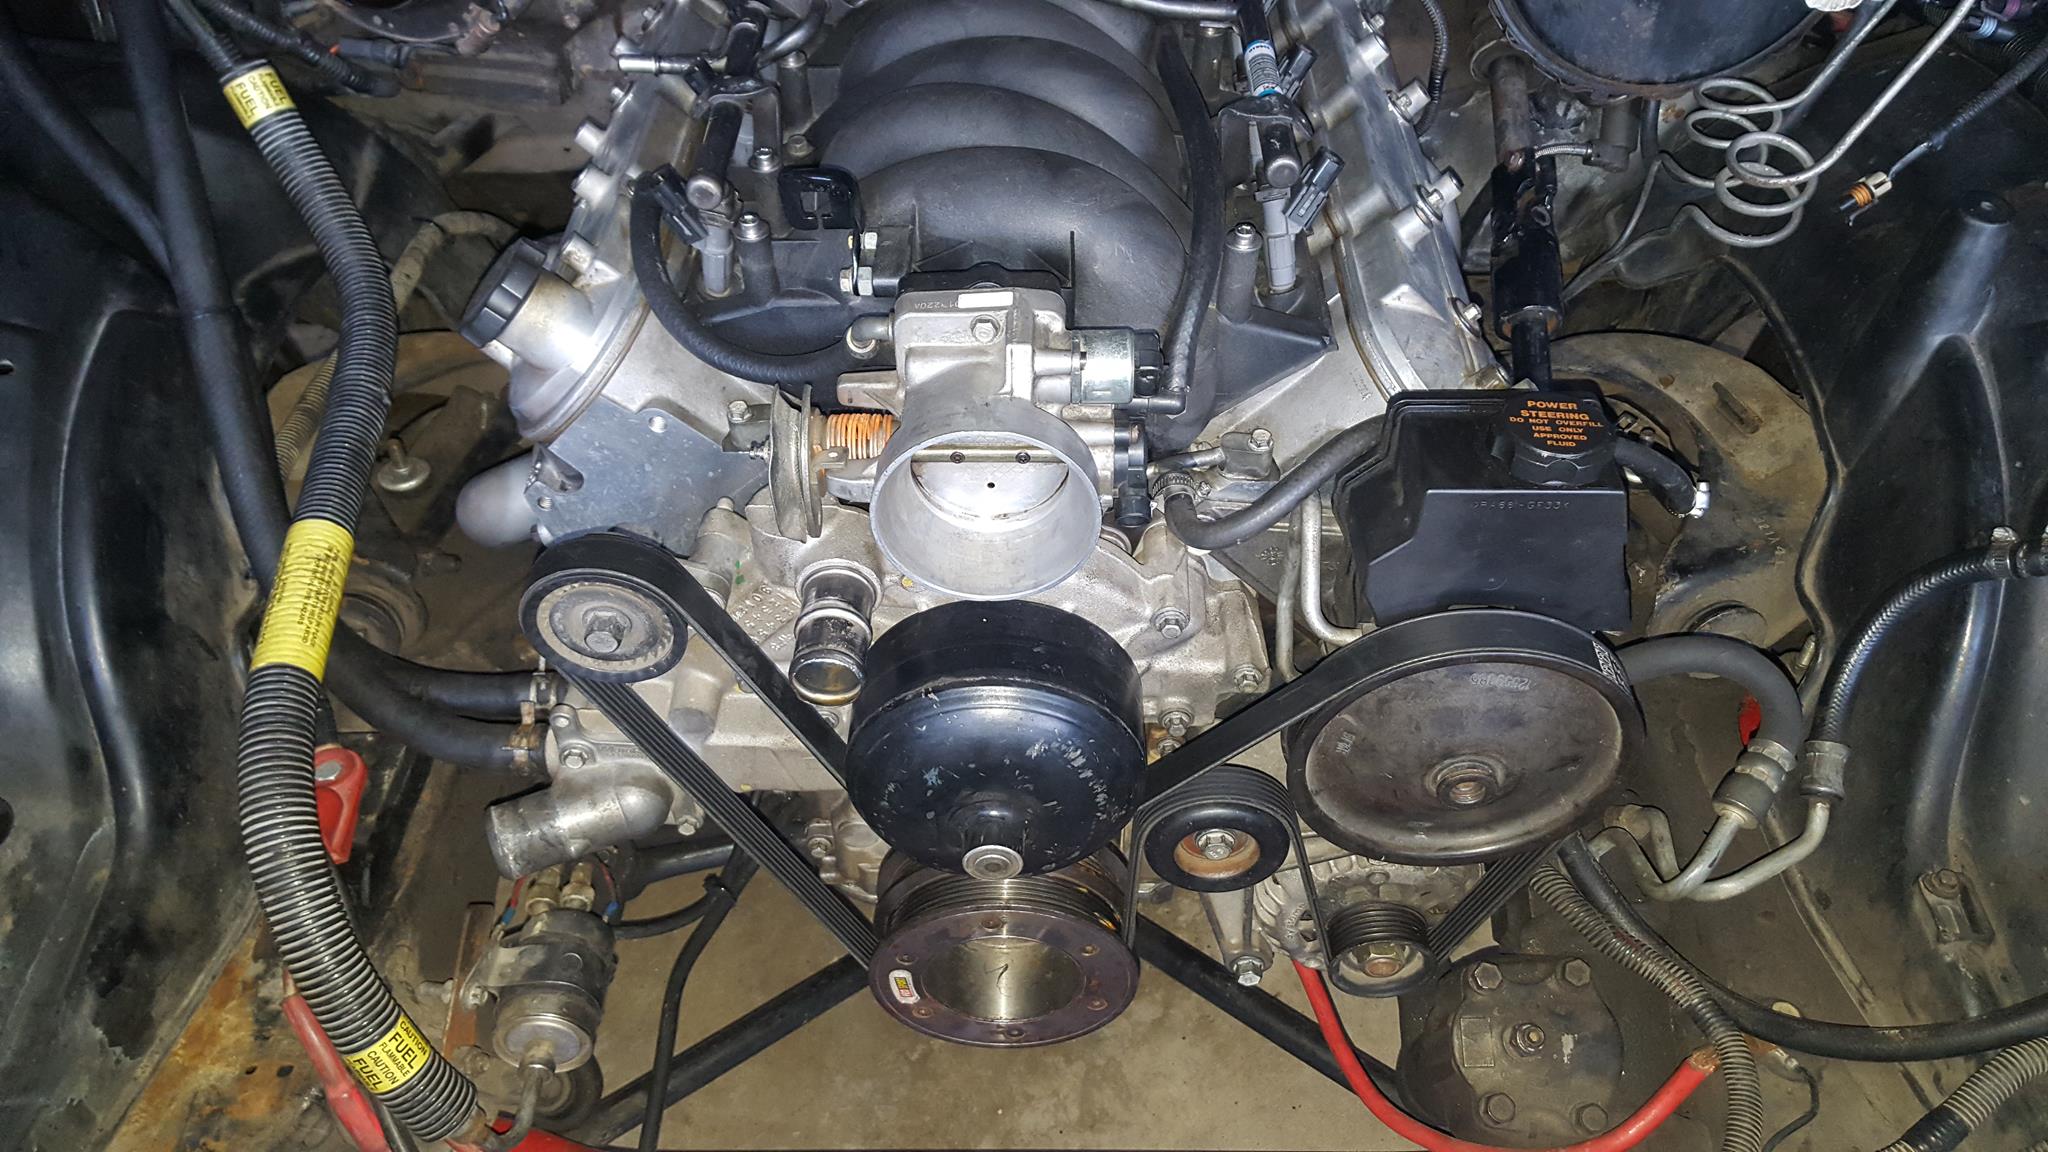
2006 6.0l LQ4, LS2 243 Heads, LS6 Intake, LS1 Fbody Accessories
Thunder Racing Cam, 230/236 .592/.602 112+3 LSA, Texas Speed Hardened Pushrods, BTR .660 Dual Coil Valve Springs
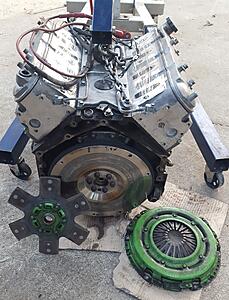
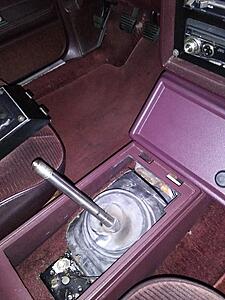
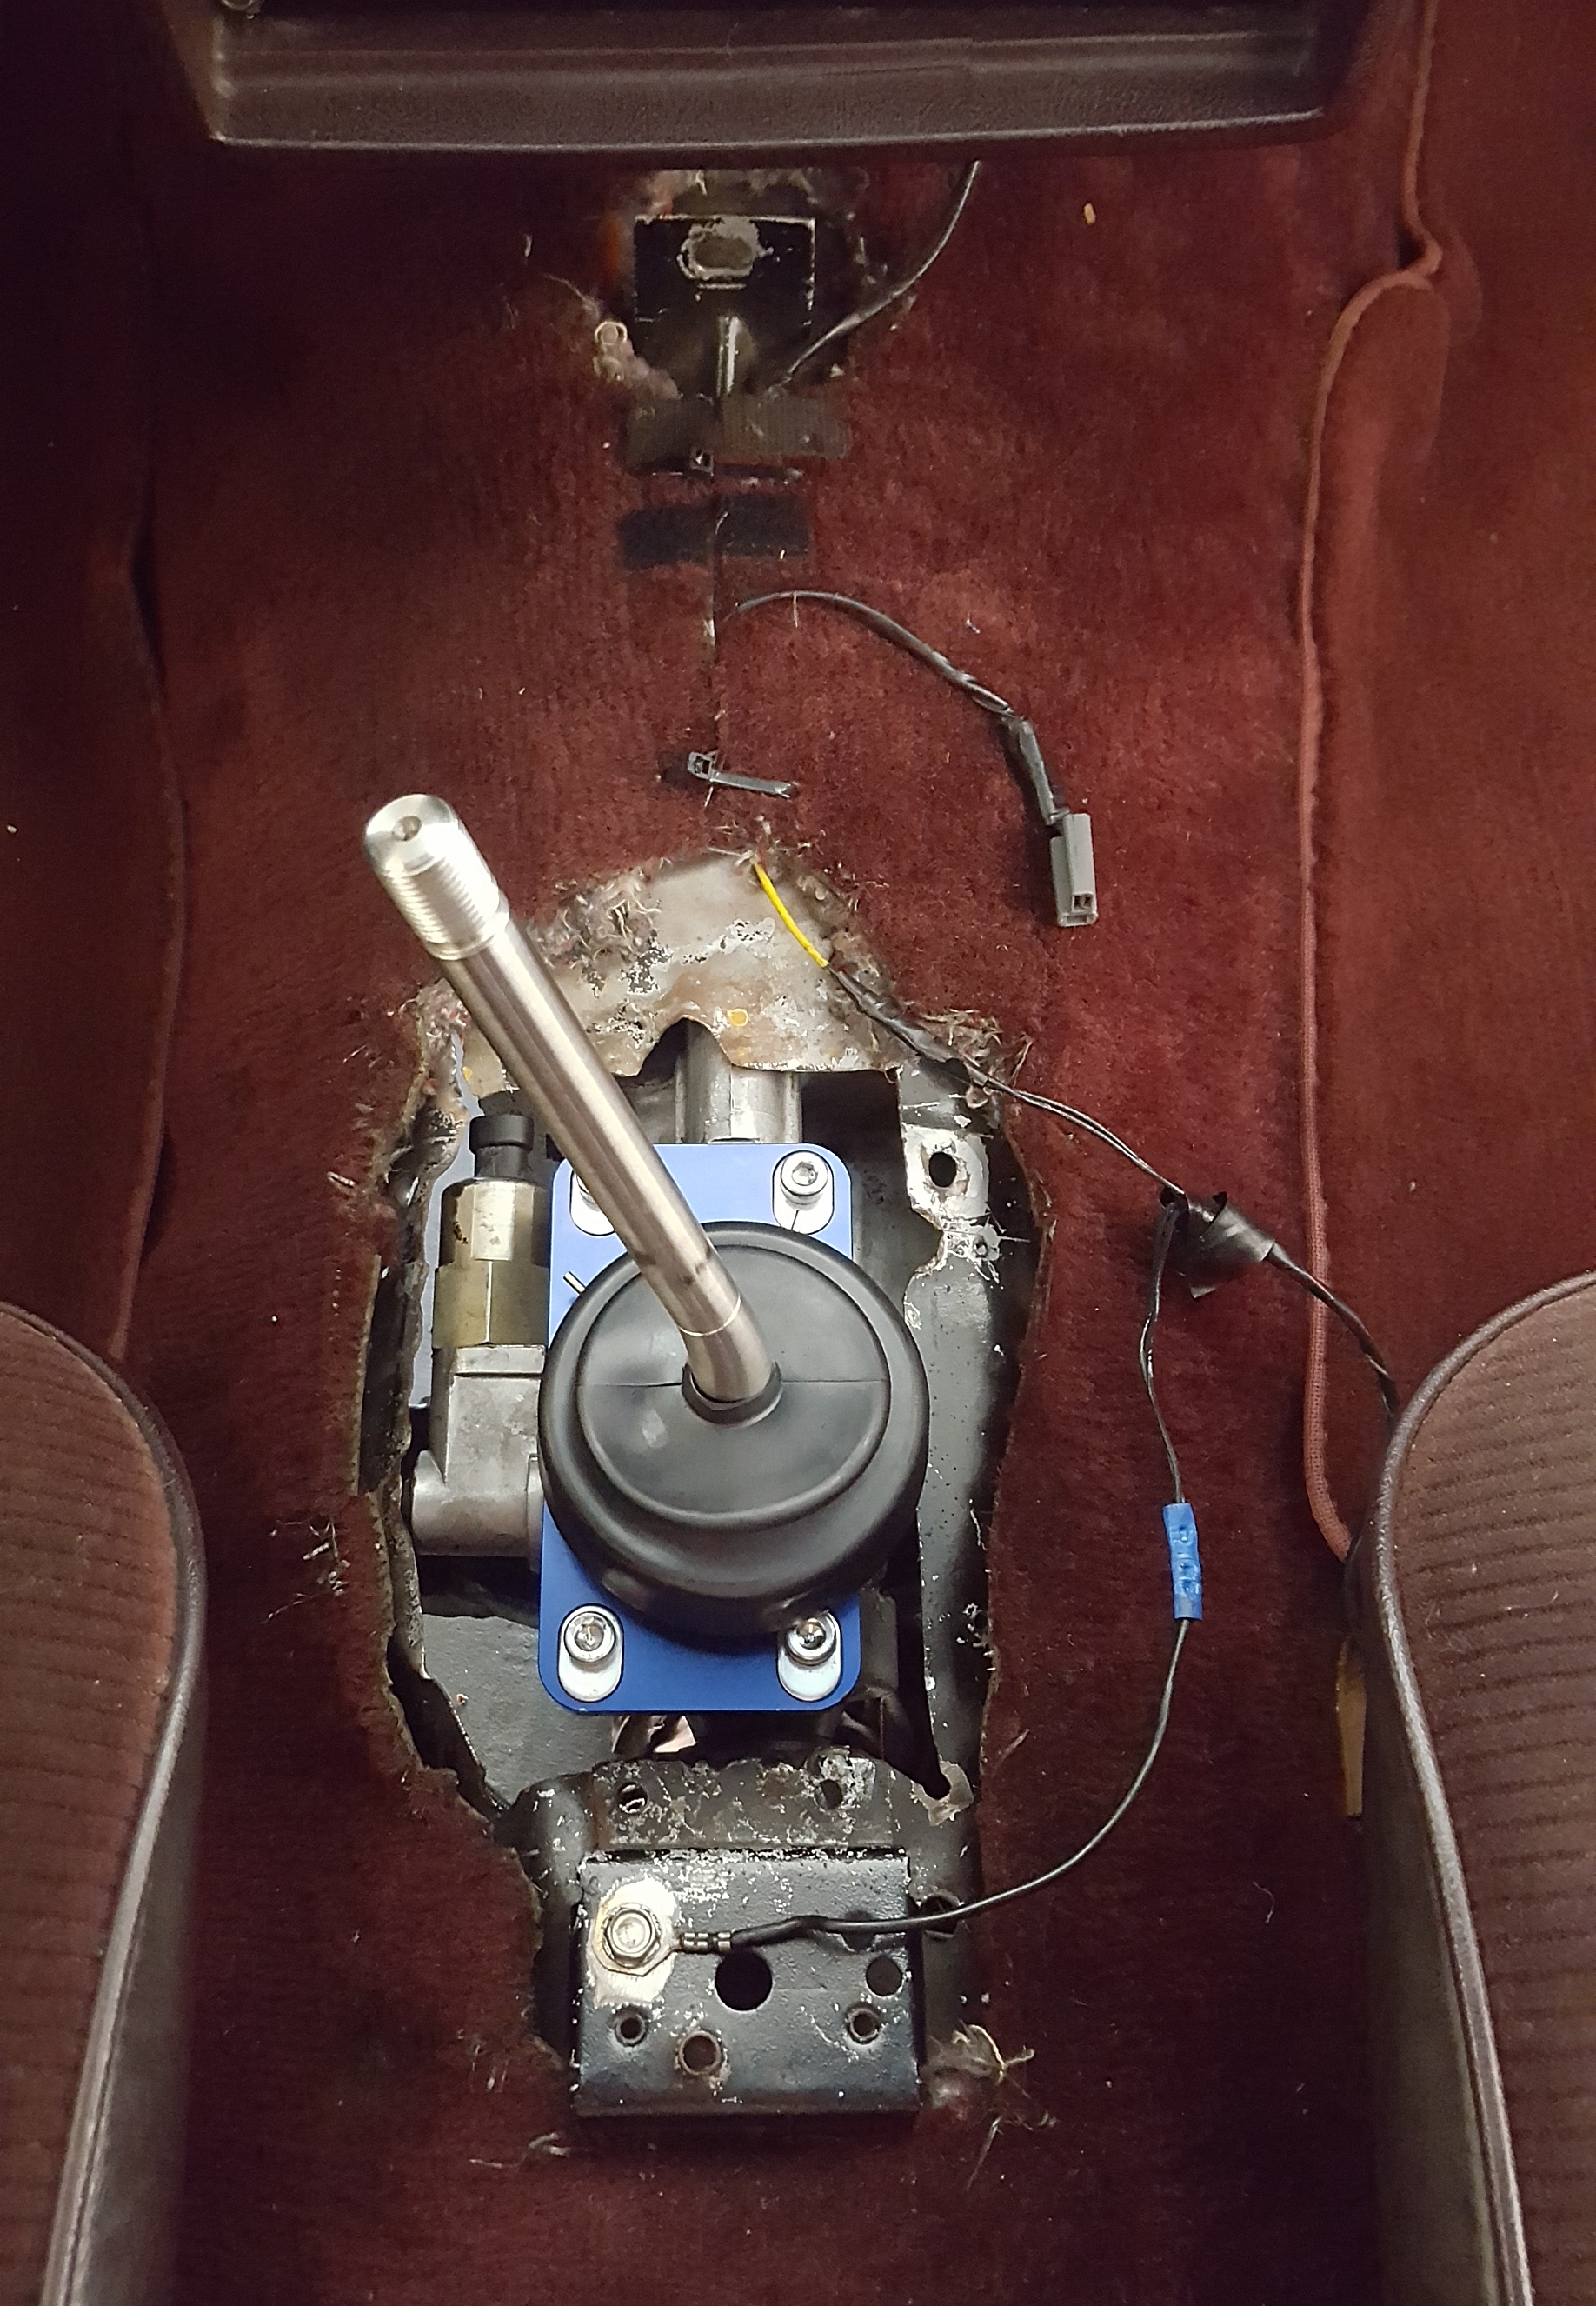
Built T56 6spd Manual Transmission, Monster Stage 3 Clutch, B&M Ripper Shifter, custom Clutch Pedal
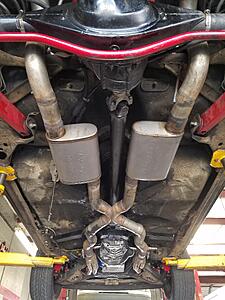
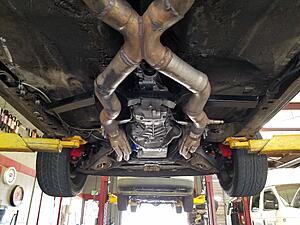
Pypes Race Pro Mufflers, 3" True Dual Exhaust over axle with Xpipe
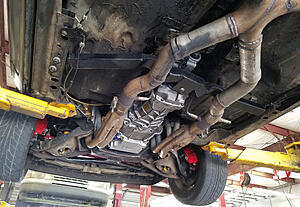
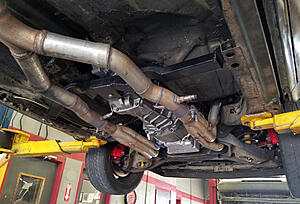
Quick Performance Custom 9" Rear End, Detroit TruTrac Differential with Richmond 3.89 Gears
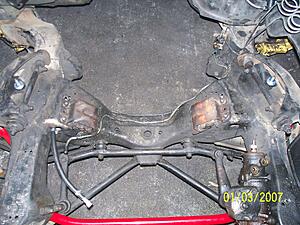
UMI Performance Front & Rear Solid Sway Bars, Rear Boxed Lower Control Arms with Double Adjustable Upper Control Arms
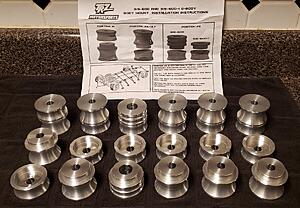
Bilstein Shocks, Eibach Front Springs cut, UMI Rear Springs, C5 Z06 Front Disc Brakes, LT1 Fbody Rear Disc Brakes, TRZ Solid Body Bushings
Tuned with HP Tuners
MODS I USED TO MAKE THE LS SWAP:
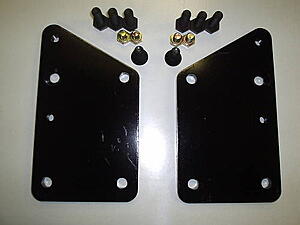
EBAY LS NON SETBACK SBC Adapter Plates, 1999-2002 GM Truck Throttle Cable
Heddman Hustler 45036 LS Gbody Swap Long Tube Headers
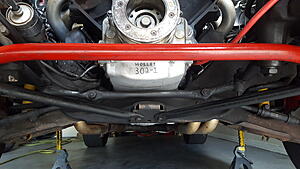
Holley 302-1 Oil Pan (Yes, it fits this car)
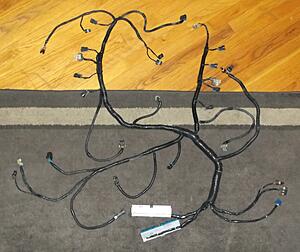
LT1 Fbody Radiator & Fans, 1998 Fbody Fuse Box, modified 1999 LS1 Fbody Engine Harness, 2002 LS1 Fbody 0411 PCM
Modified Jegs 700R4 Double Hump Crossmember for the T56
EFI Gbody Gas Tank, Walbro 255 EFI Intank Pump, Modified EFI Gbody Sending Unit, C5 Corvette Fuel Filter/Regulator
T56 6spd Manual Gbody Swap
https://gbodyforum.com/threads/t56-6...a-gbody.60659/
Electronic Speedo Conversion
https://gbodyforum.com/threads/elect...FwYlbwWJhzEEtA
C5 Z06 Front Brake Swap
https://gbodyforum.com/threads/c5-z0...WiGszGL13qBwp8
Detailed pictures of the setup in my SS
Attachment 714612


I did the initial build on this car in Dec 2010, and in the last couple weeks overhauled the car installing new parts and modifying others to make the build more refined.
This is what the car currently looks like, has come a long ways in 9 years since I bought it.


MOD LIST:
1984 Monte SS
2006 6.0l LQ4, LS2 243 Heads, LS6 Intake, LS1 Fbody Accessories
Thunder Racing Cam, 230/236 .592/.602 112+3 LSA, Texas Speed Hardened Pushrods, BTR .660 Dual Coil Valve Springs
Built T56 6spd Manual Transmission, Monster Stage 3 Clutch, B&M Ripper Shifter, custom Clutch Pedal
Pypes Race Pro Mufflers, 3" True Dual Exhaust over axle with Xpipe
Quick Performance Custom 9" Rear End, Detroit TruTrac Differential with Richmond 3.89 Gears
UMI Performance Front & Rear Solid Sway Bars, Rear Boxed Lower Control Arms with Double Adjustable Upper Control Arms
Bilstein Shocks, Eibach Front Springs cut, UMI Rear Springs, C5 Z06 Front Disc Brakes, LT1 Fbody Rear Disc Brakes, TRZ Solid Body Bushings
Tuned with HP Tuners
MODS I USED TO MAKE THE LS SWAP:
EBAY LS NON SETBACK SBC Adapter Plates, 1999-2002 GM Truck Throttle Cable
Heddman Hustler 45036 LS Gbody Swap Long Tube Headers
Holley 302-1 Oil Pan (Yes, it fits this car)
LT1 Fbody Radiator & Fans, 1998 Fbody Fuse Box, modified 1999 LS1 Fbody Engine Harness, 2002 LS1 Fbody 0411 PCM
Modified Jegs 700R4 Double Hump Crossmember for the T56
EFI Gbody Gas Tank, Walbro 255 EFI Intank Pump, Modified EFI Gbody Sending Unit, C5 Corvette Fuel Filter/Regulator
T56 6spd Manual Gbody Swap
https://gbodyforum.com/threads/t56-6...a-gbody.60659/
Electronic Speedo Conversion
https://gbodyforum.com/threads/elect...FwYlbwWJhzEEtA
C5 Z06 Front Brake Swap
https://gbodyforum.com/threads/c5-z0...WiGszGL13qBwp8
Detailed pictures of the setup in my SS
Attachment 714612


Last edited by the_merv; 01-22-2023 at 01:27 PM.

The following users liked this post:
Project GatTagO (01-23-2023)
10-05-2019, 09:28 AM
#2
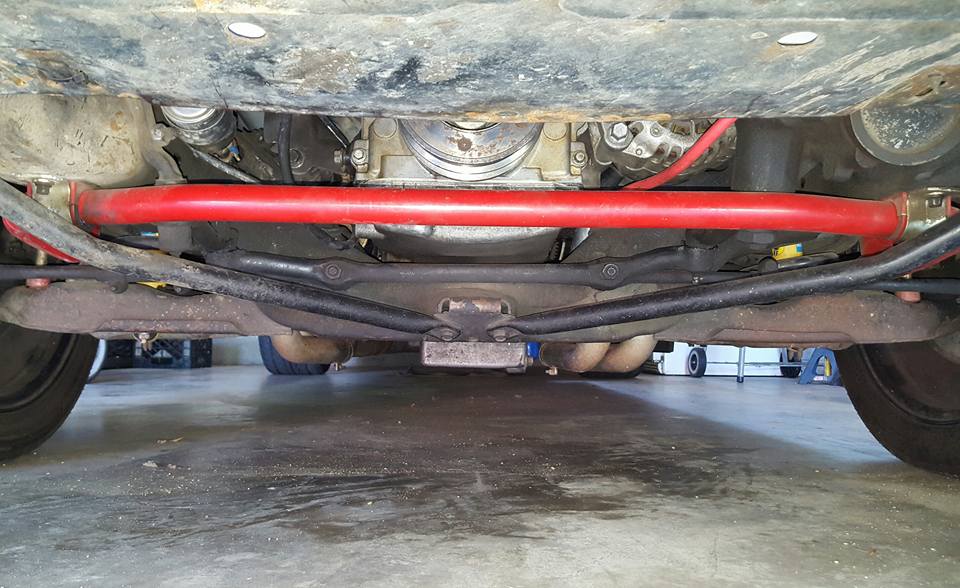
With the recent overhaul I swapped in the Holley 302-1 Oil Pan for proper ground clearance. It is flush with the Engine Cradle.
I used to have the GM Muscle Car Oil Pan, also called the H3 Pan.
Pics below comparing the two..

I freshened up the T56, and installed the Monster Stage 3 Clutch to get a little more bite over the LS7 Clutch I had
Once that was done, the package was bolted together and ready for install. The Holley Pan is about 1/4" lower than the T56 Bellhousing
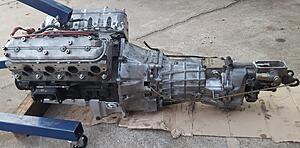
Mounts are the stock Gbody SBC Clamshells bolted onto LS NON SETBACK Plates and on the factory cradle pads
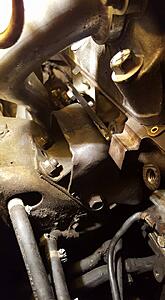
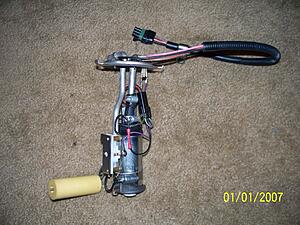
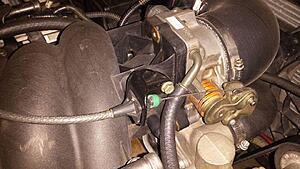
Fuel System has been the same for 9 years without issue. GM EFI Gbody Gas Tank, GM Gbody EFI Sending Unit modified to work with the LS Setup, Walbro 255 Pump.
Gas Tank I used
First thing I did was take the Sending Unit and adapted it for the LS Return setup. The way it was setup from the factory is the 1/4" was the return, and the 5/16" was the EVAP Vent. I turned the 1/4" into the vent, and the 5/16" into the return for the LS fuel system.
I modified the Sending Unit by cutting off the baffle on the end of the 5/16" line and opened up the end of it. This picture here is BEFORE I drilled out that little pin hole there. This little hole on the 5/16" line NEEDS TO BE DRILLED OUT.
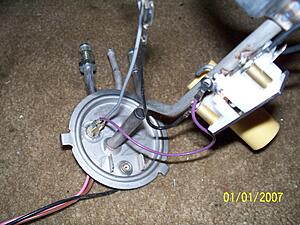
Once that is done, then cut a vent in the 1/4 metal line to vent the tank. This helps, it still gets a little splash back on fill up but that is by the design of the whole system. Cutting this slit on the 1/4" now turns that into the vent for the gas tank.
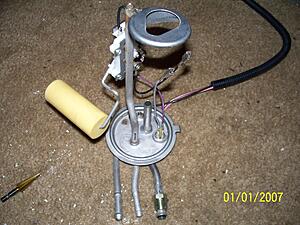
Here is the finished setup with a Walbro 255 GSS 342 Pump installed. The threaded flange was also cut off of the 3/8" line on the sending unit
Install into the EFI Gas Tank and run the proper EFI Rubber Lines
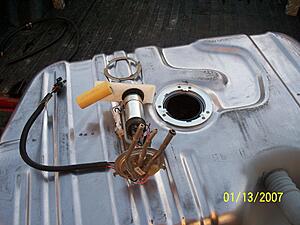

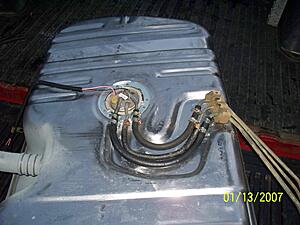
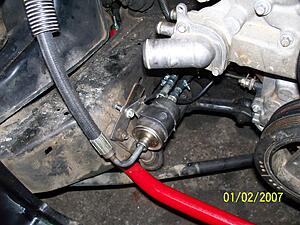
C5 Filter/Regulator mounted up on the front passengers corner
EVAP Line on the SS used as the 5/16" return line
I used to have the GM Muscle Car Oil Pan, also called the H3 Pan.
Pics below comparing the two..

I freshened up the T56, and installed the Monster Stage 3 Clutch to get a little more bite over the LS7 Clutch I had

Once that was done, the package was bolted together and ready for install. The Holley Pan is about 1/4" lower than the T56 Bellhousing

Mounts are the stock Gbody SBC Clamshells bolted onto LS NON SETBACK Plates and on the factory cradle pads


Fuel System has been the same for 9 years without issue. GM EFI Gbody Gas Tank, GM Gbody EFI Sending Unit modified to work with the LS Setup, Walbro 255 Pump.
Gas Tank I used

First thing I did was take the Sending Unit and adapted it for the LS Return setup. The way it was setup from the factory is the 1/4" was the return, and the 5/16" was the EVAP Vent. I turned the 1/4" into the vent, and the 5/16" into the return for the LS fuel system.
I modified the Sending Unit by cutting off the baffle on the end of the 5/16" line and opened up the end of it. This picture here is BEFORE I drilled out that little pin hole there. This little hole on the 5/16" line NEEDS TO BE DRILLED OUT.
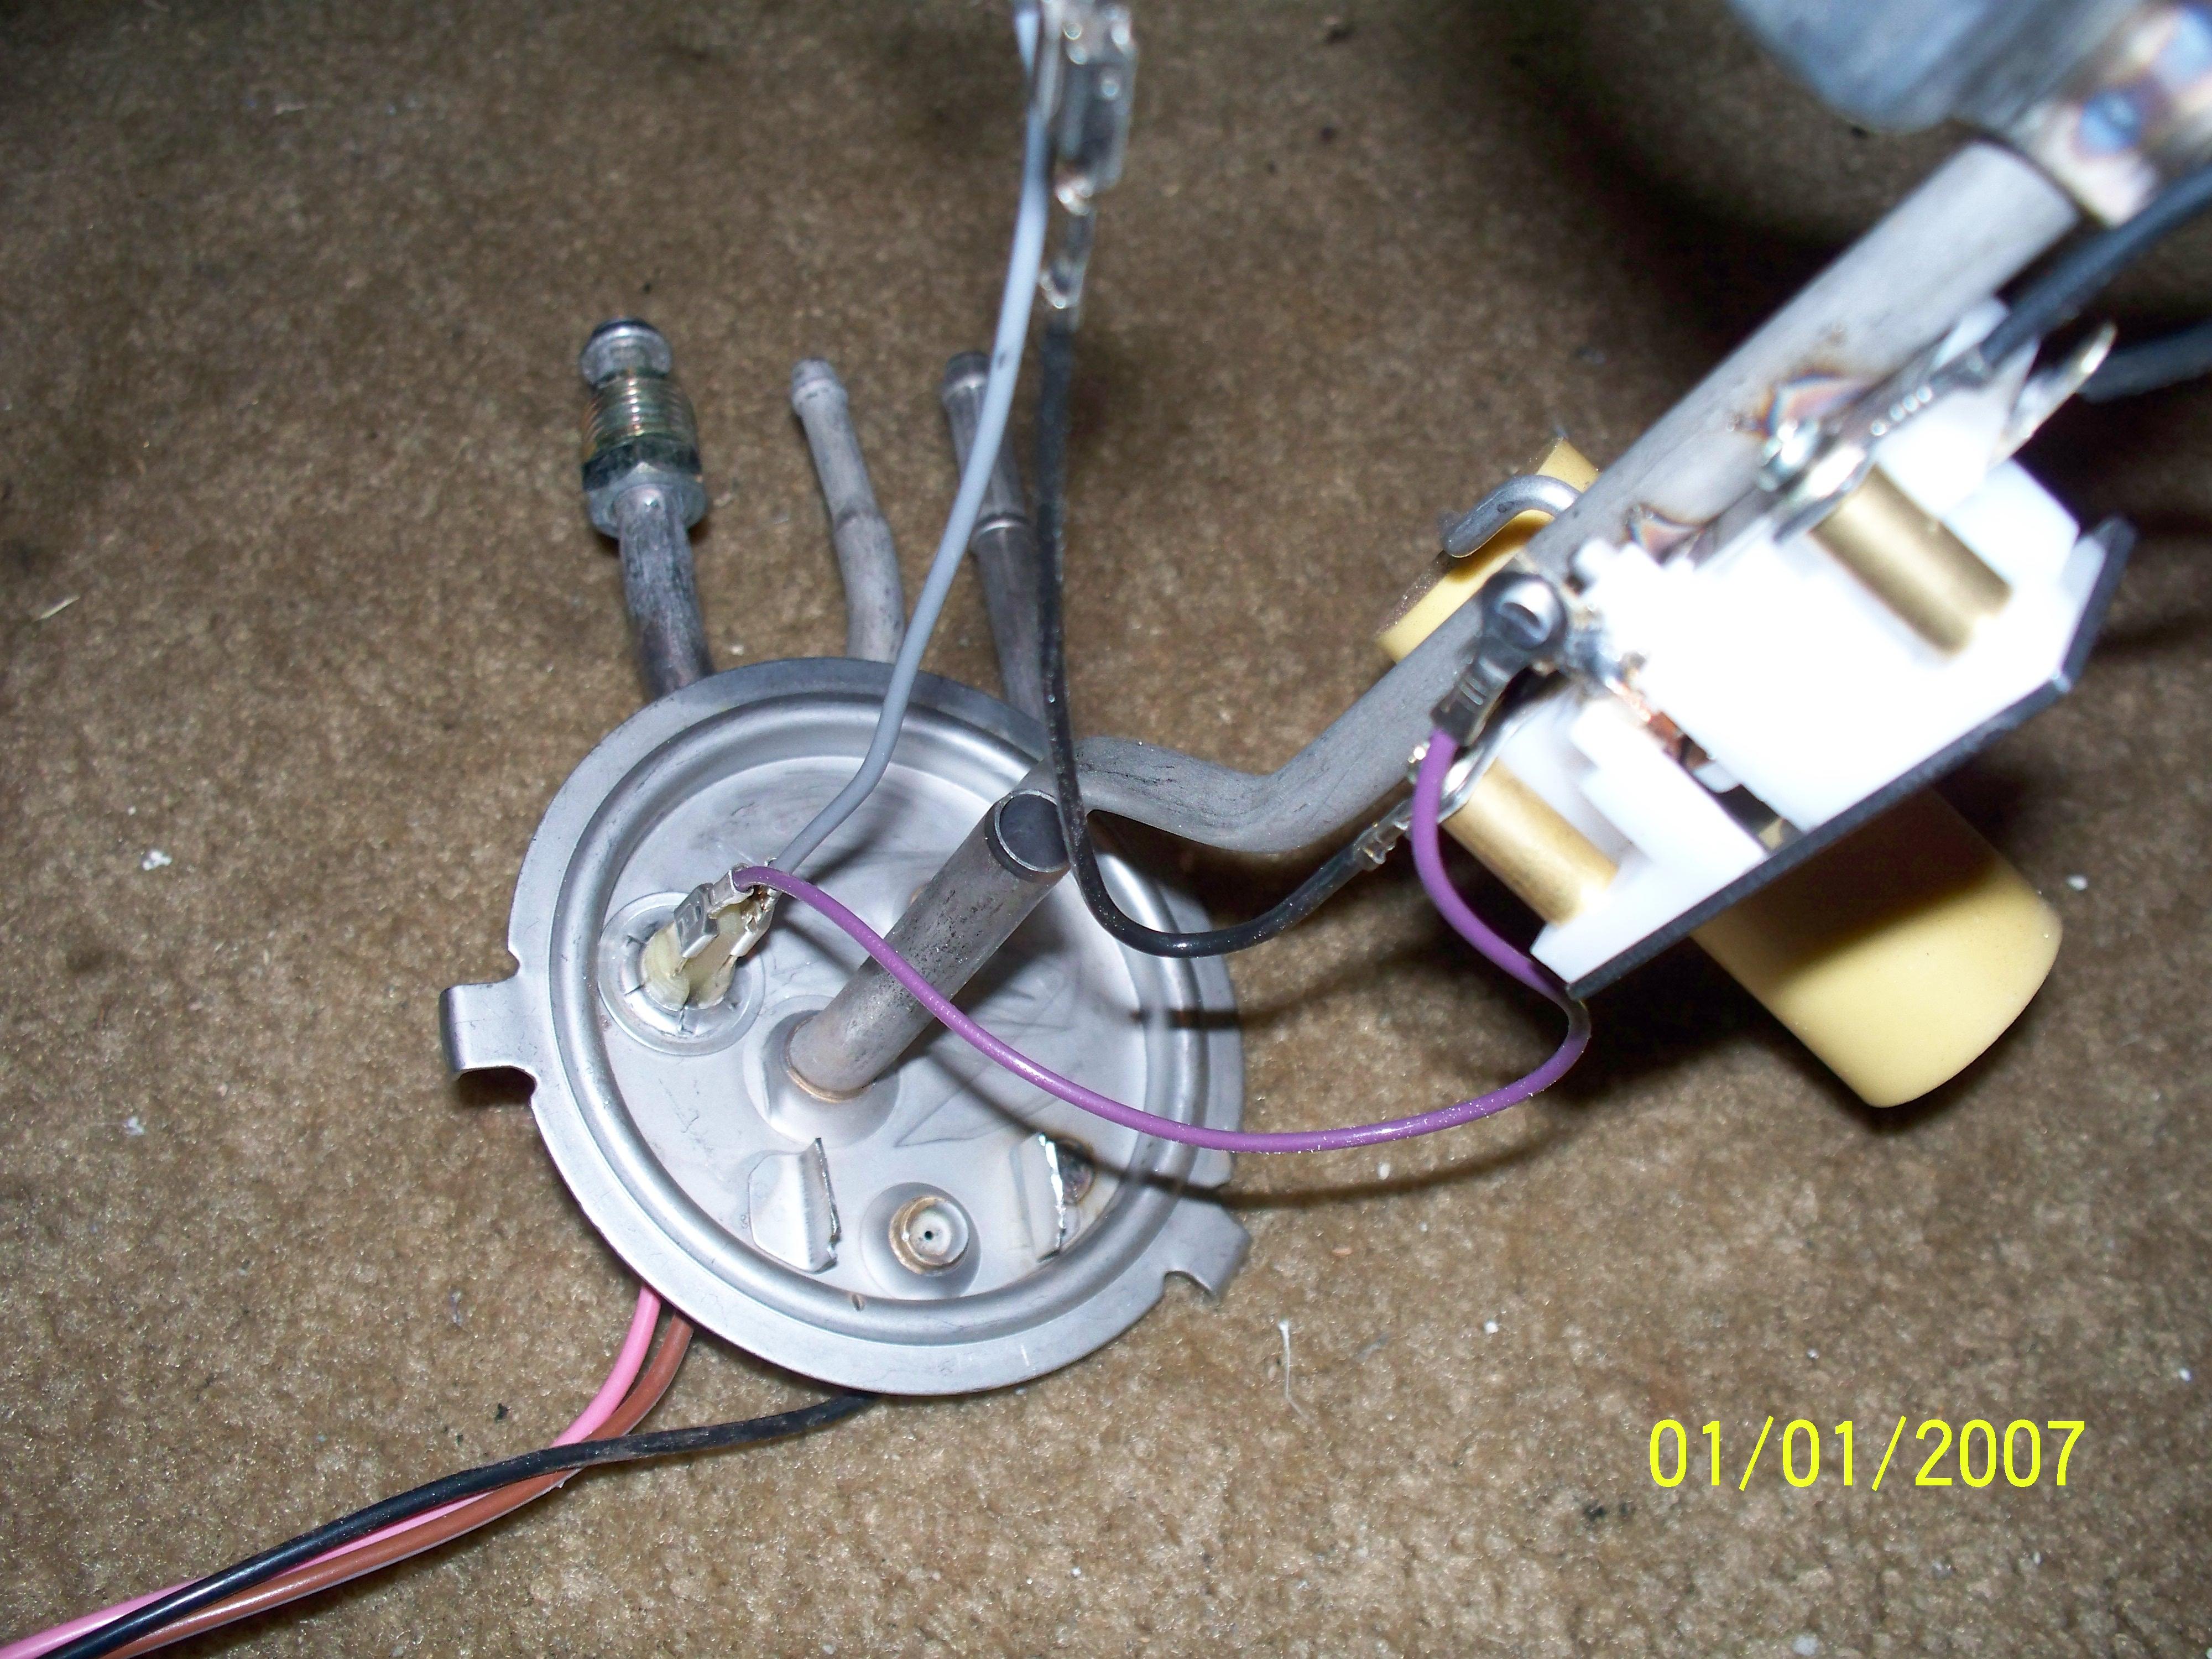
Once that is done, then cut a vent in the 1/4 metal line to vent the tank. This helps, it still gets a little splash back on fill up but that is by the design of the whole system. Cutting this slit on the 1/4" now turns that into the vent for the gas tank.

Here is the finished setup with a Walbro 255 GSS 342 Pump installed. The threaded flange was also cut off of the 3/8" line on the sending unit
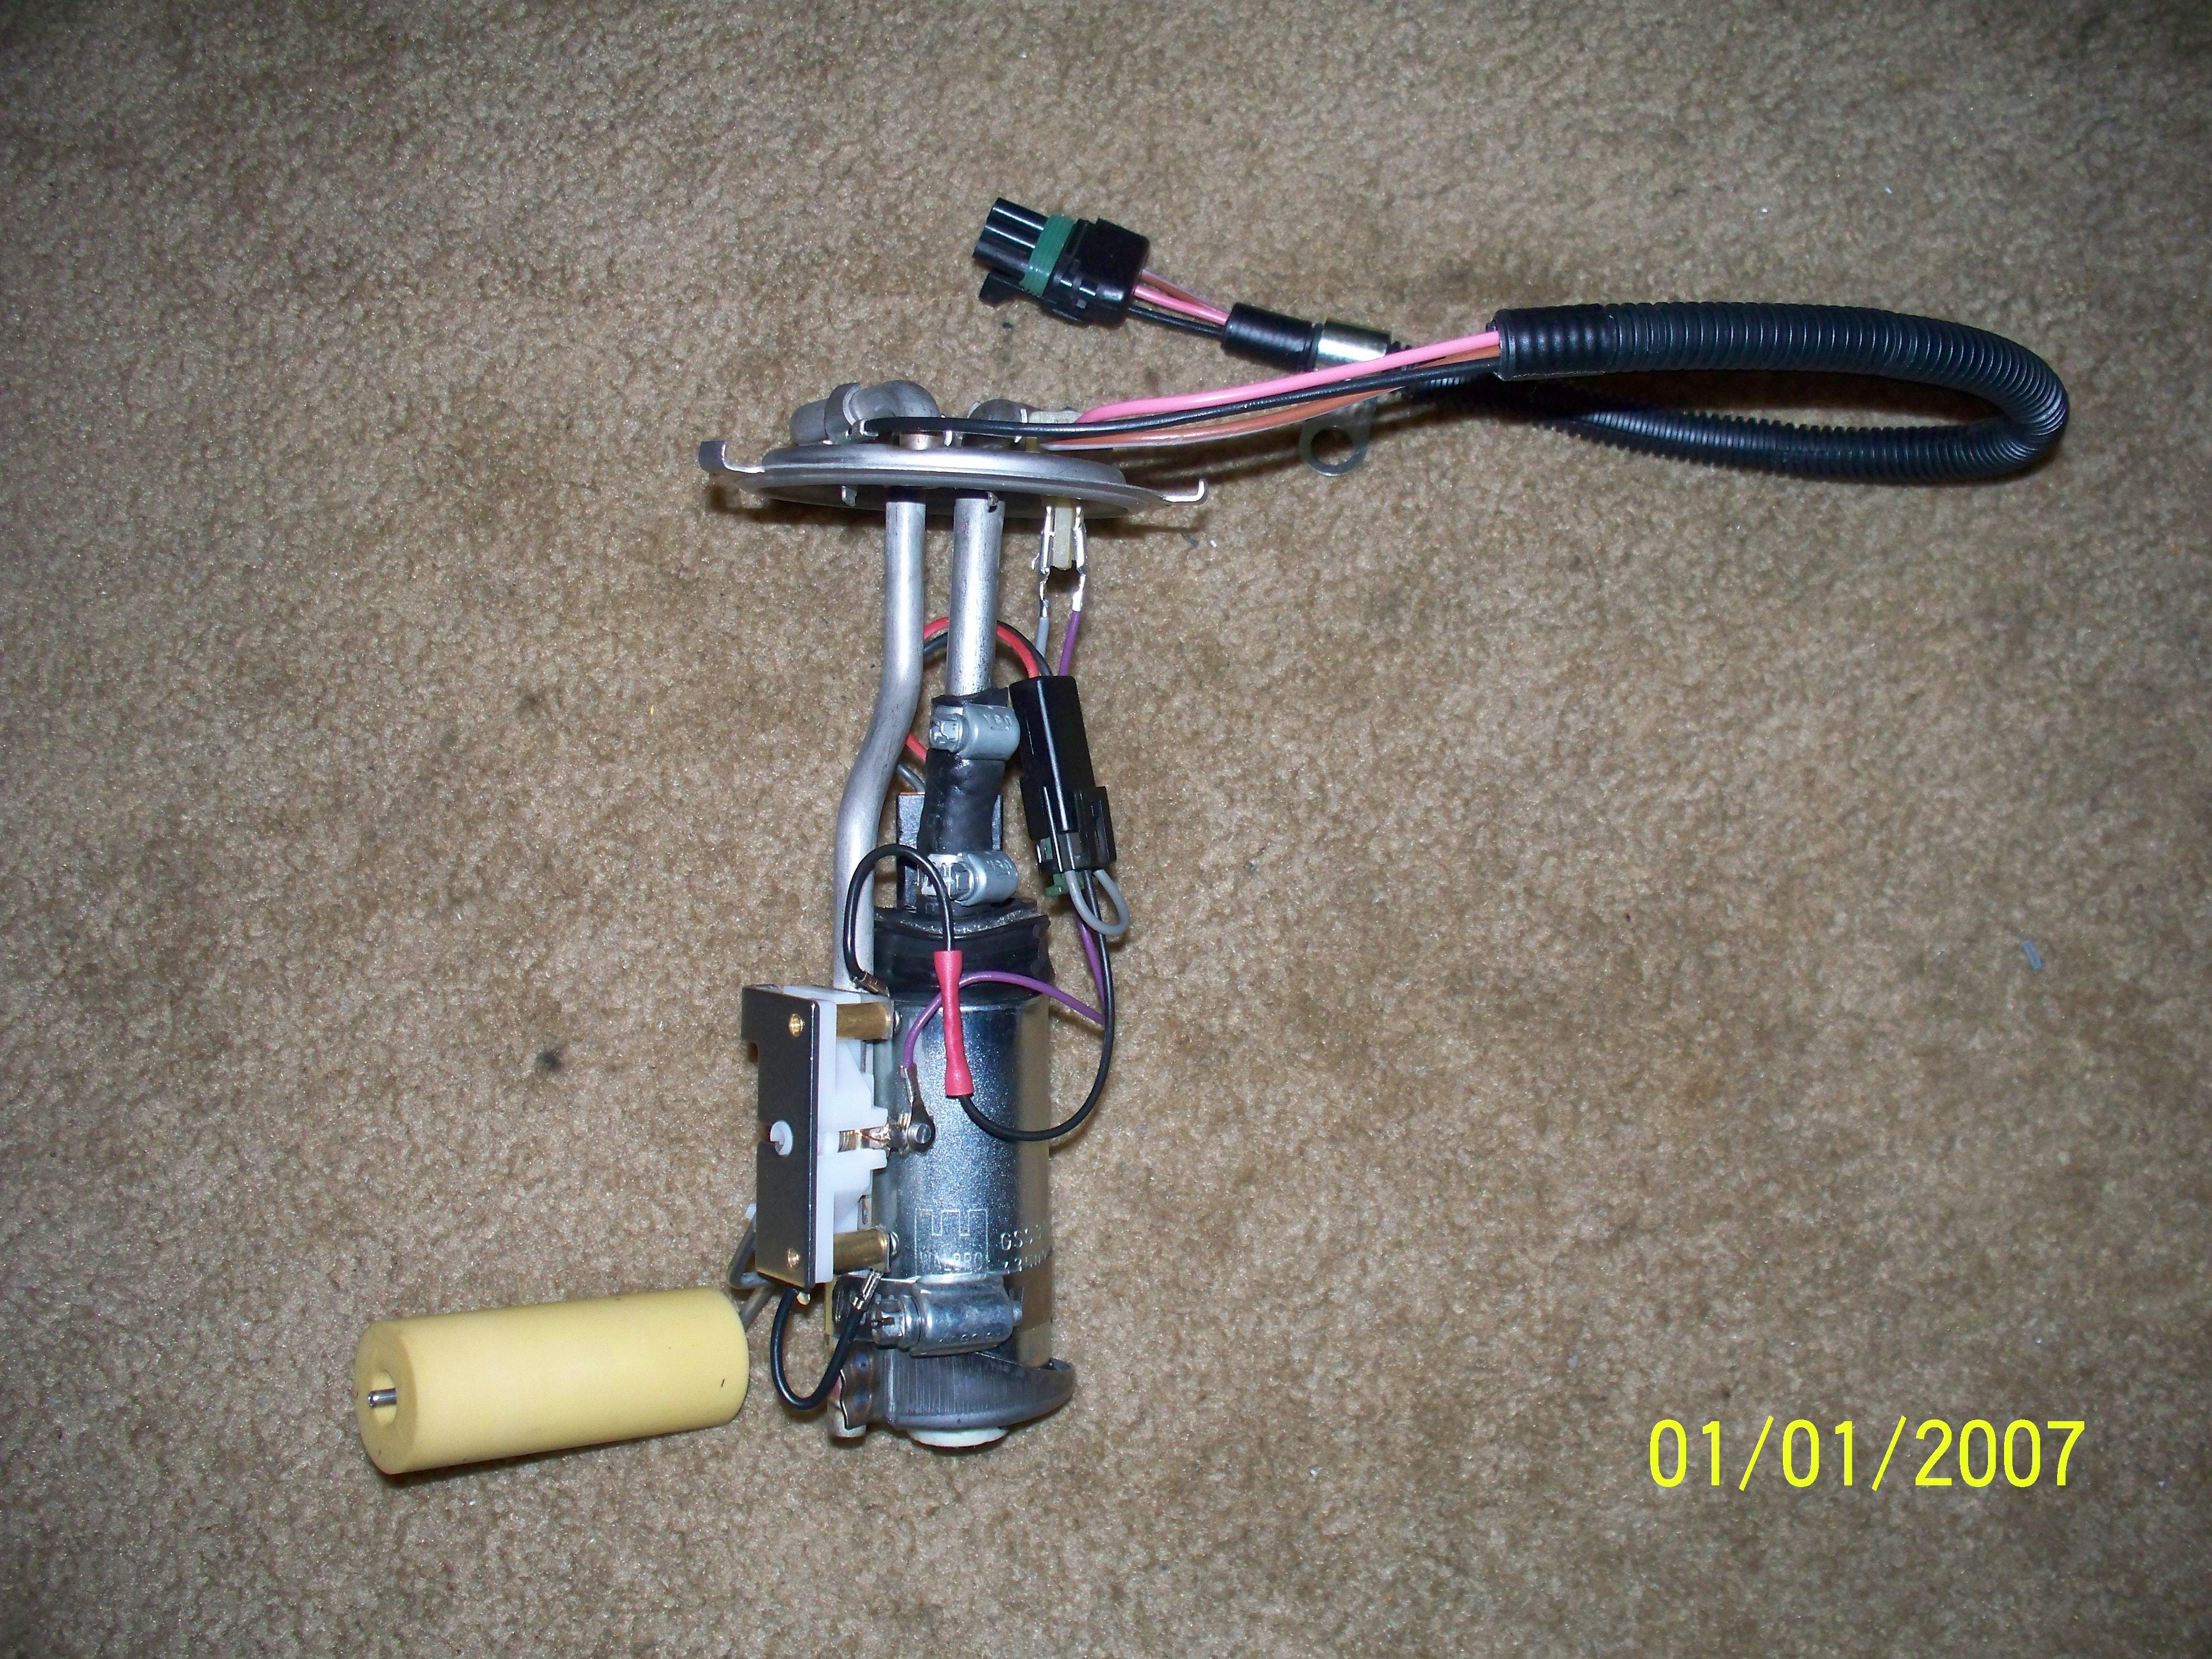
Install into the EFI Gas Tank and run the proper EFI Rubber Lines


C5 Filter/Regulator mounted up on the front passengers corner

EVAP Line on the SS used as the 5/16" return line
 10-05-2019, 09:28 AM
#3
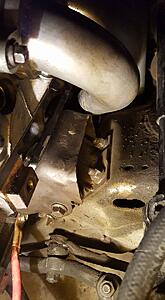
GM LS1 Fbody Engine Accessories
GM LT1 Fbody Radiator & Fans

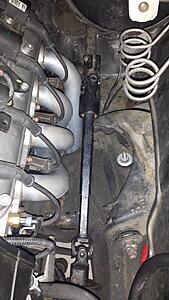
Jeep Cherokee Steering Shaft Mod
Using stock 1999-2002 Truck Throttle Cable
Modified 1999 LS1 Fbody Harness
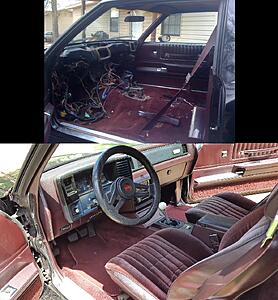
2002 PCM mounted behind the dash, wiring ran through the Trans Tunnel

1998 Fbody Fuse Box mounted in the front drivers corner
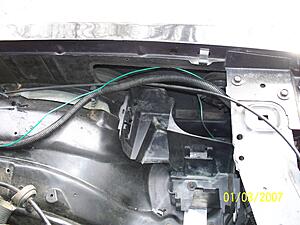
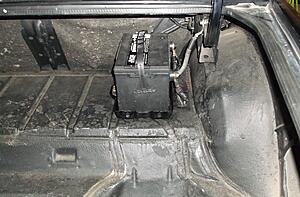
Battery relocation to the trunk
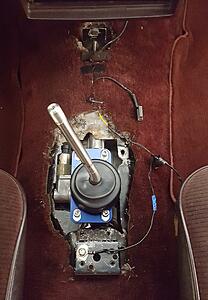
T56 Shifter location
GM LT1 Fbody Radiator & Fans

Jeep Cherokee Steering Shaft Mod

Using stock 1999-2002 Truck Throttle Cable

Modified 1999 LS1 Fbody Harness

2002 PCM mounted behind the dash, wiring ran through the Trans Tunnel
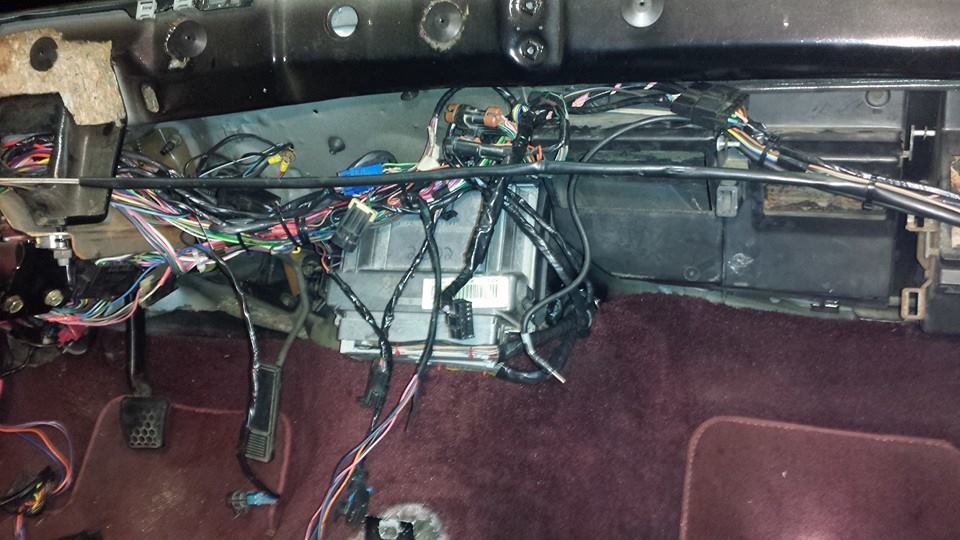
1998 Fbody Fuse Box mounted in the front drivers corner

Battery relocation to the trunk

T56 Shifter location

Last edited by the_merv; 10-05-2019 at 09:51 AM.
The following users liked this post:
vince72 (02-21-2023)


The following users liked this post:
the_merv (02-07-2023)
10-11-2019, 01:53 PM
#7
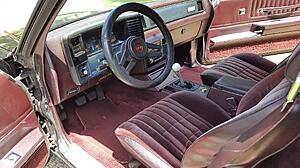
Thanks. The goal with this was to make this swap look Factory. Over the years I've refined it but the initial swap definitely has come a long ways. It's pretty much to the point of a finished running and driving car now. Gas it up, change the oil, and drive.
This Thread here isn't a build progress thread, it is a finished car with full documentation to show people what parts do what.
Which in my opinion that's what I would want to see. The finished product that way you're not sorting through a bunch of pictures just to get to it.
This Thread here isn't a build progress thread, it is a finished car with full documentation to show people what parts do what.
Which in my opinion that's what I would want to see. The finished product that way you're not sorting through a bunch of pictures just to get to it.
The following users liked this post:
focused313 (06-27-2023)
Trending Topics
10-12-2019, 06:06 PM
#8
TECH Fanatic
iTrader: (7)
This Thread here isn't a build progress thread, it is a finished car with full documentation to show people what parts do what.Which in my opinion that's what I would want to see. The finished product that way you're not sorting through a bunch of pictures just to get to it.
01-22-2023, 01:35 PM
#10
Been a while since I've posted in here, made some changes to the SS.
Installed TRZ Solid Aluminum Body Bushings to replace the older wore out factory ones..
Installing those lifted the whole car about 1/2" or so. Knowing that was going to happen I bought and installed UMI Performance Rear Springs, and cut 3/4 Coil from both of the front Eibach Springs that I've had in the car since I built it in 2010. Currently sitting looking like this here..

The solid body bushings definitely stiffened the car up, they don't dampen the road vibrations like the rubber ones did so you feel some stuff a little more, but other than that it drives pretty smooth and looks good.
Installed TRZ Solid Aluminum Body Bushings to replace the older wore out factory ones..

Installing those lifted the whole car about 1/2" or so. Knowing that was going to happen I bought and installed UMI Performance Rear Springs, and cut 3/4 Coil from both of the front Eibach Springs that I've had in the car since I built it in 2010. Currently sitting looking like this here..
The solid body bushings definitely stiffened the car up, they don't dampen the road vibrations like the rubber ones did so you feel some stuff a little more, but other than that it drives pretty smooth and looks good.
The following users liked this post:
vince72 (02-21-2023)
01-22-2023, 02:02 PM
#11
TECH Senior Member

I would suspect the aluminum bushings allow a more "connected" feel with the road. Kinda like a unibody.....
 01-22-2023, 02:13 PM
#12
Definitely stiffens the car up. I could have went with Poly or rubber, wanted to try these and see what they do. Install wasn't too bad, this is a garage kept southern car so no rust. Old ones out, new ones in with plenty of Antisieze.
The first goal with the body bushing change was to level the body on the frame to chase an issue I've been having in the rear, the drivers side sits lower than the passengers side by about 1/2". Some people say it's because of the weight balance of the car. Gas tank is heavier toward the drivers side more, the steering column and steering box with the linkage is all on the drivers side. Battery I have mounted on the passenger side of the trunk above the rear axle. The frame isn't bent and everything measures out even so it's just what it is. The car drives smooth and straight on the road.
The first goal with the body bushing change was to level the body on the frame to chase an issue I've been having in the rear, the drivers side sits lower than the passengers side by about 1/2". Some people say it's because of the weight balance of the car. Gas tank is heavier toward the drivers side more, the steering column and steering box with the linkage is all on the drivers side. Battery I have mounted on the passenger side of the trunk above the rear axle. The frame isn't bent and everything measures out even so it's just what it is. The car drives smooth and straight on the road.
The following users liked this post:
G Atsma (01-22-2023)
01-22-2023, 02:20 PM
#13
TECH Senior Member
Shim the LR spring about 1/2". Solved.
The following 2 users liked this post by the_merv:
G Atsma (01-22-2023), Project GatTagO (01-23-2023)
 01-23-2023, 02:33 PM
#16

I did a frame off on my 86 monte carlo, had a build thread years ago on mcss. cars never been wrecked, and frame etc is straight but mine also sits lower on drivers side rear. I did coil overs and straightened it out some but still not perfect. Kind of annoying but seems pretty typical.

The following users liked this post:
vince72 (02-21-2023)
The following users liked this post:
the_merv (04-15-2024)