When you click on links to various merchants on this site and make a purchase, this can result in this site earning a commission. Affiliate programs and affiliations include, but are not limited to, the eBay Partner Network.
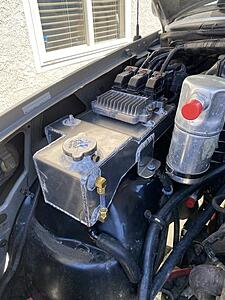
Being tight on room, I've been trying to build my own coolant expansion tank to go where the old overflow bottle was that would look much like the one from Current Performance below. The issue is that the shape below has only ever been used as an overflow and not a re-circulation type expansion tank.
I'm not sure if this shape is suitable to be used as an expansion tank just because in off camber situations, it might be more prone to uncovering the hole feeding the cooling system and suck down some air. I'm pretty sure that the angle that would uncover the port feeding the heater hose should be good enough for most of the steepest paved roads. I think the baffling setup I've come up with should cover me for most momentary situations. But what I'm wondering is if anybody has had experience with what happens if the cooling system does suck down some air from a low expansion tank. The google's tells me its bad because air is now trapped, but I would like to think that the steam tubes and expansion tank's very operation would recover from such an issue as soon as the truck is level-ish again. So am I completely off-base here and worrying about nothing? Or would introducing a momentary air pocket force me to the side of the road to get out and manually burp the cooling system? As always, any help is appreciated.
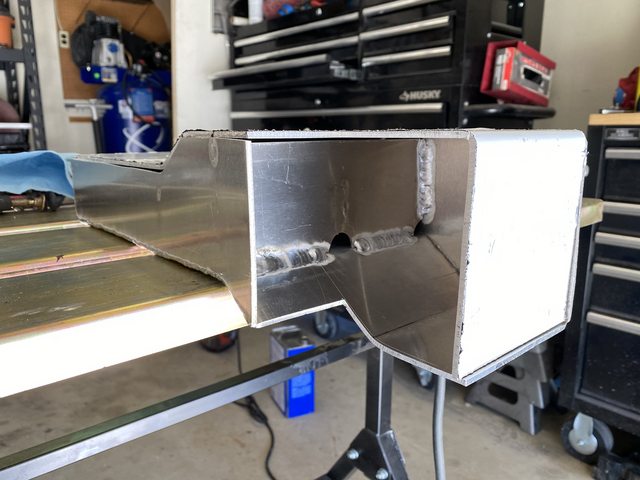
I had initially wanted some input while I still had time to change the design but I already had the pieces rough cut and bent so I went ahead and finished them up and stuck them together. If it turns out to be a bad design, the fix will be to just chop off the end about 5 inches or so to remove that "well" where coolant would pool at higher pitch angles which won't be too much work. It'd still have plenty of volume, just not sure what I'd use that free space for. I'll just run it and see what happens, doubt I'll even reach the pitch angles where I might have a problem. Pictured below, the welds aren't the prettiest, but the tank is air tight. We'll see how long it holds up.
I like the design with the ECM mount, never thought about heat though, I wonder if it would be a problem considering my Jeep LS swap has it about 8-10" from the exhaust manifold. Maybe a heat shield would be a good idea.
Looks pretty good to me, complete with site glass! Did you intend to have the heat from the tank going into the electrical component mounted on top?
That's another unknown at this point unfortunately. My hope is that the tank may not get up to the 200ish degrees that the rest of the cooling system will by convecting whatever heat it gets away faster than it receives it. If the tank does get warm, I'm hoping between the tall standoffs and the rubber isolators that not much of the heat will conduct to the computer. The computer seemed to get relatively toasty even when it wasn't mounted directly to another heat sink so it may end up being another reason to chop the back end of the tank. It may be a month or so before I get a chance to test anything.
You can use some sticky type heat reflective material on the bottom of the ECU....stack a few plastic washers between the ECU and mounting bosses on the tank....use plastic bolts to hold it in place.
You can use some sticky type heat reflective material on the bottom of the ECU....stack a few plastic washers between the ECU and mounting bosses on the tank....use plastic bolts to hold it in place.
Andrew
That's a really good idea. McMaster has got some PTFE bolts with a good temp range.
Where do you buy aluminum coolant cap and fittings? Tank looks wicked
Most of the fittings I got through summit. Search for "weld-in bungs and fittings" and you can narrow down to just about anything you need. Same goes for "radiator filler necks". The threaded standoffs for the computer mount, brass compression fittings, and clear tubing I got through McMaster Carr.
Your tank is similarly shaped to my OEM tank. And mine was originally right where yours is -- on the passenger side front inner fender. Mine was moved to the driver's side back in 96 when the car was first converted to (Ford) V8 power. Mine is similarly shallow to yours -- never had a problem with it running "dry" and allowing air into the system. As you can see, the top of the radiator ties into the small fitting at the top/front of the reservoir. There's another fitting on the bottom of the tank (5/8") that ties into a fitting on the driver's side tank of the radiator about 2/3 of the way up. You can see the steam/air vent tie-in as well. I don't think you'll have any problems with yours. I just saw the fins on the electrical component and wondered if you wanted it where you put it.
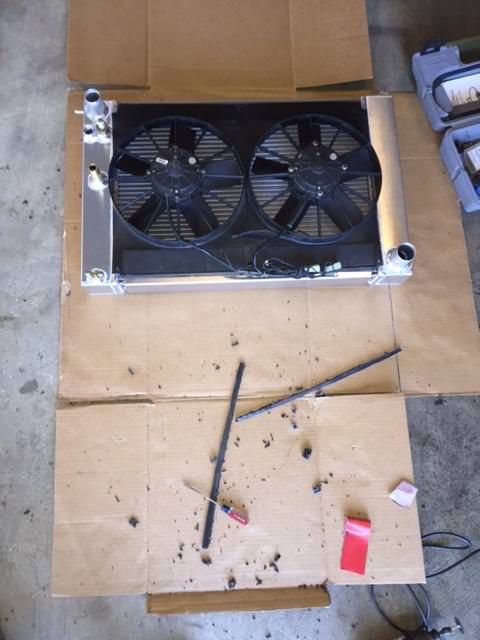
I really like your surge tank. I am curious what your using for a radiator? I recently posted a thread about radiators in daily drives. I also have a S10. I am in process of changing my cooling system out again due to another failure.
I custom ordered mine from Howe Racing in Michigan. Emailed a photo of my hand drawing on a Friday in Dec. ('15) and had the radiator in my hands the following Wednesday. Best $335 I spent on the build. Picture is of me fitting my twin SPAL 11" fans to the new radiator. It has performed flawlessly for 4 years. Car is definitely not a daily -- although reliability since the build has flawless. Nothing has gone wrong since a couple of day 1 start up bugs (tighten an intake hose clamp to clear a check engine light). Had them add some fittings for my temperature coolant sensors (gauges).
I really like your surge tank. I am curious what your using for a radiator? I recently posted a thread about radiators in daily drives. I also have a S10. I am in process of changing my cooling system out again due to another failure.
I�m currently using a universal, single pass radiator from griffin that came with a set of fans. It�s a nice radiator for the money. I had to cut up the core to fit it. I�ve had the truck running for a couple years but it�s not daily driven. I may have 5-6 thousand miles on the swap and haven�t had issues with it leaking.
It cools okay but for fun I�d like to either build my own double pass that fits into an un-modified core support. Or go with a company like Howe racing after reading about micheal yount�s experience. I think an aluminum radiator can be reliable enough for a daily driver as long as it�s mounted well. I�m not claiming my method is perfect, but I can post pictures and explain a little about how I mounted mine if you�d like.
Finally got a chance to let the truck idle for a while and hang out at normal operating temp. It was only idle with the hood open, and the tank definitely gets too hot to touch. That being said, I used some of that DEI gold looking sticky paper on the underside and some PTFE bolts and washers from McMaster Carr to mount the computer like suggested above and the computer stays cool to the touch. The sticky paper and plastic bolts may not even be necessary as the standoffs that the computer bolts to don't even seem to get warm, but it's all relatively cheap insurance anyway. Now I just have to run it through summer and see if my welds end up springing a leak.
Glad to hear you got it back operating. I called 5 different radiator manufacturers and when I asked enough questions, they all basically told me that a all aluminum radiator will only heat cycle so many times before they harden, and crack with the grade of aluminum that is used to build them with.
I asked all of them if my mounting process was the problem or part of the problem and 4 of the 5 said no. The only one who said it could be, more blamed it on lack of a good, independent ground strap, even though it had a sacrificial annode in it and had no sign of electrolysis.
I just couldn't see buying another all aluminum radiator from $300-$1437 depending on who I talked to. Not one of them would guarantee it more than 1 year.


 04-14-2020, 10:23 AM