

LS swap will not run, pulling out hair.


TECH Addict

Joined: Oct 2016
Posts: 2,513
Likes: 480
From: PDX-OR-USA
If you have fuel in the oil stop cranking it.. drain it.. Once you have clean oil, crank it with a timing light ready and put the timing light probe on each wire a short bump on each plug you should know quickly if its firing on enough cylinders to run.
Pull the pump fuse and fire it off on some starting fluid to just to purge things out.. GO easy on the fluid you just want ti to turn its head an cough.
Put the fuse back and use a tiny shot of starting fluid and turn the key briskly clear to crank so it doesn't do its prime cycle. You want it to fire off on the ether and get momentum to start.
I have a cheapo IR thermometer from Harbor Freight that works for checking each manifold leg/cylinder to see which ones are firing once it lights up, Quick way to tell which side is lighting off.
If your topping off the fuel mixing old with new, use 87 not high octane, the lower octane atomizes easier and lights off easier... You won't be doing any WOT stuff right away..
Always has worked for me when bringing a old car back from storage..
Good luck.

TECH Enthusiast


Joined: Jul 2019
Posts: 635
Likes: 187
fuel air compression spark - which does it not have?
even in the video of it "running", that thing is on the struggle bus for sure. sounds like its barely keeping its head above water about to drown. i have an L59 on my test stand right now and this is what it sounds like when it runs:
i would check your spark situation, seems like you've put a lot of thought into the fuel side but havent checked spark at each cylinder yet.
also, are you using the injectors that came on the motor from the factory? or OEM replacements? if not, the tune could have the wrong data for the injectors, which would definitely cause some issues.
if you press the gas pedal, does the throttle body move? drive by wire systems dont have an IAC, they just modulate the throttle body to control idle.

On The Tree

Joined: Jul 2009
Posts: 151
Likes: 5
From: GA
Rebuilt the engine after pulling from junkyard. So all tests have been completed on completely rebuilt engine. Didn't rebuild valves, those sealed well. But bottom end and cam is new. Pistons, rings, bearings etc.
You're correct. Pcm was sent to lt1 swap.com guy and harness to Novak to rework.
I told myself If I get 10,000 miles out of this engine I'll be happy. It was a learning experience and wasn't really fun to do because of the stress of keeping everything clean. Plus one of the oil rings was squished between the ring compressor and the piston and left a mark on the cylinder wall. It seems to have sealed up well as there's no compression problem, but I could have ruined the engine. So never again. LOL
Im going to get the computer looked at by a local tuning shop and see if everything in it matches what my setup is.
when you swapped the cam and crank, do you know if you have a 24x crank and 1x cam, or a 58x crank 4x cam reluctor set up? i know a previous post was asking about it, but it is crucial with the PCM your using and will throw off timing, could explain why you only firing off on a few cylinders.
Check the wiring, it will be annoying and tedious, but you will be kicking yourself in the *** if it isnt wired correctly or you have an open somewhere causing this.

Thread Starter
Staging Lane
Joined: Mar 2018
Posts: 73
Likes: 8
If your score the cylinder a little bit that wont be an issue, your compression check verifies that. rule of thumb, if your finger nail catches on it, then its a concern. Also, if you ever do another rebuild, always lap the valves and get new stem seals, easy $30 insurance for a good seal.
when you swapped the cam and crank, do you know if you have a 24x crank and 1x cam, or a 58x crank 4x cam reluctor set up? i know a previous post was asking about it, but it is crucial with the PCM your using and will throw off timing, could explain why you only firing off on a few cylinders.
Check the wiring, it will be annoying and tedious, but you will be kicking yourself in the *** if it isnt wired correctly or you have an open somewhere causing this.

TECH Senior Member
Joined: Jun 2016
Posts: 22,288
Likes: 3,615
From: Central Cal.
Nothing goes on the back of the cam. It's either already there or it won't be. Cams that go into a Gen III will have a pair of semi-circles around the shaft right next to the rear bearing. Almost all aftermarket cams will have them too. The cam sprocket will either be just a plain sprocket (Gen III) or it will have either a 180-degree raised part (24x crank reluctor) or 4 raised parts at 90 degrees apart (58x crank reluctor). If these get mixed up it will start hard.
On The Tree
Joined: Jul 2009
Posts: 151
Likes: 5
From: GA
So, I have no clue what the difference looks like with the two different cam reluctors...I may be able to find the part number that I bought, but I certainly don't remember me putting anything on the back of the cam after I bought it besides some thick engine lube.
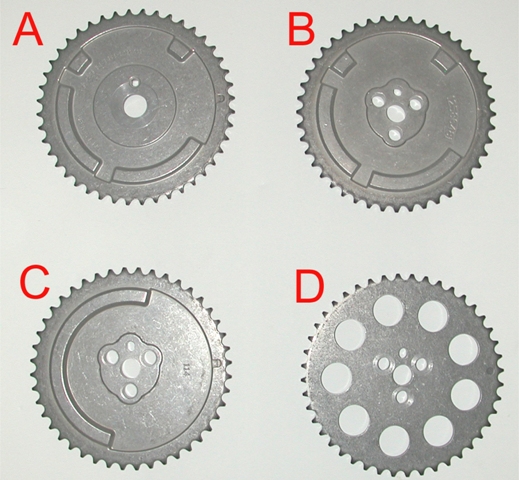
Gen III 1x Cam reluctor will look like C and D, Gen IV will be A and B. these go on the front of the cam and is used as the cam sprocket. Cams for Gen III motors will have a ring on the back as well where the cam sensor is located behind the intake. Gen IV motors have the Cam Sensor on the front engine cover. Need to make sure what cam reluctor you have. if it looks like C and D then you need a 24x crank reluctor. if the cam reluctor looks like A or B, then you need a 58X reluctor.
Last edited by AJT_LBA; Jan 12, 2022 at 05:17 AM. Reason: typo, said sprocket for rear cam sensor, meant ring
Thread Starter
Staging Lane
Joined: Mar 2018
Posts: 73
Likes: 8
Gen III 1x Cam reluctor will look like C and D, Gen IV will be A and B. these go on the front of the cam and is used as the cam sprocket. Cams for Gen III motors will have a sprocket on the back as well where the cam sensor is located behind the intake. Gen IV motors have the Cam Sensor on the front engine cover. Need to make sure what cam reluctor you have. if it looks like C and D then you need a 24x crank reluctor. if the cam reluctor looks like A or B, then you need a 58X reluctor.

On The Tree
Joined: Jul 2009
Posts: 151
Likes: 5
From: GA
On The Tree
Joined: Jul 2009
Posts: 151
Likes: 5
From: GA
OP, are you sure you have a 24x reluctor? You stated you have a new bottom end, i would assume that includes the crank. Reluctors come welded to the cranks. You can either check your order sheet or pull the crank sensor and take a peek.
Thread Starter
Staging Lane
Joined: Mar 2018
Posts: 73
Likes: 8
I've found a few threads with my same problem with most of them never having a resolution. There was a guy that posted on Facebook with a similar problem who said his fix was adjusting a few grounds and the gas tank was causing a vacuum.
Also, I've got a question. I have the gas tank canister purge valve sitting on top of the intake with an open end on the hose because I haven't hooked up the EVAP system. Is that valve normally open or closed? Could that be causing an air leak causing no start?
Also, can someone explain why a leak in the intake can drastically decrease performance? It's getting air in the system regardless if it's pulled from the front of the intake versus a leak in a gasket or brake vaccums line not being hooked up.

TECH Regular

Joined: Feb 2002
Posts: 426
Likes: 45
From: ohio
The leak bypasses the maf, map, and last and least the air temp sensor. All sensors don�t recognize the bypassing air and the engine runs lean at that point. I would certainly check all of the wiring black is ground which most if not all go to the back of the head, pink is positive in the run start position.
Last edited by cdk4219; Jan 12, 2022 at 11:29 AM.

On The Tree
Joined: Jun 2013
Posts: 112
Likes: 8
Man I'm feeling your pain, been following along cause I'm going through the same kinda thing. I also have my purge valve disconnected but I did cap the end with some electrical tape, made me laugh when you posted that, if that's the problem haha. Good luck! I also thought about the gas tank not venting so I do have the gas cap propped up just in case.
Sean
Sean
Thread Starter
Staging Lane
Joined: Mar 2018
Posts: 73
Likes: 8
Man I'm feeling your pain, been following along cause I'm going through the same kinda thing. I also have my purge valve disconnected but I did cap the end with some electrical tape, made me laugh when you posted that, if that's the problem haha. Good luck! I also thought about the gas tank not venting so I do have the gas cap propped up just in case.
Sean
Sean
If anyone has removed the fuel pump from a jeep knows why I've been dreading this. It's held in by some plastic threaded peice that you have to try to catch threads while compressing the pump setup into the tank. It's horrible and the engineers that designed it should have done better.
Now, I don't believe this is the reason for my no start, because it did this before the jeep sat, but it gives me a chance to look through the pump.
But first, I'll verify the grounds at the PCM to make sure they're actually getting ground to the pcm from the harness. That sounds like a good plan. The wiring harness is actually grounded to the body, which has a jumper ground from the block. I think the harness was stretched if I grounded it to the block. Nonetheless I'll check it out.
Thread Starter
Staging Lane
Joined: Mar 2018
Posts: 73
Likes: 8
Man I'm feeling your pain, been following along cause I'm going through the same kinda thing. I also have my purge valve disconnected but I did cap the end with some electrical tape, made me laugh when you posted that, if that's the problem haha. Good luck! I also thought about the gas tank not venting so I do have the gas cap propped up just in case.
Sean
Sean
Thread Starter
Staging Lane
Joined: Mar 2018
Posts: 73
Likes: 8
Okay, so I ran over to the exhaust shop were the jeep sits, I checked continuity between positive to the ground strap that connects the jeep harness, LS harness and the strap from the block and got a good strong beep there. So I don't think it's a grounding problem.
The LS swap guru of my area is going to the exhaust shop to check out a Chevy pickup that's LS1 swapped. I'll contact him to see if he can check out the jeep as well.
The LS swap guru of my area is going to the exhaust shop to check out a Chevy pickup that's LS1 swapped. I'll contact him to see if he can check out the jeep as well.