When you click on links to various merchants on this site and make a purchase, this can result in this site earning a commission. Affiliate programs and affiliations include, but are not limited to, the eBay Partner Network.
After a long time dormant, I'm finally working on my LS3 swap again.
The LS3 came out of a 2014 SS 1LE. For external purposes, it is a stock LS3 wearing LS1 F-body front accessories and using an LS1 F-body engine harness. At the moment, I'm working on figuring out all of the routing and connections — electrical, fuel, vacuum, etc.
I have the following worked out:
1. Fuel injector adapters (using factory LS3 injectors with my stock LS1 engine harness via these adapters)
2. Cam sensor relocation (factory LS3 sensor on the timing cover, using an extension/adapter to reach back to the LS1 connection point at the back of the intake)
3. MAP sensor relocation (using factory LS3 intake with sensor near the throttle body, using an extension to reach back to the LS1 connection point near the back of the passenger side valve cover).
4. Oil pressure sensor (using factory LS1 sensor, screwed into the LS3 valley cover, and plugging directly into the LS1 harness).
I am still working on the following: 1. Knock sensors
I originally read something that said an LS1 PCM could be reprogrammed to work properly with LS2-style knock sensors, so I have a pair of those with the Racetronix adapter mounted right now. But I kept reading, and I'm now convinced that I need LS1-style knock sensors. So, I purchased two of those, and I am pretty sure I need a different Racetronix adapter.
ICT Billet sells little adapter blocks for mounting LS1-style sensors to the side of the block, but I thought I could just screw the sensors into the same place I bolted my LS2 sensors? Is there some reason I need those adapters?
2. PCV dirty air connection from valley cover to the intake manifold
I found a part number for the this one (12599298), but it doesn't seem to be in stock anywhere. SDparts.com seemed like they might have it (website says call to check stock). I just went ahead and placed the order without calling; they refunded me a few hours later.
From the photos I've seen, factory hose seems to have some sort of twist-lock connector on each end, but the connection points on the throttle body and on the valve cover don't seem to have any provision to work with such a thing. I'm thinking I can probably just get a piece of 3/8" vacuum hose.
3. PCV fresh air connection from throttle body to valve cover
The LS1 part number is 12556454. I think this will work for me, but again, this is a hard part to find! I could probably just use 3/8" vacuum hose here too.
4. Vacuum connections and routing
In particular, the connection for the AIR system, which I've removed completely. I'm probably going to get a straight-through connector to replace the tee behind the intake. It seems like most people just cap off the third leg of the tee, but I feel like my way is cleaner, and the little straight-through connector shouldn't cost much more than a set of assorted caps.
5. Evap solenoid mounting
I definitely do not want to delete EVAP — my wife would make me sell the car if it ever had even a hint of fuel smell and I told her "it's supposed to smell like that."
I'm using all factory LS1 stuff here, and the tube from the valve to the intake manifold plugs right in to the LS3 manifold. The only problem is that there's nowhere to mount the solenoid. (The manifold has a slot that the mounting tab fits into, but when the solenoid is mounted there, it interferes with the coil brackets.
One option would be to just ziptie it to the fuel rail, but that'll be ugly and hacky. If there's a cleaner mounting solution, I'd like to know about it! I could use this extension to permit relocation, but I'd have to re-figure the valve-to-intake tube and come up with some kind of mounting solution.
Another option would be to shift the coil brackets with some spacers and longer bolts. I'd only need half an inch or so. Seriously considering this option. I'd also consider fully relocating the coils, but that's a lot of work.
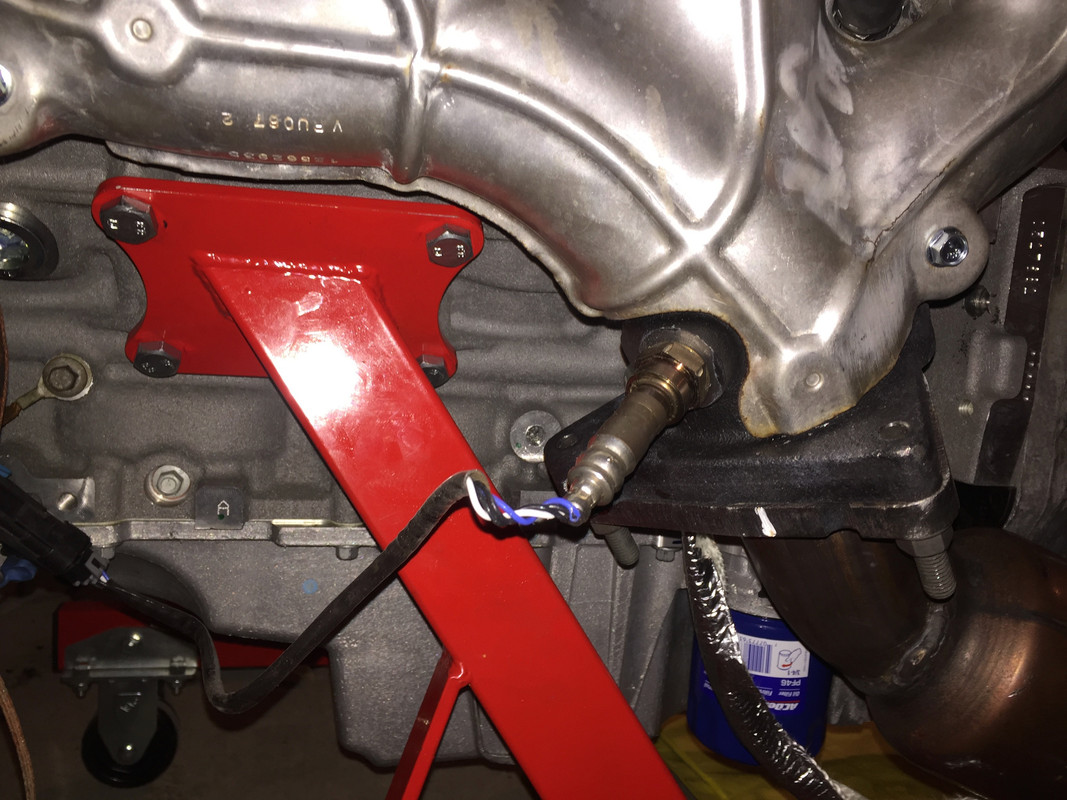
6. Mounting tab on driver side upstream O2 sensor connector
There is a mounting tab with a bolt hole attached to the wire-harness end of the driver side upstream O2 sensor connector — the one near the alternator. Can anyone tell me where it mounts? While we're at it, I'd also appreciate it if anyone could tell me exactly where on the block the ground strap is normally connected. I know it doesn't strictly matter, but I'm not seeing a spot that seems right based on the lengths of the various legs of the harness and what else those have to connect to. Maybe there is a bolt hole on the LS1 block that isn't present on the LS3?
7. Mounting bracket on engine harness at rear of engine
There is a metal bracket around the engine harness on the thick leg that goes across the back of the intake manifold. Based on position, it seems like it's supposed to bolt up to the passenger side head. If anyone has a photo of what this is supposed to look like installed, I'd appreciate it!
If anyone here has relevant experience on any of these, I would appreciate any feedback or suggestions!
Last edited by JakeRobb; Jun 10, 2023 at 03:16 PM.
2. Cam sensor relocation (factory LS3 sensor on the timing cover, using an extension/adapter to reach back to the LS1 connection point at the back of the intake) ditch the pigtail on cover. Get a Michigan motorsports harness on amazon and plug directly into cam sensor. Avoid wire swapping crap.
3. MAP sensor relocation (using factory LS3 intake with sensor near the throttle body, using an extension to reach back to the LS1 connection point near the back of the passenger side valve cover). yup
4. Oil pressure sensor (using factory LS1 sensor, screwed into the LS3 valley cover, and plugging directly into the LS1 harness). yup.
I am still working on the following: 1. Knock sensors
I originally read something that said an LS1 PCM could be reprogrammed to work properly with LS2-style knock sensors, so I have a pair of those with the Racetronix adapter mounted right now. But I kept reading, and I'm now convinced that I need LS1-style knock sensors. So, I purchased two of those, and I am pretty sure I need a different Racetronix adapter.
You can drill and tap block for ls1 sensors. Sensors have to be ls1 style. You can use those adapters from ict I guess. Get a sensor extension harness.
ICT Billet sells little adapter blocks for mounting LS1-style sensors to the side of the block, but I thought I could just screw the sensors into the same place I bolted my LS2 sensors? Is there some reason I need those adapters?
2. PCV dirty air connection from valley cover to the intake manifold
I found a part number for the this one (12599298), but it doesn't seem to be in stock anywhere. SDparts.com seemed like they might have it (website says call to check stock). I just went ahead and placed the order without calling; they refunded me a few hours later.
From the photos I've seen, factory hose seems to have some sort of twist-lock connector on each end, but the connection points on the throttle body and on the valve cover don't seem to have any provision to work with such a thing. I'm thinking I can probably just get a piece of 3/8" vacuum hose.
3. PCV fresh air connection from throttle body to valve cover
The LS1 part number is 12556454. I think this will work for me, but again, this is a hard part to find! I could probably just use 3/8" vacuum hose here too.
Cap driver valve cover. Go from valley tray to intake. Passenger valve cover to throttle.
4. Vacuum connections and routing
In particular, the connection for the AIR system, which I've removed completely. I'm probably going to get a straight-through connector to replace the tee behind the intake. It seems like most people just cap off the third leg of the tee, but I feel like my way is cleaner, and the little straight-through connector shouldn't cost much more than a set of assorted caps.
5. Evap solenoid mounting
I definitely do not want to delete EVAP � my wife would make me sell the car if it ever had even a hint of fuel smell and I told her "it's supposed to smell like that."
I'm using all factory LS1 stuff here, and the tube from the valve to the intake manifold plugs right in to the LS3 manifold. The only problem is that there's nowhere to mount the solenoid. (The manifold has a slot that the mounting tab fits into, but when the solenoid is mounted there, it interferes with the coil brackets.
One option would be to just ziptie it to the fuel rail, but that'll be ugly and hacky. If there's a cleaner mounting solution, I'd like to know about it! I could use this extension to permit relocation, but I'd have to re-figure the valve-to-intake tube and come up with some kind of mounting solution.
Another option would be to shift the coil brackets with some spacers and longer bolts. I'd only need half an inch or so. Seriously considering this option. I'd also consider fully relocating the coils, but that's a lot of work.
ditch the pigtail on cover. Get a Michigan motorsports harness on amazon and plug directly into cam sensor. Avoid wire swapping crap.
Not sure I follow? I bought an adapter that plugs right into the connector on the end of the curved black plastic thing that goes to the sensor on the LS3 timing cover, and reaches back to the top rear of the engine where the harness connector is.
You want me to remove the curved thing and get the other kind of adapter that plugs directly into the sensor? Why?
Originally Posted by B4CMaro
You can drill and tap block for ls1 sensors. Sensors have to be ls1 style. You can use those adapters from ict I guess. Get a sensor extension harness.
Oh, I assumed the threads on the LS1 sensors would screw right into the same holes where the LS2 sensors go. If that�s not the case, then I understand why ICT offers those adapters, but I�d probably just drill and tap.
Originally Posted by B4CMaro
Cap driver valve cover. Go from valley tray to intake. Passenger valve cover to throttle.
Yes, I know. I need hoses for those two connections. I have part numbers, but can�t find the parts anywhere. Current plan is to use some 3/8� ID rubber fuel line.
Originally Posted by B4CMaro
Ziptie evap to rail. Leave evap installed.
That�s the thing I don�t want to do because it�s hacky and ugly. I bought some longer bolts and some aluminum standoffs which should shift the coils away enough for everything to fit nice and clean. If that doesn�t work for some reason, maybe I�ll try the ziptie route.
Many of the aftermarket harnesses for the cam aren't pinned correctly. You will know if it's wrong. It will sometimes backfire out the exhaust and take a long time to crank. If this happens you will usually have t swap wires A and C. I recently purchased the Michigan motorsports harness off Amazon to replace my caspers harness which was throwing a p0343 code. This caspers harness plugged into the 6" black pigtail. Those wires a and c had to be swapped. I replaced it because it had developed a short. The Michigan harness was literally plug and play straight into cam sensor. The female end of the timing cover connector will be different on the cam sensor vs the end of he pigtail so the harness has to be designed to plug into either the cam sensor or the pigtail.
Again you can do it either way. But if the wires don't match up it will throw a code and have hard starts. Just a heads up. Gives lots of people headaches.
I am still working on the following: 1. Knock sensors
I originally read something that said an LS1 PCM could be reprogrammed to work properly with LS2-style knock sensors, so I have a pair of those with the Racetronix adapter mounted right now. But I kept reading, and I'm now convinced that I need LS1-style knock sensors. So, I purchased two of those, and I am pretty sure I need a different Racetronix adapter.
ICT Billet sells little adapter blocks for mounting LS1-style sensors to the side of the block, but I thought I could just screw the sensors into the same place I bolted my LS2 sensors? Is there some reason I need those adapters?
I just drilled and tapped the LS3 knock sensor location to accept LS1 knock sensors. Then ran a knock sensor extension harness for them. I recall doing some zip tying to keep the harness away from the headers
6. Mounting tab on driver side upstream O2 sensor connector
There is a mounting tab with a bolt hole attached to the wire-harness end of the driver side upstream O2 sensor connector � the one near the alternator. Can anyone tell me where it mounts? While we're at it, I'd also appreciate it if anyone could tell me exactly where on the block the ground strap is normally connected. I know it doesn't strictly matter, but I'm not seeing a spot that seems right based on the lengths of the various legs of the harness and what else those have to connect to. Maybe there is a bolt hole on the LS1 block that isn't present on the LS3?
7. Mounting bracket on engine harness at rear of engine
There is a metal bracket around the engine harness on the thick leg that goes across the back of the intake manifold. Based on position, it seems like it's supposed to bolt up to the passenger side head. If anyone has a photo of what this is supposed to look like installed, I'd appreciate it!
Oh, I assumed the threads on the LS1 sensors would screw right into the same holes where the LS2 sensors go. If that’s not the case, then I understand why ICT offers those adapters, but I’d probably just drill and tap.
As it turns out, there is a threaded hole on the driver side of the LS3 block which accepts an LS1 knock sensor without drilling and tapping. It's aft of the engine mount:
On the passenger side, there's one too -- but this one is ahead of the engine mount, right behind the LS1 factory air conditioner location:
There is another hole with the right threads on the passenger side aft of the engine mount, but the knock sensor would interfere with the starter if mounted there.
Is there any reason these locations would give me trouble?
Also, I saw something somewhere about protective boots that go over the knock sensors (although it was in the context of the 5.3 in the Silverado). Is that a thing I need to worry about, or is it okay for the sensors to be mounted in the open with no protection, as shown?
Looking at my pics, I believe I did use the driver's side pre-tapped hole, as it was the only way I could clear the header, but i'll go look to confirm. I definitely used the hole I tapped, right in front of the starter, on the passenger side. That location presented fewer issues than the one farther forward, behind the ac compressor.
The most obvious issue using the location by the starter avoids, is the forward location is impossible to get to when the motor is installed in the car. You would have the engine mount in the way behind the sensor, and the ac compressor in the way infront of it, and the header covering it from the top, k-member from the bottom.
Last edited by lees02WS6; Jun 27, 2023 at 12:46 AM.
Looking at my pics, I believe I did use the driver's side pre-tapped hole, as it was the only way I could clear the header, but i'll go look to confirm. I definitely used the hole I tapped, right in front of the starter, on the passenger side. That location presented fewer issues than the one farther forward, behind the ac compressor.
The most obvious issue using the location by the starter avoids, is the forward location is impossible to get to when the motor is installed in the car. You would have the engine mount in the way behind the sensor, and the ac compressor in the way infront of it, and the header covering it from the top, k-member from the bottom.
Could you post some pics so I can see what you did?
I have a tubular K-member, so that might make the sensor more accessible. Also, unbolting the AC compressor and swinging it out of the way isn�t a big deal.
Post 12 in my thread, I mentioned that other location on the driver's side you talk about, and I recall I did actually move it there... https://ls1tech.com/forums/pontiac-f...l#post20494780
because in the lower location the wire would touch the exhaust
In post 15 on the passenger side I definitely left it in the location closest to the starter
I recently swapped a LS3 into my 94 t/a and used a BP automotive harness with LS3 knock sensor connectors built in. Then I copy/pasted 2001-2002 Chevy S10 knock sensor tables into my tune with hptuners. I have never seen any knock but I plan on tapping near the sensors with something metal to test them.
I recently swapped a LS3 into my 94 t/a and used a BP automotive harness with LS3 knock sensor connectors built in. Then I copy/pasted 2001-2002 Chevy S10 knock sensor tables into my tune with hptuners. I have never seen any knock but I plan on tapping near the sensors with something metal to test them.
What PCM are you using? If it�s not an 0411 LS1 PCM, I don�t think this is relevant to me. But I�m glad you got yours working!
The LS1 oil pressure sensor I ordered came, but it was the wrong part. The connector was the right shape, but it had three pins. The correct connector has just one. It also had the wrong thread size (much smaller than it should be). I will be returning that one, but I ordered another from a different vendor (Tick), and that one fit perfectly on the harness and had the correct threads for the block; no adapters required. It�s significantly taller than the LS3 sensor, but it is lower than the intake manifold with the harness plugged in, so I don�t think it�ll be a problem.
I�m very nearly ready to reinstall the engine! Just a few final things to button up. I�m getting excited! It�s been nearly six years. 😭 (I still have lots to do before after the engine is installed, of course.)
Question 1: I think these two connectors on the sides of the engine bay are for the wheel speed sensors. Can someone confirm?
Question 2: I have two dangling connectors from the harness. One for the AIR solenoid on top of the engine, and another at the front left of the car where the AIR pump used to be. I�ve completely removed AIR. Do I need to cap these? Do they need resistor connections like I have to disable skip-shift without setting a code?
I�m assuming that I can disable AIR in the PCM, and that neither of those will be necessary, but that I should still close off the connectors so that they don�t get wet or corroded. What have others done here?
As it turns out, there is a threaded hole on the driver side of the LS3 block which accepts an LS1 knock sensor without drilling and tapping. It's aft of the engine mount:
With the wiring connected, this setup ended up interfering with the headers. I ended up drilling out and tapping the hole you can see right next to it, left and slightly below in the image.
6 Common C5 Corvette Failures and What's Involved In Repairing Them
Slideshow: From wobbling harmonic balancers to failed EBCMs, these are the issues that define long-term C5 ownership and what repairs typically involve.
Retro Modern Bandit Pontiac Trans AM Comes With Burt Reynolds' Autograph
Slideshow: A modern Camaro transformed into a retro icon, this limited-run "Bandit" build blends nostalgia with brute force in a way few revivals manage.
Top 10 Greatest Cadillac V Series Performance Models Ever, Ranked
Slideshow: Cadillac didn't just crash the high-performance luxury vehicle party, it showed up loud, supercharged, and occasionally a little unhinged...
Coachbuilt N2A Anteros Is an LS2-Powered C6 Corvette In Italian Clothes
Slideshow: A one-off sports car that looks like a vintage Italian exotic-but hides a C6 Corvette underneath-just sold for the price of a new mid-engine Corvette.