

1965 ls1 f85 project pic's
 I, for one, am waiting impatiently for the next chapter. ;-)
  05-13-2008 | 02:59 PM
#24
Thread Starter
TECH Resident
Joined: Nov 2007
Posts: 816
Likes: 0
From: Texas
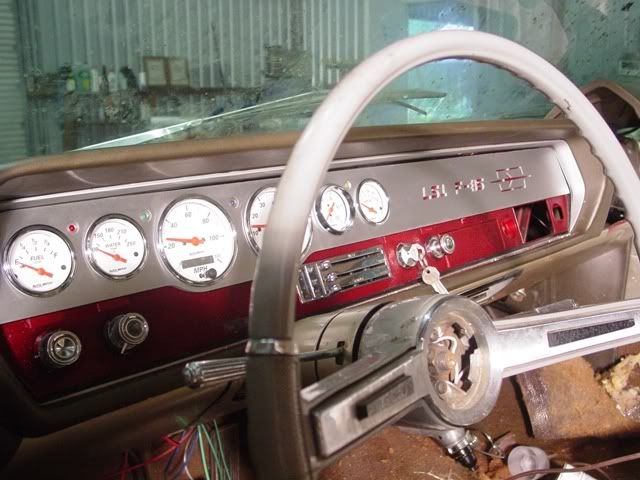
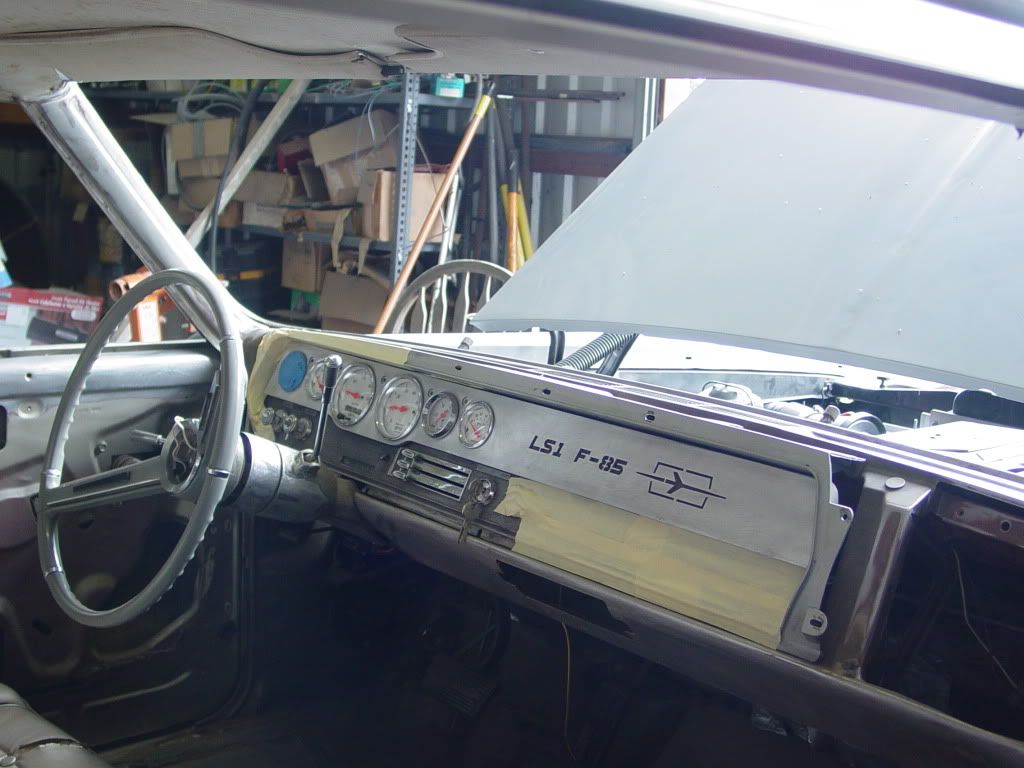
I completed the custom dash. I have it fitted but have not wired it completely yet. I got everything working except the voltage gauge. Can you guys give me info on were to tie the signal wire of my autometer gauge into the ls1 wiring to make it work? Thanks in advance.
custom hup cabs installed
custom hup cabs installed
 06-02-2008 | 02:27 PM
#26
Thread Starter
TECH Resident
Joined: Nov 2007
Posts: 816
Likes: 0
From: Texas
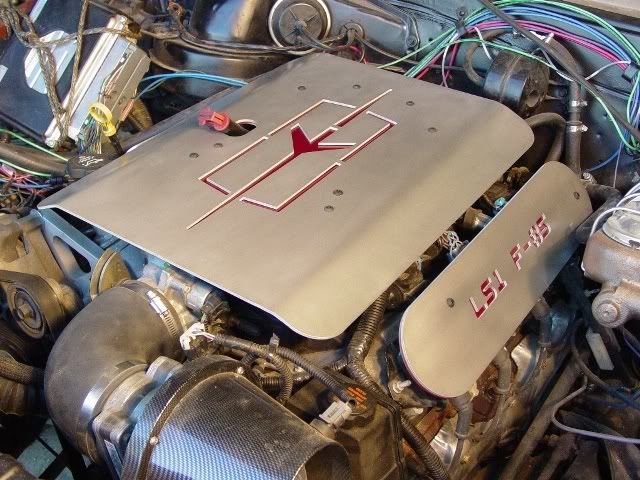
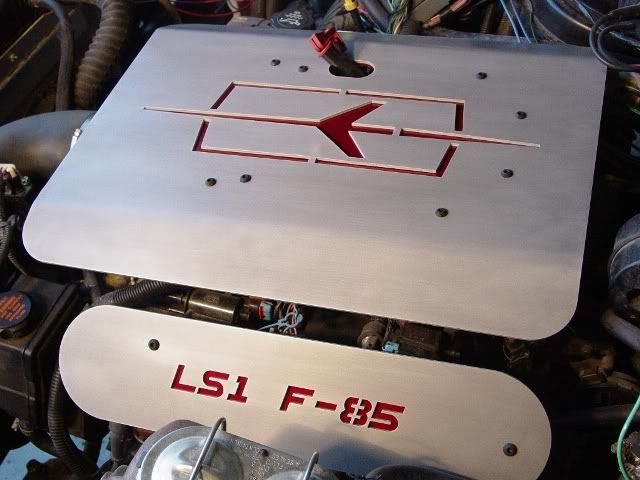
Here are some pic's of the finished engine covers. For those that might have missed it I have attached the first launch video. Based on the camera timer it ran 0-80 in about 9 seconds. How does this time compare to what you guys are getting in your classic muscle swaps? this is a stock 2002 ls1 a4 with a waitformeperformance tune.
http://s282.photobucket.com/albums/k...t=MOV06596.flv
http://s282.photobucket.com/albums/k...t=MOV06596.flv
06-02-2008 | 07:03 PM
#27

Really dig your dash and valve covers . Hoping after my Chevelle conversion I can start on two Olds projects myself one being my Grandfathers original 62 Olds starfire and my dads 70 98 Olds convertible
. Hoping after my Chevelle conversion I can start on two Olds projects myself one being my Grandfathers original 62 Olds starfire and my dads 70 98 Olds convertible
06-18-2008 | 12:19 PM
#28
Thread Starter
TECH Resident
Joined: Nov 2007
Posts: 816
Likes: 0
From: Texas
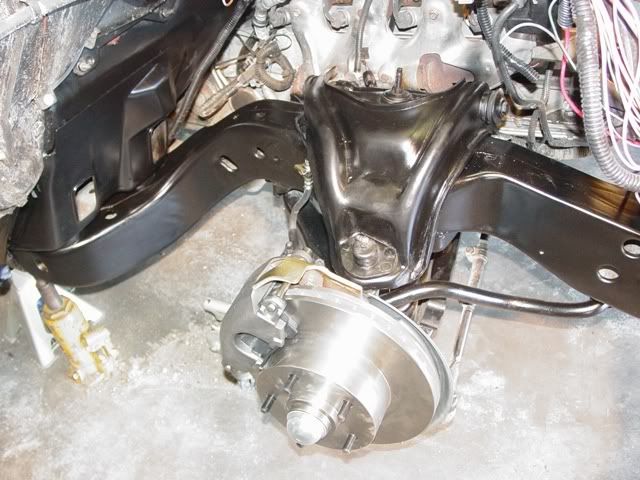
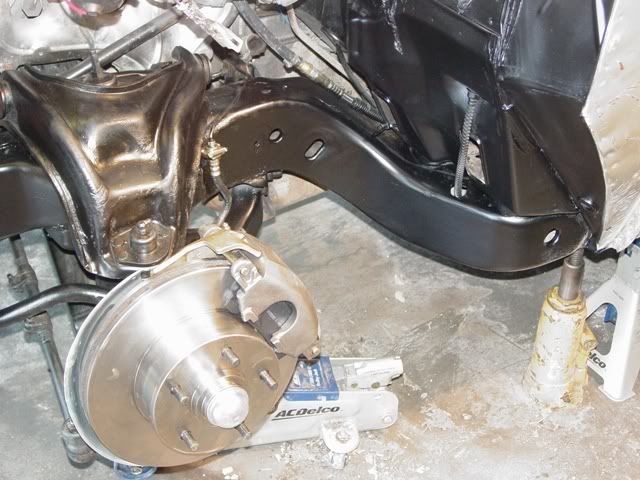
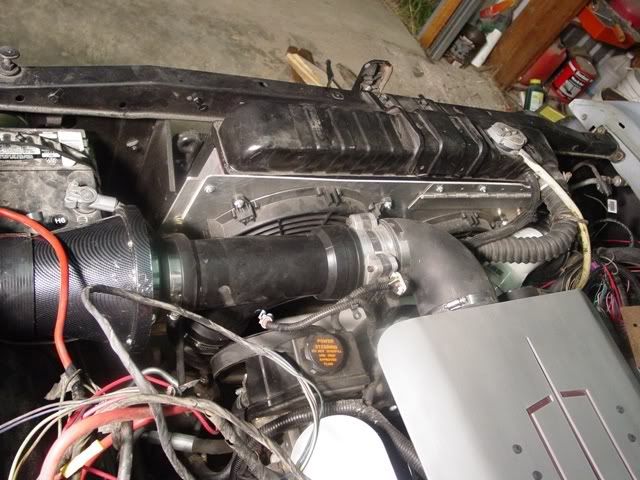
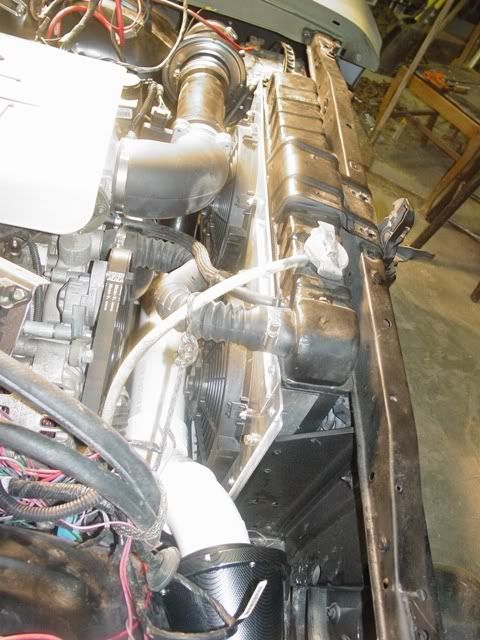
I finally got the front end back on the car allowing me to complete the plumbing of the dual ram air thru the headlights. It's tight real tight. I also can now see the stance with the drop spindles. It looks like I might end up with about 1 inch drop net with the 2 inch drop spindles and lighter LS1.

01-04-2010 | 12:05 PM
#31
Thread Starter
TECH Resident
Joined: Nov 2007
Posts: 816
Likes: 0
From: Texas
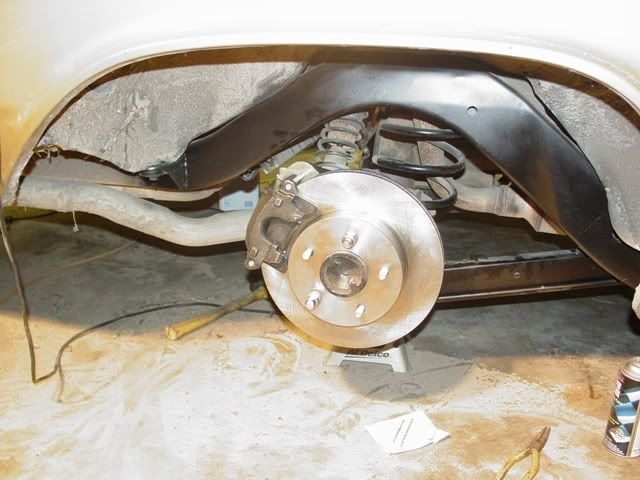
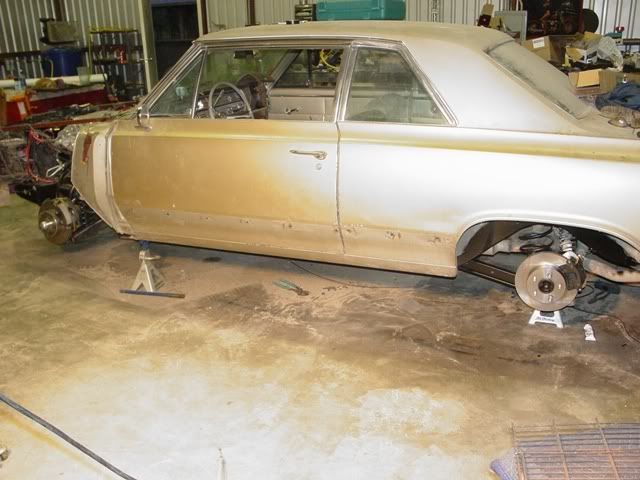
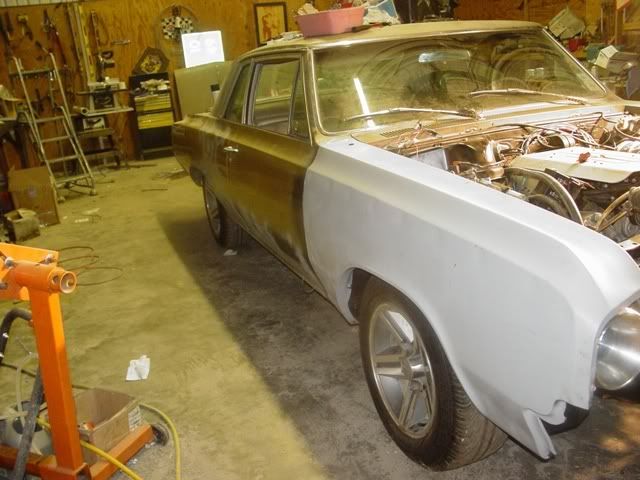
It has been a while sense I posted any progress on this project. Frankly because I have been having to much fun driving it to tear it down and finish it. But the time has come to complete this one. I have stripped the interior and started on the body work to get ready for paint. I have upgaded the rear end with a 10 bolt posi and added tublar upper and lower control arms with sway bar out back.
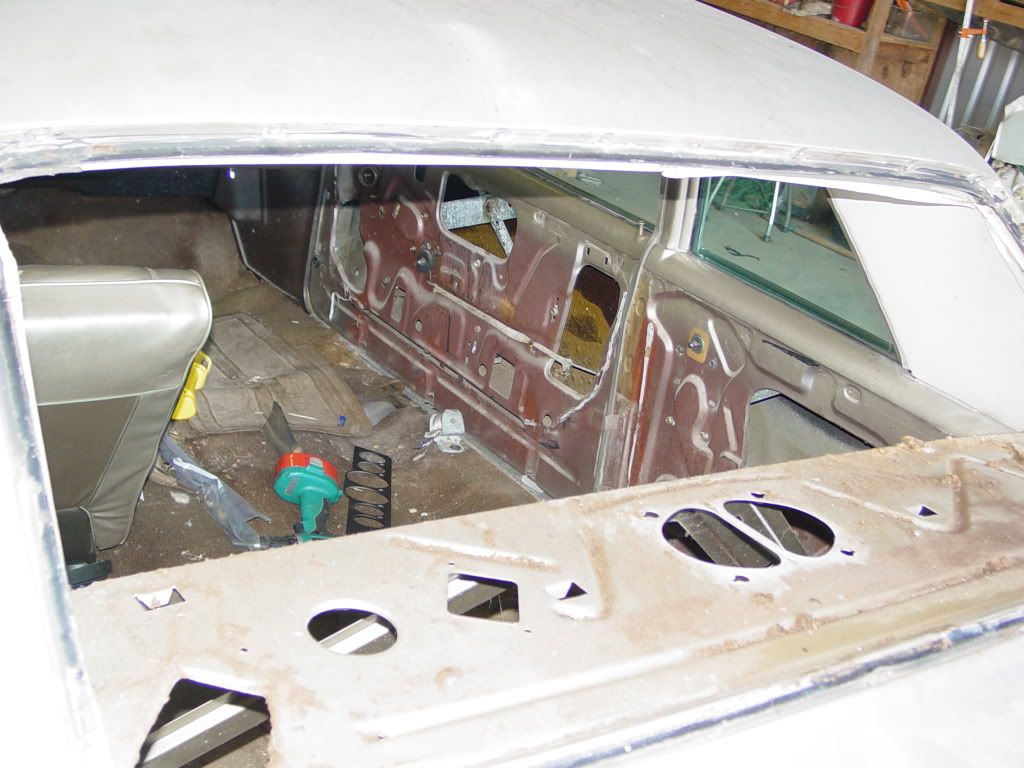
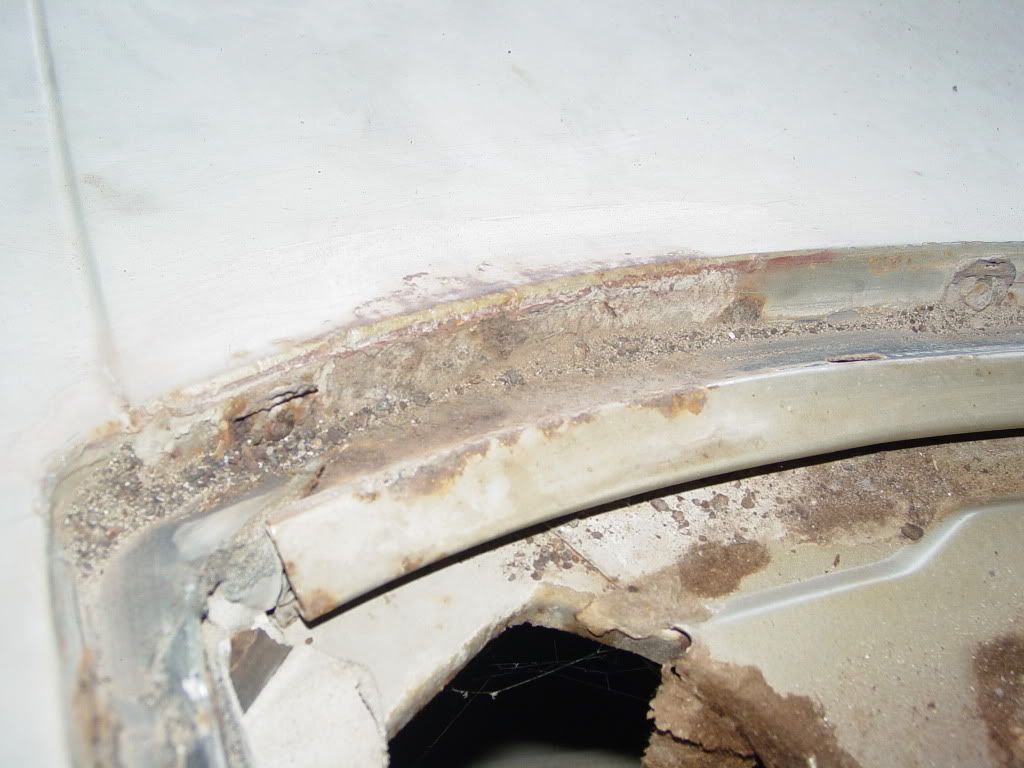
I have some cancer in the rear window lip on both lower corners but to my surprise it was minor and can be repaired fairly easily.
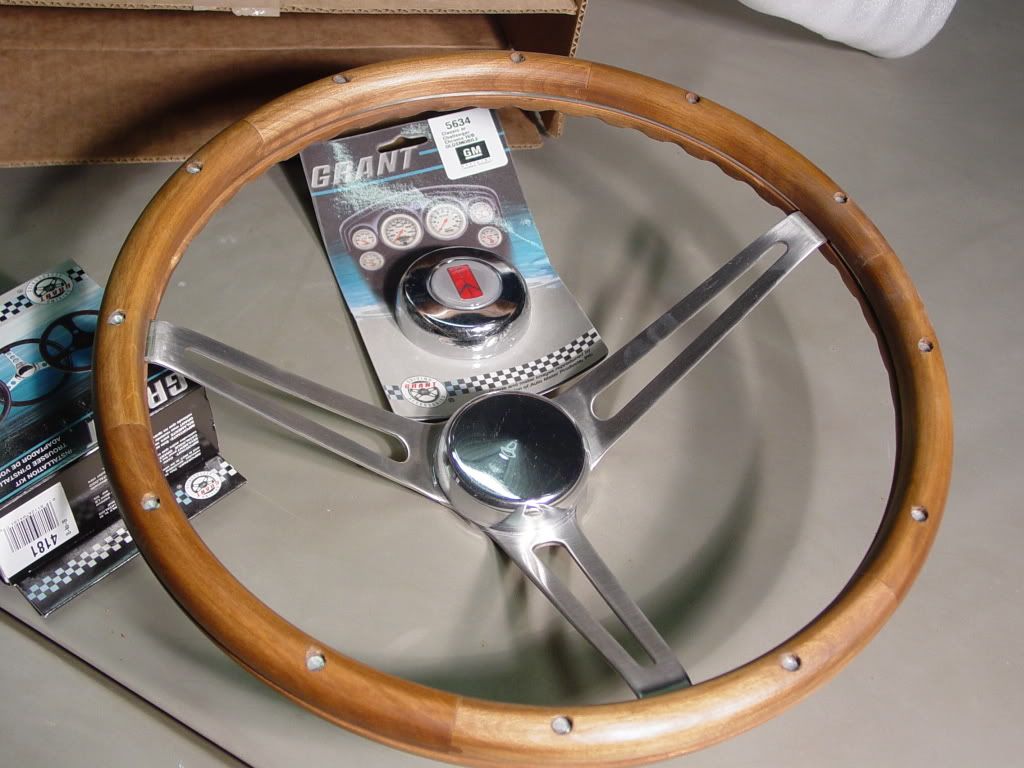
More goodies keep coming in the mail. The steering wheel was to small and did not fit the style of this car. I have swapped it for the wood grain 15 inch grant wheel which looks more oem to this year model.

The inside will be converted to all Black interior.
I have some cancer in the rear window lip on both lower corners but to my surprise it was minor and can be repaired fairly easily.
More goodies keep coming in the mail. The steering wheel was to small and did not fit the style of this car. I have swapped it for the wood grain 15 inch grant wheel which looks more oem to this year model.
The inside will be converted to all Black interior.
01-04-2010 | 12:54 PM
#32
Nice project, 60's cars are great.
I love the C clamps holding the core support up in the video! There are times when a man has to side step a few things to test his project before moving on to the next phase, I'm glad you weren't scared to document your testing. I've done the same thing...

When I punched it I suddenly discovered that I hadn't bolted the seat back down so I've got a pretty good grip on the wheel.

Sorry about the , carry on please.
I love the C clamps holding the core support up in the video! There are times when a man has to side step a few things to test his project before moving on to the next phase, I'm glad you weren't scared to document your testing. I've done the same thing...
When I punched it I suddenly discovered that I hadn't bolted the seat back down so I've got a pretty good grip on the wheel.
Sorry about the
, carry on please. 
 01-04-2010 | 03:24 PM
#35
Thread Starter
TECH Resident
Joined: Nov 2007
Posts: 816
Likes: 0
From: Texas
02-04-2010 | 04:42 PM
#36
Thread Starter
TECH Resident
Joined: Nov 2007
Posts: 816
Likes: 0
From: Texas
More goodies have arrived for the project. This is the steering wheel I have decided to go with. Sense I kept the column shifter I thought a OEM style wheel would be a better fit. Also the smaller racing style wheels block the driver view of the instrument cluster which is spread linear across the dash.
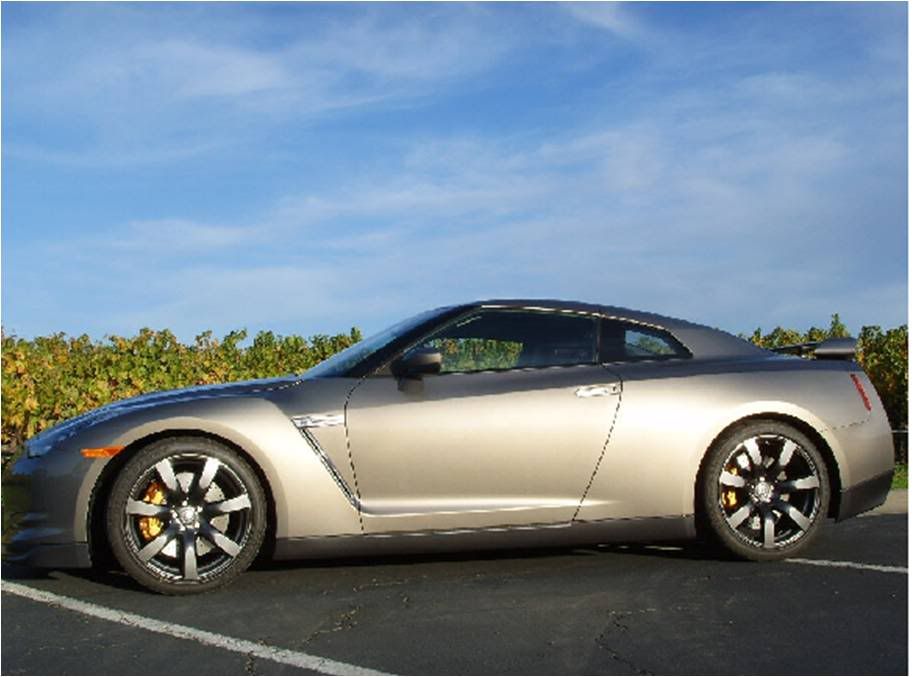
I have about 30 % of the body work done cold weather and rain have kept me from getting a lot done. I have been having a hard time deciding on a paint color. I have finally chosen a winner. I'm going with Nissan Titanium grey (also known as desert shadow) code KAC.


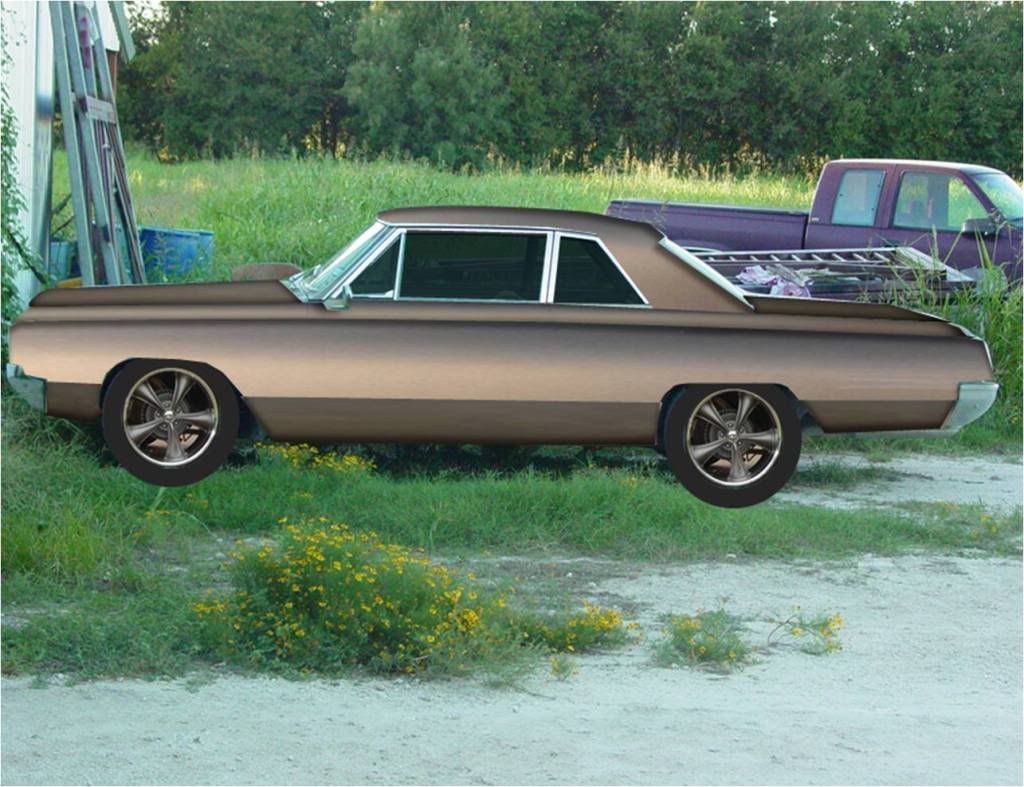
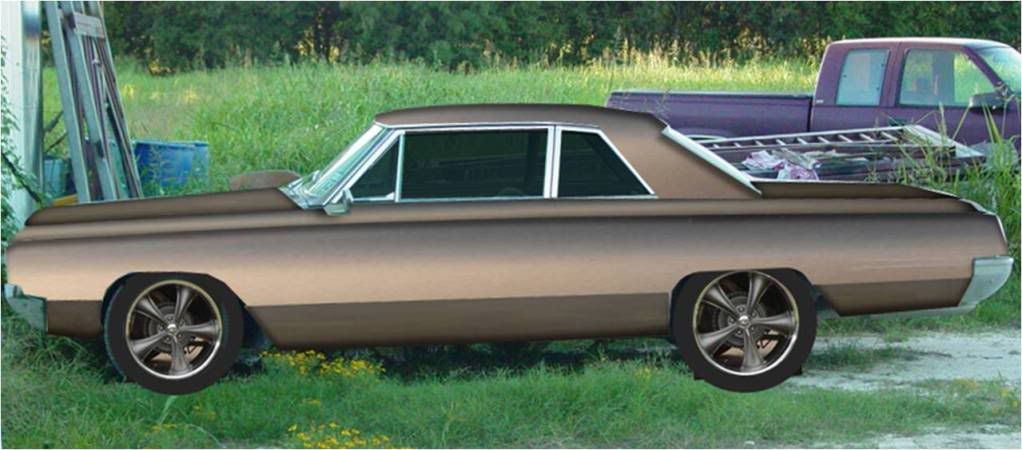
Here are a few crude renderings I did of what it might look like when finished.
I'm undecided as to weather I'm going to run 18x8 on all 4 or do a protouring style 18-20 stagger.
I have about 30 % of the body work done cold weather and rain have kept me from getting a lot done. I have been having a hard time deciding on a paint color. I have finally chosen a winner. I'm going with Nissan Titanium grey (also known as desert shadow) code KAC.
Here are a few crude renderings I did of what it might look like when finished.
I'm undecided as to weather I'm going to run 18x8 on all 4 or do a protouring style 18-20 stagger.
Last edited by rockytopper; 05-26-2010 at 09:23 AM.
05-22-2010 | 05:15 PM
#37
Thread Starter
TECH Resident
Joined: Nov 2007
Posts: 816
Likes: 0
From: Texas
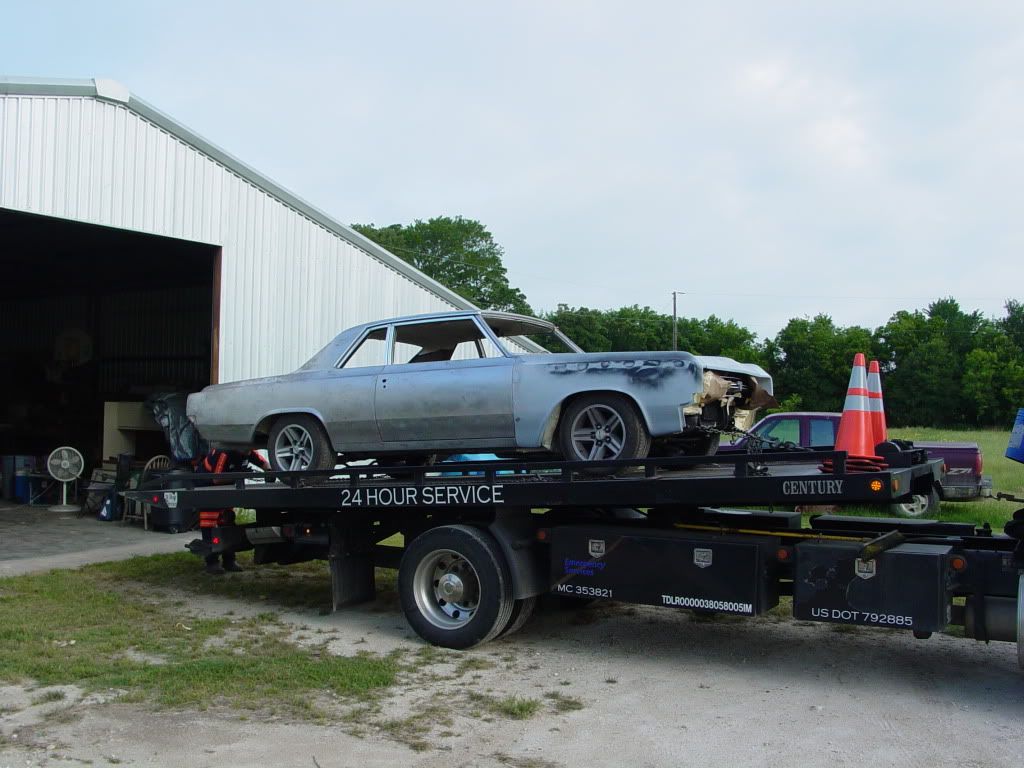
I was forced to throw in the towel. After months of sanding 6 layers of paint to bare metal and plugging numerious trim holes I had to quite pertending I knew what I was doing and call in professional help. The car left for the paint shop 2 days ago & the interior got dropped off this morning. All goodies are on order for when it returns. I'm stoked. Painter says 2 weeks, uphostery buddy says 3 weeks. We shall see.
Here is a secret project I'm working on. anyone care to take a guess?
Here is a secret project I'm working on. anyone care to take a guess?
Last edited by rockytopper; 05-26-2010 at 09:24 AM.
05-23-2010 | 11:17 AM
#38
Sorry to hear you gave up on the bodywork and let the pros do it. Speaking from experience - it is a real PITA to get everything right and materials always cost more than you think. I won't even get into the time spent...
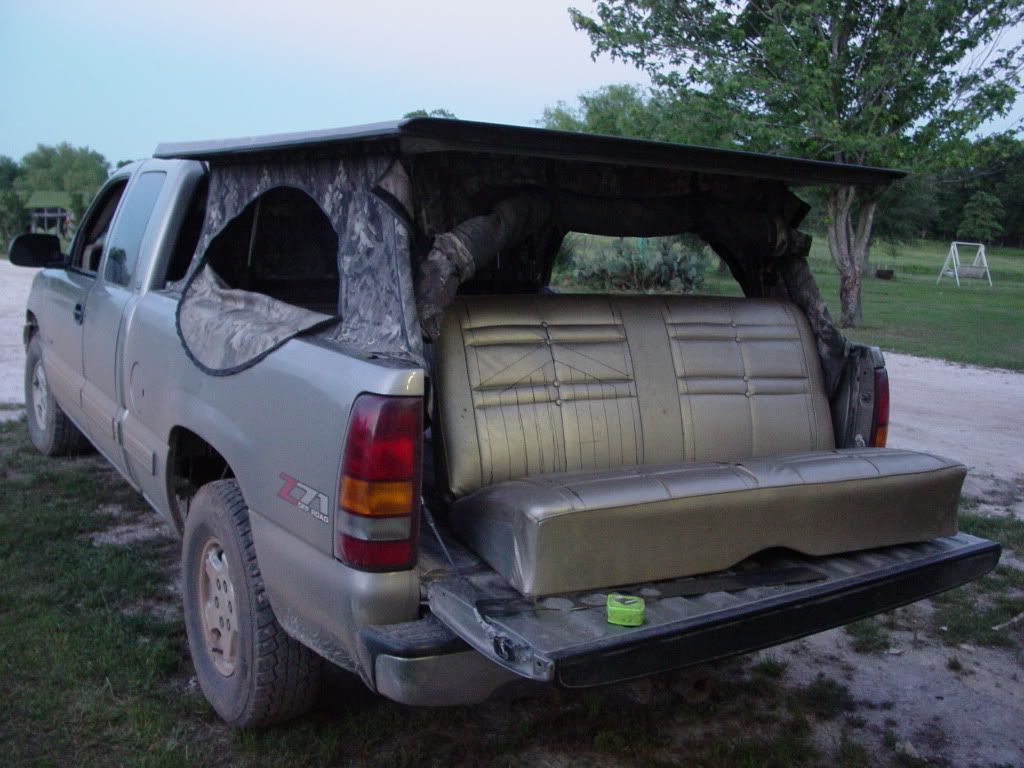
The dash is cool but I'm not sure I care for the Olds seats in the hunting blind. I understand comfort and style but my girl says the colors are all wrong. Is the pattern you drew what they will look like when they are complete? I think it looks cool.
Speaking of colors... I like the color choice for the car! I wouldn't have thought of it but I think it will work nicely and give an updated look without being too modern.
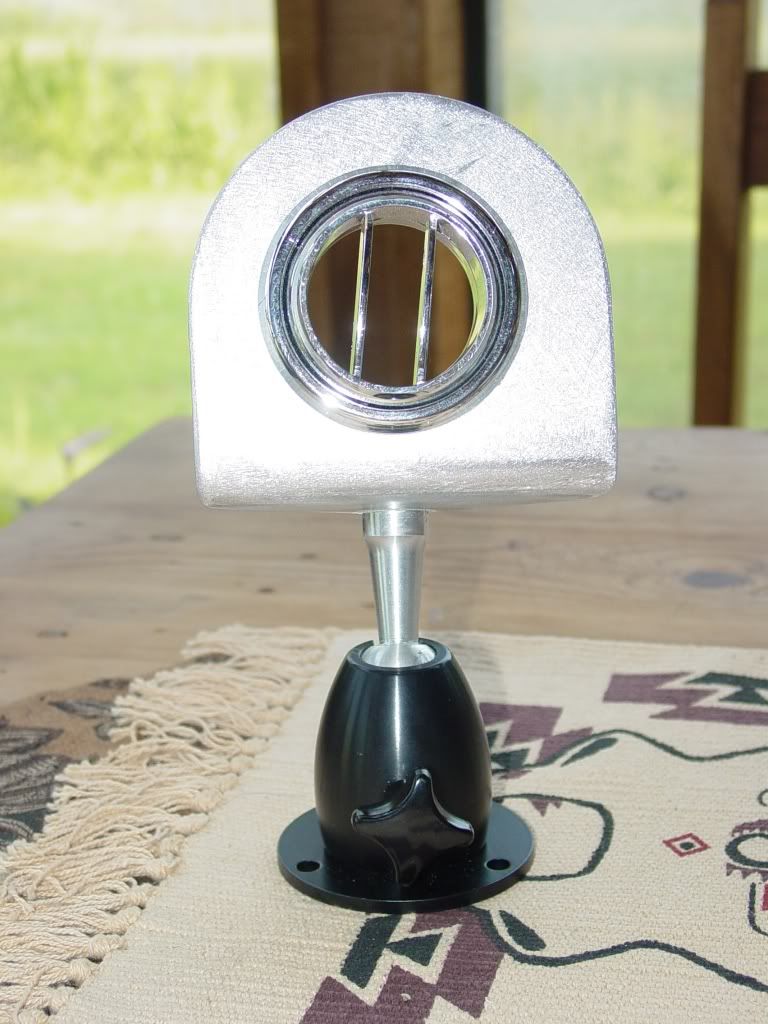
The last bit looks like an AC vent but I don't know why it is on the pedestal.
The dash is cool but I'm not sure I care for the Olds seats in the hunting blind. I understand comfort and style but my girl says the colors are all wrong.
Is the pattern you drew what they will look like when they are complete? I think it looks cool. Speaking of colors... I like the color choice for the car! I wouldn't have thought of it but I think it will work nicely and give an updated look without being too modern.
The last bit looks like an AC vent but I don't know why it is on the pedestal.
05-23-2010 | 09:26 PM
#39
Thread Starter
TECH Resident
Joined: Nov 2007
Posts: 816
Likes: 0
From: Texas
Sorry to hear you gave up on the bodywork and let the pros do it. Speaking from experience - it is a real PITA to get everything right and materials always cost more than you think. I won't even get into the time spent...
The dash is cool but I'm not sure I care for the Olds seats in the hunting blind. I understand comfort and style but my girl says the colors are all wrong. Is the pattern you drew what they will look like when they are complete? I think it looks cool.
Speaking of colors... I like the color choice for the car! I wouldn't have thought of it but I think it will work nicely and give an updated look without being too modern.
The last bit looks like an AC vent but I don't know why it is on the pedestal.
The dash is cool but I'm not sure I care for the Olds seats in the hunting blind. I understand comfort and style but my girl says the colors are all wrong.
Is the pattern you drew what they will look like when they are complete? I think it looks cool. Speaking of colors... I like the color choice for the car! I wouldn't have thought of it but I think it will work nicely and give an updated look without being too modern.
The last bit looks like an AC vent but I don't know why it is on the pedestal.
The pattern will be similar except have rounded corners instead of the pointed ends. Help makes it easier to sew. The welt on the edges is going to be replaced with saddle stitching. Factory mydrad black with black sq purf on the inlays.
Man I sure hope you are right about the color. It has been the hardest part to settle on.
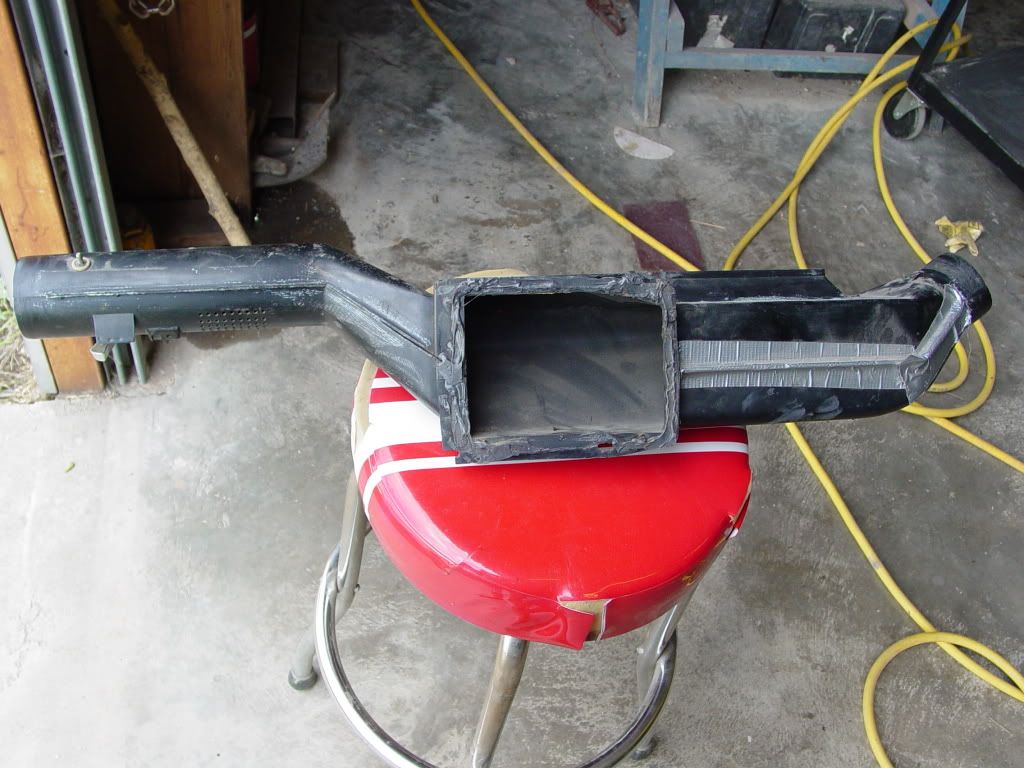
I'm doing a little custom ventilation work to my factory Hvac ducts. I'm running the LS1 compressor with my original system. It gets plenty cold but I can't get enough air flow out the vent to reach the passengers. It has never moved much air even when it was the original system. The Vent on the pedsetal is my new patented air vent. It is called the "BLO MO". The swivel mount will be hidden under the dash. The vent will be hung under the dash in the center. The vent can be adjusted and pointed in almost any direction. it will only have about 6 inchs of flex vent duct to flow thru before it exits. Here is the oem under dash duct. There is a huge pressure drop in this monster.
This is what will replace it. A few stardard parts and little fab work including keeping part of the original duct with shut off.
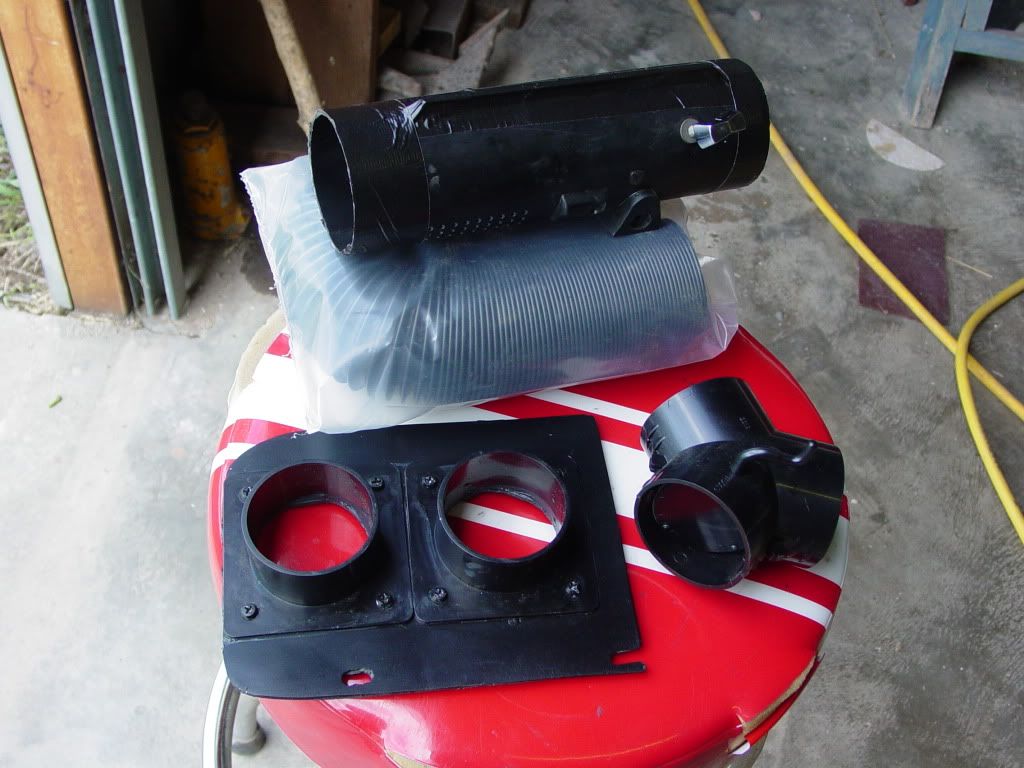
There is a huge difference in air delivery with this necked down direct ducting. I plan to run the 2 outer factory vents and the center under dash adjustable vent. The original rectangular vent will be transformed in the a hidden billet cup holder.
Last edited by rockytopper; 05-27-2010 at 01:04 PM.
