

LQ4 into a 3rd Gen/1972 Nova
 12-06-2010, 01:38 PM
#341
True, there's a fly cutter kicking around that I could've modded to work since the plate was so thin, but they were just clearance holes so I went at it the quickest and dirtiest way.
I'm going to go to the local anodizing place sometime this week and check out some samples and take it from there.
And regarding my psuedo turbo, I am afterall looking for a low-boost setup, don't want to blow the stock internals and all .
.
Picking up the piping and manifolds today after work, and this morning made some spacers to mount to the pass. side head, to which I'm going to weld some turbo flange support structure, more to come in a bit.
I'm going to go to the local anodizing place sometime this week and check out some samples and take it from there.
And regarding my psuedo turbo, I am afterall looking for a low-boost setup, don't want to blow the stock internals and all
. Picking up the piping and manifolds today after work, and this morning made some spacers to mount to the pass. side head, to which I'm going to weld some turbo flange support structure, more to come in a bit.
 12-06-2010, 10:48 PM
#342
I feel like an artist with a blank canvas...

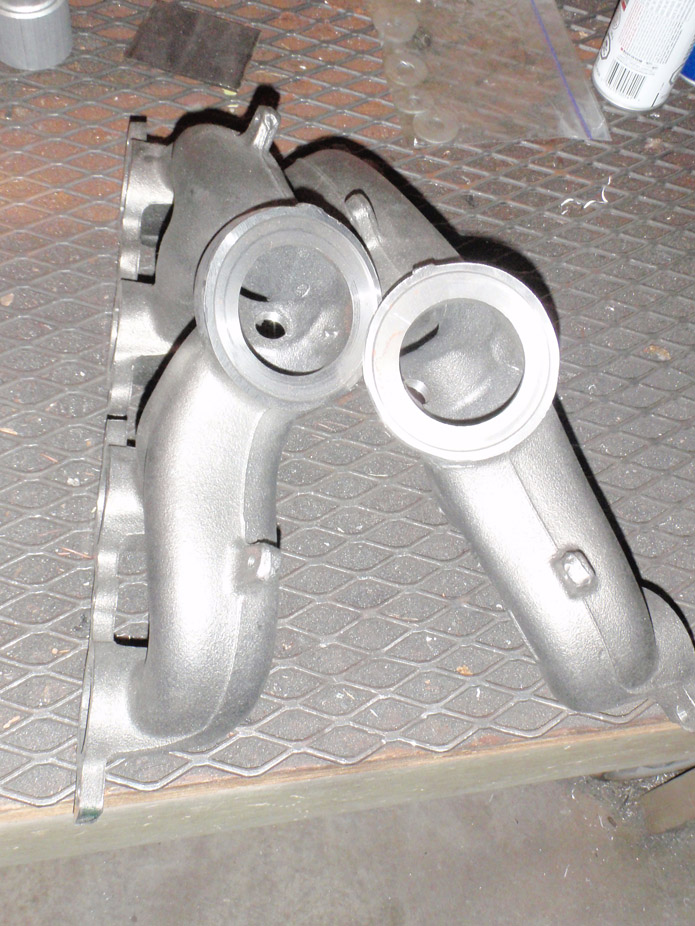
Virgin manifold metal!! Also as I was about to pay for the manifold eBay auction and I saw the seller also had this virgin LS3 waterpump. On a random impulse with the foggy memory of it being lower profile than the truck one, I just had to try it...
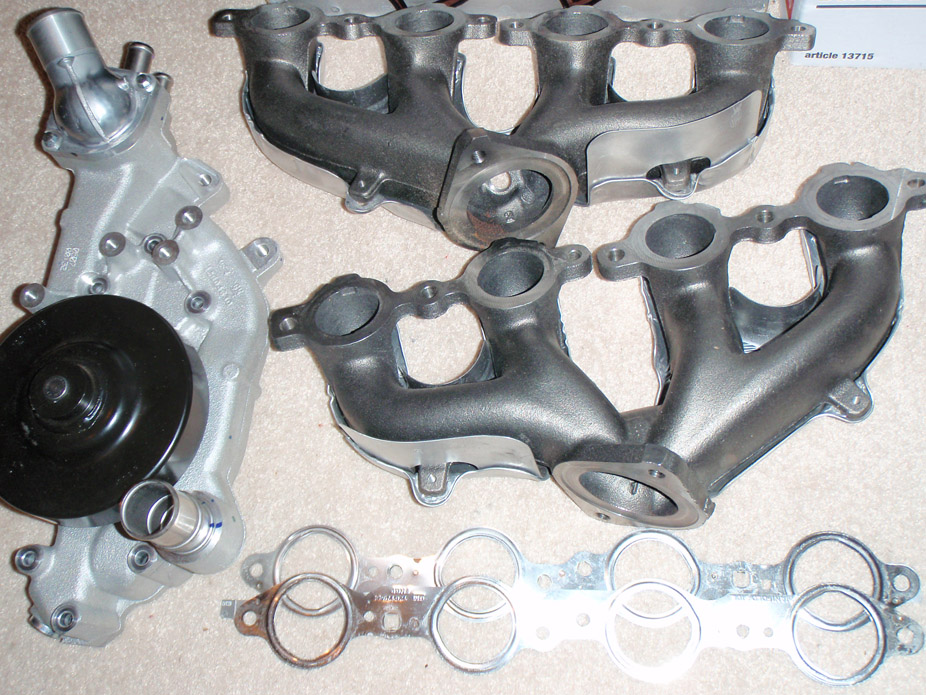
My memory served me correct, there's a nifty little O2 bung in the collector, and since the manifolds will be flipped upside down it'll be hidden
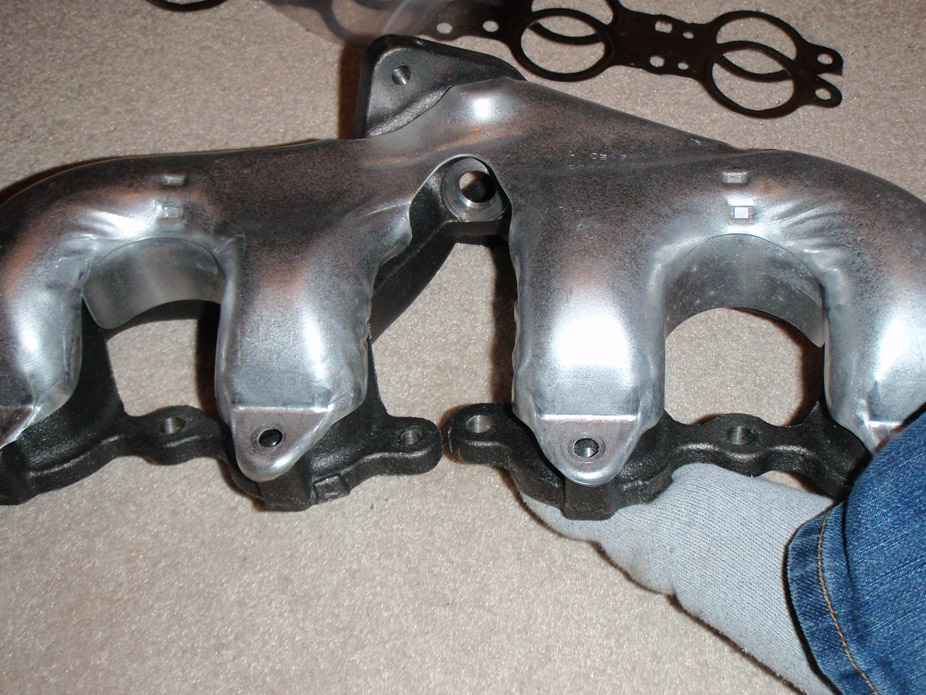
To give myself more room I though of possibly pulling these ports and tapping them, I'll have to see how much room I have/need for hotside piping..
Also has this plugged port, not sure what for but could end up being a coolant return line for a water-cooled turbo!
Virgin manifold metal!! Also as I was about to pay for the manifold eBay auction and I saw the seller also had this virgin LS3 waterpump. On a random impulse with the foggy memory of it being lower profile than the truck one, I just had to try it...
My memory served me correct, there's a nifty little O2 bung in the collector, and since the manifolds will be flipped upside down it'll be hidden
To give myself more room I though of possibly pulling these ports and tapping them, I'll have to see how much room I have/need for hotside piping..
Also has this plugged port, not sure what for but could end up being a coolant return line for a water-cooled turbo!
Last edited by frojoe; 12-06-2010 at 11:09 PM.
12-06-2010, 11:07 PM
#343
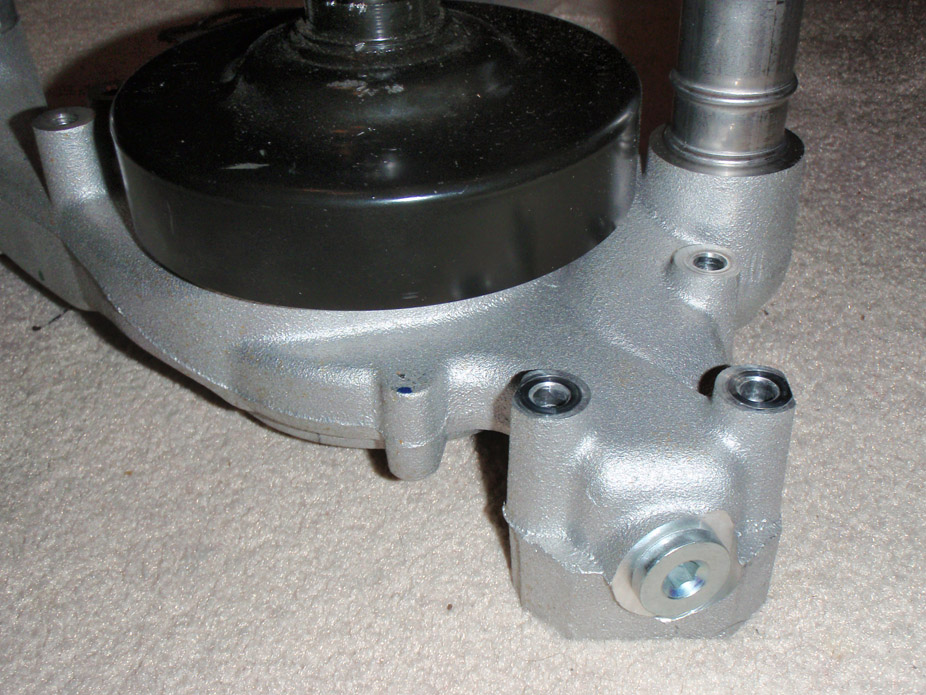
I essentially want to run this passenger side exhaust routing to get from the manifold to the turbo flange collector. The pipe looks like it'd come close to the waterpump return, so that was the main reason for trying the LS3 with its MUCH better return port location...

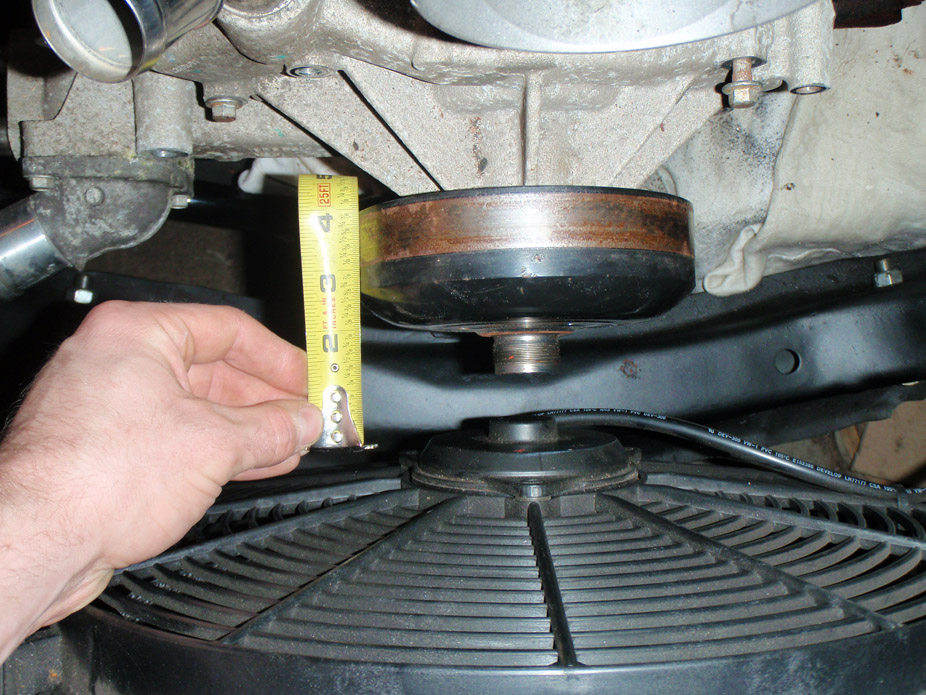
A comparison of the truck LQ4 waterpump (top) and LS3 waterpump (bottom)

Again goes the old adage of Research, Research, Research! Crap, I did not realize it tucked it in this much, I remembered the pulley itself being lower-profile on the LS3 vs. truck yet still being in the same plane as the truck accessory pullies, but turns out I was thinking of LY6 NOT LQ4...


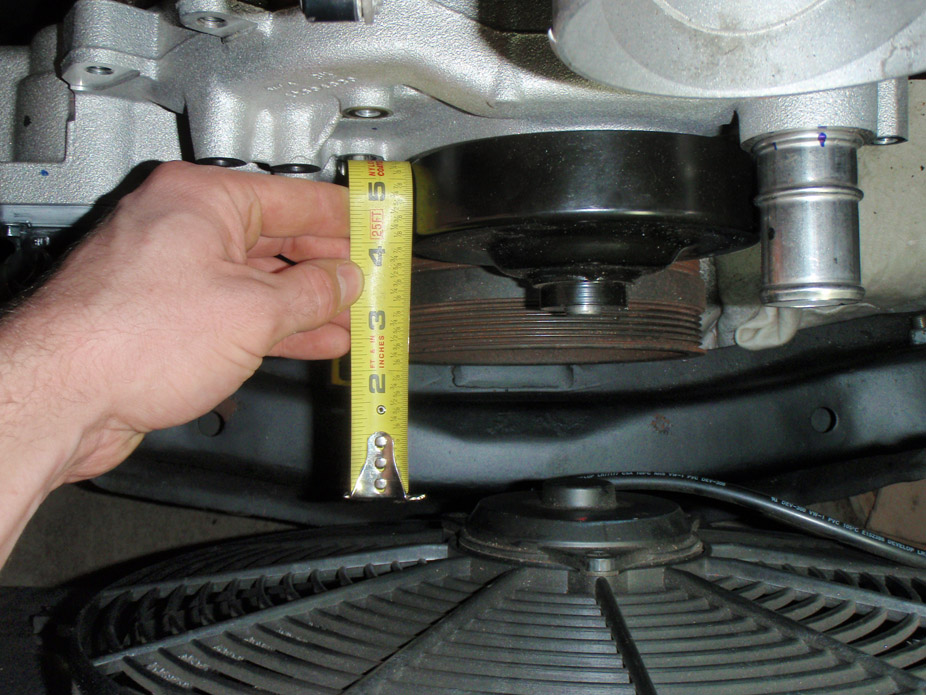
Well here is the reason I wanted lower profile, not a lot of room in this stupid short Nova engine bay!

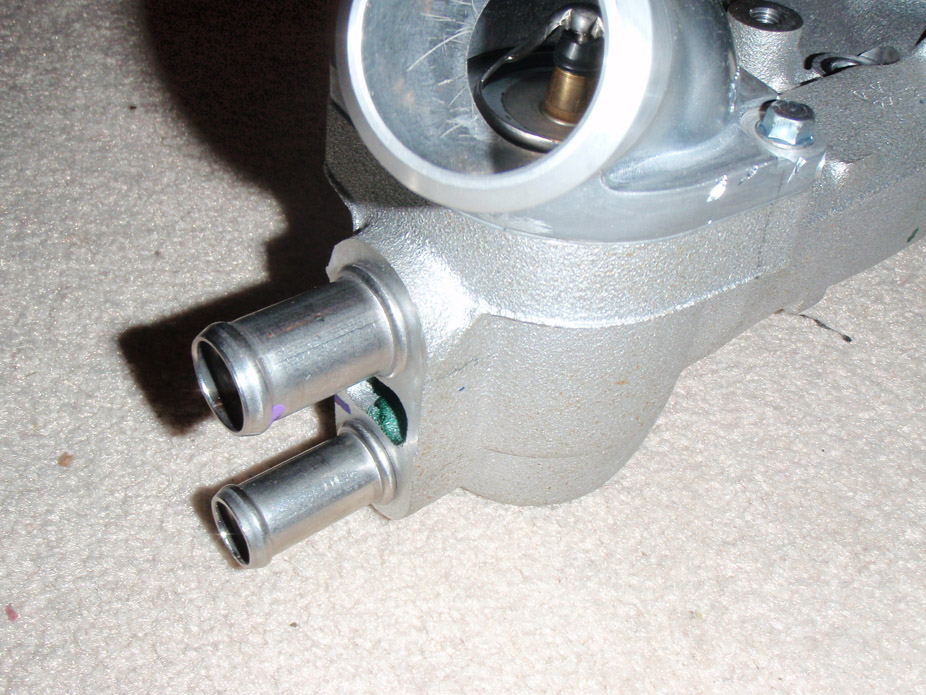
One reason I was thinking of moving the heater port from these hose barbs to an AN fitting at some angle, there's not a ton of room, the hoses would be tucking right against the upper control arm cross shaft and be right under the heat of the turbo...
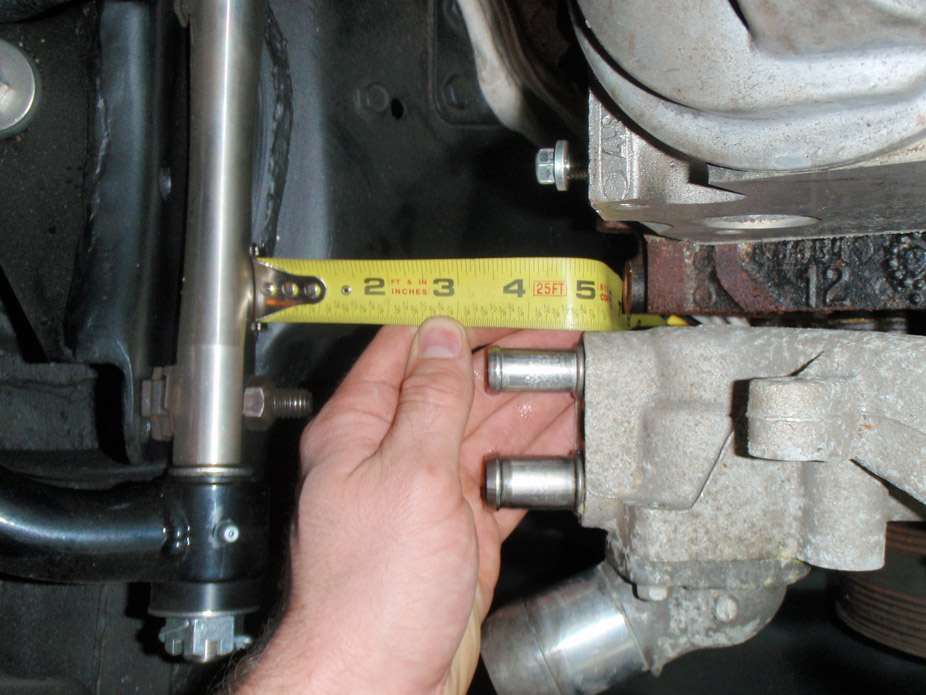
Well at least there's a tone more clearance...
Except the LS3 water pump puts the heater hose ports even further outboard...
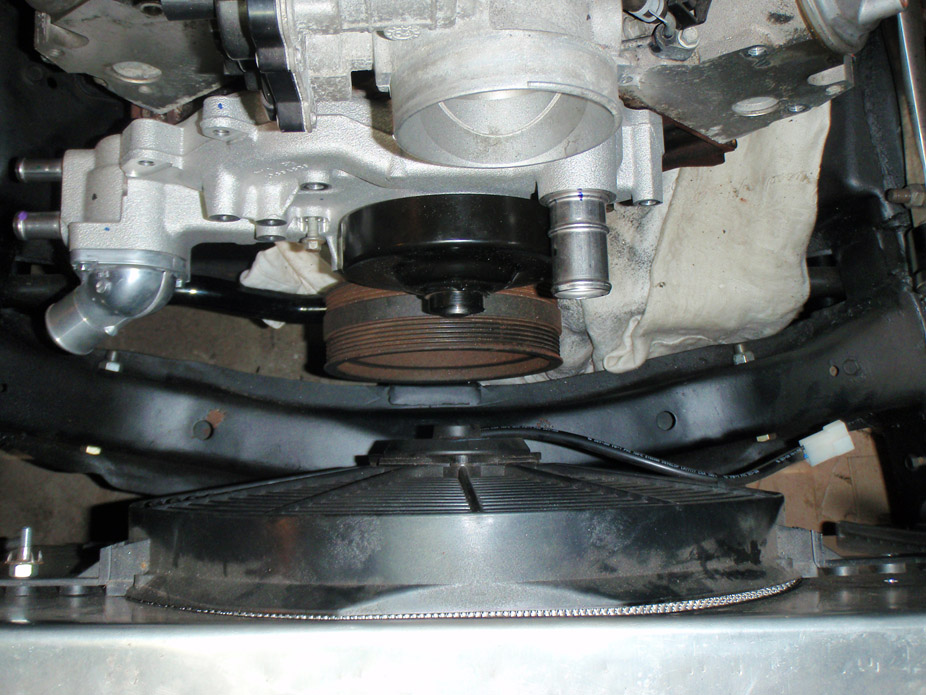
Easiest might be to make coolant-flow-thru spacers to space the waterpump forward the 1.5" offset difference, would let me keep the stock LQ4 accessory drive. Could have the heater hoses run across, up the inner fender, then tuck under the quarter panel. Also would allow more clearance for the passenger side exhaust pipe to tuck in behind the waterpump and merge to the turbo flange...

A comparison of the truck LQ4 waterpump (top) and LS3 waterpump (bottom)
Again goes the old adage of Research, Research, Research! Crap, I did not realize it tucked it in this much, I remembered the pulley itself being lower-profile on the LS3 vs. truck yet still being in the same plane as the truck accessory pullies, but turns out I was thinking of LY6 NOT LQ4...
Well here is the reason I wanted lower profile, not a lot of room in this stupid short Nova engine bay!
One reason I was thinking of moving the heater port from these hose barbs to an AN fitting at some angle, there's not a ton of room, the hoses would be tucking right against the upper control arm cross shaft and be right under the heat of the turbo...
Well at least there's a tone more clearance...
Except the LS3 water pump puts the heater hose ports even further outboard...
Easiest might be to make coolant-flow-thru spacers to space the waterpump forward the 1.5" offset difference, would let me keep the stock LQ4 accessory drive. Could have the heater hoses run across, up the inner fender, then tuck under the quarter panel. Also would allow more clearance for the passenger side exhaust pipe to tuck in behind the waterpump and merge to the turbo flange...
Last edited by frojoe; 12-06-2010 at 11:29 PM.
12-06-2010, 11:37 PM
#344
Again goes the old adage of Research, Research, Research! Crap, I did not realize it tucked it in this much, I remembered the pulley itself being lower-profile on the LS3 vs. truck yet still being in the same plane as the truck accessory pullies, but turns out I was thinking of LY6 NOT LQ4...

Also I see your LS3 pump has a plug (convenient!) where you could put a sensor. I am planning on putting my coolant sensor on the back side coaxially with the outlet.
You may want to read my thread (in my sig) around posts 24-37
Last edited by -TheBandit-; 12-06-2010 at 11:42 PM.
12-06-2010, 11:42 PM
#345
Yup that's definitely the image that I was (very poorly) remembering from your post showing it. Oh well, guess I'll see if I can space this out or maybe find an L99 pump.
Definitely has the same layout, which is exactly what I recognized but didn't double-check. Just goes to show, research twice, buy once!!
Definitely has the same layout, which is exactly what I recognized but didn't double-check. Just goes to show, research twice, buy once!!
12-06-2010, 11:46 PM
#346
Jimbo1367 is looking to get an L99 pump for his build and he has 1.5" Mast spacers he may sell you to help fund that swap. Personally I would try returning that pump and order the L99 version unless you want the tighter accessory drive. I'm not a fan of spacers.
12-07-2010, 10:20 AM
#347
TECH Apprentice
Join Date: Oct 2007
Posts: 307
Likes: 0
Received 0 Likes
on
0 Posts
Again goes the old adage of Research, Research, Research! Crap, I did not realize it tucked it in this much, I remembered the pulley itself being lower-profile on the LS3 vs. truck yet still being in the same plane as the truck accessory pullies, but turns out I was thinking of LY6 NOT LQ4...

Awesome project and great advance. Keep the clean detailed pics coming.
Subscribed
 12-07-2010, 11:53 PM
#348
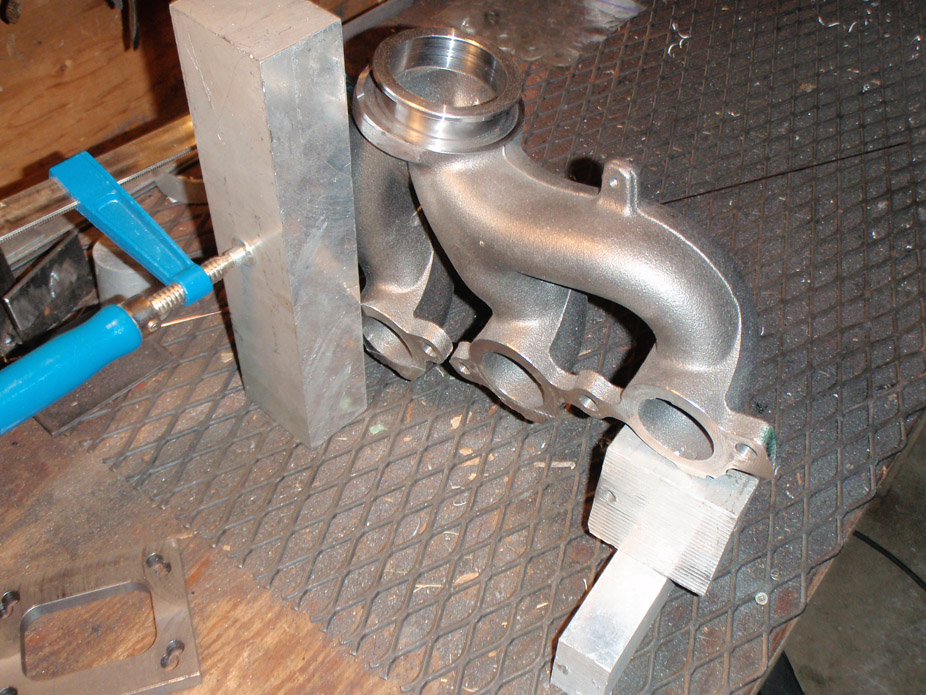
Just over 24hours after them becoming new to me, they're not new anymore...
After running a couple test beds on the flange hole tabs I cut off, it seemed like the cast "iron" was pretty accepting of being welded cold, hopefully, so I got it all set up and ready for a couple test tacks without preheat (just decided to try out of curiosity)...
Heat was pretty good, was putting in about 75 amps without burning thru the vband flange, took my time working the area with the arc at 1/2 pedal before going all in and making a puddle for the filler. It doesn't look it in this picture but the manifold material was definitely molten as I was adding filler so there was for sure enough heat going into the cast iron...
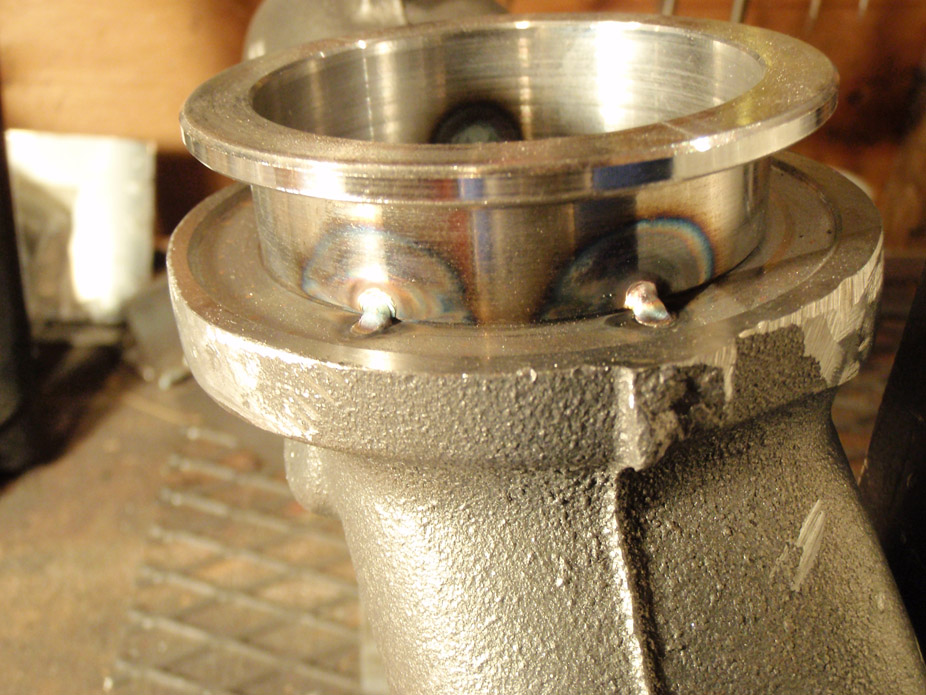
All of a sudden as I was taking a break I started hearing a ticking sound, and sure enough I inspect a tack weld on the opposite side of the flange to the two shown above...
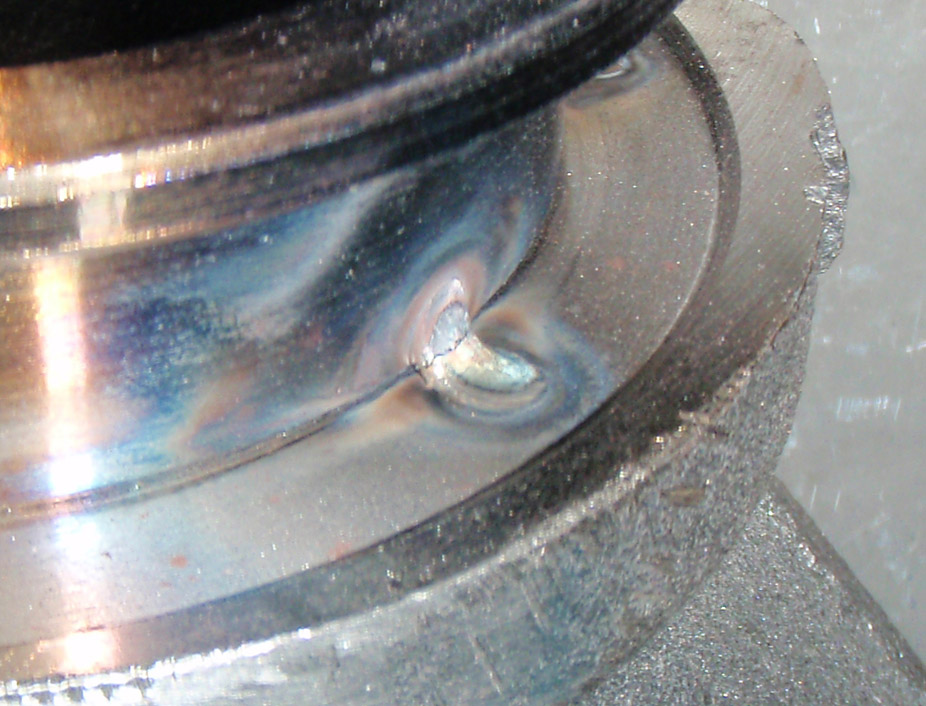
Guess I do need pre & post heat?
The vband flange was HOT but the manifold not so much, only in the area immediately around the tack... is it possible that the cast iron was soaking up all of the heat from that tack and causing it to cool too quickly = brittle tack?
I'm also thinking maybe the thermal expansion rates of the cast iron & steel are different enough to cause stress in the vband flange and break that tack? Although I would've thought that they'd both have similar cooling rates...
I tried tacking again but this time with pre & post heating with a butane torch for a couple minutes pre & post tack, it took longer to happen but sure enough the ticking sound started and I got a tack to crack.
Maybe shitty filler rod too? I don't even know the alloy of the rod, it was just generic "mild steel" filler that I picked up in a hurry at the local tool shed.
Any help/advice/tips/critisism would be greatly appreciated!!
After running a couple test beds on the flange hole tabs I cut off, it seemed like the cast "iron" was pretty accepting of being welded cold, hopefully, so I got it all set up and ready for a couple test tacks without preheat (just decided to try out of curiosity)...
Heat was pretty good, was putting in about 75 amps without burning thru the vband flange, took my time working the area with the arc at 1/2 pedal before going all in and making a puddle for the filler. It doesn't look it in this picture but the manifold material was definitely molten as I was adding filler so there was for sure enough heat going into the cast iron...
All of a sudden as I was taking a break I started hearing a ticking sound, and sure enough I inspect a tack weld on the opposite side of the flange to the two shown above...
Guess I do need pre & post heat?
The vband flange was HOT but the manifold not so much, only in the area immediately around the tack... is it possible that the cast iron was soaking up all of the heat from that tack and causing it to cool too quickly = brittle tack?
I'm also thinking maybe the thermal expansion rates of the cast iron & steel are different enough to cause stress in the vband flange and break that tack? Although I would've thought that they'd both have similar cooling rates...
I tried tacking again but this time with pre & post heating with a butane torch for a couple minutes pre & post tack, it took longer to happen but sure enough the ticking sound started and I got a tack to crack.
Maybe shitty filler rod too? I don't even know the alloy of the rod, it was just generic "mild steel" filler that I picked up in a hurry at the local tool shed.
Any help/advice/tips/critisism would be greatly appreciated!!
12-08-2010, 12:29 AM
#349
TECH Regular
iTrader: (5)

Join Date: Mar 2010
Location: Vancouver area, West coast Canada
Posts: 405
Likes: 0
Received 32 Likes
on
21 Posts

Welding Cast Iron is tricky. It has low tensile strength so it often pulls away and cracks when you weld something stronger to it (like steel). A real good warmup pre-heat helps, and also there are special cast-iron rods made for welding it. They tend to have a high nickel content.
 12-08-2010, 11:47 AM
#351
350SS.. I did see that link but didn't read through it thoroughly enough. After trying to weld from cold and failing, I'm going to pick up someof that 55% Ni filler rod and pre/post heat.
Since the manifold is new & bare metal, would anybody see any problem with using my regular oven in the kitchen? It still doesn't seem like a good idea somehow, but if I wipe the manifolds clean would it be safe for heating in something I cook with?
Since the manifold is new & bare metal, would anybody see any problem with using my regular oven in the kitchen? It still doesn't seem like a good idea somehow, but if I wipe the manifolds clean would it be safe for heating in something I cook with?
12-08-2010, 07:24 PM
#352
12-11-2010, 05:53 PM
#354
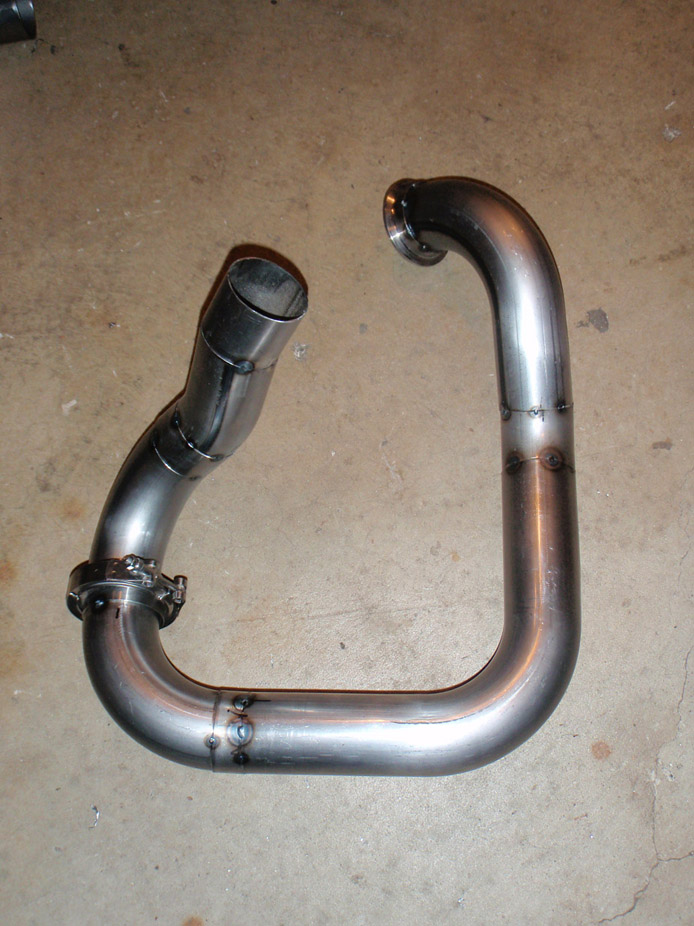
Did some baking this morning...
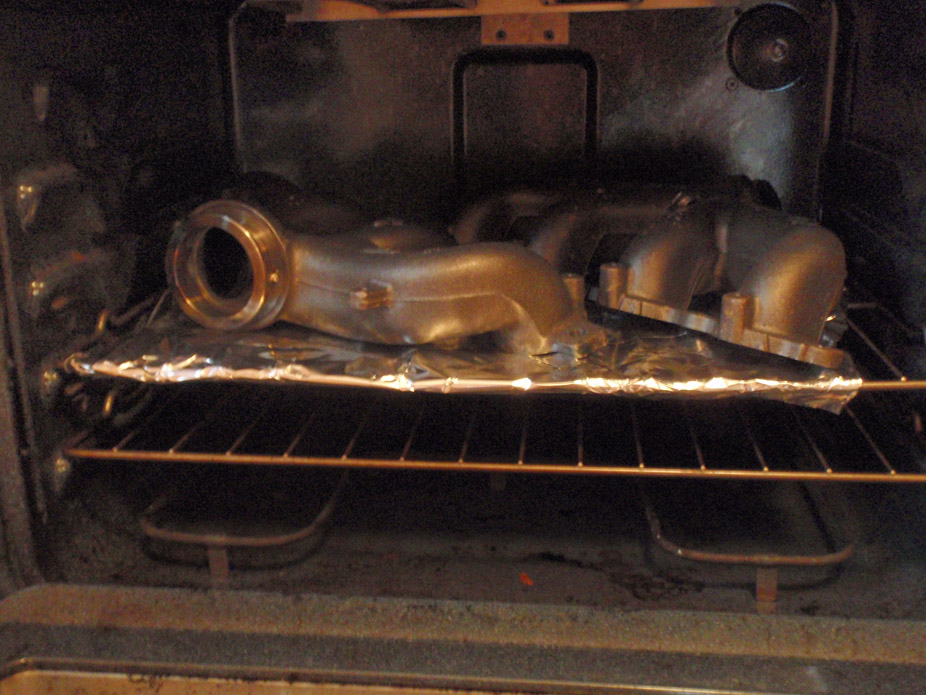
Recipe was:
1) Put manifolds in oven and from cold heat up to 450*F, hold for an hour
2) Took one manifold out, welded half the vband, put back in oven, took other manifold out, did half bead too. Went back to first one, finished, put back in oven, finished second one, put back in oven.
3) Let both fully welded manifolds sit in oven for ~15minutes
4) Turned heat down to about 300, let sit for ~15min
5) Turned heat down to about 150 (lowest oven would go), let sit for ~15min
6) Turned oven off, let everything inside cool down until I could touch, took about an hour.
Result:

Used regular ER70S mild steel filler rod, didn't heat with a torch or anything during the breaks between beads, just tried to do as quick as possible... bead quality shows that Also it was awkward as hell trying to change angles for different parts while not resting either hand on the manifold:

Not once did I hear any pinging sounds, however I was putting in about 100 amps had post flow set to 10 seconds which I think cooled the beads down a bit too much because the end points of two beads had small cracks, but everything else looked fine. Will have to carefully pre & post torch those 2 areas and quickly puddle them to fill the cracks.
-Joe
Recipe was:
1) Put manifolds in oven and from cold heat up to 450*F, hold for an hour
2) Took one manifold out, welded half the vband, put back in oven, took other manifold out, did half bead too. Went back to first one, finished, put back in oven, finished second one, put back in oven.
3) Let both fully welded manifolds sit in oven for ~15minutes
4) Turned heat down to about 300, let sit for ~15min
5) Turned heat down to about 150 (lowest oven would go), let sit for ~15min
6) Turned oven off, let everything inside cool down until I could touch, took about an hour.
Result:
Used regular ER70S mild steel filler rod, didn't heat with a torch or anything during the breaks between beads, just tried to do as quick as possible... bead quality shows that
Also it was awkward as hell trying to change angles for different parts while not resting either hand on the manifold:Not once did I hear any pinging sounds, however I was putting in about 100 amps had post flow set to 10 seconds which I think cooled the beads down a bit too much because the end points of two beads had small cracks, but everything else looked fine. Will have to carefully pre & post torch those 2 areas and quickly puddle them to fill the cracks.
-Joe
Last edited by frojoe; 12-11-2010 at 06:01 PM.
12-15-2010, 01:10 AM
#355
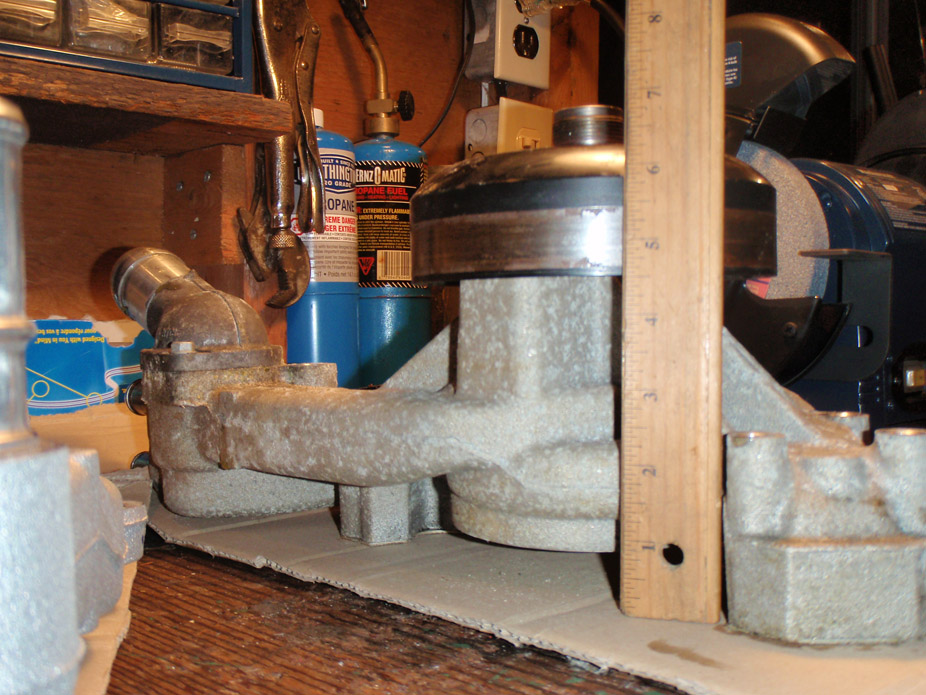
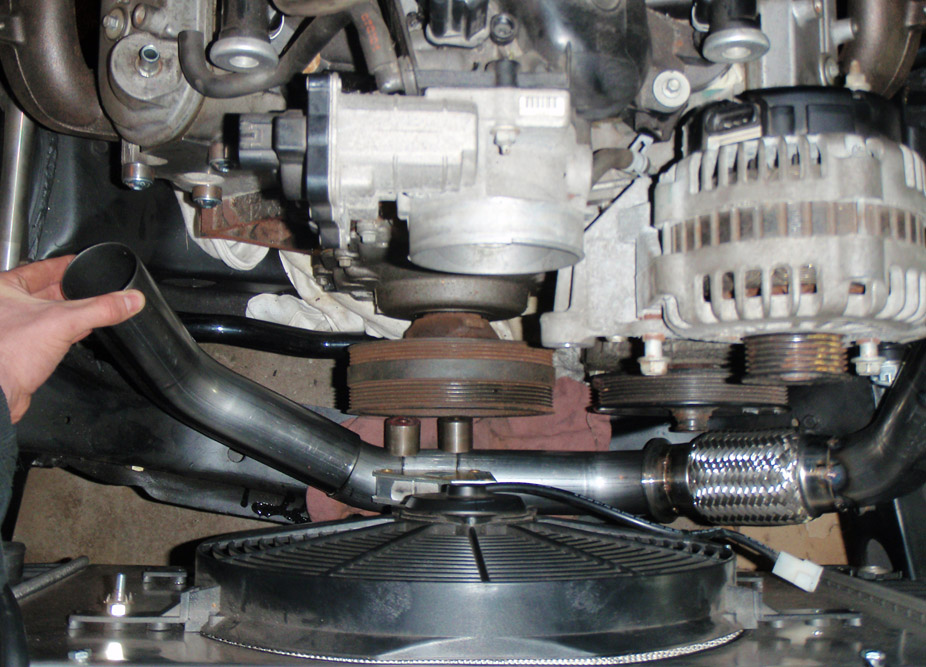
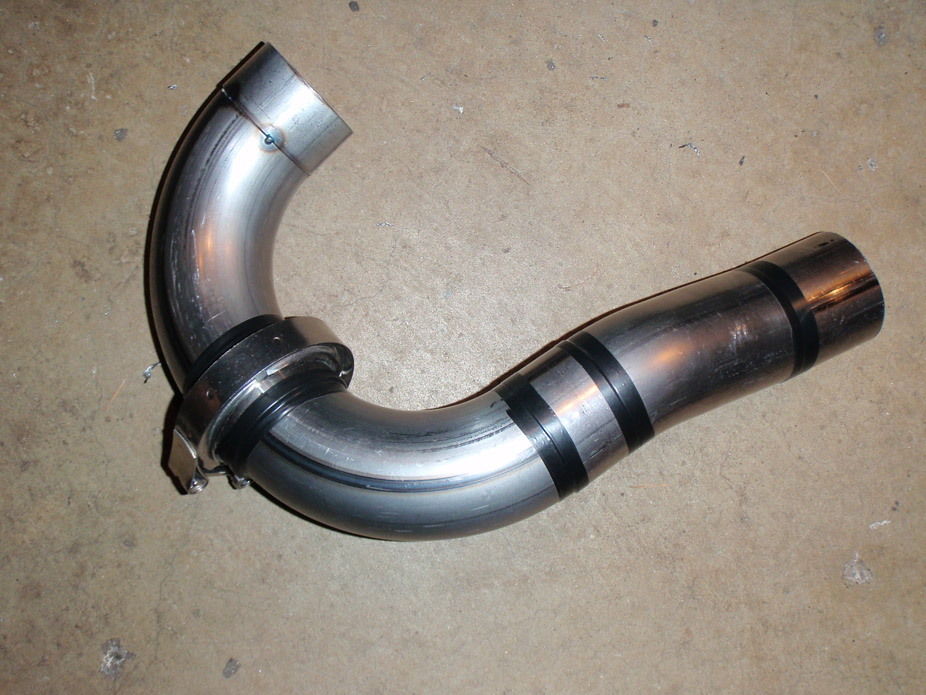
About 3 hours of "measure six times cut once" and I have the driver side tacked together...

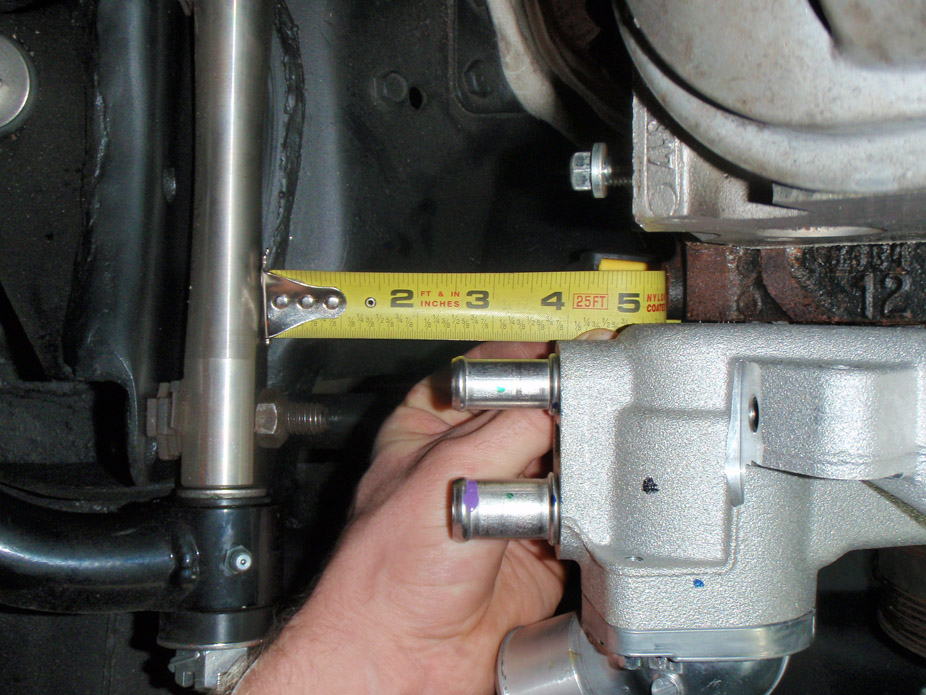
There's oodles of clearance around everything, 2" from PS pump cap, 3/4" from PS pump pulley, 1" from crank pulley, and 2" from the radiator...
Tentative planning on how driver's side will come up to merge, as drawn in one of my previous post's pics...
There's oodles of clearance around everything, 2" from PS pump cap, 3/4" from PS pump pulley, 1" from crank pulley, and 2" from the radiator...
Tentative planning on how driver's side will come up to merge, as drawn in one of my previous post's pics...
12-19-2010, 11:49 PM
#356
I wanted to throw the LQ4 alternator/PS pump bracket back on to see what work would be needed to make it work with the L99 waterpump, and surprisingly not much was needed...

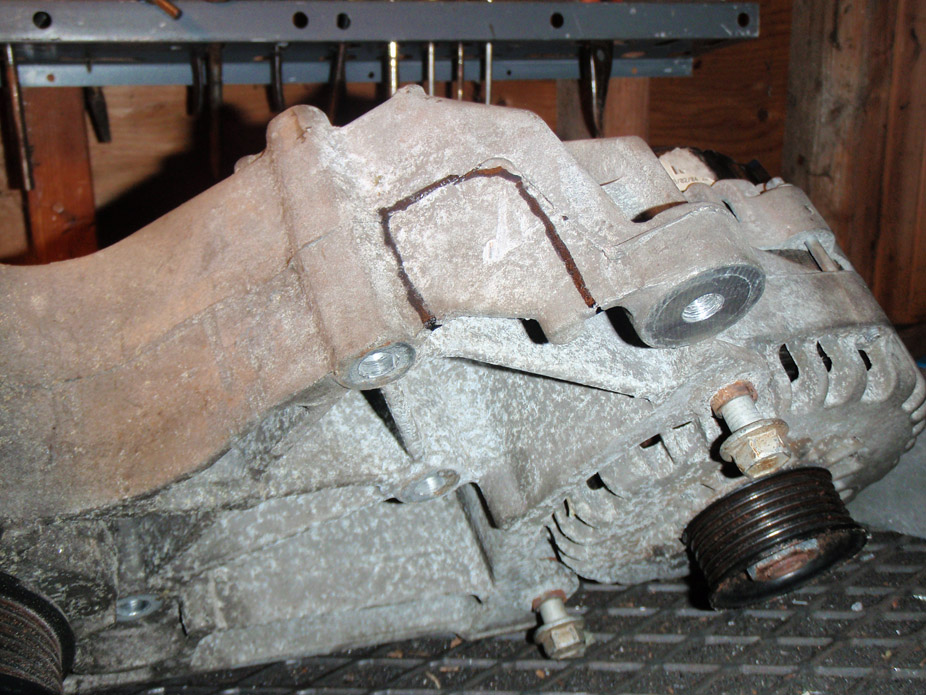

Skimmed a bit off the waterpump housing too...

Not the cleanest cuts but it'll all be pretty hidden...

Skimmed a bit off the waterpump housing too...
Not the cleanest cuts but it'll all be pretty hidden...
12-20-2010, 12:13 AM
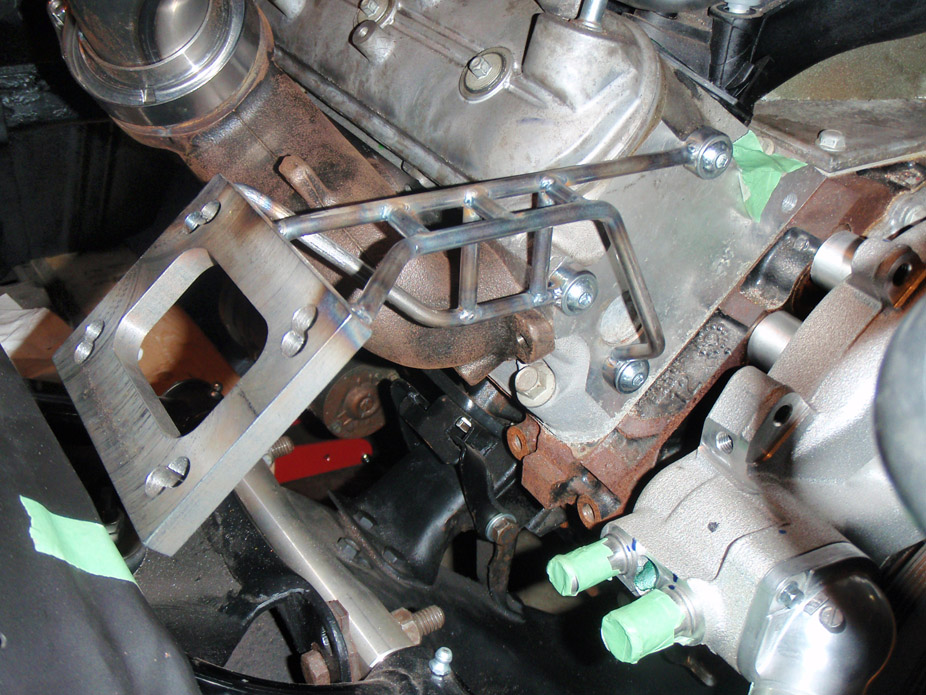
#357
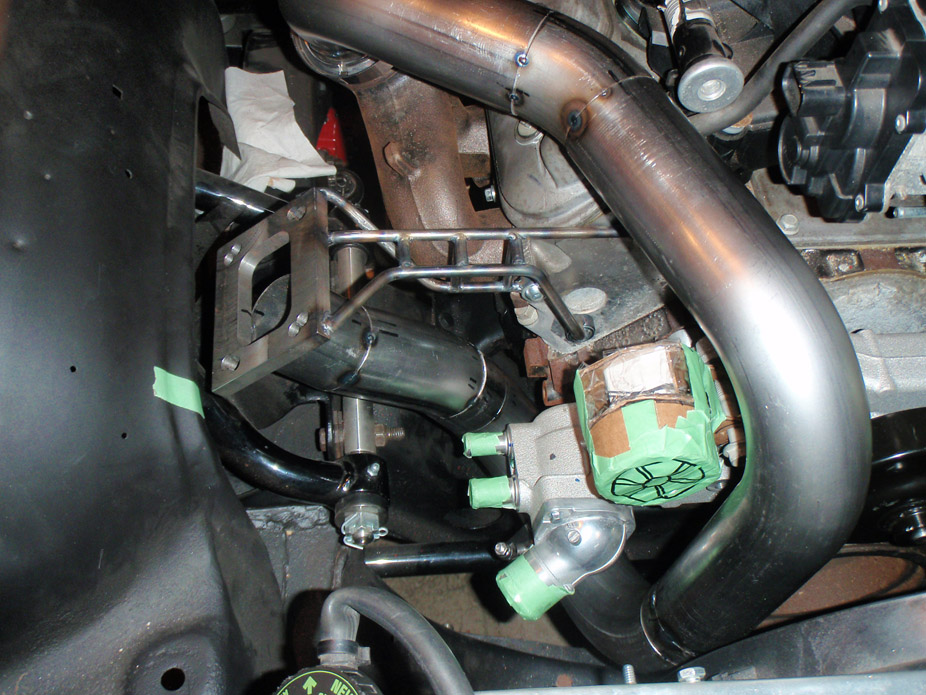
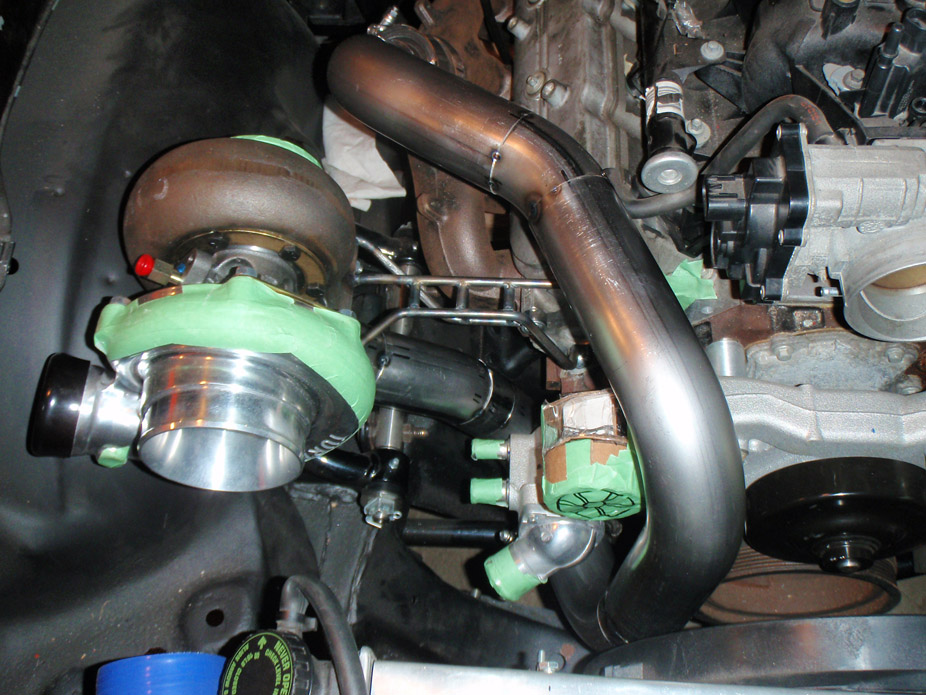
Made a turbo brace. Even with using filler rod to test the bends, it got pretty confusing. I didn't just want a couple rods at random angles supporting the turbo, tried to make the supports look uniform & industrial, to just blend in...


12-20-2010, 12:25 AM
#358
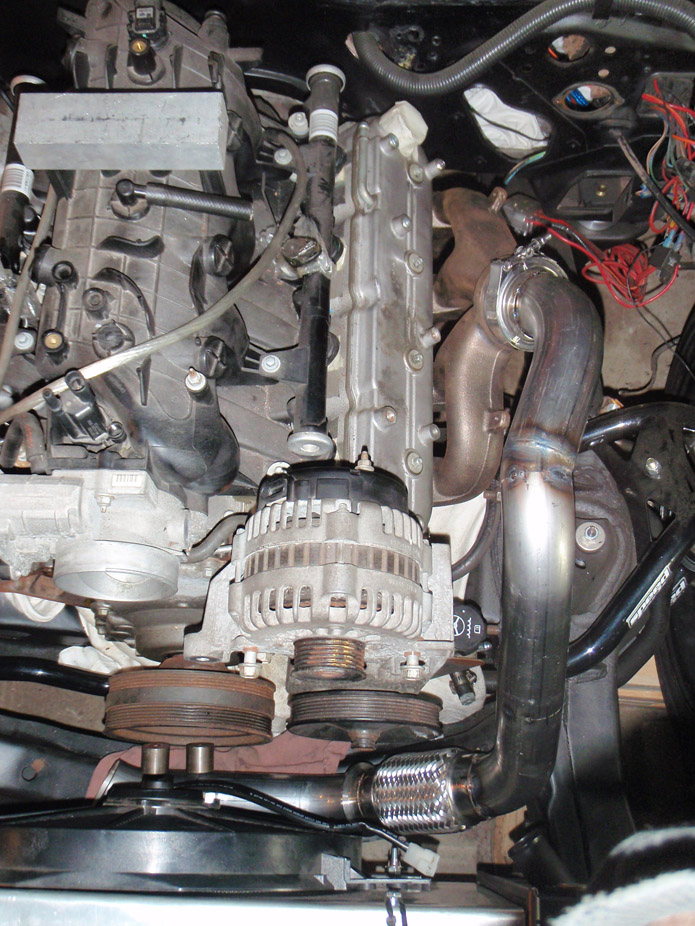
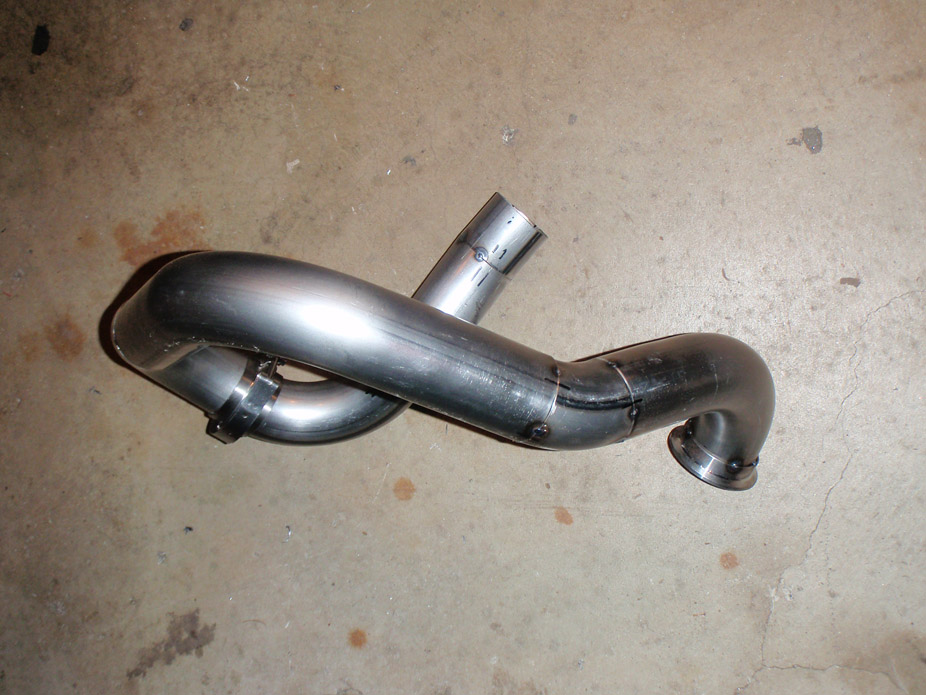
Worked on the passenger side hot pipe, bending over the passenger side valve cover, forward in front of hte waterpump, down in front of the waterpump, under to back behind the pump, then up and sideways, behind the pump and into the merge for the turbo flange...
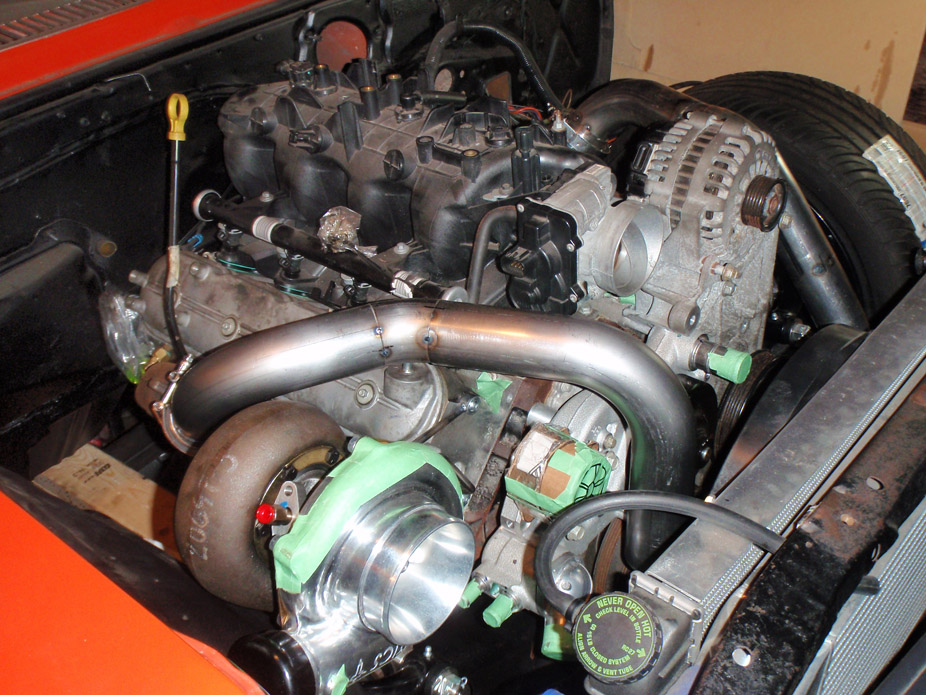

I never would've thought it but electrical tape is great for holding tubes together for mockup...
Resulting passenger side up to flange, without miters for the merge with the driver's side...
Good view of how wonky/wobbly it looks with all the bends...

I never would've thought it but electrical tape is great for holding tubes together for mockup...
Resulting passenger side up to flange, without miters for the merge with the driver's side...
Good view of how wonky/wobbly it looks with all the bends...
12-20-2010, 12:13 PM
#360
I put the turbo there for two main reasons...
1) to make the turbine outlet clear the passenger side manifold as much as possible (but a couple bends will still be needed to maneuver around the manifold's vband)
2) to make more room for the two pipes to come up and merge behind the waterpump and beside the block. With the turbo any closer to the block the pipes would have massive interference with the front corner of the passenger side exhaust manifold, so with the turbo a bit further outwards I can bend the pipes down & out to clear underneath the front of that pass. manifold.
Reqarding the strength of the brace, it's made out of 1/4" drill rod, and it doesn't even flinch when the turbo is placed on it. With turbo on there, I definitely whacked it and tried to move it around, but I ended up shifting the engine on its mounts (!!!) and rolling the car back/forth a bit without doing anything to the brace... I think it should be strong enough