
LQ4 into a 3rd Gen/1972 Nova

 02-24-2011, 07:11 PM
#402
Teching In

Join Date: Oct 2010
Posts: 4
Likes: 0
Received 0 Likes
on
0 Posts
hey im trying to set up my fuel system the same way you had it the first time. ive order everything fuel wise from your engine swap costs pdf. i cant find this tee fitting nor do i get where you used it. pn. 640340 is now a 1"-20 x 6an male flare adapter for quagrajet carb. thanks for any help!
02-27-2011, 11:57 AM
#403

Thanks,
Brandon
02-28-2011, 01:29 AM
#404
72-Nova... That tee fitting was to attach a fuel pressure gauge (to the 1/8" NPT port) to the end of the Russell quick-disconnect fuel rail fitting PN 640850 and then connect to the fuel hose barb fitting PN 624010.
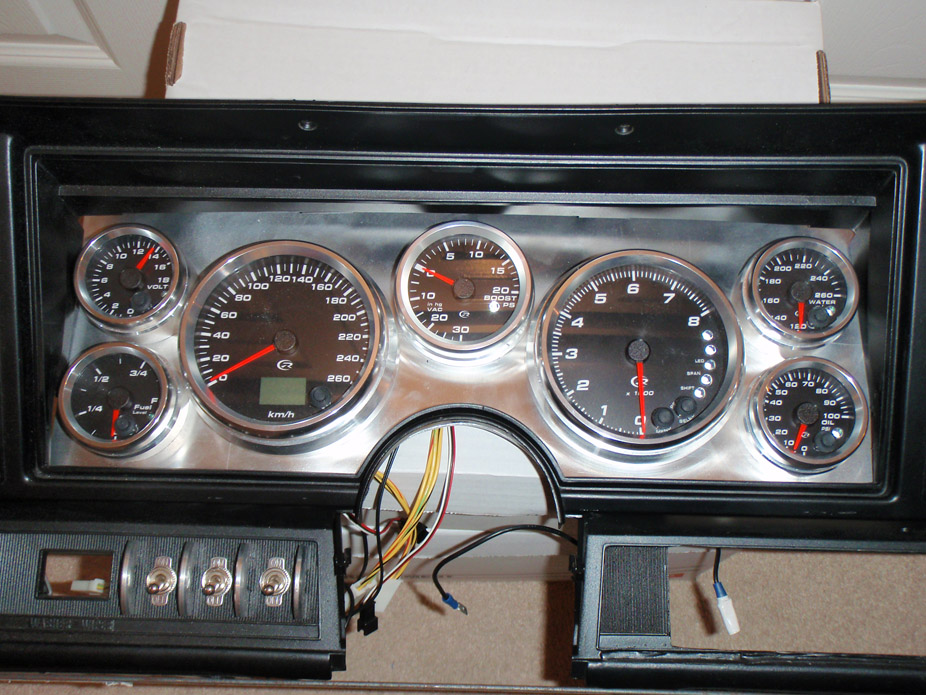
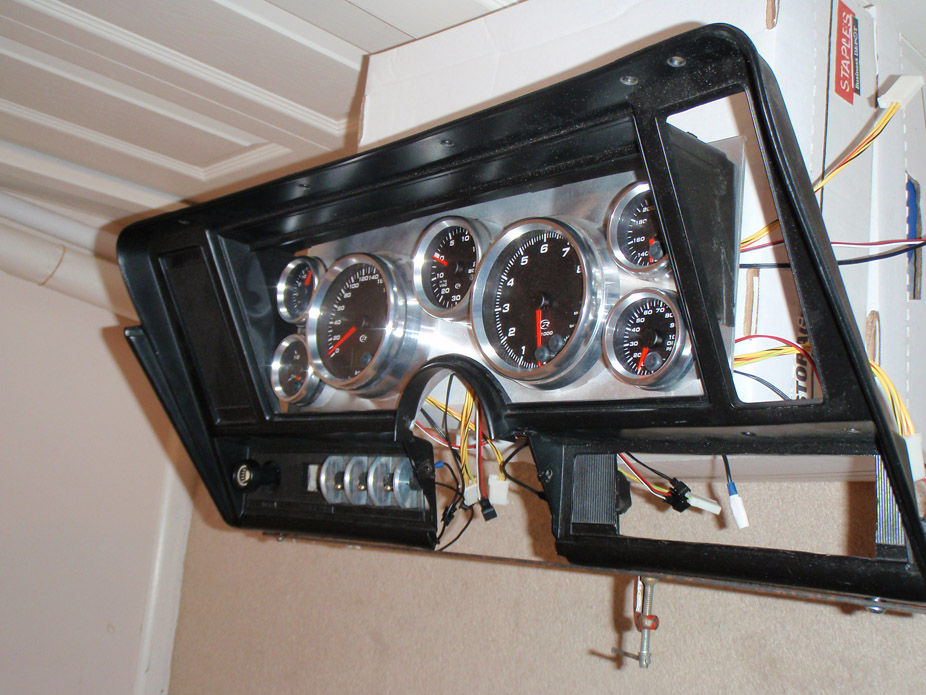
crosstraining... I don't have any pics of the back but I can snap some. I gutted all the plastic tabs and trim with a Dremel. In those pics the plastic surround is just sitting on the aluminum panel... I haven't fabbed anything yet but plan on making a couple bent aluminum tabs and tack them to the backside of the aluminum panel, then glue some aluminum tabs onto the plastic to bolt to. I've gotta get working on that real soon.
crosstraining... I don't have any pics of the back but I can snap some. I gutted all the plastic tabs and trim with a Dremel. In those pics the plastic surround is just sitting on the aluminum panel... I haven't fabbed anything yet but plan on making a couple bent aluminum tabs and tack them to the backside of the aluminum panel, then glue some aluminum tabs onto the plastic to bolt to. I've gotta get working on that real soon.
02-28-2011, 01:38 AM
#405
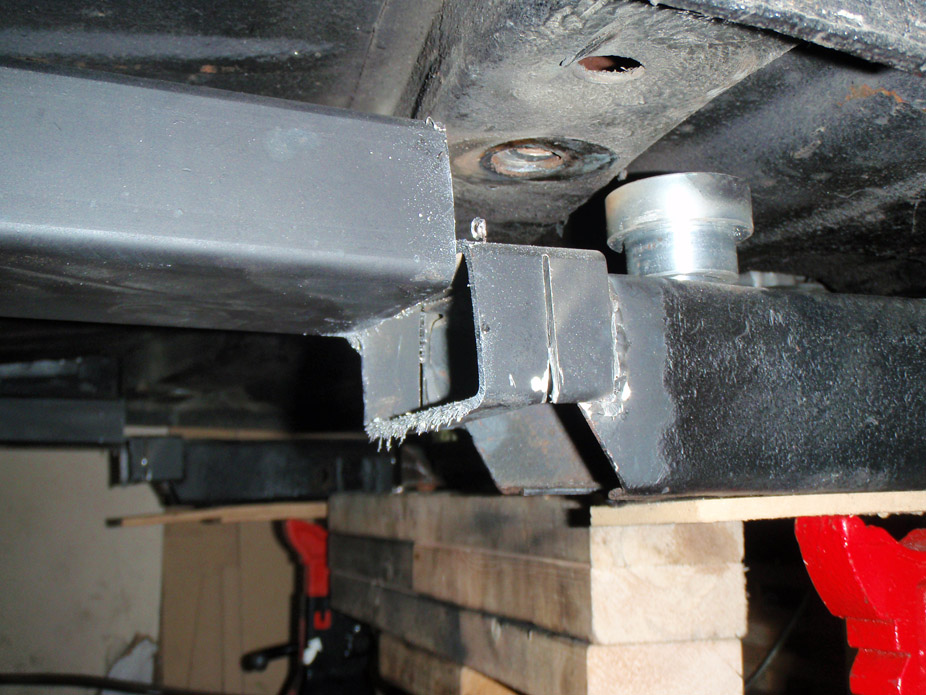
1 step forward, 17 steps back. Out come the body bushings for more lowness, before I can start making the final trans tunnel...
Another step back, so much more cutting...


240SX pedal assembly that I got for practically nothing. I like that each pedal is essentially a self-contained unit that bolts directly to the firewall/respective master cylinder...
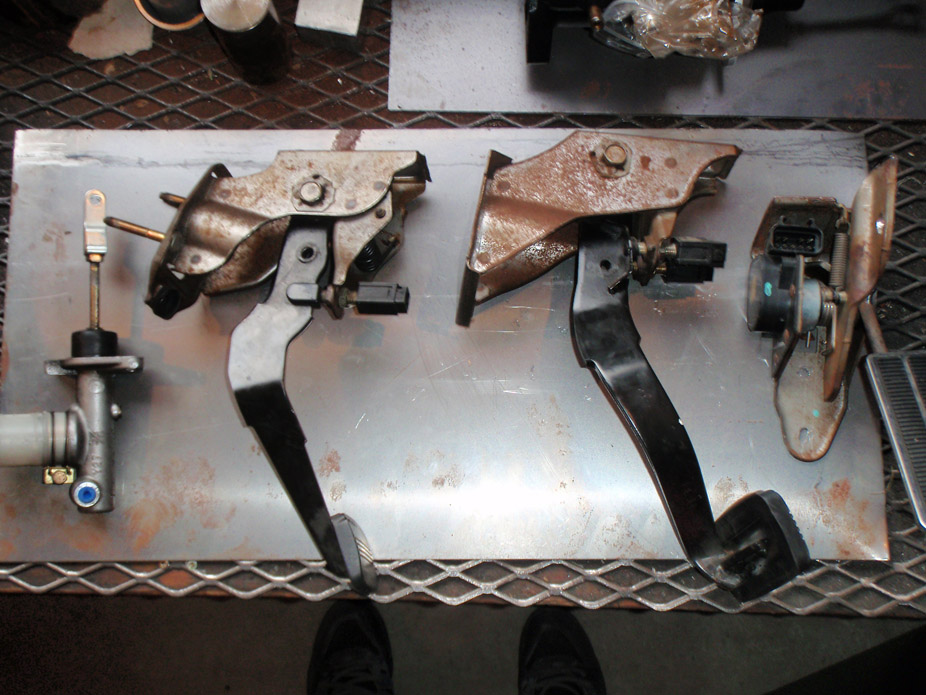
Mocked stuff up. Would like to use a stock 240SX clutch master cylinder but have yet to do the research/math to see if it'll have the right pressure and volume...

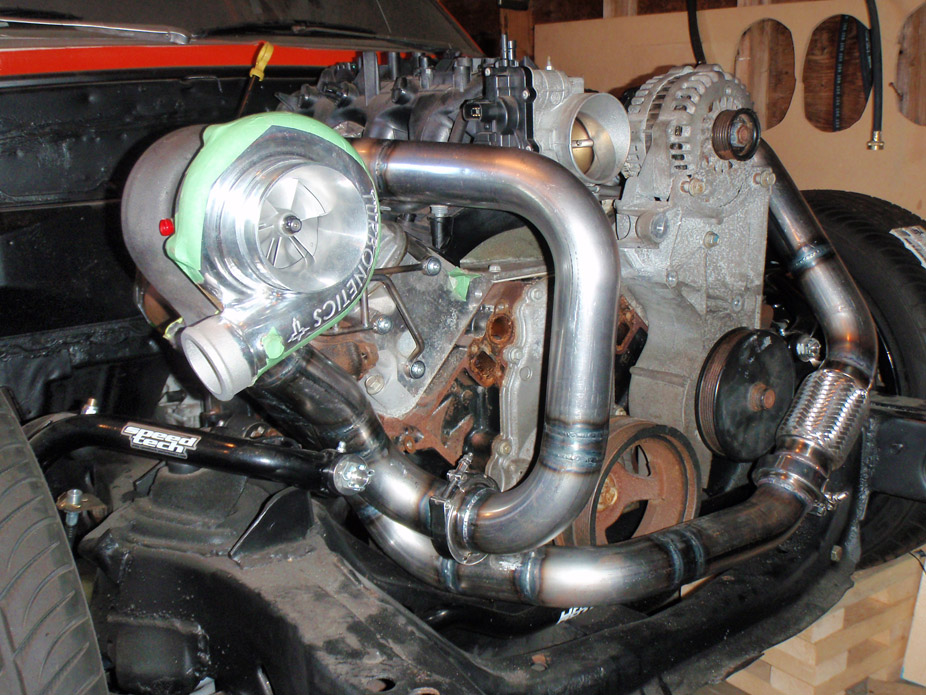
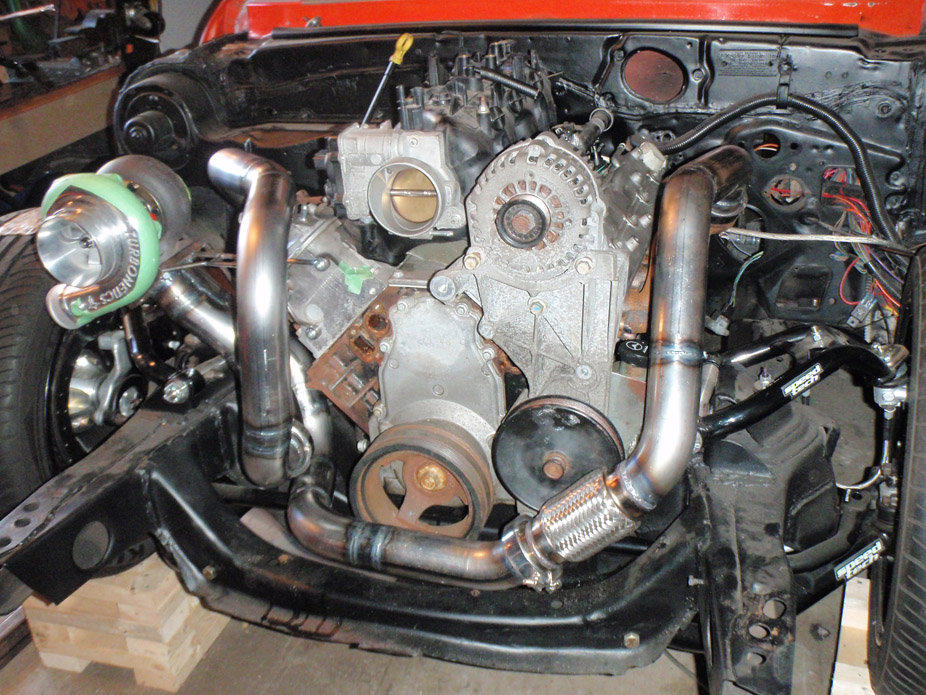
And just some cool shots of mostly final tubing. Still have to weld in a wastegate flange...

Another step back, so much more cutting...
240SX pedal assembly that I got for practically nothing. I like that each pedal is essentially a self-contained unit that bolts directly to the firewall/respective master cylinder...
Mocked stuff up. Would like to use a stock 240SX clutch master cylinder but have yet to do the research/math to see if it'll have the right pressure and volume...
And just some cool shots of mostly final tubing. Still have to weld in a wastegate flange...


 02-28-2011, 08:33 AM
#408
Joe, things are looking good. As always your fab skills are great.
No need for pics.
I grinded those tabs off too. I was able to still get the screws in to hold the acryic.


No need for pics.
I grinded those tabs off too. I was able to still get the screws in to hold the acryic.
02-28-2011, 03:47 PM
#410
Brandon, that looks really good!! And eerily similar  Not as much of the gauge bezel is cut off by the black plastic as I would've thought... looks good!! Get the Speedhut idea from my thread?
The gauge panel you made is tall enough to utilize that plastic lip on the top of the shroud in the back there, to bolt the panel to. I cut the aluminum panel a little too skinny (height wise) so I'm going to weld on a couple aluminum tabs vertically to the top edge of the aluminum panel, so that I can bolt those tabs straight thru to the plastic lip.
Not as much of the gauge bezel is cut off by the black plastic as I would've thought... looks good!! Get the Speedhut idea from my thread?The gauge panel you made is tall enough to utilize that plastic lip on the top of the shroud in the back there, to bolt the panel to. I cut the aluminum panel a little too skinny (height wise) so I'm going to weld on a couple aluminum tabs vertically to the top edge of the aluminum panel, so that I can bolt those tabs straight thru to the plastic lip.
 02-28-2011, 05:56 PM
#412
Brandon, that looks really good!! And eerily similar Not as much of the gauge bezel is cut off by the black plastic as I would've thought... looks good!! Get the Speedhut idea from my thread?
The gauge panel you made is tall enough to utilize that plastic lip on the top of the shroud in the back there, to bolt the panel to. I cut the aluminum panel a little too skinny (height wise) so I'm going to weld on a couple aluminum tabs vertically to the top edge of the aluminum panel, so that I can bolt those tabs straight thru to the plastic lip.
Not as much of the gauge bezel is cut off by the black plastic as I would've thought... looks good!! Get the Speedhut idea from my thread?The gauge panel you made is tall enough to utilize that plastic lip on the top of the shroud in the back there, to bolt the panel to. I cut the aluminum panel a little too skinny (height wise) so I'm going to weld on a couple aluminum tabs vertically to the top edge of the aluminum panel, so that I can bolt those tabs straight thru to the plastic lip.

If I only had the funds to go turbo, it might be your car's twin.
It is a compliment to your great work.
Thanks,
Brandon
and keep up the awsome work.
03-21-2011, 06:29 PM
#413
Bored at school and procrastinating through my last 2 weeks of class ever... now it's time to think of fuel system.
I'm really on the fence between a sumped/baffled in-tank setup or a transfer pump/transfer tank setup...
a) 2 pumps, transfer tank setup:
-low-pressure, high-flow internal or external pump for gas tank
-modify current 3/8" gas tank fuel sender to except some 1/2" setup, possibly even more mods if in-tank pump used
-need to make transfer tank for engine bay
-need new high-flow, high-pressure pump for engine bay (Walbro 255 likely wont be enough)
-more fittings and lines for engine bay = $$$
b) 1 pump - in tank setup:
-new high-pressure, high-flow single in-tank pump
-new gas tank
-need to make baffle setup
-need to make or buy/modify fuel pump holder inside tank
Already have 1/2" supply and 3/8" return aluminum lines for under the car, both would be needed regardless of setup with an adjustable FPR in the engine bay.
A design I've been thinking of a long, long time since I first swapped in the LQ4...
 03-22-2011, 08:19 AM
#415

Your going to build your own tank?
I successfully modded my tank to look almost identical to the model you have drawn.
Currently, I have the same fuel delivery line and return as you and am being told that with two in tank Walbro 340 pumps that I can support 1200 HP, no problem.
I would go down the line of two pumps, a hobs switch to turn on the 2nd one and a boost reference fuel pressure regulator.
03-22-2011, 02:28 PM
#416
I was originally toying with the idea of making my own stainless tank, but I'd be really unsure of the quality of my welds to feel safe about it on a gas tank.
When I say "two pumps", I mean a setup of a low-pressure transfer pump in the rear of the car transferring gas to a smaller transfer tank in the engine bay, where a secondary high-pressure pump would be used to supply to the fuel rails.
A "one pump" setup would just be a high-pressure pump/pumps in the rear of the car, either internal or external, pumping gas directly to the fuel rail.
By my calcs, using the legit Fuel Calculations on RCEng.com, for a slightly-higher-than-what-I-want crank hp...
- 650 crank hp
- 0.80 injector duty cycle
- 56psi fuel pressure (worst-case low pressure requiring highest flow from injectors)
- resulting injector flow = 58 lb/hr
Total injector flow = 58 * 8 = 464 lb/hr
(464 lb/hr) / 6 = 77.33 gph
(77.33 gph) * 3.7849 = 292.7 lph (from conversion site
Thinking about using the Aeromotive in-tank 340lph pump... quite reasonably priced I think at $169...
New Aeromotive 340in tank pump - LS1TECH


At 56psi that pump works right at 300lph at 13.5V, however I remmber my system running around 14.4V, so this should work out well for my slightly-lower-than-caluclated power goal of 550 hp at the crank.
So I'm leaning towards purchasing a new tank (~$125 CDN), welding in some baffling/sump for the pump, and using that Aeromotive pump and skipping the whole transfer pump and engine bay tank setup.
When I say "two pumps", I mean a setup of a low-pressure transfer pump in the rear of the car transferring gas to a smaller transfer tank in the engine bay, where a secondary high-pressure pump would be used to supply to the fuel rails.
A "one pump" setup would just be a high-pressure pump/pumps in the rear of the car, either internal or external, pumping gas directly to the fuel rail.
By my calcs, using the legit Fuel Calculations on RCEng.com, for a slightly-higher-than-what-I-want crank hp...
- 650 crank hp
- 0.80 injector duty cycle
- 56psi fuel pressure (worst-case low pressure requiring highest flow from injectors)
- resulting injector flow = 58 lb/hr
Total injector flow = 58 * 8 = 464 lb/hr
(464 lb/hr) / 6 = 77.33 gph
(77.33 gph) * 3.7849 = 292.7 lph (from conversion site
Thinking about using the Aeromotive in-tank 340lph pump... quite reasonably priced I think at $169...
New Aeromotive 340in tank pump - LS1TECH
At 56psi that pump works right at 300lph at 13.5V, however I remmber my system running around 14.4V, so this should work out well for my slightly-lower-than-caluclated power goal of 550 hp at the crank.
So I'm leaning towards purchasing a new tank (~$125 CDN), welding in some baffling/sump for the pump, and using that Aeromotive pump and skipping the whole transfer pump and engine bay tank setup.
03-22-2011, 07:37 PM
#417
Procrastinating can really be productive sometimes, believe it or not.
I'm really leaning towards a single in-tank pump setup. Doing lots of reading, the Aeromotive Stealth 340 pump listed above does seem like the most economical choice for my power and driving goals.
Next choice, how crazy to get when modifying a a virgin-steel new gas tank? The holed baffles are quite unlikely due to wanting to keep the access hold in the tank fairly small, but might be possible if done before the patch is welded in for the initial cutout for the access hole recess. Still leaning heavily towards the trap-door setup shown and updated below...
03-22-2011, 10:30 PM
#419
TECH Regular
iTrader: (12)
Join Date: May 2010
Location: Waxahachie, Tx
Posts: 446
Likes: 0
Received 0 Likes
on
0 Posts

Nice build!
I'm getting all sorts of ideas for my next project.
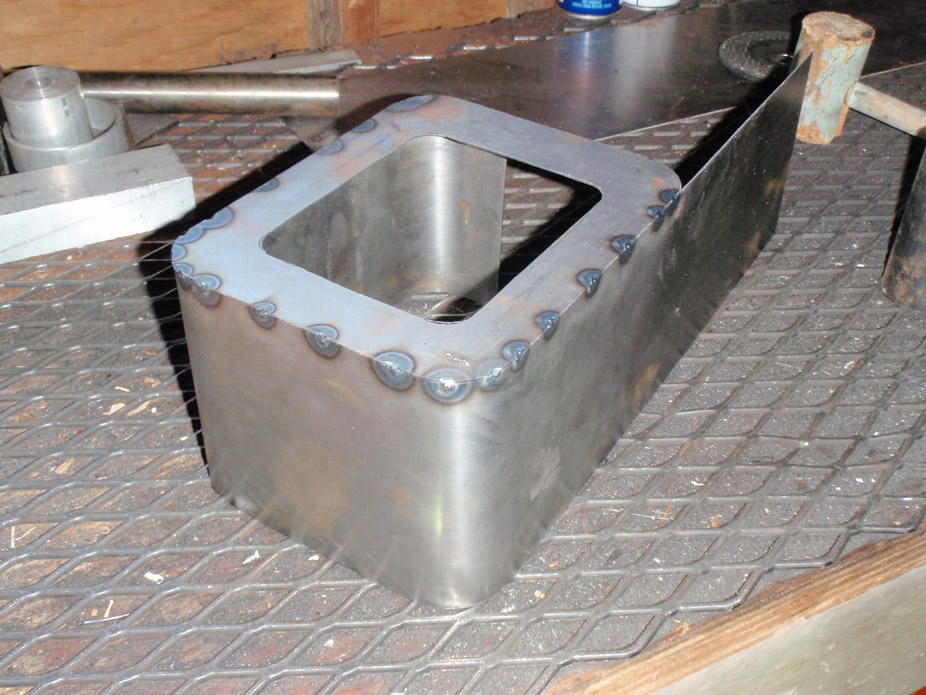
If hanging the sump from the notch in the top, consider adding a reinforcement flange along the top edge. The stock tanks are pretty thin and fuel slosh will be banging into the sump 6" or so of leverage on that weld.
I spent a ton of time thinking about the pump setup too for my old Camaro. Came to the same conclusion you did.
That CE sump just looks so much easier. But it's ugly on a Nova or Camaro.
I'm getting all sorts of ideas for my next project.
If hanging the sump from the notch in the top, consider adding a reinforcement flange along the top edge. The stock tanks are pretty thin and fuel slosh will be banging into the sump 6" or so of leverage on that weld.
I spent a ton of time thinking about the pump setup too for my old Camaro. Came to the same conclusion you did.
That CE sump just looks so much easier. But it's ugly on a Nova or Camaro.
03-22-2011, 11:02 PM
#420
Thanks... I thought of this, but wouldn't having the return ~1-2" away from the pickup introduce some aeration/bubbles and possibly cavitate the pump? I know having the return fuel exit as low in the tank as possible helps with this, but would it be good enough if it were in such an enclosed space like that sump?