

The Turbo Ta Build Thread

9 Second Club


Joined: Oct 2006
Posts: 1,190
Likes: 237
From: IL
Progress continues slowly but surely. We have been knocking out more small tedious things, just plugging away for the last couple of weeks. Some of the bigger things that have been done include the dash being mounted in for the last time. Also Chris trimmed the dash pad to fit around the cage and we got that installed as well
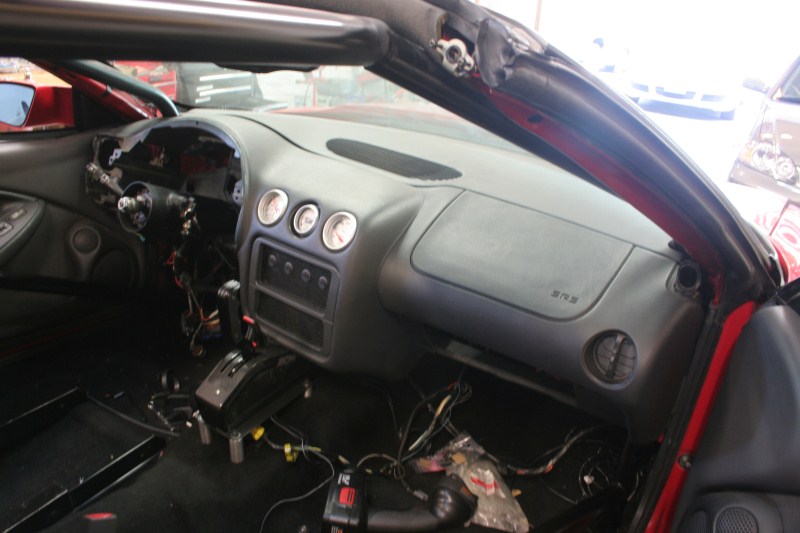
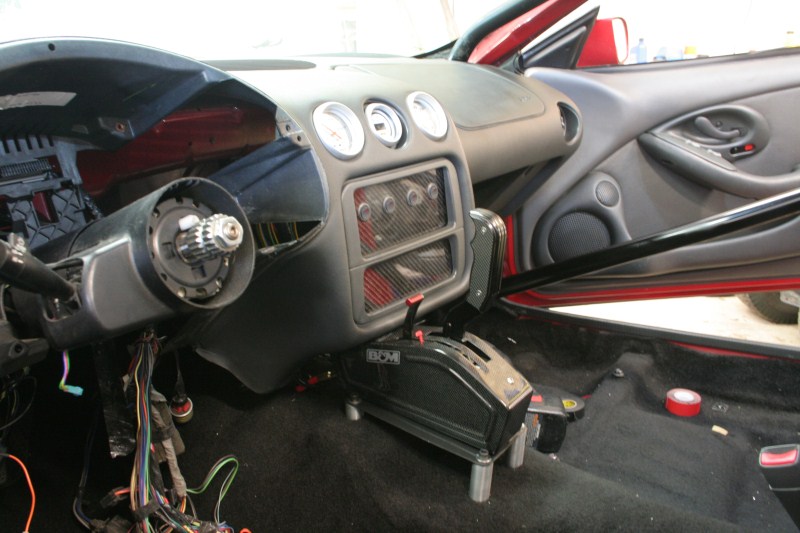
It doesn't look very exciting, but it is a major part finally done. Chris also made a support for the passenger side of the dash, since it wanted to sag without the heavy factory cross bar. He has also been cleaning up the wiring, and adding what we need for various things. There is still more to be done but we are waiting on some terminals, and other supplies. Once the wiring is done then we need to mount the harness, and install the seats and its is done.
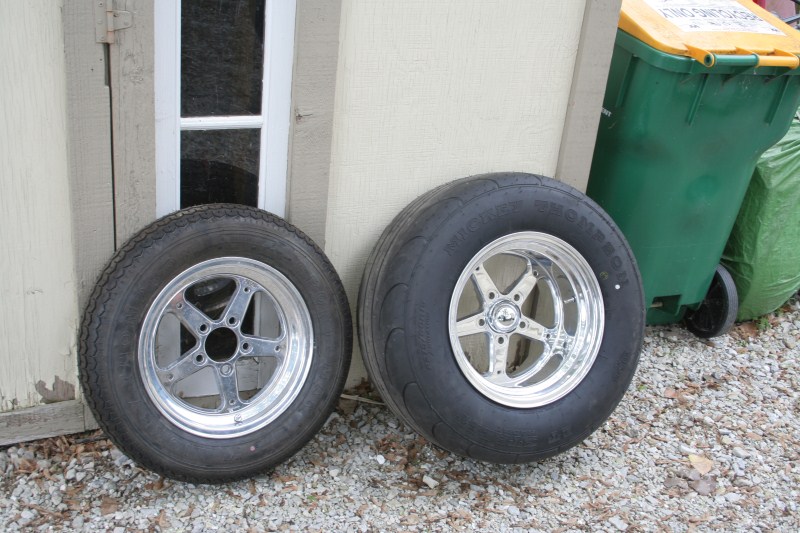
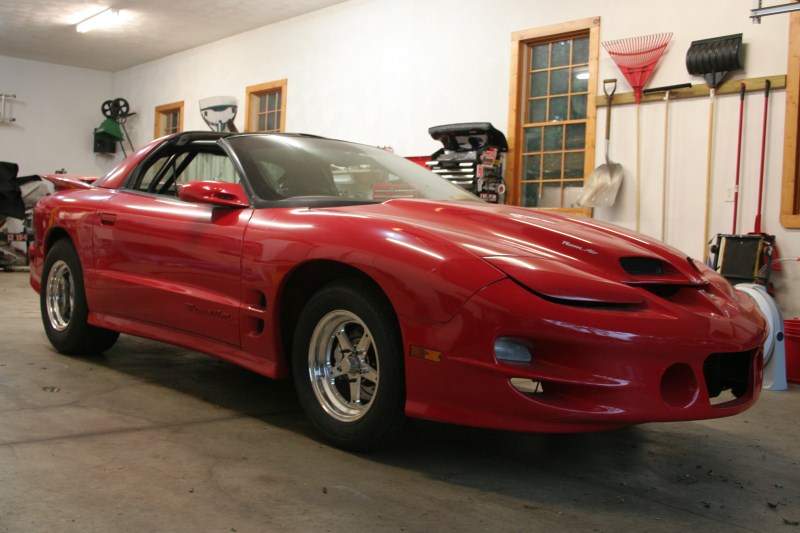
Next comes the rear wheels! Once the decision was made to narrow the rear end it was just a matter of picking the right backspace for the wheels which turned out awesome.
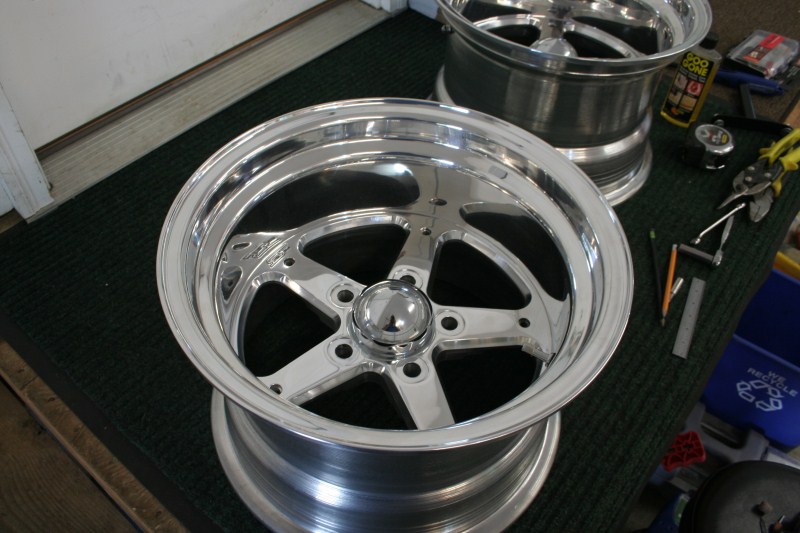
And next to the Mickey Thompson 275/60 drag radials (28x10.5)
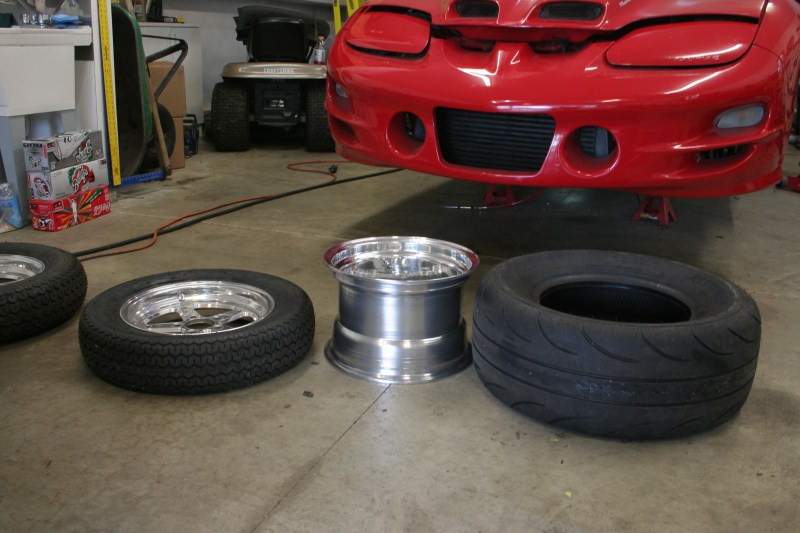
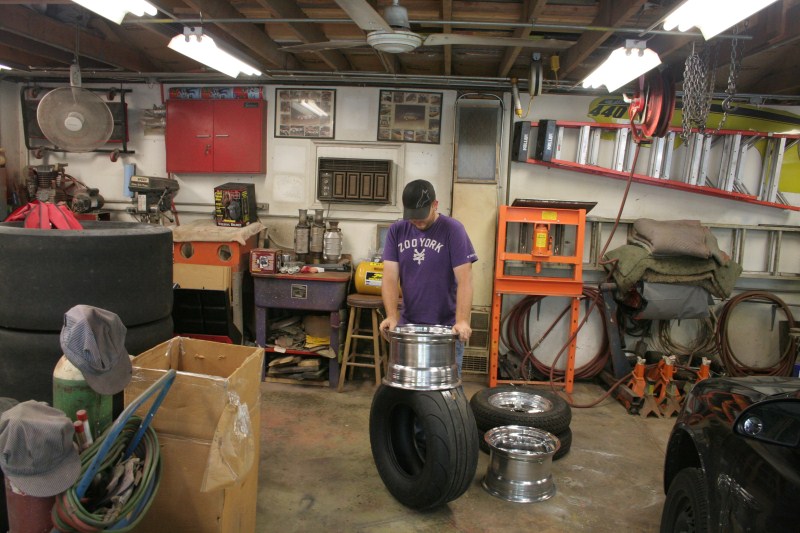
The reason the front runners were off was because we needed to pop the tires off and tighten the valve stems (I forgot to do this when I mounted them the first time around). Here you can see Chris in my bosses garage trying to figure out how the hell these go together.
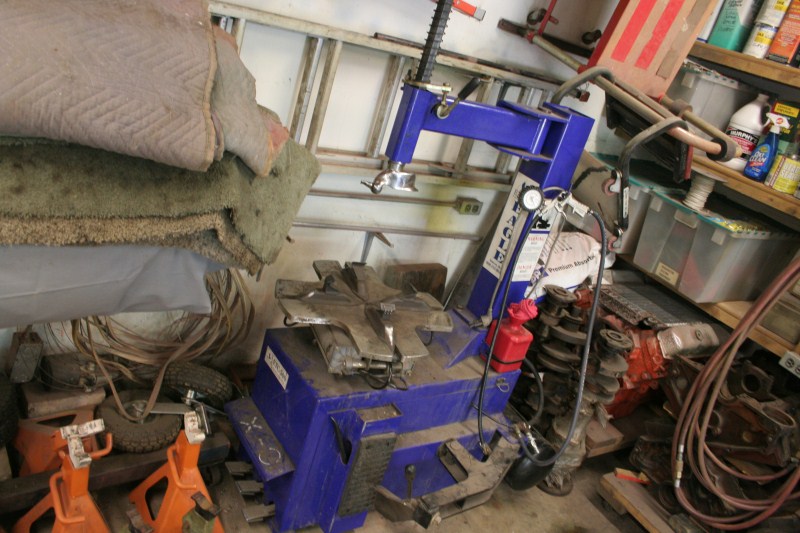
Luckily inside this garage is this...
And this...
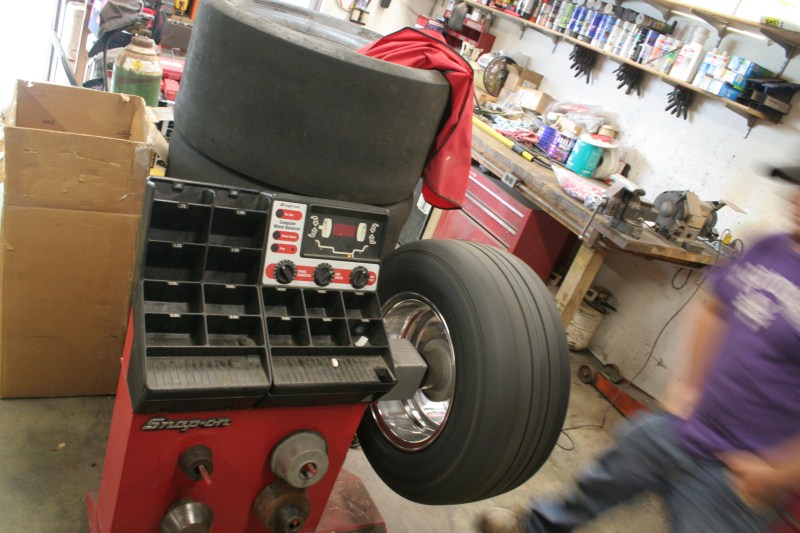
So in no time we have the wheels mounted and balanced (one of the rears only needed 1oz!) Here is the end result
Chris had to do some massaging to the driver wheel well (other than cutting out the bump stops which we did a while back) to get the 28's to fit, but it was worth it in the end.
(The hatch is open in this pic)
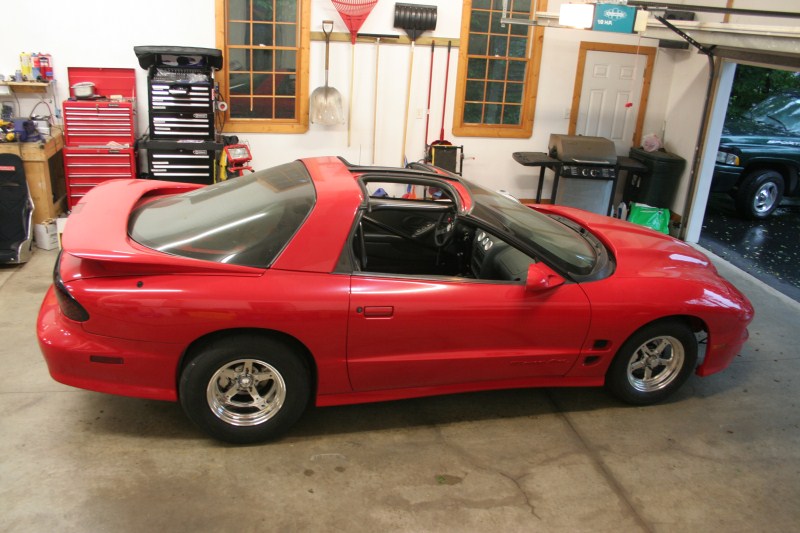
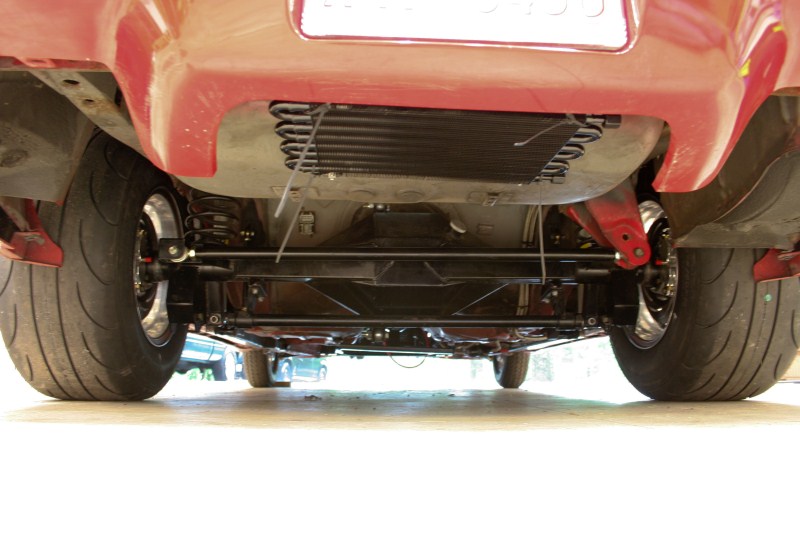
In this one you can see that the gas tank is back in (another big piece of the puzzle that is done) and the trans cooler (minus fan) mounted. We installed it in the back for a couple of reasons, but mainly packaging. There is a lot in the front of the car, we didn't need to add more.
After changing the rear wheel studs to some longer ones (3") we loaded the car up on the trailer. since it was storming real bad out, we just parked it all in the garage
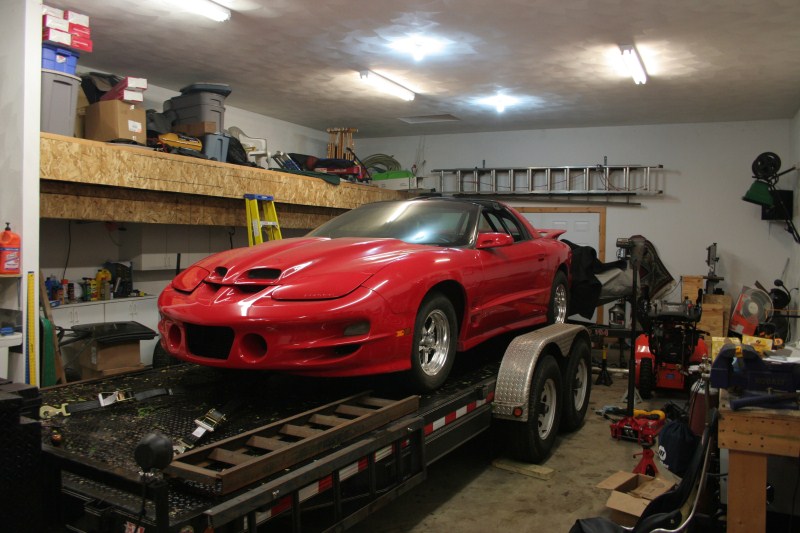
And still had plenty of room for the cars!
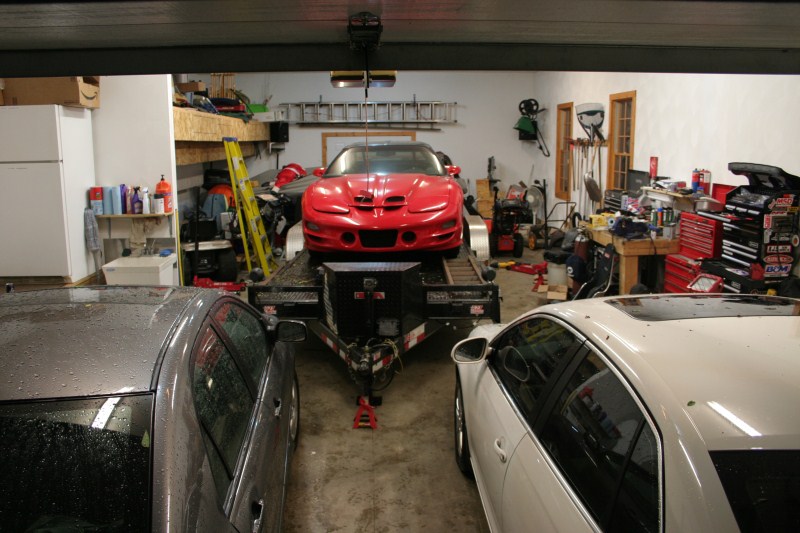
And yes that is a boat in the back too! So for anyone counting, there is a 17' bass boat, a 20' car hauler with the TA on it, a Jetta, and a Corolla, plus the riding mower, huge snow blower, work bench, three tool boxes, etc etc etc. It was a little tight in there to say the least. But it is very nice to have this much space available.
The reason the car is on the trailer is brakes. We were going to attack these ourselves (they really aren't that hard) but we found out that we would need at least one flare tool (37*) and probably a better 45* double wall flare tool. Once you buy the two flare tools, and the couple of fittings and extra line we needed the cost was equal to having a local hot rod shop bend them up for us. So today we drove it down the road 15min and dropped it off, we should get it back by the weekend. Once we get it back we can finally put the motor in! We wanted it out for the brakes so it wouldn't be in the way.
Well that is all for now, thanks for looking!
Sean
It doesn't look very exciting, but it is a major part finally done. Chris also made a support for the passenger side of the dash, since it wanted to sag without the heavy factory cross bar. He has also been cleaning up the wiring, and adding what we need for various things. There is still more to be done but we are waiting on some terminals, and other supplies. Once the wiring is done then we need to mount the harness, and install the seats and its is done.
Next comes the rear wheels! Once the decision was made to narrow the rear end it was just a matter of picking the right backspace for the wheels which turned out awesome.
And next to the Mickey Thompson 275/60 drag radials (28x10.5)
The reason the front runners were off was because we needed to pop the tires off and tighten the valve stems (I forgot to do this when I mounted them the first time around). Here you can see Chris in my bosses garage trying to figure out how the hell these go together.
Luckily inside this garage is this...
And this...
So in no time we have the wheels mounted and balanced (one of the rears only needed 1oz!) Here is the end result
Chris had to do some massaging to the driver wheel well (other than cutting out the bump stops which we did a while back) to get the 28's to fit, but it was worth it in the end.
(The hatch is open in this pic)
In this one you can see that the gas tank is back in (another big piece of the puzzle that is done) and the trans cooler (minus fan) mounted. We installed it in the back for a couple of reasons, but mainly packaging. There is a lot in the front of the car, we didn't need to add more.
After changing the rear wheel studs to some longer ones (3") we loaded the car up on the trailer. since it was storming real bad out, we just parked it all in the garage
And still had plenty of room for the cars!
And yes that is a boat in the back too! So for anyone counting, there is a 17' bass boat, a 20' car hauler with the TA on it, a Jetta, and a Corolla, plus the riding mower, huge snow blower, work bench, three tool boxes, etc etc etc. It was a little tight in there to say the least. But it is very nice to have this much space available.
The reason the car is on the trailer is brakes. We were going to attack these ourselves (they really aren't that hard) but we found out that we would need at least one flare tool (37*) and probably a better 45* double wall flare tool. Once you buy the two flare tools, and the couple of fittings and extra line we needed the cost was equal to having a local hot rod shop bend them up for us. So today we drove it down the road 15min and dropped it off, we should get it back by the weekend. Once we get it back we can finally put the motor in! We wanted it out for the brakes so it wouldn't be in the way.
Well that is all for now, thanks for looking!
Sean
9 Second Club
Joined: Oct 2006
Posts: 1,190
Likes: 237
From: IL
Well just a quick update this week, mostly because I didn't get a lot of pictures. As I said last week, we dropped the car off at Hot Rods by Huber in Stillman Valley to get the brake lines done, and we picked it up Friday afternoon. Apparently our idea of having the lines done was a good one. They had problems flaring the stainless line even with a very expensive Snap-On Hydraulic tool! Here is a couple of shitty pics of the front lines under the hood. I don't know why they all turned out like crap, but you get the idea anyway.
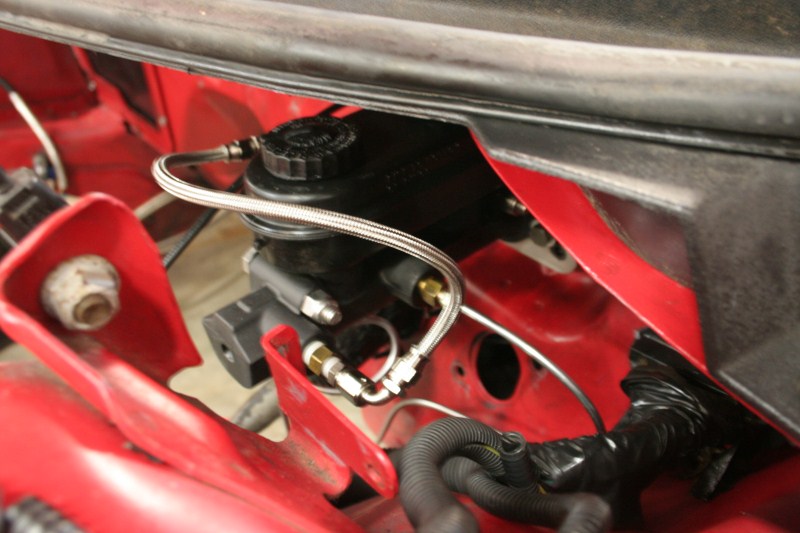
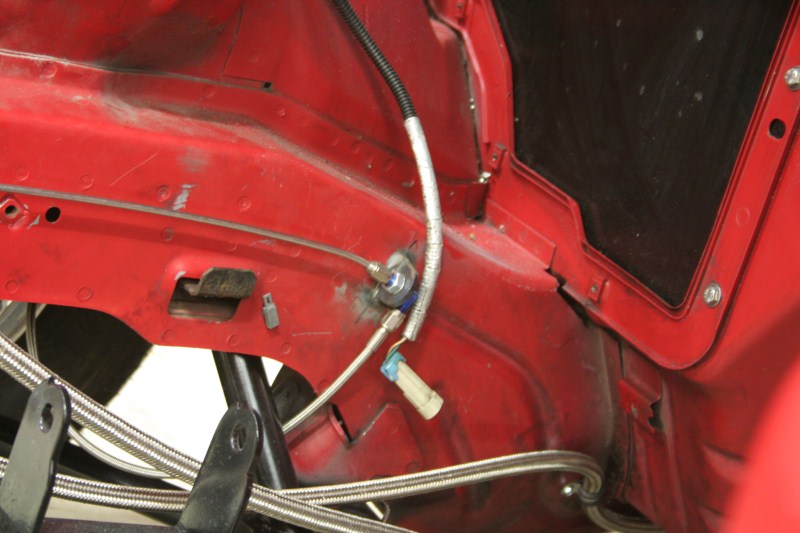
Thats all that is worth posting right now. When we get the car up in the air and get the wheels off I will have a couple more (and they wont suck).
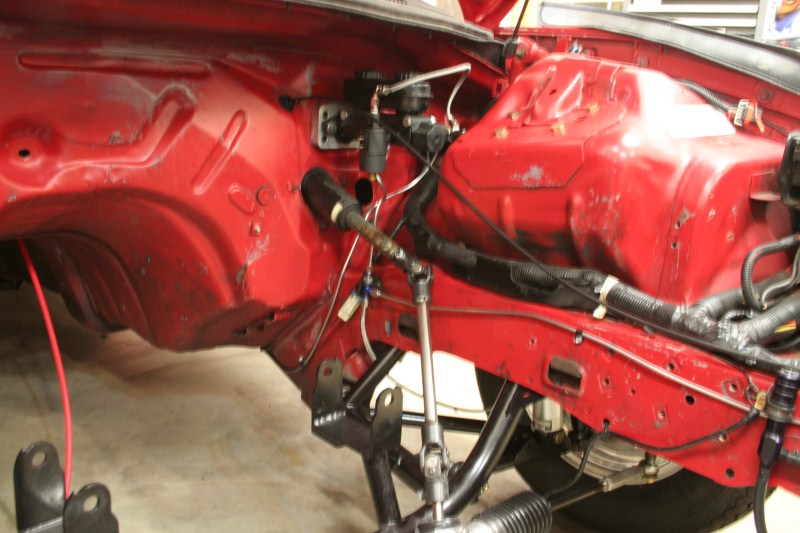
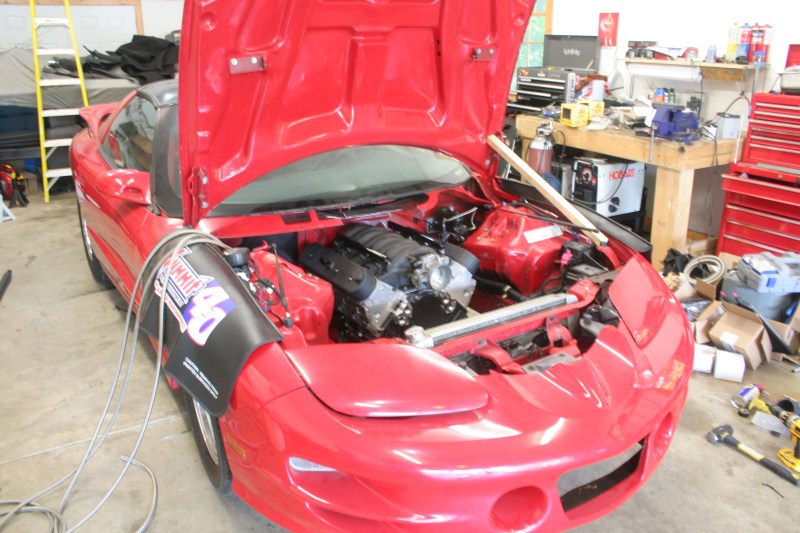
Now that the brake lines are in, we can move on to the real wokr....putting in the motor! If you have never installed a motor in a 4th gen F-body, let me tell you it is a pain in the ***. It took muscle, sweat, a load leveler, some jacks, some cutting, and brain power to get that SOB in. I had my camera in the house over night and it fogged up when I brought it outside, so the pics don't start until part way through the process.
Here you can see where we cut the center of the cowl out to give the motor and the leveler clearance to go backward. Unfortunately that only got us so far, and the chains on the back were touching the windshield. So we put the back of the motor on a jack and un-did the rear chains.
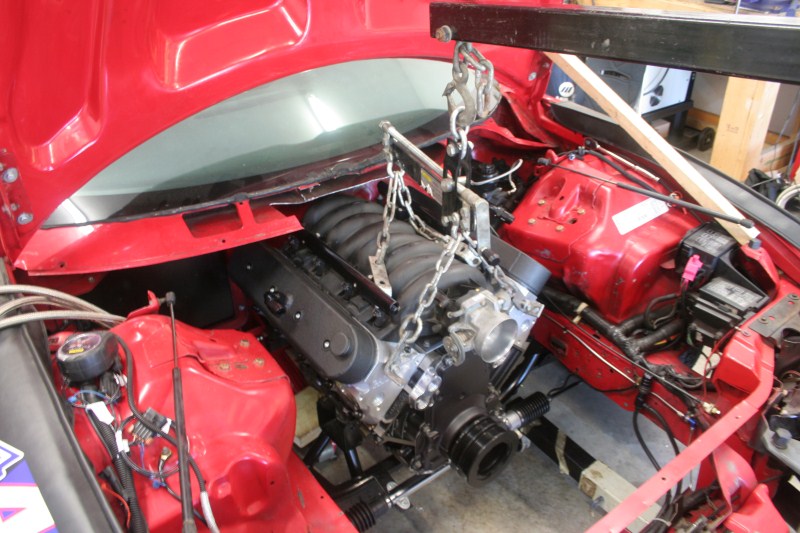
Then we moved the leveler all the way forward so that the back of it would go up over the windshield (and give us some more room with the hoist).
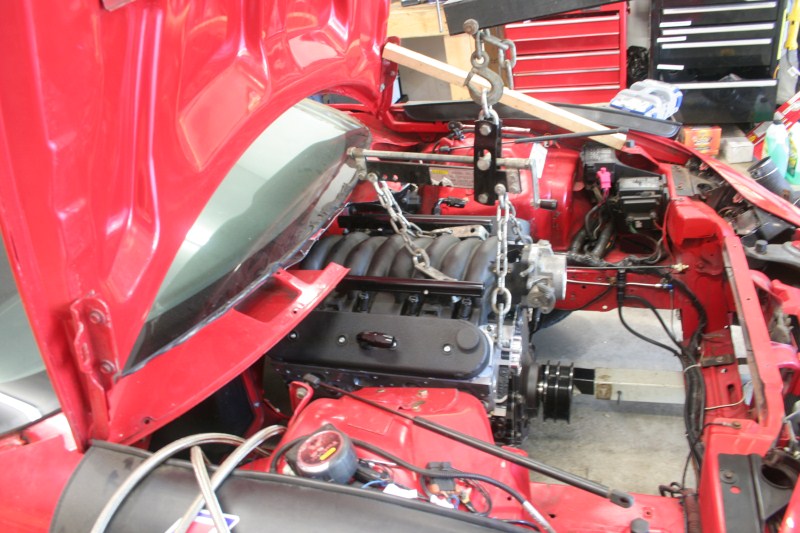
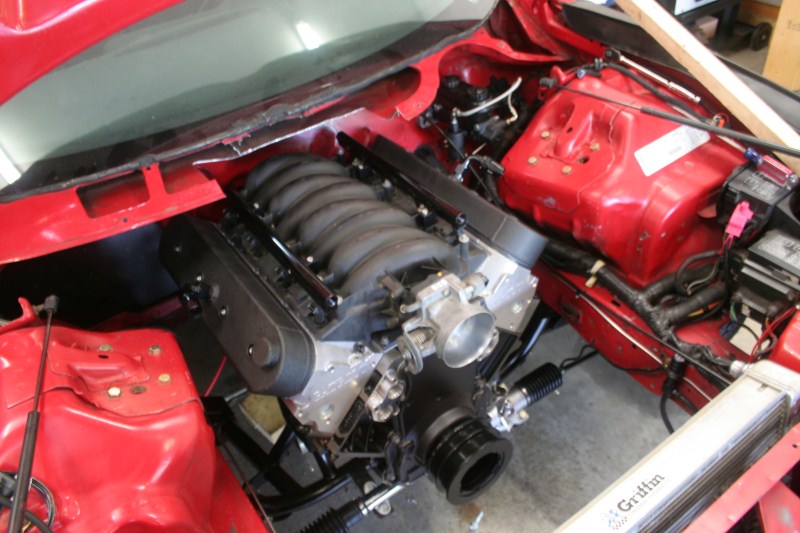
With the motor on the jack we were able to go back far enough to line the mounts up with the saddles, but we couldn't lower the motor (since we had to take the handle off of the jack to get it under the car). So then we had to jack the car up to the motor and muscle it the rest of the way. But after not to long it was in the car and off the hoist!!!
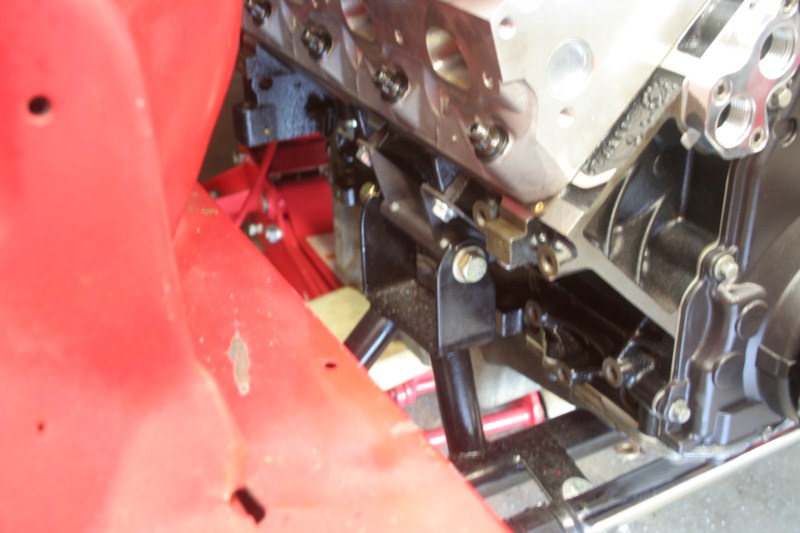
Here you can see the solid mounts from Midwest Chassis, and the jack in the background
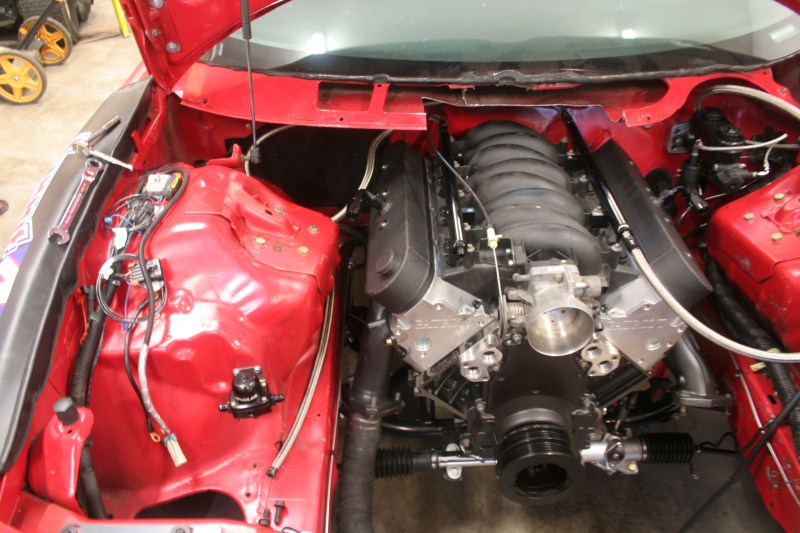
Once the motor was in the car we began the planning stages for the rest of the work we need to do. We have a lot to package in the car, and not so much room. Once we laid out how/where we were going to put the battery, the water pump, the catch can, and the regulator we started to plumb the fuel system from the back. Here you can see the lines feeding the back of the rails, we are actually going to change the fittings from the straights to 90's so the line isn't bent so tight. You can also see the fuel pressure regulator mounted and the return line ready to be terminated.
Here you can see where the -8 comes from the filter into the "Y" and splits to two -6's to feed the rails. It is in this location for a couple of reasons but mostly so we can get at it easily.

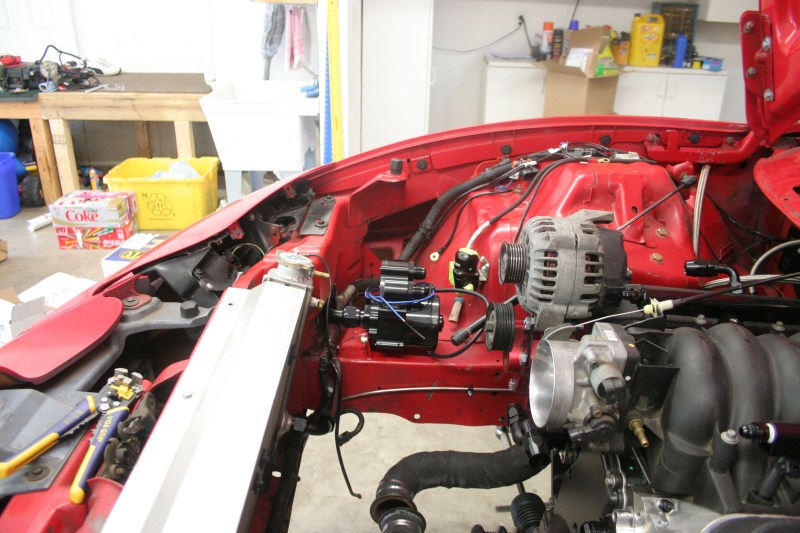
That is as far as we got while I was still taking pictures. At that point we started to plumb the rails to the regulator and needed to install the alternator to see how it would affect the routing of lines. Well it turns out that caused a couple of problems. The first, and most obvious one, was the clearance on the passenger side rail. Because of its position we will need to change the hose end for that side (if you are keeping track we have needed to change quite a few fittings from what we planned without the car in front of us). The second problem brings up back to the water pump, again. The alternator bracket that we have used a piece that bolted on to a part of the factory water pump (as far as we can tell). As you all know the factory water pump is long gone, and so is the factory replacement electric (because of the alternator ironical enough), so out comes the welder to fix that problem. After staring at it for a while, and trying my hardest to convince Chris to just get rid of the alternator all together and go to a 16v system he finally came up with a solution. Ill have pictures of it later, but basically it is a piece of flat stock that bolts to two existing holes in the head, and then two braces that come up to support the lower part of the bracket. It was easy enough to make, and it solved the problem.
That is all for now, but we should be only a couple of weekends worth of work from getting this thing running again! Thanks for looking!
Sean
Thats all that is worth posting right now. When we get the car up in the air and get the wheels off I will have a couple more (and they wont suck).
Now that the brake lines are in, we can move on to the real wokr....putting in the motor! If you have never installed a motor in a 4th gen F-body, let me tell you it is a pain in the ***. It took muscle, sweat, a load leveler, some jacks, some cutting, and brain power to get that SOB in. I had my camera in the house over night and it fogged up when I brought it outside, so the pics don't start until part way through the process.
Here you can see where we cut the center of the cowl out to give the motor and the leveler clearance to go backward. Unfortunately that only got us so far, and the chains on the back were touching the windshield. So we put the back of the motor on a jack and un-did the rear chains.
Then we moved the leveler all the way forward so that the back of it would go up over the windshield (and give us some more room with the hoist).
With the motor on the jack we were able to go back far enough to line the mounts up with the saddles, but we couldn't lower the motor (since we had to take the handle off of the jack to get it under the car). So then we had to jack the car up to the motor and muscle it the rest of the way. But after not to long it was in the car and off the hoist!!!
Here you can see the solid mounts from Midwest Chassis, and the jack in the background
Once the motor was in the car we began the planning stages for the rest of the work we need to do. We have a lot to package in the car, and not so much room. Once we laid out how/where we were going to put the battery, the water pump, the catch can, and the regulator we started to plumb the fuel system from the back. Here you can see the lines feeding the back of the rails, we are actually going to change the fittings from the straights to 90's so the line isn't bent so tight. You can also see the fuel pressure regulator mounted and the return line ready to be terminated.
Here you can see where the -8 comes from the filter into the "Y" and splits to two -6's to feed the rails. It is in this location for a couple of reasons but mostly so we can get at it easily.
That is as far as we got while I was still taking pictures. At that point we started to plumb the rails to the regulator and needed to install the alternator to see how it would affect the routing of lines. Well it turns out that caused a couple of problems. The first, and most obvious one, was the clearance on the passenger side rail. Because of its position we will need to change the hose end for that side (if you are keeping track we have needed to change quite a few fittings from what we planned without the car in front of us). The second problem brings up back to the water pump, again. The alternator bracket that we have used a piece that bolted on to a part of the factory water pump (as far as we can tell). As you all know the factory water pump is long gone, and so is the factory replacement electric (because of the alternator ironical enough), so out comes the welder to fix that problem. After staring at it for a while, and trying my hardest to convince Chris to just get rid of the alternator all together and go to a 16v system he finally came up with a solution. Ill have pictures of it later, but basically it is a piece of flat stock that bolts to two existing holes in the head, and then two braces that come up to support the lower part of the bracket. It was easy enough to make, and it solved the problem.
That is all for now, but we should be only a couple of weekends worth of work from getting this thing running again! Thanks for looking!
Sean


 but your Nova is sick)
9 Second Club
Joined: Oct 2006
Posts: 1,190
Likes: 237
From: IL

So far we have not had any problems with the radiator/core support. The way it is it can come straight up and out. I don't think we are opposed to the idea of making it completely removable latter though. Maybe when we build the new turbo kit we will do that to gain some more space as well.
Sean
My cobalt?!?! This is not my car, I just work on it and occasionally get to drive it
So far we have not had any problems with the radiator/core support. The way it is it can come straight up and out. I don't think we are opposed to the idea of making it completely removable latter though. Maybe when we build the new turbo kit we will do that to gain some more space as well.
Sean
So far we have not had any problems with the radiator/core support. The way it is it can come straight up and out. I don't think we are opposed to the idea of making it completely removable latter though. Maybe when we build the new turbo kit we will do that to gain some more space as well.
Sean
anyways, thats a nice car you work on
Chris

Anyways, the problem is more with the alternator being on the head. I could of run the street version of the pump, with has a pulley on it for the belt, or im sure we could of made some type of bracket that adds a idler, or moved the alternator down a little... It would definatly require some fabing.
Thanks, Chris
9 Second Club
Joined: Oct 2006
Posts: 1,190
Likes: 237
From: IL
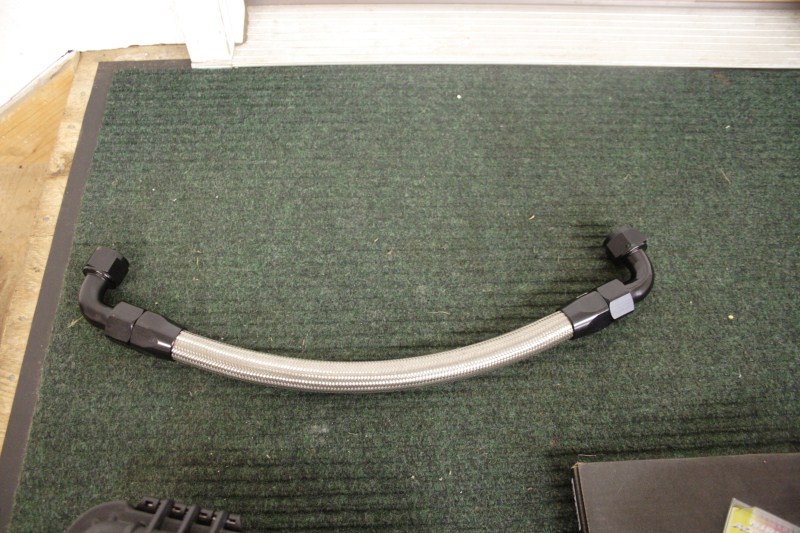
Well boys and girls, we got back after it this weekend and got some work done! After taking the holiday weekend off we spent Friday night, and all day Saturday working on the car. We started out by finally mounting the water pump. We had actually decided where we wanted it a couple of weeks ago, but I was hesitant on welding in the bracket "just in case". Well Friday came around and I said **** it! I double checked everything, cleaned up the metal and welded it in. Once that was done I started to make the lower radiator hose which was a -16 from the pump to the radiator. Thats when Chris said, "Are we sure it will clear the turbo?", to which I replied "Of course it will, it should be no where near it!". Well wouldn't you know it, the turbo was in the way of the planned routing. No big deal, just cut some metal out of the way, flip the fittings around and run the line around the frame rail in the area behind the bumper.
Here is the line I whipped up...
And here is the final product with the pump mounted and just the -16 run.
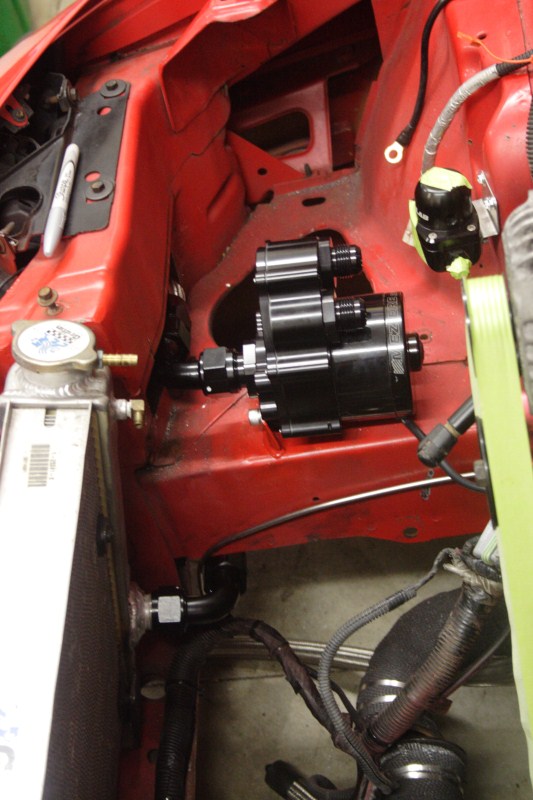
Here it is with the harness back in place.
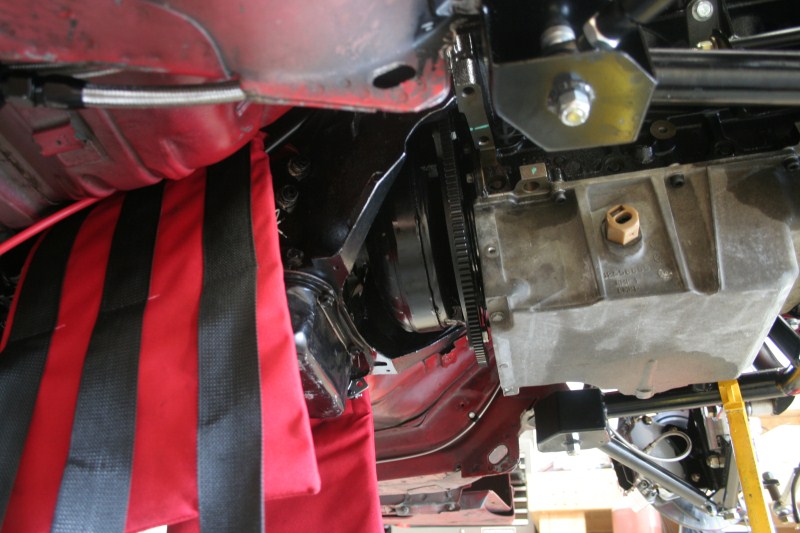
Next up was the transmission, which as you could imagine was not something I could take pictures of during the process. It did go relatively smooth however so that was good. Started by throwing a quart of trans fluid in the converter.
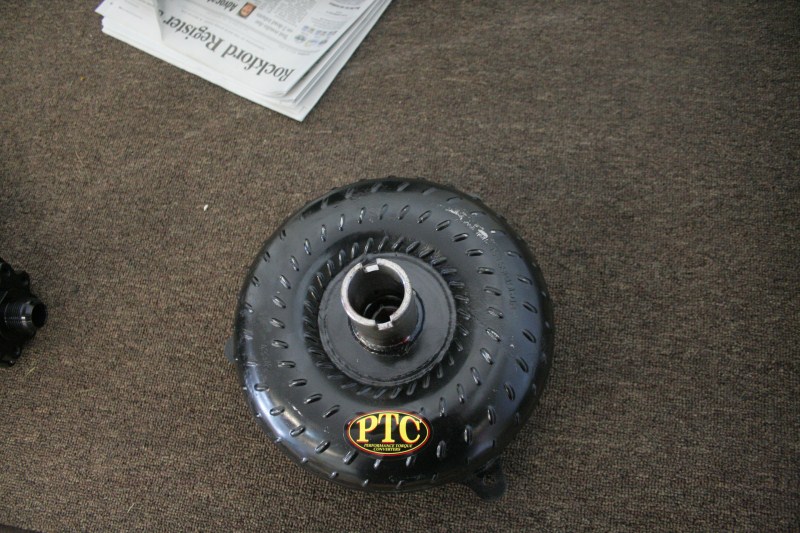
Then we put the TCI flex plate in (no pictures), put the converter in the trans making sure we properly engaged the pump (no pictures), and got ready to put the trans in. This was not as bad as we thought, but we planned well and took our time. Everything lined up the way it was supposed to the very first time and just fell into place. The hardest part of the whole process was installing the trans blanket. Also for anyone wondering we installed the dipstick AFTER the trans was in!!
Here it is all bolted in! The pan is going to be replaced, we didn't realize how beat up it was until it was installed.
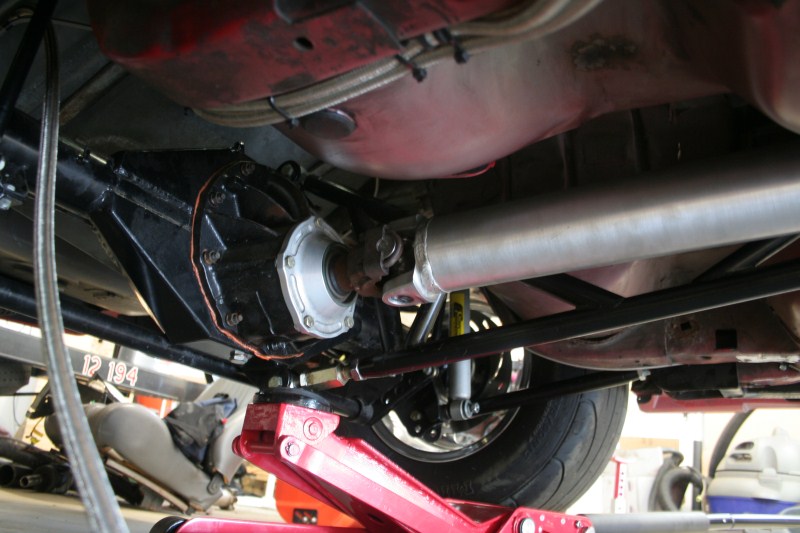
Here you can see the Midwest Chassis Aluminum cross member, and poly mount. I am also planning on re-routing the shifter cable so just ignore that
You can also see the 3.5" aluminum PST drive shaft in that picture. It is a VERY nice piece, but we did have some trouble getting the rear u-joint installed. Also we had to drop the drive shaft safety loop in order to get it in, but its in
After I muscled the drive shaft in, Chris rough adjusted the front coil overs for height.
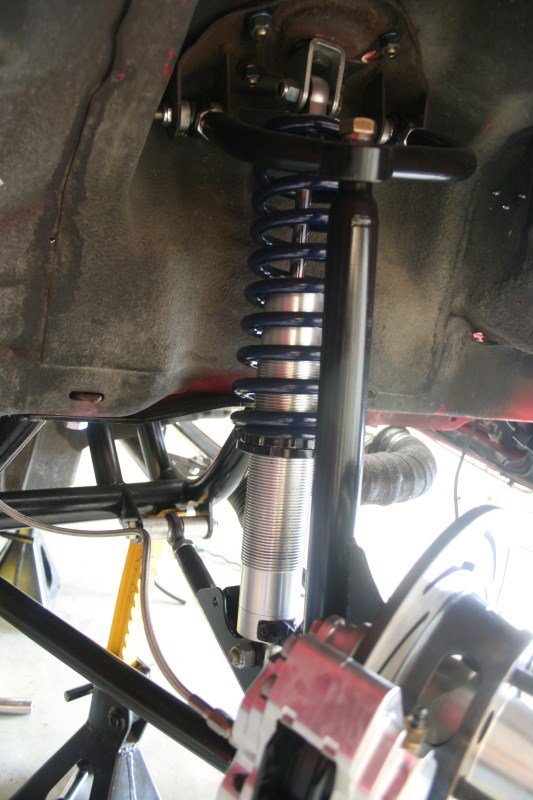
Once the car is done and running it will get a full on adjustment and alignment.
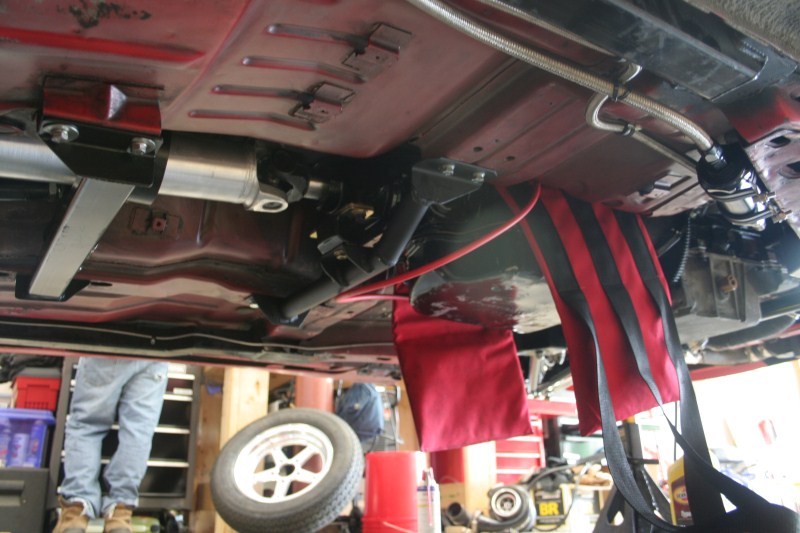
While he labored away on that, I took on the easy tasks of final mounting the trans cooler and fan, and also the radiator overflow. Here you can see the radiator overflow, also mounted in the back of the car.
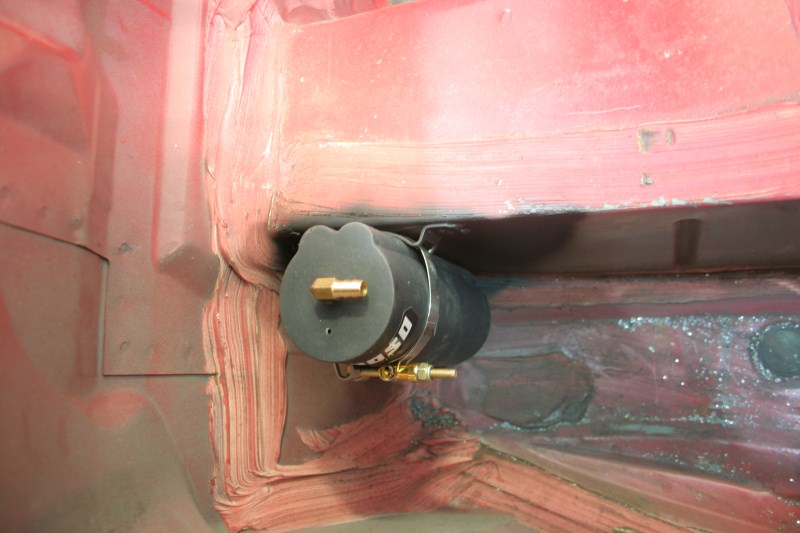
And the drain valve coming out of the bottom of the car.
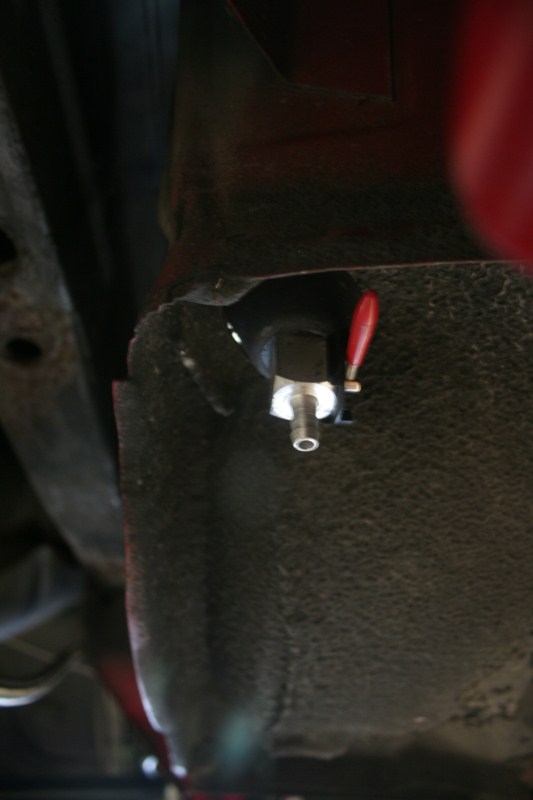
Again the reason for mounting it in the rear of the car was two fold, firstly for space and second for safety. Since we only have 4 bolt heads there is a good chance we will push water sooner or later, so if we push enough to overflow the overflow I would much rather have it come out behind the rear tires.
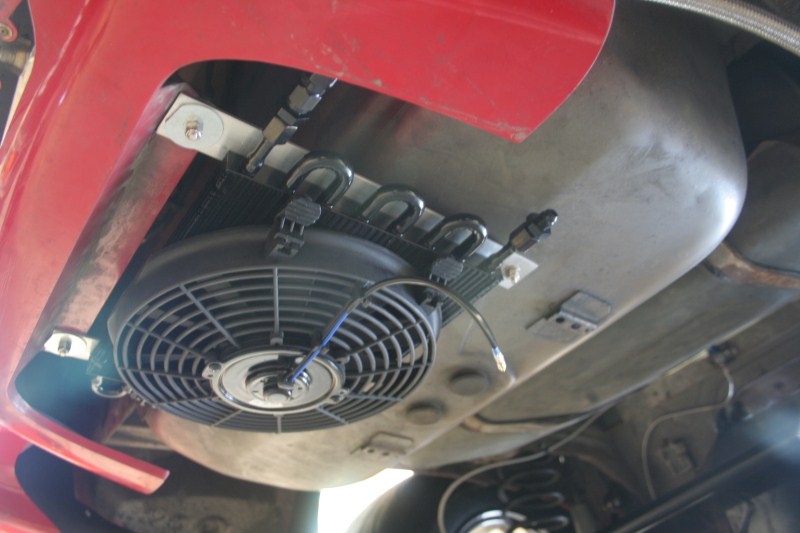
Lastly here you can see the trans cooler with fan all done and ready to be plumbed. I started on one line, but we needed clamps and more -6 for the second line so its not finished yet.
That is all for this week, it was really the last large project that needed to get done. We have plenty of plumbing and wiring yet to do, and the never ending wait for the fuel fittings (ordered 4 months ago) continues. So barring us getting the last of the fuel fittings we should be firing it up in the next couple of weeks. Well as always thanks for looking!!
Sean
Here is the line I whipped up...
And here is the final product with the pump mounted and just the -16 run.
Here it is with the harness back in place.
Next up was the transmission, which as you could imagine was not something I could take pictures of during the process. It did go relatively smooth however so that was good. Started by throwing a quart of trans fluid in the converter.
Then we put the TCI flex plate in (no pictures), put the converter in the trans making sure we properly engaged the pump (no pictures), and got ready to put the trans in. This was not as bad as we thought, but we planned well and took our time. Everything lined up the way it was supposed to the very first time and just fell into place. The hardest part of the whole process was installing the trans blanket. Also for anyone wondering we installed the dipstick AFTER the trans was in!!
Here it is all bolted in! The pan is going to be replaced, we didn't realize how beat up it was until it was installed.
Here you can see the Midwest Chassis Aluminum cross member, and poly mount. I am also planning on re-routing the shifter cable so just ignore that
You can also see the 3.5" aluminum PST drive shaft in that picture. It is a VERY nice piece, but we did have some trouble getting the rear u-joint installed. Also we had to drop the drive shaft safety loop in order to get it in, but its in
After I muscled the drive shaft in, Chris rough adjusted the front coil overs for height.
Once the car is done and running it will get a full on adjustment and alignment.
While he labored away on that, I took on the easy tasks of final mounting the trans cooler and fan, and also the radiator overflow. Here you can see the radiator overflow, also mounted in the back of the car.
And the drain valve coming out of the bottom of the car.
Again the reason for mounting it in the rear of the car was two fold, firstly for space and second for safety. Since we only have 4 bolt heads there is a good chance we will push water sooner or later, so if we push enough to overflow the overflow I would much rather have it come out behind the rear tires.
Lastly here you can see the trans cooler with fan all done and ready to be plumbed. I started on one line, but we needed clamps and more -6 for the second line so its not finished yet.
That is all for this week, it was really the last large project that needed to get done. We have plenty of plumbing and wiring yet to do, and the never ending wait for the fuel fittings (ordered 4 months ago) continues. So barring us getting the last of the fuel fittings we should be firing it up in the next couple of weeks. Well as always thanks for looking!!
Sean