
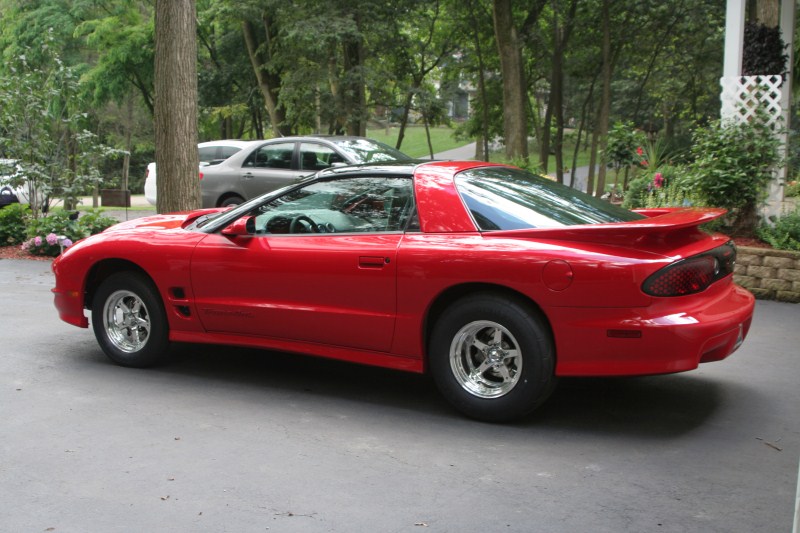
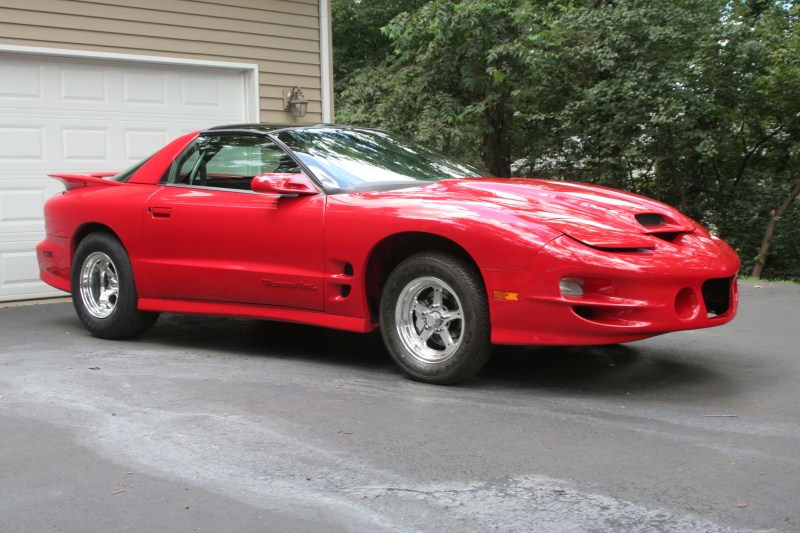
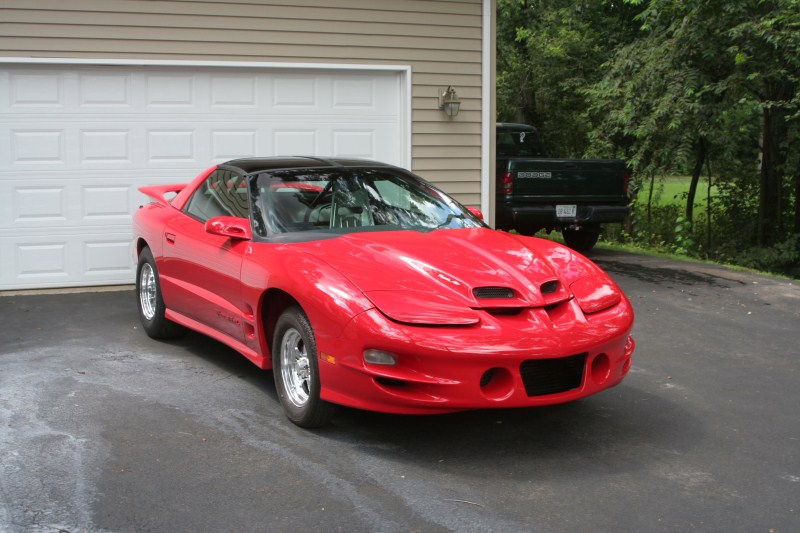
The Turbo Ta Build Thread
9 Second Club


Joined: Oct 2006
Posts: 1,194
Likes: 247
From: IL
Installing the trans blanket wasn't the worst thing we have done, but it was challenging. We actually laid it over the trans before we lifted it into place, then got the bolts that don't hold a strap into place first. Then it was a little bit of a pain to get the bolts that hold the straps into place (with the strap) since it was a tight squeeze to the trans tunnel. The other advantage we had was we were able to adjust the length of the straps on the trans outside of the car which I am sure made it easier.
Thank you, I don't remember where we got the piece of carbon. There are a ton of places that sell it, but at the time we found it cheapest from the place we got it from (twice actually). I drilled it wrong the first time, and the first sheet was a little too thin so I had to buy a second sheet. I am sure Chris will remember the name of the place we used.
Sean
Here is a link to where i got the CF sheet for the switch panel. Thanks, Chris
http://www.sierracomposites.com/category-s/22.htm
http://www.sierracomposites.com/category-s/22.htm
If you need carbon fiber, Jerry Bickel also sells a quality stuff at a good price.
http://www.jerrybickel.com/carbon-fi...-jbrc2121.html
Looks good man!
http://www.jerrybickel.com/carbon-fi...-jbrc2121.html
Looks good man!
9 Second Club
Joined: Oct 2006
Posts: 1,194
Likes: 247
From: IL
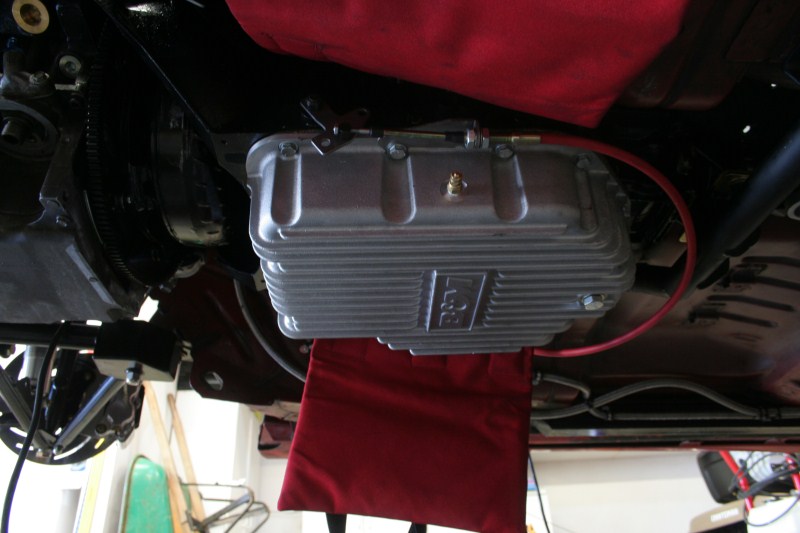
Another weekend of work has come and gone. I started this weekend changing out the trans pan for the new B&M Aluminum pan. Here is a quick pic.
Unfortunately when I changed the pan I tried to reroute the shifter cable because it was sticking last weekend. After spending a good amount of time on it I thought I had figured out that the problem was where the cable came out of the car. The thought was that the hole wasn't big enough and it was putting stress on the cable. I decided to just wait till Chris could help look at it on Saturday. We opened up the hole, and it did nothing to help the problem, the shifter still sticks when going into third. So we have to call B&M on Monday and see what they say.
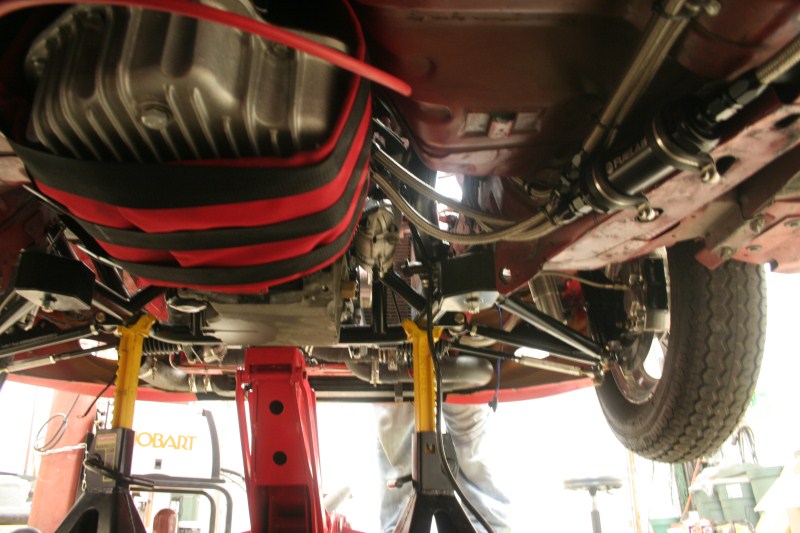
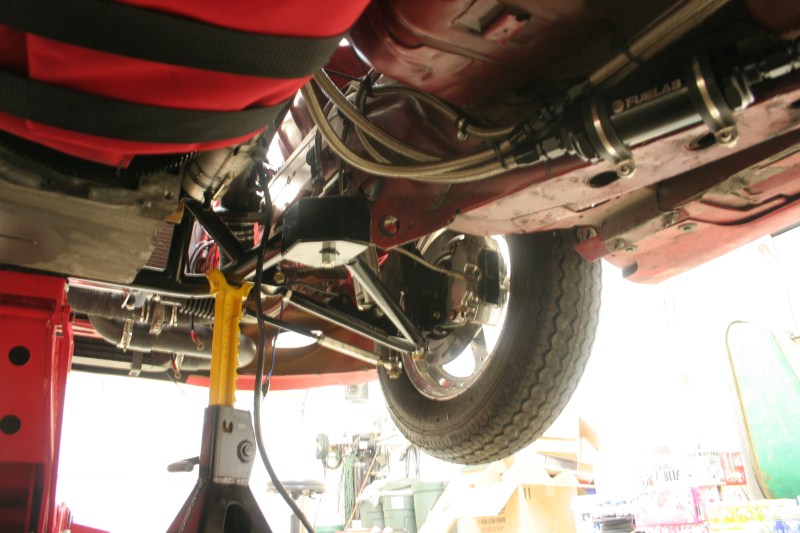
Then I started to plumb the trans cooler lines, and found out that the new piece of line was going to be short!!! Instead of undoing the work I already did, and buying a new piece (which would have left us a spare 10' piece that we would likely never use. we decided to use a -6 to -6 fitting and just have a short piece splice in. Once that decision was made, Chris jumped under the car and finished routing and terminating the rest of the cooler lines. Here you can see the coupling just above the fuel filter, and the finished lines.
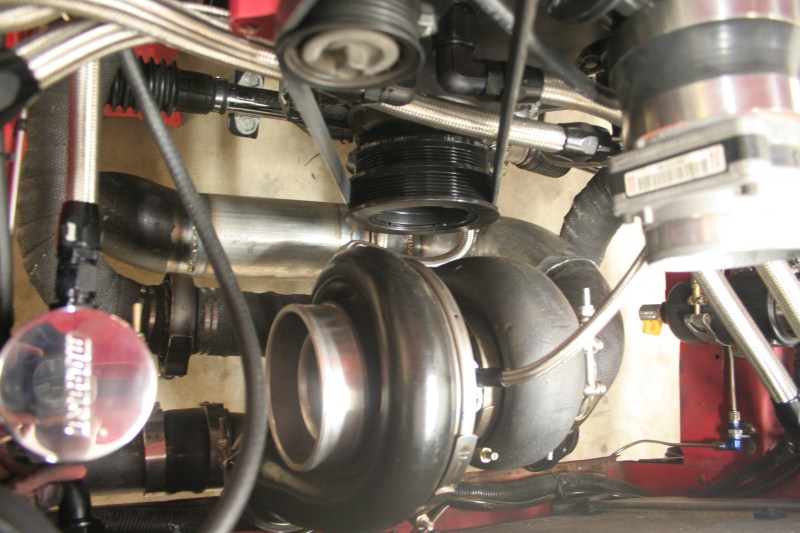
We were basically done with under the car at that point, so we decided to just attack under the hood. Nothing real exciting here, just redid the fuel rail feed lines, the fuel rail return lines, the main return line, radiator lines, breathers etc. Installed the manifolds, the crossover, had the turbo on and off (need new bolts), just basically put everything together!


That is all for this weekend, we are starting to get very close to startup. We measured for plug wires this weekend, so if they come in by next weekend we should be firing it up! If not then it will be the following weekend. Thanks as always for looking!
Sean
Unfortunately when I changed the pan I tried to reroute the shifter cable because it was sticking last weekend. After spending a good amount of time on it I thought I had figured out that the problem was where the cable came out of the car. The thought was that the hole wasn't big enough and it was putting stress on the cable. I decided to just wait till Chris could help look at it on Saturday. We opened up the hole, and it did nothing to help the problem, the shifter still sticks when going into third. So we have to call B&M on Monday and see what they say.
Then I started to plumb the trans cooler lines, and found out that the new piece of line was going to be short!!! Instead of undoing the work I already did, and buying a new piece (which would have left us a spare 10' piece that we would likely never use. we decided to use a -6 to -6 fitting and just have a short piece splice in. Once that decision was made, Chris jumped under the car and finished routing and terminating the rest of the cooler lines. Here you can see the coupling just above the fuel filter, and the finished lines.
We were basically done with under the car at that point, so we decided to just attack under the hood. Nothing real exciting here, just redid the fuel rail feed lines, the fuel rail return lines, the main return line, radiator lines, breathers etc. Installed the manifolds, the crossover, had the turbo on and off (need new bolts), just basically put everything together!
That is all for this weekend, we are starting to get very close to startup. We measured for plug wires this weekend, so if they come in by next weekend we should be firing it up! If not then it will be the following weekend. Thanks as always for looking!
Sean
LS1 Tech Stories
The Best V8 Stories One Small Block at Time

Gas Monkey Built a 6-Wheel Ferrari Testarossa With a Corvette LT4 Engine
Verdad Gallardo
7 Most Reliable High-Performance Engines GM Has Ever Built
Verdad Gallardo
Amazing '71 Camaro Restomod Is Modern Muscle Car Under the Skin
Verdad Gallardo
6 Common C5 Corvette Failures and What's Involved In Repairing Them
Pouria Savadkouei
Retro Modern Bandit Pontiac Trans AM Comes With Burt Reynolds' Autograph
Verdad Gallardo
Top 10 Greatest Cadillac V Series Performance Models Ever, Ranked
Pouria Savadkouei
Top 10 Most Powerful Chevy Trucks Ever Made!

Hennessey's New Supercharged Silverado ZR2 Has 700 HP
Verdad Gallardo
Coachbuilt N2A Anteros Is an LS2-Powered C6 Corvette In Italian Clothes
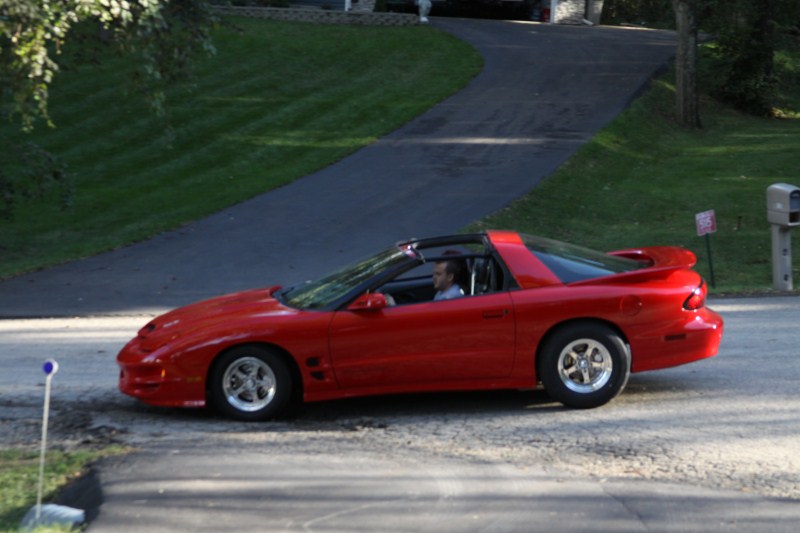
Verdad Gallardo we got it started tonight. Really didn't have any issues! im sure Broke Ef will do a full post on sunday, but for now its video time.(sorry for quality its off my phone)
http://www.youtube.com/watch?v=_EnFL5jjdY0
http://www.youtube.com/watch?v=_EnFL5jjdY0
9 Second Club
Joined: Oct 2006
Posts: 1,194
Likes: 247
From: IL
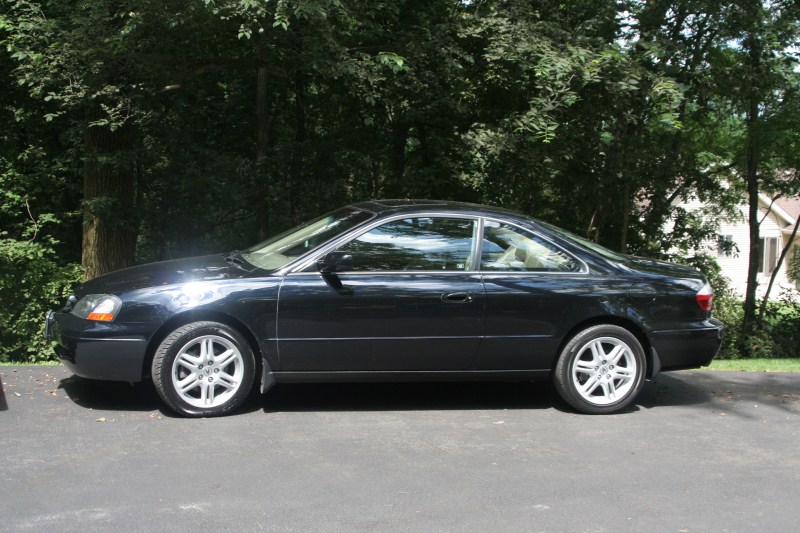
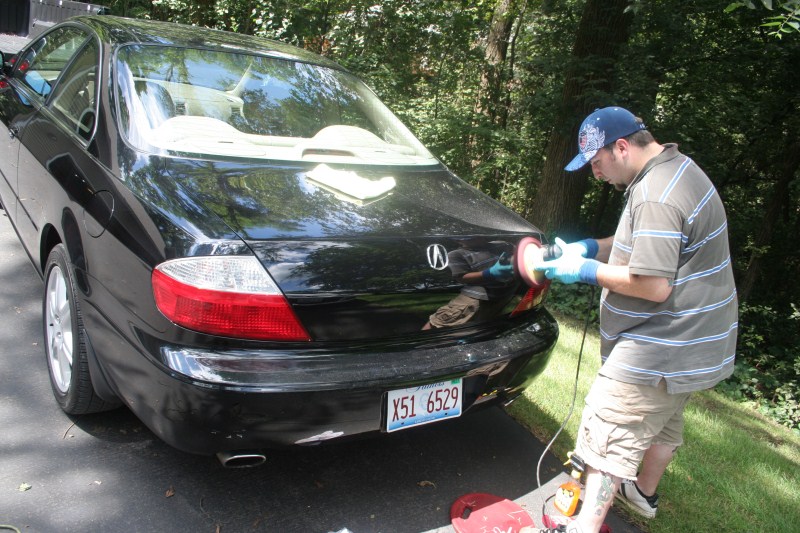
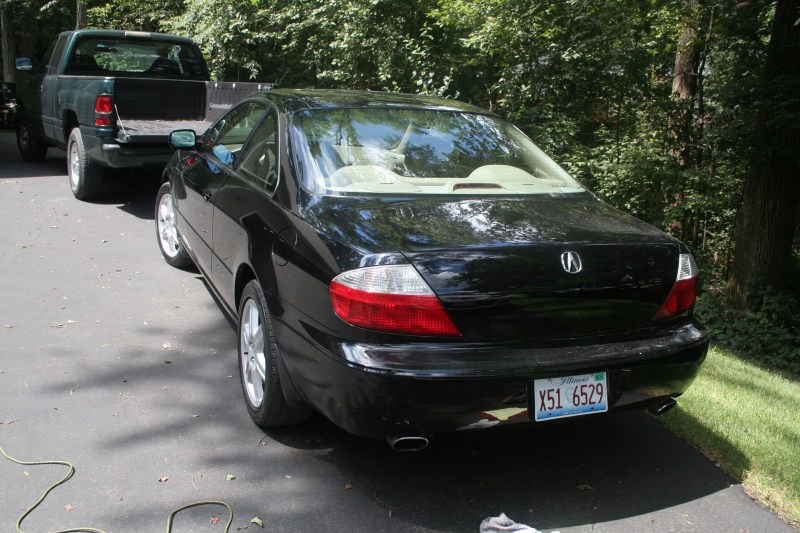
This was a busy/eventful weekend to say the least! As you can see we did indeed get the car running, but that is getting ahead of ourselves. One of the first things this week was my car finally being deemed totaled! So that meant getting a new car, which I was going to put off till Monday since I wanted to work on the TA. For some reason I decided to check out one more car on Friday before going by Chris, and then that led to me buying the car I had looked at earlier in the week. That meant that I was MIA for Friday, and want able to get there till Saturday afternoon. So here is the car I picked up, a 2003 Acura CL Type-S with 71,000 miles.
But enough about non TA related things, and on to the good stuff! The work this weekend actually started during the week, when Chris installed the main distribution blocks and wired a few things in. Friday he worked on more wiring, but mainly just crashed (hard to stay motivated on Fridays). Saturday he hit the ground running, determined to get the car running this weekend. Since I wasn't there I didn't get any pics of his handy work, but he finished wiring all of the main power and grounds. While he was wrapping that all up I arrived and started working on the fuel pumps. I had already made the mount for the pumps a few weeks back, but I still needed to mod the upper part of the mount. More or less we removed all of the metal lines that come out of top of the pump mount/tank only leaving one that acts as a vent. Of course that left a bunch of holes that needed to be filled, so I started by welding them all up, and those fumes were no fun. After I had sealed it all up I then drilled for the -8 and -6 bulkhead fittings and installed them. After that was done I wired the pumps together, and then plumbed in the Y block. Here is the finished result!
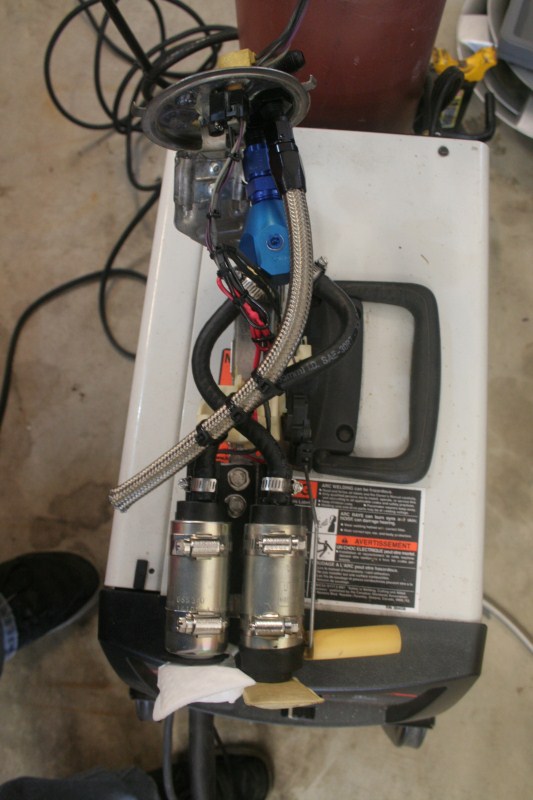
The AN line is just a piece of -6 we threw in there so that the fuel would not dump over the pumps, probably not needed, but what the hell. That is actually the ONLY pic I have of any work Chris and I did all weekend. As you saw in the video above, the car did start and run just fine. There was really no drama in it, which is good. We started by disconnecting the injectors and cranking it to get the oil moving. Once we knew it was then we tried to fire it up, but had no spark. A quick "temp in" of the main harness grounds and that problem was solved. Round two of trying to start told us the coil packs were not right, so we swapped them front to back on both sides and wallah it lit right up!! We are still a long way away from driving, but we needed to hear it come to life.
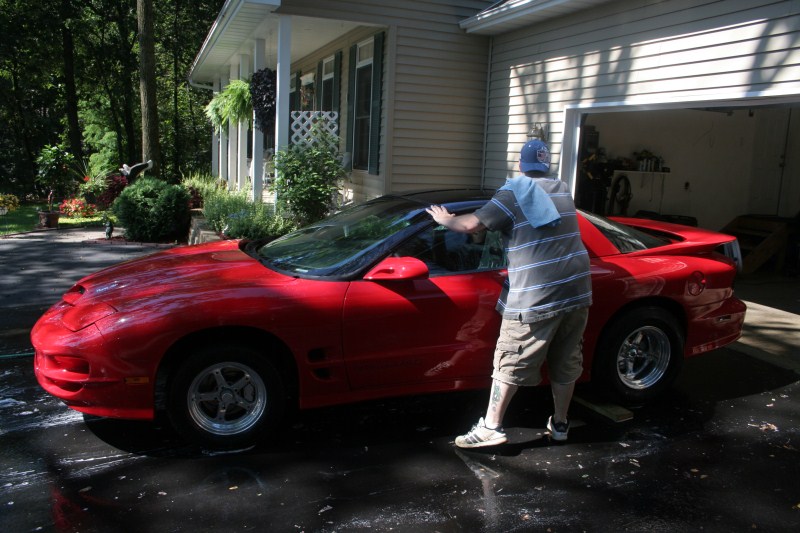
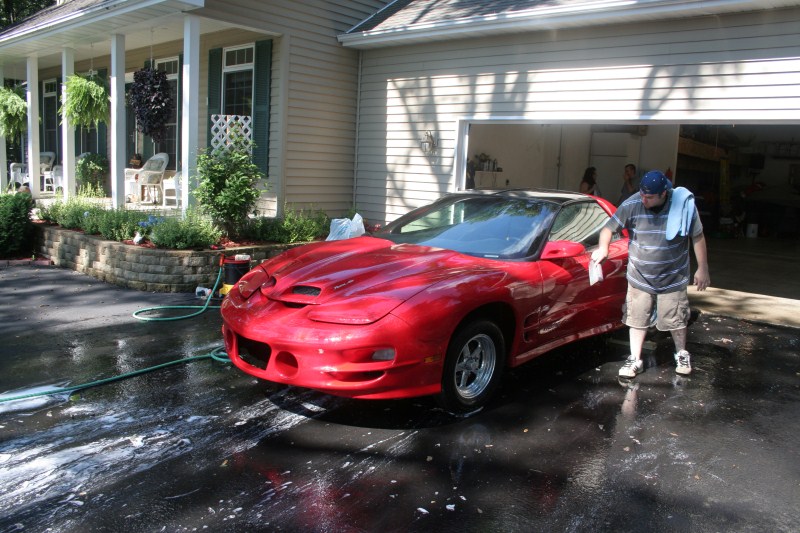
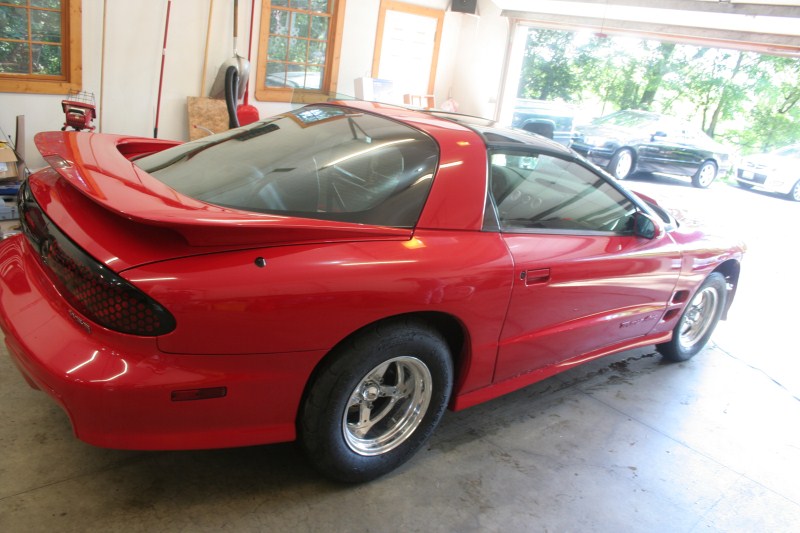
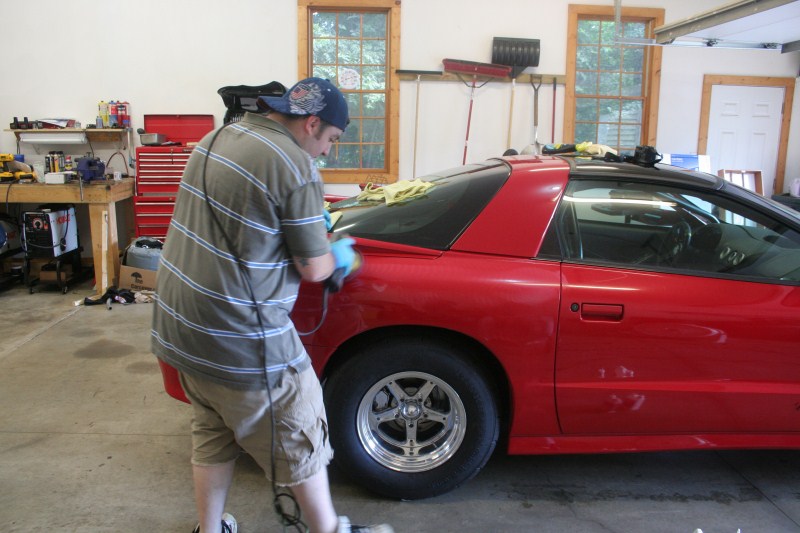
Now on to Sunday, when I actually took some pics...because I wasn't working Chris has been wanting to get the car detailed for a while now, and since we are nearing completion he set it up for Sunday morning. David (blue-sun) showed up about 9:30 in the morning, and busted his *** till just about 3:00, and it looked awesome! On with the pics,
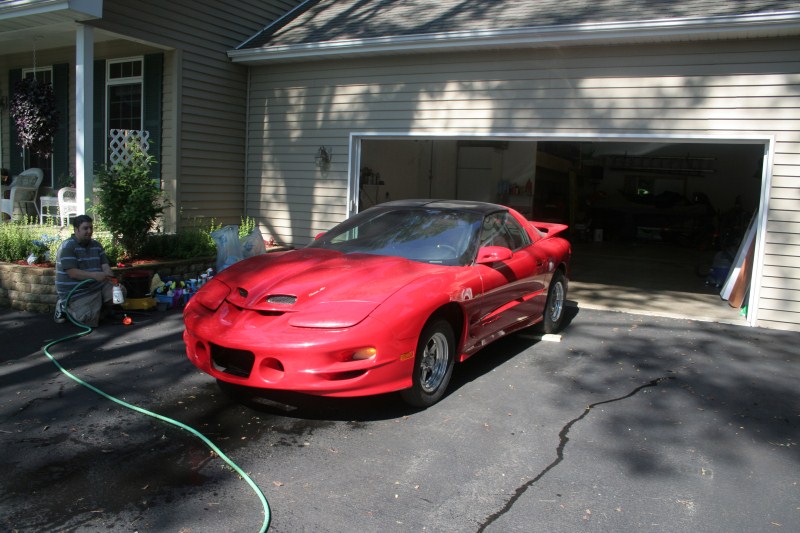
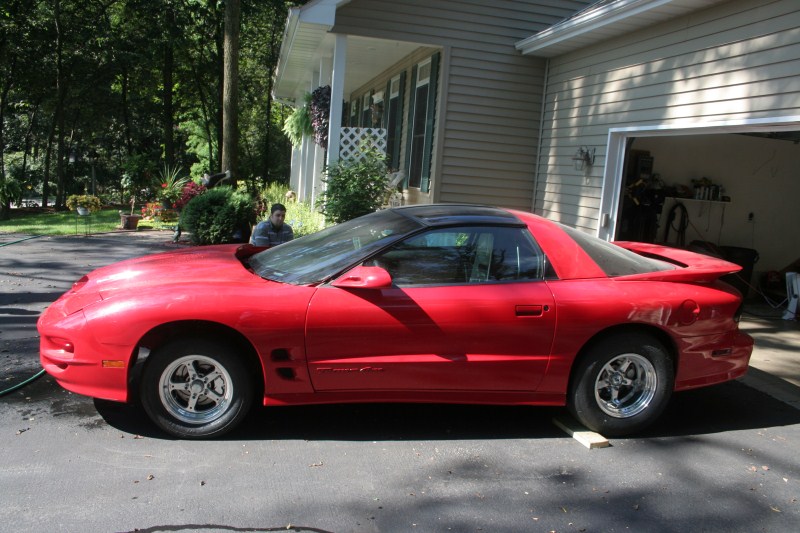
Before
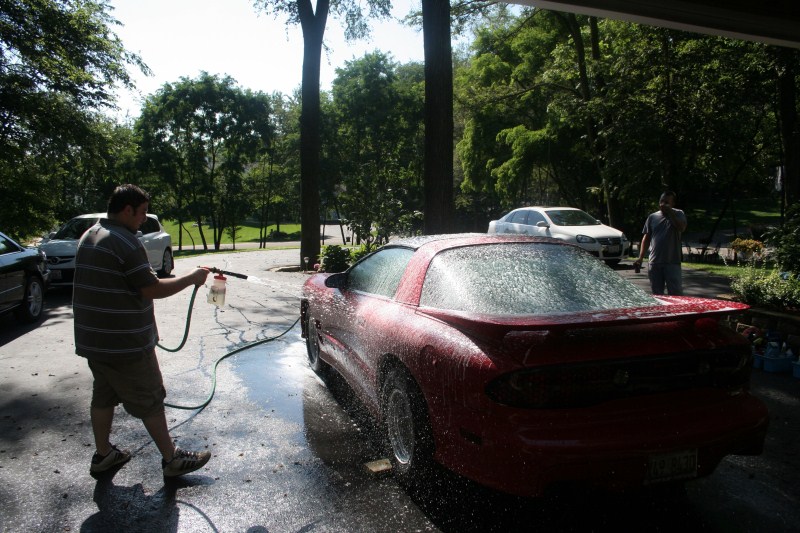
Starting the wash
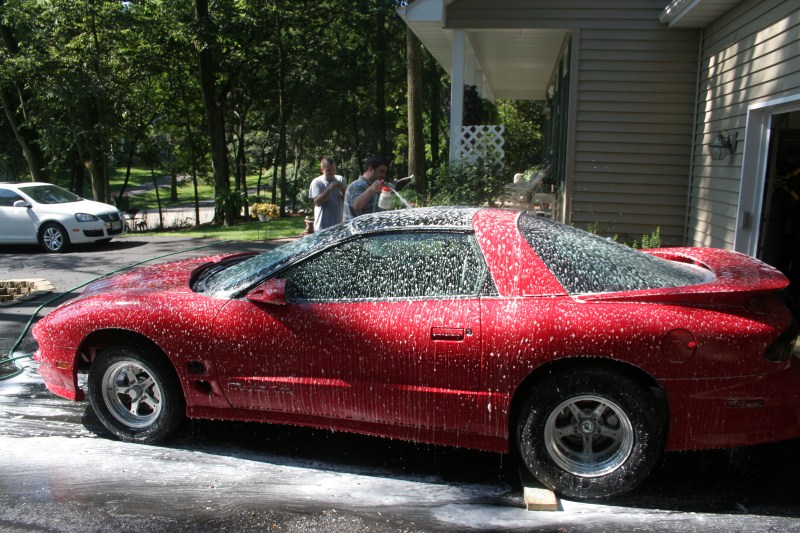
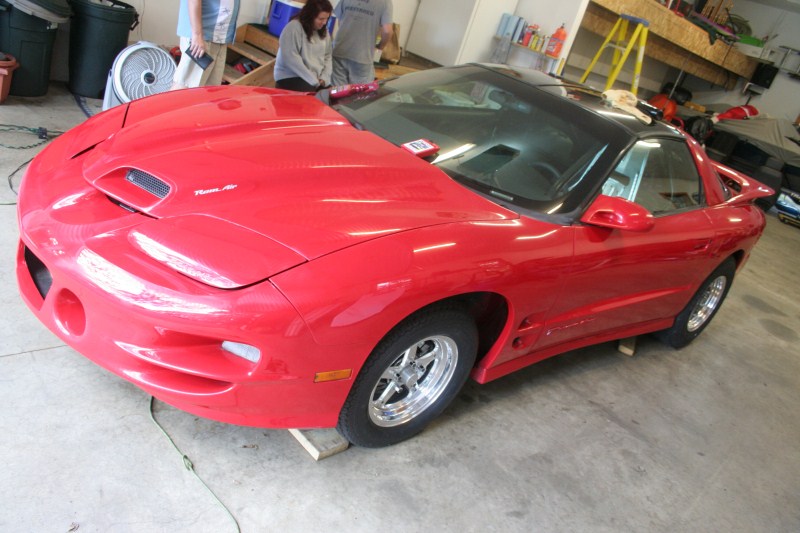
After the wash, and the clay, and the wash, drying it off
Already looks 100 times better
Back in the garage to start the real work
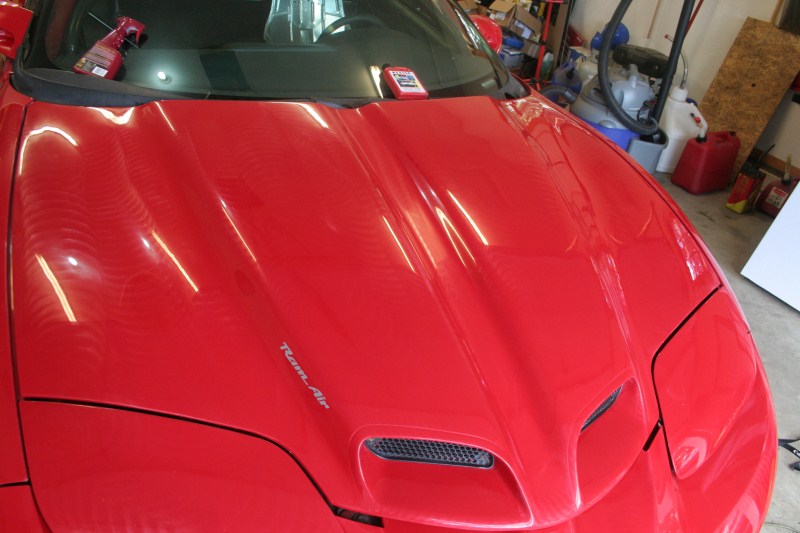
Polishing
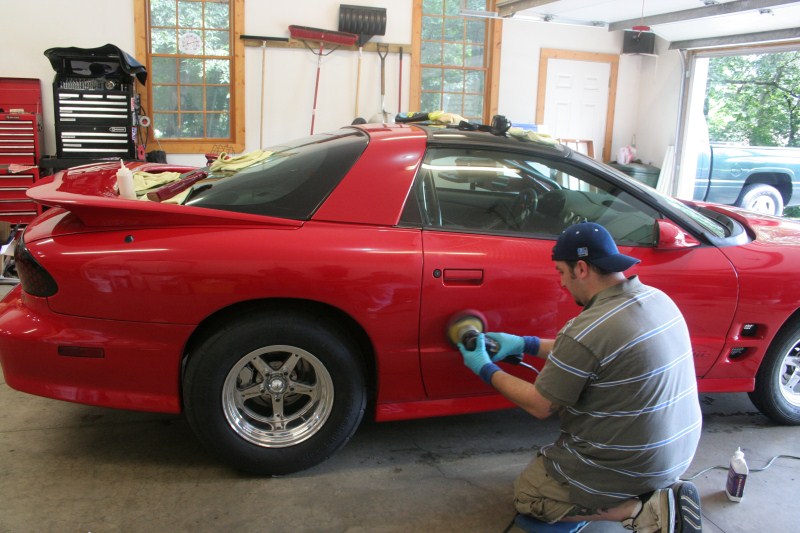
Wax on
While the wax was setting up on the TA, I stole David away and put him to work on my car I generally don't like emblems so they needed to go!
Before
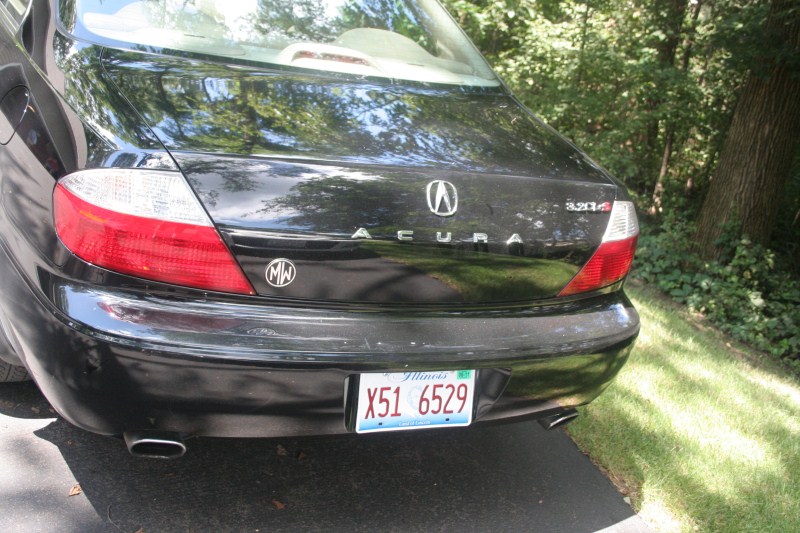
During
After (much better)
 \
\
Now I just need him to do my whole car, so it can look this nice!!
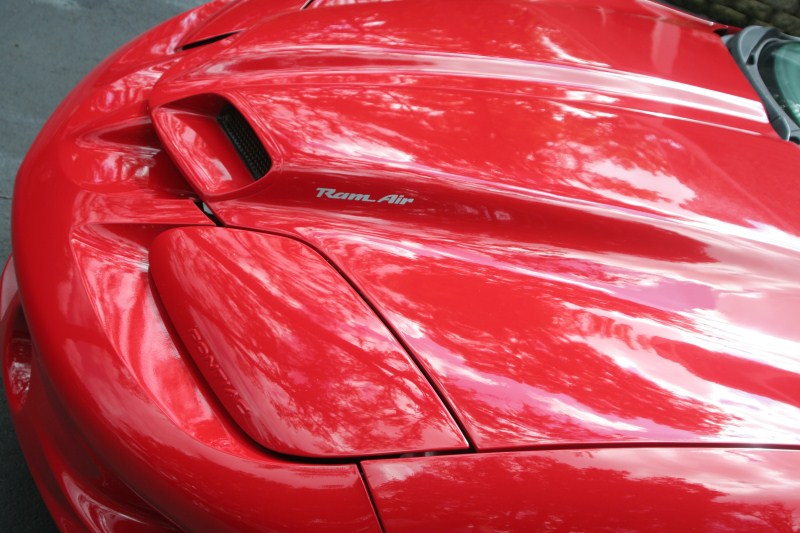
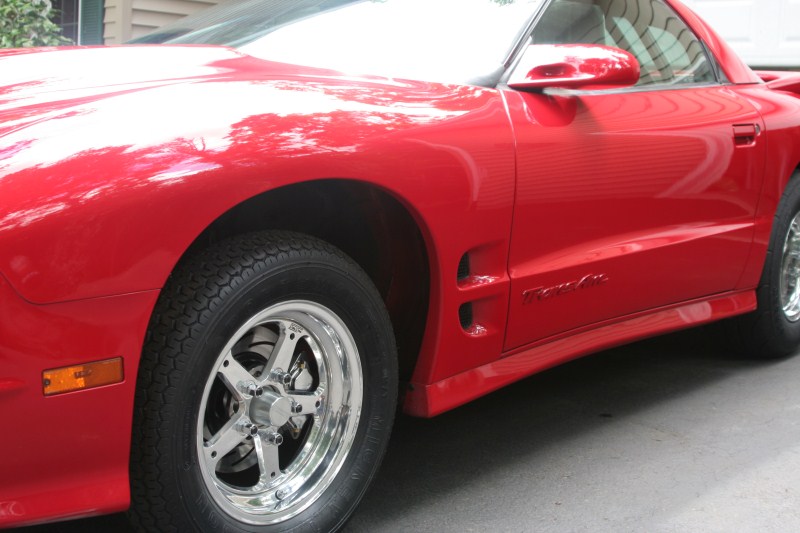

Well I think you get the idea, it looks GREAT! Anybody in the Chicago land area, looking for a detailer that can come to you I would highly recommend David. Well that is all for this weekend, we should be wrapping up all the odds and ends for the next two weekends or so, then off for an alignment and maybe a tune, then to the track!! We are getting close now!! Thanks for looking!
Sean
But enough about non TA related things, and on to the good stuff! The work this weekend actually started during the week, when Chris installed the main distribution blocks and wired a few things in. Friday he worked on more wiring, but mainly just crashed (hard to stay motivated on Fridays). Saturday he hit the ground running, determined to get the car running this weekend. Since I wasn't there I didn't get any pics of his handy work, but he finished wiring all of the main power and grounds. While he was wrapping that all up I arrived and started working on the fuel pumps. I had already made the mount for the pumps a few weeks back, but I still needed to mod the upper part of the mount. More or less we removed all of the metal lines that come out of top of the pump mount/tank only leaving one that acts as a vent. Of course that left a bunch of holes that needed to be filled, so I started by welding them all up, and those fumes were no fun. After I had sealed it all up I then drilled for the -8 and -6 bulkhead fittings and installed them. After that was done I wired the pumps together, and then plumbed in the Y block. Here is the finished result!
The AN line is just a piece of -6 we threw in there so that the fuel would not dump over the pumps, probably not needed, but what the hell. That is actually the ONLY pic I have of any work Chris and I did all weekend. As you saw in the video above, the car did start and run just fine. There was really no drama in it, which is good. We started by disconnecting the injectors and cranking it to get the oil moving. Once we knew it was then we tried to fire it up, but had no spark. A quick "temp in" of the main harness grounds and that problem was solved. Round two of trying to start told us the coil packs were not right, so we swapped them front to back on both sides and wallah it lit right up!! We are still a long way away from driving, but we needed to hear it come to life.
Now on to Sunday, when I actually took some pics...because I wasn't working
Chris has been wanting to get the car detailed for a while now, and since we are nearing completion he set it up for Sunday morning. David (blue-sun) showed up about 9:30 in the morning, and busted his *** till just about 3:00, and it looked awesome! On with the pics,Before
Starting the wash
After the wash, and the clay, and the wash, drying it off
Already looks 100 times better
Back in the garage to start the real work
Polishing
Wax on
While the wax was setting up on the TA, I stole David away and put him to work on my car
I generally don't like emblems so they needed to go!Before
During
After (much better)
\Now I just need him to do my whole car, so it can look this nice!!
Well I think you get the idea, it looks GREAT! Anybody in the Chicago land area, looking for a detailer that can come to you I would highly recommend David. Well that is all for this weekend, we should be wrapping up all the odds and ends for the next two weekends or so, then off for an alignment and maybe a tune, then to the track!! We are getting close now!! Thanks for looking!
Sean
Thanks, Chris
Here is a link to it on summit.
http://www.summitracing.com/parts/TCI-823800/
Last edited by Sideways240sx; Jul 26, 2010 at 08:02 PM.
9 Second Club
Joined: Oct 2006
Posts: 1,194
Likes: 247
From: IL
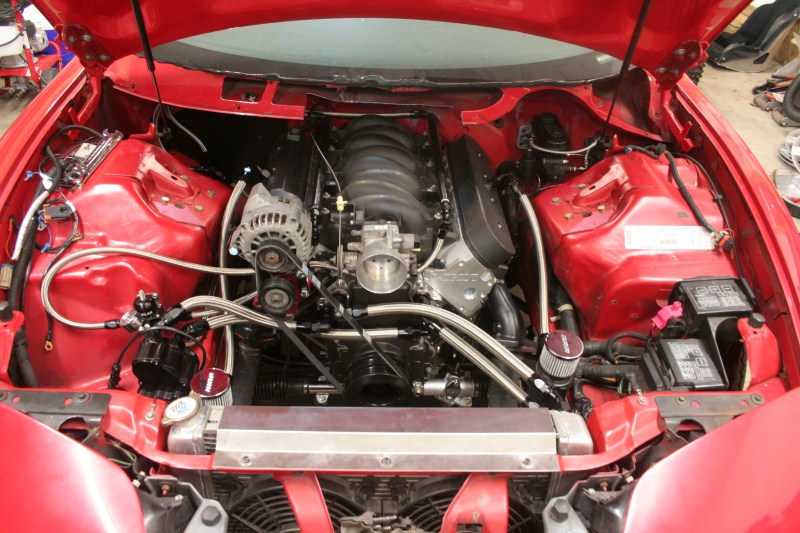
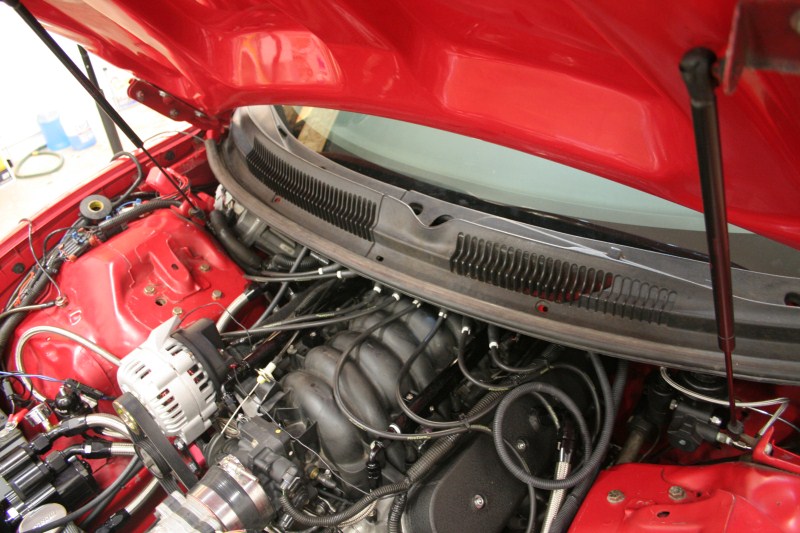
What a crazy weekend! The plan for this weekend was to clean up the wiring, make some coil mounts, and just start wrapping up the loose ends. Well sometimes things don't go as planned. This is basically what it looked like under the hood Friday when we showed up

And this is what it looked like Friday night
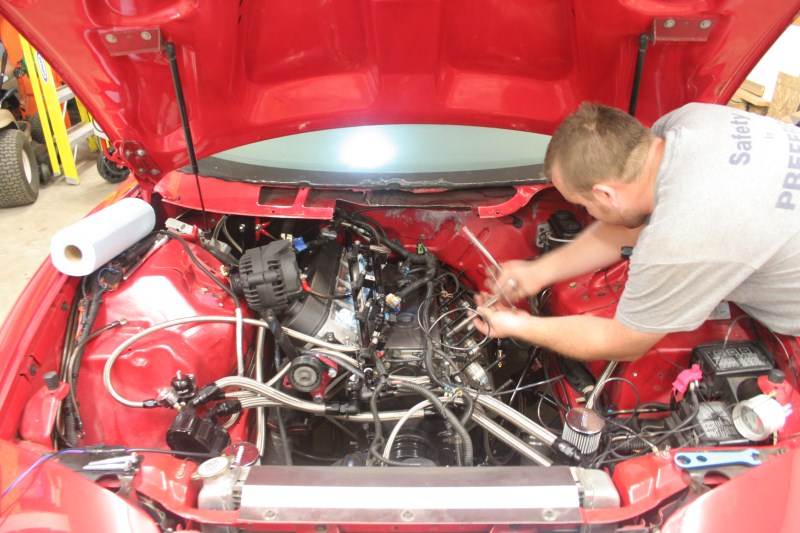
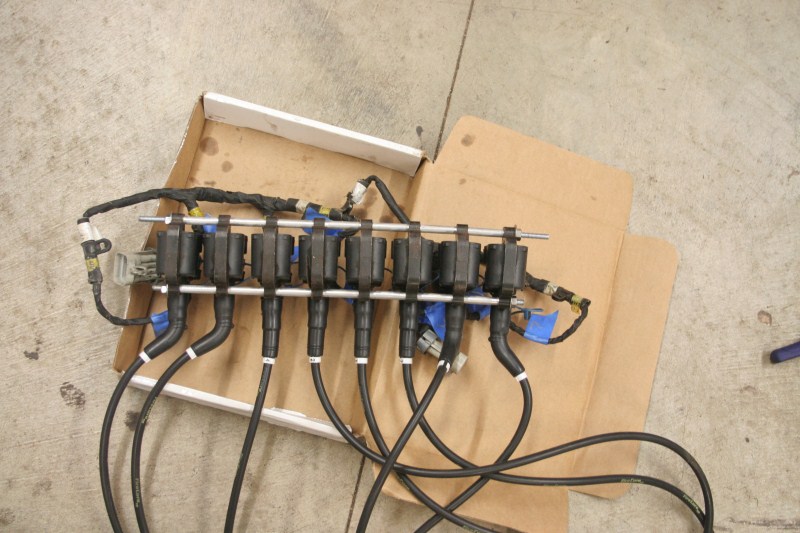
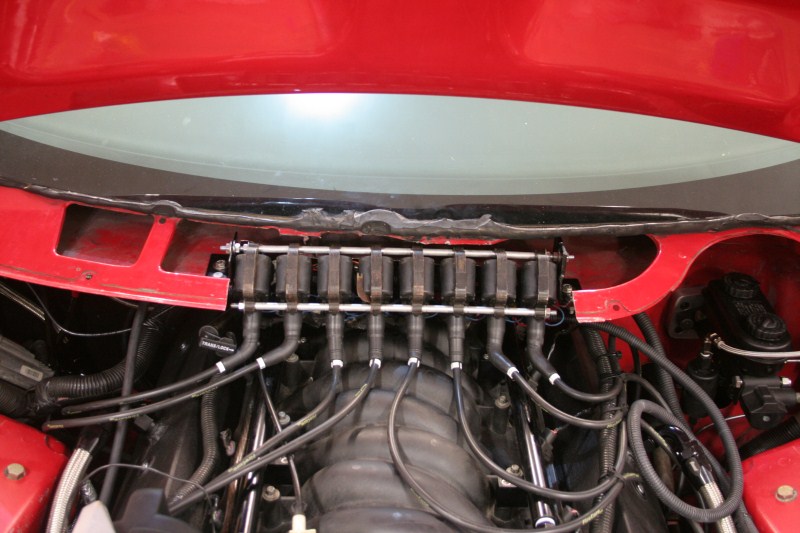
Let me explain how we got to this point real quick. During the week Chris was working on the idle and heard a noise which he thought was a coil rubbing. So Friday, since we had gotten the new plug wires, we made up the coil mounts. The mount is simple, just some 1/4-20 rod with 5/16 aluminum tubing as spacers. The over hang of the top rod sits in some cradles that I whipped up real quick so that the whole assembly is easy to install/remove. That little part came in quite handy more times than we would have like this weekend. Here is the coils mounted to the rods. I did not get a picture of the cradles, but you will be able to see them installed later.
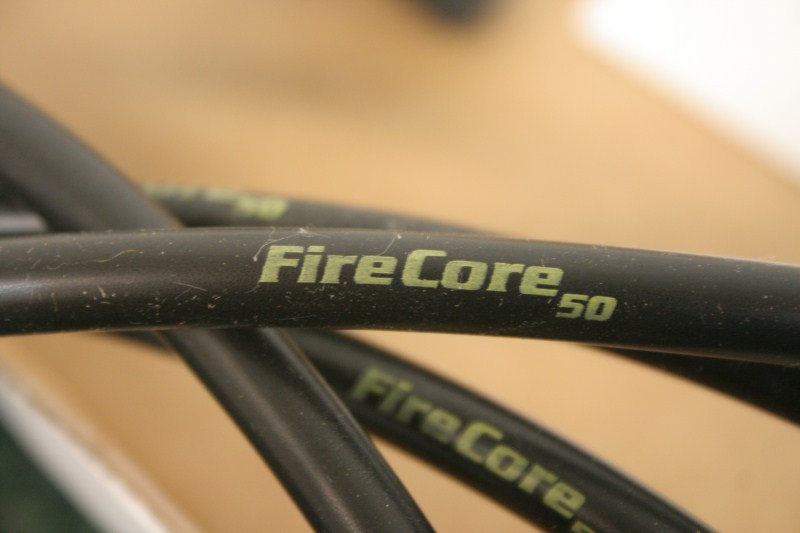
BTW, we are using Fire Core 50 wires that were custom made for us by www.customwiresets.com They have been great to deal with, and are highly recommended.
So once we had the coil mount made, we installed them with the new wires and started it up. I heard the noise that Chris was referring to almost immediately. It was not a noise I was happy to hear, a squeak which means that something isn't getting oil. I was hoping it was simple, so we pulled off the valve cover on the driver side and saw some metal flakes by the front most rocker. We then pulled the rockers, and the push rods and cleaned then throughly thinking that oil just wasn't making it up the push rod. Put it all back together and started it up, same noise! So then we knew the head had to come off. Chris suddenly found some energy and was able to get the head off Friday night. Got everything cleaned up, and put the lifters in some oil to soak over night. We did find one piece of metal down by the rear lifters which may have been some of the problem.
Saturday morning Chris get the head back on, and everything re-assembled. While he was working on that I was doing smaller things like running the line for the radiator overflow to the back of the car, extending the upper inter cooler pipe, and final installing the lower inter cooler pipe. So we get it all back together, fire it up.... SAME NOISE but now on the other side. This time we both traded off taking everything apart and pulling the head. We also checked everything out on the driver side to make sure it was doing OK. We got the passenger side head pulled and all of the parts cleaned and soaking early in the afternoon.
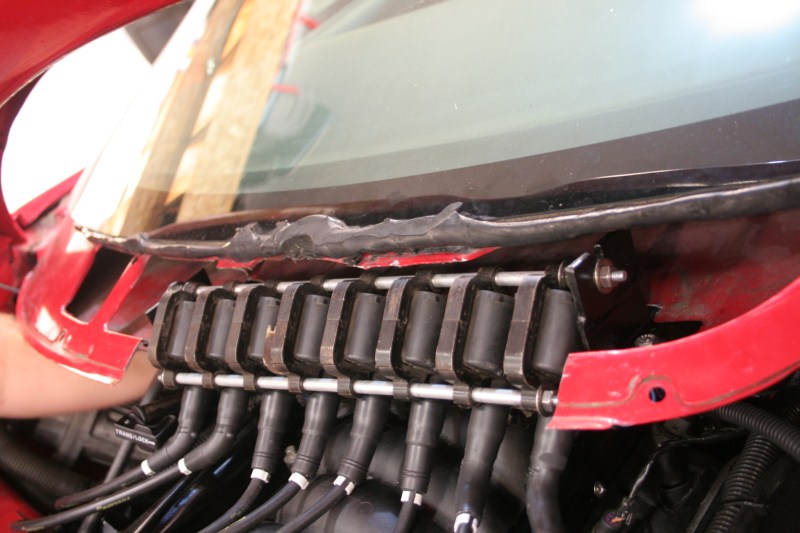
In this picture you can see the cradles for the coil packs in the cowl notch.
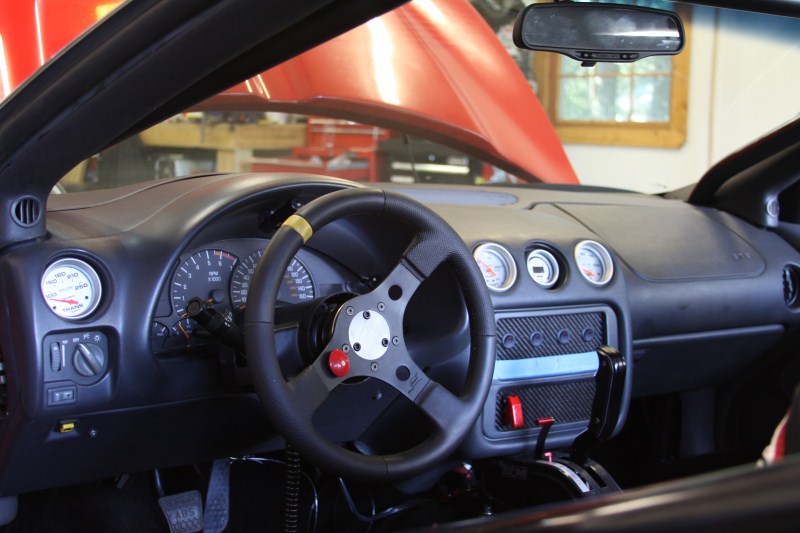
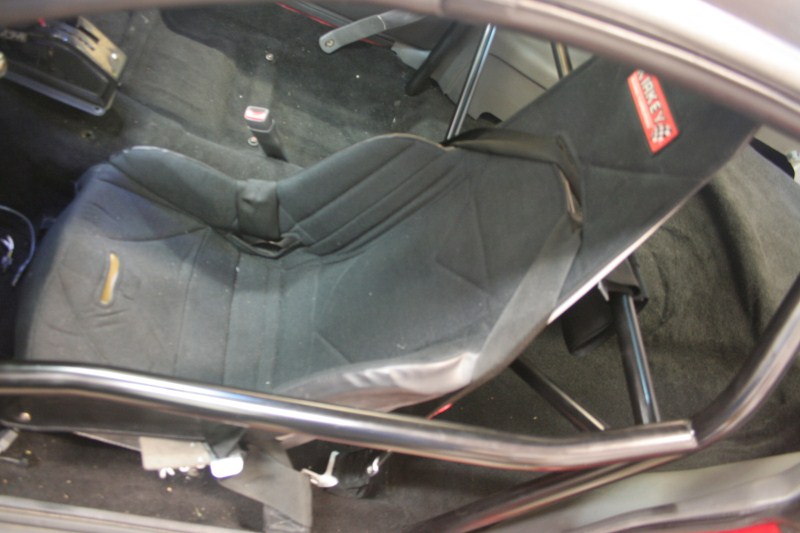
We took a break while the parts were soaking and tried to make sure we didn't miss anything else before we put it all together. There were a couple of things we checked, but they were all OK, so we put it all back together. While Chris was working on finishing everything up, I was able to get the seat bolted in, and most of the harness installed (I need some parts to install the crotch strap).
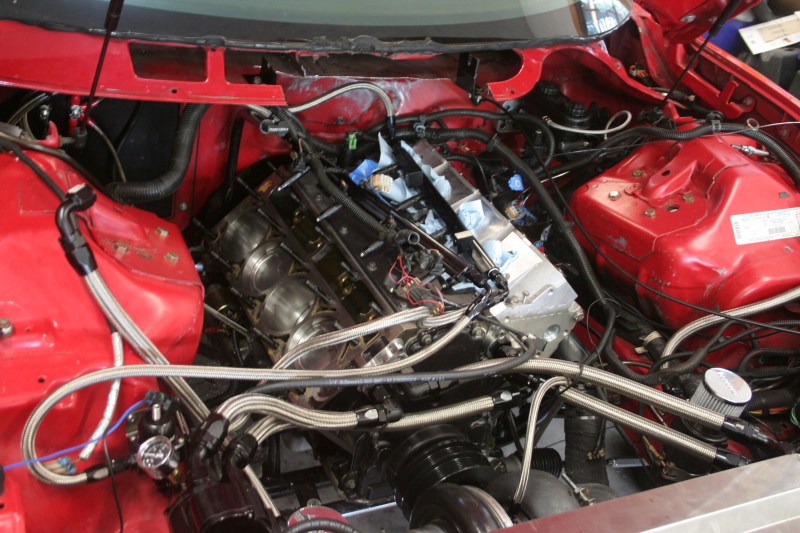
This time we got it all back together, started it up, and it was perfect!!! Car sounded great, and was holding an idle at about 800 RPM just fine. We ran it for about 5 min and let it get to full operating temperature. It was a lot of work, but we are more confident about how the valve train is installed, and we caught something that could have been a huge issue, that piece of metal down by the lifter. Here is a quick shot of how it looked when when we were done for the weekend.
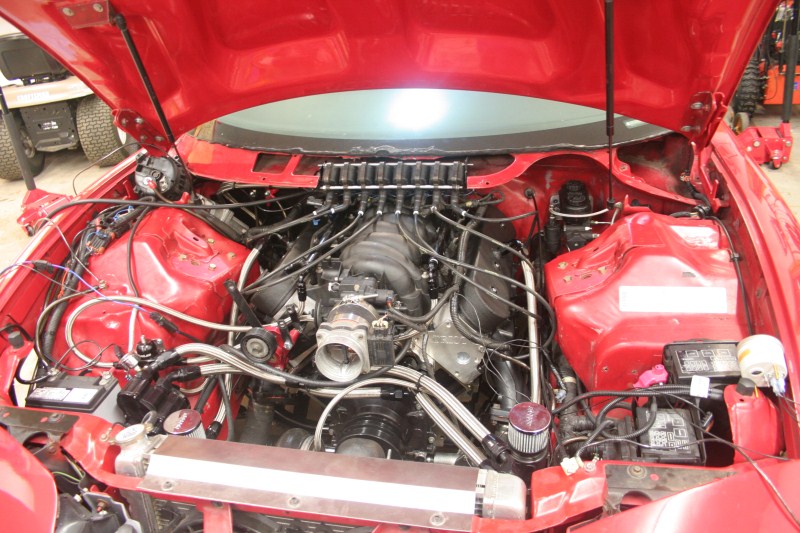
We were able to do a few other things this weekend as well. Chris cleaned up the engine harness by removing unneeded connectors, re wrapping parts and so on. Cleaned up the grounds on the main harness as well. We also discovered that the alternator is no good, which is why its juts laying there in the last pic, a new one is on order. We temporarily hooked up the oil pressure gage (seen on the right side) to make sure we had good oil pressure, which we do (around 40 at idle). You will also notice that the MAF is still there in the last pic, even though I extended the upper inter cooler pipe (not installed), that is because we are having a hard time getting it to idle on a speed density tune up. Chris is already working on getting the speed density tune up good to go, so that we can finally get rid of that ugly *** MAF.
Well thats all for this weekend, thanks again for looking!
Sean
And this is what it looked like Friday night
Let me explain how we got to this point real quick. During the week Chris was working on the idle and heard a noise which he thought was a coil rubbing. So Friday, since we had gotten the new plug wires, we made up the coil mounts. The mount is simple, just some 1/4-20 rod with 5/16 aluminum tubing as spacers. The over hang of the top rod sits in some cradles that I whipped up real quick so that the whole assembly is easy to install/remove. That little part came in quite handy more times than we would have like this weekend. Here is the coils mounted to the rods. I did not get a picture of the cradles, but you will be able to see them installed later.
BTW, we are using Fire Core 50 wires that were custom made for us by www.customwiresets.com They have been great to deal with, and are highly recommended.
So once we had the coil mount made, we installed them with the new wires and started it up. I heard the noise that Chris was referring to almost immediately. It was not a noise I was happy to hear, a squeak which means that something isn't getting oil. I was hoping it was simple, so we pulled off the valve cover on the driver side and saw some metal flakes by the front most rocker. We then pulled the rockers, and the push rods and cleaned then throughly thinking that oil just wasn't making it up the push rod. Put it all back together and started it up, same noise! So then we knew the head had to come off. Chris suddenly found some energy and was able to get the head off Friday night. Got everything cleaned up, and put the lifters in some oil to soak over night. We did find one piece of metal down by the rear lifters which may have been some of the problem.
Saturday morning Chris get the head back on, and everything re-assembled. While he was working on that I was doing smaller things like running the line for the radiator overflow to the back of the car, extending the upper inter cooler pipe, and final installing the lower inter cooler pipe. So we get it all back together, fire it up.... SAME NOISE but now on the other side. This time we both traded off taking everything apart and pulling the head. We also checked everything out on the driver side to make sure it was doing OK. We got the passenger side head pulled and all of the parts cleaned and soaking early in the afternoon.
In this picture you can see the cradles for the coil packs in the cowl notch.
We took a break while the parts were soaking and tried to make sure we didn't miss anything else before we put it all together. There were a couple of things we checked, but they were all OK, so we put it all back together. While Chris was working on finishing everything up, I was able to get the seat bolted in, and most of the harness installed (I need some parts to install the crotch strap).
This time we got it all back together, started it up, and it was perfect!!! Car sounded great, and was holding an idle at about 800 RPM just fine. We ran it for about 5 min and let it get to full operating temperature. It was a lot of work, but we are more confident about how the valve train is installed, and we caught something that could have been a huge issue, that piece of metal down by the lifter. Here is a quick shot of how it looked when when we were done for the weekend.
We were able to do a few other things this weekend as well. Chris cleaned up the engine harness by removing unneeded connectors, re wrapping parts and so on. Cleaned up the grounds on the main harness as well. We also discovered that the alternator is no good, which is why its juts laying there in the last pic, a new one is on order. We temporarily hooked up the oil pressure gage (seen on the right side) to make sure we had good oil pressure, which we do (around 40 at idle). You will also notice that the MAF is still there in the last pic, even though I extended the upper inter cooler pipe (not installed), that is because we are having a hard time getting it to idle on a speed density tune up. Chris is already working on getting the speed density tune up good to go, so that we can finally get rid of that ugly *** MAF.
Well thats all for this weekend, thanks again for looking!
Sean
9 Second Club
Joined: Oct 2006
Posts: 1,194
Likes: 247
From: IL
Well boys and girls we are getting close to being all wrapped up! This weekend we just tied up loose ends, finished mounting things, and so on. Nothing all that interesting , so Ill just move on to the pictures.
Here is another shot of the coil pack mount that we made last week. Since we didn't have to tear the motor down again we finally mounted it up!
We actually made the hole in the cowl so that we could install the motor, but it was exactly the size needed for the coils! Here is a quick shot of the mount on the car side.
And with the plastic back on
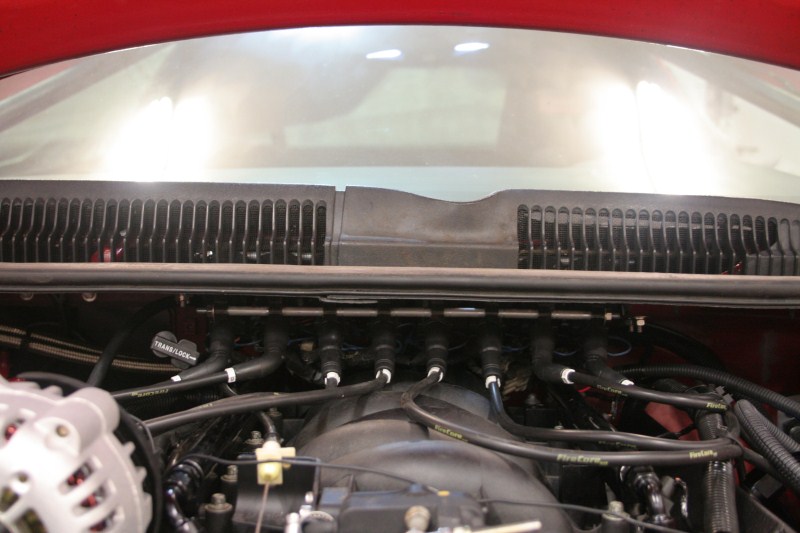
I have to say that it worked out perfect!
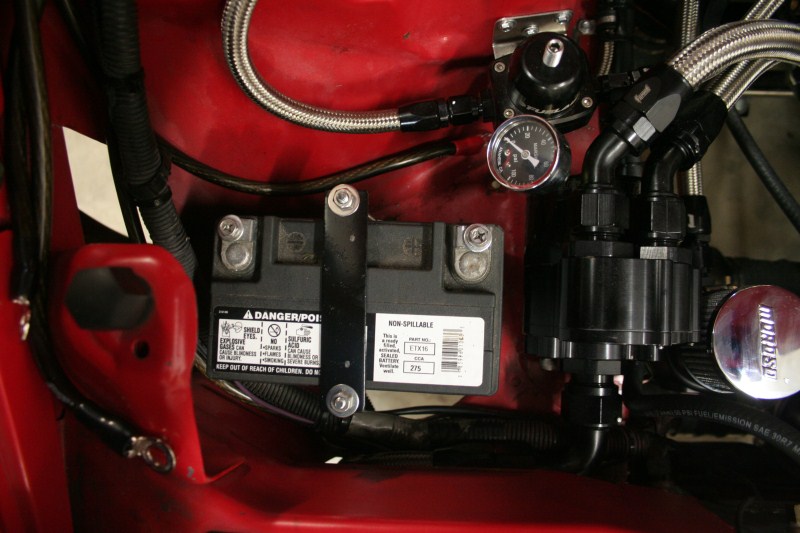
Next up was finishing the battery mount/tie down. This was just a simple set up, as we plan on moving the battery to the back of the car soonish. The bottom of the tray is some 1-1/2" aluminum angle that I notched and bent into a box. Then its just two pieces of flat stock with some 1/4-20 threaded rod to hold the battery down.
The last thing that that we needed to fab was an "exhaust". This was something that gave us problems last time the car was out. Before we basically had a down pipe which was a very shortened 4" 90 right off of the turbo with a v-band at the end. Right at the edge of the down pipe, about 1/4" from the v-band was our wide band O2, which was fine when the rest of the exhaust was on. Problem was that we had to go under the factory K-member since we had the turbo facing the way we did. Well despite my best effort it was just way to low and we ended up not using it ever. So then the O2 was at the very end of the "exhaust" and did not read very well because one side was more or less open to outside air. So since the turbo is still facing the same way, we still had the same problem, we also didn't have much 4" stuff to work with. The best solution we came up with was to bend the exhaust around to face the passenger side. Now that we had a plan I started cutting and welding, and here is the end result.
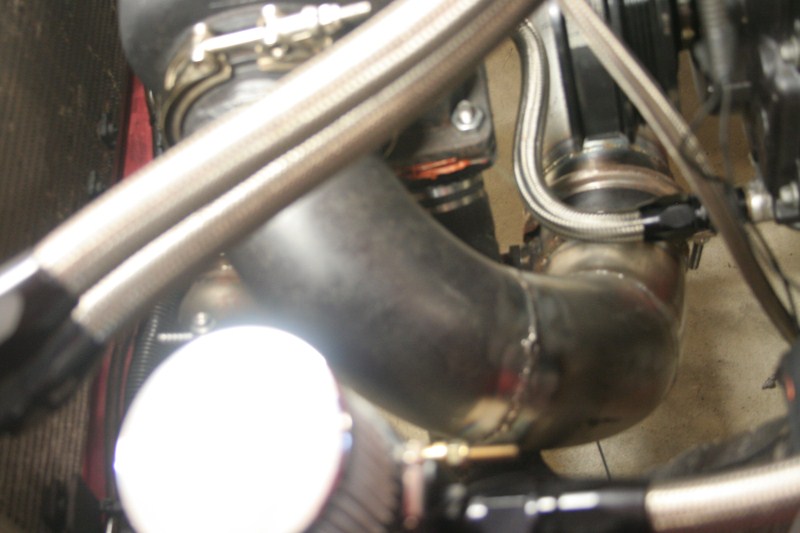
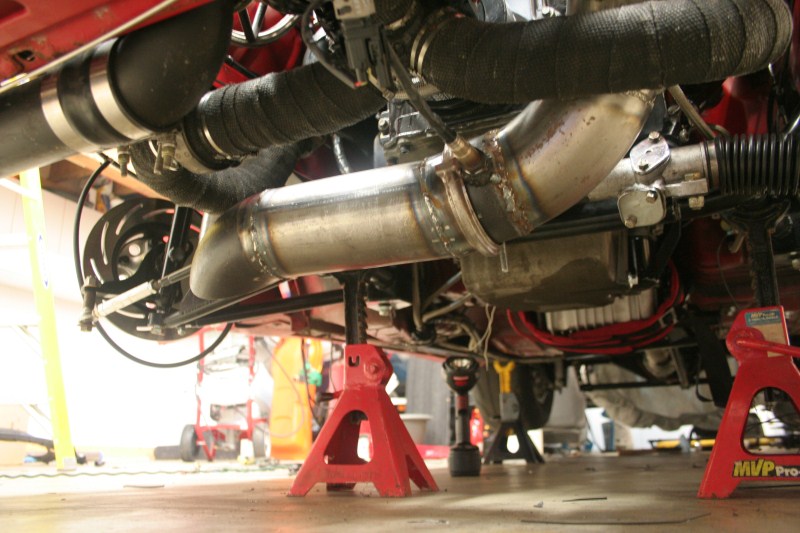
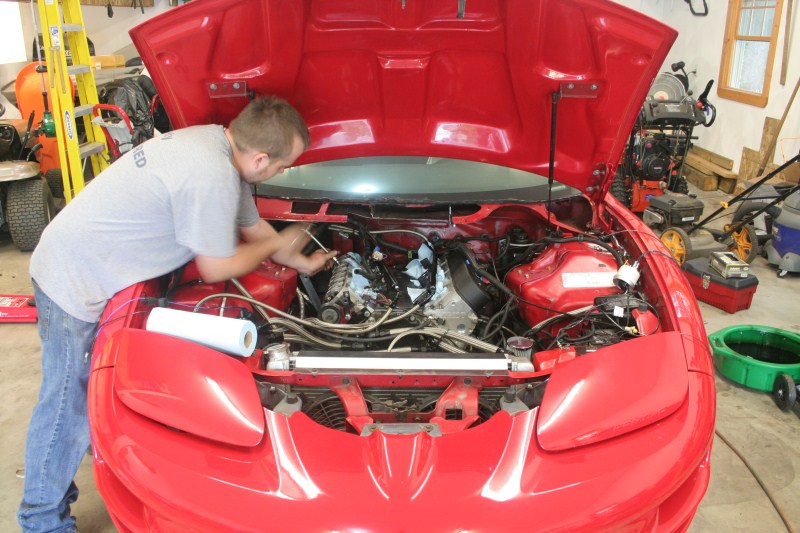
Its not the prettiest thing out there, but it does the job. We still need to paint it with some high temp paint, and then wrap it to hide the ugly. While I was doing that stuff Chris was laboring away on all of the wiring inside the car. He was bent up like a pretzel cutting out un needed wiring, soldering in new stuff and making it all look nice. I would say the hardest stuff is now finished as far as the wiring goes, but there is still more to be done. Once its all done, Ill get some pictures but wiring in process is nothing to look at.
As I said we are getting very close to being done. There is a few small things that need to be finalized, but 99% of the work is done. Then its just a matter of getting an alignment, checking everything over, tuning, and making passes! I probably wont update the thread until the car is finished and on the dyno, or the track. Hopefully that should only be a couple of weeks away, but we will see.
As always, Thanks for looking!
Sean
Here is another shot of the coil pack mount that we made last week. Since we didn't have to tear the motor down again we finally mounted it up!
We actually made the hole in the cowl so that we could install the motor, but it was exactly the size needed for the coils! Here is a quick shot of the mount on the car side.
And with the plastic back on
I have to say that it worked out perfect!
Next up was finishing the battery mount/tie down. This was just a simple set up, as we plan on moving the battery to the back of the car soonish. The bottom of the tray is some 1-1/2" aluminum angle that I notched and bent into a box. Then its just two pieces of flat stock with some 1/4-20 threaded rod to hold the battery down.
The last thing that that we needed to fab was an "exhaust". This was something that gave us problems last time the car was out. Before we basically had a down pipe which was a very shortened 4" 90 right off of the turbo with a v-band at the end. Right at the edge of the down pipe, about 1/4" from the v-band was our wide band O2, which was fine when the rest of the exhaust was on. Problem was that we had to go under the factory K-member since we had the turbo facing the way we did. Well despite my best effort it was just way to low and we ended up not using it ever. So then the O2 was at the very end of the "exhaust" and did not read very well because one side was more or less open to outside air. So since the turbo is still facing the same way, we still had the same problem, we also didn't have much 4" stuff to work with. The best solution we came up with was to bend the exhaust around to face the passenger side. Now that we had a plan I started cutting and welding, and here is the end result.
Its not the prettiest thing out there, but it does the job. We still need to paint it with some high temp paint, and then wrap it to hide the ugly
. While I was doing that stuff Chris was laboring away on all of the wiring inside the car. He was bent up like a pretzel cutting out un needed wiring, soldering in new stuff and making it all look nice. I would say the hardest stuff is now finished as far as the wiring goes, but there is still more to be done. Once its all done, Ill get some pictures but wiring in process is nothing to look at.As I said we are getting very close to being done. There is a few small things that need to be finalized, but 99% of the work is done. Then its just a matter of getting an alignment, checking everything over, tuning, and making passes! I probably wont update the thread until the car is finished and on the dyno, or the track. Hopefully that should only be a couple of weeks away, but we will see.
As always, Thanks for looking!
Sean