


LT1 383 Blower Build
I'm running 15lbs with a 12 rib and I have no belt slip. Everything seems good so-far. Nice build. What gate are you going to run. I'm running the big Red ATI racegate and its loud as $hit. Its a little too loud for the average neighborhood.

Thread Starter
Joined: Mar 2005
Posts: 2,161
Likes: 4
From: Millstone Twp, NJ
 . I can't wait to get this fired up.
 Hoping to get the engine in the car by the 16th and mayyyybe get it started.
By the way, I assume you had your race bypass welded to a portion of your charge piping. What did it cost you?
Mine was welded when I got it.
It should not cost you more then half an hour labor at any weld shop.
I would estimate $20-$35.
The Gate sounds amazing. I love to see the neighborhood kids run out of there back yards looking to see a jet drive by.
It should not cost you more then half an hour labor at any weld shop.
I would estimate $20-$35.
The Gate sounds amazing. I love to see the neighborhood kids run out of there back yards looking to see a jet drive by.
Last edited by fastcars95; Jan 2, 2011 at 08:51 PM.
Thread Starter
Joined: Mar 2005
Posts: 2,161
Likes: 4
From: Millstone Twp, NJ
Well need some help guys.
First, the damper/hub install tool I rented from Advance Auto isn't going to work. This is the one I grabbed.
http://shop.advanceautoparts.com/web...%7CGRP2083____
Does anyone know the tool to allow me to press the crank hub onto the snout of the crank?
To make things more difficult, Callies decided to start the threads deeper into the crank snout so I need a longer 7/16 fine thread rod to ?? thread adapter to even think about using this tool. I will be calling Callies tomorrow to see what they recommend.
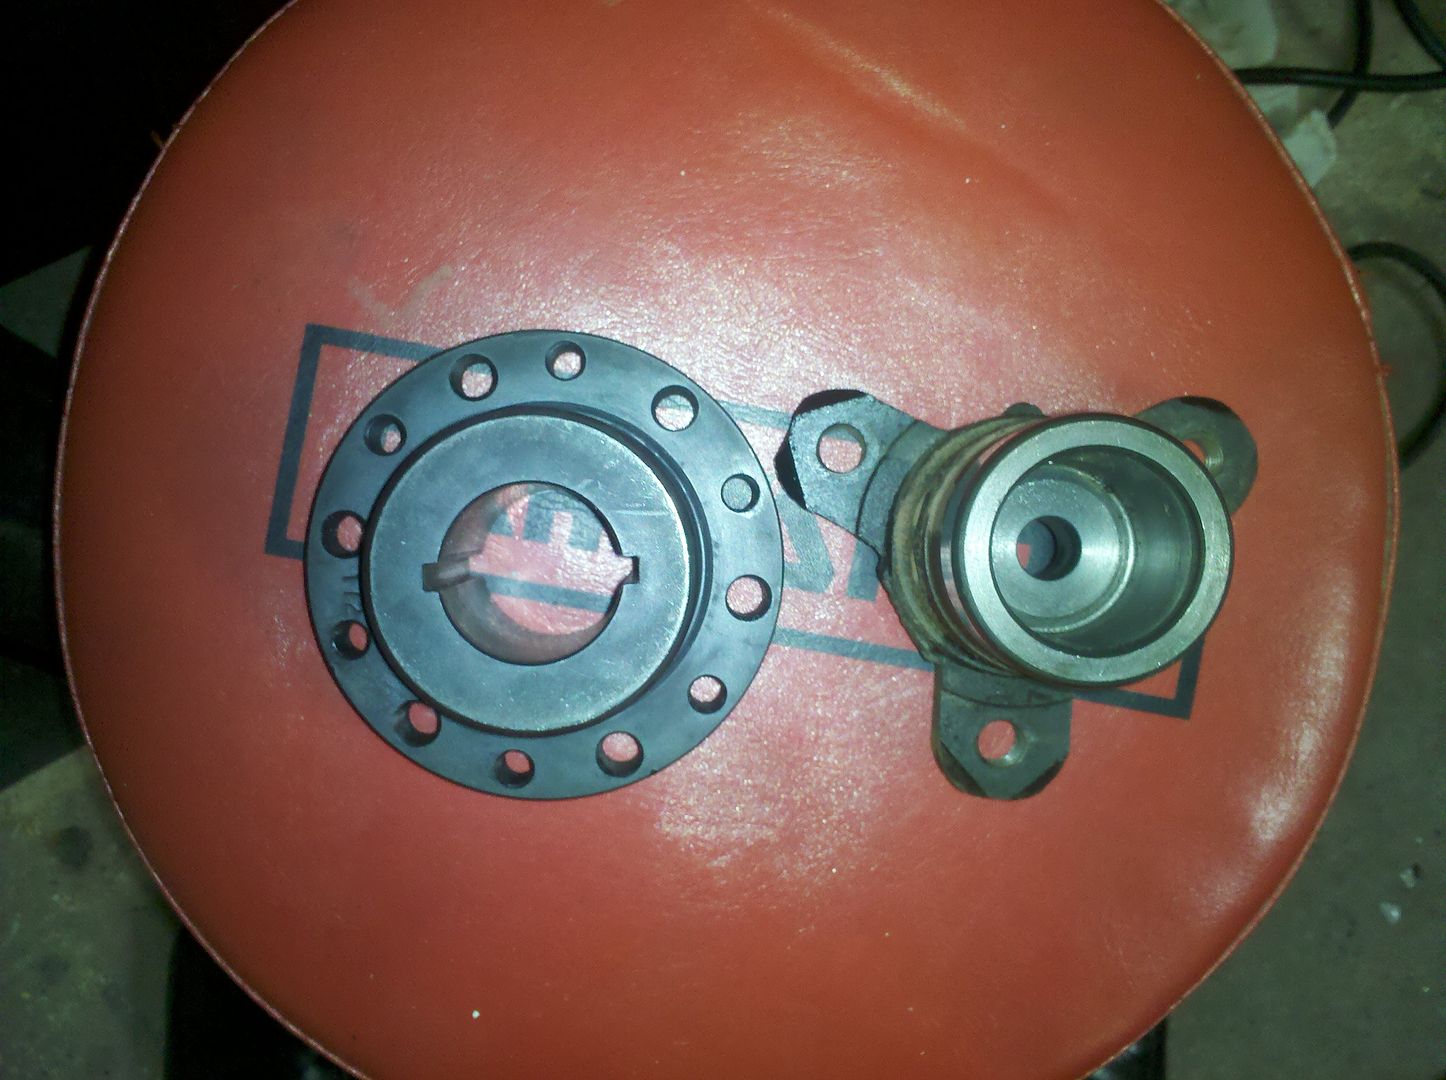
I didn't think of this before but I also don't know how the bolt in the center will even secure the crank hub when installed. See the pic below compared to the old crank hub. Its clear the old crank hub is smaller in the center to allow the bolt to actually do something.
Summit sent me the wrong pushrods (Comp Hi-Tech pushrods) which were 7.1" not 7.2". The box listed the correct length but the rods said something different. Summit was really good. I called them and they are sending new ones out immediately and only need me to send the old ones back when the new package arrives.
Now, onto what I did get done...not much granted the other issues I ran into. I got the new white spring installed in the Melling Select oil pump. Pump was primed, installed and the stud torqued to spec.
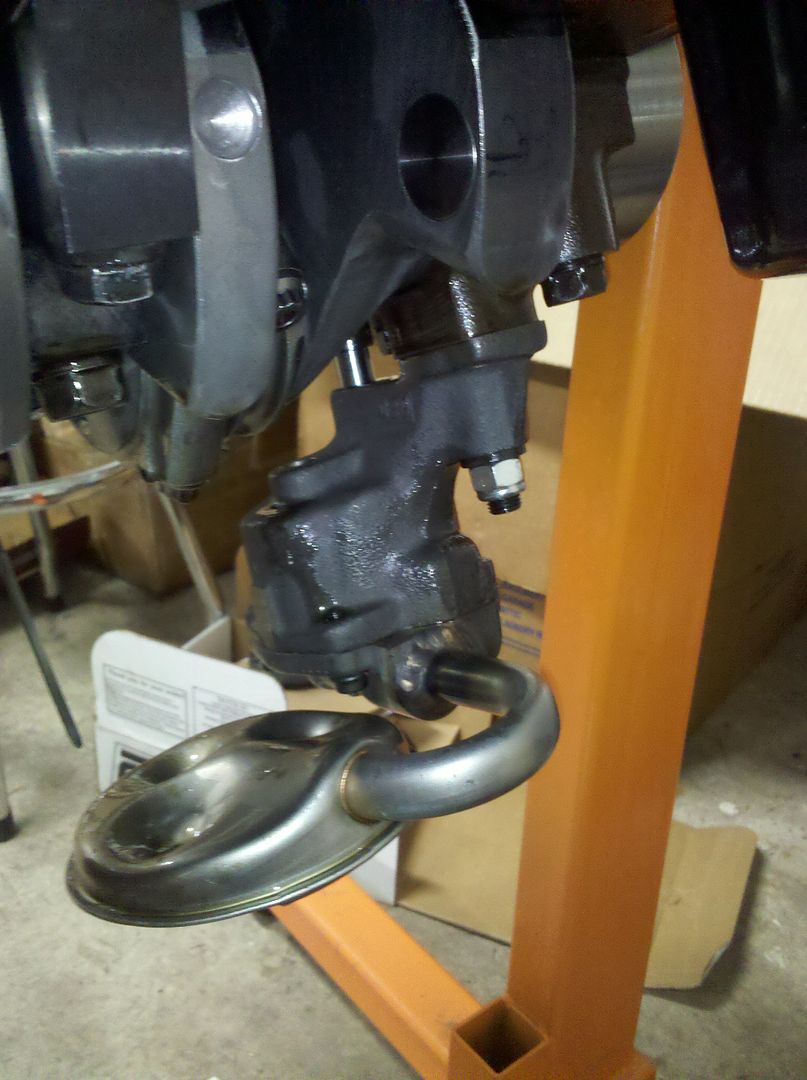
Also installed my lokar dipstick which required trimming of the shroud going into the block. The shroud hit the splayed main cap so I simply cut off the necessary length and its all good now. The lokar stick is a much more rigid piece than a stock flimsy unit so I don't imagine I will run into issues.
My other crafty idea actually seems to be working out. The polished elbow going into the throttle body has a fitting for the IAT sensor. The MAF is a 5-wire which has the IAT built in. Since I didn't need the fitting in the elbow, I converted it to be a port for the meth injection. The port was threaded too large to simply drill and re-tap the hole so I found a nice Russell 1/8NPT to 3/8NPT to hopefully make it work. I got the proper drill and tap for the 3/8NPT and successfully got the fitting installed. Looks great and should work perfectly fine.
First, the damper/hub install tool I rented from Advance Auto isn't going to work. This is the one I grabbed.
http://shop.advanceautoparts.com/web...%7CGRP2083____
Does anyone know the tool to allow me to press the crank hub onto the snout of the crank?
To make things more difficult, Callies decided to start the threads deeper into the crank snout so I need a longer 7/16 fine thread rod to ?? thread adapter to even think about using this tool. I will be calling Callies tomorrow to see what they recommend.
I didn't think of this before but I also don't know how the bolt in the center will even secure the crank hub when installed. See the pic below compared to the old crank hub. Its clear the old crank hub is smaller in the center to allow the bolt to actually do something.
Summit sent me the wrong pushrods (Comp Hi-Tech pushrods) which were 7.1" not 7.2". The box listed the correct length but the rods said something different. Summit was really good. I called them and they are sending new ones out immediately and only need me to send the old ones back when the new package arrives.
Now, onto what I did get done...not much granted the other issues I ran into. I got the new white spring installed in the Melling Select oil pump. Pump was primed, installed and the stud torqued to spec.
Also installed my lokar dipstick which required trimming of the shroud going into the block. The shroud hit the splayed main cap so I simply cut off the necessary length and its all good now. The lokar stick is a much more rigid piece than a stock flimsy unit so I don't imagine I will run into issues.
My other crafty idea actually seems to be working out. The polished elbow going into the throttle body has a fitting for the IAT sensor. The MAF is a 5-wire which has the IAT built in. Since I didn't need the fitting in the elbow, I converted it to be a port for the meth injection. The port was threaded too large to simply drill and re-tap the hole so I found a nice Russell 1/8NPT to 3/8NPT to hopefully make it work. I got the proper drill and tap for the 3/8NPT and successfully got the fitting installed. Looks great and should work perfectly fine.
Just know that you can only get the 12 rib belts direct from Procharger, I called Gates and they said it was proprietary to them, at $100.00 a pop its not cheap, also you can tear the ribs very easy, one time I tried to slide the belt on instead of putting it on the crank hub first and tore a few ribs, when I started the car the belt started eating itself, destroyed it in less than a minute..
I'm not sure what your supposed to do with the crank hub in the left. It looks like your missing something.
When I installed my aftermarket keyed hub I had no problems.
I did not need any special tools. My engine guy told me to remove the washer from the crank bolt to make the bolt a little longer and it worked
try this
first remove the washer from your crank hub bolt.
then place the bolt through the hub.
thread the bolt into the crank and lineup your keyways
install the bolt and hub about a half inch or so onto the crank
remove the bolt and put the washer back on.
tighten the rest of the way and torque.
Did you prime the motor and then remove the oil pan. I had a hard time priming my engine. It took half an hour plus to get oil to all the rockers.
LS1 Tech Stories
The Best V8 Stories One Small Block at Time

6 Common C5 Corvette Failures and What's Involved In Repairing Them
Pouria Savadkouei
Retro Modern Bandit Pontiac Trans AM Comes With Burt Reynolds' Autograph
Verdad Gallardo
Top 10 Greatest Cadillac V Series Performance Models Ever, Ranked
Pouria Savadkouei
Top 10 Most Powerful Chevy Trucks Ever Made!

Hennessey's New Supercharged Silverado ZR2 Has 700 HP
Verdad Gallardo
Coachbuilt N2A Anteros Is an LS2-Powered C6 Corvette In Italian Clothes
Verdad Gallardo
Awesome K5 Blazer Restomod Comes With C7 Corvette Power
Verdad Gallardo
10 Camaros You Should Never Buy

10 LS Engine Myths That Refuse to Die
Verdad Gallardo Thread Starter
Joined: Mar 2005
Posts: 2,161
Likes: 4
From: Millstone Twp, NJ
Just know that you can only get the 12 rib belts direct from Procharger, I called Gates and they said it was proprietary to them, at $100.00 a pop its not cheap, also you can tear the ribs very easy, one time I tried to slide the belt on instead of putting it on the crank hub first and tore a few ribs, when I started the car the belt started eating itself, destroyed it in less than a minute..
I'm not sure what your supposed to do with the crank hub in the left. It looks like your missing something.
When I installed my aftermarket keyed hub I had no problems.
I did not need any special tools. My engine guy told me to remove the washer from the crank bolt to make the bolt a little longer and it worked
try this
first remove the washer from your crank hub bolt.
then place the bolt through the hub.
thread the bolt into the crank and lineup your keyways
install the bolt and hub about a half inch or so onto the crank
remove the bolt and put the washer back on.
tighten the rest of the way and torque.
Did you prime the motor and then remove the oil pan. I had a hard time priming my engine. It took half an hour plus to get oil to all the rockers.
When I installed my aftermarket keyed hub I had no problems.
I did not need any special tools. My engine guy told me to remove the washer from the crank bolt to make the bolt a little longer and it worked
try this
first remove the washer from your crank hub bolt.
then place the bolt through the hub.
thread the bolt into the crank and lineup your keyways
install the bolt and hub about a half inch or so onto the crank
remove the bolt and put the washer back on.
tighten the rest of the way and torque.
Did you prime the motor and then remove the oil pan. I had a hard time priming my engine. It took half an hour plus to get oil to all the rockers.
I figured the issue out, I need a large washer like the SBC cars use however I need a much longer bolt. I called Callies and they offer various stud kits from ARP to make it all work. I ordered that yesterday so should be able to get this put to bed on Monday. It's something I should have clearly noticed earlier but just didn't think about it. I'm not in any particular rush so no big deal.
As far as installing the hub, the tool isn't going to work so I am going to make my own with all grade 8 hardware. 1' threaded rod, large diameter nuts, thick washers, etc and should be fine.
The nice thing is I can pull the crank sensor in the bottom of the timing cover to make sure the hub is in far enough.
 Mine is a pile of parts slowly coming together. Many will think I'm crazy however I go to bed nearly every night and think about driving it when its all done. It truly is a sickness.
 nope on jack stands lol not running yet i have to finish putting the rearend in abs delete and few other odds and ends then it will be the first start up with the procharger on it but i would love to build what your building im excited to get my car back on the rear so i can tear the streets up lol good build tho man im watching you
Thread Starter
Joined: Mar 2005
Posts: 2,161
Likes: 4
From: Millstone Twp, NJ
nope on jack stands lol not running yet i have to finish putting the rearend in abs delete and few other odds and ends then it will be the first start up with the procharger on it but i would love to build what your building im excited to get my car back on the rear so i can tear the streets up lol good build tho man im watching you
That is the Key, to get the belt perfectly lined up, Do not try washers in the event your pullies dont line up. My kit came with a billet spacer but the alignment was off by about 1/8" of an inch, this was enough to cause belt failure, I tried washers, even torqued the bolts to a run out gage to keep the balancer perfectly straight and still failure. I took a straight edge against the supercharger pulley and measured the difference at the crank pulley the had a billet spacer made..No more belt failures...Oh and I tried the double 6 rib..Did not work...for me anyway...
Thread Starter
Joined: Mar 2005
Posts: 2,161
Likes: 4
From: Millstone Twp, NJ
That is the Key, to get the belt perfectly lined up, Do not try washers in the event your pullies dont line up. My kit came with a billet spacer but the alignment was off by about 1/8" of an inch, this was enough to cause belt failure, I tried washers, even torqued the bolts to a run out gage to keep the balancer perfectly straight and still failure. I took a straight edge against the supercharger pulley and measured the difference at the crank pulley the had a billet spacer made..No more belt failures...Oh and I tried the double 6 rib..Did not work...for me anyway...
Pushrods and my other hardware have come in so I can now get the rockers installed and get the hub/balancer installed as well. I will mock up the blower and see how things are lining up. At least I know not to expect it to line up perfectly lol.
Thread Starter
Joined: Mar 2005
Posts: 2,161
Likes: 4
From: Millstone Twp, NJ
Little bit more done today.
The proper length pushrods came in so got those installed along with the 1.6rr's. The lash was double checked and everything is ready to roll.
7.200" Comp Hi-Tech pushrods
Comp Ultra-Magnum 1.6RR's


My makeshift crank hub install tool also did the trick but it was a pain in the ***. I feared for the rod to snap or the threads to get marred but everything worked out just fine. The crank reluctor isn't moving at all so I assume the hub is fully seated. If it's not, I will need to start taking steroids to get it on any farther.
The proper length pushrods came in so got those installed along with the 1.6rr's. The lash was double checked and everything is ready to roll.
7.200" Comp Hi-Tech pushrods
Comp Ultra-Magnum 1.6RR's
My makeshift crank hub install tool also did the trick but it was a pain in the ***. I feared for the rod to snap or the threads to get marred but everything worked out just fine. The crank reluctor isn't moving at all so I assume the hub is fully seated. If it's not, I will need to start taking steroids to get it on any farther.

Thread Starter
Joined: Mar 2005
Posts: 2,161
Likes: 4
From: Millstone Twp, NJ
I have 98-02 fbody brakes that will go on which should be a decent upgrade to the crappy single piston calipers. I will want to put a decent drag setup on the car so no big brake setup for me at the moment.
Thread Starter
Joined: Mar 2005
Posts: 2,161
Likes: 4
From: Millstone Twp, NJ
Some more progress made today after the snow cleanup thanks to my Dad and buddy, Jon.
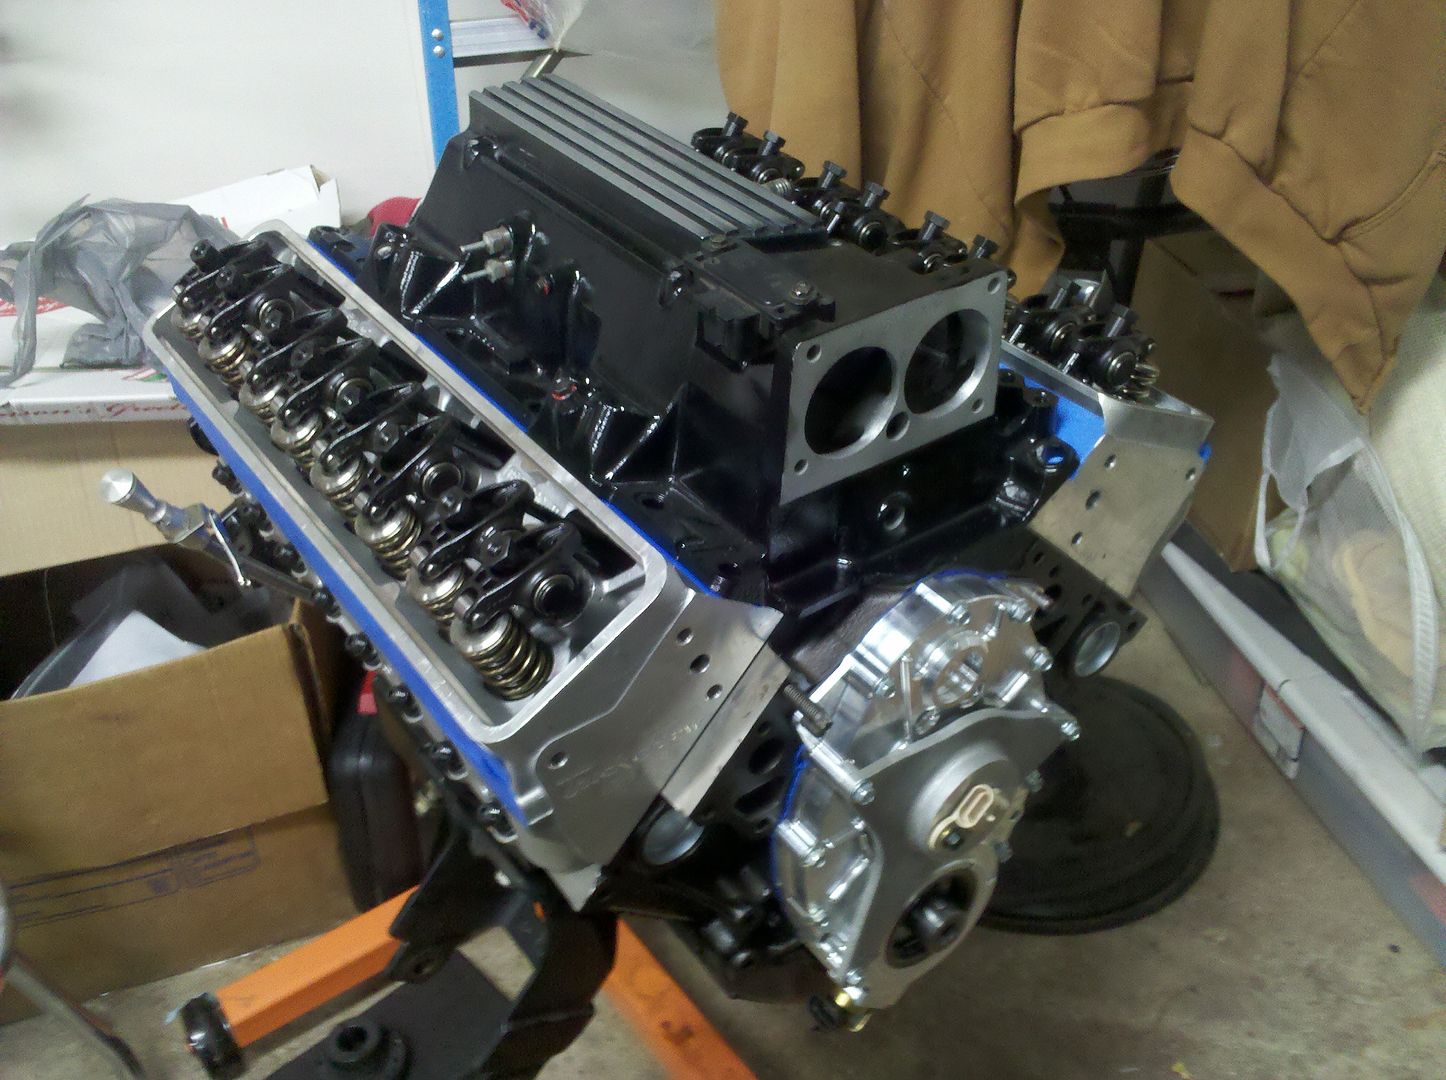
Intake is just about ready, got the rails/injectors installed as well as the block off plates. I laid the intake on the engine just for the photo op but will wait until the engine goes back in to finish the install. Motor mounts are also ready to roll with the prothane inserts thanks to Jon.
The Lonnies Double Pumper wiring has been run from the tank and will be run to the front of the car tomorrow.
The wire mod hole was drilled today on the passenger side and holes on the drivers for the fuel line relocation kit from Speed Inc. This is really going to clean things up well.
Don't mind the blue tape in the pics. I taped off the ports to make sure nothing found its way in the ports before the final install.

Don't ask what Jon was doing with the intake


Intake is just about ready, got the rails/injectors installed as well as the block off plates. I laid the intake on the engine just for the photo op but will wait until the engine goes back in to finish the install. Motor mounts are also ready to roll with the prothane inserts thanks to Jon.
The Lonnies Double Pumper wiring has been run from the tank and will be run to the front of the car tomorrow.
The wire mod hole was drilled today on the passenger side and holes on the drivers for the fuel line relocation kit from Speed Inc. This is really going to clean things up well.
Don't mind the blue tape in the pics. I taped off the ports to make sure nothing found its way in the ports before the final install.
Don't ask what Jon was doing with the intake
Thread Starter
Joined: Mar 2005
Posts: 2,161
Likes: 4
From: Millstone Twp, NJ
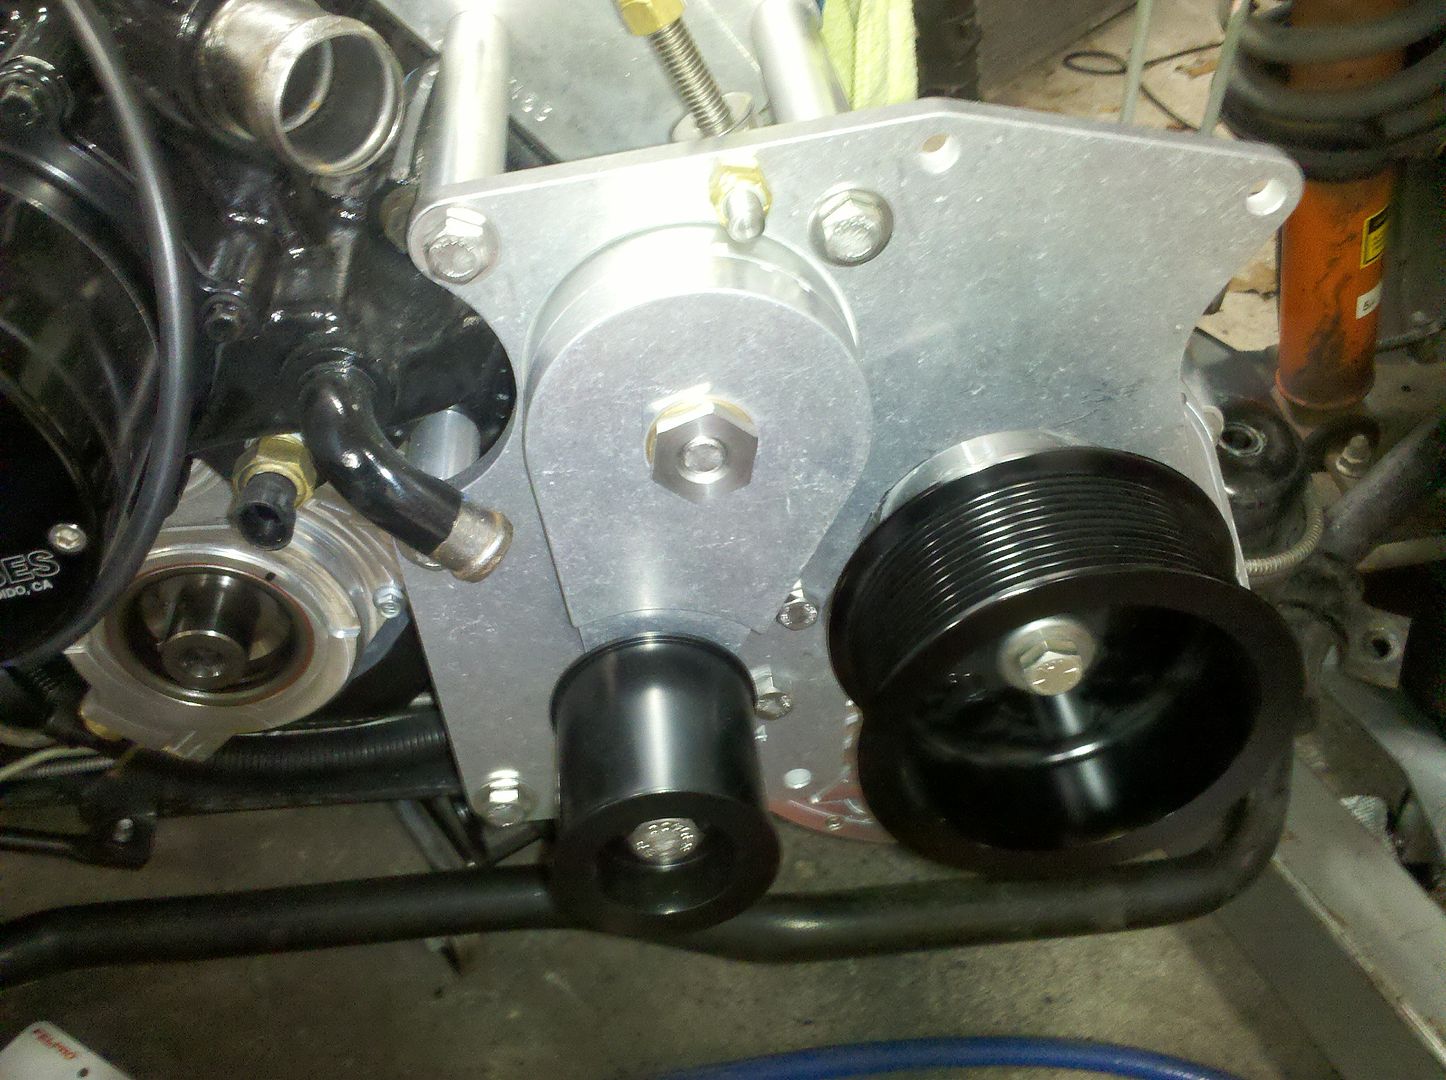
Pic time!
Clutch is on and just a few pics of the blower mocked up. Once I get the front end jibberish back from the machine shop, I will install it for good (so I hope).
As you can see, the block needed to be clearanced quite a bit to get the blower to fit. Don't worry about its proximity to the freeze plug, the pic angle makes it look closer. Still close but not that bad to cause concern.
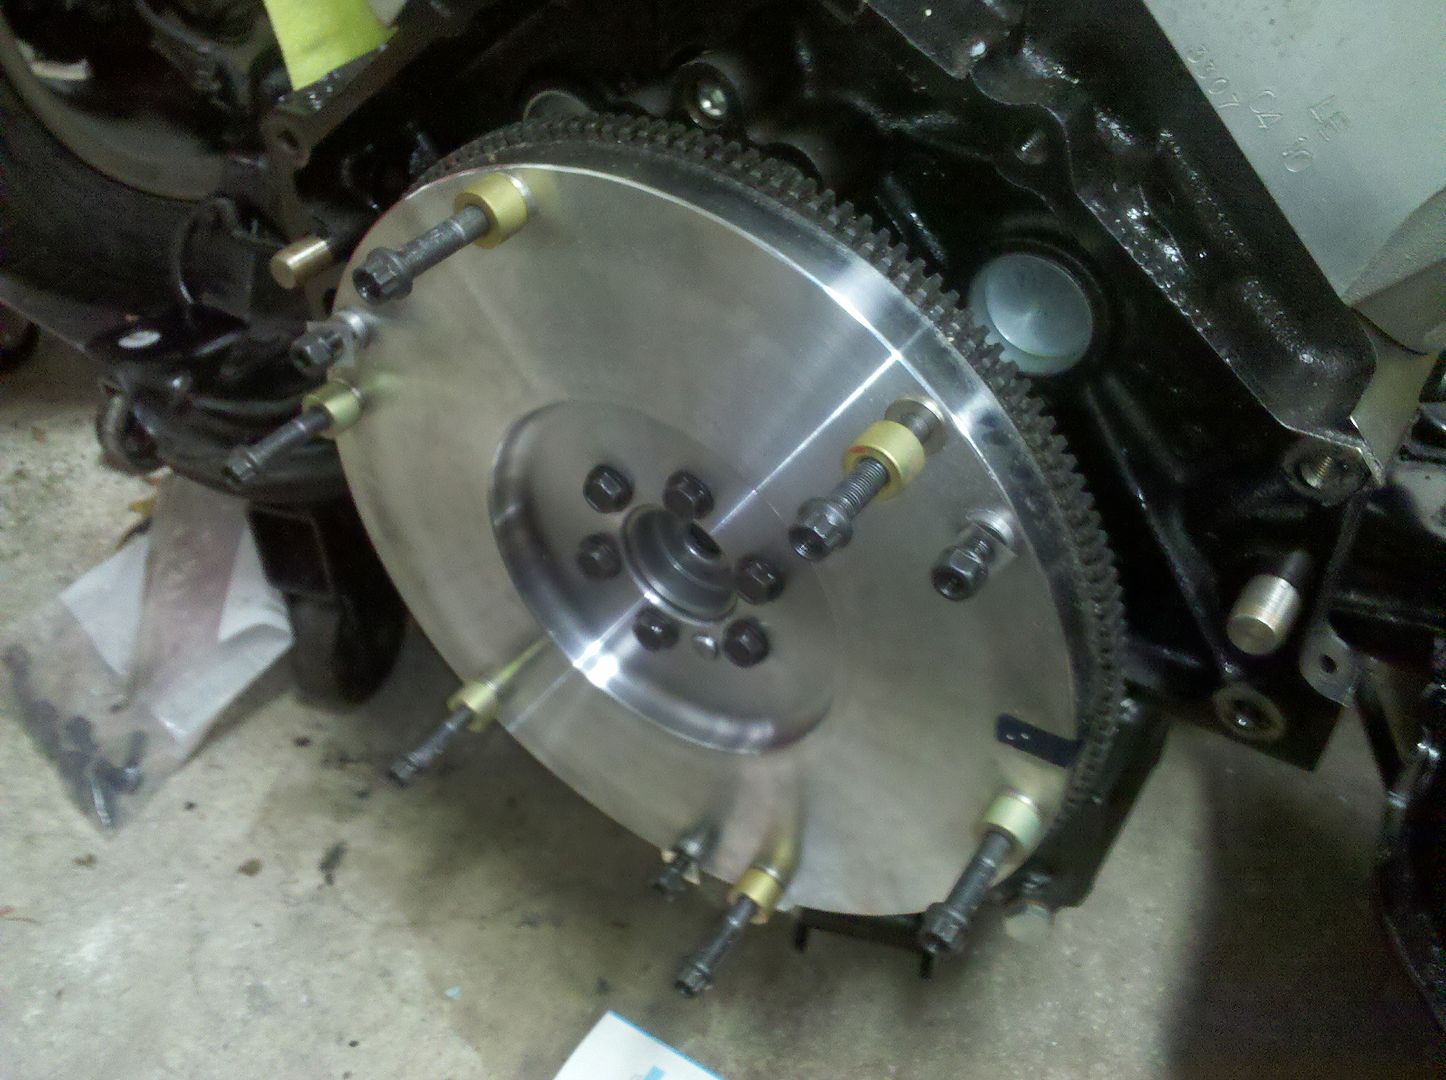
Thread Starter
Joined: Mar 2005
Posts: 2,161
Likes: 4
From: Millstone Twp, NJ
The snout of my crankshaft is going to hate me for this....
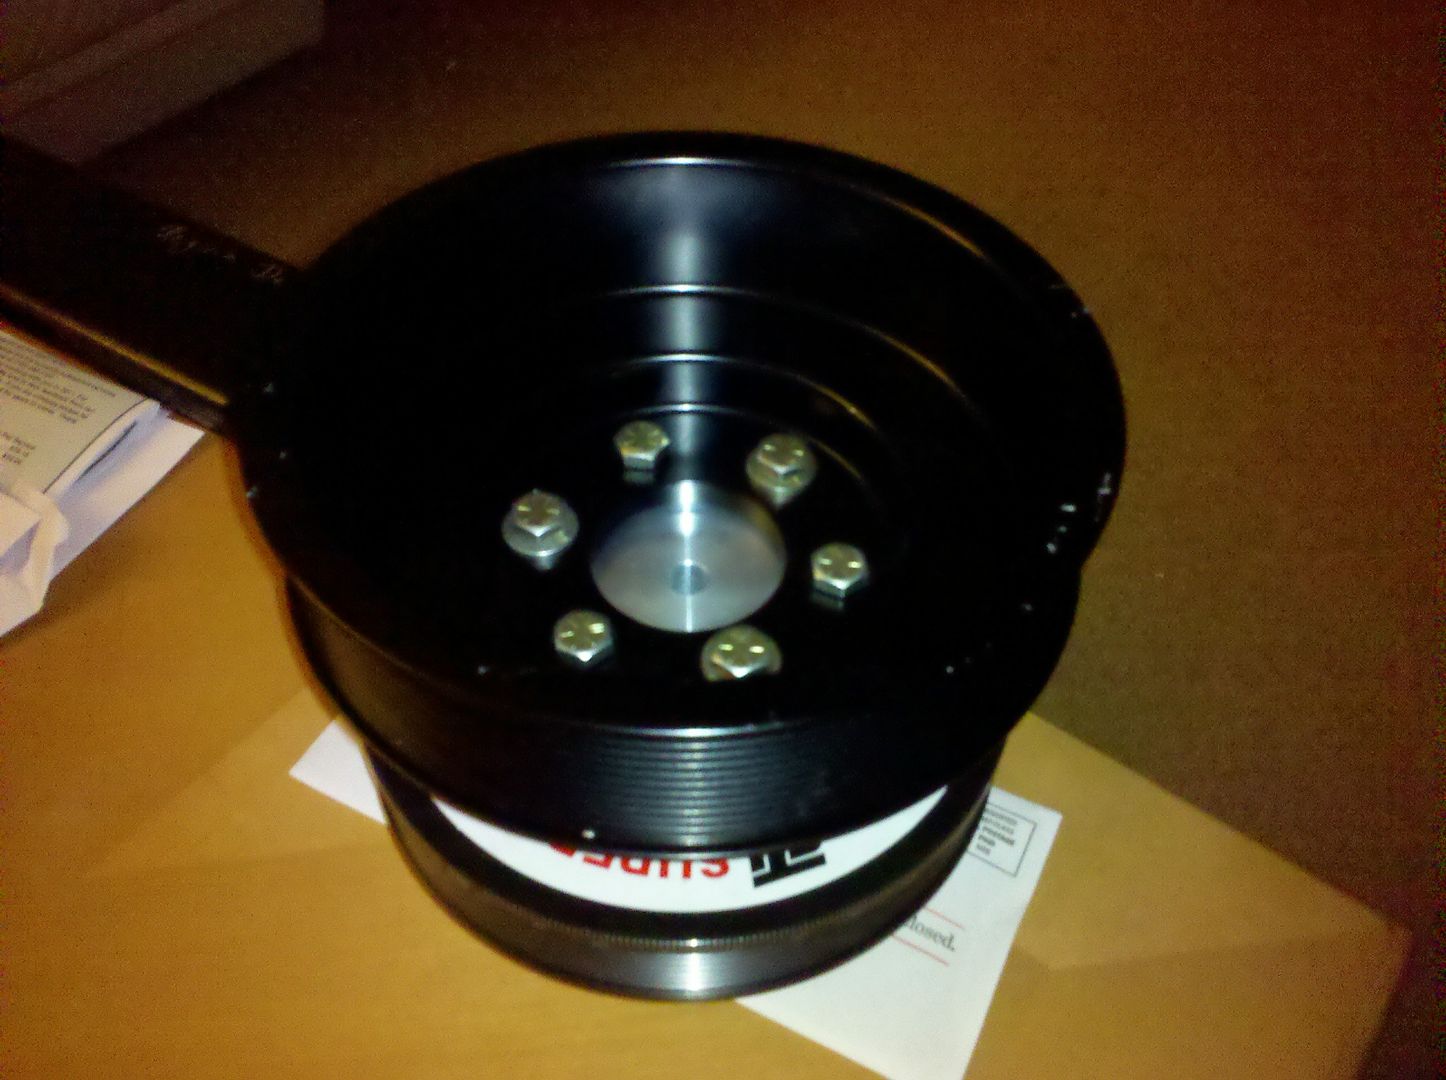

Just got the spacer and blower pulley back from the machine shop. Spacer and blower pulley had three extra mounting holes added along with some material taken off to space the pullies accordingly. When taking the material off, they left a nice protrusion to center everything on the hub. Came out really nice.
Just got the spacer and blower pulley back from the machine shop. Spacer and blower pulley had three extra mounting holes added along with some material taken off to space the pullies accordingly. When taking the material off, they left a nice protrusion to center everything on the hub. Came out really nice.