70 Chevelle Restomod 5.3 w/S475 and 4L80E, Videos start on page 10


 09-19-2013, 12:42 PM
#102
11 Second Club
Thread Starter
iTrader: (8)
Join Date: Jan 2010
Location: Southern Idaho
Posts: 502
Likes: 0
Received 0 Likes
on
0 Posts
Yes it is.
I will probably be switching it out in the future to compliment an LS6 intake I picked up but I want some better looking fuel rails and a fuel pressure regulator first.
 09-20-2013, 11:58 AM
#103

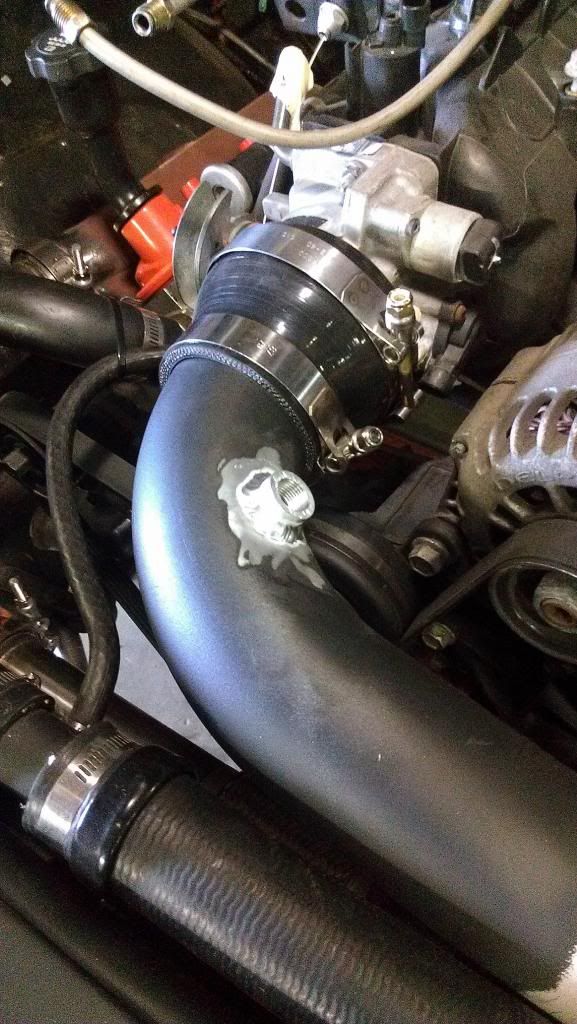
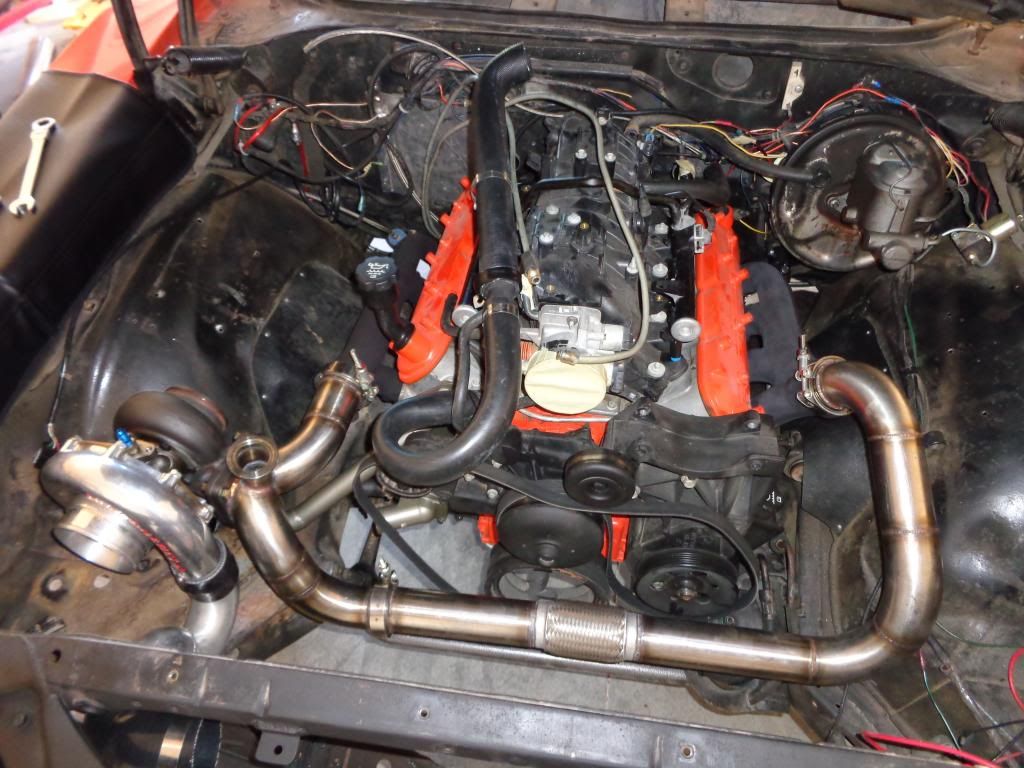
Thanks, yeah figured that might be a wise piece to spend a little money on since it regulates boost lol. It's a 46mm inlet I believe and comes with the v-bands needed for the inlet and outlet. The IC is just an Ebay unit with 31"x11.5"x3" core size and 3" inlet/outlet, I wanted the biggest core I could fit. I lost my stock hood latch because of it but I will figure something out.
Yes it is.
I will probably be switching it out in the future to compliment an LS6 intake I picked up but I want some better looking fuel rails and a fuel pressure regulator first.
Yes it is.
I will probably be switching it out in the future to compliment an LS6 intake I picked up but I want some better looking fuel rails and a fuel pressure regulator first.
 Now I have to use a C6 manifold to clear it and still follow your overall desgin.
09-23-2013, 06:09 PM
Now I have to use a C6 manifold to clear it and still follow your overall desgin.
09-23-2013, 06:09 PM
#104
11 Second Club
Thread Starter
iTrader: (8)
Join Date: Jan 2010
Location: Southern Idaho
Posts: 502
Likes: 0
Received 0 Likes
on
0 Posts
Made some more progress on the car over the weekend but need to find a new image host as imageshack sucks. I reread my thread and half the photos didn't show up and the other half changed size 
So once I figure that out I will post up some more progress pics.
So once I figure that out I will post up some more progress pics.
10-09-2013, 10:30 AM
#105
11 Second Club
Thread Starter
iTrader: (8)
Join Date: Jan 2010
Location: Southern Idaho
Posts: 502
Likes: 0
Received 0 Likes
on
0 Posts
Decided to try photobucket as my new image host, we'll see how that works out. Anyways a couple updates.
Finished the turbo brace
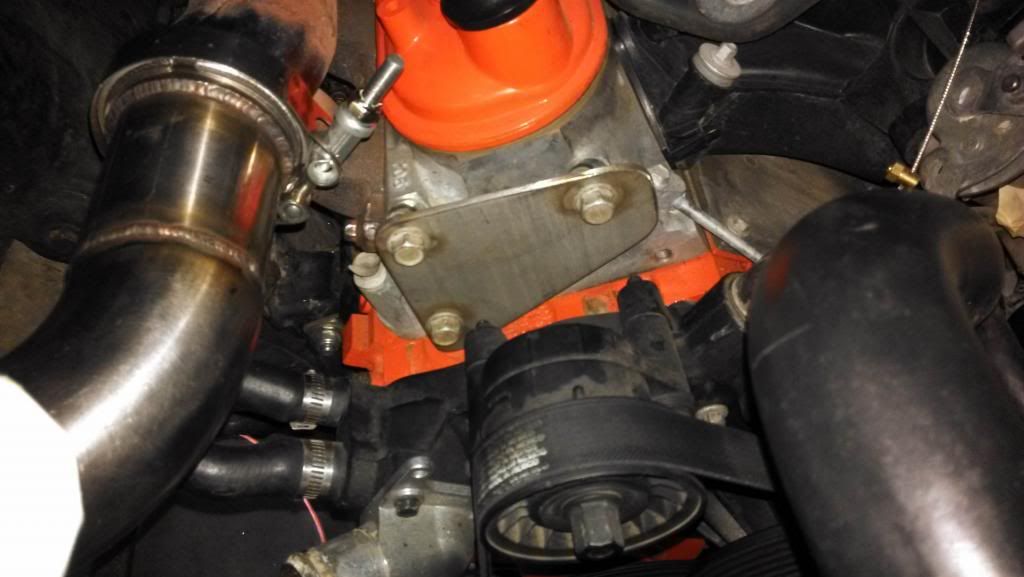
Made my lower intercooler brackets which will double as my trans cooler brackets.

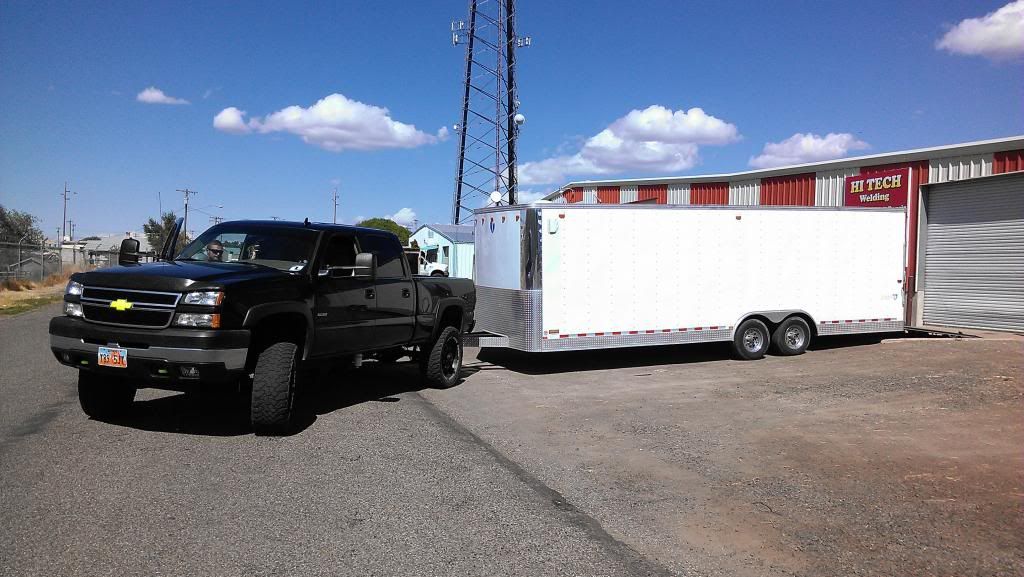
Had a couple buddies in town for the weekend that helped me get the car back to the house. Gettting a high class ride home in a borrowed trailer and truck haha

Had my buddy Steve make an aluminum bung on his lathe for my IAT mount in my charge pipe.
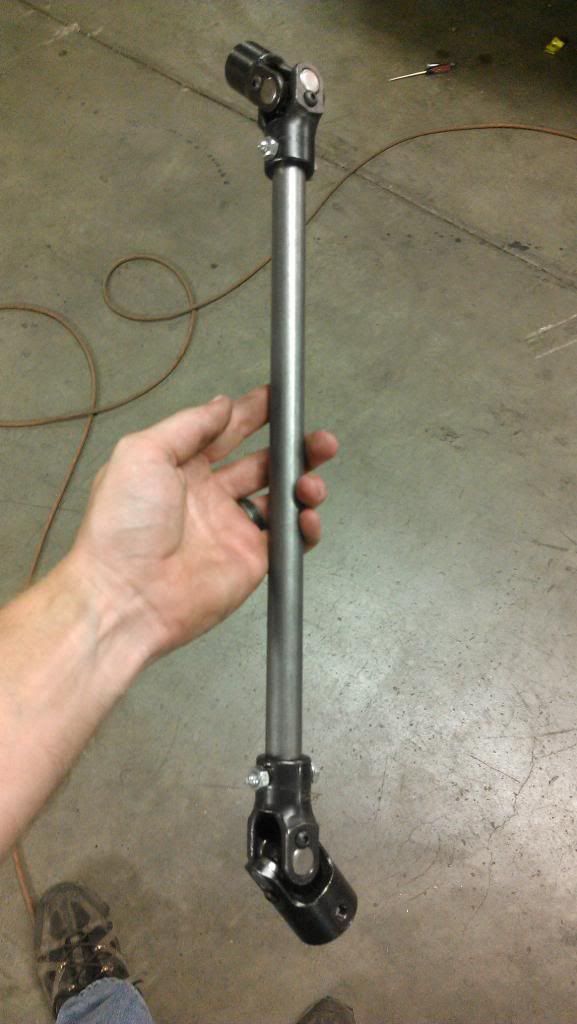
Made a new steering shaft because the stock piece hit the inverted driverside manifold.
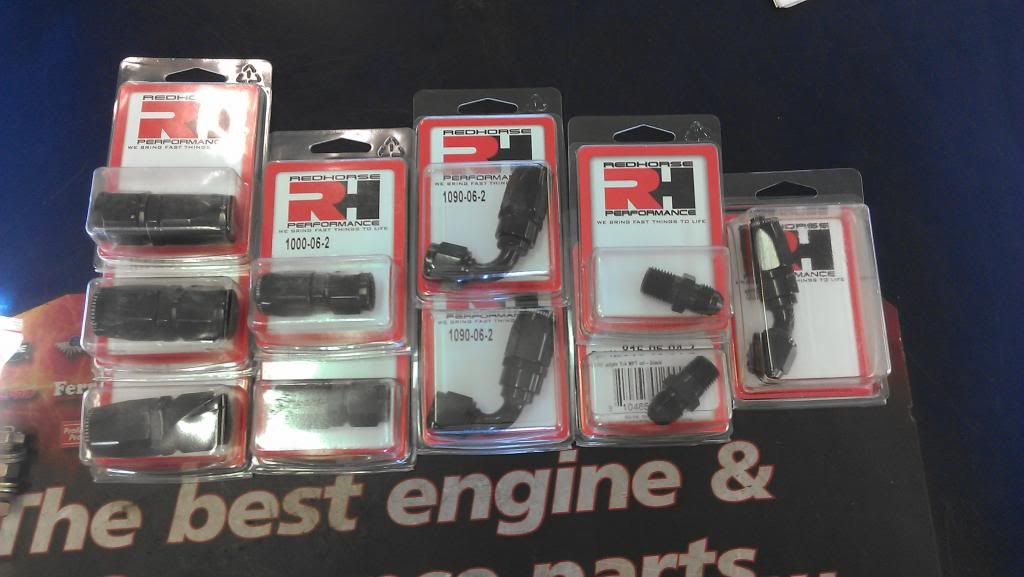
Spent a little coin on fuel system pieces, my plan is to run dual external walbro's from the sump to a y block and 8an from there to the rail, then a 6an return line to the tank.
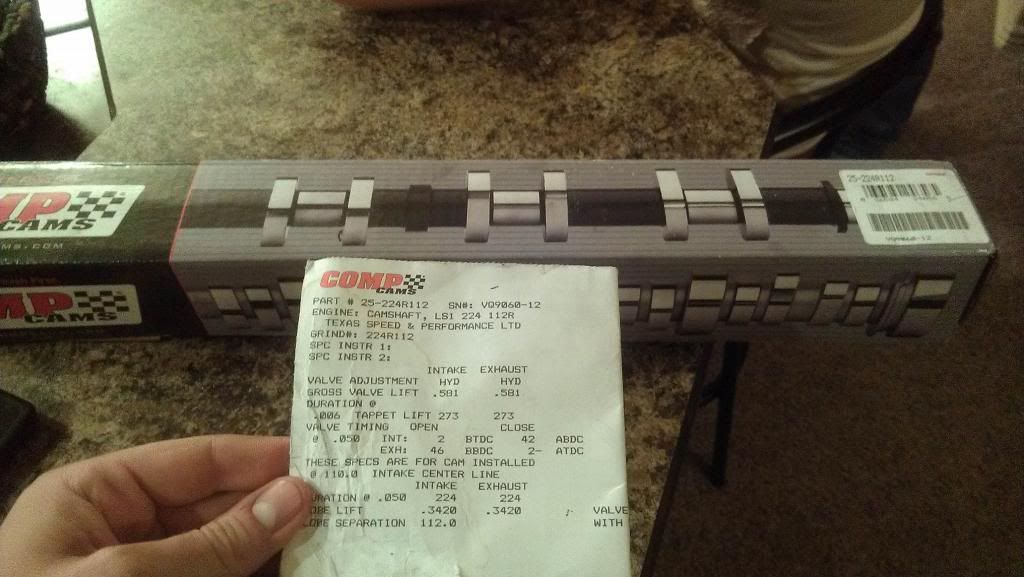
Also picked up a TSP224r cam from a local classified, I know it's technically not a turbo cam but it specs pretty close to the Speed Inc. TU1 and I got a good deal on it, so couldn't pass it up. I will probably go ahead and run the car with the LS6 cam first then install the 224r later to see how much difference there is.
Finished the turbo brace


Made my lower intercooler brackets which will double as my trans cooler brackets.


Had a couple buddies in town for the weekend that helped me get the car back to the house. Gettting a high class ride home in a borrowed trailer and truck haha


Had my buddy Steve make an aluminum bung on his lathe for my IAT mount in my charge pipe.

Made a new steering shaft because the stock piece hit the inverted driverside manifold.

Spent a little coin on fuel system pieces, my plan is to run dual external walbro's from the sump to a y block and 8an from there to the rail, then a 6an return line to the tank.

Also picked up a TSP224r cam from a local classified, I know it's technically not a turbo cam but it specs pretty close to the Speed Inc. TU1 and I got a good deal on it, so couldn't pass it up. I will probably go ahead and run the car with the LS6 cam first then install the 224r later to see how much difference there is.
 10-09-2013, 10:38 AM
#106
Did your upper radiator hose come with the plastic piece in it to hook up that smaller hose which I'm assuming goes to the steam port? Where did you get it? Do you happen to know the part number? Thanks
10-09-2013, 10:55 AM
#107
11 Second Club
Thread Starter
iTrader: (8)
Join Date: Jan 2010
Location: Southern Idaho
Posts: 502
Likes: 0
Received 0 Likes
on
0 Posts
Sorry no part # because It's actually an aluminum reducer that I made with a brass fitting in the bottom side for the steam port connection, I just painted it black to make it look cleaner. If you are looking to purchase something similar you should try Jags that run.
 10-16-2013, 11:52 AM
#111
11 Second Club
Thread Starter
iTrader: (8)
Join Date: Jan 2010
Location: Southern Idaho
Posts: 502
Likes: 0
Received 0 Likes
on
0 Posts
Got the fuel system started, here is a pic of the pumps and routing. It goes from the pumps to a y block then a single #8 line runs through the frame rail over the axle up to the post pump filter which I haven't determined the exact mounting location yet.

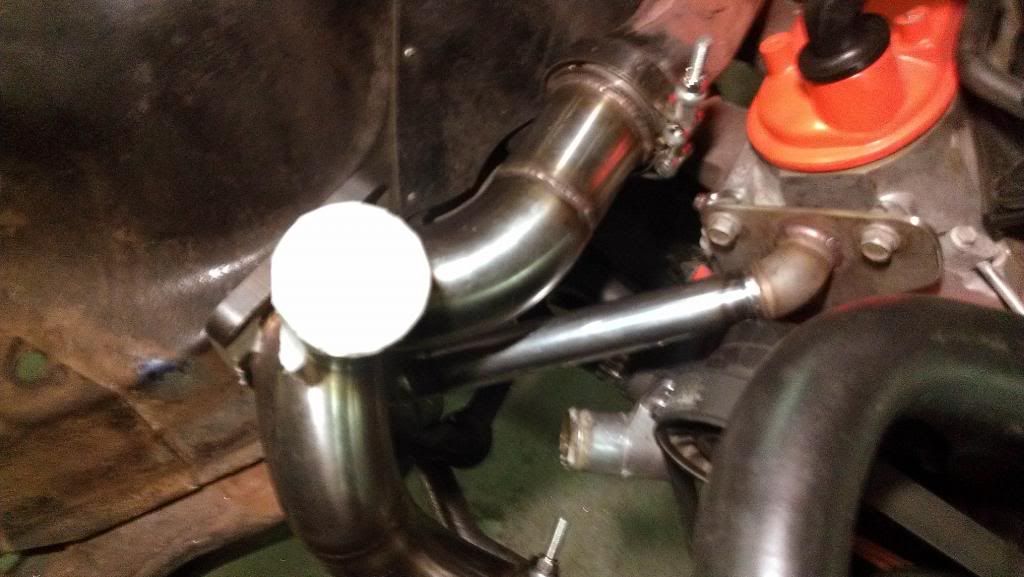
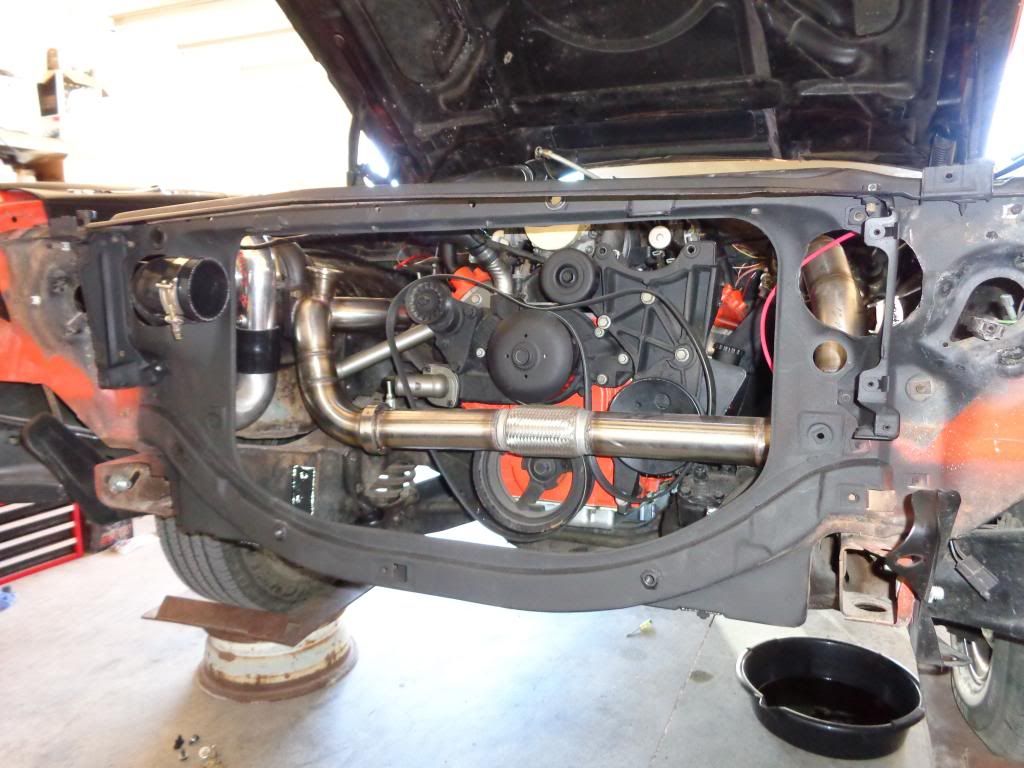
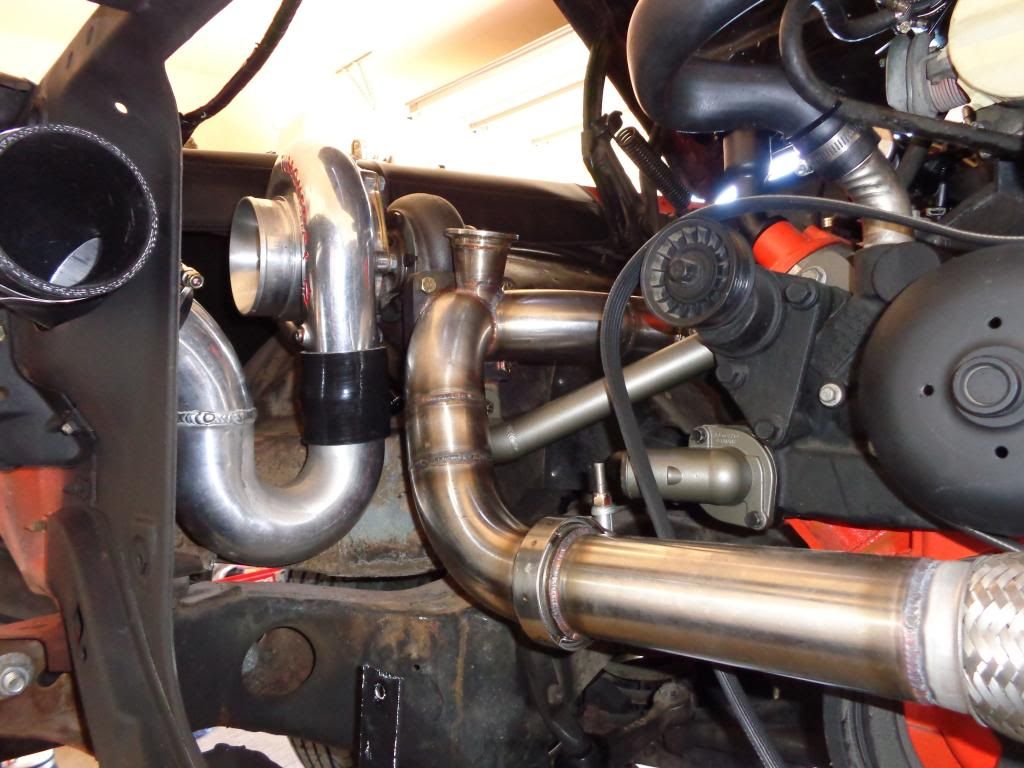
Took a few more pictures of the hotside routing with the radiator out of the way to better show where everything sits.

Once I marked my oil return location on the pan, pulled the motor cause I couldn't get the pan off with the engine in the car. So this is where it sits now.
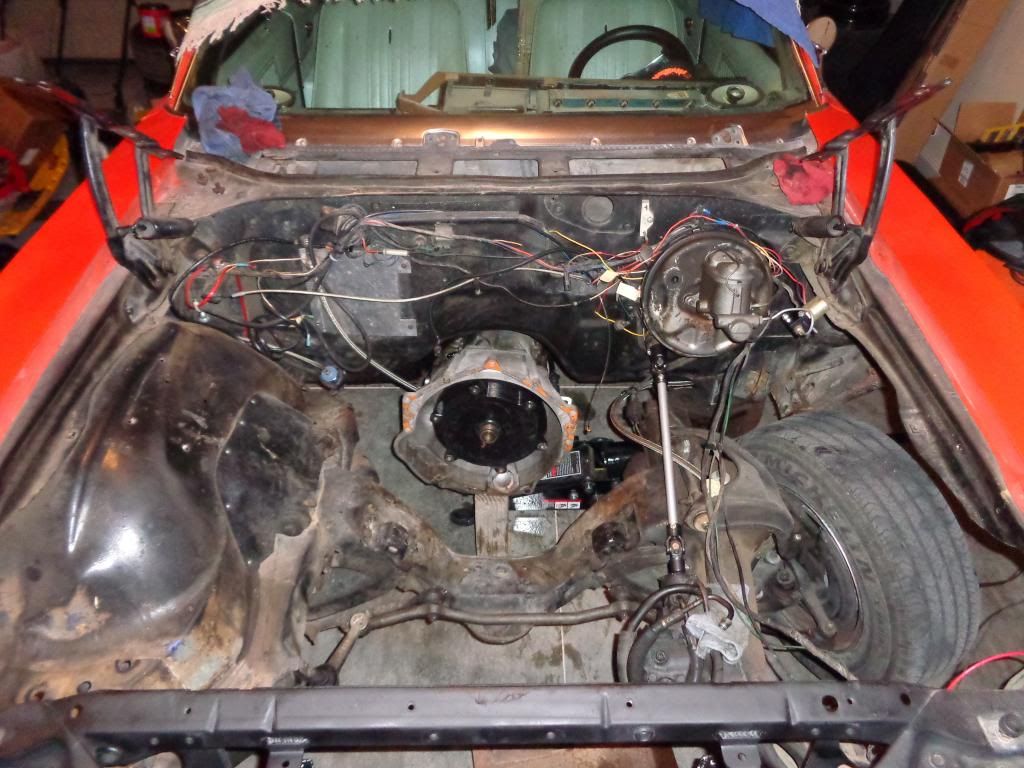
Should get the bung installed in the pan in the next day or so. Once that's done just have other little odds and ends to wrap up before everything goes back together. Still have to redo the entire wire harness too....not looking forward to that lol.


Took a few more pictures of the hotside routing with the radiator out of the way to better show where everything sits.


Once I marked my oil return location on the pan, pulled the motor cause I couldn't get the pan off with the engine in the car. So this is where it sits now.

Should get the bung installed in the pan in the next day or so. Once that's done just have other little odds and ends to wrap up before everything goes back together. Still have to redo the entire wire harness too....not looking forward to that lol.
10-18-2013, 11:03 AM
#112
11 Second Club
Thread Starter
iTrader: (8)
Join Date: Jan 2010
Location: Southern Idaho
Posts: 502
Likes: 0
Received 0 Likes
on
0 Posts
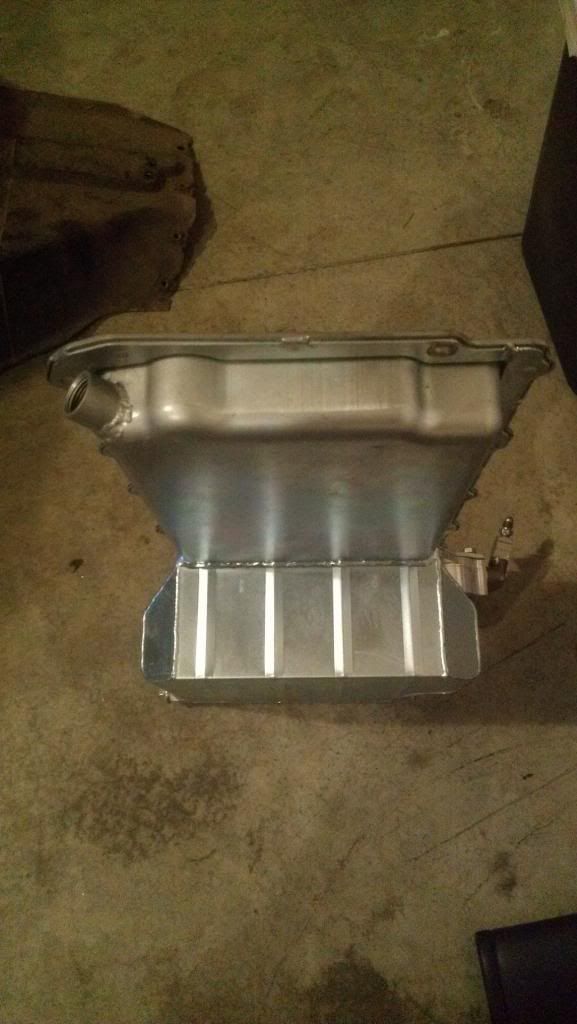
Got the bung installed in my oil pan

I also started to mount the PCM on the firewall behind the driverside inner fender like I had seen a couple other turbo chevelles do.
I will get pics of that as soon as it's done.


I also started to mount the PCM on the firewall behind the driverside inner fender like I had seen a couple other turbo chevelles do.
I will get pics of that as soon as it's done.
10-19-2013, 09:25 AM
#113
Thanks for the extra pics bro. Really put things into perspective. Couple questions for you (as usual)
1. Did you sump your stock tank and is the return line run above the tank
2. What pumps are you using (I have a Bosch 044) and how do you plan to power both?
3. Are you using E85?
1. Did you sump your stock tank and is the return line run above the tank
2. What pumps are you using (I have a Bosch 044) and how do you plan to power both?
3. Are you using E85?
10-21-2013, 09:50 AM
#114
11 Second Club
Thread Starter
iTrader: (8)
Join Date: Jan 2010
Location: Southern Idaho
Posts: 502
Likes: 0
Received 0 Likes
on
0 Posts
Thanks for the extra pics bro. Really put things into perspective. Couple questions for you (as usual)
1. Did you sump your stock tank and is the return line run above the tank
2. What pumps are you using (I have a Bosch 044) and how do you plan to power both?
3. Are you using E85?
1. Did you sump your stock tank and is the return line run above the tank
2. What pumps are you using (I have a Bosch 044) and how do you plan to power both?
3. Are you using E85?
2. Walbro 255's, I think they are part# gsl392
3. I haven't decided on pump+meth or E85 yet, there is only one gas station in town that has E85 and they have the price jacked way up. Plus I think my fuel system would barely be able to support it, so most likely will run pump then maybe try E85 later.
10-23-2013, 11:24 AM
#119
11 Second Club
Thread Starter
iTrader: (8)
Join Date: Jan 2010
Location: Southern Idaho
Posts: 502
Likes: 0
Received 0 Likes
on
0 Posts
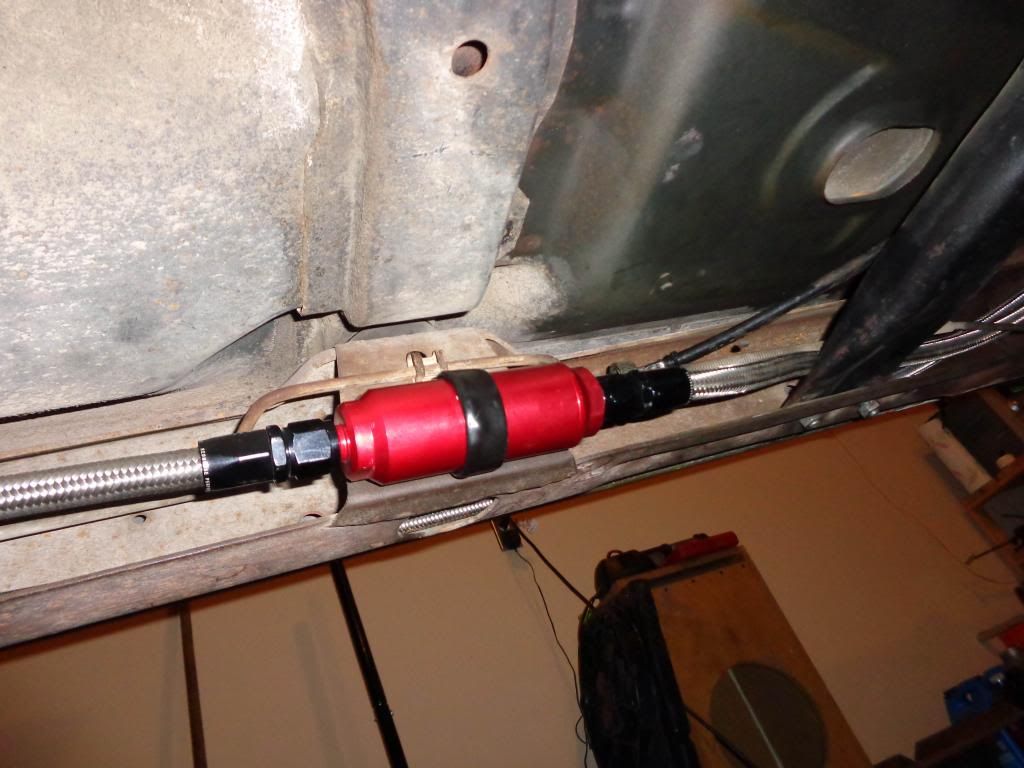
Got my post fuel pump filter mounted, from here it just continues along the frame then runs up the firewall to the stock fuel rail with a russell adapter.
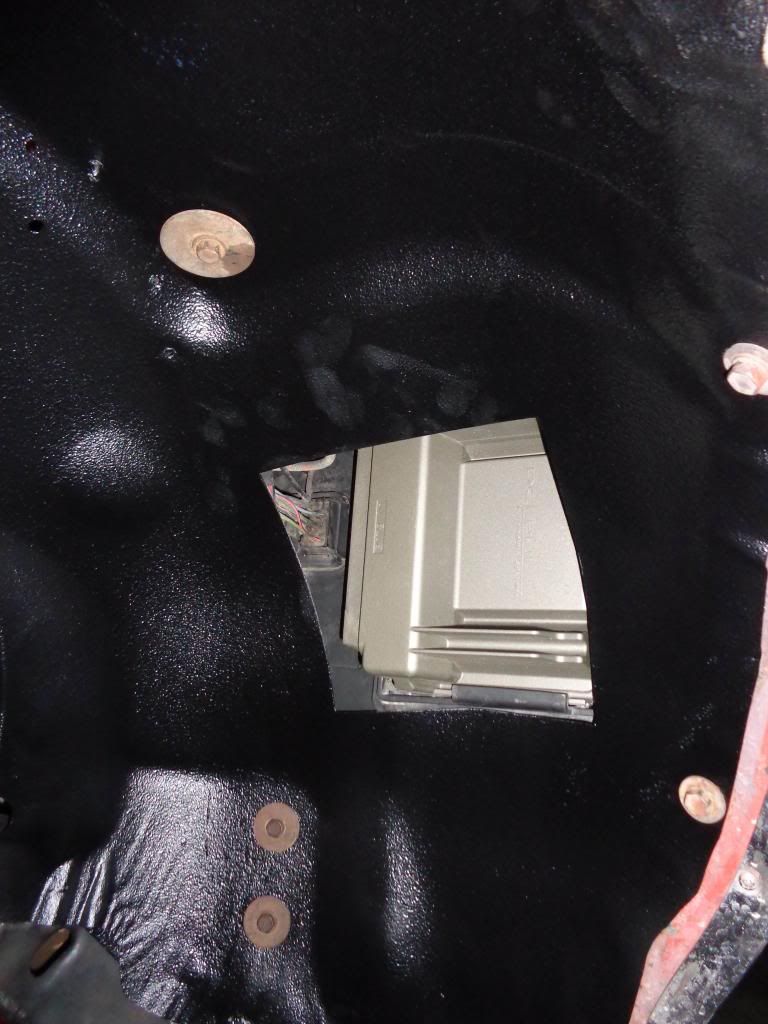
Also got the PCM mounted behind the driverside inner fender, I just used the stock truck pcm mount after I cut the backside off for a flat mount to the firewall.
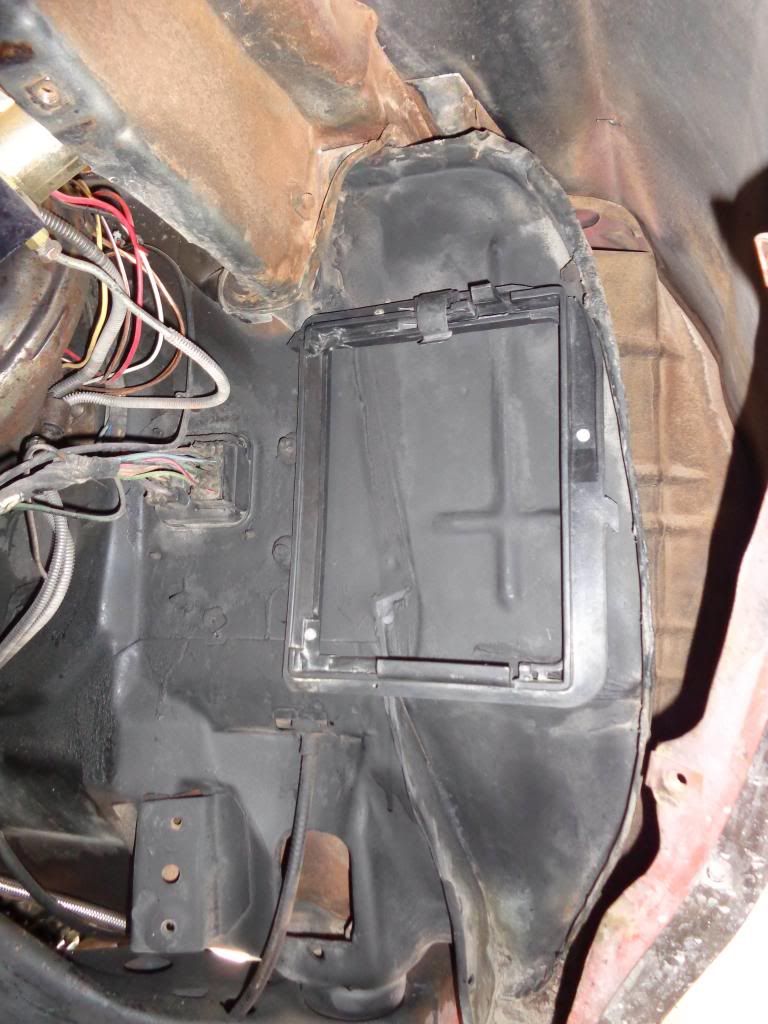
I had a to cut a hole in the inner fender to clear the PCM so I decided to make it big enough that I could pull the PCM in or out with the fender in place. I still need to make an access panel to cover it up and provide protection from road debris.

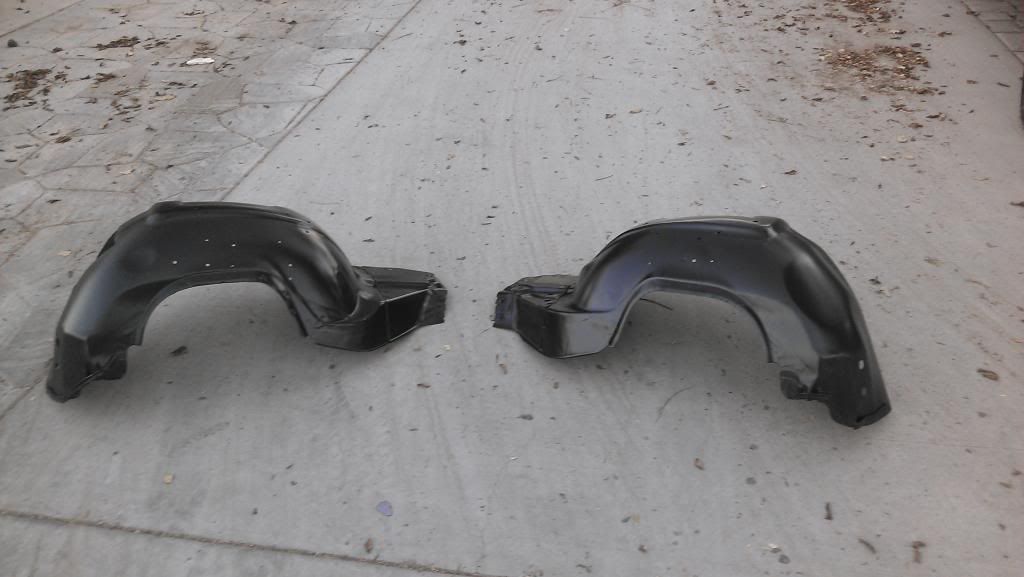
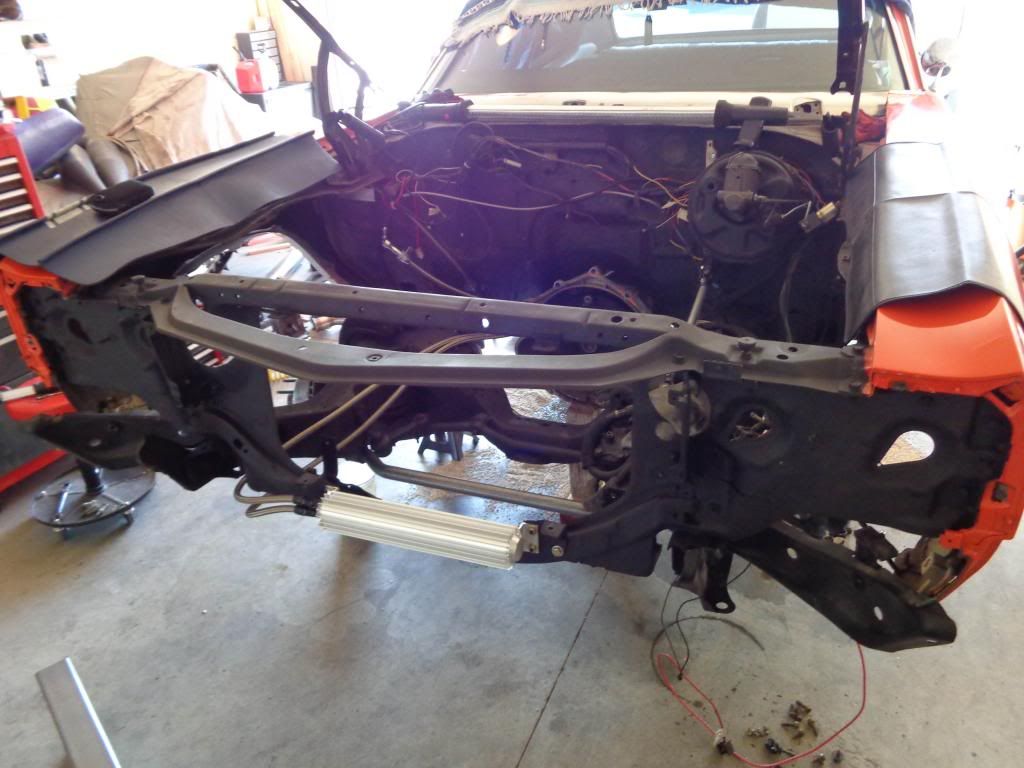
Decided while I had one inner fender out I should take the other one out and clean them up and paint them, turned into sandblasting the inner fenders and having my buddy Kaylan coat the inside with a bedliner coating and painting the outside with an actual paint gun. They looked so good I figured I better do something with the rest of the rusty and dirty engine compartment. So I grabbed some flat black spray paint I had laying around and painted the frame, cross member and rad support while I had the engine out. Definitely doesn't look as good as the inner fenders but it will work for now.
Finished inner fenders
Rad support painted with trans cooler mounted and lines made, still need to tie them down in couple spots.
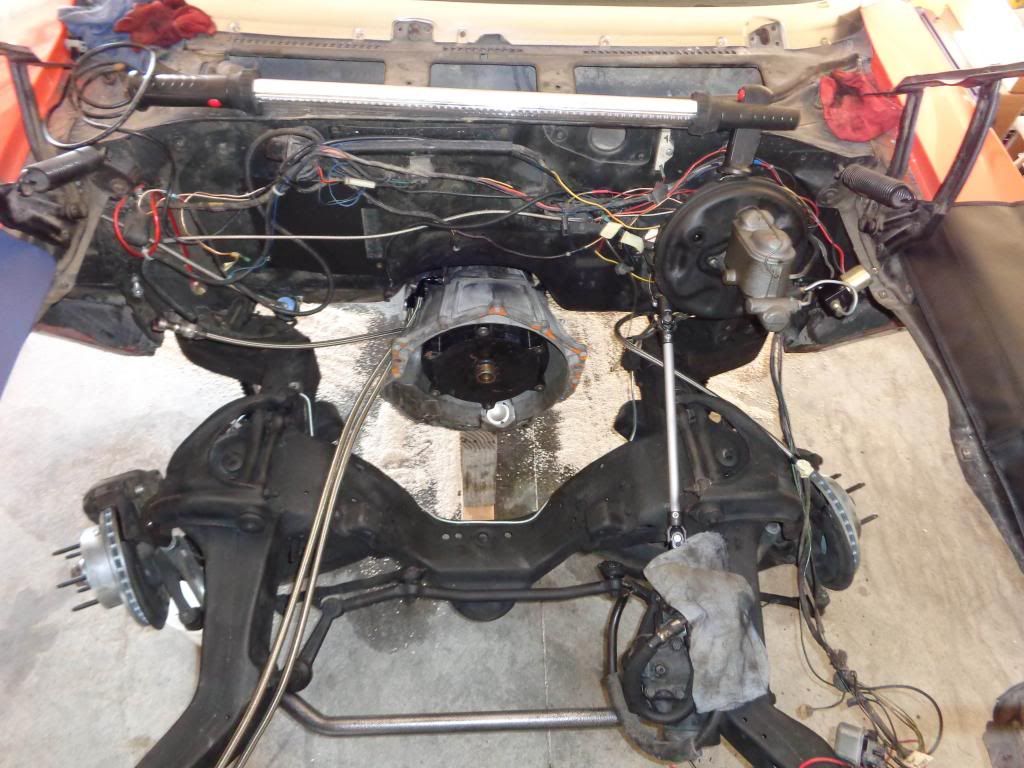
Frame freshly rattle canned and new passenger side brake line bent to shape and installed. The old brake line was in pretty bad shape from multiple oil pans being dragged across it and 40+ years of road grime. Don't mind the floor dry everywhere lol when I set the trans down on the block I forgot to unhook the dipstick from the firewall, so it pulled it out and dumped trans fluid all over the floor.

Also got the PCM mounted behind the driverside inner fender, I just used the stock truck pcm mount after I cut the backside off for a flat mount to the firewall.

I had a to cut a hole in the inner fender to clear the PCM so I decided to make it big enough that I could pull the PCM in or out with the fender in place. I still need to make an access panel to cover it up and provide protection from road debris.


Decided while I had one inner fender out I should take the other one out and clean them up and paint them, turned into sandblasting the inner fenders and having my buddy Kaylan coat the inside with a bedliner coating and painting the outside with an actual paint gun. They looked so good I figured I better do something with the rest of the rusty and dirty engine compartment. So I grabbed some flat black spray paint I had laying around and painted the frame, cross member and rad support while I had the engine out. Definitely doesn't look as good as the inner fenders but it will work for now.
Finished inner fenders

Rad support painted with trans cooler mounted and lines made, still need to tie them down in couple spots.

Frame freshly rattle canned and new passenger side brake line bent to shape and installed. The old brake line was in pretty bad shape from multiple oil pans being dragged across it and 40+ years of road grime. Don't mind the floor dry everywhere lol when I set the trans down on the block I forgot to unhook the dipstick from the firewall, so it pulled it out and dumped trans fluid all over the floor.

