When you click on links to various merchants on this site and make a purchase, this can result in this site earning a commission. Affiliate programs and affiliations include, but are not limited to, the eBay Partner Network.
I spent a lot of time fighting belt slip issues, and finally I decided to go a different route and try a turbo out for a change. My buddy over at Spoolin Performance built my piping, and I went ahead with a Borg Warner s480.
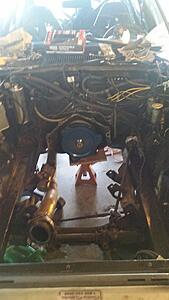
Had to start by tilting the radiator for some extra space. This is a full time street car, so driveability and not overheating is a huge concern of mine. We wanted to be sure there was good airflow through the radiator.
Then we had to build some headers. Or in my case, the cheap v band exhaust manifold route.
Then the TIG work got hot and heavy and he did a pretty gorgeous up-pipe setup with dual recirculated wastegates because again this is a street car, and I don't want loud *** dump tubes.
And then the exhaust. I was demanding, since I want to have a regular exhaust, and a dumped exhaust for track days.
Finally he used a Garrett core to build a custom intercooler for my car
After that, a few more pipes were made, and I got it all wrapped and buttoned up nicely.
Made a few dyno passes, but ran out of injectors (80lbers). Maxed out in the low 900rwhp. The tuning was done by Nate at AOP in Fresno. Car drives like its stock, but makes an insane amount of power.
After that, the only thing left to do, was go to the track!
Car drove nicely the 100 miles each way. This is about as hot as it got, which considering the blower setup ran around 215 on the freeway was AWESOME.
Car did well, still only 15-16lbs of boost. I plan on going a bit faster this year.
Hey Jon, the car looks great! Seems to be running pretty good. I'm with you on the driveability thing - it's nice having something quiet that you can just get in and drive. Is that the same forged 402 you were running in the Z06?
Hey Jon, the car looks great! Seems to be running pretty good. I'm with you on the driveability thing - it's nice having something quiet that you can just get in and drive. Is that the same forged 402 you were running in the Z06?
Thanks Todd! Yeah, its the same motor. I'm probably going to be selling either the block or the entire engine pretty soon. Don't want to keep pushing the aluminum block any more.
Wow....my friend you have one bad *** project and whoever did the fab work has some bad *** fab skills. I am and will always be a Nissan guy at heart (LM7-240sx right now) and doing a 240z build is still on my bucket list. Seeing projects like yours are rather inspiring. I am subed for more updates as they come.
Wow....my friend you have one bad *** project and whoever did the fab work has some bad *** fab skills. I am and will always be a Nissan guy at heart (LM7-240sx right now) and doing a 240z build is still on my bucket list. Seeing projects like yours are rather inspiring. I am subed for more updates as they come.
Thanks man! Stay tuned, I'm gonna be doing a big change in the next few months, and plan to go a LOT faster this year.
Nice! Good to see some guys from HybridZ make the jump over here. You should fit right in. There are quite a few of us turbo LS S30's wondering around here.
Car looks nice, rolls out too
I asked this question before but not sure on what post, WHat size are the speedo gauge and what size is the smaller gauges to fit in the stock location? looks nice
Nice! Good to see some guys from HybridZ make the jump over here. You should fit right in. There are quite a few of us turbo LS S30's wondering around here.
Fastest LS S30 right?
I'm pretty sure I am. Been doing a ton of research on it, and it looks like I'm .09 faster than the next guy currently hahaha. Unfortunately nobody delivered a wreath of roses and a check for the feat.
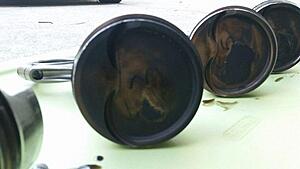
The Speedo is a 5" Autometer Tach that I made simple brackets to mount. The smaller gauges are 2 5/8" autometer gauges with a similar bracket setup.
Very slick setup, looks great! What are the engine details? What kind of fuel? The long block/cam the same as it was with the blower?
Longblock is the same as it has been for 5 years or so, yeah. I changed the cam to a custom cam made by DRC. Sounded close to stock at idle, built boost VERY well, and made great power on the dyno and track.
Sadly, a few passes after my 8.7, I saw a drop in oil pressure on the return road (About 15 at idle down from 30), so I trailered the car home. Motor still ran perfectly, but I didn't want to hurt anything. I was planning on refreshing the engine and going for low 8s, but I picked up a new motor to play with so now I'm going to either sell the longblock as it sits if anyone is interested, refresh it and sell it for more money, or part out all the components.
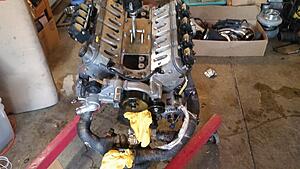
So I went home for an insanely hectic weekend! Pulled the old 402, and got the new 427 ready for install, hoping to get it in the car and running within my 4 day trip. Unfortunately I had incredibly bad luck all trip...
First I got the old motor out, wasn't much work, took about 3 hours to pull.
Nice thing, it comes out without pulling the exhaust system apart! Which is a nightmare...
Next I prepped the new motor, put in the biggest cam I've ever run by far (Thanks to DRC for the beast cam), and swapped over the peripherals for the install. Unfortunately this is where it started to go downhill. The new motor had Lunati Link bar lifters, and 6 out of 16 of them decided to lock out in full extension and were unwilling to compress back down no matter what I did. Luckily I caught this on the cam install otherwise I would have been in for a world of bent valves on my expensive *** 6 bolt heads [] . So I had to pull the heads and install the short block alone, and next trip I will be putting in some Comp or high end Morel lifters. (Looking into the short travel style lifter now)
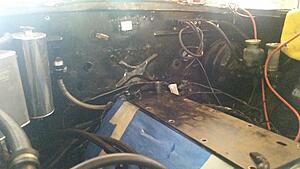
So you can probably see my massive rats nest up there above the motor... That was driving me nuts since after I built my car originally, I did the wiring for Infidel's car and his is a billion times cleaner looking than mine. Since I had free time due to the lifter fiasco, I figured I would clean up the wiring behind the engine. This turned into redoing the ENTIRE engine harness, which was a fun adventure of re wrapping every section nice and tightly, and hiding all the main harnesses behind the engine. This is the result: (Obviously it isn't laid out for the wiring on the motor in the picture, but thats all confined to two banks now and everything is exactly the correct length now.)
After the wiring was complete, I decided to tackle ANOTHER project that was sitting around mocking me, which is my NRG detachable steering wheel. When my window net is up at the track, its almost impossible to maneuver around in my car, due to my 6'2" 220lb stature, and the fact that we had to remove 2" of seat space for the 28+" wheel tubs. So I decided a removable steering wheel would make my life so much easier at the track.
I didn't want to add a bunch of length to the steering column though, and the slim series NRG was not easily manipulated with fire gloves on, so I opted with the winged design instead and cut down a Sparco steering wheel hub adapter. We took about 1 1/2" of length and retained the crush style bracket so in an accident it will safely collapse. After that, the install was a cinch, just bolted it together and ran the wire for the horn button. (I use that for my trans brake at the track, so its important it works perfectly)
Sorry about the awful picture quality, my phone was not being very cooperative this trip for some reason. One day I will invest in a decent camera...
Also, as for the engine damage, looks like the #2 and #4 main bearings took a bit of a beating. I'm told this is indicative of block flex on an aluminum block. (I was making mid 900RWHP on my last few passes, seems my block was not a fan) Luckily I pulled the motor early, and found it, so there was very little damage done. Only the bearings took much abuse, all the hard parts look to be fine. I'm pending sale on this engine to a friend who is going to be swapping it into an IS300 most likely, which will be a really cool build IMO.
Heres some pictures of the engine
Pistons were fine, just had a bit of buildup from the 30k miles. The coating seemed to let the carbon stick better, which is a bit annoying. Slight scuffing on the skirts, but no major scuffs and no traded metals, which is pretty common on a 4" stroke LS engine.
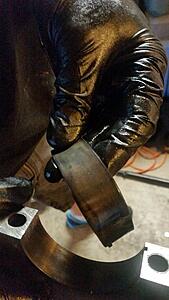
Rods looked perfect. Bearings were good, no overheating and no spinning at all.
Bores were fine, the camera picks up the vertical lines more than the eye, the walls were perfectly smooth, and the crosshatching is still there in its entirety.
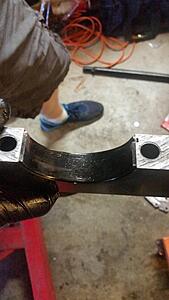
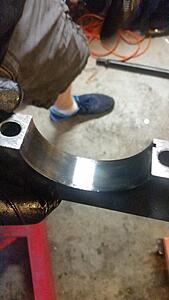
Heres the culprit! This is the #2 crank bearing. Both #2 and #4 looked pretty similar on top and bottom. #1, 3, and 5 were fine, no major wear and no sign of thrust wear at all.
You can see the mushrooming of the bearing in this picture. These ones just fell out when I unbolted the mains, they were no longer the correct size due to warpage. Crank didn't look like it saw too much heat, and the block/caps looked fine as well. Glad I pulled the motor when I saw a small decrease in oil pressure instead of ignoring it and just continuing on... This would have gone from minor rebuild, to major overhaul if I had waited.
Gas Monkey Built a 6-Wheel Ferrari Testarossa With a Corvette LT4 Engine
Slideshow: The controversial Ferrari F6 swaps its original flat-12 for a Corvette Z06-derived LT4 V8 and sends power to four rear wheels through a custom-built drivetrain.
7 Most Reliable High-Performance Engines GM Has Ever Built
Slideshow:These GM engines didn't just make huge power, they survived abuse, boost, track days, and six-digit mileage with a reputation for refusing to quit.
6 Common C5 Corvette Failures and What's Involved In Repairing Them
Slideshow: From wobbling harmonic balancers to failed EBCMs, these are the issues that define long-term C5 ownership and what repairs typically involve.
Retro Modern Bandit Pontiac Trans AM Comes With Burt Reynolds' Autograph
Slideshow: A modern Camaro transformed into a retro icon, this limited-run "Bandit" build blends nostalgia with brute force in a way few revivals manage.
Top 10 Greatest Cadillac V Series Performance Models Ever, Ranked
Slideshow: Cadillac didn't just crash the high-performance luxury vehicle party, it showed up loud, supercharged, and occasionally a little unhinged...
Coachbuilt N2A Anteros Is an LS2-Powered C6 Corvette In Italian Clothes
Slideshow: A one-off sports car that looks like a vintage Italian exotic-but hides a C6 Corvette underneath-just sold for the price of a new mid-engine Corvette.