When you click on links to various merchants on this site and make a purchase, this can result in this site earning a commission. Affiliate programs and affiliations include, but are not limited to, the eBay Partner Network.
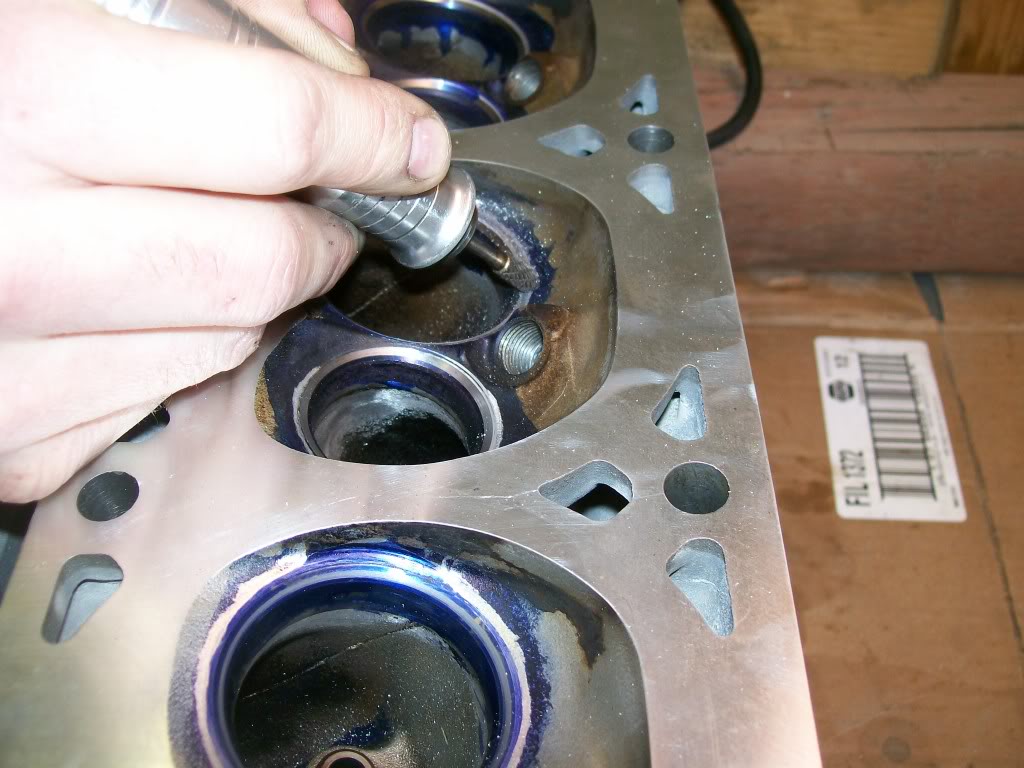
Got my reman 862 heads off eBay and they look good. Pulled the valves out of the pass side head and started working on the heads but then I broke my carbide cutter but and had to order new ones so I'm waiting on them.
Motor is a budget style build, got a smidge of noisy lifters and decided to build parts up for freshening of the top end. It's a 99 5.3 from a Silverado with 150k. Stock untouched long block minus Ls6 springs. Figured out I have the knotched 862s so I got new reman 862s with no knotch so I can run MLS gaskets otherwise I would have stock with the stockers but machine work would have been close to the same $339 price I paid shipped for the already done ones. Motor has been up to 12psi with a torqstorm supercharger and really fun up to about 5300 and then falls on its face. Being that it has 150k and I'm pushing it harder than it's ever been I decided to spend about 1k and put a new top end and gain lots more power.
Parts ive gathered.
Reman 862s
Beehive howards springs slightly better than the PAC 1218s good for .6 lift and alittle more spring pressure
straub bushing kit for stock rockers
morel 5315 lifters
ARP head bolts
Used LQ9 cam
im prob going to change the cam to the TFS 216/220 .56/.56 114 lobe or a custom cam motion cam which could add 100hp easily.
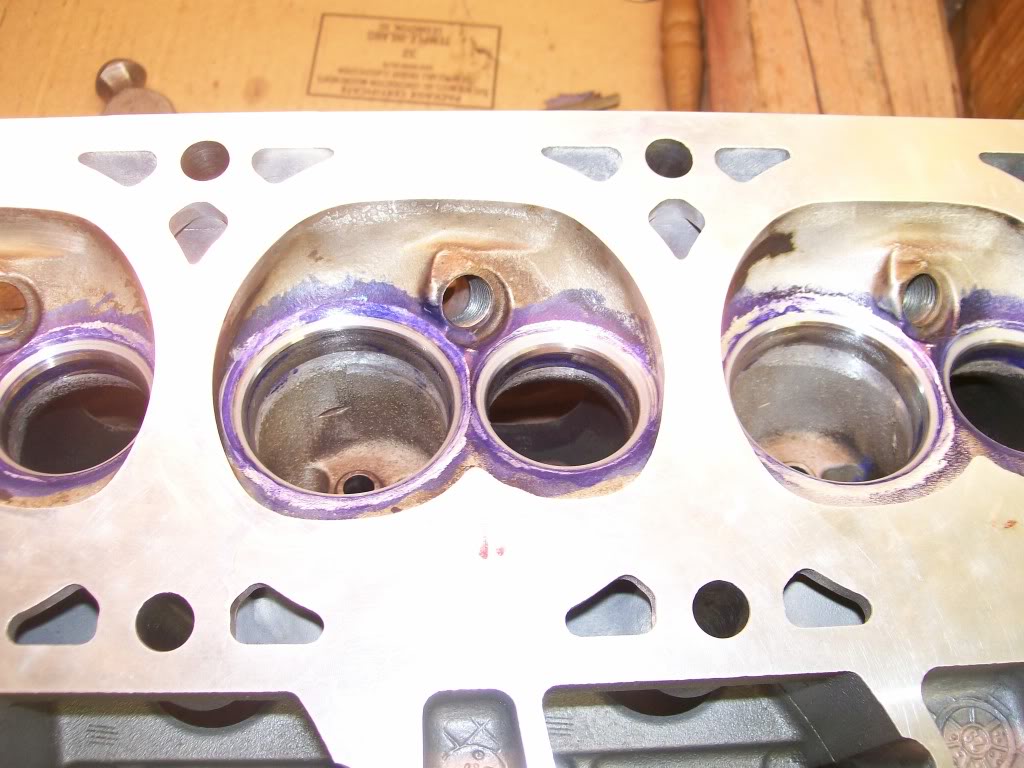
So since I'm boosted and staying stock 5.3 bottom end I'm not wanting to do a ton of work on the heads to keep velocity high and low end power intact. This is not a DD but does get out a few days a week and only on the street. So for the heads I've started doing the following.
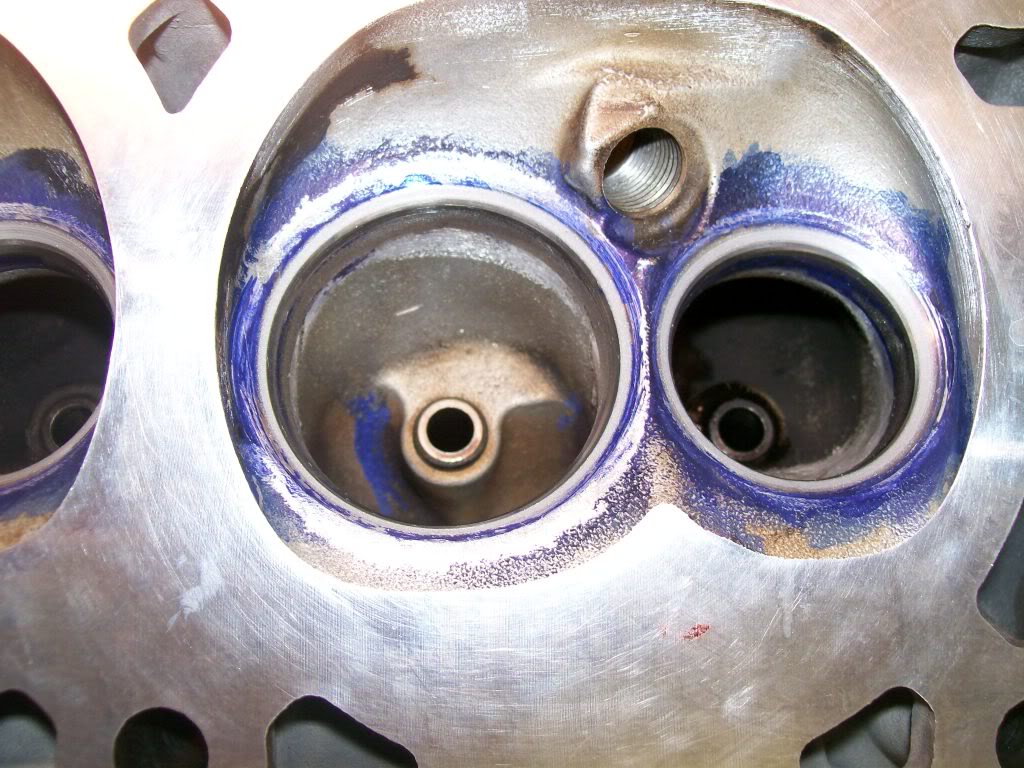
removing the swirl ramp
smoothing out the spark plug boss in the chamber
cleaning up the bowl below the valve (ridge)
didnt want to mess with the rocker boss as I don't want to worry about the bolt and putting sealant and I don't think I'll gain a whole lot being that it doesnt look that restrictive
going to be cleaning up any flash I see as well.
What at do you guys think? Even really necessary being such a small cube build with boost?
Explain the difference? Stock heads with stock rebuild, $30 in Carbide bits everything else is free. Heads have 150k and figured if I have to yank them to do the lifters might as well swap them for something better that doesn't have knotches. Morel 5315s are only like $50 more than GMPP LS7 lifters and have better quality/reliability. Didn't go with the high end or link bar setup. Going to rock stock rockers with $130 bushing upgrades, stock pushrods, Howards springs are only $118 and they have the same lift as PaC 1218s but alittle more spring rate and they Are cheaper. $30 MLS GMPP gaskets and ARP bolts I got off the forum for like $70 under cost. Figure if the stock bolts aren't an issue the ARPs will be more than enough and I don't trust the speed master studs. I'm not replacing the timing chain or the pump and not removing the oil pan.
I'd say it qualifies as a budget when you consider I went cheaper than the parts that most people do. The motor was purchased for $750 with the PCM and harness. Figure 1 grand for upgrades to the top end and I should be pushing easily 100-150hp over my current without sacrificing reliability. The part that's annoying is $250-400 for a cam which is most of the cost.
I didnt say say a junkyard build lol... That's what I got now and I'm impressed. Let's see what 1k does in just cam/heads and associated crap.
I was told with mild hand porting you pick up most of the gains right behind the valve. (cleaning up the bowl below the valve ridge) Clean that up with a good valve job sounds like the best bet for money/time vs gain.
i also read that the swirl ramp helps with economy, idle and off idle response but limits flow and promotes cavitation at high Rpms. Not to mention the ramp itself reduces the intakes size considerably. So some say leave it in and some say take it out. I'm opting to removing most of it to help the heads breath better in the upper ranges. But I'm capping the motor at 6k-6500k due to the OEM rod bolts.
Personally dont care about economy too much but I don't want to limit low rpm power as I'm driven on the street with a low 2400ish stall. With my 2004R converter locked i cruise between 1400-2500rpms on the highway depending on speed so it can't be a complete dog.
Explain the difference? Stock heads with stock rebuild, $30 in Carbide bits everything else is free. Heads have 150k and figured if I have to yank them to do the lifters might as well swap them for something better that doesn't have knotches. Morel 5315s are only like $50 more than GMPP LS7 lifters and have better quality/reliability. Didn't go with the high end or link bar setup. Going to rock stock rockers with $130 bushing upgrades, stock pushrods, Howards springs are only $118 and they have the same lift as PaC 1218s but alittle more spring rate and they Are cheaper. $30 MLS GMPP gaskets and ARP bolts I got off the forum for like $70 under cost. Figure if the stock bolts aren't an issue the ARPs will be more than enough and I don't trust the speed master studs. I'm not replacing the timing chain or the pump and not removing the oil pan.
I'd say it qualifies as a budget when you consider I went cheaper than the parts that most people do. The motor was purchased for $750 with the PCM and harness. Figure 1 grand for upgrades to the top end and I should be pushing easily 100-150hp over my current without sacrificing reliability. The part that's annoying is $250-400 for a cam which is most of the cost.
I didnt say say a junkyard build lol... That's what I got now and I'm impressed. Let's see what 1k does in just cam/heads and associated crap.
I think you misunderstood my point. I am genuinely interested in results when people do things differently than I would do. I in no way implied that you were doing something wrong, just different from me.
I think you misunderstood my point. I am genuinely interested in results when people do things differently than I would do. I in no way implied that you were doing something wrong, just different from me.
gotcha. Sorry don't take that as an attack... Just wondering what you meant by that. people do things like throw cheap Delphi $99 lifters, double springs and moly 5/16" pushrods and the parts are miss matched and wonder why they whipe out a cam. LS7 lifters are a stock replacement lifter that can rev to 6500+ on a LS7 with light weight valves and retainers etc. I'm trying to throw together a DD reliable setup with cheap but better parts while increasing HP output considerably.
im open to ideas as well as setups if you feel like sharing what you would do. I'm not going to pull the parts off the motor till I have everything I need and ready to do it. Prob over the winter so I got some time to change directions if need be.
I was told with mild hand porting you pick up most of the gains right behind the valve. (cleaning up the bowl below the valve ridge) Clean that up with a good valve job sounds like the best bet for money/time vs gain.
Thats true with 95% of heads. 4, 6, and 8 banger alike.
Thats true with 95% of heads. 4, 6, and 8 banger alike.
Yea I don't agree with that 100% Lots of the old style iron heads had super restrictive ports and picked up a ton if you hogging out the port. The LS ports already flow a ton and the valve is the restriction.
You purchased 862 heads? I couldn't give mine away! I've tossed two sets to the scrap yard and have another set sitting here. I'd gladly give them to someone who could use them if they cover shipping.
You purchased 862 heads? I couldn't give mine away! I've tossed two sets to the scrap yard and have another set sitting here. I'd gladly give them to someone who could use them if they cover shipping.
shippig the heads is close to $75 I would think. One guy here quoted me about $50-75 to ship USPS. Shipping costs are out of hand these days. Yup I bought them but they were fully rebuilt, guides, seals, springs, retainers. They deck the heads .005 to clean them up for a true flat sealing surface. They are pressure checked and hot tanked. Valves and seats are redone. Basically standard head rebuild. And around me it would cost close to the same to have the work done (including time, traveling, gas etc) but I have knotched heads (can't use MLS gaskets) so I don't even have good cores for machine work. So for $339 I got reman heads with no knotches so I can run cheap LS1 $30/pair MLS gaskets or LS9s. It's not that much when you consider money spent on new heads. Should have some decent heads for $500 roughly.
Spend your time and effort on the fuel system and torque converter/trans instead.
All that has been taken care of.
fuel system is brand new. Aeromotive 340lph in tank. Aeromotive boost referenced return regulator, billet fuel rails
and Bosch 72lb injectors from FIC. Pump runs off a 10 gauge rear mount relay and custom wiring so the pump gets full voltage.
Trans ins is a billet 2004R with CK Performance parts good for 800hp/tq all day. Converter is a billet 10" 2400 stall with oversized lockup custom built good for 1000hp. I find that it stalls around 2600 tho but has great drive ability. I won't be changing this as the car is all street driving.
The whole car is built and all aftermarket. I will prob change out the ford 8.8 to a S60 at some point down the road.
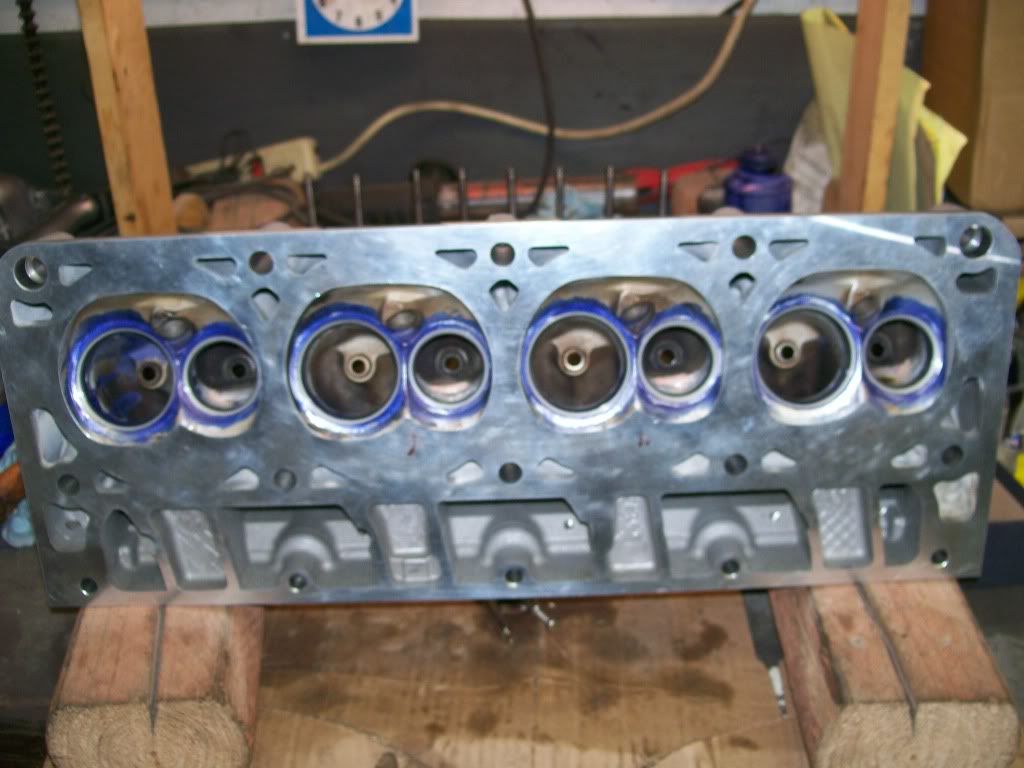
This is where I stopped after I broke my only carbide bit. I just got like 10 used bits yesterday for really cheap. Should get a lot more done if I can find time this weekend.
According to my injector duty cycle someone calculated a 500-550hp at the crank with the OEM LM7 cam and stock 862 heads with 150k on them with LS6 valve springs. I was told from the supercharger manufacture that it eats 47hp at full boost. I'm thinking with a custom cam and the lightly ported heads I should be in the 650hp range and I'd be happy with that.
Here is a pretty good article that might help you out. I'm not sure what you are running for a valve job, but with a good valve job you can pick up 20-30 cfm. The valve job and the bowl are the most important areas. Also the throat should be opened up to 86-89% of the valve size for max velocity.
Info from when I did my 243 heads: I made 444 rwhp through a 346 with a 224 cam running 11:1 compression with just the valve job / throat work on my heads. The valve job is super important. It's a ton of work and I will probably never do it again in my life!
Keep in mind air does not like to turn much more than 15 degrees. I think my valve angles went like, blend top cut into aluminum of combustion chamber by hand, maybe 30 degrees or so I'm not sure, not a cut but just a hand blend with dremel to get rid of the step.
30 degree blend into chambers, 38 degree top cut, 45 degree seat, 60 degree and than a 75 bottom cut. Also intake valves with a light 32 degree back cut.
Here is some quotes from Bret and Dennis from Airflow development that have some good info.
Actually FAR from the standard is what works!
Joe had some seriously funny sayings when it came to talking about valve jobs.... If you don't get the nuances then they aren't that funny though. This makes me realize how it's hard to discuss this to the uninitiated.
A "valve job" and valve combination's duty is to make the air/fuel mixture stay attached together and move into the cylinder in the most efficent point for proper burning.
We often talk about "loading" the valve, meaning that the volume of air moving around the valve saturates that whole circumfrence or as much of it as possible to the maximum 146 cfm/sq*in for the curtain area given. That is most likely not going to happen but the more we can load the valve at every valve lift the better TQ we are going to make. This concept is called discharge coef.
The other part that people don't get is that the chamber and area right below the VJ in the port are also vital to the rest of the VJ. Little nuances like a sharp edge put in with a 82� cutter on the bottom cut can make a world of difference.
FWIW "Top cuts" are those in the chamber and above the seat angle when you are doing the VJ and "Bottom cuts" are those below the seat angle. Top cuts are listed fist in the 30/45/60 (yuk) , followed by the seat angle and then the bottom cut.
Top cuts are usually the most vital of all the the angles IMHO.
Bret
yes,
the guides in the 243's seem to be all over the place.
without the VJ complete and proper I don't see how you could shape the SSR correctly? It is possible that the SSR could be layed back enough to have a negative affect once the VJ is complete. I would get atleast one seat roughed in so you have some type of master to work from and measure from.
Very little air in the inlet. port match to your fast and you will be fine.
Most important step also!!! when you get your VJ done, you will want a 37-39 degree topcut and blend that topcut into the chamber.
The water on top of the bowls of the 243 head is .200+ farther away than the traditional LS1 heads. BTW... if you hit water in the 241's in the bowl, they are very easy to fix... don't throw them away! I normally dig them all out to water and weld them back up.
After you follow all the steps, rules, and measuring...you will probably wish you had paid someone to do it! Not very easy work is it....
O.P. There are several ported head threads on this board as well as others.
I would concentrate on the bowl area and around the valve seat. You want smooth the transitions between the valve seat and the bowl. A little work in the bowl area around the valve guide will help as well. If you can get the Short turn radius with the tools you have there is some more to gain there.
Being Boosted I wouldnt be too concerned with extracting the most out of the heads.
Here is some of threads that I recall on porting. there is some good and some bad. It looks like you're off to a fairly good start though so keep it up!
Thanks guys. I've read almost all of those threads before I started as I wanted to make sure swirl ramp removal was good or bad.
Good of info on blending the valve job into the chamber... Didn't see that before and I will check out my heads to see what needs to be done.
My tools don't allow proper shaping of the SHort turn radius (str) and I know messing that up really kills the flow. All I did was remove the 82* seat cut which went into the STR slightly and I'm going to smooth that out with a tootsie roll.
Pass side hesd is done with the cutters for the most part besides the chambers. Then going to go in with the tootsie roll and smooth it all out. Should of gained alittle flow outs these bad boys for a few hours of time. Believe I have about 2 hours in them thus far.
Here it is boys! Finished up one of the heads today. Total time was 6hrs all together including cleaning and reassembly of the heads.
I removed the swirl ramps, and blended the bowl around the guide. Tappered the valve guide for flow and removed any of the valve seat ridges. Intake didn't need much due to the smaller valves. The exhaust actually had some of the 82* valve seat showing so I removed that. The exhaust I decided to fully sand the exhaust runner to smooth it out some, sanded down to a 120 grit and it's pretty smooth. Tapering the valve guide and opening the valve seat machining really opened it up. Hopefully the 120 grit is smooth enough, def smoother than the original casted finish by far.
Then I decided to look into the chambers. Decided to unshround the exhaust valve alittle and polished around the exhaust valve in the chamber. Then I decided to smooth out the rest of the chamber but more just polished around the exhaust valve. The chamber finishes are so rough that's why I decided to smooth it out alittle. Of course I smoothed out the spark plug bosses.
Cleaned them out and put it all back together. Swapped the OE springs for high lift/higher rate howards beehives. Fit together like stock. But good for .600 lift and has alittle more spring rate than PAC 1218s and only cost $120.
U shrouding the valve
Finished intake finish
Finished exhaust
Chambers
Dynamic duo!
All done! I used permatex engine assembly lube for the guides and locks so it's lubed for a long long time till engine startup. Stuff is awsome and I've used it on my last 3 motors.
I would sell that TH200-4R as they are not known for taking abuse... even if you have one from an '86-87 Buick GN. Built up those transmissions are notorious for issues including all billet internals.
Gas Monkey Built a 6-Wheel Ferrari Testarossa With a Corvette LT4 Engine
Slideshow: The controversial Ferrari F6 swaps its original flat-12 for a Corvette Z06-derived LT4 V8 and sends power to four rear wheels through a custom-built drivetrain.
7 Most Reliable High-Performance Engines GM Has Ever Built
Slideshow:These GM engines didn't just make huge power, they survived abuse, boost, track days, and six-digit mileage with a reputation for refusing to quit.
6 Common C5 Corvette Failures and What's Involved In Repairing Them
Slideshow: From wobbling harmonic balancers to failed EBCMs, these are the issues that define long-term C5 ownership and what repairs typically involve.
Retro Modern Bandit Pontiac Trans AM Comes With Burt Reynolds' Autograph
Slideshow: A modern Camaro transformed into a retro icon, this limited-run "Bandit" build blends nostalgia with brute force in a way few revivals manage.
Top 10 Greatest Cadillac V Series Performance Models Ever, Ranked
Slideshow: Cadillac didn't just crash the high-performance luxury vehicle party, it showed up loud, supercharged, and occasionally a little unhinged...