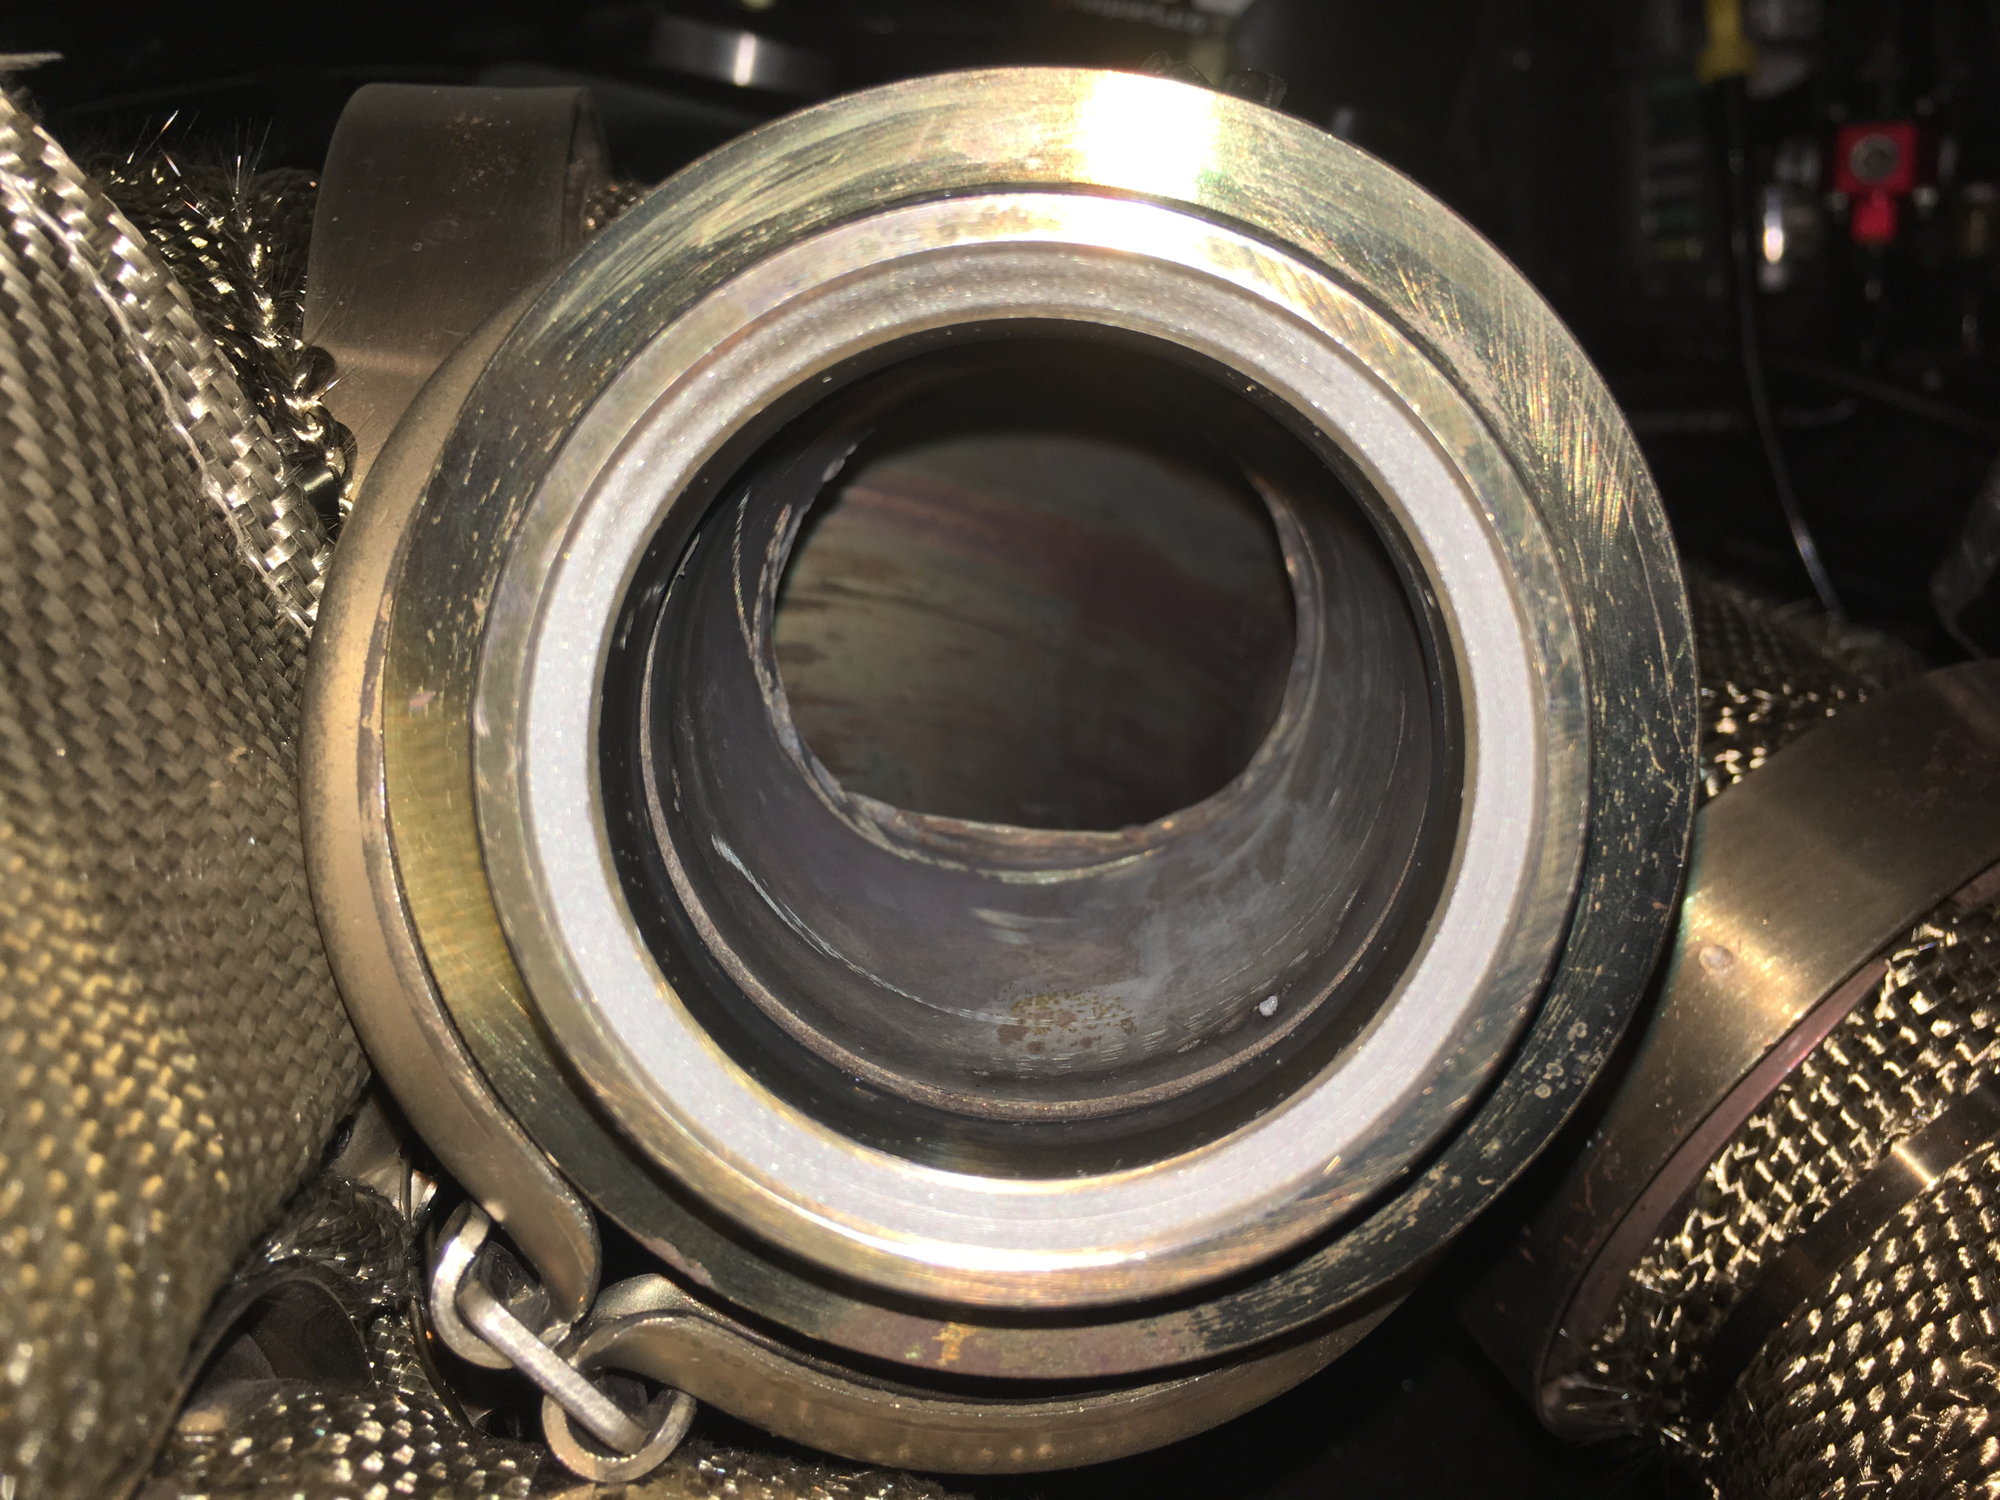
WG leaking exhaust at idle... ugh. Fix?
#1
60mm HKS copy that came with my CX kit. Just upgraded to a 78/75 VS cast turbo and noticed I can hear/feel exhaust coming out of the WG dump pipe that vents to atmosphere.
Before you ask, the flange welded onto the header is a 1 peice that includes the fire ring/valve seat so itís installed correctly. Also Iíve cleaned and disassembled the WG and cleaned up the valve seat on the header side and still leaks. Itís very annoying that this WG has less than 500miles and leaks already. The valve seat and valve both look good with no large dings or any carbon trails that I could see. Itís a small exhaust leak but I can hear it more as I get on it with the cutout closed.
Thoughts? I might just get another one but if the seat is fucked on the header Iím going to have to remove the whole thing to cut off and weld on a new one. I donít have any lapping compound either. The car still builds boost just alittle later in the band.
#3
Any local Napa should have lapping compound so you'll still want to do that and while you're there pick up some copper RTV and apply it to the flange when installing the wastegate assembly.
My Tial gate leaked a little at the mounting flange but some RTV took care of it.
My Tial gate leaked a little at the mounting flange but some RTV took care of it.
Im not understanding the RTV part. Where does it go? Mine doesnít leak where the WG housing clamps to the flange, itís all one peice so no leaks. It only leaks around the valve where it contacts to the seat. I havenít found carbon really anywhere but gas still comes out the dump.
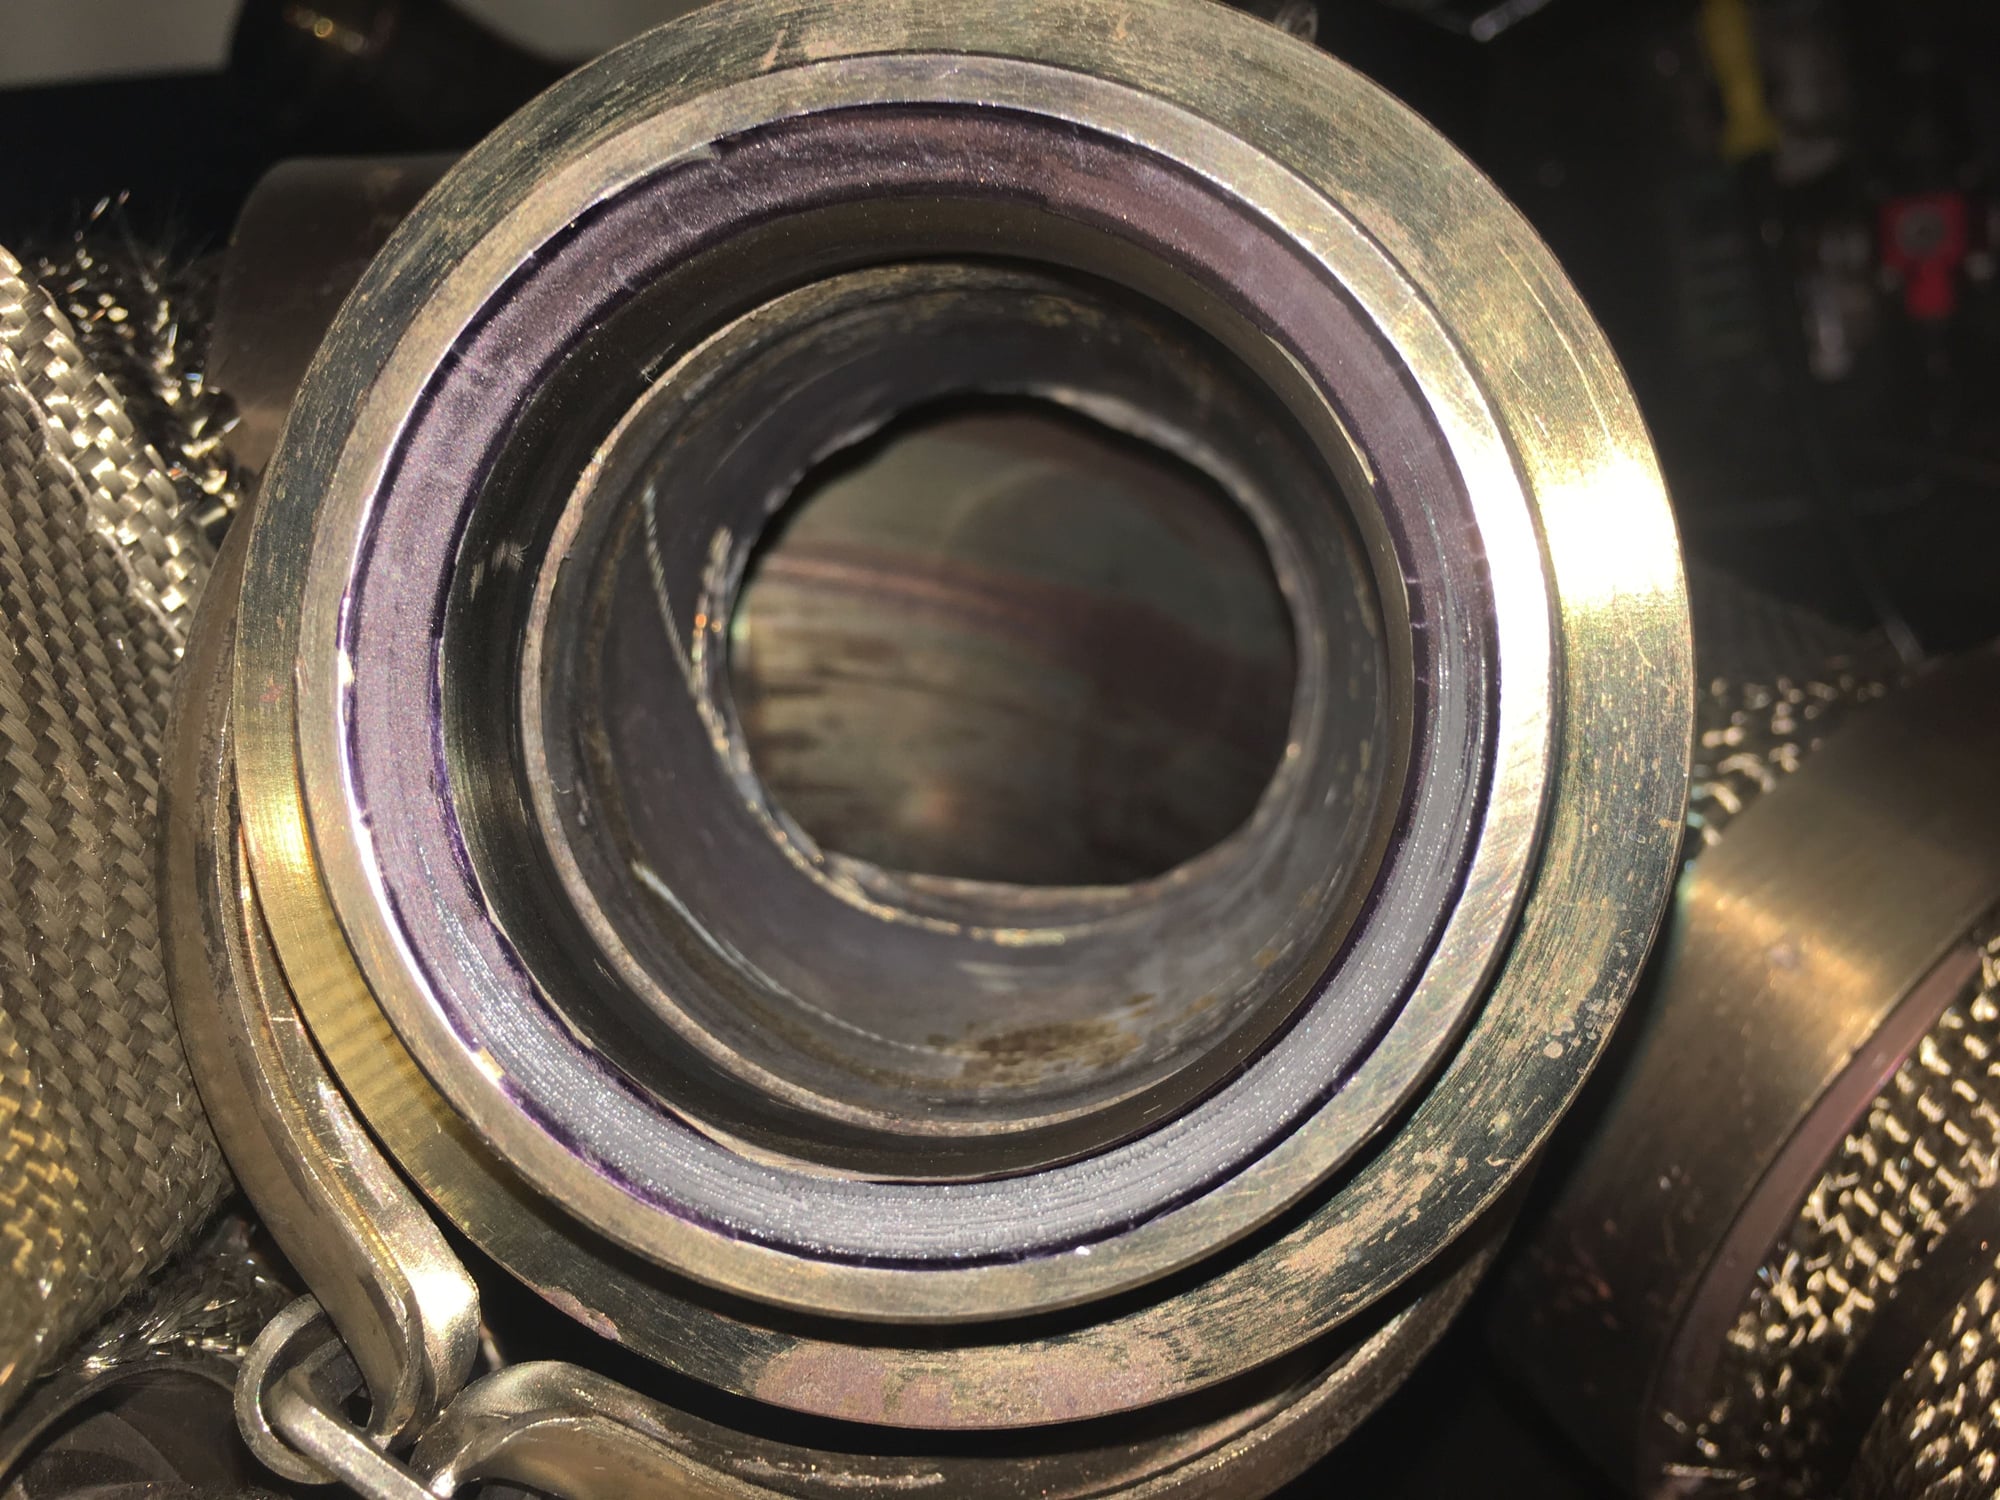
Heres out the seat looks after the lapping compound.

#5
bottom of the gate connected to the compressor and top
of the gate to a 3 port solenoid controlled by the AEM tru boost EBC. With the EBC off it just vents the top of the gate to atmosphere.
On the gate alone I see 6psi with cutout closed and 8psi open cutout.
The dump sounds like a exhaust leak when coming up on boost and itís more noticeable with the cutout closed bc the exhaust is quieter.
#7
TECH Senior Member
iTrader: (25)
So I had my EBC set up like that when I had a GT45 and it worked fine. When I switched to the 7875 I couldn't control boost so I switched to the "high back pressure" gate plumbing.
https://www.theturboforums.com/attac...bc-jpg.671721/
https://www.theturboforums.com/attac...bc-jpg.671721/
Trending Topics
#8
So I had my EBC set up like that when I had a GT45 and it worked fine. When I switched to the 7875 I couldn't control boost so I switched to the "high back pressure" gate plumbing.
https://www.theturboforums.com/attac...bc-jpg.671721/
https://www.theturboforums.com/attac...bc-jpg.671721/
#11
Yes the fire ring is all one peice. It looks fine, it has maybe 500miles on it. No big divots or anything and I cleaned it up, the pic above shows it after I lapped the valves and the Lap band looks fat and even. I donít really want to run more spring as I wanted to keep it light and use my EBC to *** boost as needed but keep a safe 5psi spring that actually gives me 6psi and 8.5psi with the cutout closed and open. If I add preload itís going to still make more peak boost.
#13
Got to start it today and it still leaks. Not a horrible leak but itís light puffs against your hand.
Will it was running and leaking cranked down on the preload and made no change.
This spring nets me 6psi gate closed clutout and 8psi open cutout and it cracks open via a compressor bench test at 12psi.
I dunno what else to do.
Will it was running and leaking cranked down on the preload and made no change.
This spring nets me 6psi gate closed clutout and 8psi open cutout and it cracks open via a compressor bench test at 12psi.
I dunno what else to do.
#14
Your seat is still not true to the valve. Look at your above pic from about 10:30-1:00 you can still see the black area where its leaking. Take a marker and color the seat and lightly lap the valve with a small amount of compound. Pull the valve out wipe off seat and you will see the leak. The marker acts the same as machine dye for the seat.
#15
Your seat is still not true to the valve. Look at your above pic from about 10:30-1:00 you can still see the black area where its leaking. Take a marker and color the seat and lightly lap the valve with a small amount of compound. Pull the valve out wipe off seat and you will see the leak. The marker acts the same as machine dye for the seat.
Also say we know the flange is not true or warped. What do I do at that point? Just keep lapping it?
#16
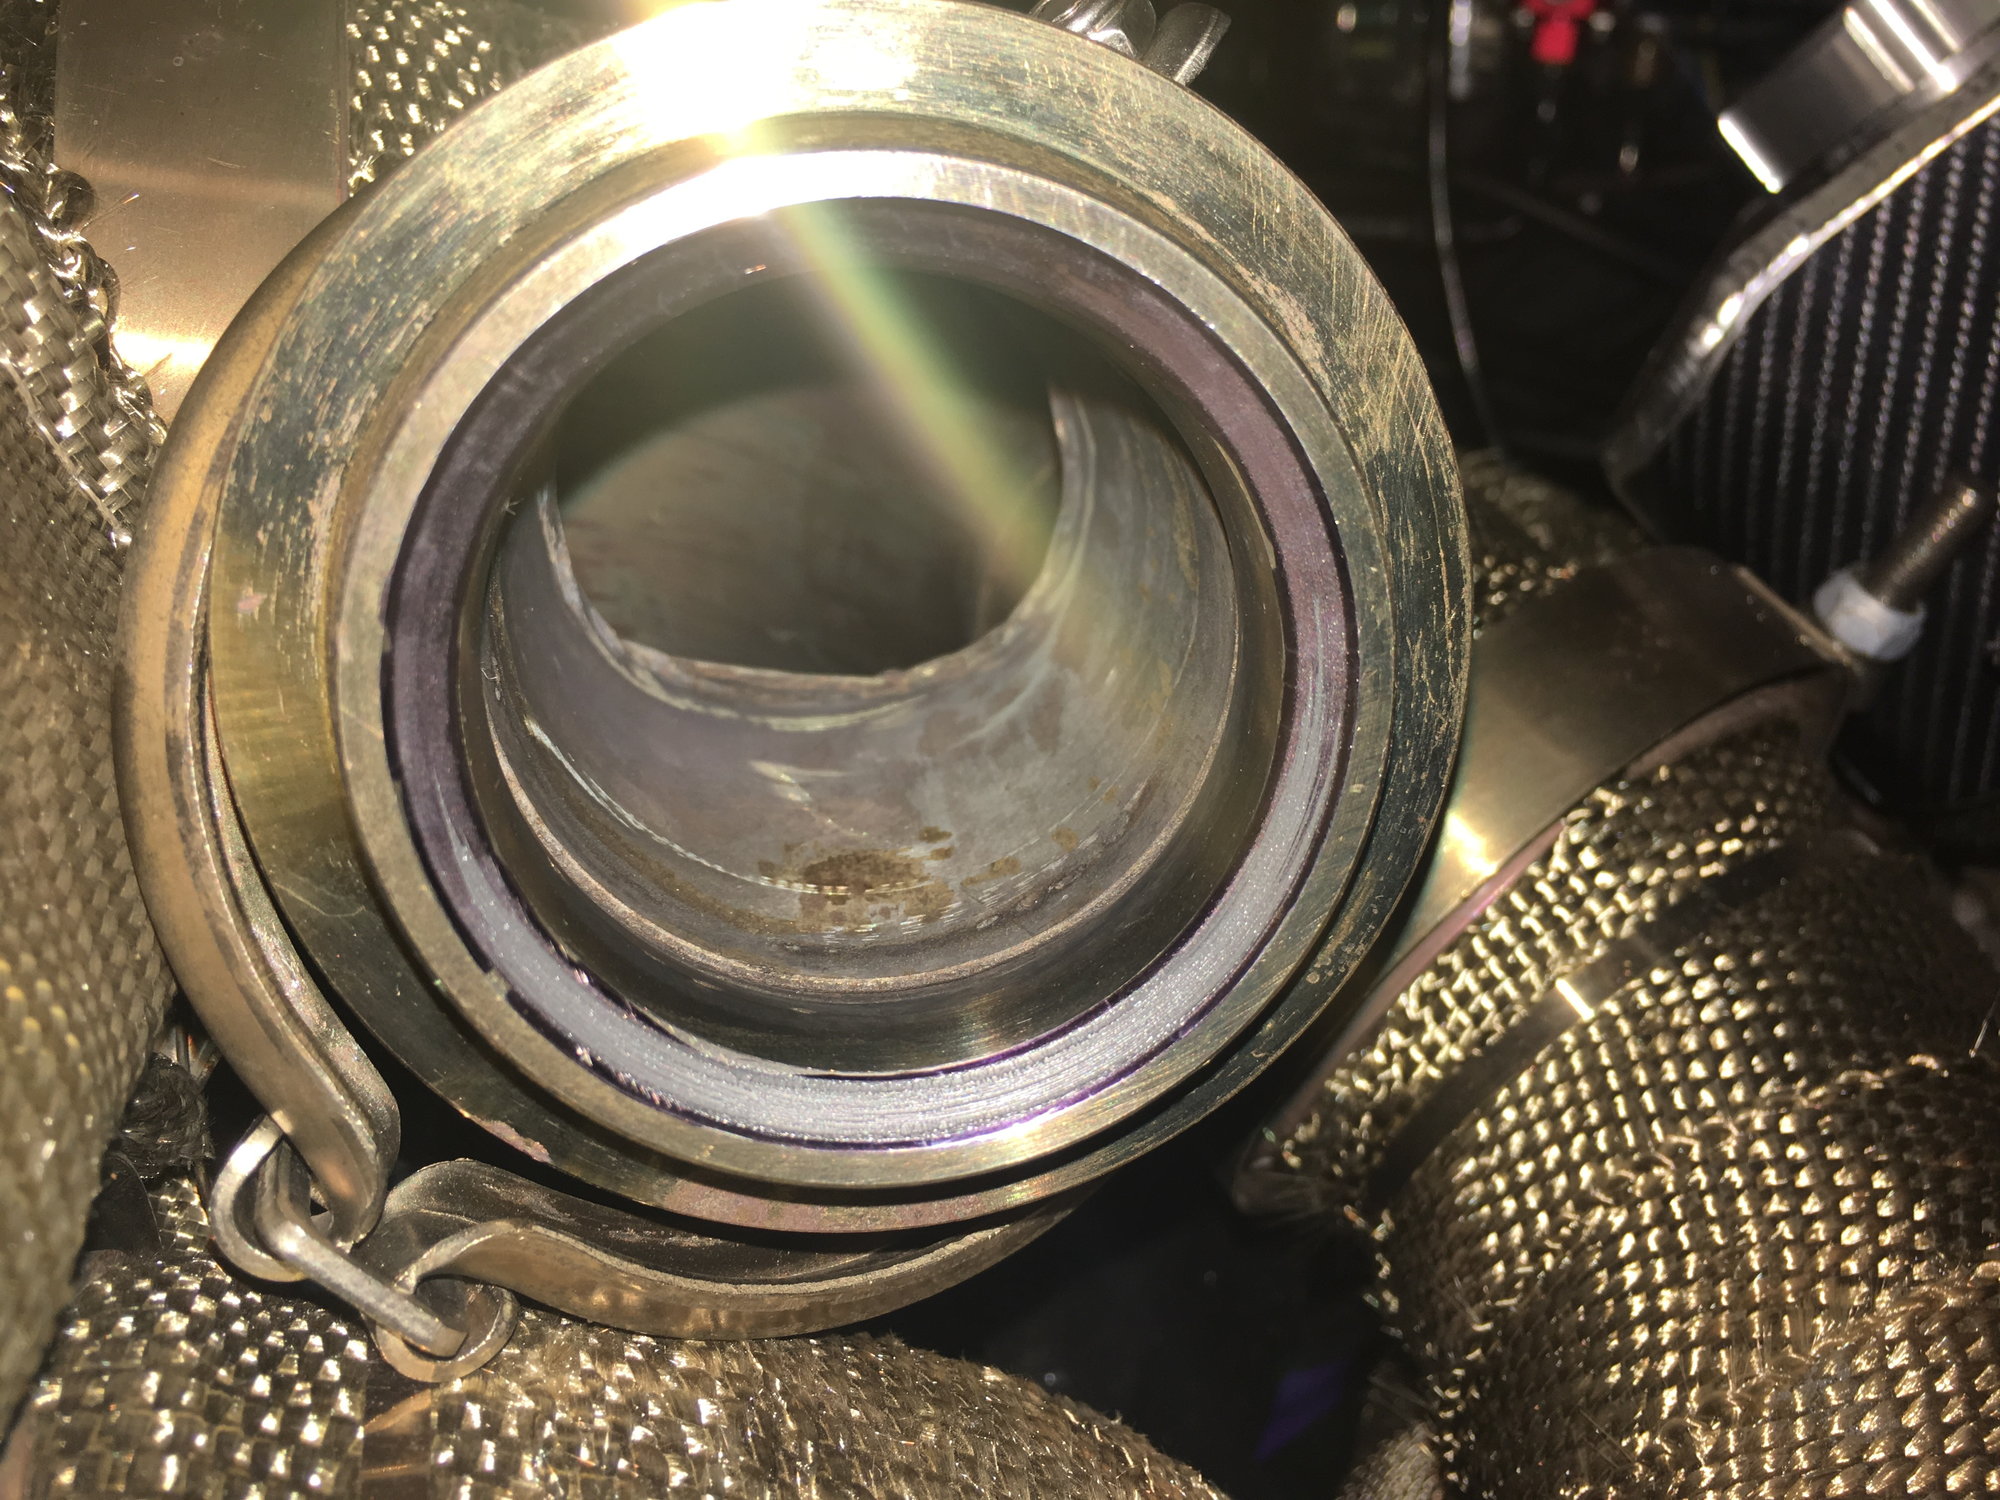
Color the whole seat with the permanent marker, take your valve and just put a very small amount of compound around the 45* face of the valve. Put it in the hole twist the valve back and forth with your fingers 3-4 times pull the valve out wipe the seat off gently with dry towel, you will see where the valve is not seating the mark will still be on the seat. If you put a lot of compound on the seat and turn it it will give you a false reading like your getting. You can do the same thing on the valve color it install turn it a little pull it out look at it. You look at your pic at the bottom you can also see a line in the middle of the seat where the valve has been hitting it. Its not black as a low point would be but white as a high point would be. It may lap in with some elbow grease and time but seat really needs to be trued up with a seat cutter, probably wouldn't hurt to have the valve ground also. Good Luck.
#17
Color the whole seat with the permanent marker, take your valve and just put a very small amount of compound around the 45* face of the valve. Put it in the hole twist the valve back and forth with your fingers 3-4 times pull the valve out wipe the seat off gently with dry towel, you will see where the valve is not seating the mark will still be on the seat. If you put a lot of compound on the seat and turn it it will give you a false reading like your getting. You can do the same thing on the valve color it install turn it a little pull it out look at it. You look at your pic at the bottom you can also see a line in the middle of the seat where the valve has been hitting it. Its not black as a low point would be but white as a high point would be. It may lap in with some elbow grease and time but seat really needs to be trued up with a seat cutter, probably wouldn't hurt to have the valve ground also. Good Luck.
Heres what the valve seat looked like.


#18
Oh ya that is a bad leak for sure. When you get your new WG you can take it apart and check it the same way before you install it to make sure the valve is seating, if not you can repair before installing. After installing you can check it again to make sure you didn't warp it while welding it in.
Last edited by H.P.Ranch1; 07-05-2018 at 11:46 PM.
#19
I donít actually want to replace it lol. I have to remove 70% of the hotside just to take the header off to replace the flange. Then I have to fab it up and if I change the wastegate I have to make a new dump pipe as mine is only like 1.75Ē and it snakes through a bunch of things with no real room.
What if if I took a cartridge roll to it? I tried hand sanding the bottom with 120 grit and and 220 Ana no dice. Whatís weird is that I get a different mark every time I bolt the WG down.
What if if I took a cartridge roll to it? I tried hand sanding the bottom with 120 grit and and 220 Ana no dice. Whatís weird is that I get a different mark every time I bolt the WG down.
#20
Cartridge roll to the valve seat? If you do that you will have a monster leak.
Use a a drill to spin the valve with the lapping compound. Just takes time. Worse case, your replacing the wastegates anyways.
Use a a drill to spin the valve with the lapping compound. Just takes time. Worse case, your replacing the wastegates anyways.


