When you click on links to various merchants on this site and make a purchase, this can result in this site earning a commission. Affiliate programs and affiliations include, but are not limited to, the eBay Partner Network.
The one inch wire bundle runs down along the bottom of the front of the battery, attaches to the lights etc on the passenger side and then over to the driver side attaching again to the lights etc. It's the end tanks on the radiator on either side that won't go past the wire loom on either side.
Some say the wire loom can be moved, but I don't want to cut and splice into any of the stock wiring - especially that wire loom. My 98 is nearly 20 years old now and the wiring is getting old and brittle. Don't want to create any gremlins by moving or cutting into it if at all possible.
That said, practically any modification is possible. Just depends upon your skill level if doing it yourself, or how deep you pockets are to pay someone else to do it. Paying someone to do it when it is still in testing or experimental can get very costly, however, if plan a or plan b doesn't work.
I have found that out doing it myself, even. Six fans of different sizes, three ac condensers, three radiators, three shrouds, three intercooler pipe systems not including the ATI 3 1/2 inch system, and three fmic's plus a lot of miscellaneous stuff. It adds up fast.
You have it backwards it starts on from the driver side and goes towards the passenger. No cutting or splicing needed
It contains a good pic of the fmic and the amount of room behind it when mounted on a Firebird. In fact the stock front bumper is still attached. It appears that the fmic is mounted forward quite a bit into the front bumper cavity. The fmic looks like it is a 3 1/2 - might want to ask since your is 4.5 inches.
You might PM Alchemist for more pics and/or ask about the amount of cutting required to fit his fmic into the front bumper cover.
Last edited by dlandsvZ28; 11-16-2017 at 02:03 PM.
It contains a good pic of the fmic and the amount of room behind it when mounted on a Firebird. In fact the stock front bumper is still attached. It appears that the fmic is mounted forward quite a bit into the front bumper cavity. The fmic looks like it is a 3 1/2 - might want to ask since your is 4.5 inches.
You might PM Alchemist for more pics and/or ask about the amount of cutting required to fit his fmic into the front bumper cover.
Virtually all my build photos and how-to's are toast now. A lot of it's on srtforums but still, it seems like I run into the photobucket blockage everywhere.
Virtually all my build photos and how-to's are toast now. A lot of it's on srtforums but still, it seems like I run into the photobucket blockage everywhere.
Are your photos in photobucket..?
You can put them all on your laptop....just takes some time.
They are out there, but they all charge money if they are any good and going to stay around, but it's not ridiculous photobucket type charges. Like $5/month. Imageshack is one.
I went a little different route with my rad. I used the typical vertical summit style rad at first but I wanted to upgrade my cooling system and I ended up switching up quite a bit to make more room. This is on my NA car. I did it on this one first but I'll be finishing it up on my Procharged car soon. I just wanted to see how everything would work first. I still need to finish the coolant tubing. I'm just waiting on a few pieces to come back.
I installed a steam vent kit I made, with fittings from Summit, to drain all 4 steam vents from the heads and decided to drain it into a surge tank that I ended up mounting to the drivers side head. Now I don't have power steering but you could find another spot for the tank. The main thing with the tank is I wanted it to be the highest point of the cooling system so I could use it as the fill point.
I used a Canton surge tank that I modified to have 4, -4an inlet ports at the top and a -6an outlet at the bottom. And I had a thick piece of aluminum cut to size so I could mount the tank to the head.
You can see the 2 ports going to the drivers side head here
Passenger side here
This is the -6an hose from the bottom of the surge tank. It will go into a 6an male fitting welded into my upper rad tubing. I'm waiting on that piece now.
Here is a vid of how much water flow goes into the tank from the steam vents in the heads. I had it all hooked up and working before but changed some stuff up like I always end up doing lol
I had Bell Intercoolers make me a custom size radiator that would fit completely inside the core support area with no radiator cap (because my fill point is now the surge tank). I don't have AC but you could have these rads made any size you want and they also they will make custom AC condensers if you wanted to move the condenser all together. Or they'll build a mount on the front of the rad for a condenser too. There's lots of options. I have a buddy that's planning on doing this with AC after seeing how everything came out. It was actually his idea but I got it implemented first.
Custom shroud built in for the new Spal fans also. This is just a crazy nice piece from Bell Intercoolers. I have another set coming for my boosted car now.
Here's how I got mine to fit. I welded some boxed metal tubing down in the core support to keep it tight and put high temp 1/4" thick rubber over it. Then I also put it at the top where it touches on the top front. On the tabs on the engine side I put the same rubber so it is not touching metal anywhere and bolted it down. It is very secure.
Here's a couple pics of the engine side so you can see the clearance. I need to attach the aluminum coolant tubing at the bottom and top still but I'm waiting on it to come back from being welded for me. I don't have any tig skills yet and I wanted it to look halfway decent lol.
Definitely a more involved route but this is such a good thread I figured I'd add it to the mix. I'll post up again in here when I get it done on my boosted car. Hopefully in the next month or so.
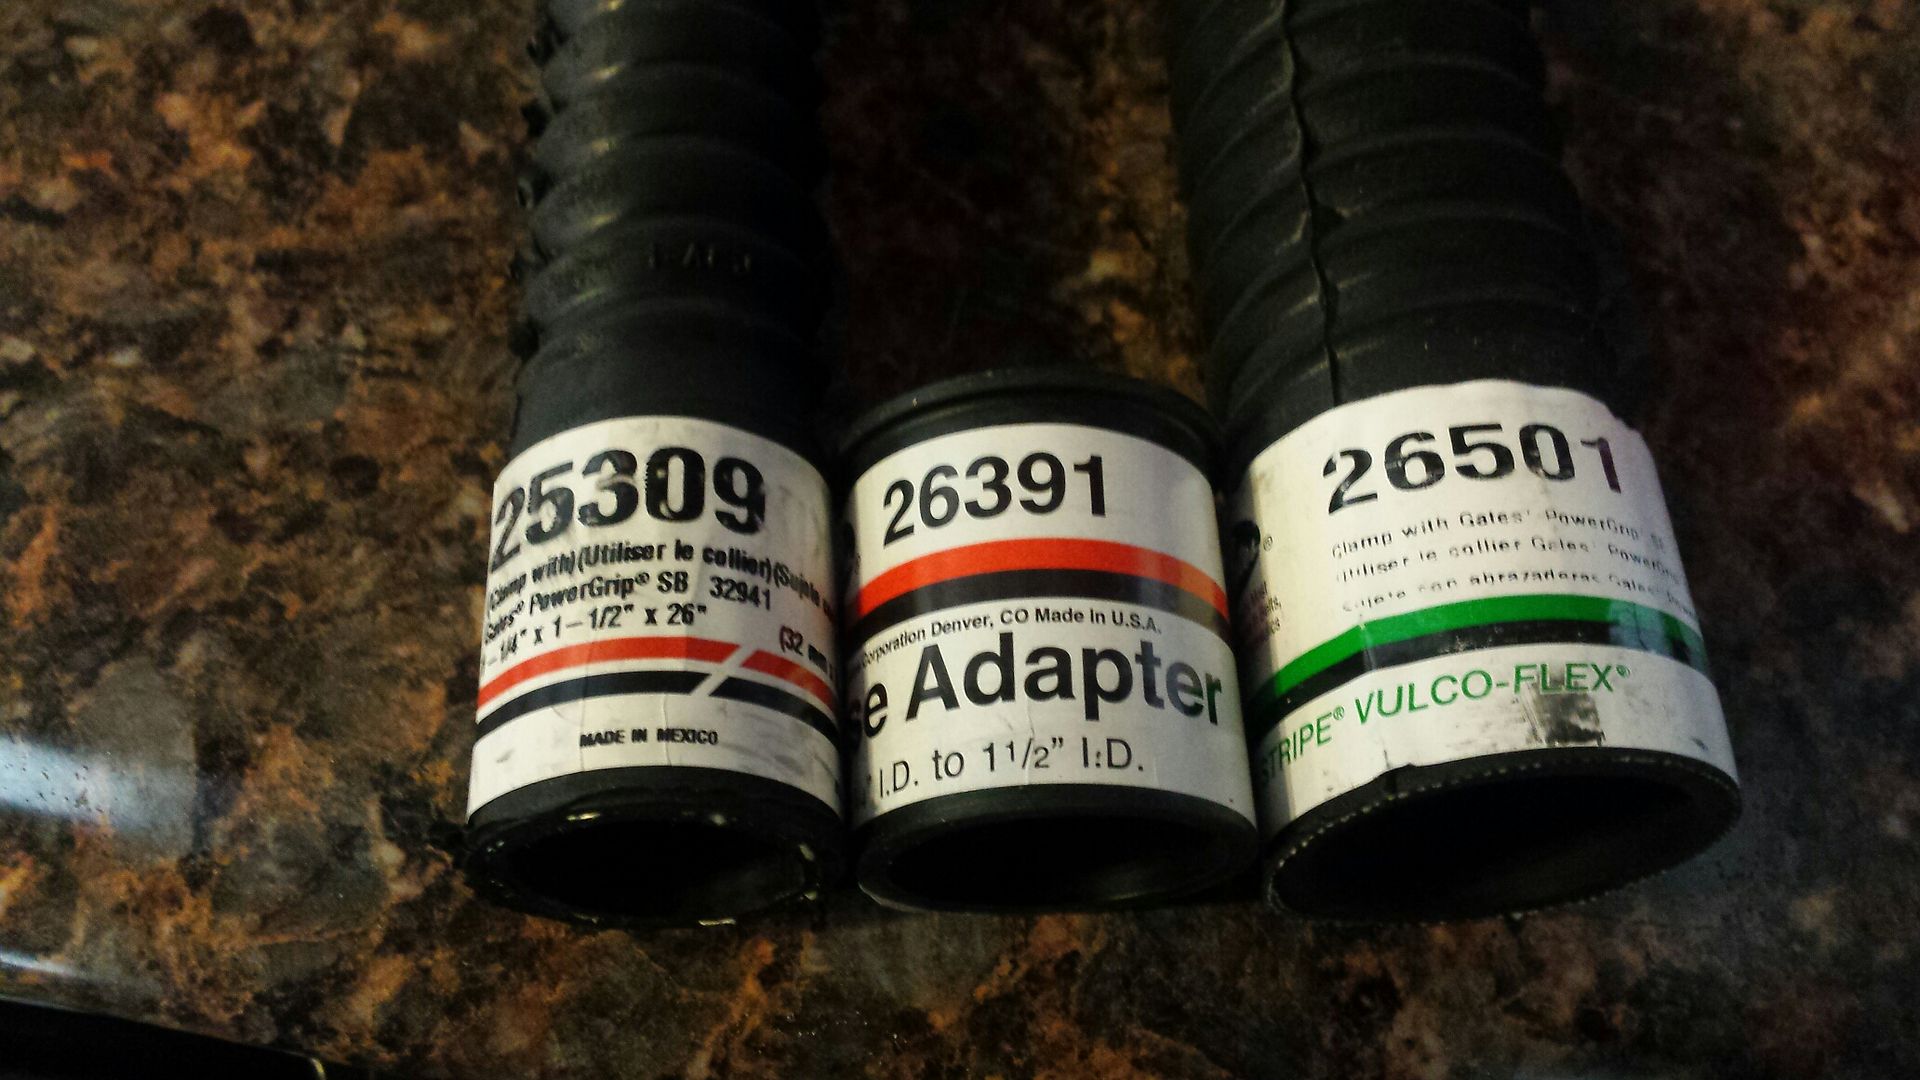
For the On3 radiatior going to f body accs you need upper hose 25309, for the lower adapter 26391, and for the lower the one in the pic is too short so get 26611 and use the adapter at the waterepump side.
And its back for another year lol. Is there a better radiator to use than the griffin 55241-xs ? or is that what people are still using? At one point I thought I saw a picture of the 55241-xs modified to be a dual pass but can't find it now lol
 11-15-2017, 04:51 PM