Pinion angle in a custom LSx + 4l80e installation
 03-23-2017, 11:19 PM
#1

Hello,
I recently installed an LSx into 95' 240sx vehicle with 4l80e transmission.
I just finished making my transmission mount, it will hold the transmission with a 3 to 4 degree downward angle, as per my angle gauge. I thought this was pretty standard (engines are supposedly installed 3 degrees tailshaft tilt down)
So, I get my driveshaft and go to check the angle at my differential... and there is none! Its actually about parallel with my driveshaft. So I have a 3-4 degree tailshaft downward angle, and then a parallel driveshaft/differential with 0 to 1 degrees (it slightly angles but there isn't much) with all 4 tires on the ground.
I guess my question is, what can I do? I don't think I can raise my transmission tailshaft to correct this issue- I need to do something with the differential. The 240sx has an IRS, I think this has something to do with the issue I am having. There is no tilt to the rear differential, and no way I can see of adding a tilt to it to match the tailshaft. The factory used a 2-piece driveshaft design... should I attempt to convert to the 2-piece design also? The driveshaft shop says to just try what I've got first, which I probably will, but I am also looking for some suggestions and experienced advice, as this is my first time.
 03-24-2017, 05:40 PM
#2

The diff should match the engine. So if the tail housing is down 3*, then the pinion needs to be pointing up 3*. Then measure working angle of the joint, should be less than 3* for greatest joint life and no vibrations.
Is the engine square to the chassis and lined up with the pinion?, just want to not introduce compound angles to the system
Edit, just read about the IRS. Should try lifting the trans so the engine/trans matches the differential. It's hard getting good points. Try using the pinion flange face and tranny seal face, if you can't use that, the balancer or even the head front face surface works just as well
03-24-2017, 09:16 PM
#3
So you are saying mount the trans tailshaft with 0*, just like the differential flange is 0* (about 0*). Both will be level with the earth then, the engine doesn't mind being level? I honestly think this is what I will have to do, since I cant rotate the differential up or down any number of degrees, this seems my only option.
I suppose I might be able to modify the rear subframe somehow to give the differential an angle. I am not sure which would be more work though. To move the trans up level I would need to severely modify the trans tunnel and make a new crossmember, about 2-3 days of work (15-20 hours) I estimate.
I suppose I might be able to modify the rear subframe somehow to give the differential an angle. I am not sure which would be more work though. To move the trans up level I would need to severely modify the trans tunnel and make a new crossmember, about 2-3 days of work (15-20 hours) I estimate.
03-25-2017, 06:57 AM
#4


It does not matter if the rear and engine are at 0* together . As long as you have some working angle on the driveshaft . Lets just say if you draw a straight horizontal line at 0* from the rear and the engine drive line and the engine is lets say 2" above the rear then you will have some working angle .
Just as long as the engine drive line is above the rear and the drive shaft has to drop down the meet the rear . Being the rear will not flex up much you could probably get by with 1.5 to 2 degrees of working angle .
Being both will be at 0* you can measure from the floor when you get the trans up to 0* to see how much difference there is .
As you say , other option would be move the rear .

 03-25-2017, 02:00 PM
#7
Even a half degree working angle is good. We need just enough to keep the needle bearings turning
I had huge joint issues on a project I did. Horrible front to back but had side to side angle too. Had to cure the issue with a custom 2pc setup with a joint at the tranny and porche 930 cv joints at the carrier and diff. But it's silky smooth at 100mph cruise finally
I had huge joint issues on a project I did. Horrible front to back but had side to side angle too. Had to cure the issue with a custom 2pc setup with a joint at the tranny and porche 930 cv joints at the carrier and diff. But it's silky smooth at 100mph cruise finally
Trending Topics
03-31-2017, 02:58 PM
#8
Alright, I got it good this time. Went under the car and made a couple marks, pulled the engine/trans, and proceed to cut out the original mounting holes for the crossmember, then hammer it all around to make room. I put the engine back in and WOW she has miles of room now, I could almost fit two transmissions in that tunnel now  Im actually going to hammer it a little back (from the inside of the car, back towards the trans) because there is so much room now. I was able to get the angle I needed perfectly- and I didn't have to cut into the tunnel at all ( there was no trans tunnel removal, I never cut through it into the car, just removed the OEM trans crossmember bolt holes and hammer a little ). So of course I forgot my camera. I was so excited though- I will bring it with me next time I go and get some pics. I pulled the engine back out to anyways to do the oil pump next so I can snap plenty of pics without an engine in the way.
thanks again
Im actually going to hammer it a little back (from the inside of the car, back towards the trans) because there is so much room now. I was able to get the angle I needed perfectly- and I didn't have to cut into the tunnel at all ( there was no trans tunnel removal, I never cut through it into the car, just removed the OEM trans crossmember bolt holes and hammer a little ). So of course I forgot my camera. I was so excited though- I will bring it with me next time I go and get some pics. I pulled the engine back out to anyways to do the oil pump next so I can snap plenty of pics without an engine in the way.thanks again
04-11-2017, 12:40 AM
#10
hey everyone, I didn't forget about you! I am just waiting on a part to arrive (neutral position switch for 4l80e from rockauto was $20~ !, mine got damaged during the install before I 'fixed' the tunnel) and then I can drop the trans one more time and get some decent pics of the pinion angle (front and rear) and massive space in there now.
Until then, I did manage to get these. Just before the motor went in, but before painted (I painted it just before putting the engine in) and one pic where was able to put my hand under the car while it was on the ground to snap the actual space I have now, its huge. I am actually going to move the tunnel back towards the transmission a bit, since I have so much room now it was overkill what I did. At least now I have tons of room to run exhaust well away from the transmission, and trans lines, going to be super easy.
without paint
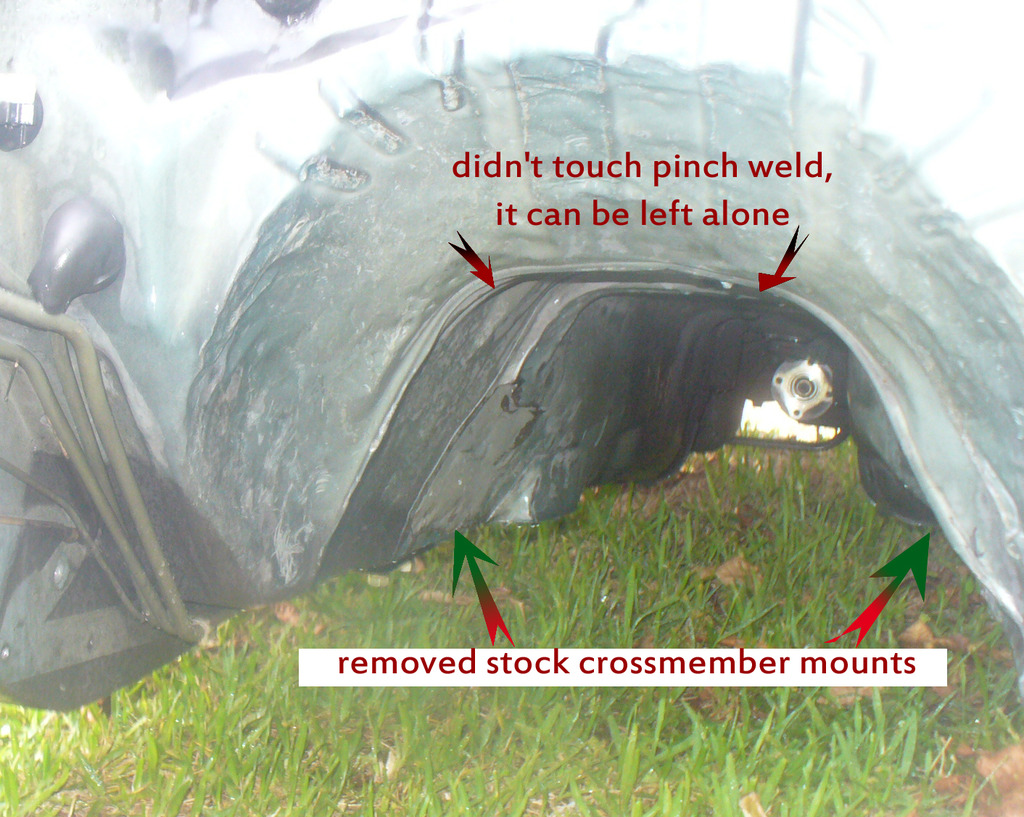
space between trans and car while installed
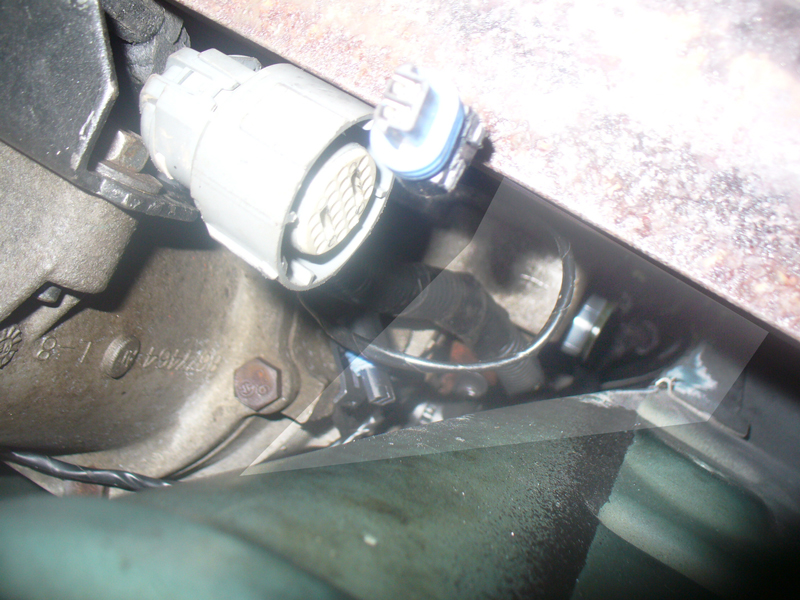
 01-26-2020, 02:00 PM
#11
TECH Senior Member

Adding vital info is NOT hijacking.... rest easy....